文章目录
背景
之前的Python(一)实现一个爬取微信小程序数据并定时秒杀的爬虫+工程化初步实践 爬取了目标网站的接口,这个目标网站在请求接口方面没做什么防护,只要会抓包的爬虫小子都能根据请求格式构造合法的请求数据,这种没难度的接口基本上把所有压力都给到了后端。恰好近2年自己偶尔也思考如何提高爬虫小子分析后端接口的难度,再加上偶尔看到一些大型网站如阿里云等,F12看到的请求体有时候是一堆加了密的乱码,所以趁此机会自己简单实现一下以清楚的知道基本流程
注意:任何在前端做的防护理论上都有可能被击破,我们的目标是提高爬虫者分析我们接口的难度,包括但不限于使用JS 混淆、WASM 化等
JS混淆
第一步,我们对JS进行混淆,使用javascript-obfuscator,由于前端使用Vite,所以使用vite-plugin-javascript-obfuscator)
typescript
import { defineConfig } from 'vite'
import react from '@vitejs/plugin-react'
import obfuscator from 'vite-plugin-javascript-obfuscator'

export default defineConfig({
  plugins: [
    react(),
    // 仅在 build 时混淆,dev 保持可读便于调试
    obfuscator({
      apply: 'build',
      options: {
        compact: true,
        // 控制流平坦化 + 字符串抽取是提高逆向成本的主要手段
        controlFlowFlattening: true,
        controlFlowFlatteningThreshold: 0.5,
        stringArray: true,
        stringArrayEncoding: ['base64'],
        stringArrayThreshold: 0.75,
        splitStrings: true,
        splitStringsChunkLength: 10,
        // 以下对体积/性能代价大或容易误伤,演示项目不开
        deadCodeInjection: false,
        renameGlobals: false,
        selfDefending: false,
        sourceMap: false
      }
    })
  ],
  server: {
    port: 5173,
    proxy: {
      '/api': 'http://localhost:8080'
    }
  },
  // preview 模式不复用 server 配置,需单独配置代理
  preview: {
    proxy: {
      '/api': 'http://localhost:8080'
    }
  }
})
未混淆之前
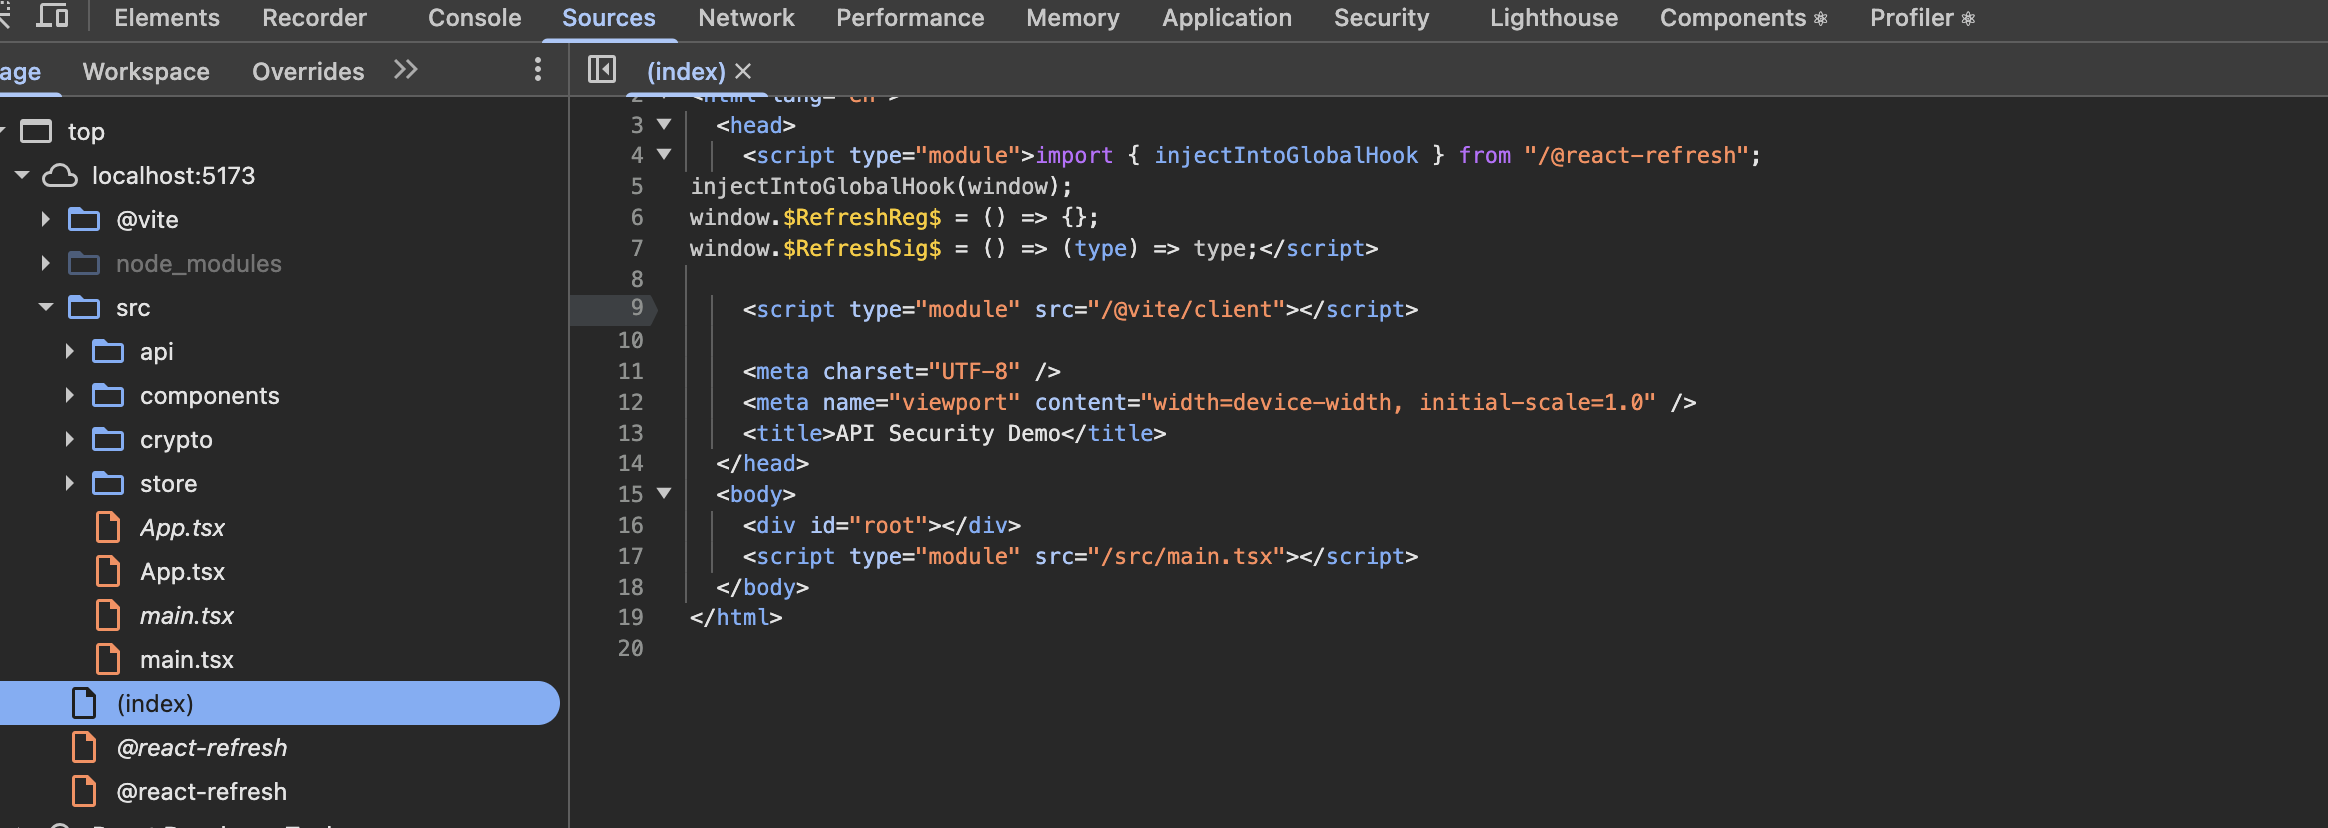
F12之后可以看到所有前端的源码
混淆之后
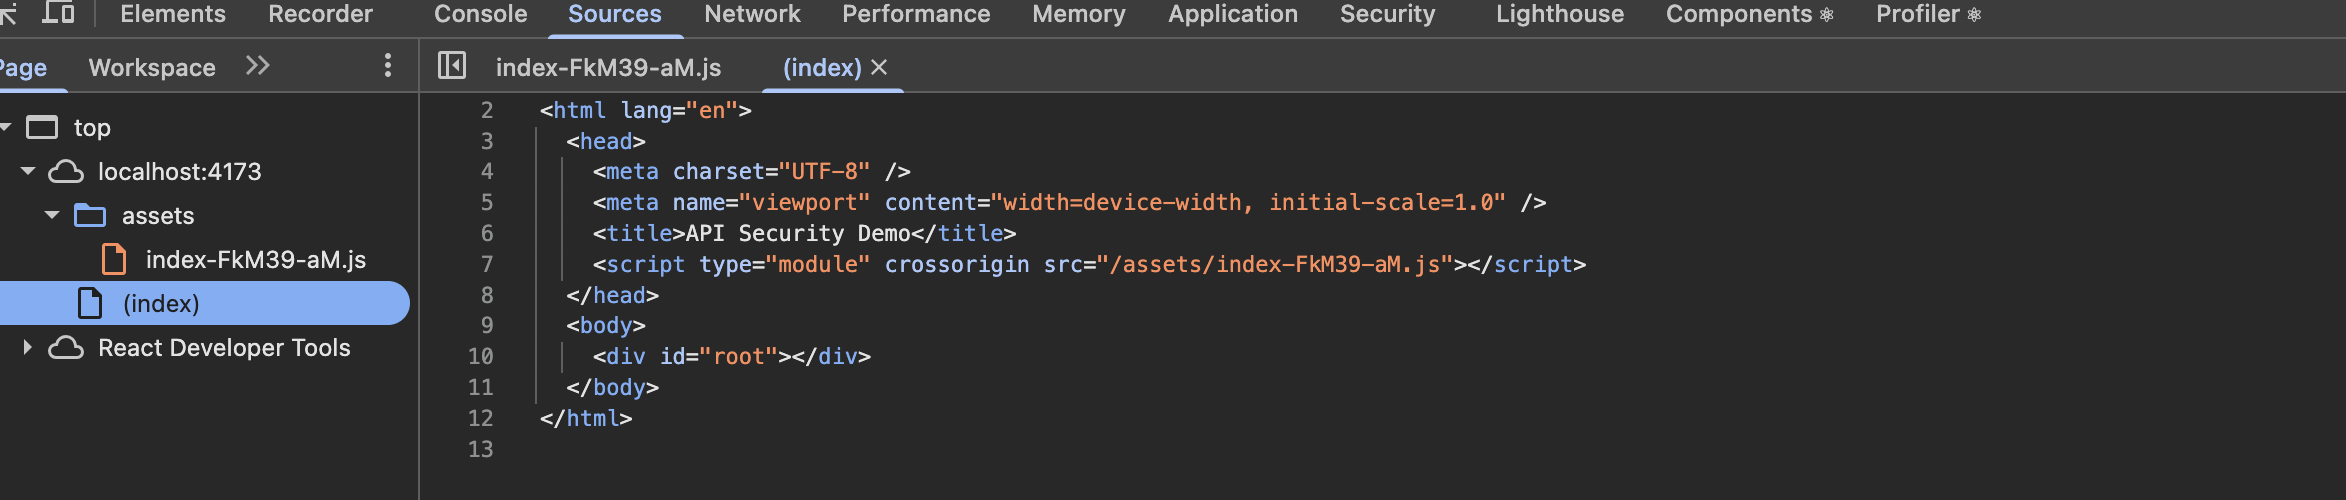
index页面只引用了一个混淆后的JS
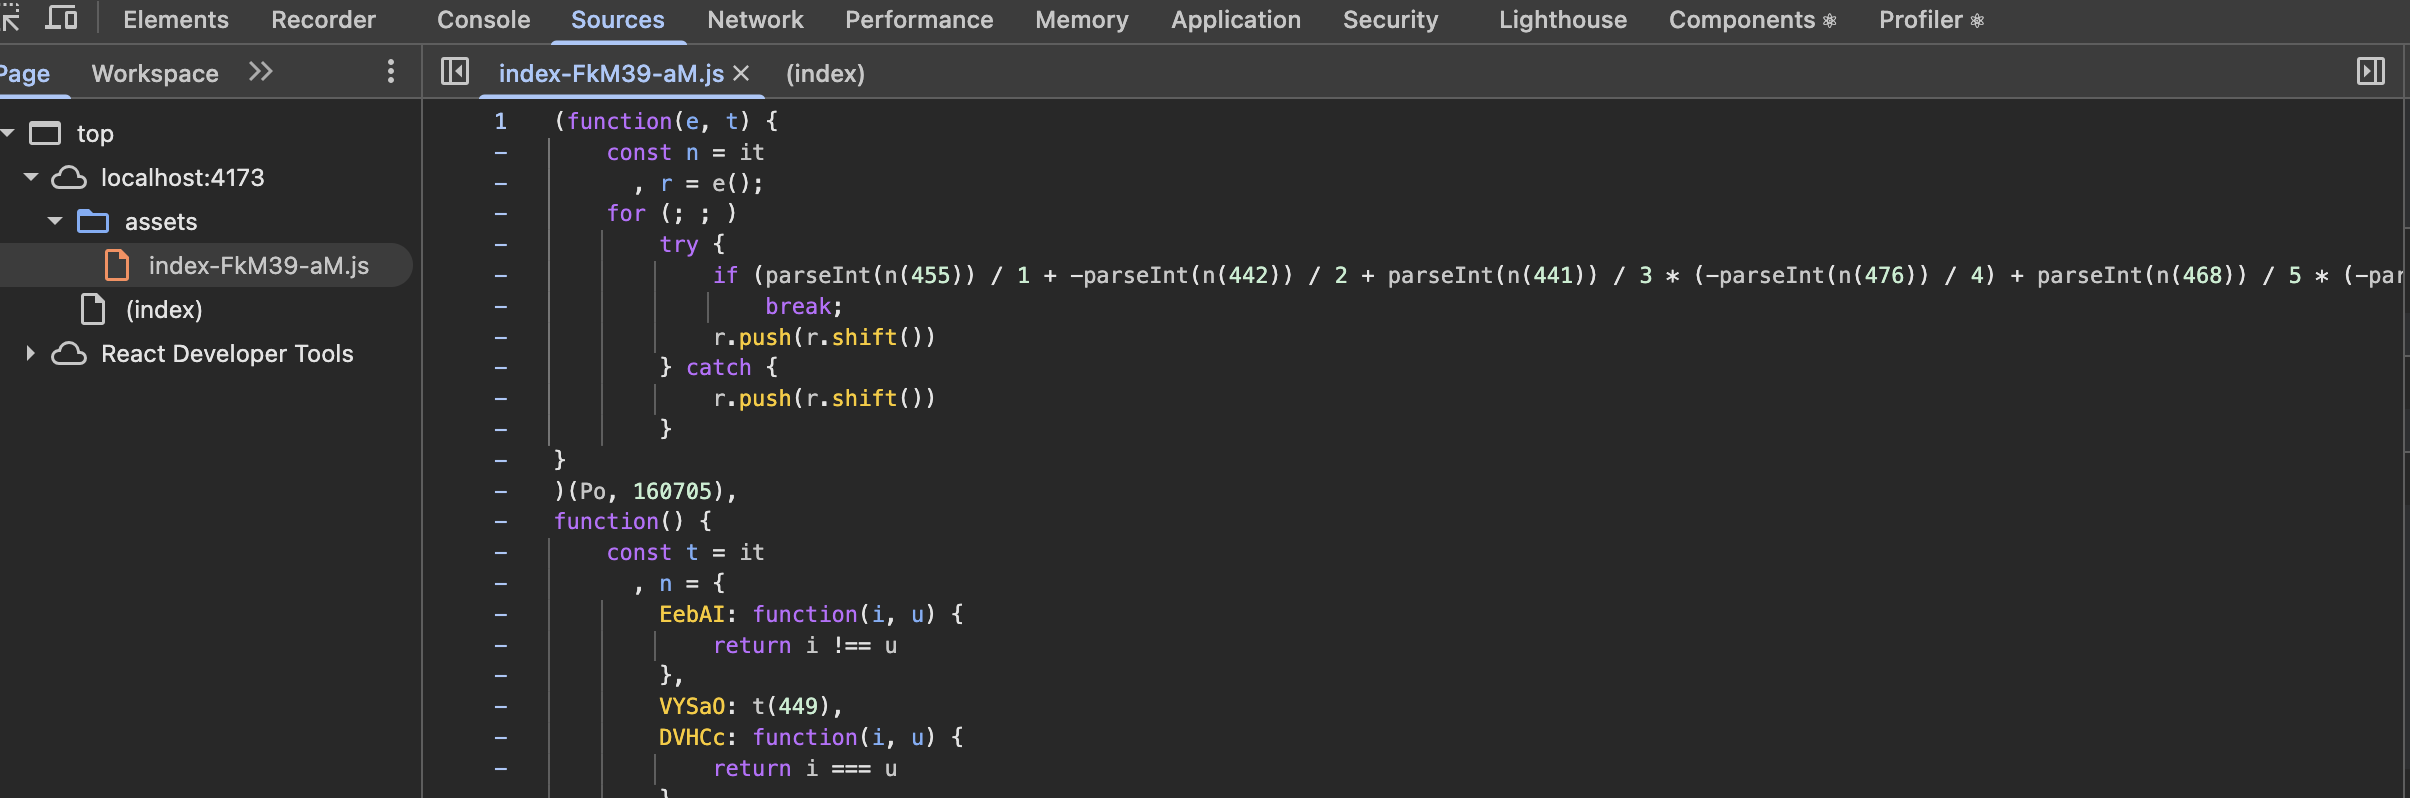
这个混淆后的JS里面的内容完全看不懂,和上面未混淆形成鲜明对比
发布微信小程序时压缩混淆
小程序自带的基础压缩和混淆和高级的代码加固功能都能提高被逆向的难度
请求体加密
密钥协商
在加密请求体时,我决定使用对称加密。对称加密的密钥是前端自己生成的,每一个session对应的密钥都是不同的。既然对称加密的密钥是前端生成的,那就要告诉后端,这一步密钥协商阶段使用非对称加密。
流程如下:
- 后端生成RSA密钥对,私钥存储在服务器
- 前端请求接口
GET /api/auth/public-key获取公钥 - 前端调用浏览器自带的crypto.subtle.generateKey方法生成密钥,这里算法使用的是AES-GCM
- 将这个密钥用公钥加密,请求接口
POST /api/auth/session-key到后端,后端用私钥解密,获得密钥后和session相关联,以便对后续来自该session的请求进行解密
加密格式
格式为
plain
[ IV (12 字节) ] + [ 密文 ] + [ Tag (16 字节) ]- IV即Initialization Vector(初始化向量),本质上是一个随机数,有过后端开发经验的同学,可以理解为"加盐"
- 密文则是用刚刚协商好的对称密钥去加密
JSON.stringify(plainTextJsonBody) - tag则是调用Crypto相关方法时,由Web Crypto 自动附在密文尾部
- 最终用base64编码,这里再用base64编码一次的原因是,AES-GCM 的输出(
iv + ciphertext + tag)是任意二进制字节(0--255),而 JSON 字符串必须是合法 Unicode 文本------原始字节直接塞进 JSON,轻则不是合法 UTF-8 解析失败,重则控制字符破坏 JSON 结构,中间任何按文本处理的环节(网关、日志、代理)都可能损坏数据。Base64 用 64 个文本安全字符表示任意字节,保证二进制能"活着穿过"文本协议"
前端请求体加解密
由于这种加密是针对所有接口的,所以在最底层调用后端接口和接收后端响应时使用interceptors统一处理,负责加密的aes.ts的核心加解密方法如下
typescript
/**
 * AES-GCM 加密,流程与后端 AesService 镜像:
 * 1. 生成 12 字节随机 IV(GCM 标准 IV 长度,无需保密)
 * 2. AES-GCM 加密,128 位认证 tag 由 Web Crypto 自动附在密文尾部
 * 3. iv + ciphertext(+tag) 拼接
 * 4. 整体 Base64 编码
 *
 * 注意 btoa 只接受"二进制字符串"(每个字符的码点必须等于一个字节值 0-255),
 * 所以要先用 String.fromCharCode 把 Uint8Array 逐字节转成字符串再编码。
 * 展开运算符写法不适合超大数组(会栈溢出),本项目请求体很小,无需处理。
 */
export async function encryptAes(plainText: string, key: CryptoKey): Promise<string> {
  const iv = crypto.getRandomValues(new Uint8Array(IV_LENGTH))
  const encoder = new TextEncoder()
  const cipherBuffer = await crypto.subtle.encrypt(
    { name: AES_ALGORITHM, iv },
    key,
    encoder.encode(plainText)
  )
  const combined = new Uint8Array(iv.length + cipherBuffer.byteLength)
  combined.set(iv)
  combined.set(new Uint8Array(cipherBuffer), iv.length)
  return btoa(String.fromCharCode(...combined))
}

/**
 * AES-GCM 解密,encryptAes 的逆过程:
 * 1. atob 解 Base64,再逐字符还原为字节数组(与编码侧的 String.fromCharCode 对应)
 * 2. 前 12 字节为 IV,其余为 ciphertext(+tag)
 * 3. crypto.subtle.decrypt 内部先校验 tag,密文被篡改会直接抛异常,不会返回明文
 */
export async function decryptAes(encryptedBase64: string, key: CryptoKey): Promise<string> {
  const combined = Uint8Array.from(atob(encryptedBase64), c => c.charCodeAt(0))
  const iv = combined.slice(0, IV_LENGTH)
  const cipherText = combined.slice(IV_LENGTH)
  const decrypted = await crypto.subtle.decrypt(
    { name: AES_ALGORITHM, iv },
    key,
    cipherText
  )
  return new TextDecoder().decode(decrypted)
}
经过加密之后的请求和响应数据结构如下
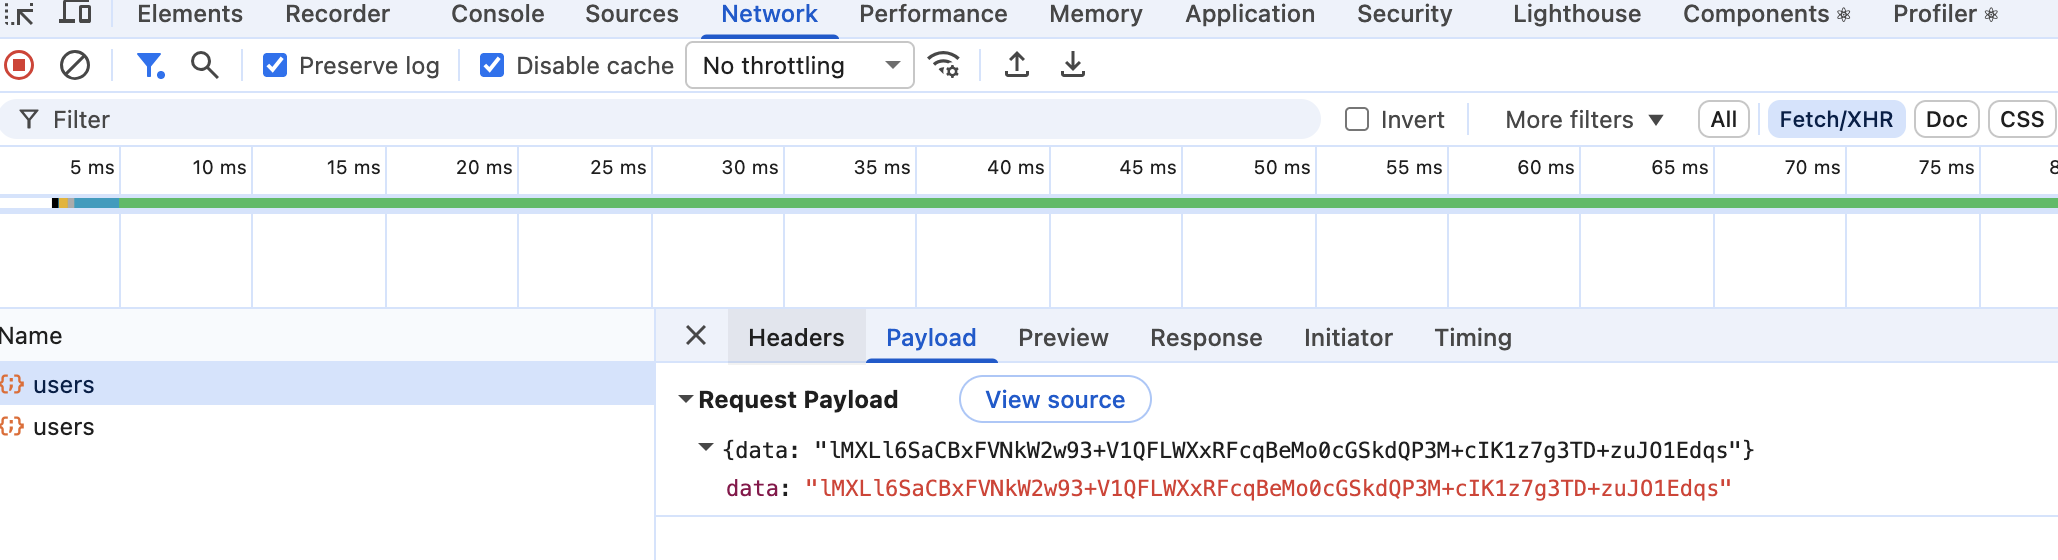
后端请求体解加密
后端对应的类则为AesService.java,其核心逻辑为
java
@Service
public class AesService {
    private static final String ALGORITHM = "AES";
    private static final String TRANSFORMATION = "AES/GCM/NoPadding";
    private static final int GCM_IV_LENGTH = 12;
    private static final int GCM_TAG_LENGTH = 128;

    public String encrypt(byte[] key, String plainText) throws Exception {
        byte[] iv = new byte[GCM_IV_LENGTH];
        new SecureRandom().nextBytes(iv);

        Cipher cipher = Cipher.getInstance(TRANSFORMATION);
        GCMParameterSpec spec = new GCMParameterSpec(GCM_TAG_LENGTH, iv);
        cipher.init(Cipher.ENCRYPT_MODE, new SecretKeySpec(key, ALGORITHM), spec);

        byte[] cipherText = cipher.doFinal(plainText.getBytes(StandardCharsets.UTF_8));
        byte[] combined = ByteBuffer.allocate(iv.length + cipherText.length)
                .put(iv)
                .put(cipherText)
                .array();
        return Base64Util.encode(combined);
    }

    public String decrypt(byte[] key, String encryptedBase64) throws Exception {
        byte[] combined = Base64Util.decode(encryptedBase64);
        ByteBuffer buffer = ByteBuffer.wrap(combined);
        byte[] iv = new byte[GCM_IV_LENGTH];
        buffer.get(iv);
        byte[] cipherText = new byte[buffer.remaining()];
        buffer.get(cipherText);

        Cipher cipher = Cipher.getInstance(TRANSFORMATION);
        GCMParameterSpec spec = new GCMParameterSpec(GCM_TAG_LENGTH, iv);
        cipher.init(Cipher.DECRYPT_MODE, new SecretKeySpec(key, ALGORITHM), spec);
        byte[] plain = cipher.doFinal(cipherText);
        return new String(plain, StandardCharsets.UTF_8);
    }
}
请求签名
签名格式
plain
签名原文 raw =
      [ METHOD (大写) ]\n
      [ 请求 URI (含 /api 前缀) ]\n
      [ canonicalBody (排序后紧凑 JSON;GET/空 body 为 "") ]\n
      [ timestamp (秒级 epoch 字符串) ] \n
      [ nonce (randomUUID) ]
签名使用的密钥依旧是上述协商好的对称密钥,同时为请求头添加下列自定义项
plain
X-Nonce: a93aa270-a06f-4d41-bfbc-e05d7f751c64
X-Session-Id: b3594ca0-71d8-41bf-b702-2977b9fed8c3
X-Sign: E6eTcLGbEajIpPu4sgu75mjXvzKwNcB/NvAQCNcEuNU=
X-Timestamp: 1785452663
前端生成签名
typescript
export async function computeHmac(
  keyData: ArrayBuffer,
  method: string,
  url: string,
  body: unknown,
  timestamp: string,
  nonce: string
): Promise<string> {
  const hmacKey = await crypto.subtle.importKey(
    'raw',
    keyData,
    { name: 'HMAC', hash: 'SHA-256' },
    false,
    ['sign']
  )
  const bodyPart = canonicalizeBody(body)
  const raw = `${method.toUpperCase()}\n${url}\n${bodyPart}\n${timestamp}\n${nonce}`
  const encoder = new TextEncoder()
  const signature = await crypto.subtle.sign(
    'HMAC',
    hmacKey,
    encoder.encode(raw)
  )
  return btoa(String.fromCharCode(...new Uint8Array(signature)))
}
后端全局Filter验证签名
验证签名的逻辑是:使用相同的密钥按照签名格式重新生成签名,然后对比是否一致。它和解密逻辑要一起协作,所以写在一个全局的Filter中,逻辑如下
- 先验证上述4个自定义请求头是否存在,不存在,则拒绝
- 验证时间戳是否在合法窗口内,如果X-Timestamp和服务器端实时时间过大,则拒绝
- 验证Nonce是否已经被使用用来防重放攻击,如果已经被使用,则拒绝
- 从请求中解密请求体,然后根据签名格式重新计算,如果不一致,则拒绝
java
@Component
@Order(1)
public class CryptoFilter implements Filter {
    private static final long TIMESTAMP_WINDOW_SECONDS = 300;
    private static final String PUBLIC_KEY_PATH = "/api/auth/public-key";
    private static final String SESSION_KEY_PATH = "/api/auth/session-key";

    private final AesService aesService;
    private final SignService signService;
    private final SessionService sessionService;
    private final NonceService nonceService;
    private final ObjectMapper mapper;

    public CryptoFilter(AesService aesService, SignService signService,
                        SessionService sessionService, NonceService nonceService) {
        this.aesService = aesService;
        this.signService = signService;
        this.sessionService = sessionService;
        this.nonceService = nonceService;
        this.mapper = new ObjectMapper();
    }

    /**
     * 安全校验与加解密主流程(@Order(1),所有 /api/** 请求必经):
     * 1. 白名单放行:/api/auth/public-key、/api/auth/session-key(密钥协商阶段无会话,无法验签)
     * 2. 依次校验:安全头齐全(X-Session-Id/X-Sign/X-Timestamp/X-Nonce)
     *    → sessionId 有效未过期 → timestamp 在 ±300 秒窗口内 → nonce 未被使用过
     *    → AES-GCM 解密请求体(GCM tag 校验,篡改即失败)→ 重算 HMAC 签名比对
     * 3. 全部通过后 markUsed(nonce),用 CryptoRequestWrapper 把明文 JSON 回写请求流,
     *    Controller 照常 @RequestBody 收参,对安全层无感知
     * 4. 响应经 CryptoResponseWrapper 捕获明文后整体 AES 加密,输出双层包装结构:
     *    ApiResponse.ok(EncryptedPayload),即 {code, message, data: {data: "base64密文"}}
     * 任一校验失败直接写 401 + 明文 ApiResponse.error(错误响应不加密)。
     */
    @Override
    public void doFilter(ServletRequest request, ServletResponse response, FilterChain chain)
            throws IOException, ServletException {
        HttpServletRequest httpRequest = (HttpServletRequest) request;
        HttpServletResponse httpResponse = (HttpServletResponse) response;
        String path = httpRequest.getRequestURI();

        if (path.equals(PUBLIC_KEY_PATH) || path.equals(SESSION_KEY_PATH)) {
            chain.doFilter(request, response);
            return;
        }

        String sessionId = httpRequest.getHeader("X-Session-Id");
        String sign = httpRequest.getHeader("X-Sign");
        String timestamp = httpRequest.getHeader("X-Timestamp");
        String nonce = httpRequest.getHeader("X-Nonce");

        if (sessionId == null || sign == null || timestamp == null || nonce == null) {
            writeError(httpResponse, 401, "Missing security headers");
            return;
        }

        byte[] aesKey = sessionService.getKey(sessionId);
        if (aesKey == null) {
            writeError(httpResponse, 401, "Invalid or expired session");
            return;
        }

        if (!validateTimestamp(timestamp)) {
            writeError(httpResponse, 401, "Request timestamp out of range");
            return;
        }

        if (nonceService.isUsed(nonce)) {
            writeError(httpResponse, 401, "Replay attack detected: nonce reused");
            return;
        }

        String encryptedBody = readBody(httpRequest);
        String plainBody;
        if (encryptedBody == null || encryptedBody.isBlank()) {
            plainBody = "";
        } else {
            try {
                plainBody = aesService.decrypt(aesKey, parseData(encryptedBody));
            } catch (Exception e) {
                writeError(httpResponse, 401, "Failed to decrypt request body");
                return;
            }
        }

        try {
            String computedSign = signService.computeSign(aesKey, httpRequest.getMethod(), httpRequest.getRequestURI(), plainBody, timestamp, nonce);
            if (!computedSign.equals(sign)) {
                writeError(httpResponse, 401, "Invalid signature");
                return;
            }
        } catch (Exception e) {
            writeError(httpResponse, 401, "Signature computation failed");
            return;
        }

        nonceService.markUsed(nonce);

        CryptoRequestWrapper requestWrapper = new CryptoRequestWrapper(httpRequest, plainBody);
        CryptoResponseWrapper responseWrapper = new CryptoResponseWrapper(httpResponse);

        chain.doFilter(requestWrapper, responseWrapper);

        String captured = responseWrapper.getCapturedBody();
        try {
            String encryptedResponse = aesService.encrypt(aesKey, captured);
            String output = mapper.writeValueAsString(ApiResponse.ok(new EncryptedPayload(encryptedResponse)));
            httpResponse.setContentType("application/json;charset=UTF-8");
            httpResponse.getOutputStream().write(output.getBytes(StandardCharsets.UTF_8));
        } catch (Exception e) {
            writeError(httpResponse, 401, "Failed to encrypt response");
        }
    }

    /**
     * 从加密请求体中取出密文字段:body 结构为 {"data": "<base64密文>"},
     * 解析出 data 的 Base64 字符串交给 AesService.decrypt;空 body / data 为 null 时返回空串。
     */
    private String parseData(String body) throws IOException {
        if (body == null || body.isBlank()) {
            return "";
        }
        EncryptedPayload payload = mapper.readValue(body, EncryptedPayload.class);
        if (payload.data() == null) {
            return "";
        }
        return payload.data();
    }

    /**
     * 读取原始请求体字符串(按行读取后拼接,不含换行符)。
     * 必须在解密前读取:原始输入流随后被 CryptoRequestWrapper 替换为明文内容。
     */
    private String readBody(HttpServletRequest request) throws IOException {
        StringBuilder sb = new StringBuilder();
        try (java.io.BufferedReader reader = request.getReader()) {
            String line;
            while ((line = reader.readLine()) != null) {
                sb.append(line);
            }
        }
        return sb.toString();
    }

    /**
     * 校验时间戳防重放:timestamp 为秒级 epoch,与服务器当前时间相差不得超过
     * ±300 秒窗口;非数字直接判失败。窗口内容许合理的前后端时钟偏差。
     */
    private boolean validateTimestamp(String timestamp) {
        try {
            long ts = Long.parseLong(timestamp);
            long now = Instant.now().getEpochSecond();
            return Math.abs(now - ts) <= TIMESTAMP_WINDOW_SECONDS;
        } catch (NumberFormatException e) {
            return false;
        }
    }

    /**
     * 统一错误响应:直接写 HTTP 状态码 + 明文 ApiResponse.error JSON(不加密,
     * 因为校验失败阶段前端尚无法证明持有会话密钥,密文错误也无法被正常解密)。
     */
    private void writeError(HttpServletResponse response, int code, String message) throws IOException {
        response.setStatus(code);
        response.setContentType("application/json;charset=UTF-8");
        String output = mapper.writeValueAsString(ApiResponse.error(code, message));
        response.getOutputStream().write(output.getBytes(StandardCharsets.UTF_8));
    }
}
只签名不加密
可以看到,上述不管是加密还是签名,都依赖于JS混淆,所以如果JS混淆做的足够好,被逆向的难度足够大,有信心的开发也会采取只签名的做法。即使我把请求格式告诉你,但是你无法找到签名算法,也起到了提升爬虫难度的同时并减少了后端开发不必要的加解密的逻辑
生产环境的应用
上述代码逻辑只是用来演示基本的签名、加密使用场景,如果要在生产环境中使用还远远不够,有更多需要优化的地方,例如可以
- 动态代码混淆:每次用户刷新页面,下发的JS里的变量名、执行路径和混淆方式都在变,极大提高脚本小子的逆向难度
- WebAssemby:把核心签名算法用C++/Rust编写,编译成
.wasm文件,逆向wasm的难度要比JS高得多 - 在安全和性能之间做一个取舍和平衡
备注
- 完整示例代码地址