前五讲的语法结束后,图穷而匕首现了,其实本人学rust的目的不是想开发别的,就是想用rust开发单片机,本文记录在一台 Windows 11 + VS 2022 Community 机器上,为 ESP32-S3 N16R8(16MB Flash / 8MB PSRAM,Xtensa 架构)从零搭建 Rust 开发环境,并完成串口 demo 烧录测试的完整过程。
1. 背景知识:为什么不能只用官方 stable Rust
ESP32-S3 是 Xtensa 架构,不是 RISC-V(ESP32-C3/C6/H2 等才是)。上游 Rust 不支持 Xtensa 目标,必须使用 esp-rs 维护的 Rust fork(即 esp 工具链),它额外提供这些 target:
xtensa-esp32-espidf      xtensa-esp32-none-elf
xtensa-esp32s2-espidf    xtensa-esp32s2-none-elf
xtensa-esp32s3-espidf    xtensa-esp32s3-none-elf   ← 本教程使用(no_std)
xtensa-esp8266-none-elf
官方安装器是 espup,但它只从 GitHub 直连下载,网络不通时会直接失败。因此本教程采用「手动下载 + 手动注册」的方式,效果与 espup 完全等价。
整体方案选型:
- no_std + esp-hal(不用 ESP-IDF/std):体积小、编译快、生态现代
- GNU LD 链接 (Xtensa GCC):esp-hal 官方默认方案;实测 esp 工具链自带的 rust-lld 链接 Xtensa 会出现地址符号扩展错误(
section .data ... exceeds available address space),不要用 rust-lld
2. 解决网络问题(国内环境关键步骤)
先诊断本机网络:
bash
# github.com 直连(本机超时,被墙)
curl -sI --max-time 15 https://github.com

# api.github.com(本机可直连!)
curl -s --max-time 10 -o /dev/null -w "%{http_code}\n" https://api.github.com

# crates.io 静态资源速度(本机仅 ~10KB/s)
curl -s -o /dev/null -w "%{speed_download}B/s\n" --max-time 20 \
  "https://static.crates.io/crates/esp-hal/esp-hal-1.1.2.crate" -r 0-100000
实测结论与对策:
| 资源 | 直连情况 | 对策 |
|---|---|---|
github.com 网页/Release 下载 |
❌ 超时 | 走镜像前缀,如 https://ghfast.top/https://github.com/...(备选 gh-proxy.com、ghproxy.net) |
api.github.com(查询 release 信息) |
✅ 通 | 直接用 |
static.crates.io |
🐢 ~10KB/s | cargo 换 rsproxy.cn 镜像(实测 ~400KB/s) |
测试镜像是否可用的方法:
bash
curl -sL -o /dev/null -w "%{http_code}\n" --max-time 15 \
  "https://ghfast.top/https://github.com/esp-rs/espup/releases/latest/download/espup-x86_64-pc-windows-msvc.zip"
# 返回 200 即可用
3. 下载并安装 esp Rust 工具链(Xtensa fork)
3.1 查询最新版本
bash
curl -s --max-time 30 "https://api.github.com/repos/esp-rs/rust-build/releases/latest" \
  -o rustbuild.json
从返回的 JSON 中找到两个 Windows 资源(本教程时为 v1.95.0.0):
rust-1.95.0.0-x86_64-pc-windows-msvc.zip(约 160MB,已内置 rust-src,无需单独下载 rust-src 包)rust-src-1.95.0.0.tar.xz(4MB,可忽略)
3.2 通过镜像下载
bash
mkdir -p /e/URust/ESP32Rust/tools && cd /e/URust/ESP32Rust/tools

# -C - 支持断点续传;大文件超时后重复执行同一命令即可续传
curl -sL -C - --max-time 280 -o rust-esp.zip \
  "https://ghfast.top/https://github.com/esp-rs/rust-build/releases/download/v1.95.0.0/rust-1.95.0.0-x86_64-pc-windows-msvc.zip"
如果 280 秒没下完(curl 退出码 28),直接再跑一遍同样的命令,
curl -C -会接着下。本机第一次下了 112MB 超时,第二次续传完成。
3.3 解压并验证
bash
unzip -o -q rust-esp.zip -d rust-esp
rust-esp/esp/bin/rustc.exe --version
# rustc 1.95.0-nightly (95e5bda86 2026-04-15) (1.95.0.0)

rust-esp/esp/bin/rustc.exe --print target-list | grep xtensa
# 应能看到 xtensa-esp32s3-none-elf 等 7 个目标

# 确认 rust-src 已内置(build-std 需要)
ls rust-esp/esp/lib/rustlib/src/rust/library
3.4 注册为 rustup 工具链
bash
# 注意:rustup 在 ~/.cargo/bin 下,Git Bash 默认 PATH 没有它,用全路径调用
~/.cargo/bin/rustup.exe toolchain link esp "E:\URust\ESP32Rust\tools\rust-esp\esp"

~/.cargo/bin/rustup.exe toolchain list
# stable-x86_64-pc-windows-gnu (active, default)
# stable-x86_64-pc-windows-msvc
# esp          ← 出现这行即成功
之后在工程目录里放 rust-toolchain.toml(内容 channel = "esp"),cargo 就会自动切换到这个 fork。
4. 安装 espflash(烧录工具)
bash
# 查最新版本(本教程时为 v4.5.0)
curl -s --max-time 30 "https://api.github.com/repos/esp-rs/espflash/releases/latest"

cd /e/URust/ESP32Rust/tools
curl -sL -C - -o espflash.zip \
  "https://ghfast.top/https://github.com/esp-rs/espflash/releases/download/v4.5.0/espflash-x86_64-pc-windows-msvc.zip"

unzip -o -q espflash.zip -d espflash-bin

# 复制到 cargo bin 目录(该目录通常已在用户 PATH 中)
cp espflash-bin/espflash.exe ~/.cargo/bin/
~/.cargo/bin/espflash.exe --version
# espflash 4.5.0
5. 安装 Xtensa GCC 工具链(链接器)
esp-hal 官方对 Xtensa 目标默认用 GNU LD 链接,需要乐鑫 crosstool-NG 工具链里的 xtensa-esp32s3-elf-gcc。
bash
# 查最新 release(本教程时为 esp-16.1.0_20260609)
curl -s --max-time 30 "https://api.github.com/repos/espressif/crosstool-NG/releases/latest"

cd /e/URust/ESP32Rust/tools
curl -sL -C - --max-time 280 -o gcc-xtensa.zip \
  "https://ghfast.top/https://github.com/espressif/crosstool-NG/releases/download/esp-16.1.0_20260609/xtensa-esp-elf-16.1.0_20260609-x86_64-w64-mingw32.zip"

unzip -o -q gcc-xtensa.zip
ls xtensa-esp-elf/bin | grep esp32s3-elf-gcc
# xtensa-esp32s3-elf-gcc.exe  ← 链接时会被 rustc 调用
该工具的
bin目录需要在编译时加入 PATH(见第 7 步的 build.bat)。
6. 创建串口 demo 工程
目录结构:
E:\URust\ESP32Rust\serial-demo\
├── .cargo\config.toml      # 目标平台 / 链接参数 / crates 镜像
├── .vscode\                # VSCode 配置(第 8 步)
├── src\main.rs             # 串口 demo
├── build.bat               # 构建环境脚本(第 7 步)
├── Cargo.toml
└── rust-toolchain.toml     # 指定 esp 工具链
6.1 rust-toolchain.toml
toml
[toolchain]
channel = "esp"
6.2 Cargo.toml
toml
[workspace]   # ← 重要:防止被上级目录已有的 cargo workspace 吞并

[package]
name    = "serial-demo"
version = "0.1.0"
edition = "2021"

[dependencies]
critical-section       = "1.2"
esp-backtrace          = { version = "0.19", features = ["esp32s3", "panic-handler", "println"] }
esp-bootloader-esp-idf = { version = "0.5", features = ["esp32s3"] }
esp-hal                = { version = "1.1", features = ["esp32s3", "unstable"] }
esp-println            = { version = "0.17", features = ["esp32s3"] }

[profile.dev]
opt-level = "s"

[profile.release]
opt-level        = "s"
lto              = "fat"
codegen-units    = 1
debug-assertions = true
版本号可通过 crates.io API 查询确认最新稳定版:
bash
curl -s -A "esp32-setup" "https://crates.io/api/v1/crates/esp-hal" | python -c \
  "import json,sys; print(json.load(sys.stdin)['crate']['max_stable_version'])"
注意事项:
[workspace]空表必须有------若上级目录(如E:\URust)已存在Cargo.tomlworkspace,cargo 会报错this may be fixable by adding ... to the workspace.members array- esp-hal 1.1 中
delay等模块在unstablefeature 后面,不加会报could not find 'delay' in 'esp_hal'
6.3 .cargo/config.toml
toml
# ESP32-S3 (Xtensa) 目标配置
# Xtensa 目标默认调用 xtensa-esp32s3-elf-gcc 链接(GNU LD),
# 需保证 tools\xtensa-esp-elf\bin 在 PATH 中(build.bat 已处理)

[build]
target = "xtensa-esp32s3-none-elf"

[target.xtensa-esp32s3-none-elf]
# cargo run 时自动调用 espflash 烧录并打开串口监视器
runner = "espflash flash --monitor"
rustflags = [
  "-C", "link-arg=-Wl,-Tlinkall.x",   # GNU LD 方式传入 esp-hal 链接脚本
  "-C", "link-arg=-nostartfiles",
  "-C", "force-frame-pointers",
]

[unstable]
build-std = ["core", "alloc"]   # Xtensa 无预编译 std 组件,需从源码构建 core/alloc

# 国内 crates 镜像(直连 crates.io 太慢)
[source.crates-io]
replace-with = "rsproxy-sparse"

[source.rsproxy]
registry = "https://rsproxy.cn/crates.io-index"

[source.rsproxy-sparse]
registry = "sparse+https://rsproxy.cn/index/"

[registries.rsproxy]
index = "https://rsproxy.cn/crates.io-index"

[net]
git-fetch-with-cli = true
6.4 src/main.rs --- 串口 demo
rust
//! ESP32-S3 (N16R8) 串口 Demo
//!
//! 功能:
//!   1. 上电后通过 UART0 (GPIO43=TX, GPIO44=RX, 115200 8N1) 打印启动信息
//!   2. 每秒输出一次心跳计数
//!   3. 收到的串口数据原样回显(echo)

#![no_std]
#![no_main]

use core::fmt::Write;

use esp_backtrace as _;
use esp_hal::{
    delay::Delay,
    main,
    uart::{Config, Uart},
};

// 生成 ESP-IDF 格式的应用描述符(bootloader/espflash 需要)
esp_bootloader_esp_idf::esp_app_desc!();

#[main]
fn main() -> ! {
    let peripherals = esp_hal::init(esp_hal::Config::default());
    let delay = Delay::new();

    // UART0:默认 115200 8N1,TX=GPIO43,RX=GPIO44(ESP32-S3 默认串口引脚)
    let mut uart = Uart::new(peripherals.UART0, Config::default())
        .expect("UART0 初始化失败")
        .with_tx(peripherals.GPIO43)
        .with_rx(peripherals.GPIO44);

    uart.write(b"\r\n================================\r\n").ok();
    uart.write(b" ESP32-S3 Rust serial demo\r\n").ok();
    uart.write(b" type something -> echo back\r\n").ok();
    uart.write(b"================================\r\n").ok();
    uart.flush().ok();

    let mut buf = [0u8; 64];
    let mut elapsed_s: u32 = 0;
    let mut tick: u32 = 0;

    loop {
        // 1. 回显收到的数据
        if uart.read_ready() {
            match uart.read(&mut buf) {
                Ok(n) if n > 0 => {
                    uart.write(&buf[..n]).ok();
                    uart.flush().ok();
                }
                Err(e) => {
                    writeln!(uart, "\r\n[RX error: {e:?}]").ok();
                }
                _ => {}
            }
        }

        // 2. 每秒打印一次心跳
        tick += 1;
        if tick >= 100 {
            tick = 0;
            elapsed_s += 1;
            writeln!(uart, "[heartbeat] up {elapsed_s} s").ok();
        }

        delay.delay_millis(10);
    }
}
以上 API(
Uart::new(...).with_tx().with_rx()、read_ready()、read()/write()、core::fmt::Writeimpl)均已对照 esp-hal v1.1.2 源码确认。esp-hal 1.x API 变动较快,换版本时建议查对应版本的 docs.rs 或官方 examples。
7. 关键一步:build.bat(MSVC + GCC 环境)
7.1 为什么需要它
第一次直接 cargo build 会遇到两类错误:
link: extra operand ... Try 'link --help'
esp 工具链 host 是x86_64-pc-windows-msvc,编译 build-script / proc-macro 时调用 MSVC 的link.exe。但 Git Bash 的/usr/bin/link.exe(GNU coreutils)抢占了 PATH 前列,调到了错误的 link。xtensa-esp32s3-elf-gcc找不到 (如果 PATH 没配)
最终固件链接需要 Xtensa GCC。
解决办法:在 CMD (不是 Git Bash)里先执行 vcvars64.bat 加载 MSVC 环境,再补上 GCC 和 cargo 的 PATH。固化为脚本 build.bat:
bat
@echo off
REM 用法: build.bat cargo build --release    编译
REM       build.bat cargo run --release     编译 + 烧录 + 串口监视
REM       build.bat espflash monitor        只打开串口监视器
call "C:\Program Files\Microsoft Visual Studio\2022\Community\VC\Auxiliary\Build\vcvars64.bat" >nul 2>&1
set PATH=C:\Users\12518\.cargo\bin;E:\URust\ESP32Rust\tools\xtensa-esp-elf\bin;%PATH%
%*
如果你的 VS 版本/路径不同,可用
"%ProgramFiles(x86)%\Microsoft Visual Studio\Installer\vswhere.exe" -latest -requires Microsoft.VisualStudio.Component.VC.Tools.x86.x64 -property installationPath查询安装路径。
7.2 编译并生成固件
bash
cd /e/URust/ESP32Rust/serial-demo
cmd //c build.bat cargo fetch            # 先拉依赖(Git Bash 中 cmd 用 //c)
cmd //c build.bat cargo build --release  # 编译(首次约 1-2 分钟)
验证固件镜像可以不插板子生成:
bash
~/.cargo/bin/espflash.exe save-image --chip esp32s3 \
  target/xtensa-esp32s3-none-elf/release/serial-demo serial-demo.bin
# Image successfully saved!  (本例 93,680 字节)
8. 配置 VSCode
8.1 .vscode/extensions.json
json
{
  "recommendations": ["rust-lang.rust-analyzer"]
}
8.2 .vscode/settings.json
json
{
  "rust-analyzer.cargo.target": "xtensa-esp32s3-none-elf",
  "rust-analyzer.check.allTargets": false,
  "rust-analyzer.check.overrideCommand": [
    "cmd", "/c", "build.bat", "cargo", "check", "--workspace", "--message-format=json"
  ],
  "[rust]": {
    "editor.formatOnSave": true
  }
}
check.overrideCommand 是关键:rust-analyzer 默认直接跑 cargo check,会踩到和第 7 步一样的 link.exe 问题;改成走 build.bat 后代码检查完全正常。
8.3 .vscode/tasks.json
json
{
  "version": "2.0.0",
  "tasks": [
    {
      "label": "esp32: build (release)",
      "type": "shell",
      "command": "cmd /c build.bat cargo build --release",
      "group": { "kind": "build", "isDefault": true },
      "problemMatcher": ["$rustc"]
    },
    {
      "label": "esp32: flash + monitor",
      "type": "shell",
      "command": "cmd /c build.bat cargo run --release",
      "detail": "烧录到 ESP32-S3 并打开串口监视器(Ctrl+] 退出监视器)",
      "group": { "kind": "test", "isDefault": true },
      "problemMatcher": ["$rustc"]
    },
    {
      "label": "esp32: monitor only",
      "type": "shell",
      "command": "cmd /c build.bat espflash monitor",
      "detail": "只打开串口监视器,不烧录",
      "problemMatcher": []
    }
  ]
}使用:Ctrl+Shift+P → Tasks: Run Task → 选任务。
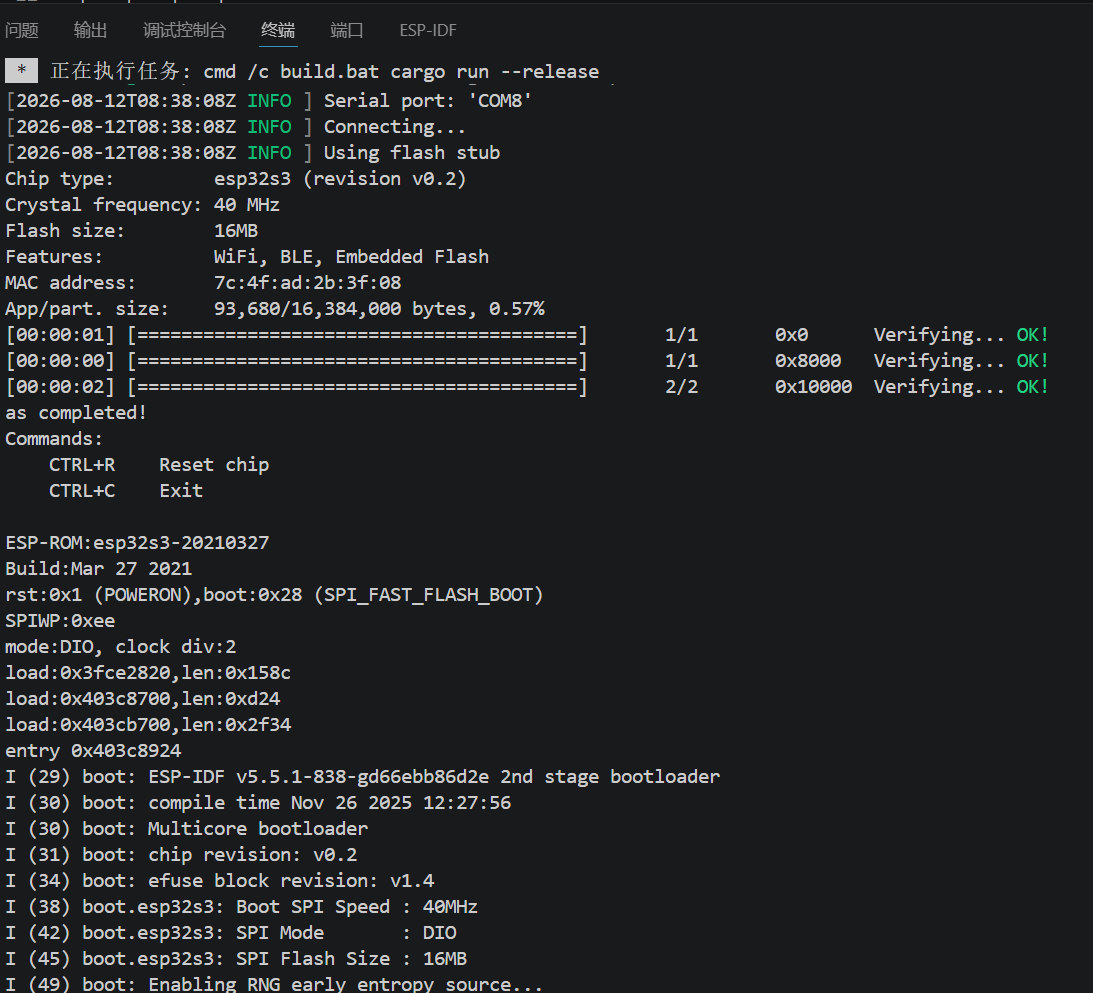
9. 烧录与验证(实测记录)
插上开发板,运行 esp32: flash + monitor (即 cargo run --release),实测输出:
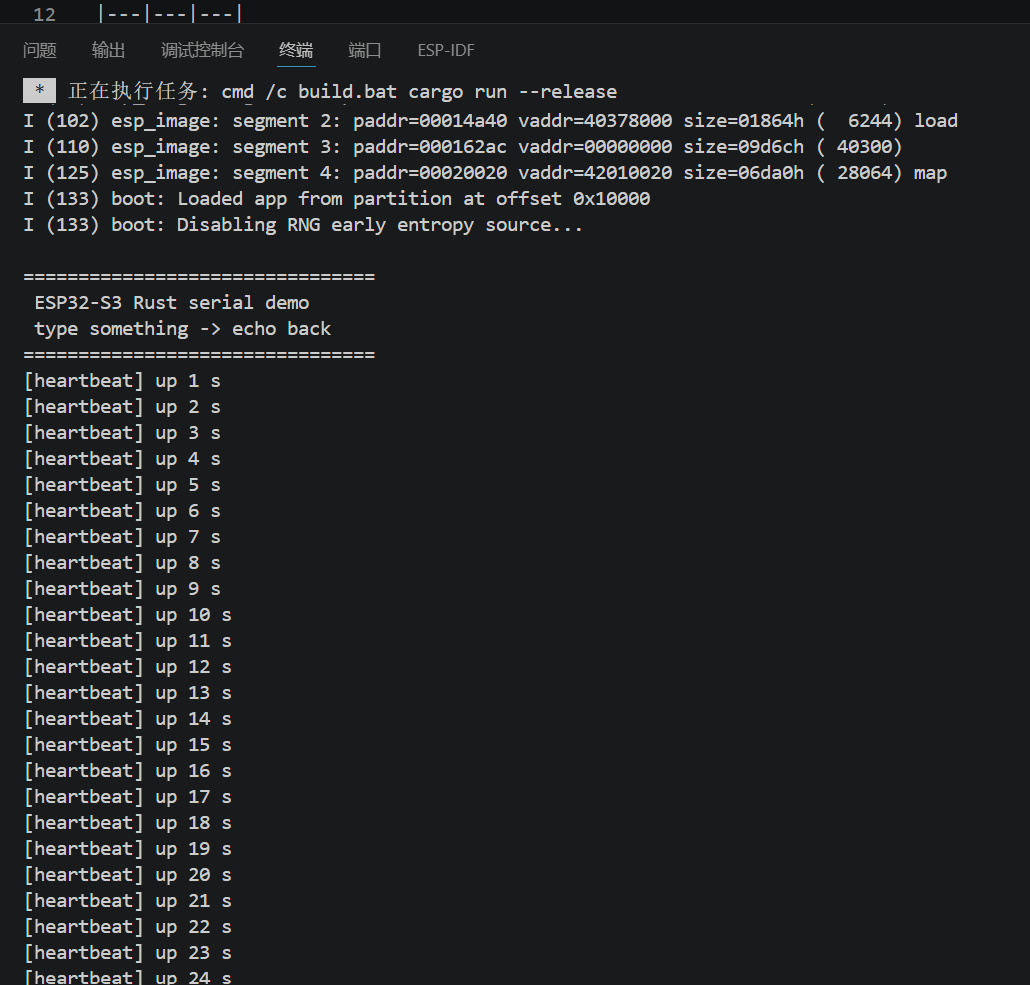
验证要点:

- espflash 正确识别 **esp32s3 + 16MB Flash**(与 N16R8 一致)✅
- bootloader 加载 Rust 应用成功 ✅
- banner + 每秒心跳正常打印 ✅
- 在监视器中直接敲键盘,字符原样回显(echo 功能)✅
- `Ctrl+C` 退出监视器,`Ctrl+R` 复位芯片

---