前言
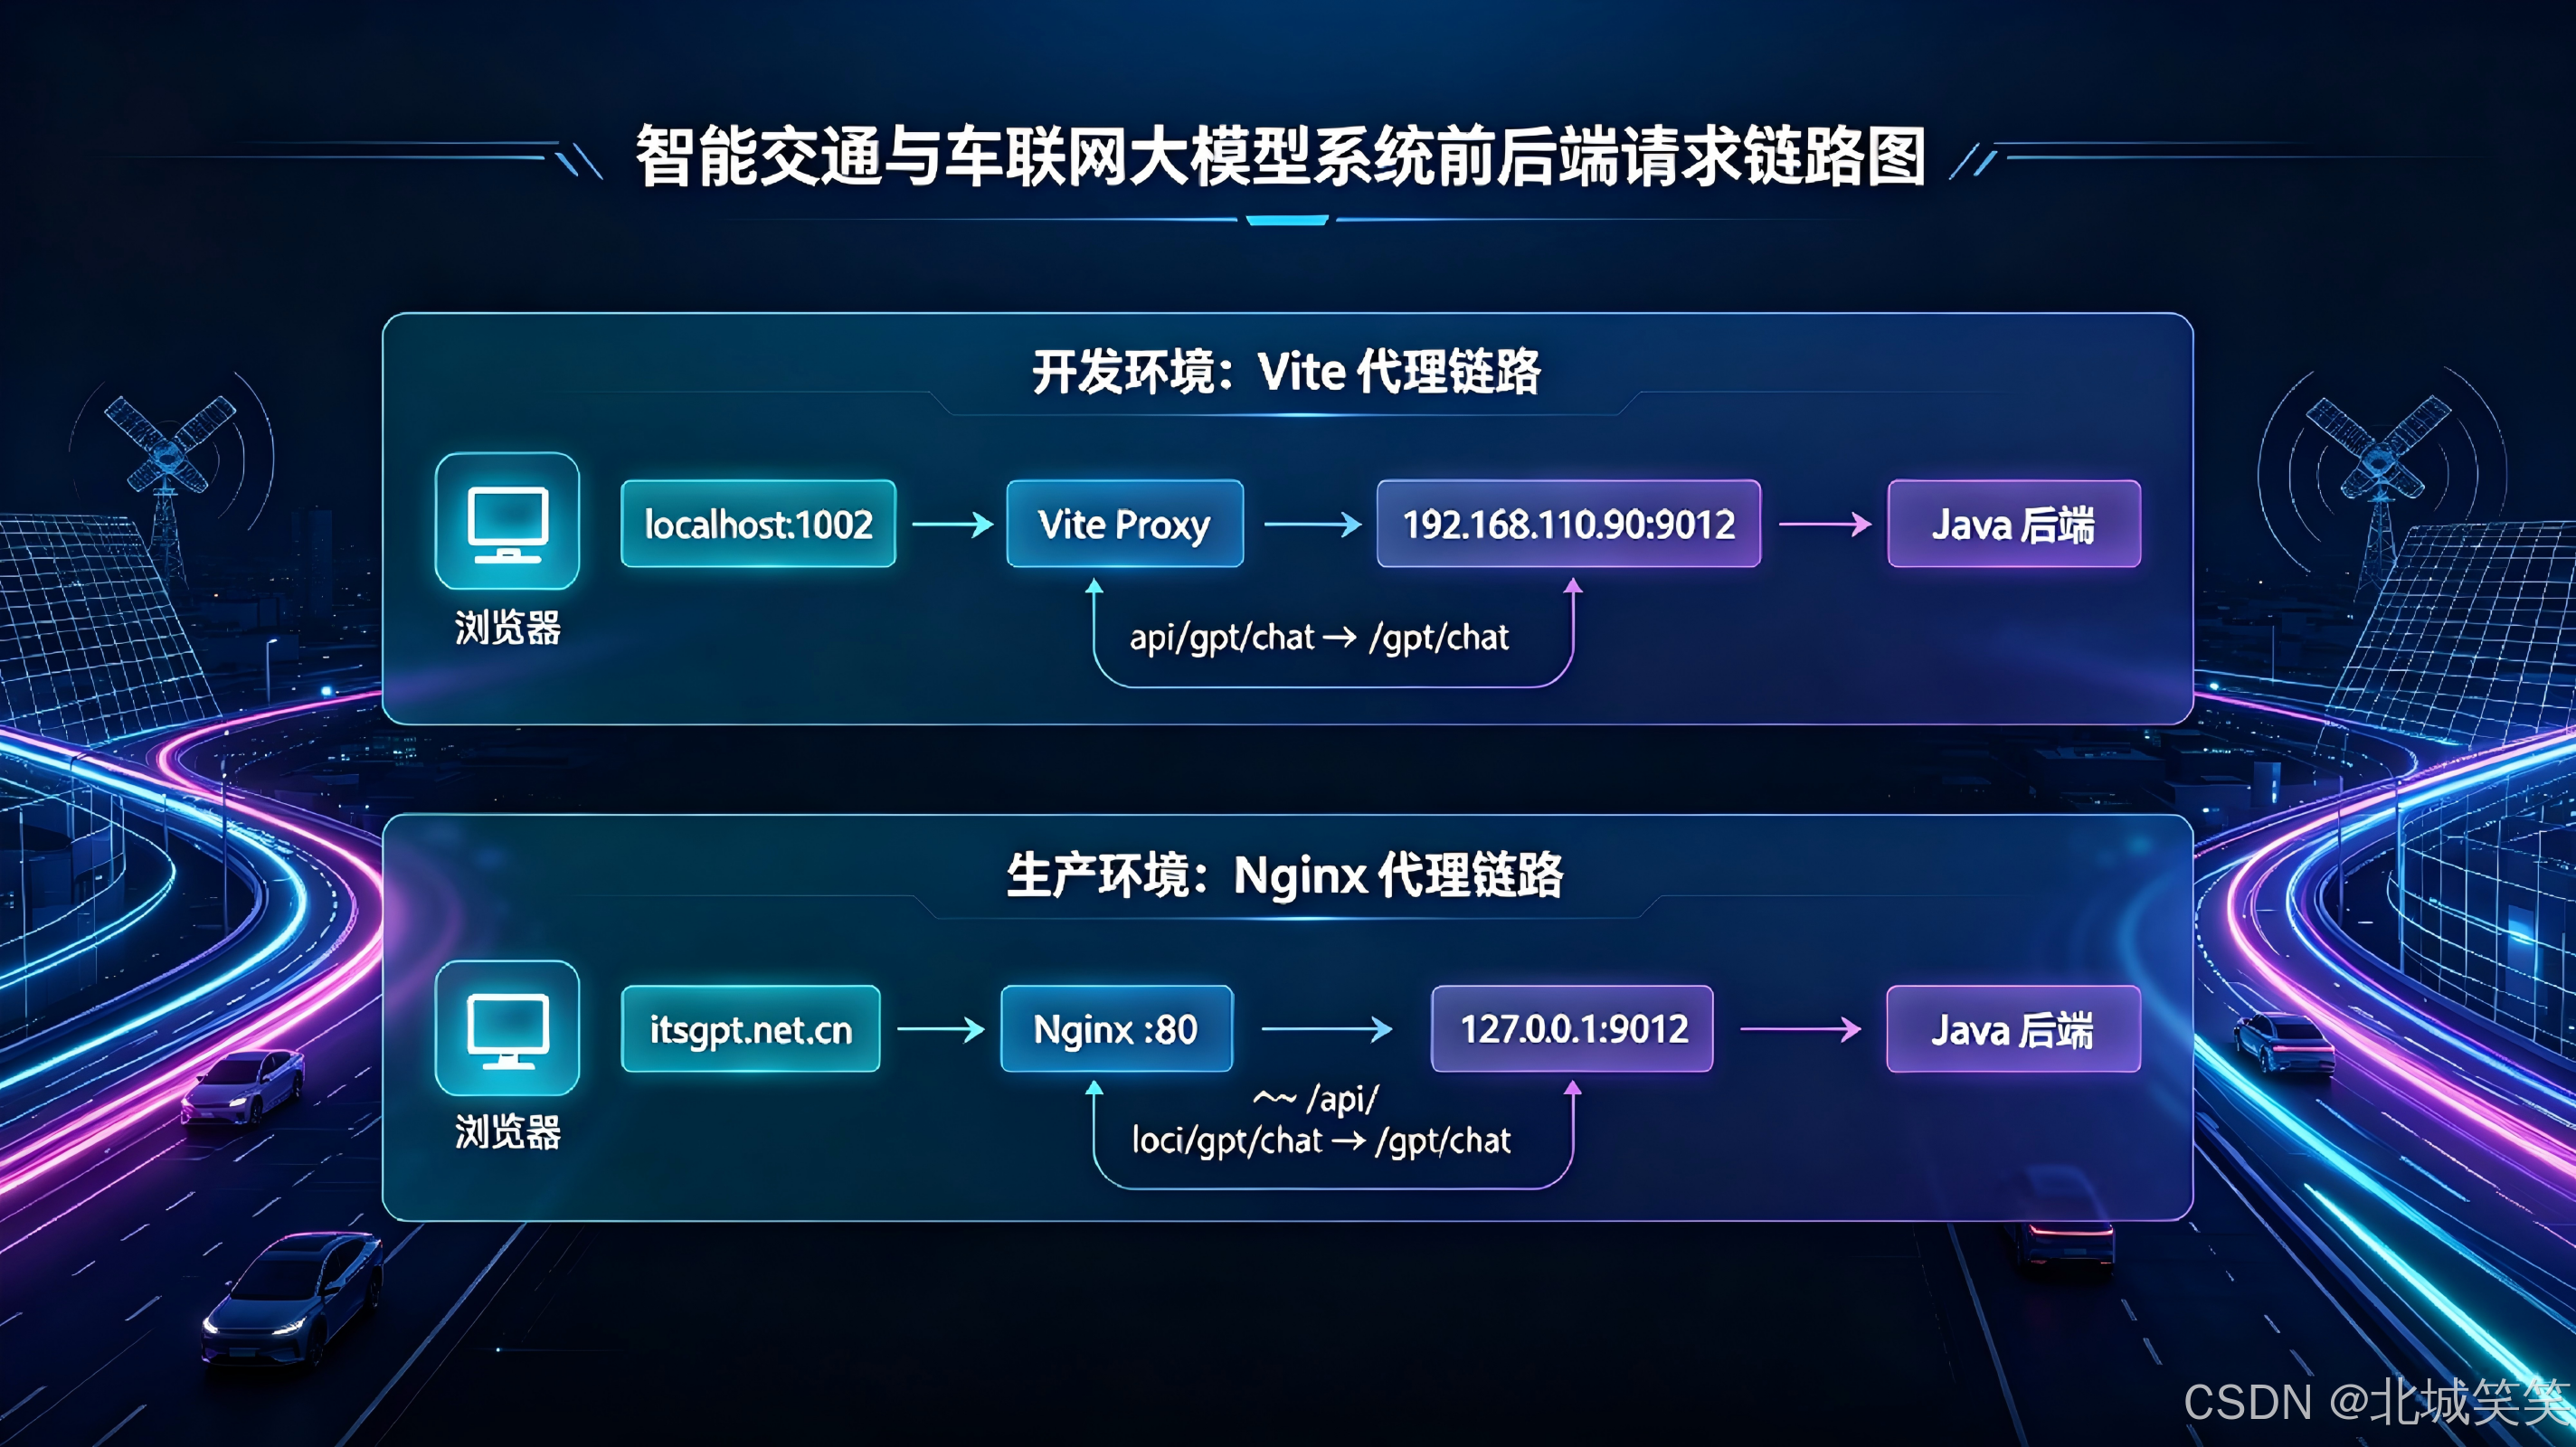
在开发智能交通与车联网大模型系统平台 时,前端采用开源 chatgpt-web 前端框架,开发环境使用 Vite,生产环境通过 Nginx 部署。一次后端算法服务调整之后,出现了一个非常典型的问题:
本地调用
http://localhost:1002/api/gpt/chat正常,部署到服务器后调用http://itsgpt.net.cn/api/gpt/chat却返回 404。
刚开始看起来像是"前端接口地址写错了",但实际排查后发现,问题涉及 Vite Proxy、Nginx location 匹配、proxy_pass 路径转换、后端端口变化、Nginx 实际运行配置以及 127.0.0.1 的含义。
本文把这次问题从头到尾记录下来,不只解决当前问题,也整理成一套以后遇到类似 "本地正常、生产环境 404" 时可以直接套用的排查流程。
一、问题背景:为什么本地正常,服务器却 404?
1.1 项目运行环境
本次项目采用 chatgpt-web 前端框架进行二次开发,主要技术栈包括:
- Vue
- Vite
- Axios
- Nginx
- Java 后端
- 大模型 / 算法服务
前端开发环境运行在:
text
http://localhost:1002核心聊天接口:
text
/api/gpt/chat因此本地完整请求地址为:
text
http://localhost:1002/api/gpt/chat浏览器开发者工具显示:
text
请求方法:POST
状态码:200 OK也就是说,本地接口完全正常。
但是部署到服务器后,请求变成:
text
http://itsgpt.net.cn/api/gpt/chat结果:
text
POST
404 Not Found
这时候最容易产生一个误区:
"本地接口能通,说明前端代码没问题,所以服务器 404 应该是后端的问题。"
实际上不能直接这么判断。
因为本地请求和生产环境请求根本不是同一条网络链路。
1.2 本地请求为什么能正常?
项目的 vite.config.ts 中配置了:
ts
server: {
  host: '0.0.0.0',
  port: 1002,

  proxy: {
    '/api': {
      target: 'http://192.168.110.90:9012',
      changeOrigin: true,
      rewrite: path => path.replace('/api/', '/'),
    },
  },
}
这里最重要的是:
ts
proxy和:
ts
rewrite本地请求:
text
/api/gpt/chat经过 Vite 代理后,实际上会被转发为:
text
192.168.110.90:9012/gpt/chat也就是说,本地浏览器看到的是:
text
localhost:1002/api/gpt/chat但真正接收请求的后端实际上是:
text
192.168.110.90:9012/gpt/chat所以本地请求成功,并不能证明 Nginx 配置正确。
1.3 打包之后,Vite Proxy 还存在吗?
不存在。
这是本次问题最关键的知识点之一。
下面这段:
ts
server: {
  proxy: {
    '/api': {
      target: 'http://192.168.110.90:9012'
    }
  }
}
只对:
bash
npm run dev启动的 Vite 开发服务器生效。
执行:
bash
npm run build之后,Vite 最终只负责生成静态资源,例如:
text
dist/
├── index.html
├── assets/
│   ├── xxx.js
│   └── xxx.css
└── ...
部署到服务器之后,请求链路变成:
text
浏览器
  ↓
itsgpt.net.cn
  ↓
Nginx
  ↓
后端服务
此时已经没有 Vite Dev Server 参与。
所以生产环境接口能否访问,最终取决于 Nginx 是否正确转发到了后端。
二、服务器排查:从 8090 到 9012 找到真正的问题
2.1 原来的 Nginx 配置到底转发到了哪里?
最初的 Nginx 配置中存在:
nginx
location = /api/gpt/chat {
    proxy_pass http://127.0.0.1:8090/gpt/chat;

    proxy_http_version 1.1;
    proxy_set_header Connection "";
    proxy_set_header Host $host;
    proxy_set_header Authorization $http_authorization;

    proxy_buffering off;
    proxy_cache off;
    chunked_transfer_encoding on;

    proxy_connect_timeout 60s;
    proxy_read_timeout 300s;
    proxy_send_timeout 300s;
}
这意味着:
text
/api/gpt/chat
       ↓
Nginx
       ↓
127.0.0.1:8090/gpt/chat
问题也很快出现了。
在服务器执行:
bash
curl -i http://127.0.0.1:8090/gpt/chat返回:
text
curl: (7) Failed to connect to 127.0.0.1 port 8090: Connection refused继续测试 POST:
bash
curl -i -X POST http://127.0.0.1:8090/gpt/chat依然:
text
Connection refused这说明一个非常重要的问题:
Nginx 配置的 8090 端口上已经没有服务在监听。
所以生产环境请求:
text
itsgpt.net.cn/api/gpt/chat实际上还在尝试访问已经失效的:
text
127.0.0.1:8090这就是为什么服务器请求会出现异常。
2.2 通过 ss 查看服务器到底运行了哪些端口
服务器排查服务时,不要首先猜端口,直接执行:
bash
ss -lntp本次服务器关键结果如下:
text
0.0.0.0:8080
0.0.0.0:8081
0.0.0.0:8083
*:9012
其中:
text
8080 → nginx
8081 → python
8083 → python
9012 → java
尤其值得注意:
text
*:9012
users:(("java",pid=246728,fd=45))
这直接说明:
9012 端口当前确实有 Java 后端服务正在监听。
而之前配置中的:
text
8090根本没有出现在监听列表中。
因此可以确定:
text
原配置:
/api/gpt/chat → 8090 ❌

当前后端:
9012 → Java ✅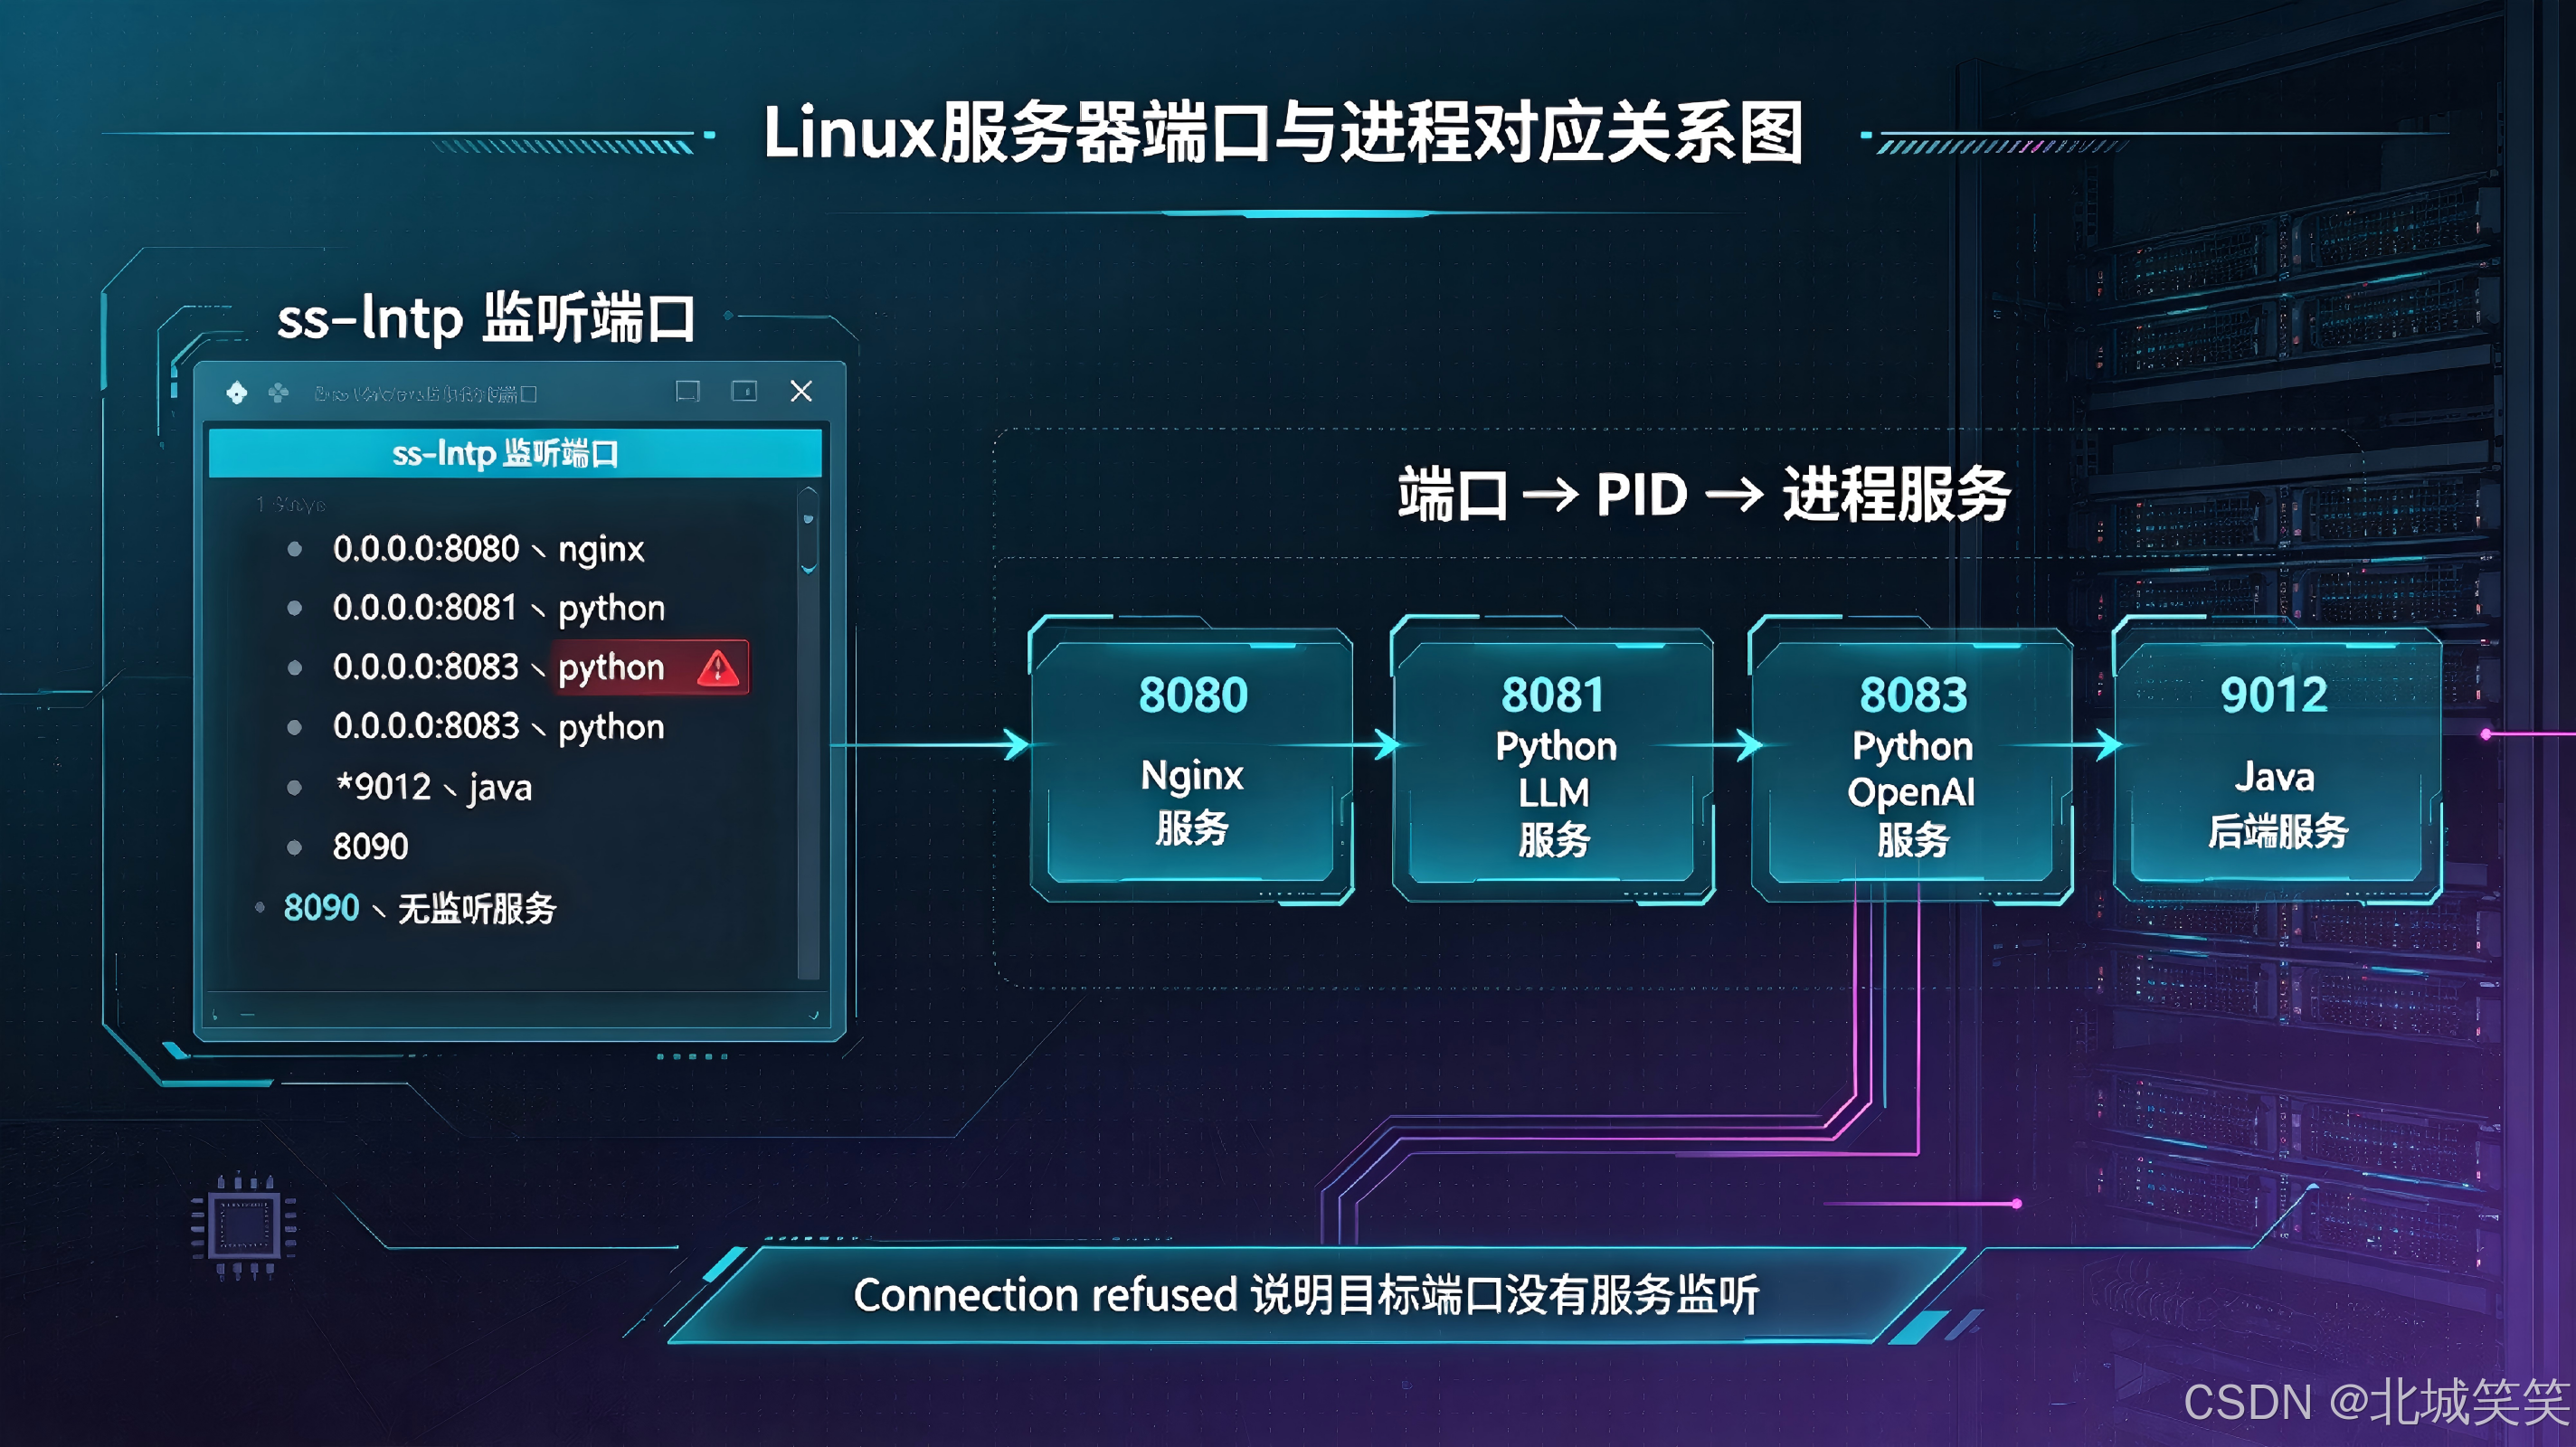
2.3 8081 和 8083 分别是什么服务?
通过端口只能知道"谁在监听",还需要继续确认具体程序。
执行:
bash
ps -fp 301524得到:
text
root 301524 ... python /home/LLM/main.py因此:
text
8081 → /home/LLM/main.py继续查看 8083:
bash
ps -fp 2223508得到:
text
root 2223508 ... /root/miniconda3/envs/llm/bin/python /home/LLM/main-openai.py因此:
text
8083 → /home/LLM/main-openai.py可以进一步通过:
bash
tr '\0' ' ' < /proc/301524/cmdline和:
bash
tr '\0' ' ' < /proc/2223508/cmdline确认进程实际启动命令。
这一步的意义在于:
不要因为服务器上有很多 Python 服务,就直接认为某个端口是当前大模型接口。
必须结合:
text
端口
+
PID
+
启动命令
+
实际接口测试
一起判断。
2.4 9012 才是当前正确的 Java 后端
服务器执行:
bash
ss -lntp | grep 9012得到:
text
LISTEN ... *:9012 ... users:(("java",pid=246728,fd=45))说明当前 Java 服务监听:
text
9012对应服务器公网地址:
text
118.31.19.221:9012因此当前系统后端应该理解为:
text
118.31.19.221:9012但这并不意味着 Nginx 配置中必须写:
nginx
proxy_pass http://118.31.19.221:9012/;如果 Nginx 和 Java 后端就在同一台服务器上,更合适的配置是:
nginx
proxy_pass http://127.0.0.1:9012/;三、真正理解 Nginx:为什么之前 /api/gpt/chat 会走 8090?
3.1 location = 和 location ^~ 到底有什么区别?
原配置同时存在:
nginx
location = /api/gpt/chat {
    proxy_pass http://127.0.0.1:8090/gpt/chat;
}
以及:
nginx
location ^~ /api/ {
    proxy_pass http://127.0.0.1:9012/;
}
很多人看到 /api/gpt/chat 以 /api/ 开头,就认为应该走:
text
9012实际上不是。
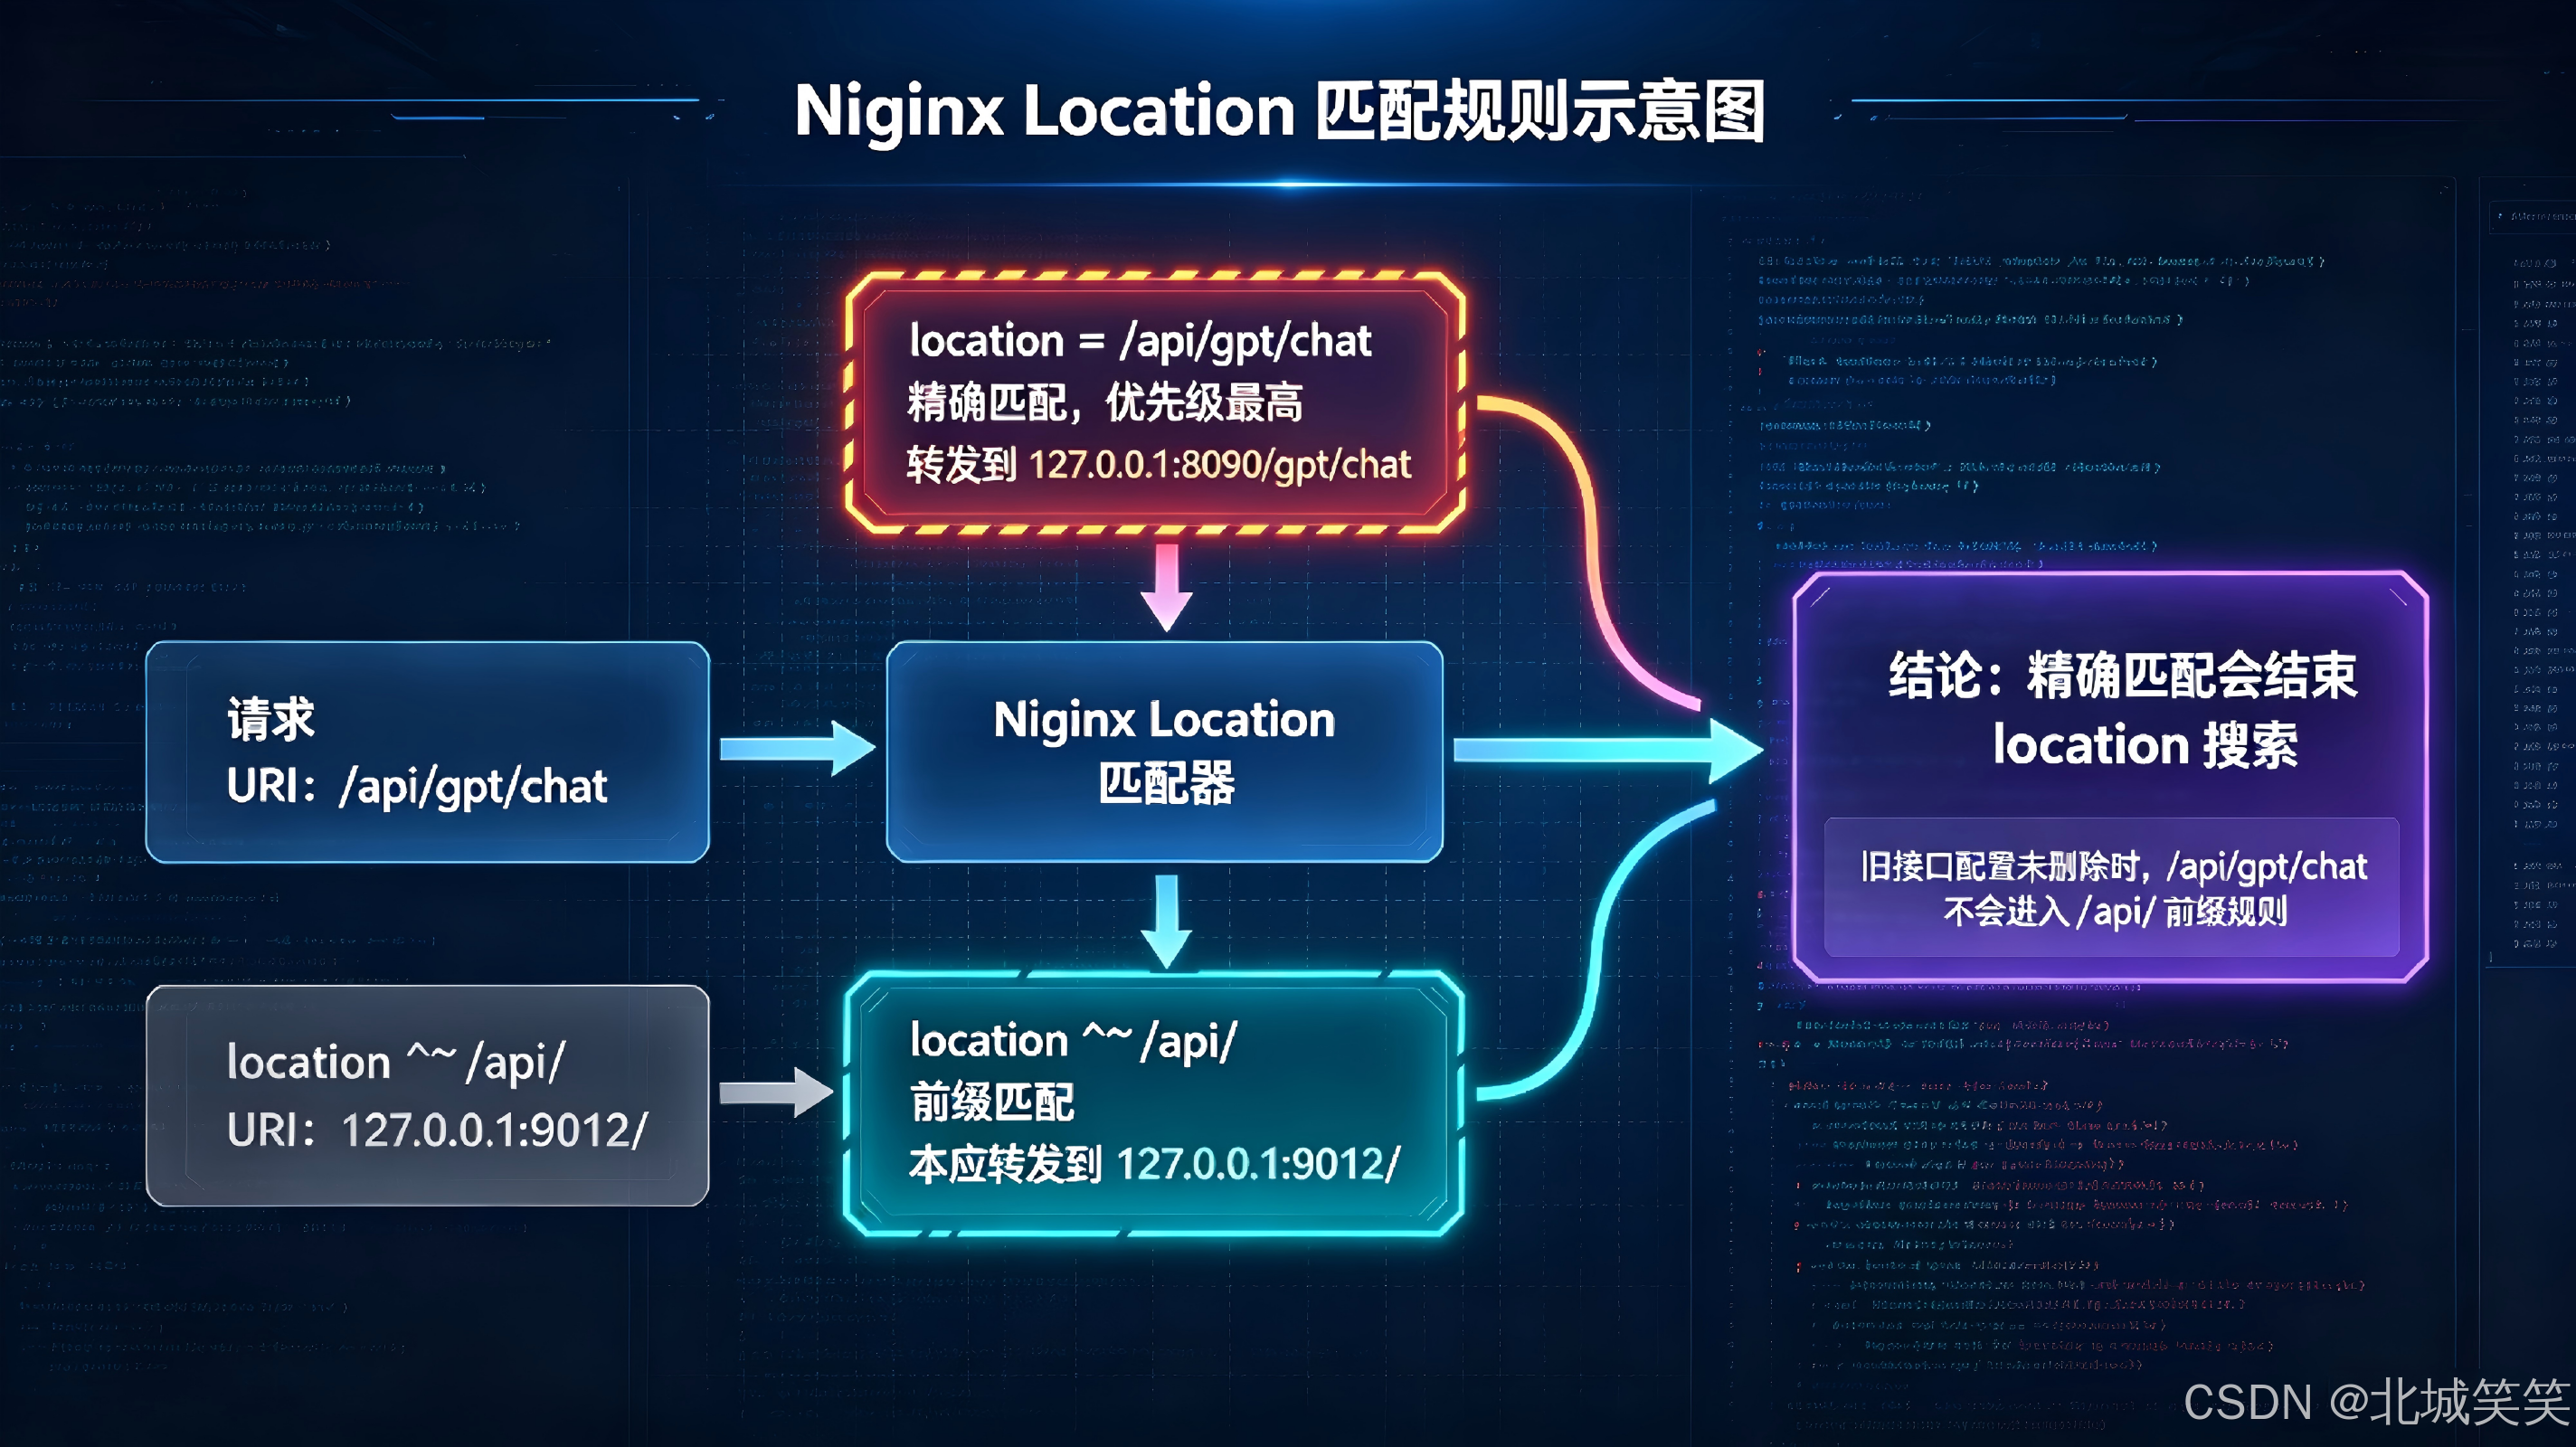
Nginx 中:
nginx
location = /api/gpt/chat这里的 = 表示精确匹配。
而:
nginx
location ^~ /api/属于前缀匹配。
Nginx 官方文档明确说明,location = 是精确 URI 匹配,一旦找到精确匹配,就会结束 location 搜索。(Nginx1)
因此:
text
/api/gpt/chat
       ↓
location = /api/gpt/chat
       ↓
8090
而不是:
text
/api/gpt/chat
       ↓
location ^~ /api/
       ↓
9012
所以之前配置实际上是:
text
/api/gpt/chat       → 8090
其他 /api/*         → 9012
这正是本次问题的关键。
3.2 为什么删除 location = /api/gpt/chat?
既然当前 Java 后端已经统一运行在:
text
9012那么继续保留:
nginx
location = /api/gpt/chat {
    proxy_pass http://127.0.0.1:8090/gpt/chat;
}
反而会造成错误。
正确做法是删除这段特殊配置,让:
text
/api/gpt/chat统一进入:
nginx
location ^~ /api/最终形成:
text
/api/gpt/chat
       ↓
location ^~ /api/
       ↓
127.0.0.1:9012
       ↓
/gpt/chat
这样配置逻辑更加清晰,也避免以后后端端口变化时留下旧配置。
3.3 proxy_pass 最后的 / 为什么重要?
最终配置:
nginx
location ^~ /api/ {
    proxy_pass http://127.0.0.1:9012/;
}
注意:
text
9012/
    ↑
这里有一个 /
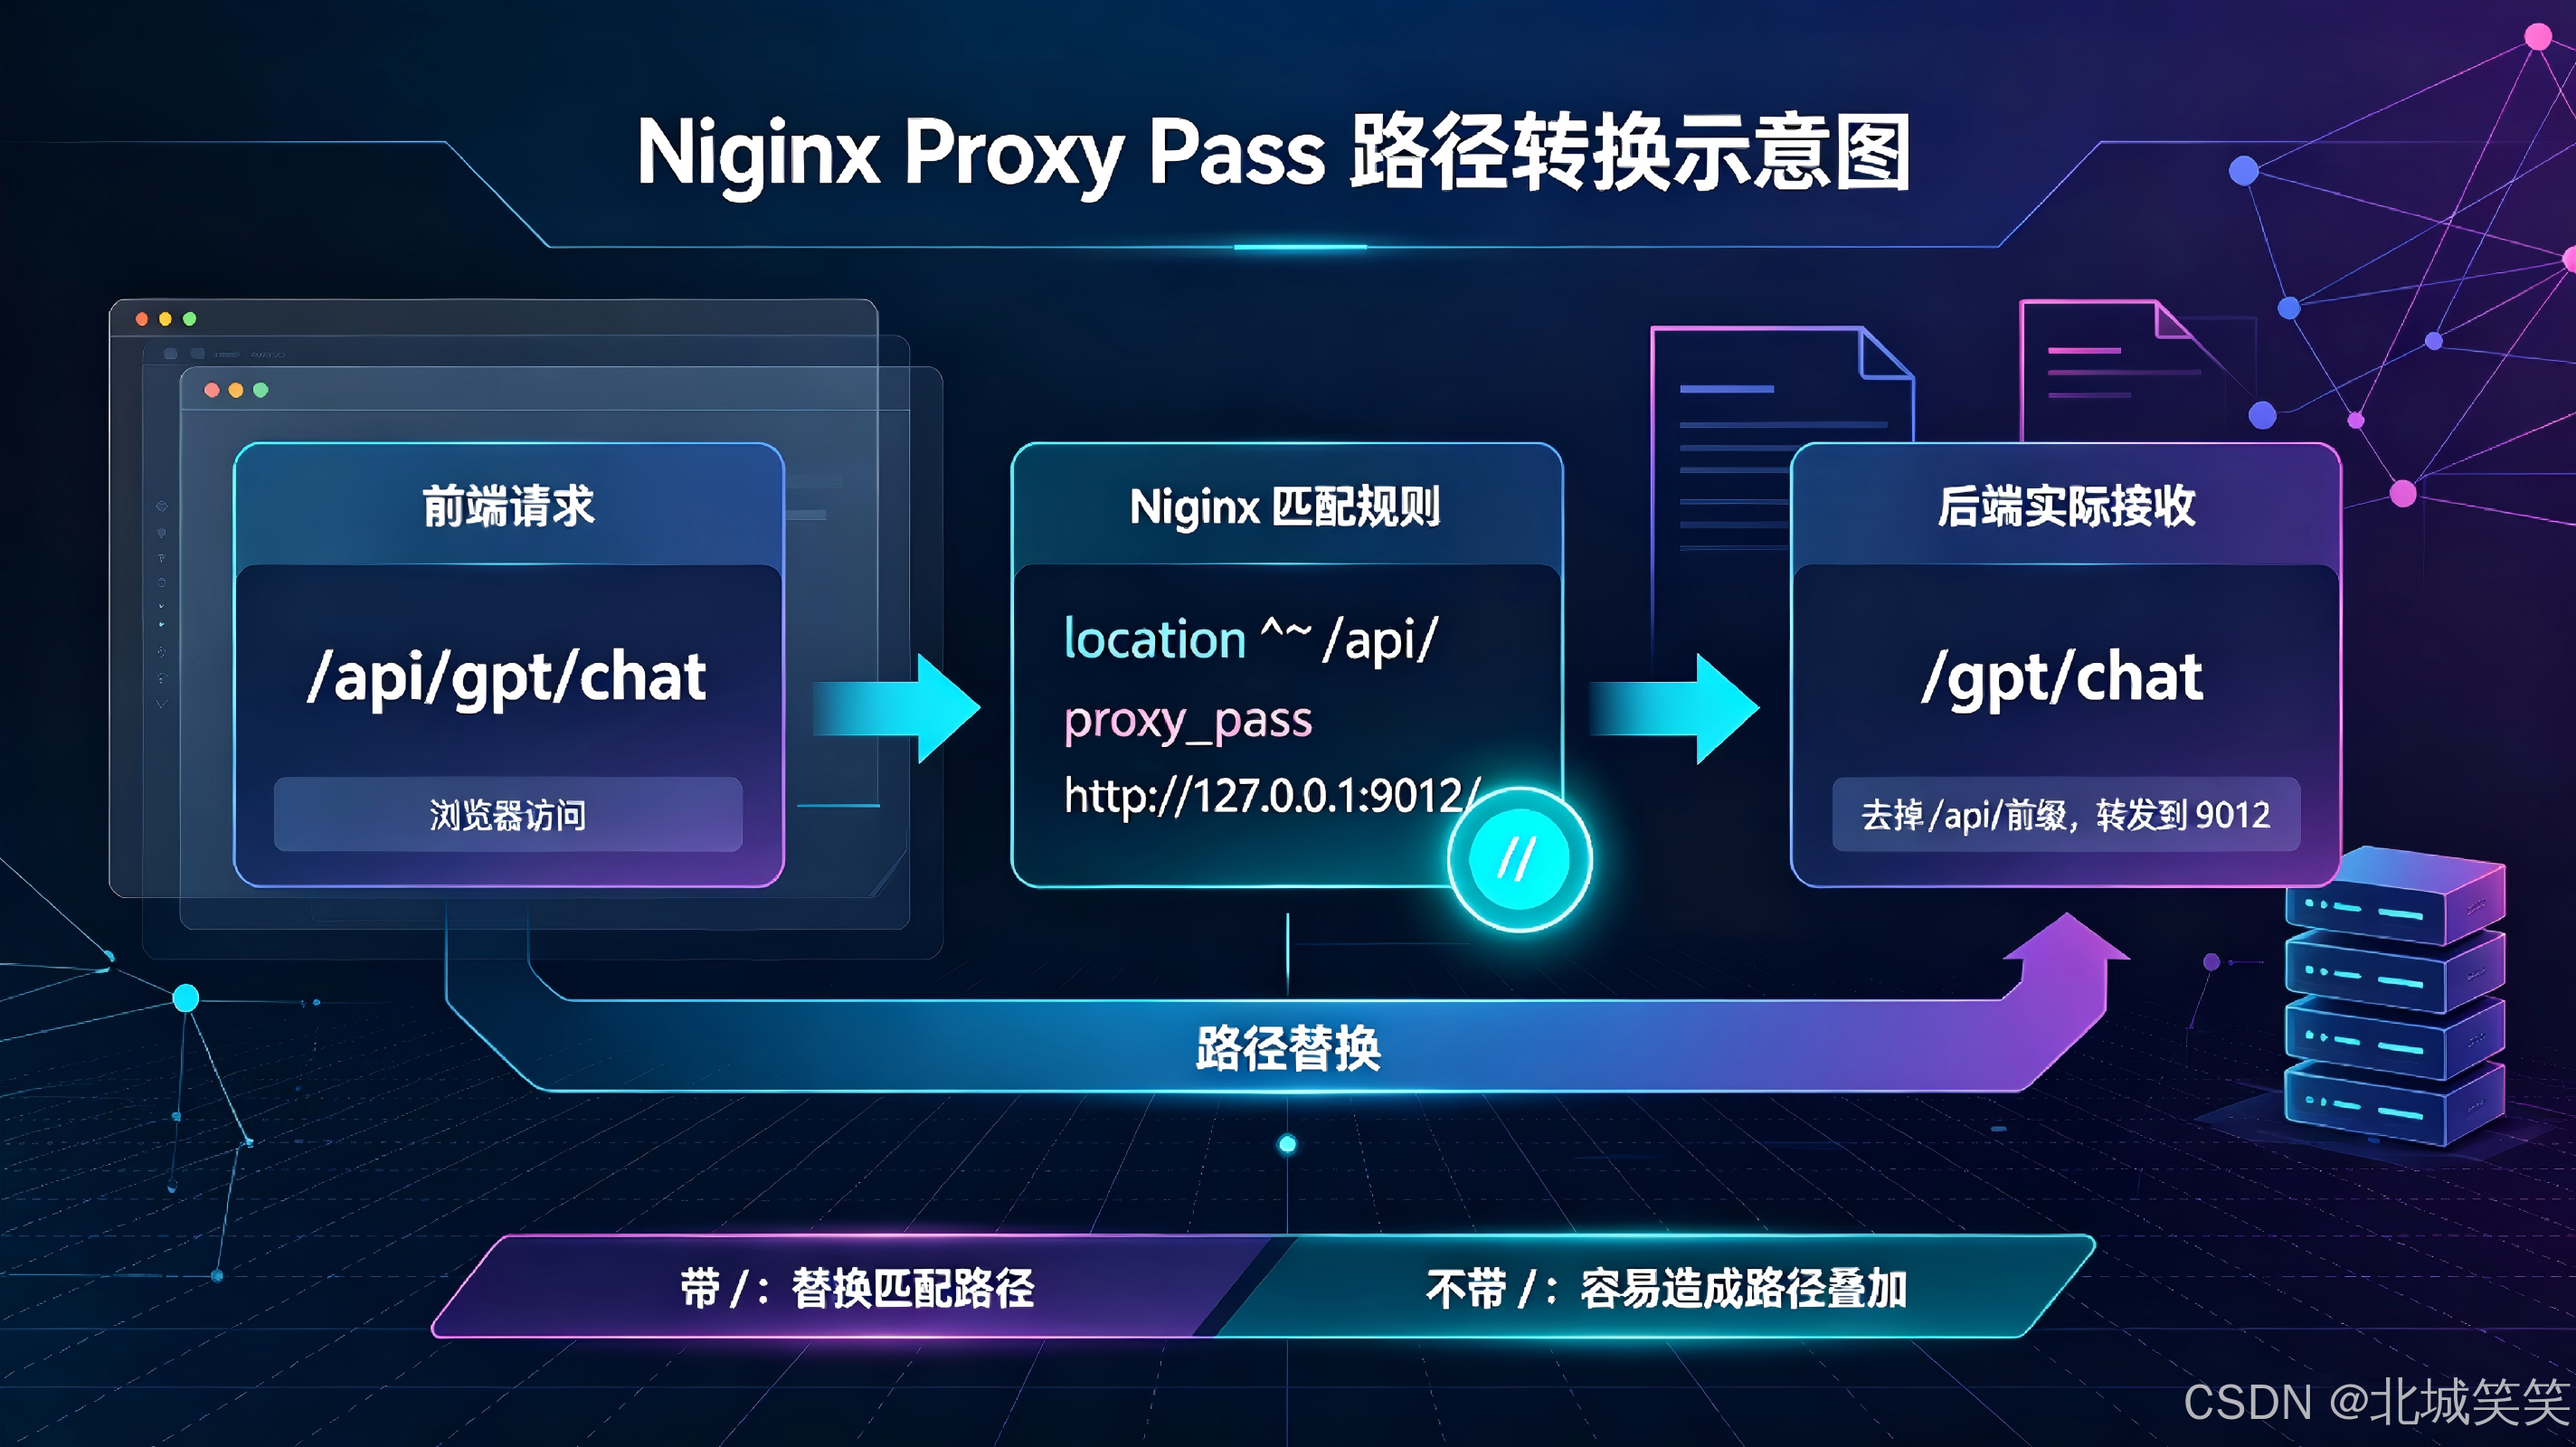
这个 / 会影响 Nginx 转发后的 URI。
例如前端请求:
text
/api/gpt/chat配置:
nginx
location ^~ /api/ {
    proxy_pass http://127.0.0.1:9012/;
}
最终后端收到:
text
/gpt/chat也就是:
text
/api/gpt/chat
       ↓
删除 /api/
       ↓
/gpt/chat
这正好与前端 Vite 配置中的:
ts
rewrite: path => path.replace('/api/', '/')保持一致。
Nginx 官方文档也明确说明,proxy_pass 如果带 URI,则匹配到的 location 部分会被 proxy_pass 指定的 URI 替换。(Nginx2)
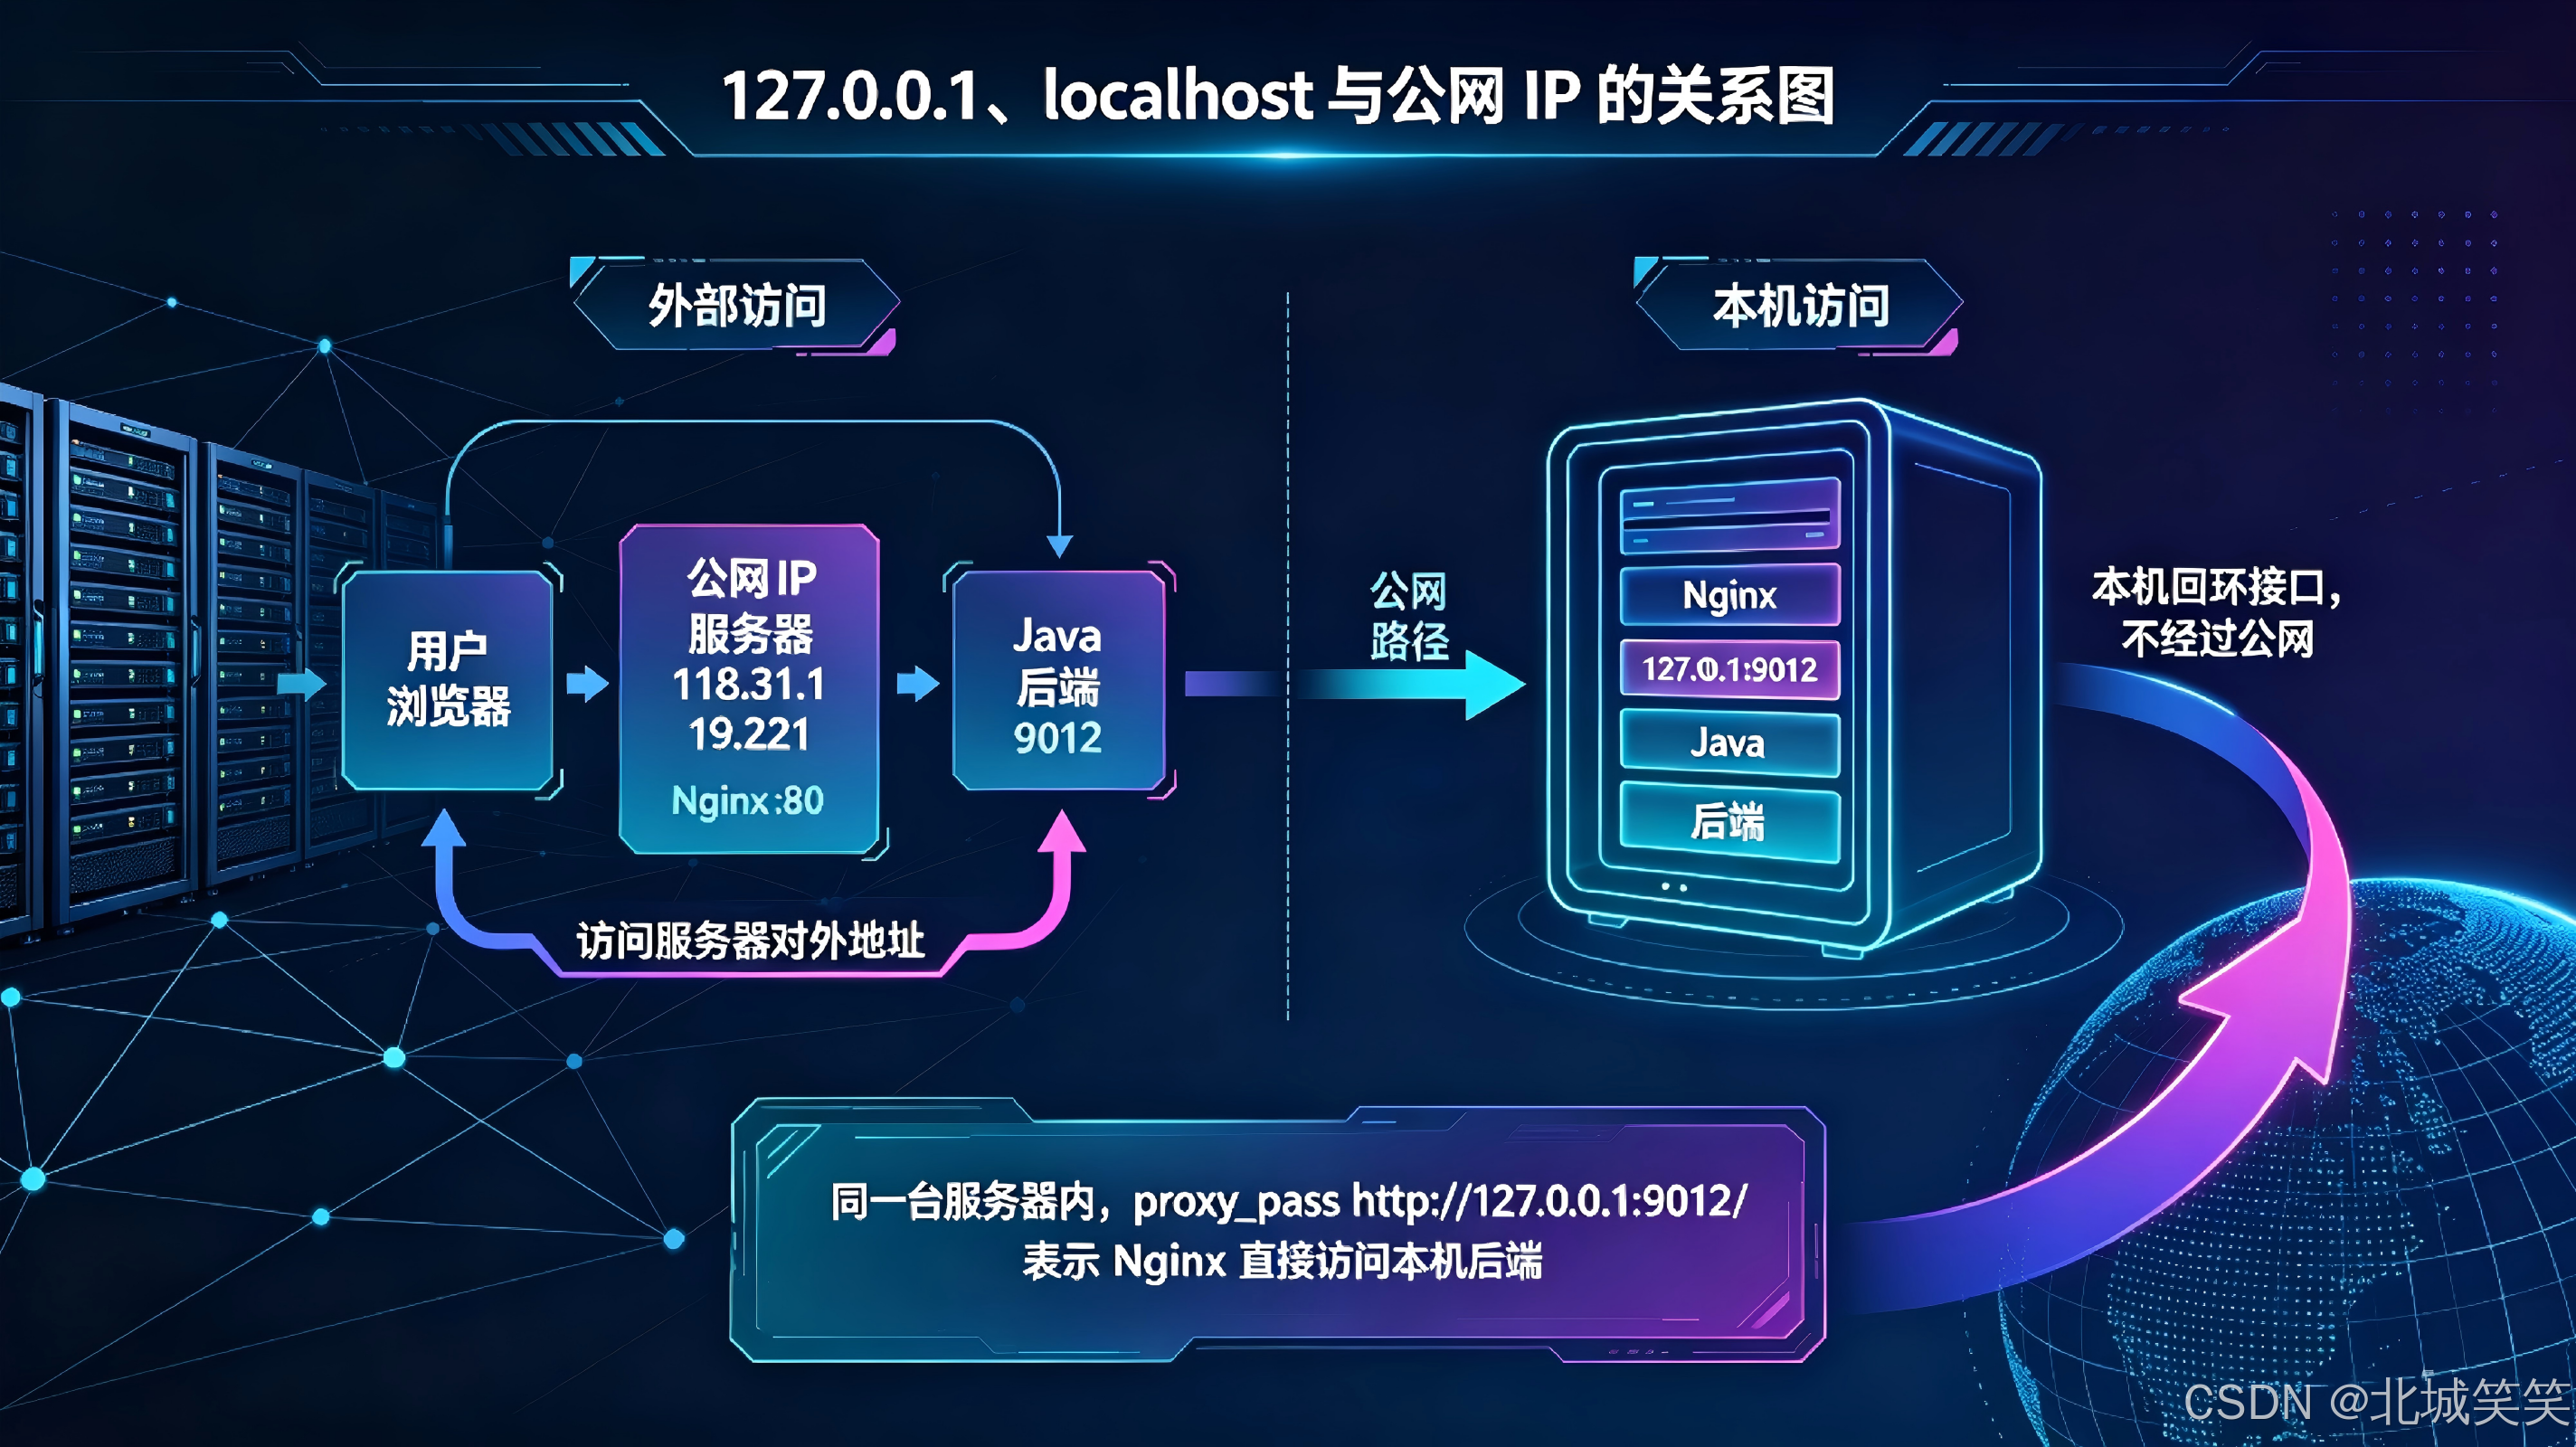
3.4 为什么使用 127.0.0.1:9012,而不是 118.31.19.221:9012?
这是另一个非常容易混淆的地方。
服务器公网 IP:
text
118.31.19.221表示:
外部网络访问这台服务器的地址。
而:
text
127.0.0.1表示:
当前服务器自身,也就是 localhost。
因此:
text
118.31.19.221:9012可以理解为:
text
外部 → 服务器 → 9012而:
text
127.0.0.1:9012表示:
text
Nginx → 本机 → 9012如果 Nginx 和 Java 服务都部署在同一台服务器,那么:
nginx
proxy_pass http://127.0.0.1:9012/;是合理的。
另外,本次 ss -lntp 显示:
text
*:9012说明 Java 服务监听所有网卡,因此本机通过:
text
127.0.0.1:9012也可以访问。
四、最终 Nginx 配置:解决 /api/gpt/chat 404
4.1 推荐的完整 nginx.conf
当前服务器实际运行的 Nginx 是:
text
/usr/local/nginx/sbin/nginx实际配置文件:
text
/usr/local/nginx/conf/nginx.conf最终配置建议如下:
nginx
# Nginx 主配置
worker_processes 1;

events {
    worker_connections 1024;
}

http {
    include       mime.types;
    default_type  application/octet-stream;

    sendfile on;
    keepalive_timeout 65;


    # =========================
    # 主站:前端 + 后端 API
    # =========================
    server {
        listen 80;
        server_name itsgpt.net.cn;

        # Vue 前端页面
        location / {
            root html/dmx;
            index index.html index.htm;
            try_files $uri $uri/ /index.html;
        }

        # 禁止公网访问 Druid
        location ^~ /api/druid/ {
            deny all;
            return 404;
        }

        # 后端 API:/api/* → 9012 后端服务
        location ^~ /api/ {
            proxy_pass http://127.0.0.1:9012/;

            proxy_http_version 1.1;
            proxy_set_header Connection "";
            proxy_set_header Host $host;
            proxy_set_header X-Real-IP $remote_addr;
            proxy_set_header X-Forwarded-For $proxy_add_x_forwarded_for;
            proxy_set_header X-Forwarded-Proto $scheme;
            proxy_set_header Authorization $http_authorization;

            # 大模型流式响应
            proxy_buffering off;
            proxy_cache off;
            chunked_transfer_encoding on;

            # 接口超时时间
            proxy_connect_timeout 60s;
            proxy_send_timeout 300s;
            proxy_read_timeout 300s;
        }

        # Njust API 服务
        location ^~ /njust-api/ {
            proxy_pass http://127.0.0.1:18082/;

            proxy_http_version 1.1;
            proxy_set_header Connection "";
            proxy_set_header Host $host;
            proxy_set_header Authorization $http_authorization;

            proxy_buffering off;
            proxy_read_timeout 300s;
        }

        # Njust RAG 服务
        location ^~ /njust-rag/ {
            proxy_pass http://127.0.0.1:18084/;

            proxy_http_version 1.1;
            proxy_set_header Connection "";
            proxy_set_header Host $host;
            proxy_set_header Authorization $http_authorization;

            proxy_buffering off;
            proxy_cache off;
            chunked_transfer_encoding on;

            proxy_connect_timeout 60s;
            proxy_send_timeout 300s;
            proxy_read_timeout 300s;
        }

        # 错误页面
        error_page 500 502 503 504 /50x.html;

        location = /50x.html {
            root html;
        }
    }


    # =========================
    # 8080 独立前端网站
    # =========================
    server {
        listen 8080;
        server_name itsgpt.net.cn;

        # 8080 网站前端
        location / {
            root html/website;
            index index.html index.htm;
            try_files $uri $uri/ /index.html;
        }

        # 错误页面
        error_page 500 502 503 504 /50x.html;

        location = /50x.html {
            root html;
        }
    }


    # DomainMaster 独立入口
    include conf.d/*.conf;
}
4.2 修改 Nginx 后正确的操作顺序
不要修改完配置直接重启。
第一步,检查配置:
bash
/usr/local/nginx/sbin/nginx -t -c /usr/local/nginx/conf/nginx.conf正常情况下应该看到:
text
syntax is ok
test is successful
第二步,重新加载:
bash
/usr/local/nginx/sbin/nginx -s reload第三步,查看 Nginx 状态:
bash
systemctl status nginx如果确实需要完全停止:
bash
systemctl stop nginx启动:
bash
systemctl start nginx完全重启:
bash
systemctl restart nginx生产环境更推荐:
bash
nginx -t
↓
nginx -s reload
因为只是修改配置时,通常没必要先停止整个 Nginx。
五、完整排查流程:以后遇到 404 可以直接照着查
5.1 第一步:先判断是开发环境还是生产环境
看到:
text
localhost:1002/api/xxx首先想到:
这是 Vite Proxy。
看到:
text
itsgpt.net.cn/api/xxx首先想到:
这是 Nginx。
两者不能混为一谈。
5.2 第二步:确认前端真正请求的 URI
打开浏览器:
text
F12
→ Network
→ 找到接口
重点查看:
text
Request URL
Request Method
Status Code
例如:
text
POST
http://itsgpt.net.cn/api/gpt/chat
404
记录真实 URI:
text
/api/gpt/chat5.3 第三步:检查服务器到底有什么端口
执行:
bash
ss -lntp或者:
bash
ss -lntp | grep LISTEN重点关注:
text
端口
+
PID
+
进程
例如:
text
*:9012 → java
0.0.0.0:8081 → python
0.0.0.0:8083 → python
0.0.0.0:80 → nginx
0.0.0.0:8080 → nginx
如果 Nginx 配的是:
text
8090但是:
bash
ss -lntp | grep 8090没有任何结果,那么基本可以确定:
Nginx 正在转发到一个没有服务监听的端口。
5.4 第四步:直接绕过 Nginx 测试后端
例如后端是 9012:
bash
curl -i http://127.0.0.1:9012/针对具体接口:
bash
curl -i -X POST http://127.0.0.1:9012/gpt/chat如果需要 JSON:
bash
curl -i -X POST http://127.0.0.1:9012/gpt/chat \
-H "Content-Type: application/json" \
-d '{}'
这里要注意:
后端返回 400、422、参数错误,不一定代表后端服务没启动。
只要不是:
text
Connection refused就说明端口层面至少已经能够建立连接。
5.5 第五步:确认 Nginx 使用的到底是哪一个配置文件
这次服务器执行:
bash
ps -ef | grep nginx | grep -v grep得到:
text
nginx: master process /usr/local/nginx/sbin/nginx -c /usr/local/nginx/conf/nginx.conf这条信息非常重要。
它直接告诉我们:
text
Nginx 程序:
/usr/local/nginx/sbin/nginx

配置文件:
/usr/local/nginx/conf/nginx.conf
因此不能想当然地去修改:
text
/etc/nginx/nginx.conf或者其他目录里的配置。
另外,nginx -c 可以指定 Nginx 启动时使用的配置文件,官方文档也说明了 -c 参数用于指定配置文件路径。(Nginx3)
5.6 第六步:检查 Nginx 当前加载的配置
如果服务器可以直接执行 Nginx:
bash
/usr/local/nginx/sbin/nginx -T -c /usr/local/nginx/conf/nginx.conf然后查看:
bash
/usr/local/nginx/sbin/nginx -T -c /usr/local/nginx/conf/nginx.conf | grep -n "server_name"也可以搜索:
bash
/usr/local/nginx/sbin/nginx -T -c /usr/local/nginx/conf/nginx.conf | grep -n "9012"或者:
bash
/usr/local/nginx/sbin/nginx -T -c /usr/local/nginx/conf/nginx.conf | grep -n "8090"如果发现实际加载配置里还存在:
nginx
proxy_pass http://127.0.0.1:8090;就说明旧配置仍然存在。
六、这次问题的最终结论
6.1 为什么本地正常?
因为本地使用:
text
Vite Dev Server
    ↓
server.proxy
    ↓
9012
也就是:
text
localhost:1002/api/gpt/chat
        ↓
Vite Proxy
        ↓
192.168.110.90:9012/gpt/chat
6.2 为什么服务器 404?
因为生产环境不再使用 Vite Proxy,而是:
text
浏览器
 ↓
itsgpt.net.cn
 ↓
Nginx
 ↓
127.0.0.1:8090
但是:
text
8090已经没有服务监听。
与此同时,真正的 Java 后端已经运行在:
text
118.31.19.221:9012因此产生了:
text
本地 → 9012 → 正常

服务器 → 8090 → 异常
6.3 为什么之前明明配置了 9012,却还是不走 9012?
因为存在:
nginx
location = /api/gpt/chat这是精确匹配。
而:
nginx
location ^~ /api/只是前缀匹配。
对于:
text
/api/gpt/chatNginx 会优先使用精确匹配的:
nginx
location = /api/gpt/chat所以之前的 9012 配置实际上没有接管这个接口。Nginx 官方文档对 = 精确匹配和前缀 location 的选择规则有明确说明。(Nginx1)
七、注意事项:以后排查类似问题重点看这几个地方
7.1 不要把 Vite Proxy 当成生产代理
ts
server.proxy只负责开发环境。
打包后:
text
Vite Proxy ❌
Nginx      ✅
7.2 修改后端端口时,必须同步检查 Nginx
例如后端从:
text
8090改成:
text
9012至少检查:
text
vite.config.ts
Nginx nginx.conf
其他 conf.d/*.conf
Docker 配置
systemd 服务
不要只修改其中一个地方。
7.3 遇到 404 不要马上改前端
按照下面顺序排查效率最高:
text
① 浏览器 Request URL
        ↓
② Vite Proxy / Nginx
        ↓
③ Nginx location
        ↓
④ proxy_pass
        ↓
⑤ 后端端口
        ↓
⑥ curl 直接测试后端
        ↓
⑦ 查看后端日志
尤其是:
bash
ss -lntp是排查服务器服务端口非常实用的一条命令。
7.4 127.0.0.1 不等于公网 IP
记住:
text
118.31.19.221
→ 服务器公网 IP

127.0.0.1
→ 当前服务器本机

localhost
→ 当前服务器本机名称
因此:
nginx
proxy_pass http://127.0.0.1:9012/;并不是配置错了。
它表示:
Nginx 在当前服务器上直接访问当前服务器的 9012 端口。
7.5 修改 Nginx 配置一定先测试
推荐固定形成习惯:
bash
/usr/local/nginx/sbin/nginx -t -c /usr/local/nginx/conf/nginx.conf确认:
text
syntax is ok
test is successful
再:
bash
/usr/local/nginx/sbin/nginx -s reload不要养成"改完配置直接 restart"的习惯。
八、最终形成一张排错速查表
| 现象 | 优先检查 | |
|---|---|---|
本地 localhost:1002 正常 |
Vite Proxy | |
| 服务器域名 404 | Nginx location |
|
Connection refused |
后端端口没有服务 | |
| Nginx 转发到旧端口 | 检查 proxy_pass |
|
配了 /api/ 却没生效 |
检查是否存在 location = xxx |
|
| 后端端口不知道是多少 | ss -lntp |
|
| 不知道端口对应哪个程序 | ps -fp PID |
|
| 不知道 Nginx 用哪个配置 | `ps -ef | grep nginx` |
| 修改 Nginx 后不生效 | 检查实际配置文件并 reload | |
| 大模型流式响应异常 | proxy_buffering off |
|
| Vue 刷新页面 404 | try_files $uri $uri/ /index.html |
|
| Nginx 配置改完担心出错 | nginx -t |
九、本文结语
这次问题表面上只是一个:
text
/api/gpt/chat → 404但真正原因并不在前端接口代码,而是开发环境和生产环境的代理链路不同。
最终完整链路应该明确为:
text
开发环境:

浏览器
  ↓
localhost:1002
  ↓
Vite Proxy
  ↓
9012
  ↓
Java 后端


生产环境:

浏览器
  ↓
itsgpt.net.cn
  ↓
Nginx :80
  ↓
/api/*
  ↓
127.0.0.1:9012
  ↓
Java 后端以后再遇到"本地接口正常、部署后接口 404 "的问题,不要第一时间修改前端代码,先把这条链路逐层拆开。浏览器请求 → Vite/Nginx → location → proxy_pass → 端口 → 后端进程,只要一层一层验证,很快就能定位到问题。
本文最值得记住的一句话:本地能通,只能证明 Vite Proxy 能通;生产能不能通,要看 Nginx 实际加载的配置、location 匹配结果以及后端真实监听端口。
十、更多操作
更多 Server 实战内容,请看,Server 个人专栏
本文属于 Server 企业级实战系列,持续更新 服务端开发、接口开发、数据库实战、服务器部署、性能调优、高并发解决方案等干货,欢迎关注我的 CSDN 专栏
👉
如果本文对你有帮助,欢迎点赞、收藏、评论,你的支持是我持续输出实战干货的动力!
