Rust+Slint 实现温度计源码分享
- 一、效果展示
- 二、源码分享
- 三、实现原理
-
- 1、整体架构
- [2、 核心数据模型与绑定](#2、 核心数据模型与绑定)
- [3、 温度计可视化实现](#3、 温度计可视化实现)
-
- [3.1、 刻度系统](#3.1、 刻度系统)
- [3.2、 温度计管体与填充](#3.2、 温度计管体与填充)
- [3.3、 底部圆球与高光](#3.3、 底部圆球与高光)
- 4、交互控制实现
-
- [4.1、 滑块控制](#4.1、 滑块控制)
- [4.2 、预设按钮](#4.2 、预设按钮)
- [4.3、 加减按钮与范围限制](#4.3、 加减按钮与范围限制)
- 5、数据流与响应式更新
- 6、工程构建要点
-
- [6.1、 模块包含](#6.1、 模块包含)
- [6.2、 构建脚本](#6.2、 构建脚本)
- [7、 设计模式总结](#7、 设计模式总结)
一、效果展示
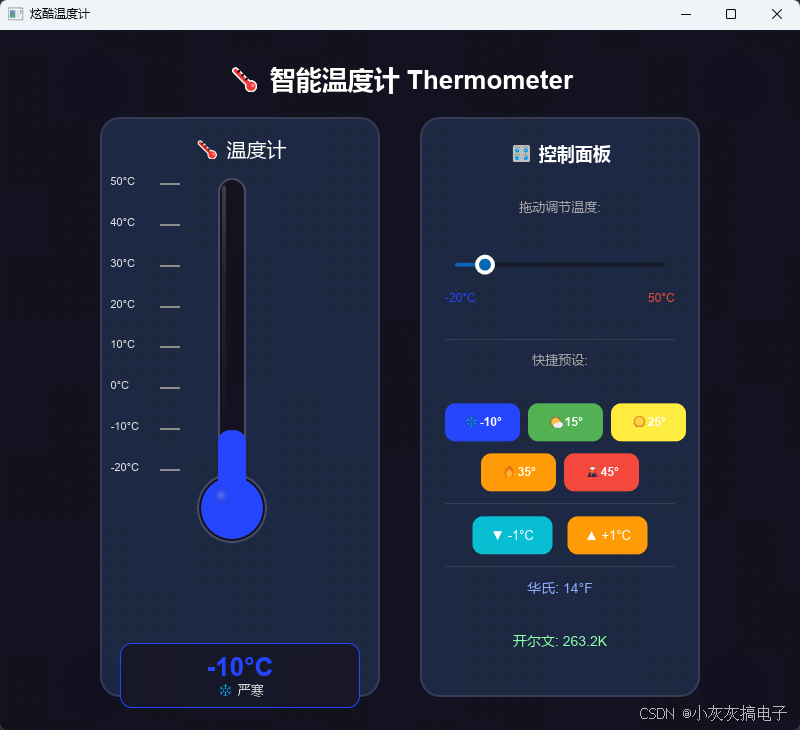
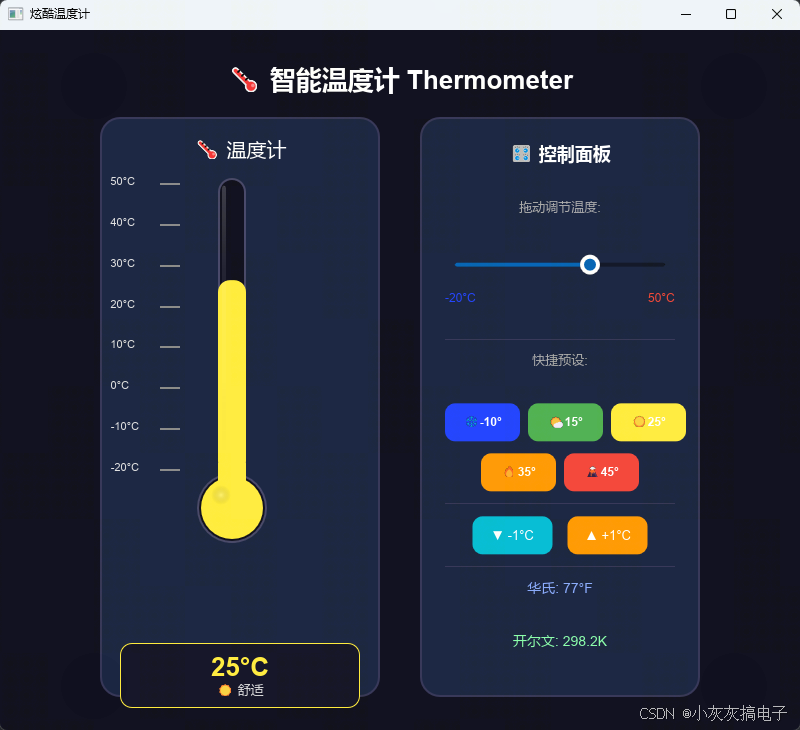
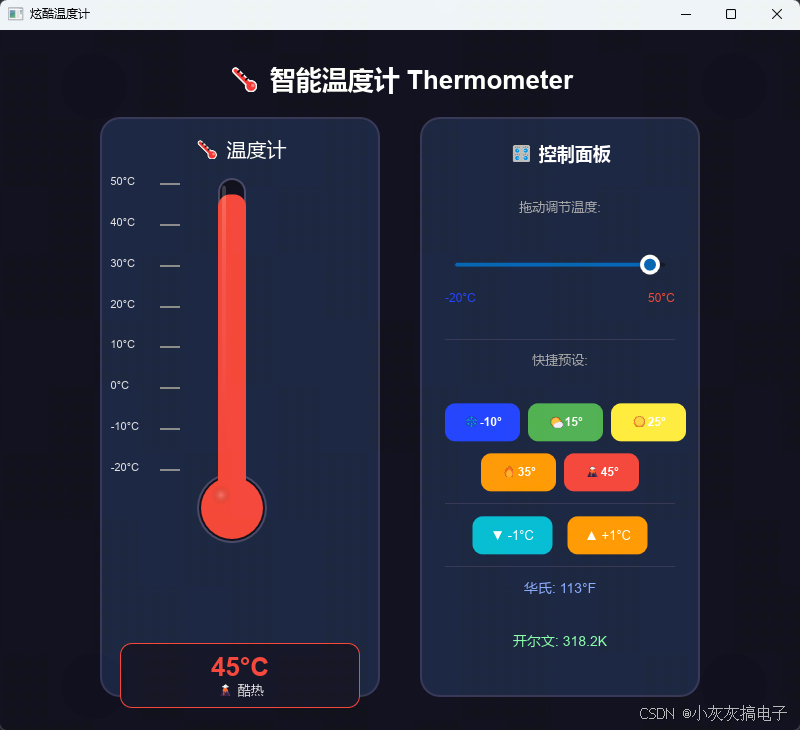
二、源码分享
1、工程结构
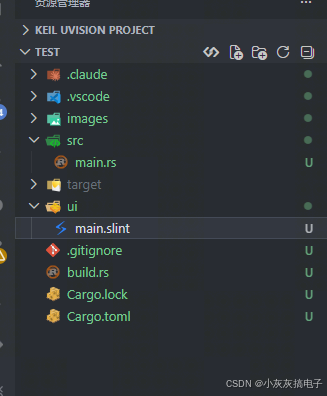
2、main.rs
rust
slint::include_modules!();

fn main() -> Result<(), slint::PlatformError> {
    let main_window = MainWindow::new()?;
    main_window.run()
}3、build.rs
rust
fn main() {
    // 编译 Slint UI
    slint_build::compile("ui/main.slint").unwrap();
}
4、main.slint
rust
import { Slider } from "std-widgets.slint";
// 刻度数据结构
struct ScaleMark {
value: int,
ypos: float,
}
// 预设按钮数据结构
struct PresetBtn {
label: string,
temp: float,
clr: color,
}
// 主窗口
export component MainWindow inherits Window {
preferred-width: 800px;
preferred-height: 700px;
title: "炫酷温度计";
background: #0a0a1a;
// 温度状态
property <float> temperature: -10;
// 计算进度比例 (0~1)
pure function progress(t: float) -> float {
clamp((t - (-20)) / (50 - (-20)), 0, 0.98)
}
// 温度对应的颜色
property <color> fill-color:
temperature < 0 ? #1e40ff :
temperature < 10 ? #00bcd4 :
temperature < 20 ? #4caf50 :
temperature < 30 ? #ffeb3b :
temperature < 40 ? #ff9800 : #f44336;
// 刻度数据
property <[ScaleMark]> marks: [
{value: 50, ypos: 0},
{value: 40, ypos: 0.143},
{value: 30, ypos: 0.286},
{value: 20, ypos: 0.429},
{value: 10, ypos: 0.571},
{value: 0, ypos: 0.714},
{value: -10, ypos: 0.857},
{value: -20, ypos: 1.0}
];
// 预设按钮数据
property <[PresetBtn]> presets: [
{label: "❄️-10°", temp: -10, clr: #1e40ff},
{label: "🌤️15°", temp: 15, clr: #4caf50},
{label: "☀️25°", temp: 25, clr: #ffeb3b},
{label: "🔥35°", temp: 35, clr: #ff9800},
{label: "🌋45°", temp: 45, clr: #f44336}
];
VerticalLayout {
alignment: center;
spacing: 20px;
padding: 30px;
// 标题
Text {
text: "🌡️ 智能温度计 Thermometer";
font-size: 26px;
font-weight: 700;
color: white;
horizontal-alignment: center;
}
// 主内容区
HorizontalLayout {
spacing: 40px;
alignment: center;
// === 左侧温度计 ===
Rectangle {
width: 280px;
height: 580px;
background: #16213e;
border-radius: 20px;
border-width: 2px;
border-color: #333355;
VerticalLayout {
alignment: space-around;
padding: 20px;
Text {
text: "🌡️ 温度计";
font-size: 20px;
color: white;
horizontal-alignment: center;
}
HorizontalLayout {
height: parent.height - 100px;
padding-top: 20px;
// 温度计主体区域 --- 使用绝对定位确保刻度与管体对齐
Rectangle {
height: 370px;
// 刻度区域(绝对定位)
Rectangle {
x: 10px;
y: 0px;
width: 55px;
height: 370px;
background: transparent;
// 主刻度 (8个)
for mark[idx] in root.marks: Rectangle {
y: 286px * mark.ypos;
height: 2px;
width: 20px;
x: 30px;
background: #888;
Text {
text: mark.value + "°C";
font-size: 11px;
color: #e0e0e0;
x: -50px;
y: -8px;
horizontal-alignment: right;
}
}
}
// 温度计管体 + 圆球(绝对定位)
Rectangle {
x: 77px;
// y: 0px;
width: 70px;
height: 430px;
// 管体外壳(窄管)
Rectangle {
x: 21px;
y: 25px;
width: 28px;
height: 365px;
background: #0a0a1a;
border-radius: 14px;
border-width: 2px;
border-color: #444466;
// 温度填充(管内液体)
Rectangle {
property <length> tube-fill-h: 300px * root.progress(root.temperature);
y: 295px - tube-fill-h;
height: tube-fill-h;
background: root.fill-color;
border-radius: 12px;
}
// 玻璃反光 --- 细竖条,在管子左侧
Rectangle {
x: 4px;
y: 8px;
width: 4px;
height: 274px;
background: @linear-gradient(
180deg,
#ffffff30 0%,
#ffffff15 30%,
#ffffff08 70%,
transparent 100%
);
border-radius: 2px;
}
}
// 底部圆球(温度计 bulb)--- 大圆球
Rectangle {
x: 0px;
y: 320px;
width: 70px;
height: 70px;
background: #0a0a1a;
border-radius: 35px;
border-width: 2px;
border-color: #444466;
// 圆球内液体填充
Rectangle {
x: 4px;
y: 4px;
width: 62px;
height: 62px;
background: root.fill-color;
border-radius: 31px;
}
// 圆球高光
Rectangle {
x: 14px;
y: 12px;
width: 20px;
height: 20px;
background: @radial-gradient(circle, #ffffff40 0%, transparent 70%);
border-radius: 10px;
}
}
// 管体与圆球连接处的遮盖(去掉接缝)
Rectangle {
x: 21px;
y: 310px;
width: 28px;
height: 20px;
background: root.fill-color;
}
}
}
}
// 底部温度数字显示
Rectangle {
height: 65px;
background: #0f0f23;
border-radius: 12px;
border-width: 1px;
border-color: root.fill-color;
VerticalLayout {
alignment: center;
Text {
text: round(root.temperature * 10) / 10 + "°C";
font-size: 26px;
font-weight: 700;
color: root.fill-color;
horizontal-alignment: center;
}
Text {
text:
root.temperature < 0 ? "❄️ 严寒" :
root.temperature < 10 ? "🥶 寒冷" :
root.temperature < 20 ? "🌤️ 凉爽" :
root.temperature < 30 ? "☀️ 舒适" :
root.temperature < 40 ? "🔥 炎热" : "🌋 酷热";
font-size: 13px;
color: #e0e0e0;
horizontal-alignment: center;
}
}
}
}
}
// === 右侧控制面板 ===
Rectangle {
width: 280px;
height: 580px;
background: #16213e;
border-radius: 20px;
border-width: 2px;
border-color: #333355;
VerticalLayout {
padding: 25px;
spacing: 12px;
Text {
text: "🎛️ 控制面板";
font-size: 18px;
font-weight: 600;
color: white;
horizontal-alignment: center;
}
Text {
text: "拖动调节温度:";
font-size: 13px;
color: #aaa;
horizontal-alignment: center;
}
// 温度滑块
Slider {
height: 28px;
minimum: -20;
maximum: 50;
value <=> root.temperature;
}
// 滑块范围标签
HorizontalLayout {
spacing: 10px;
Text { text: "-20°C"; font-size: 12px; color: #1e40ff; }
Rectangle { }
Text { text: "50°C"; font-size: 12px; color: #f44336; }
}
Rectangle { height: 1px; background: #333355; }
Text {
text: "快捷预设:";
font-size: 13px;
color: #aaa;
horizontal-alignment: center;
}
// 预设按钮第一行 (3个)
HorizontalLayout {
spacing: 8px;
alignment: center;
Rectangle {
width: 75px;
height: 38px;
background: #1e40ff;
border-radius: 10px;
Text {
text: "❄️-10°";
font-size: 12px;
font-weight: 600;
color: white;
horizontal-alignment: center;
vertical-alignment: center;
}
TouchArea {
clicked => { root.temperature = -10; }
}
}
Rectangle {
width: 75px;
height: 38px;
background: #4caf50;
border-radius: 10px;
Text {
text: "🌤️15°";
font-size: 12px;
font-weight: 600;
color: white;
horizontal-alignment: center;
vertical-alignment: center;
}
TouchArea {
clicked => { root.temperature = 15; }
}
}
Rectangle {
width: 75px;
height: 38px;
background: #ffeb3b;
border-radius: 10px;
Text {
text: "☀️25°";
font-size: 12px;
font-weight: 600;
color: white;
horizontal-alignment: center;
vertical-alignment: center;
}
TouchArea {
clicked => { root.temperature = 25; }
}
}
}
// 预设按钮第二行 (2个)
HorizontalLayout {
spacing: 8px;
alignment: center;
Rectangle {
width: 75px;
height: 38px;
background: #ff9800;
border-radius: 10px;
Text {
text: "🔥35°";
font-size: 12px;
font-weight: 600;
color: white;
horizontal-alignment: center;
vertical-alignment: center;
}
TouchArea {
clicked => { root.temperature = 35; }
}
}
Rectangle {
width: 75px;
height: 38px;
background: #f44336;
border-radius: 10px;
Text {
text: "🌋45°";
font-size: 12px;
font-weight: 600;
color: white;
horizontal-alignment: center;
vertical-alignment: center;
}
TouchArea {
clicked => { root.temperature = 45; }
}
}
}
Rectangle { height: 1px; background: #333355; }
// 加减温度按钮
HorizontalLayout {
spacing: 15px;
alignment: center;
Rectangle {
width: 80px;
height: 38px;
background: #00bcd4;
border-radius: 10px;
Text {
text: "▼ -1°C";
font-size: 13px;
color: white;
horizontal-alignment: center;
vertical-alignment: center;
}
TouchArea {
clicked => {
root.temperature = max(-20, root.temperature - 1);
}
}
}
Rectangle {
width: 80px;
height: 38px;
background: #ff9800;
border-radius: 10px;
Text {
text: "▲ +1°C";
font-size: 13px;
color: white;
horizontal-alignment: center;
vertical-alignment: center;
}
TouchArea {
clicked => {
root.temperature = min(50, root.temperature + 1);
}
}
}
}
Rectangle { height: 1px; background: #333355; }
// 华氏温度
Text {
text: "华氏: " + round((root.temperature * 9 / 5 + 32) * 10) / 10 + "°F";
font-size: 14px;
color: #88aaff;
horizontal-alignment: center;
}
// 开尔文温度
Text {
text: "开尔文: " + round((root.temperature + 273.15) * 10) / 10 + "K";
font-size: 14px;
color: #88ffaa;
horizontal-alignment: center;
}
}
}
}
}
}5、Cargo.toml
rust
[package]
name = "sokoban"
version = "0.1.0"
edition = "2024"

[dependencies]
slint = "1.16.1"

[build-dependencies]
slint-build = "1.16.1
三、实现原理
本温度计应用基于 Rust + Slint 技术栈构建,采用声明式 UI 与数据绑定机制,实现了美观的视觉效果与流畅的交互。下面从架构分层、数据流、UI 组件三个层面解析其实现原理。
1、整体架构
应用采用典型的前后端一体化架构,但所有逻辑均在前端(Slint UI)中通过声明式代码完成:
编译流程 (由 build.rs 驱动):
build.rs调用slint_build::compile("ui/main.slint"),将.slint文件编译为 Rust 代码。- Cargo 编译生成的 Rust 代码与
main.rs链接,生成最终可执行文件。
2、 核心数据模型与绑定
在 main.slint 中,我们定义了以下核心数据属性:
rust
// 温度值(核心状态)
property <float> temperature: -10;

// 根据温度计算进度条比例 (0~1)
pure function progress(t: float) -> float {
    clamp((t - (-20)) / (50 - (-20)), 0, 0.98)
}

// 温度对应的颜色(动态计算)
property <color> fill-color:
    temperature < 0 ? #1e40ff :
    temperature < 10 ? #00bcd4 :
    temperature < 20 ? #4caf50 :
    temperature < 30 ? #ffeb3b :
temperature < 40 ? #ff9800 : #f44336;关键机制:
- 属性绑定 :
temperature是核心状态,UI 中多处通过root.temperature或<=>双向绑定与之关联。 - 纯函数 :
progress()是一个纯函数,根据温度计算填充高度比例,确保 UI 与数据同步。 - 条件颜色 :
fill-color属性根据温度范围返回不同颜色,实现温度计液柱与底部圆球的动态着色。
3、 温度计可视化实现
温度计主体由多个矩形层叠构成,采用绝对定位实现精确布局:
3.1、 刻度系统
rust
struct ScaleMark {
    value: int,
    ypos: float,
}
property <[ScaleMark]> marks: [ ... ];- 刻度数据预计算了 8 个主要温度值(-20°C 到 50°C)及其对应的垂直位置(
ypos)。 - 通过
for mark[idx] in root.marks: Rectangle { ... }循环渲染刻度线与数值标签。
3.2、 温度计管体与填充
rust
// 温度填充(管内液体)
Rectangle {
    property <length> tube-fill-h: 300px * root.progress(root.temperature);
    y: 295px - tube-fill-h;
    height: tube-fill-h;
    background: root.fill-color;
    border-radius: 12px;
}- 动态高度 :
tube-fill-h根据progress()函数计算,温度越高填充越高。 - 动态颜色 :
background绑定到root.fill-color,随温度变化。 - 定位技巧 :通过
y: 295px - tube-fill-h实现从底部向上填充的效果。
3.3、 底部圆球与高光
- 圆球使用两个同心矩形实现:外层边框、内层填充色。
- 高光通过径向渐变
@radial-gradient模拟玻璃反光效果。 - 连接处用与填充色相同的矩形遮盖,消除管体与圆球的接缝。
4、交互控制实现
4.1、 滑块控制
rust
Slider {
    height: 28px;
    minimum: -20;
    maximum: 50;
    value <=> root.temperature;  // 双向绑定
}- 双向绑定 :
value <=> root.temperature使滑块值与温度属性实时同步。 - 用户拖动滑块时,
temperature自动更新,触发所有相关 UI 重绘。
4.2 、预设按钮
rust
Rectangle {
    // ... 样式定义
    TouchArea {
        clicked => { root.temperature = -10; }
    }
}- 每个预设按钮内嵌
TouchArea,点击时直接将temperature设为对应值。 - 按钮背景色与温度颜色系统保持一致,提供视觉一致性。
4.3、 加减按钮与范围限制
rust
// 减温度按钮
TouchArea {
    clicked => {
        root.temperature = max(-20, root.temperature - 1);
    }
}
// 加温度按钮
TouchArea {
    clicked => {
        root.temperature = min(50, root.temperature + 1);
    }
}- 使用
max()和min()函数确保温度始终在 -20, 50 的合理范围内。
5、数据流与响应式更新
本应用的数据流是典型的 单向数据流 + 响应式更新:
- 状态变更 :用户通过滑块、预设按钮或加减按钮修改
temperature。 - 属性重算 :
progress()函数重新计算填充比例fill-color根据新温度重新求值- 华氏/开尔文温度显示文本自动更新
- UI 重绘 :
- 温度计填充高度与颜色更新
- 底部数字显示更新
- 温度描述文本更新("严寒"/"寒冷"/...)
- 视觉反馈:所有变化在下一帧立即呈现,无延迟。
6、工程构建要点
6.1、 模块包含
main.rs 极其简洁:
rust
slint::include_modules!();  // 包含由 build.rs 生成的 Rust 代码

fn main() -> Result<(), slint::PlatformError> {
    let main_window = MainWindow::new()?;
    main_window.run()
}slint::include_modules!()宏在编译时展开,将.slint文件编译后的 Rust 结构体引入当前作用域。
6.2、 构建脚本
build.rs 确保 Slint UI 文件被正确编译:
rust
fn main() {
    // 编译 Slint UI
    slint_build::compile("ui/main.slint").unwrap();
}- 在 Cargo 构建过程中,此脚本先于
main.rs编译执行。 - 生成的 Rust 代码位于
target/目录,被主程序引用。
7、 设计模式总结
- 声明式 UI :所有界面元素在
.slint中声明,无需手动操作 DOM。 - 数据驱动:UI 是数据的函数,状态变更自动触发界面更新。
- 组件化:温度计、控制面板等被封装为可复用的视觉单元。
- 响应式绑定 :通过
property、<=>、=>建立数据与 UI 的关联。 - 纯函数计算 :
progress()等纯函数确保相同输入总是得到相同输出,便于测试与维护。
这种架构使得应用逻辑清晰、易于扩展。如需添加新功能(如温度历史曲线、主题切换),只需在现有数据模型和 UI 组件基础上进行增量开发。

图:实现原理架构图 - 展示了组件分层、事件流和数据绑定关系
、事件流和数据绑定关系*