文章目录
MooseFS分布式存储
MooseFS 是一个开源的分布式文件系统,它可以把多台普通服务器的存储空间整合成一个统一的存储资源池,以解决海量数据存储、高可靠性和易扩展性等问题。
可以把它想象成一个由软件定义的大型虚拟存储磁盘。从用户角度看,它就像一个普通的本地文件夹或磁盘,但在底层,数据是分散存储在多个物理服务器上的。
它的核心架构由四个部分组成
- 管理服务器 (Master Server):负责"大脑"工作,管理整个文件系统的目录树、文件属性和数据位置等元数据。它会将元数据保存在内存中以实现高性能响应。
- 数据服务器 (Chunk Servers):负责实际存储用户的数据文件。文件会被切分成小块(Chunk),并按照设定的策略(如副本数)分布存储在多台数据服务器上,以此实现数据冗余和高可用。
- 元数据备份服务器 (Metalogger Server):作为管理服务器的元数据"备份",它会不断地从管理服务器同步元数据变更日志。当管理服务器发生故障时,可以依靠它来恢复元数据。
- 客户端 (Client):用户通过客户端挂载 MooseFS 文件系统。它基于 FUSE(用户态文件系统)技术,让应用程序可以像访问本地文件一样访问 MooseFS 存储。
部署MooseFS
四台主机,server1部署master,server2、server3部署chunk,server4部署client
首先四台主机都执行
bash
curl "https://repository.moosefs.com/RPM-GPG-KEY-MooseFS" > /etc/pki/rpm-gpg/RPM-GPG-KEY-MooseFS

curl "http://repository.moosefs.com/MooseFS-4-el9.repo" > /etc/yum.repos.d/MooseFS.repo
分别部署
bash
yum install moosefs-master moosefs-cgi moosefs-cgiserv moosefs-cli  # For Master Servers
yum install moosefs-chunkserver                                     # For Chunkservers
yum install moosefs-client                                          # For Clients
都添加解析
bash
vim /etc/hosts
192.168.117.161 server1 mfsmaster
master
bash
[root@server1 ~]# systemctl enable --now moosefs-master
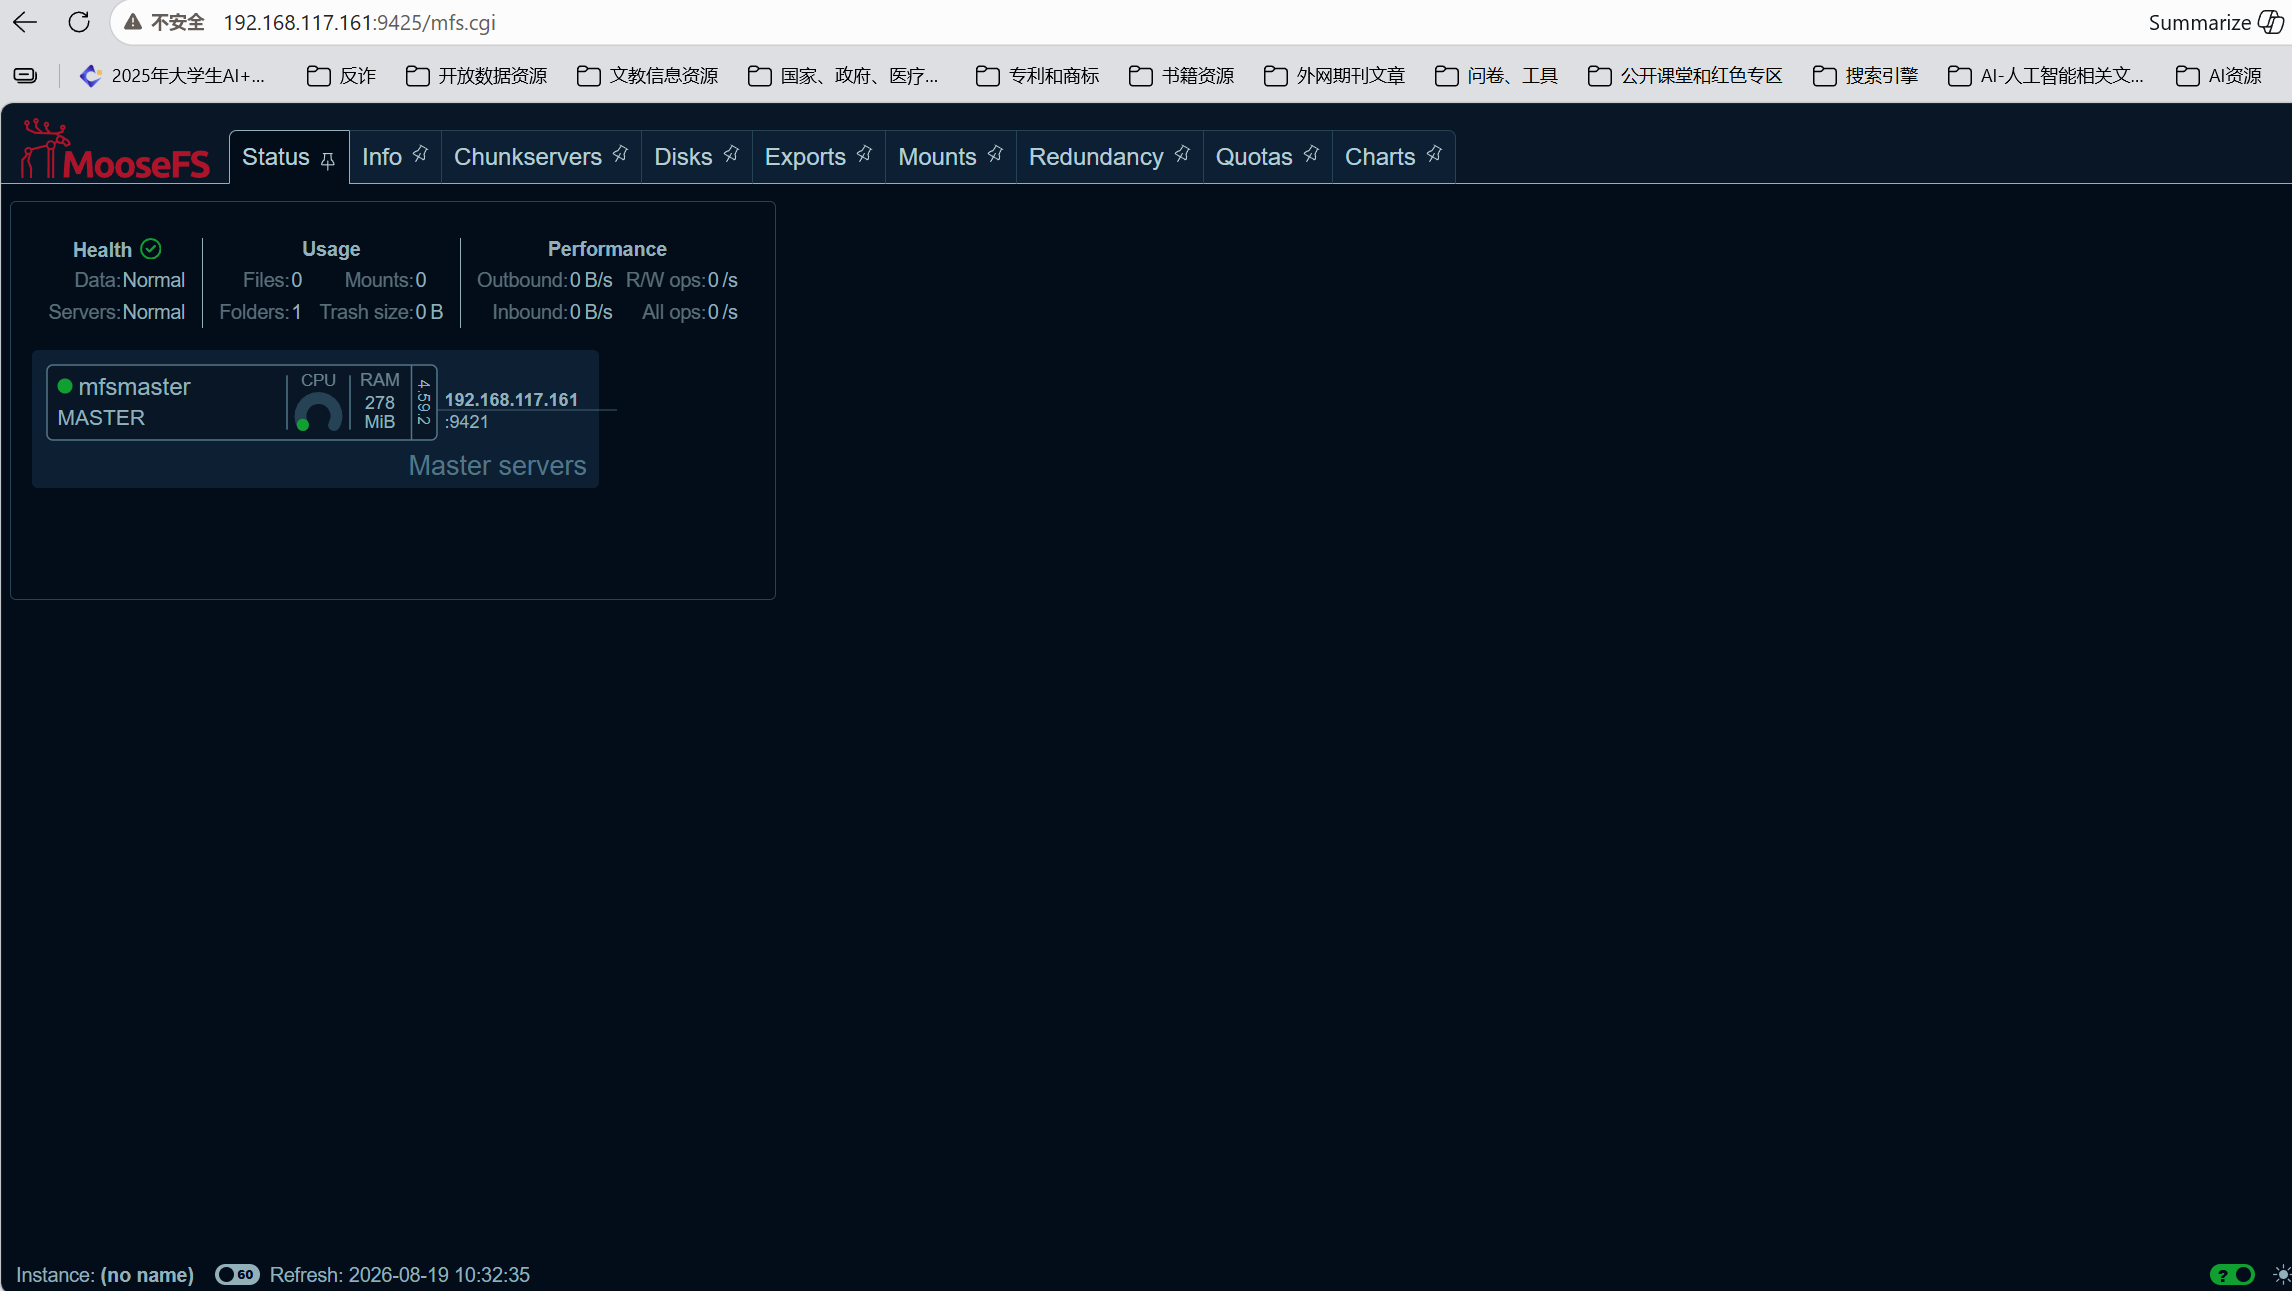
[root@server1 ~]# systemctl enable --now moosefs-gui访问:192.168.117.161:9425即可看到
chunk
bash
[root@server2 ~]# vim /etc/mfs/mfshdd.cfg
/mnt/ssd01
[root@server2 ~]# mkdir /mnt/ssd01
#添加硬盘后分区
[root@server2 ~]# fdisk /dev/nvme0n2

Welcome to fdisk (util-linux 2.37.4).
Changes will remain in memory only, until you decide to write them.
Be careful before using the write command.

Device does not contain a recognized partition table.
Created a new DOS disklabel with disk identifier 0xdd559a56.

Command (m for help): n
Partition type
   p   primary (0 primary, 0 extended, 4 free)
   e   extended (container for logical partitions)
Select (default p): p
Partition number (1-4, default 1): 1
First sector (2048-41943039, default 2048):
Last sector, +/-sectors or +/-size{K,M,G,T,P} (2048-41943039, default 41943039):

Created a new partition 1 of type 'Linux' and of size 20 GiB.

Command (m for help): p
Disk /dev/nvme0n2: 20 GiB, 21474836480 bytes, 41943040 sectors
Disk model: VMware Virtual NVMe Disk
Units: sectors of 1 * 512 = 512 bytes
Sector size (logical/physical): 512 bytes / 512 bytes
I/O size (minimum/optimal): 512 bytes / 512 bytes
Disklabel type: dos
Disk identifier: 0xdd559a56

Device         Boot Start      End  Sectors Size Id Type
/dev/nvme0n2p1       2048 41943039 41940992  20G 83 Linux

Command (m for help): w
The partition table has been altered.
Calling ioctl() to re-read partition table.
Syncing disks.
#格式化
[root@server2 ~]# mkfs.xfs /dev/nvme0n2p1
#查看UUID
[root@server2 ~]# blkid
/dev/mapper/rl-swap: UUID="6e8c8a2f-a1f3-4b51-bae8-a835011f4c12" TYPE="swap"
/dev/nvme0n1p1: UUID="c45fcf00-5311-4f39-ada1-d0ab054a06e0" TYPE="xfs" PARTUUID="f42118cd-01"
/dev/nvme0n1p2: UUID="fSnNwp-2elH-LqoJ-YBJc-PfEk-fb43-cIrkGt" TYPE="LVM2_member" PARTUUID="f42118cd-02"
/dev/sr0: UUID="2025-05-26-20-19-37-00" LABEL="Rocky-9-6-x86_64-dvd" TYPE="iso9660" PTUUID="4cca338e" PTTYPE="dos"
/dev/nvme0n2p1: UUID="4c254e16-f2e0-4d92-80f9-054afc78d308" TYPE="xfs" PARTUUID="727599be-01"
/dev/mapper/rl-root: UUID="e2f7fa1d-291e-48c1-bf27-91933009381c" TYPE="xfs"
#挂载
[root@server2 ~]# vim /etc/fstab
UUID="9a03a1ae-6764-430e-987d-33a8d10b839f"     /mnt/ssd01      xfs     defaults
        0 0
[root@server2 ~]# systemctl daemon-reload
[root@server2 ~]# mount -a
#查看
[root@server2 ~]# df
Filesystem          1K-blocks    Used Available Use% Mounted on
devtmpfs                 4096       0      4096   0% /dev
tmpfs                  988660       0    988660   0% /dev/shm
tmpfs                  395464    5688    389776   2% /run
/dev/mapper/rl-root  49201152 1778736  47422416   4% /
/dev/nvme0n1p1         983040  211056    771984  22% /boot
tmpfs                  197732       0    197732   0% /run/user/0
/dev/nvme0n2p1       20904960  178804  20726156   1% /mnt/ssd01
#修改权限
[root@server2 ~]# chown mfs.mfs /mnt/ssd01/
#启动
[root@server2 ~]# systemctl enable --now moosefs-chunkserver
Created symlink /etc/systemd/system/multi-user.target.wants/moosefs-chunkserver.service → /usr/lib/systemd/system/moosefs-chunkserver.service.
client
bash
[root@server4 ~]# cd /etc/mfs/
[root@server4 mfs]# vim mfsmount.cfg
/mnt/mfs
[root@server4 mfs]# mkdir /mnt/mfs
[root@server4 mfs]# mfsmount
mfsmaster accepted connection with parameters: read-write,restricted_ip,admin ; root mapped to root:root ; sclass groups allowed: ALL

[root@server4 mfs]# df
...
mfs#mfsmaster:9421   41809920  882240  40927680   3% /mnt/mfs
测试
bash
[root@server4 mfs]# cd /mnt/mfs/
[root@server4 mfs]# mkdir dir1
[root@server4 mfs]# mkdir dir2
#查看所有可用存储类别
[root@server4 mfs]# mfslistsclass
2CP
3CP
EC4+1
EC8+1
#查询目录当前存储类别
[root@server4 mfs]# mfssclass get dir1/
dir1/: 2CP
#修改方法
[root@server4 mfs]# mfssclass set 2CP -r dir1/

[root@server4 mfs]# cd dir1
[root@server4 dir1]# cp /etc/passwd .
[root@server4 dir1]# ls
passwd
#查看 MooseFS 文件底层块副本信息
[root@server4 dir1]# mfsfileinfo passwd
passwd:
        chunk 0: 0000000000000002_00000001 / (id:2 ver:1) ; mtime:1787119508 (2026-08-19 02:05:08)
                copy 1: 192.168.117.162:9422 ; status:VALID
                copy 2: 192.168.117.163:9422 ; status:VALID
#创建存储类
[root@server4 dir1]# mfsscadmin create -K 1* hot_1cp
storage class make hot_1cp: ok
#递归给目录应用存储类
[root@server4 dir1]# mfssclass set hot_1cp -r .
.:
 inodes with storage class changed:              2
 inodes with storage class not changed:          0
 inodes with permission denied:                  0
#查看存储类
[root@server4 dir1]# mfssclass get passwd
passwd: hot_1cp
[root@server4 dir1]# mfssclass get .
.: hot_1cp
#校验文件副本
[root@server4 dir1]# mfscheckfile passwd
passwd:
1 full copy (redundancy level: 0):          1


#在目录里新建的文件,自动继承父目录的存储类策略
[root@server4 dir1]# cd ..
[root@server4 mfs]# cd dir2
[root@server4 dir2]# mfssclass get .
.: 2CP
[root@server4 dir2]# cp /etc/fstab .
[root@server4 dir2]# mfsfileinfo fstab
fstab:
        chunk 0: 0000000000000003_00000001 / (id:3 ver:1) ; mtime:1787133481 (2026-08-19 05:58:01)
                copy 1: 192.168.117.162:9422 ; status:VALID
                copy 2: 192.168.117.163:9422 ; status:VALID
添加标签
bash
#MFS数据块
[root@server2 ~]# cd /mnt/ssd01
[root@server2 ssd01]# ls
00  0D  1A  27  34  41  4E  5B  68  75  82  8F  9C  A9  B6  C3  D0  DD  EA  F7
01  0E  1B  28  35  42  4F  5C  69  76  83  90  9D  AA  B7  C4  D1  DE  EB  F8
02  0F  1C  29  36  43  50  5D  6A  77  84  91  9E  AB  B8  C5  D2  DF  EC  F9
03  10  1D  2A  37  44  51  5E  6B  78  85  92  9F  AC  B9  C6  D3  E0  ED  FA
04  11  1E  2B  38  45  52  5F  6C  79  86  93  A0  AD  BA  C7  D4  E1  EE  FB
05  12  1F  2C  39  46  53  60  6D  7A  87  94  A1  AE  BB  C8  D5  E2  EF  FC
06  13  20  2D  3A  47  54  61  6E  7B  88  95  A2  AF  BC  C9  D6  E3  F0  FD
07  14  21  2E  3B  48  55  62  6F  7C  89  96  A3  B0  BD  CA  D7  E4  F1  FE
08  15  22  2F  3C  49  56  63  70  7D  8A  97  A4  B1  BE  CB  D8  E5  F2  FF
09  16  23  30  3D  4A  57  64  71  7E  8B  98  A5  B2  BF  CC  D9  E6  F3
0A  17  24  31  3E  4B  58  65  72  7F  8C  99  A6  B3  C0  CD  DA  E7  F4
0B  18  25  32  3F  4C  59  66  73  80  8D  9A  A7  B4  C1  CE  DB  E8  F5
0C  19  26  33  40  4D  5A  67  74  81  8E  9B  A8  B5  C2  CF  DC  E9  F6
[root@server2 ssd01]# ls | wc -l
256
[root@server2 ssd01]# cd
#给这个存储节点打标签 A
[root@server2 ~]# vim /etc/mfs/mfschunkserver.cfg
LABELS = A
[root@server2 ~]# systemctl reload moosefs-chunkserver
同样方法给server3打标签 B
bash
#数据永久保存在打了标签 A 的 chunkserver 节点上
[root@server4 mfs]# mfsscadmin create -K A 1CP_A
storage class make 1CP_A: ok
#递归给dir1目录设置该存储类
[root@server4 mfs]# mfssclass set -r 1CP_A dir1/
dir1/:
 inodes with storage class changed:              2
 inodes with storage class not changed:          0
 inodes with permission denied:                  0
新增一台chunk
server5没有新加硬盘
bash
[root@server5 ~]# vim /etc/hosts
192.168.117.161 server1 mfsmaster
[root@server5 ~]# curl "https://repository.moosefs.com/RPM-GPG-KEY-MooseFS" > /etc/pki/rpm-gpg/RPM-GPG-KEY-MooseFS
[root@server5 ~]# curl "http://repository.moosefs.com/MooseFS-4-el9.repo" > /etc/yum.repos.d/MooseFS.repo
[root@server5 ~]# yum install moosefs-chunkserver
[root@server5 ~]# mkdir /mnt/hdd01
[root@server5 ~]# chown mfs.mfs /mnt/hdd01/
[root@server5 ~]# vim /etc/mfs/mfshdd.cfg
/mnt/hdd01
[root@server5 ~]# systemctl enable --now moosefs-chunkserver
Created symlink /etc/systemd/system/multi-user.target.wants/moosefs-chunkserver.service → /usr/lib/systemd/system/moosefs-chunkserver.service.
[root@server5 ~]# vim /etc/mfs/mfschunkserver.cfg
LABELS = C
[root@server5 ~]# systemctl reload moosefs-chunkserver
指定副本放在带有标签的机器里
bash
[root@server4 dir2]# mfsscadmin create -K A,C 2CP_AC .
storage class make 2CP_AC: ok
storage class make .: ok
[root@server4 dir2]# mfssclass set -r 2CP_AC .
.:
 inodes with storage class changed:              2
 inodes with storage class not changed:          0
 inodes with permission denied:                  0
[root@server4 dir2]# mfsfileinfo fstab
fstab:
        chunk 0: 0000000000000004_00000001 / (id:4 ver:1) ; mtime:1787141175 (2026-08-19 08:06:15)
                copy 1: 192.168.117.162:9422 ; status:VALID
                copy 2: 192.168.117.165:9422 ; status:VALID

#dir3目录内的文件拷贝3份
[root@server4 dir2]# cd ..
[root@server4 mfs]# mkdir dir3
[root@server4 mfs]# mfsgetsclass dir3
dir3: 2CP
[root@server4 mfs]# mfssclass set -r 3CP dir3/
dir3/:
 inodes with storage class changed:              1
 inodes with storage class not changed:          0
 inodes with permission denied:                  0
[root@server4 mfs]# cp /etc/hosts dir3/
[root@server4 mfs]# cd dir3
[root@server4 dir3]# mfsfileinfo hosts
hosts:
        chunk 0: 0000000000000005_00000001 / (id:5 ver:1) ; mtime:1787141458 (2026-08-19 08:10:58)
                copy 1: 192.168.117.162:9422 ; status:VALID
                copy 2: 192.168.117.163:9422 ; status:VALID
                copy 3: 192.168.117.165:9422 ; status:VALID
添加多个标签
bash
[root@server2 ~]# vim /etc/mfs/mfschunkserver.cfg
LABELS = A,S
[root@server2 ~]# systemctl reload moosefs-chunkserver


[root@server3 ~]# vim /etc/mfs/mfschunkserver.cfg
LABELS = B,S
[root@server3 ~]# systemctl reload moosefs-chunkserver


[root@server5 ~]# vim /etc/mfs/mfschunkserver.cfg
LABELS = C,H
[root@server5 ~]# systemctl reload moosefs-chunkserver
创建存储类:2CP_SH,-K S,H →2个副本,分别存到标签S、标签H的ChunkServer节点
bash
[root@server4 dir3]# mfscreatesclass -K S,H 2CP_SH
storage class make 2CP_SH: ok
[root@server4 dir3]# cd ..
[root@server4 mfs]# ls
dir1  dir2  dir3
[root@server4 mfs]# mfsfileinfo dir2/fstab
dir2/fstab:
        chunk 0: 0000000000000004_00000001 / (id:4 ver:1) ; mtime:1787141175 (2026-08-19 08:06:15)
                copy 1: 192.168.117.162:9422 ; status:VALID
                copy 2: 192.168.117.165:9422 ; status:VALID
[root@server4 mfs]# mfssetsclass -r 2CP_SH dir2/
dir2/:
 inodes with storage class changed:              2
 inodes with storage class not changed:          0
 inodes with permission denied:                  0
[root@server4 mfs]# mfsfileinfo dir2/fstab
dir2/fstab:
        chunk 0: 0000000000000004_00000001 / (id:4 ver:1) ; mtime:1787141175 (2026-08-19 08:06:15)
                copy 1: 192.168.117.162:9422 ; status:VALID
                copy 2: 192.168.117.165:9422 ; status:VALID
[root@server4 mfs]# cd dir2/
[root@server4 dir2]# cp /etc/hostname .
[root@server4 dir2]# mfsfileinfo hostname
hostname:
        chunk 0: 0000000000000006_00000001 / (id:6 ver:1) ; mtime:1787142168 (2026-08-19 08:22:48)
                copy 1: 192.168.117.163:9422 ; status:VALID
                copy 2: 192.168.117.165:9422 ; status:VALID
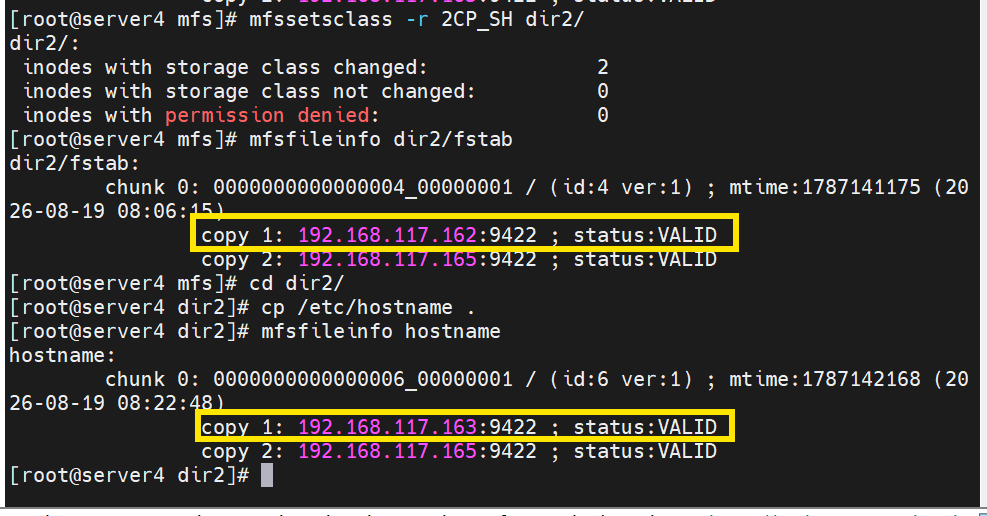
会出现以下现象是因为162与163都是S标签所属机器,它的内部会有自均衡,自动分配储藏机器
恢复文件
bash
[root@server4 dir2]# cd /mnt/mfs/dir1
[root@server4 dir1]# rm -f passwd
[root@server4 dir1]# ls
[root@server4 dir1]# cd /mnt/
[root@server4 mnt]# mkdir meta
[root@server4 mnt]# mfsmount -m /mnt/meta/
mfsmaster accepted connection with parameters: read-write,restricted_ip ; sclass groups allowed: ALL
[root@server4 mnt]# cd meta/trash/
[root@server4 trash]# find -name *passwd*
./005/00000005|dir1|passwd
[root@server4 trash]# mv ./005/00000005\|dir1\|passwd undel/
[root@server4 trash]# cd /mnt/mfs/dir1/
[root@server4 dir1]# ls
passwd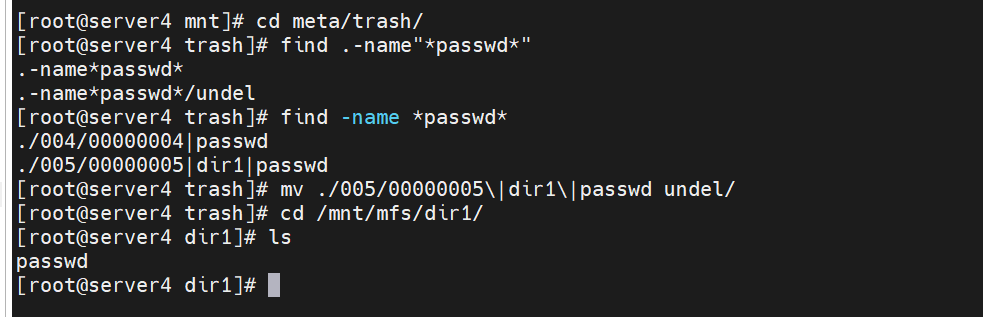
数据迁移
bash
[root@server4 ~]# cd /mnt/mfs/
[root@server4 mfs]# ls
dir1  dir2  dir3
[root@server4 mfs]# mfscreatesclass -K A,B 2CP_AB
storage class make 2CP_AB: ok
[root@server4 mfs]# mfssetsclass -r 2CP_AB dir2/
dir2/:
 inodes with storage class changed:              3
 inodes with storage class not changed:          0
 inodes with permission denied:                  0
[root@server4 mfs]# mfssetsclass -r 2CP_AB dir3/
dir3/:
 inodes with storage class changed:              2
 inodes with storage class not changed:          0
 inodes with permission denied:                  0
[root@server4 mfs]# mfsfileinfo dir2/hostname
dir2/hostname:
        chunk 0: 0000000000000006_00000001 / (id:6 ver:1) ; mtime:1787142168 (2026-08-19 08:22:48)
                copy 1: 192.168.117.162:9422 ; status:VALID
                copy 2: 192.168.117.163:9422 ; status:VALID
[root@server4 mfs]# mfsfileinfo dir2/fstab
dir2/fstab:
        chunk 0: 0000000000000004_00000001 / (id:4 ver:1) ; mtime:1787141175 (2026-08-19 08:06:15)
                copy 1: 192.168.117.162:9422 ; status:VALID
                copy 2: 192.168.117.163:9422 ; status:VALID
下线一台chunk留作pacemaker备机
bash
[root@server5 ~]# systemctl disable --now moosefs-chunkserver
Removed "/etc/systemd/system/multi-user.target.wants/moosefs-chunkserver.service".
添加pacemaker高可用
前提准备
停止服务,pacemaker(pcs 集群)接管 moosefs‑master,就不能让 systemd 自己开机启动它,防止两套机制同时管理同一个服务,发生冲突
bash
[root@server1 ~]# systemctl disable --now moosefs-master
Removed "/etc/systemd/system/multi-user.target.wants/moosefs-master.service".

[root@server2 ~]# systemctl disable --now moosefs-chunkserver
Removed "/etc/systemd/system/multi-user.target.wants/moosefs-chunkserver.service".

[root@server3 ~]# systemctl disable --now moosefs-chunkserver
Removed "/etc/systemd/system/multi-user.target.wants/moosefs-chunkserver.service".
取消挂载,前面是手动挂载 MFS 客户端;现在要做集群实验,要还原干净环境。 如果不卸载,旧的手动挂载还在,会干扰后续测试、漂移实验
bash
[root@server4 mfs]# cd
[root@server4 ~]# umount /mnt/mfs
下载软件
bash
[root@server1 ~]# cd /etc/yum.repos.d/
[root@server1 yum.repos.d]# vim rocky-addons.repo
[root@server1 yum.repos.d]# yum install -y pacemaker corosync pcs fence-agents
[root@server1 yum.repos.d]# cd
[root@server1 ~]# systemctl enable --now pcsd
server5同样操作
开启集群
bash
[root@server1 ~]# ssh-keygen
[root@server1 ~]# ssh-copy-id server5
[root@server1 ~]# echo westos | passwd --stdin hacluster
[root@server1 ~]# ssh server5 'echo westos | passwd --stdin hacluster'
[root@server1 ~]# timedatectl	#时间同步要配好
[root@server1 ~]# pcs host auth server1 server5 -u hacluster -p westos
[root@server1 ~]# pcs cluster setup mycluster server1 server5
[root@server1 ~]# cat /etc/hosts	#解析做好
[root@server1 ~]# pcs cluster start --all
[root@server1 ~]# pcs cluster enable --all
[root@server1 ~]# pcs property set no-quorum-policy=ignore	#两台节点都忽略
[root@server1 ~]# pcs property set stonith-enabled=false	#两台节点都禁止
#添加VIP资源
[root@server1 ~]# pcs resource create VIP ocf:heartbeat:IPaddr2 ip=192.168.117.200 cidr_netmask=24 op monitor interval=30s
[root@server1 ~]# pcs status	#运行状态正常
[root@server1 ~]# ip a	#可以看到VIP了
[root@server1 ~]# vim /etc/hosts	#所有机器都修改解析
127.0.0.1   localhost localhost.localdomain localhost4 localhost4.localdomain4
::1         localhost localhost.localdomain localhost6 localhost6.localdomain6
192.168.117.161 server1
192.168.117.162 server2
192.168.117.163 server3
192.168.117.164 server4
192.168.117.165 server5
192.168.117.200 mfsmaster
[root@server1 ~]# yum install -y iscsi-initiator-utils	#另一个节点也下载
iSCSI磁盘共享
agent上添加一块硬盘,把这块硬盘,通过网络共享出来,做成网络磁盘,给 server1、server5 两台 MFS 主节点共用,MooseFS master 的元数据就存这块共享盘上,实现故障漂移
bash
[root@server4 ~]# yum install -y targetcli
[root@server4 ~]# systemctl enable --now target
[root@server4 ~]# targetcli
/> /backstores/block create my_disk /dev/nvme0n2
/> /iscsi create iqn.2026-08.com.example:mfsdata
/> /iscsi/iqn.2026-08.com.example:mfsdata/tpg1/luns create /backstores/block/my_disk
/> /iscsi/iqn.2026-08.com.example:mfsdata/tpg1/acls create iqn.2026-08.com.example:client
/> exit
iSCSI 存储挂载,给 Pacemaker 集群用共享盘
bash
[root@server1 ~]# cd /etc/iscsi/
[root@server1 iscsi]# vim initiatorname.iscsi
InitiatorName=iqn.2026-08.com.example:client
[root@server1 iscsi]# scp initiatorname.iscsi server5:/etc/iscsi/
[root@server1 iscsi]# iscsiadm -m discovery -t st -p 192.168.117.164
iscsiadm: Cannot perform discovery. Invalid Initiatorname.
iscsiadm: Could not perform SendTargets discovery: invalid parameter	#出现这种错误时重启一下服务就好了,另一个节点也是同样操作

[root@server1 iscsi]# systemctl restart iscsid
[root@server1 iscsi]# iscsiadm -m discovery -t st -p 192.168.117.164
192.168.117.164:3260,1 iqn.2026-08.com.example:mfsdata
数据迁移
给 MooseFS(MFS)主节点 ,把 MFS 元数据目录迁移到 iSCSI 共享磁盘/dev/sda1
bash
#登录接入这个target存储
[root@server1 iscsi]# iscsiadm -m node -l	#同一时间只允许一个节点真正登录
#查看识别到的磁盘
[root@server1 iscsi]# lsblk
NAME        MAJ:MIN RM  SIZE RO TYPE MOUNTPOINTS
sda           8:0    0   20G  0 disk
...

[root@server1 iscsi]# cd
[root@server1 ~]# fdisk /dev/sda
Command (m for help): n
Select (default p): p
Command (m for help): w
[root@server1 ~]# mkfs.xfs /dev/sda1

#临时挂载共享盘到临时目录/mnt,用来拷贝旧元数据
[root@server1 ~]# mount /dev/sda1 /mnt/
[root@server1 ~]# df
...
/dev/sda1            20904960  178804  20726156   1% /mnt

#修改挂载目录属主为mfs用户、mfs组。MooseFS‑master 进程运行身份是 mfs,权限不对启动会报错
[root@server1 ~]# chown mfs.mfs /mnt/

#进入 MFS 默认本地元数据目录,这里存放 MFS 最重要的元数据文件
[root@server1 ~]# cd /var/lib/mfs/
[root@server1 mfs]# ll
...
-rw-r----- 1 mfs mfs    4418 Aug 20 11:00 metadata.mfs.back.1

#元数据迁移,把元数据从本地磁盘搬到共享存储
[root@server1 mfs]# cp -p * /mnt/

#确认共享盘目录权限已经是 mfs:mfs
[root@server1 mfs]# cd /mnt/
[root@server1 mnt]# ll -d .
drwxr-xr-x 2 mfs mfs 4096 Aug 20 15:53 .

#卸载临时挂载点/mnt
[root@server1 mnt]# cd
[root@server1 ~]# umount /mnt

#把 iSCSI 共享磁盘直接挂载到 MFS 的数据目录/var/lib/mfs
[root@server1 ~]# mount /dev/sda1 /var/lib/mfs/
[root@server1 ~]# df
...
/dev/sda1            20904960  187860  20717100   1% /var/lib/mfs

#启动 MFS 主服务,此时 master 读取的是 iSCSI 盘上的元数据
[root@server1 ~]# systemctl start moosefs-master.service

#查看共享盘上生成更新后的元数据文件,MFS 运行会改写 metadata
[root@server1 ~]# cd /var/lib/mfs/
[root@server1 mfs]# ll
...
-rw-r----- 1 mfs mfs    4730 Aug 20 11:18 metadata.mfs.back

#停止 mfs‑master 服务,高可用集群中,业务不能手动启停,交给 Pacemaker 资源管理
[root@server1 mfs]# systemctl stop moosefs-master.service
[root@server1 ~]# systemctl is-enabled moosefs-master.service
disabled

#卸载文件系统
[root@server1 mfs]# cd
[root@server1 ~]# umount /var/lib/mfs

#登出iSCSI target,释放磁盘所有权
[root@server1 ~]# iscsiadm -m node -u
在备节点 server5 做 MooseFS Master 环境验证
bash
[root@server5 ~]# yum install -y moosefs-master moosefs-cli moosefs-gui
[root@server5 ~]# iscsiadm -m node -l
[root@server5 ~]# mount /dev/sda1 /var/lib/mfs/
[root@server5 ~]# df
...
/dev/sda1            20904960  187868  20717092   1% /var/lib/mfs
[root@server5 ~]# systemctl start moosefs-master.service
[root@server5 ~]# systemctl stop moosefs-master.service
[root@server5 ~]# systemctl is-enabled moosefs-master.service
disabled
[root@server5 ~]# umount /var/lib/mfs
[root@server5 ~]# iscsiadm -m node -u
创建资源
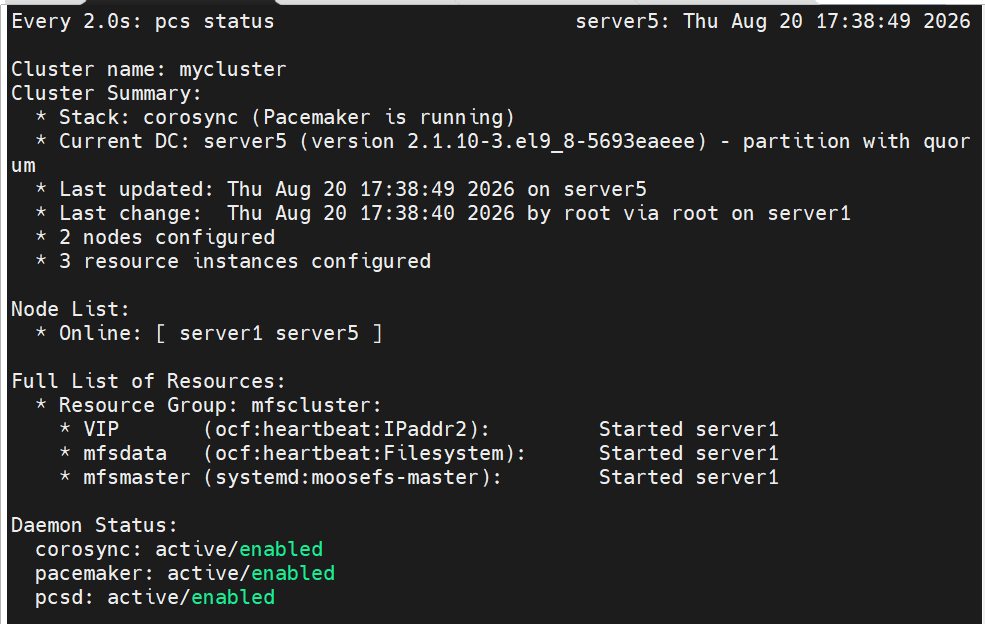
iSCSI 共享盘已经连通,在 Pacemaker 集群里面创建 3 个高可用资源,放到同一个资源组mfscluster,实现 MooseFS‑Master 故障自动漂移。
资源启动顺序:VIP(虚拟IP) → mfsdata(共享磁盘挂载) → mfsmaster(Master服务),全部跑在同一台节点;节点故障全部飘到另一台。
bash
[root@server1 ~]# iscsiadm -m node -l
Login to [iface: default, target: iqn.2026-08.com.example:mfsdata, portal: 192.168.117.164,3260] successful.
[root@server1 ~]# iscsiadm -m session
tcp: [3] 192.168.117.164:3260,1 iqn.2026-08.com.example:mfsdata (non-flash)
[root@server1 ~]# ls /dev/sda1
/dev/sda1
[root@server1 ~]# pcs resource create mfsdata ocf:heartbeat:Filesystem device=/dev/sda1 directory=/var/lib/mfs fstype=xfs op monitor interval=1min
[root@server1 ~]# pcs resource create mfsmaster systemd:moosefs-master op monitor interval=30s
[root@server1 ~]# pcs resource group add mfscluster VIP mfsdata mfsmaster
验证
查看集群状态,如果没有漂移到同一节点,执行pcs resource cleanup VIP清除旧数据,就成功啦
启动chunk节点
bash
[root@server2 ~]# systemctl start moosefs-chunkserver.service
[root@server3 ~]# systemctl start moosefs-chunkserver.service
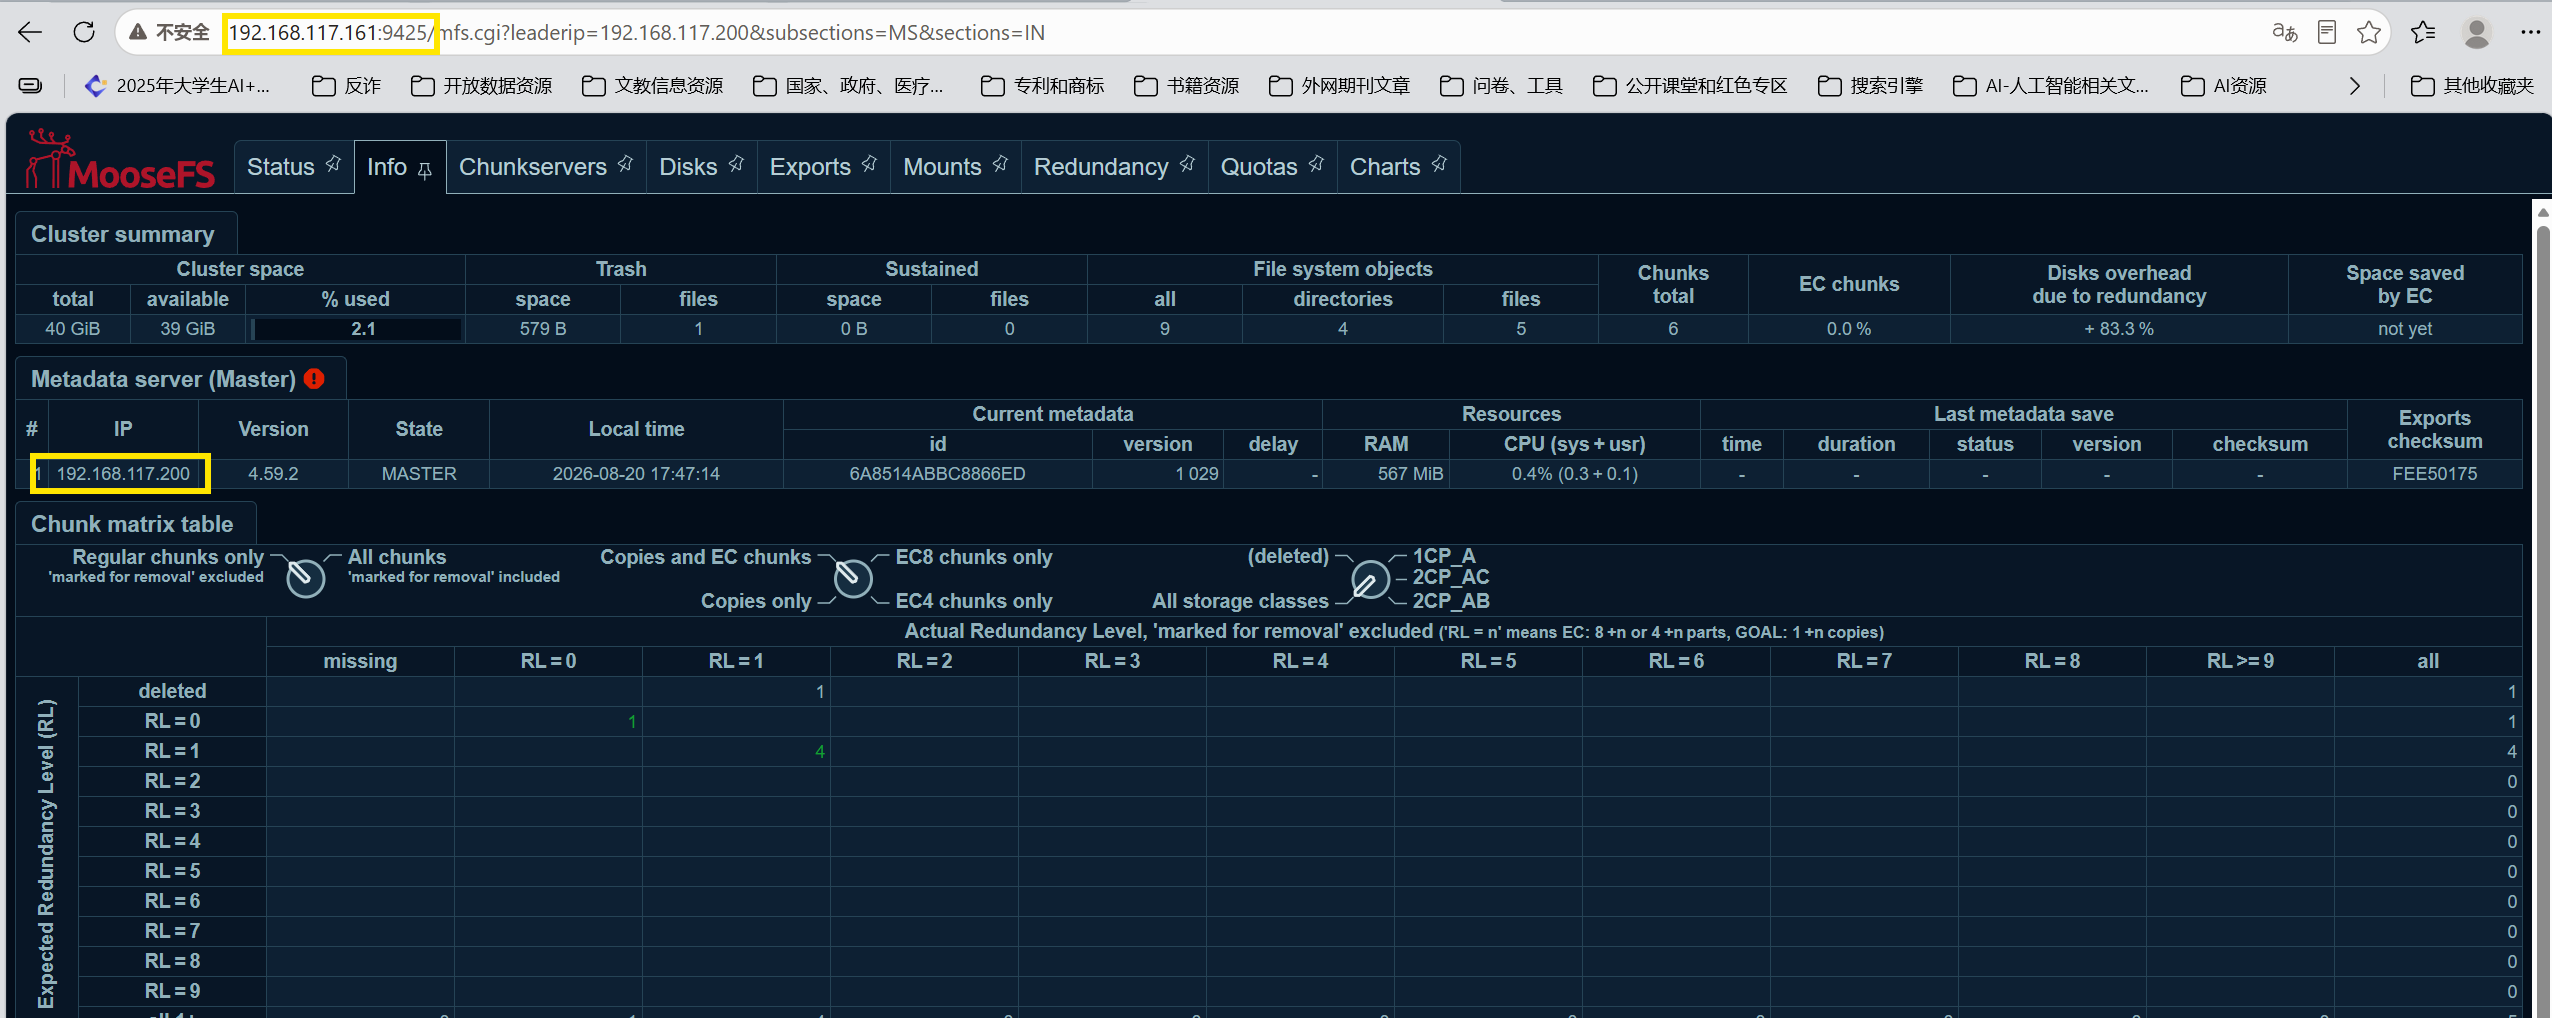
查看网址也是以VIP登录的
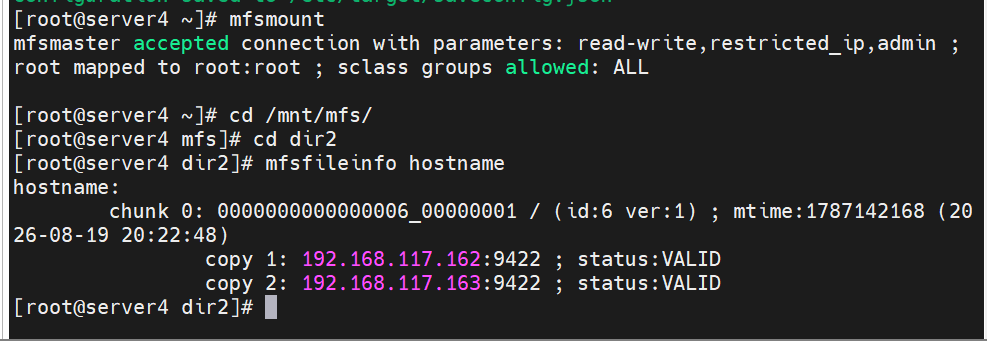
挂载agent查看数据
bash
[root@server4 ~]# mfsmount
[root@server4 ~]# cd /mnt/mfs/
[root@server4 mfs]# cd dir2
[root@server4 dir2]# mfsfileinfo hostname
可以看到我们的元数据完好
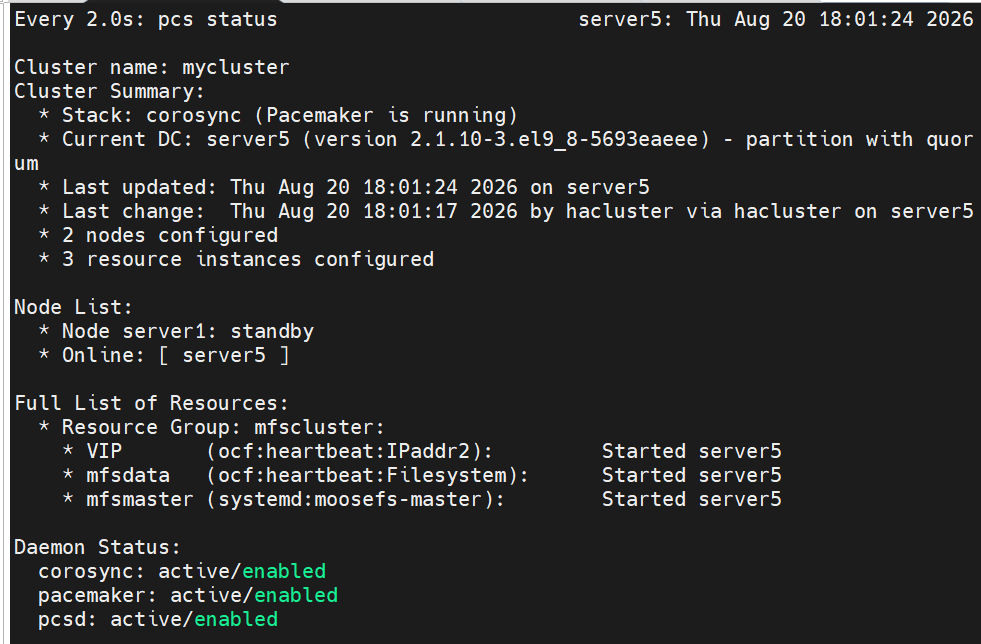
测试故障漂移
bash
[root@server1 ~]# pcs node standby
[root@server1 ~]# pcs resource cleanup VIP
自动漂移到另一个节点
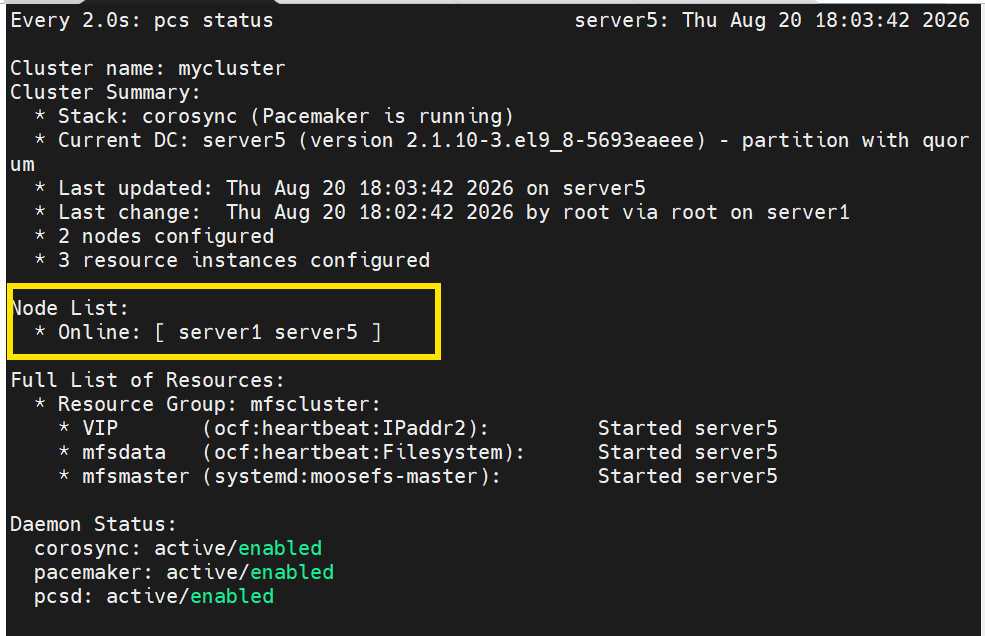
恢复节点
bash
[root@server1 ~]# pcs node unstandby节点加入集群,但没有自动漂移
关机时,要先将集群停掉,不然可能会造成元数据的损坏
bash
[root@server1 ~]# pcs cluster stop --all
[root@server1 ~]# poweroff