《SpringBoot 3:入门与应用实战》第 6 章 Spring Boot 最佳实践 阅读笔记 10
Spring Boot 的强大特性为开发项目提供了有力的保障,第 5 章中的内容仅仅是小试牛刀。了解和掌握足够多的 Spring Boot 特性,有助于更灵活、更高效地开发项目,提升工作效率。本章内容会覆盖足够多的 Spring Boot 最佳实践场景。
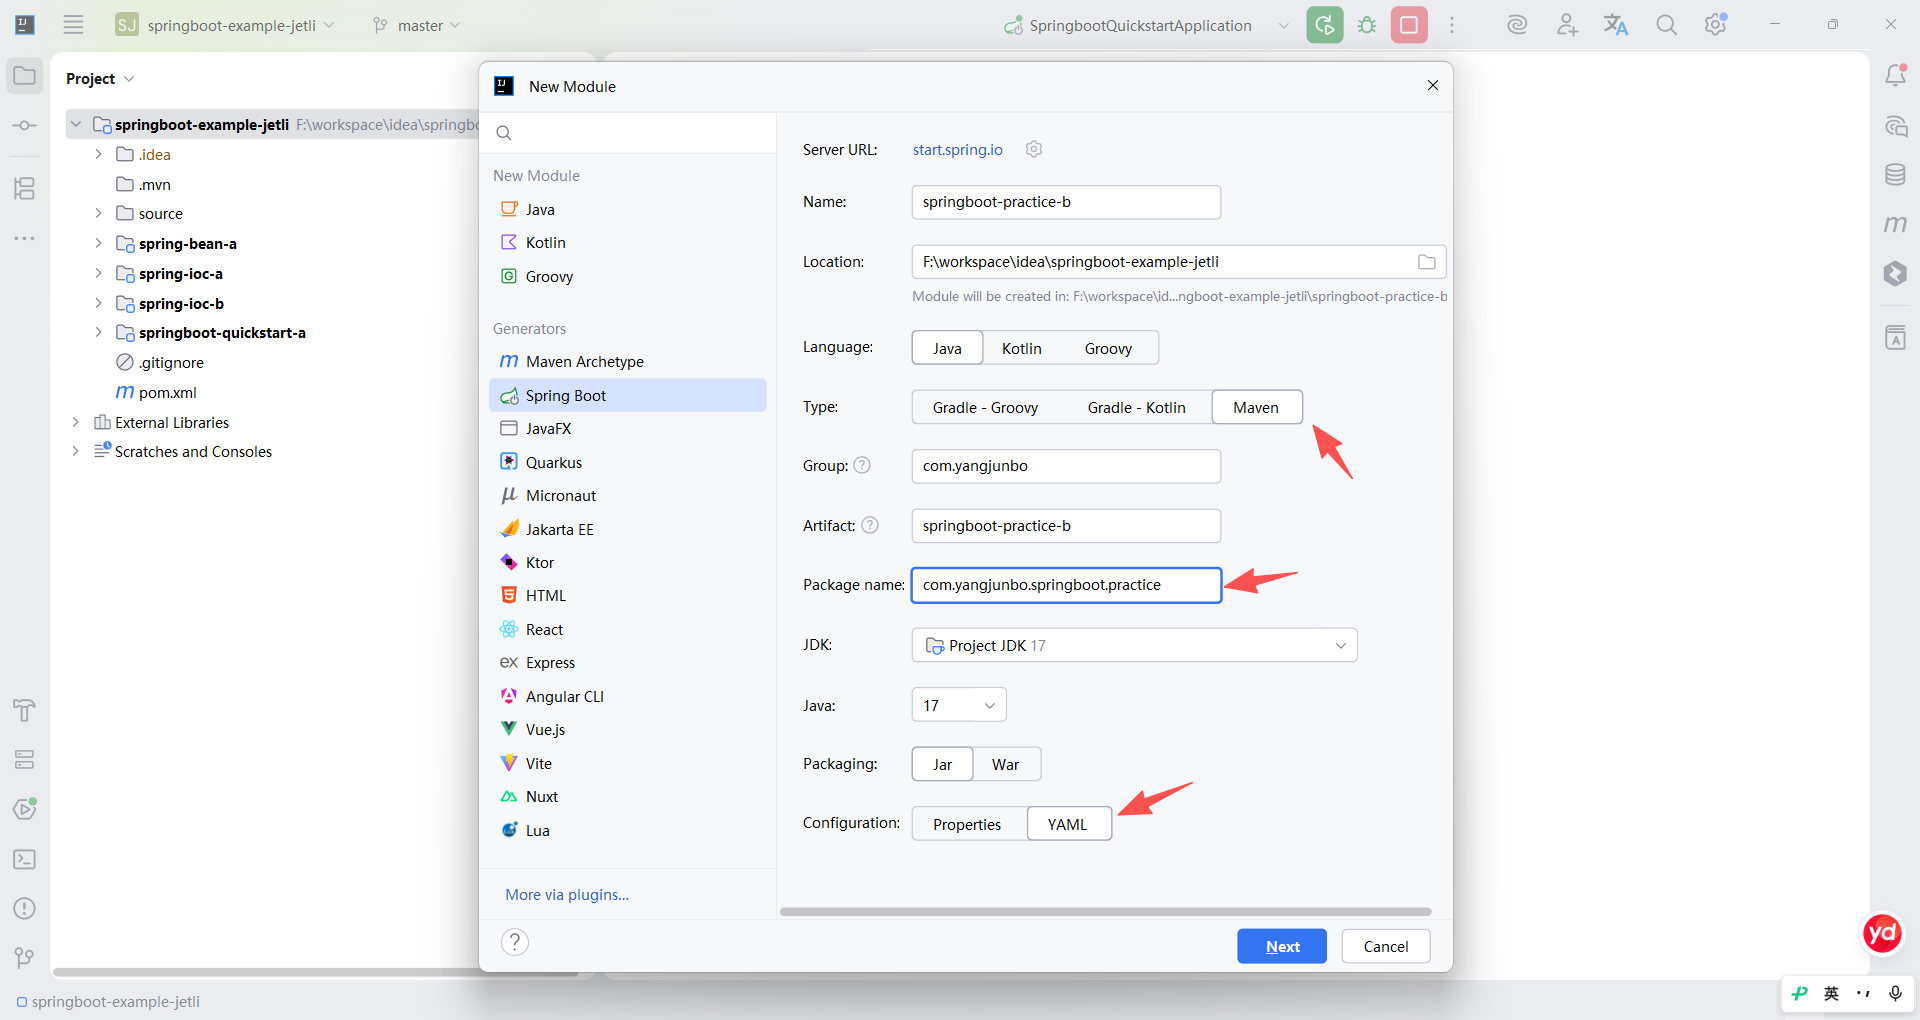
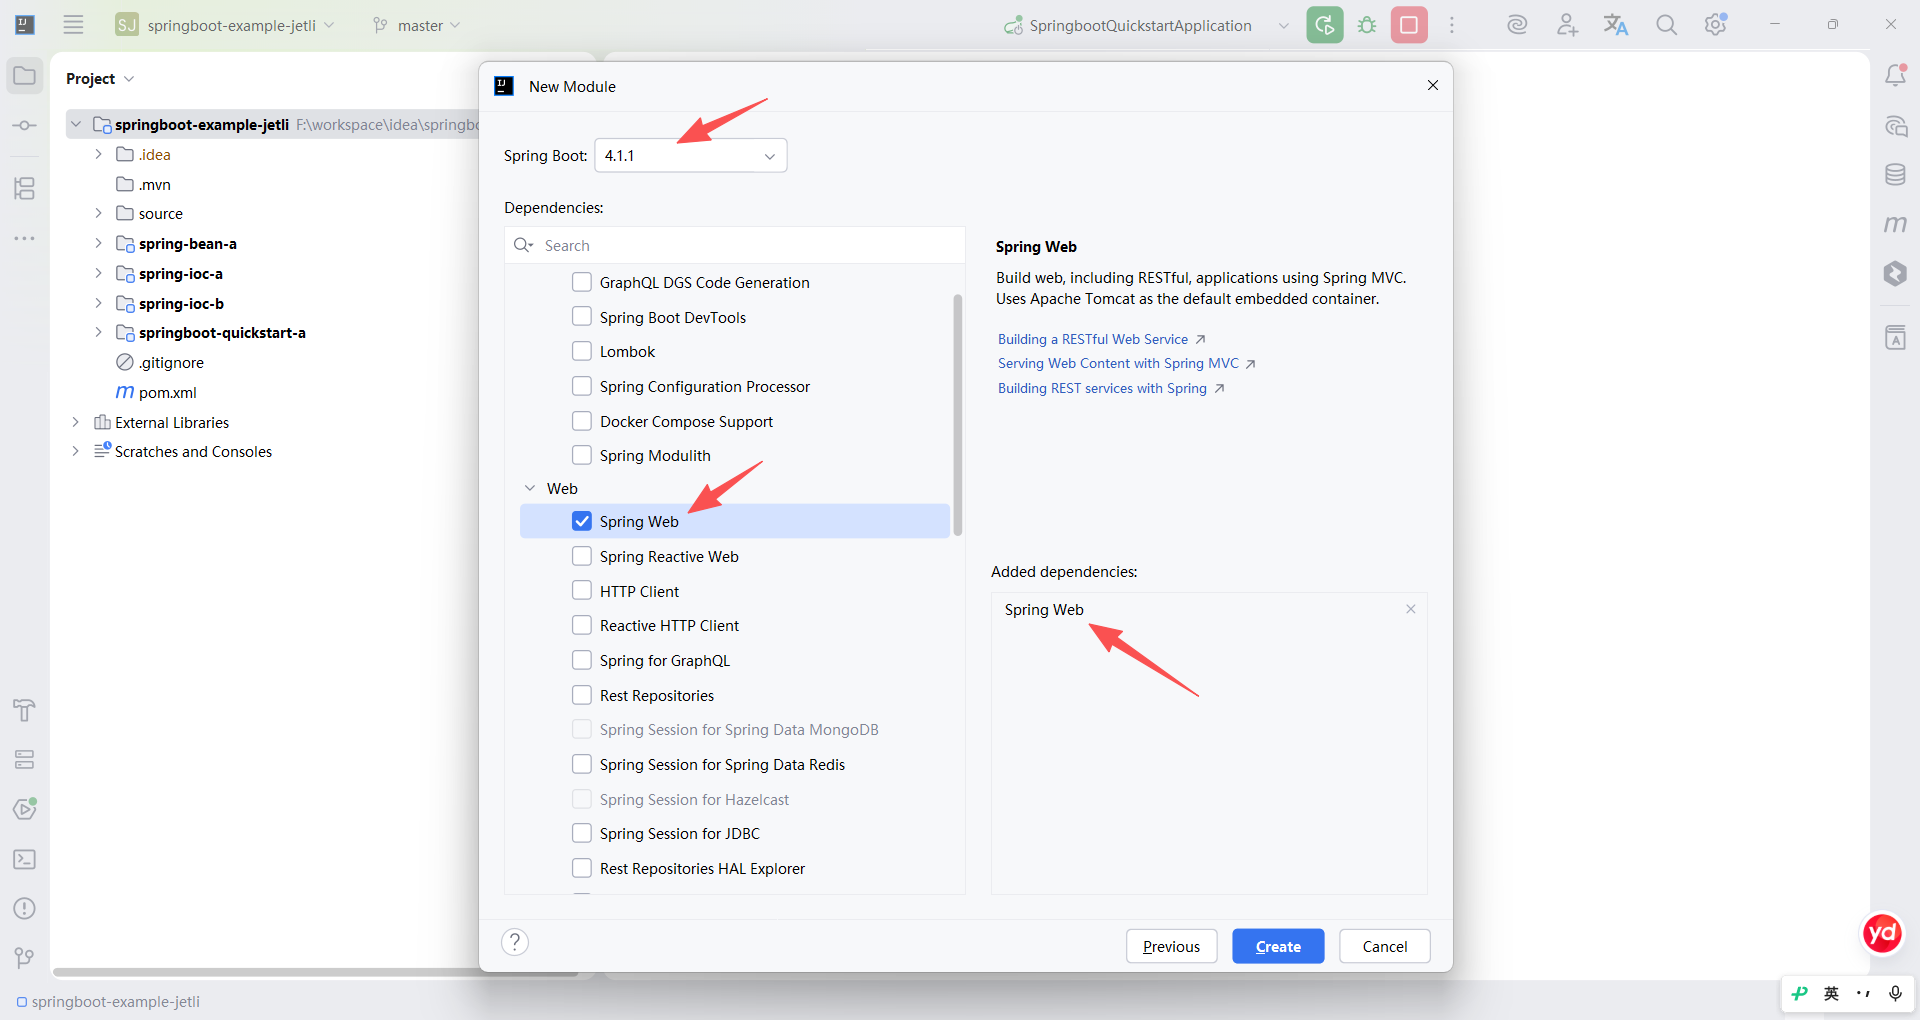
6.1 属性配置
Spring Boot 支持的属性配置文件除了第 5 章中使用的 application.properties 之外,还有第 4 章中讲到的 YML 格式,并且 Spring Boot 推荐我们使用 YML 格式作为主配置文件。
6.1.1 YML 格式语法
YML 格式可以理解为 properties 格式的替代格式,由于 YML 格式的层级特性,使得它非常适合承载配置文件,并且占用的空间更小。
YML 格式的语法很简单,只需要遵循以下的基本原则。
- YML 的配置内容仍然是 key-value 格式,基本的写法为 key: value(注意冒号和 value 之间有一个空格)。
- YML 格式对字母大小写敏感( abc 和 ABC 是两个不同的属性)。
- 由于 YML 格式有层级的概念,表达不同的层级时需要用空格缩进的方式(只能用空格,不允许用制表符)。
- 使用空格缩进时,对于每一个层级缩进的空格数量没有限制,但必须保证同层级下的空格数量保持一致。
- YML 语法同样使用 # 作为注释符。
- YML 配置的属性值可以用单引号/双引号包裹,含义不同。
1.key-value 格式
透过现象看本质,YML 是另一种表达键值对的格式,所以它仍然使用 key-value 的格式表达,需要重点关注的是,key 后面的冒号与 value 之间必须间隔一个空格。
yaml
key: value
name: zhangsan
NAME: lisi
2.字母大小写敏感和松散的语法
YML 格式对字母大小写敏感,name 与 NAME 是两个不同的属性,如果使用 YML 解析器解析配置信息,则最终会提取出 3 个配置属性。
3.层级关系
YML 格式可以表达层级关系。server 作为配置项的一段单独成行,代表它属于一个层级;下面的 port 和 servlet 都使用两个空格作为缩进,它们代表同一个层级;servlet 下面的 encoding 和 charset 分别为再往下的层级。
yaml
server:
  port: 8080
  servlet:
    encoding:
      charset: UTF-8
另外对于 YML 中的层级,不强制要求使用 2 个空格或者 4 个空格缩进,只要保证同层级下的配置项都使用同样多的空格缩进即可,可以看到即便 spring.application.name 与 spring.cache.type 的缩进层级不同,但 spring.application 和 spring.cache 位于同一层级,这样编写的 YML 就没有问题。
yaml
spring:
    application:
       name: halow
    cache:
      type: simple
    aop:
     auto: on
     proxy-target-class: true
4.复杂类型编写
YML 配置文件可以像Spring Framework的XML 配置文件那样,编写诸如数组、集合、Map等复杂类型,一个简单示例,读者可以仿照示例体会编写方式,很快就能掌握 YML 的各种数据类型的编写。
yaml
person:
  name: 小帅
  age: 20
  # 默认的日期格式为yyyy/MM/dd HH:mm:ss
  birthday: 2000/01/01 10:00:00
  # 数组/集合,以下两种方式均可
  alias:
    - 张三
    - 三三来迟
  tels: [88881234, 12345678]
  # 对象数组/集合
  cats:
    - name: 咪咪
      age: 2
    - name: 喵喵
      age: 3
  # Map/嵌套对象
  events:
    eight: 起床
    nine: 撸猫
    twenty: 睡觉
  # Map<String, Object> 对象可以直接用JSON形式
  dogs:
    wang:
      name: 旺旺
      age: 4
    wuwu: {name: 呜呜, age: 5}
5.单/双引号
在 YML 中如果声明的属性值为 String 类型,则无须使用双引号或单引号标注(当然对于普通字符串文本使用引号也没有问题),但是对于一些特殊文本来讲,使用单引号或双引号引用时,最终产生的效果是不同的。
假定我们需要在 person.name 属性中给 "小帅" 两个字之间加入一个制表符。为了能够输出 person.name 的值,我们可以使用 @Value 注解将该属性注入 Spring Boot 的主启动类中,在 Spring Boot 应用启动完成后得到 ApplicationContext,获取当前的 Spring Boot 主启动类之后打印name 的值。
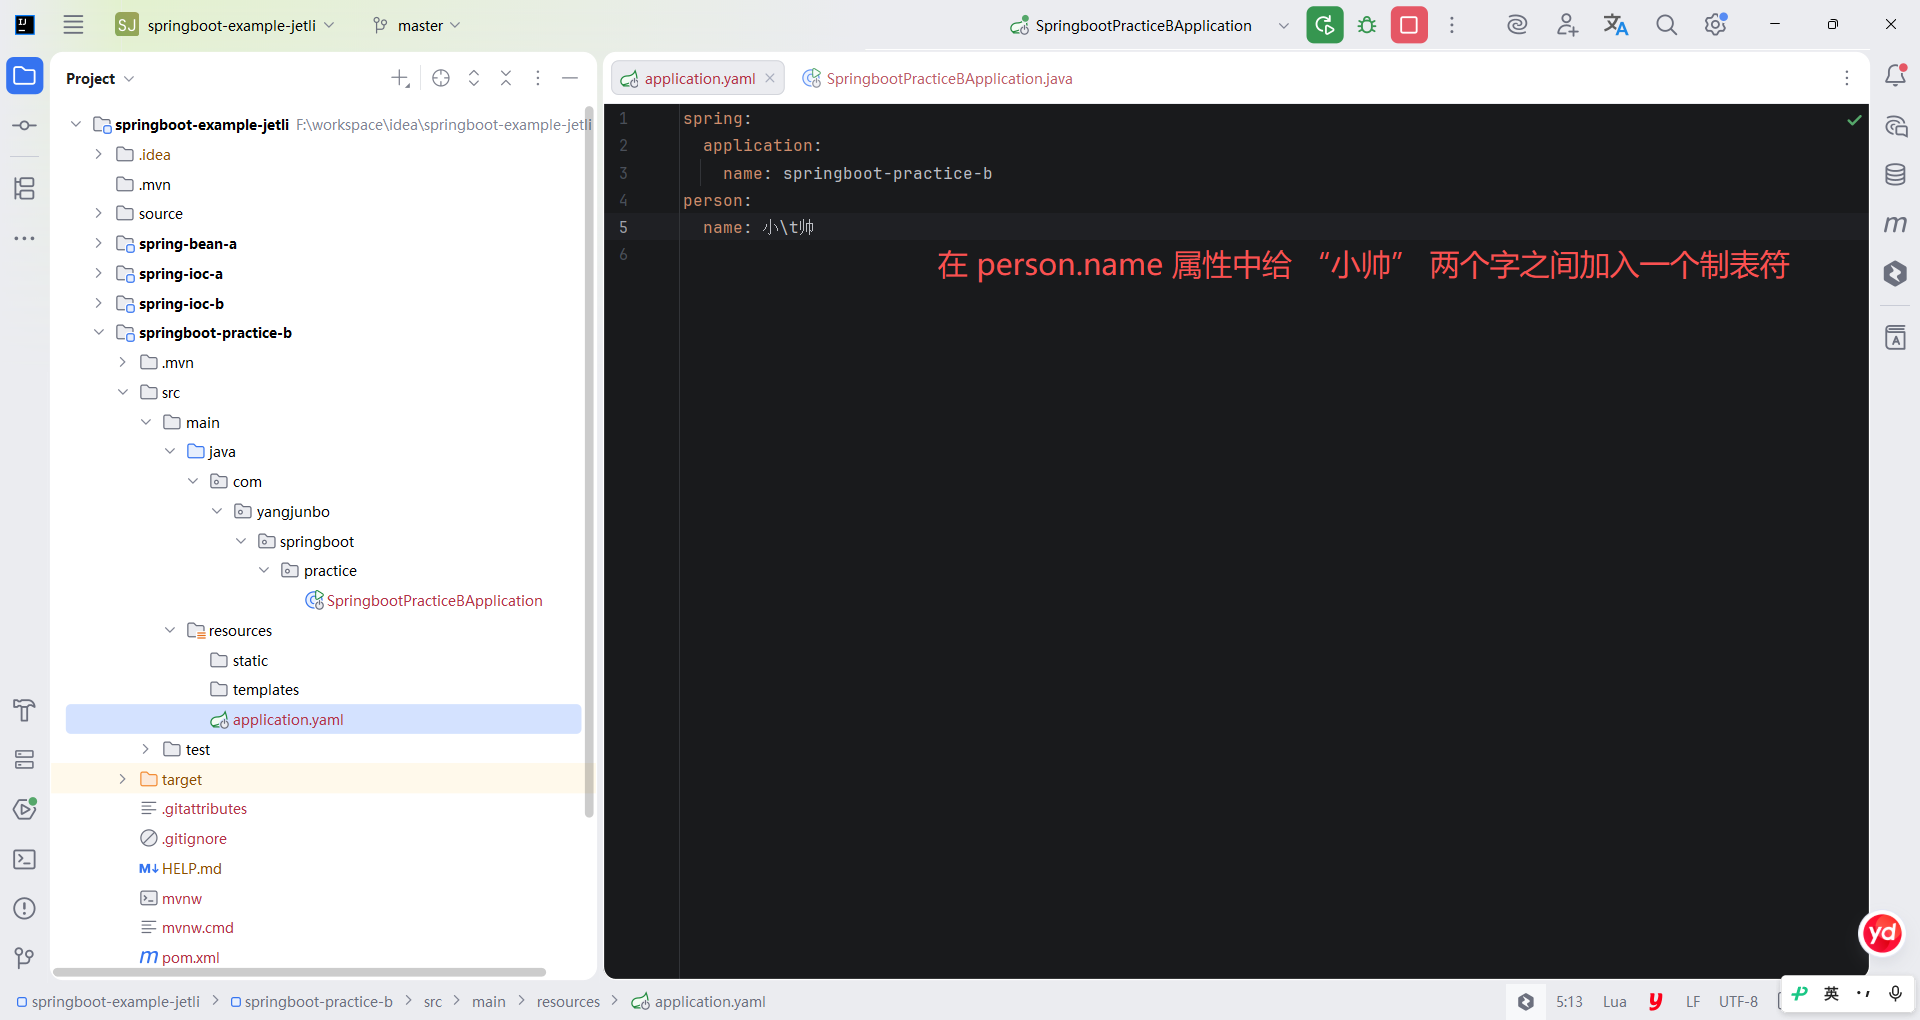
yaml
spring:
  application:
    name: springboot-practice-b
person:
  name: 小\t帅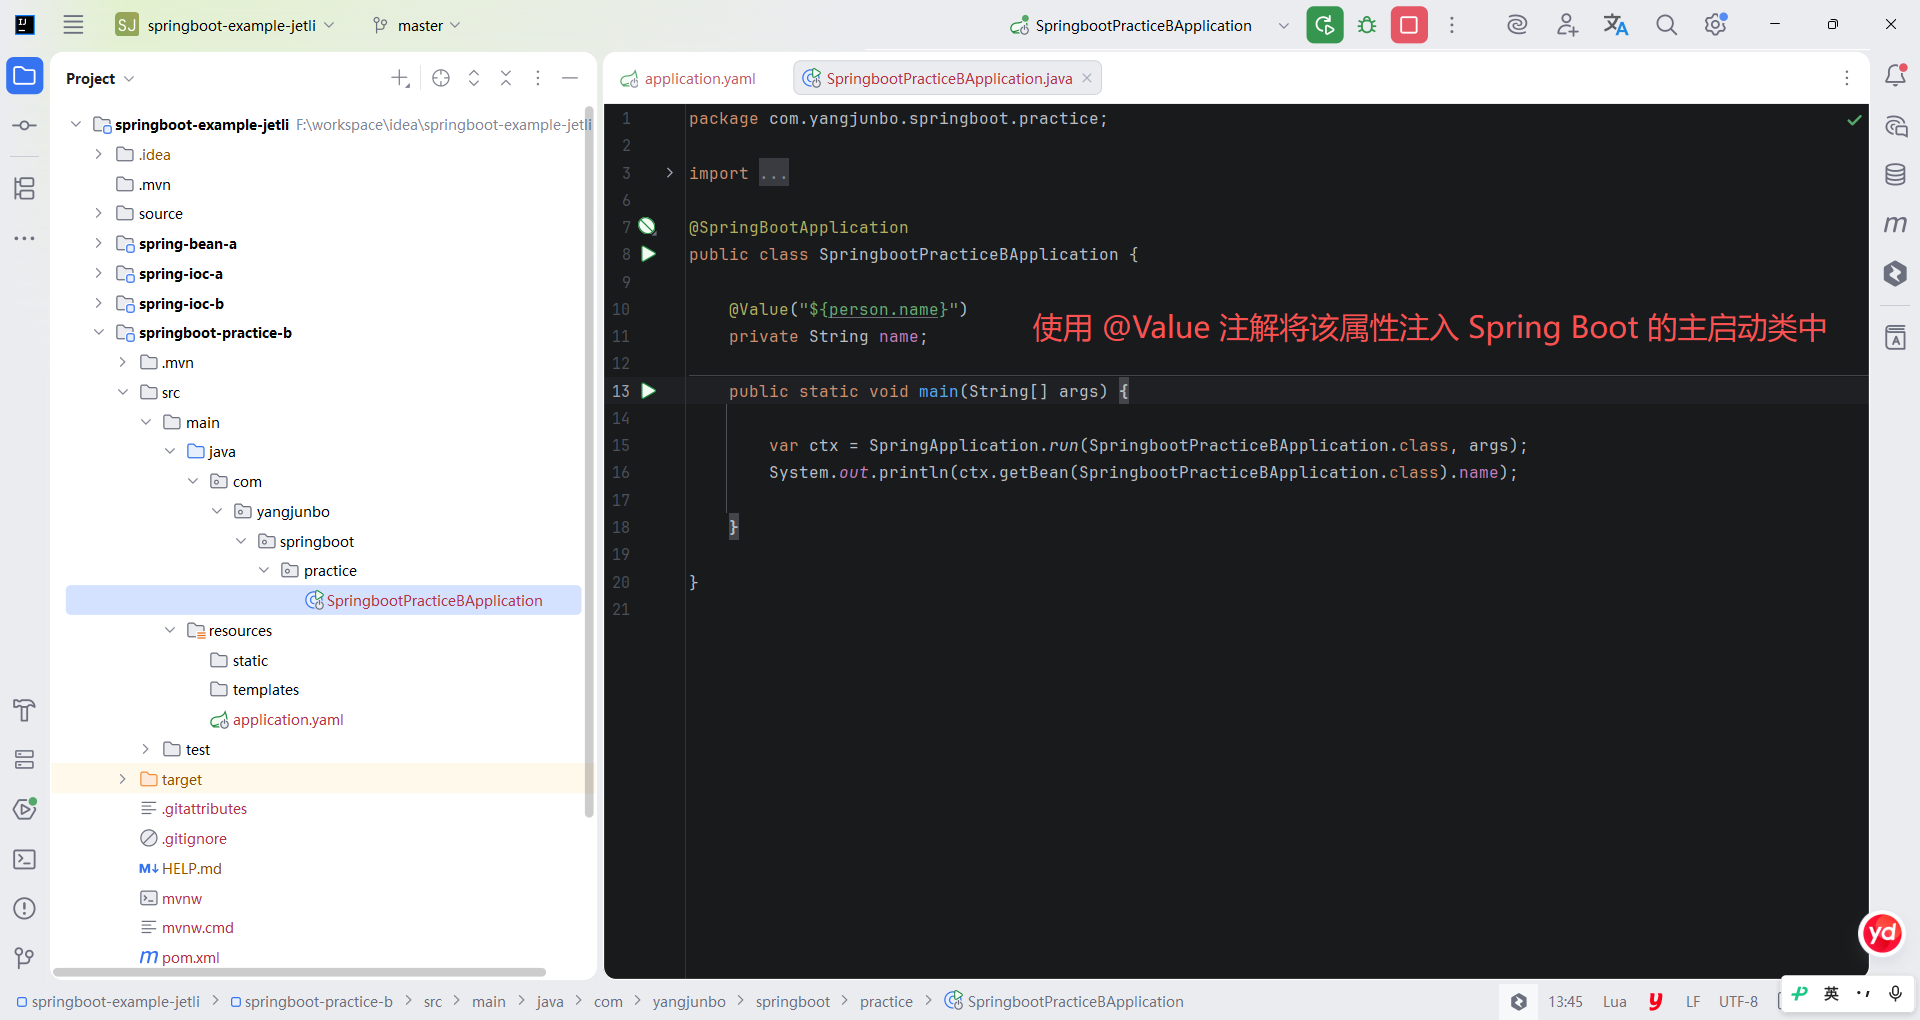
java
package com.yangjunbo.springboot.practice;

import org.springframework.beans.factory.annotation.Value;
import org.springframework.boot.SpringApplication;
import org.springframework.boot.autoconfigure.SpringBootApplication;

@SpringBootApplication
public class SpringbootPracticeBApplication {

    @Value("${person.name}")
    private String name;

    public static void main(String[] args) {

        var ctx = SpringApplication.run(SpringbootPracticeBApplication.class, args);
        System.out.println(ctx.getBean(SpringbootPracticeBApplication.class).name);

    }

}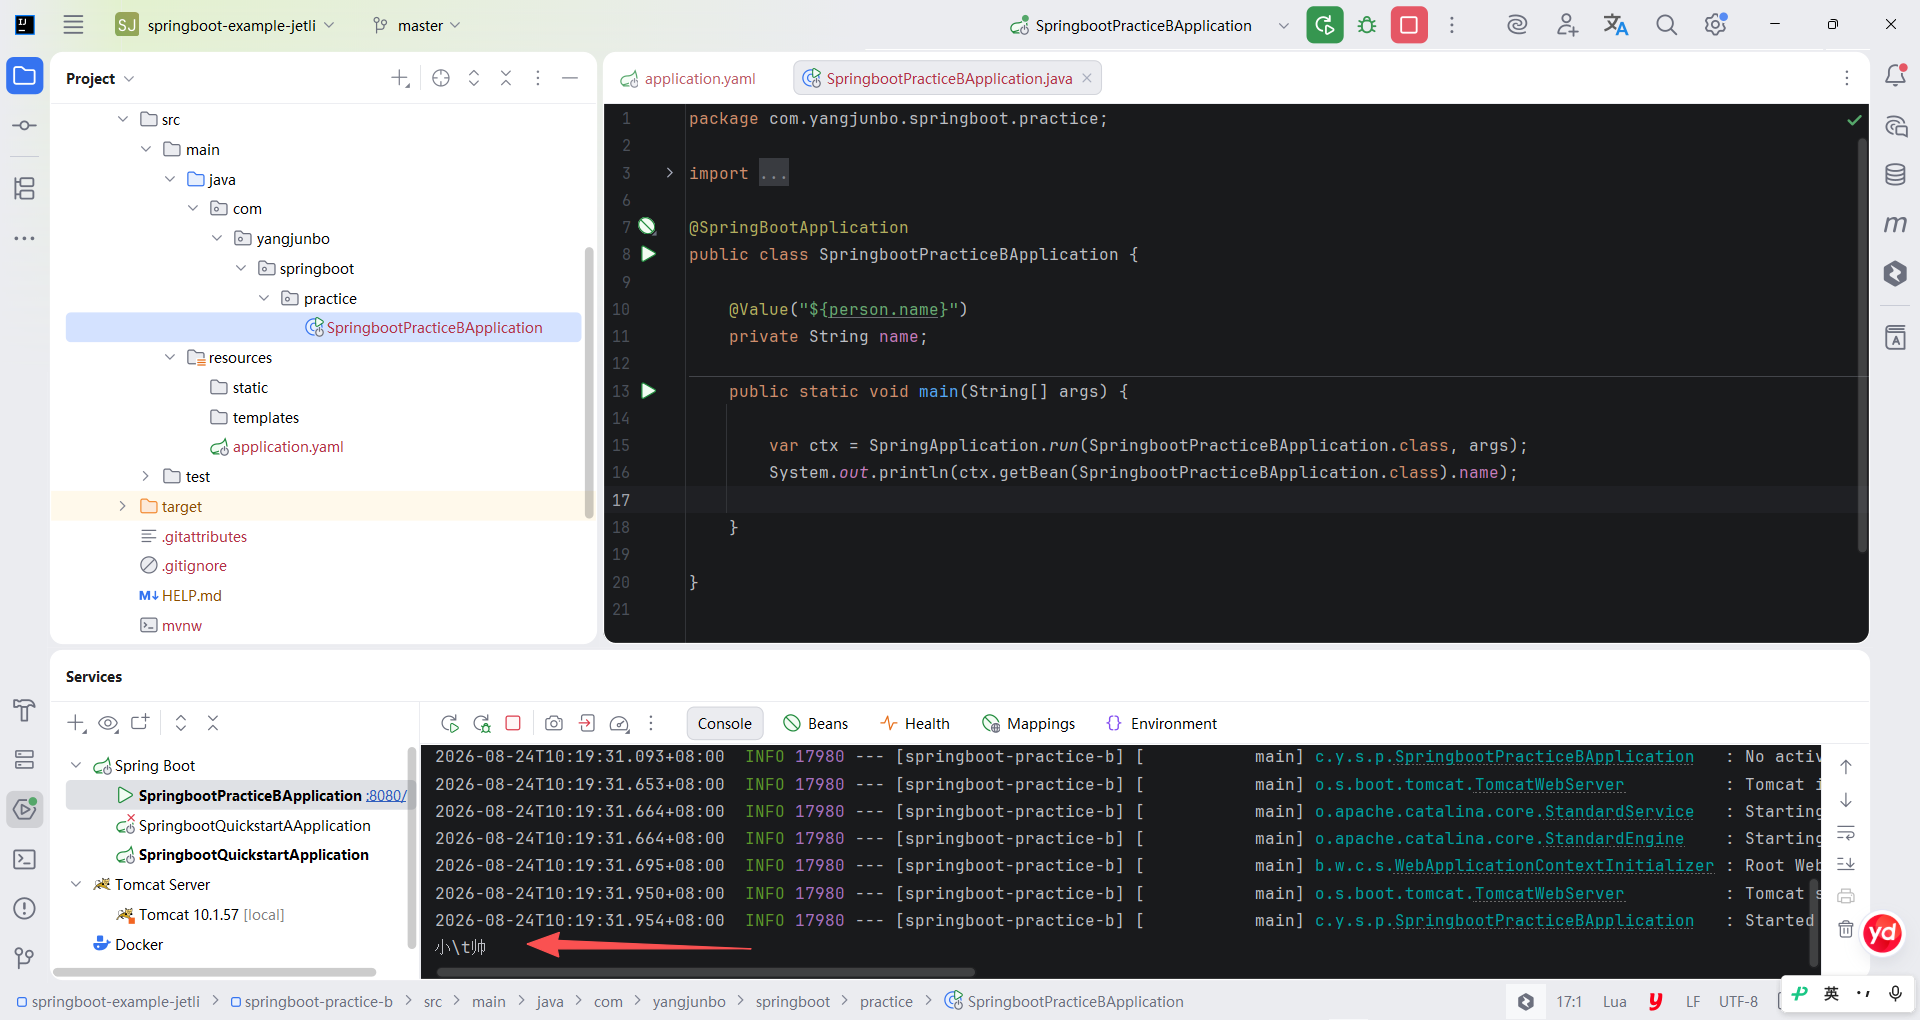
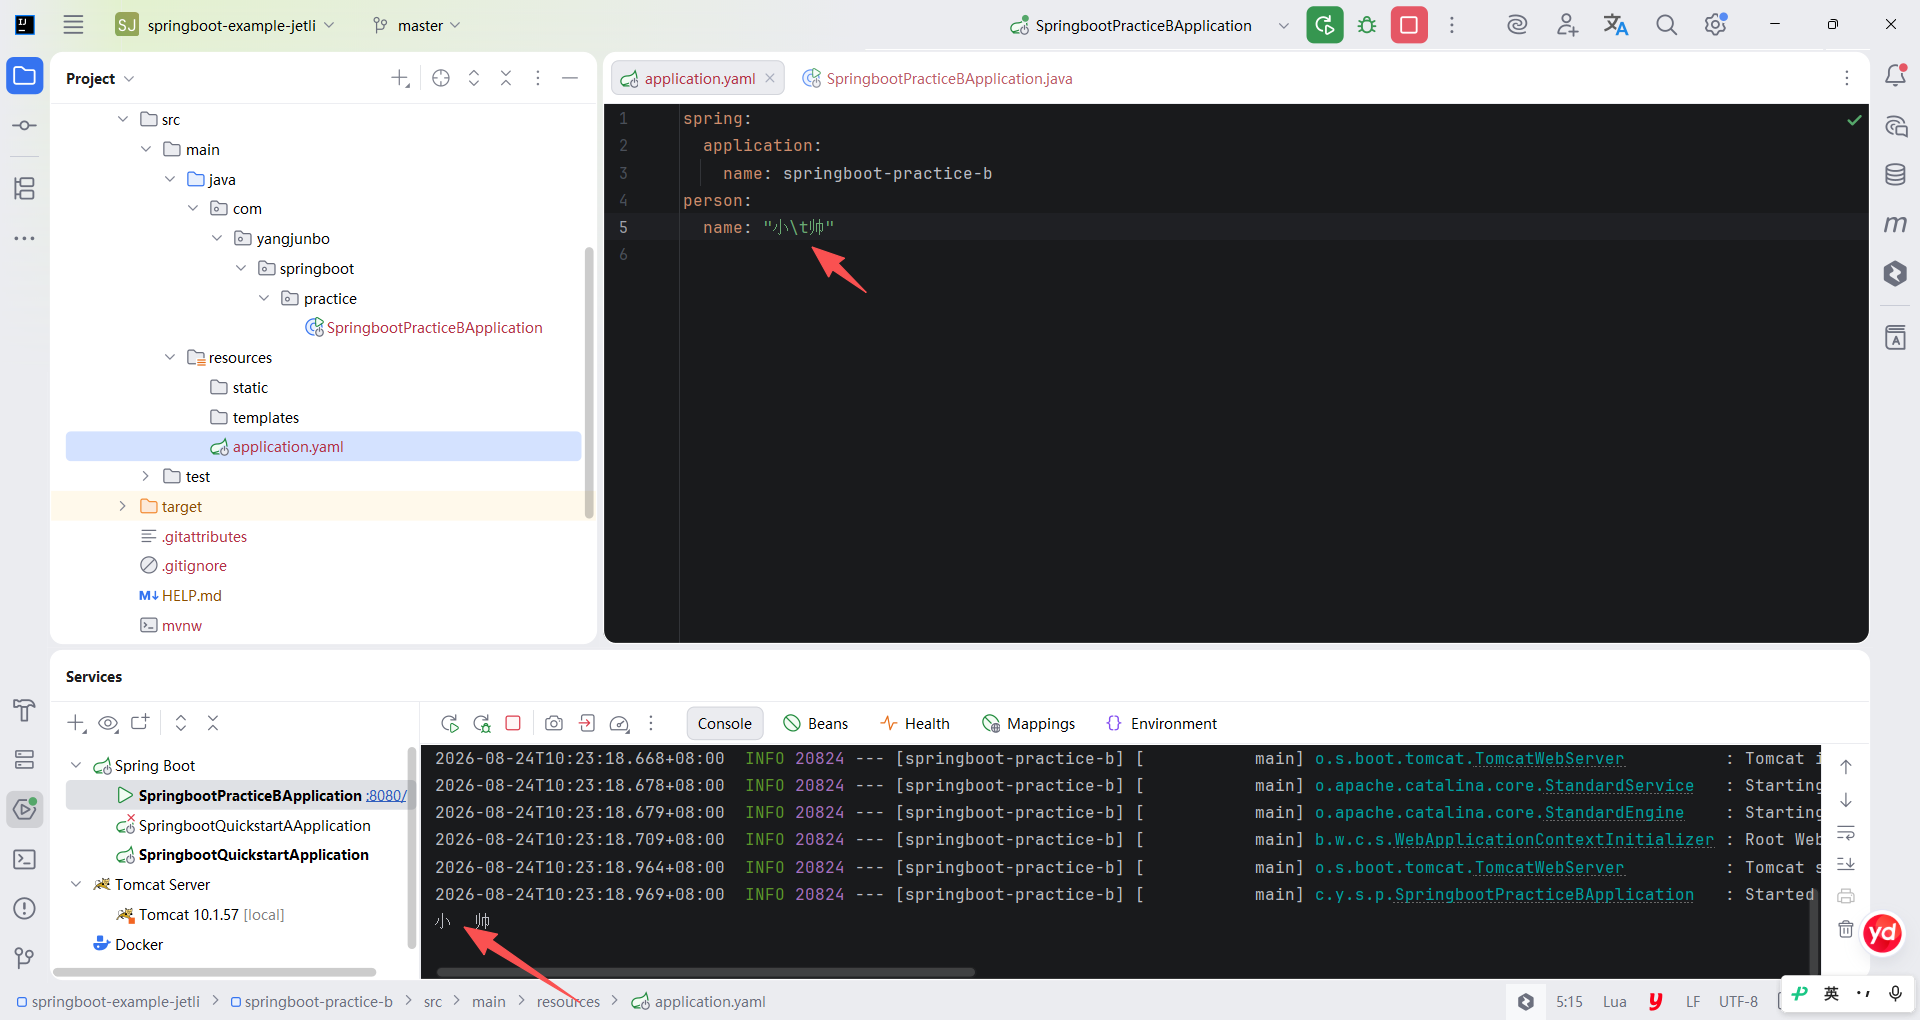
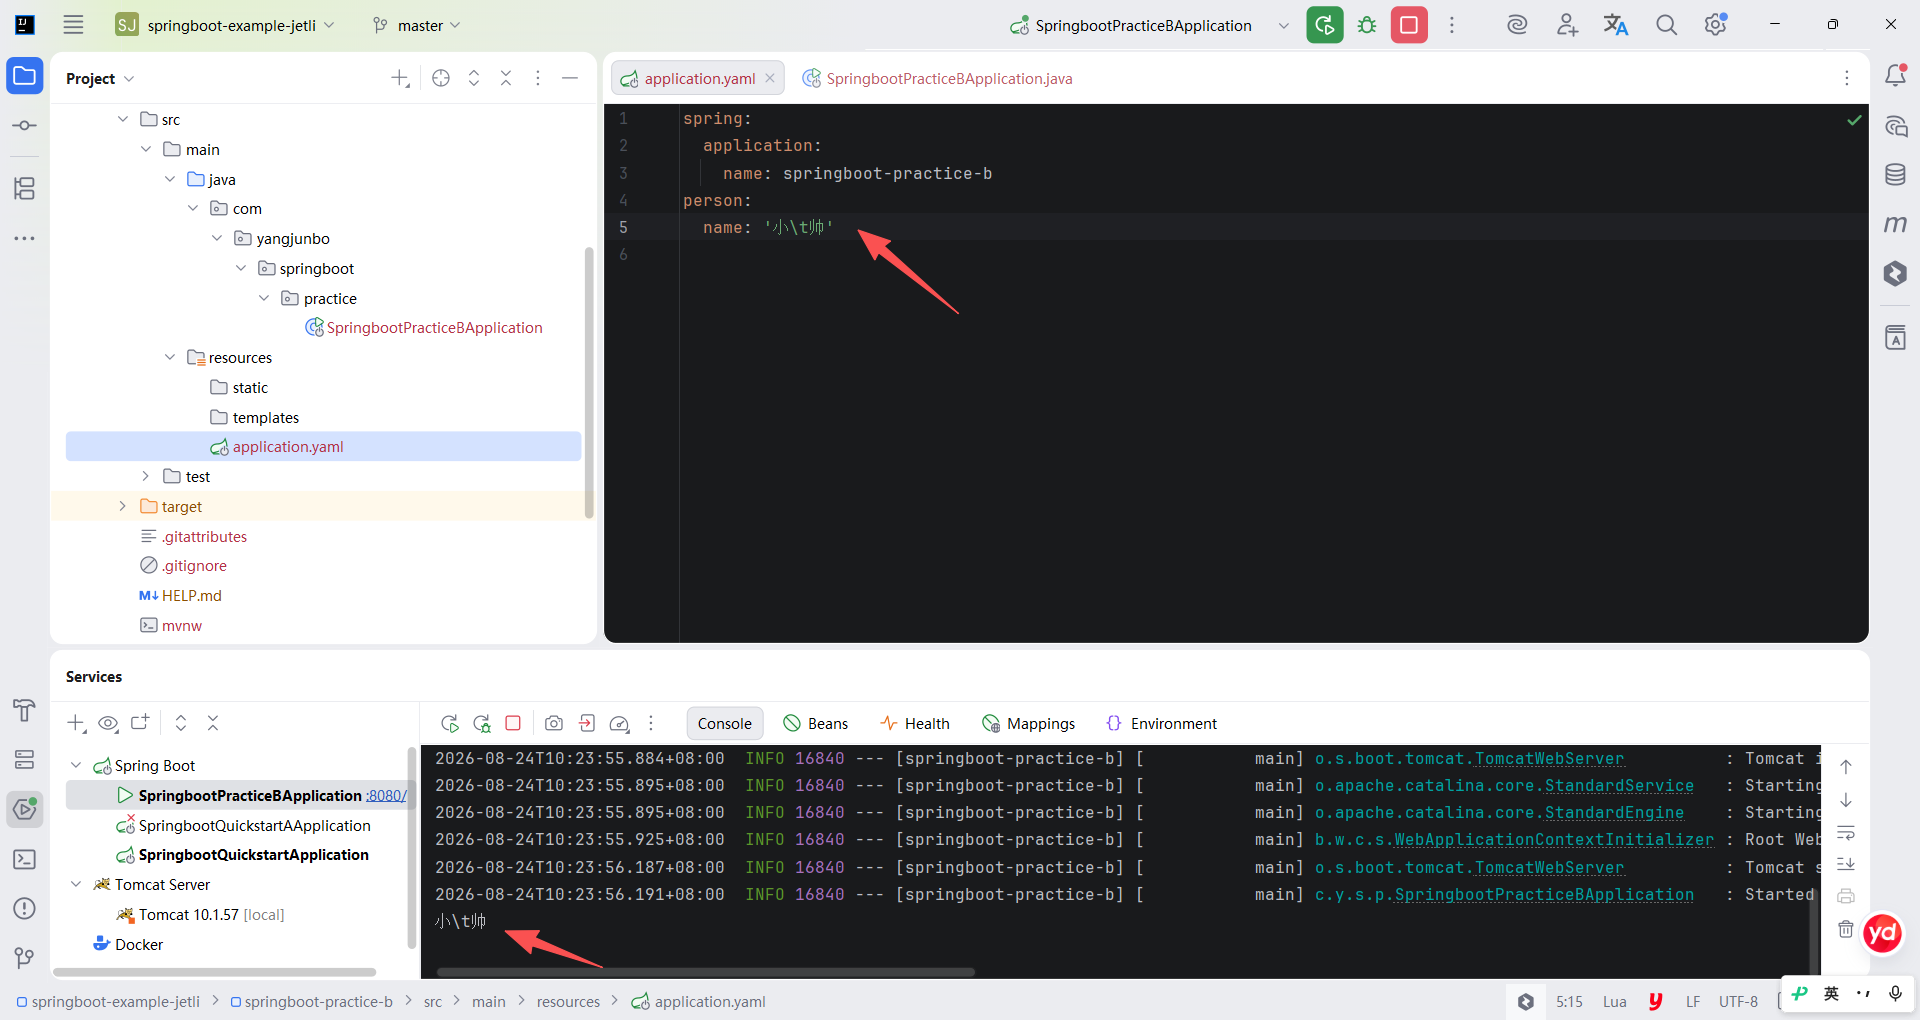
如果直接写 \t,则运行 main 方法后控制台会原样打印 "小\t帅",不符合我们的预期。要想让字符串中的 \t 转义为制表符,就需要给这个属性值使用双引号引用。如此修改后再运行 main 方法,控制台即可打印出正确的 "小 帅"。单引号的效果与不加引号没有区别。
6.文本块
使用双引号配合 \n 换行符,可以实现在 YML 中配置多行文本,但是这种写法会很麻烦而且不直观,为此在 YML 语法中提供了两个特殊符号,利用这两个特殊符号即可实现文本块。
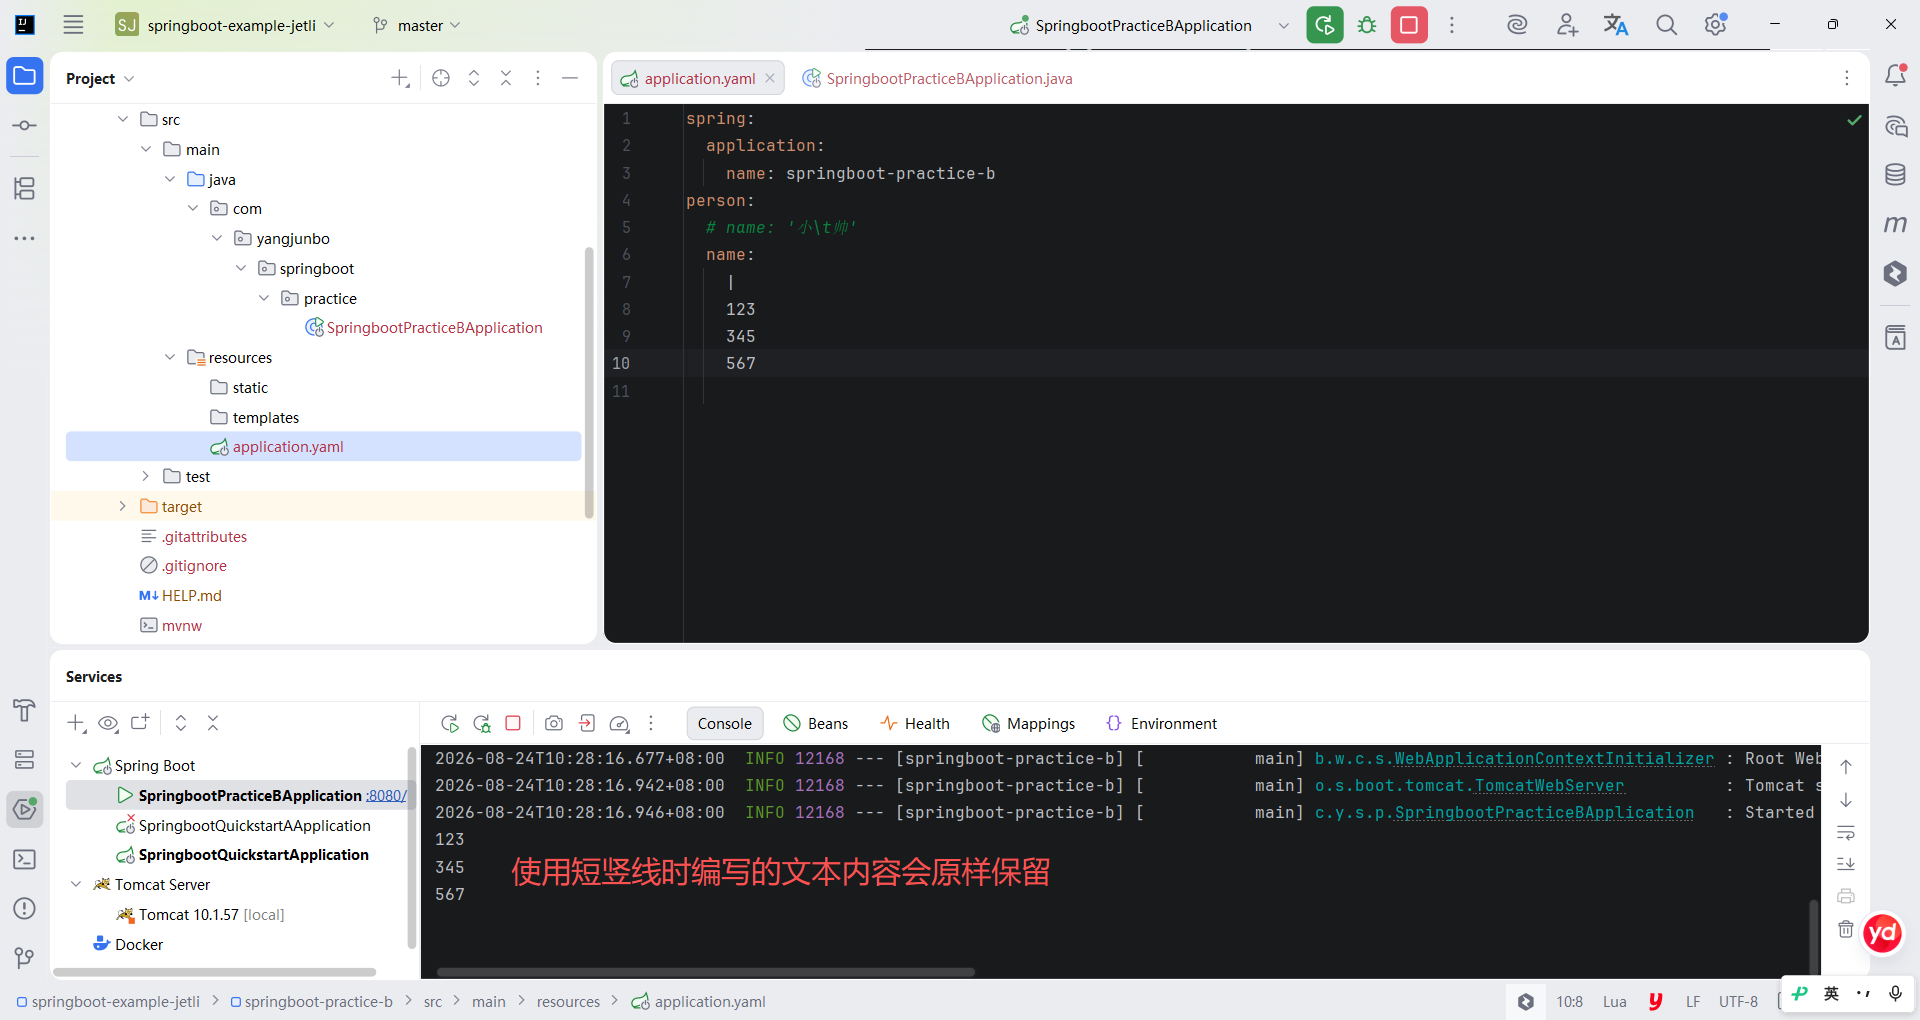
YML 中编写文本块所用的符号是短竖线和大于号,利用这两者都能实现在 YML 文件中编写文本块,不同的是使用短竖线时编写的文本内容会原样保留,而使用大于号时换行符会被取消,改为一行显示。
修改 person.name 属性,使用上述两种方式编写。分别验证两种编写方式,使用短竖线时控制台会打印 3 行数据,而使用大于号时只会打印一行数据,每段字符串之间使用空格分隔。
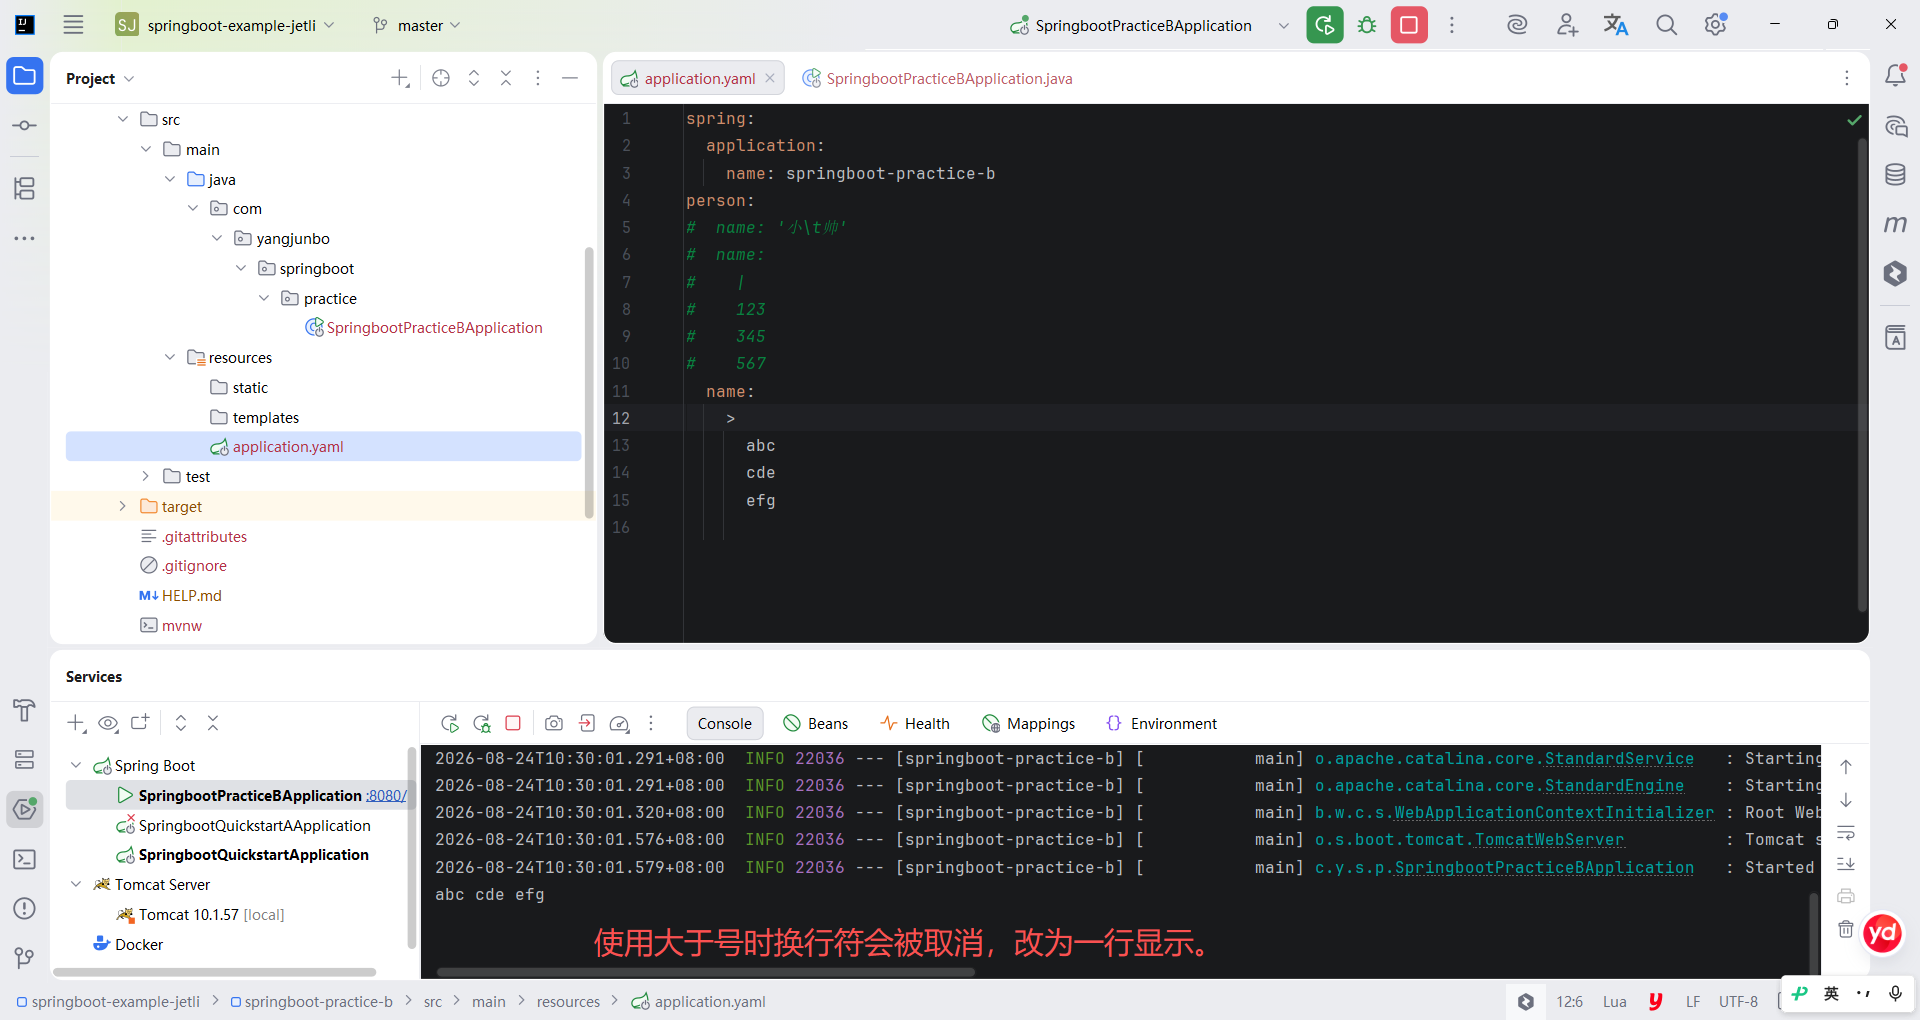
yaml
spring:
  application:
    name: springboot-practice-b
person:
#  name: '小\t帅'
#  name:
#    |
#    123
#    345
#    567
  name:
    >
      abc
      cde
      efg
6.1.2 属性绑定
YML 文件中的属性编写完毕后,在实际使用时不可能逐个使用 @Value 来进行属性注入,因为这种方式编码效率低且局限性很大。Spring Boot提供了一种基于配置文件到模型对象之间的映射机制,即本节要学习的属性绑定。
1.@ConfigurationProperties 注解
在 Spring Boot 中实现模型对象与配置文件中某些属性的映射绑定,使用的注解是 @ConfigurationProperties,它可以标注在类上并指定配置属性的前缀,即可将所有可以映射的配置属性一一绑定到模型对象中。
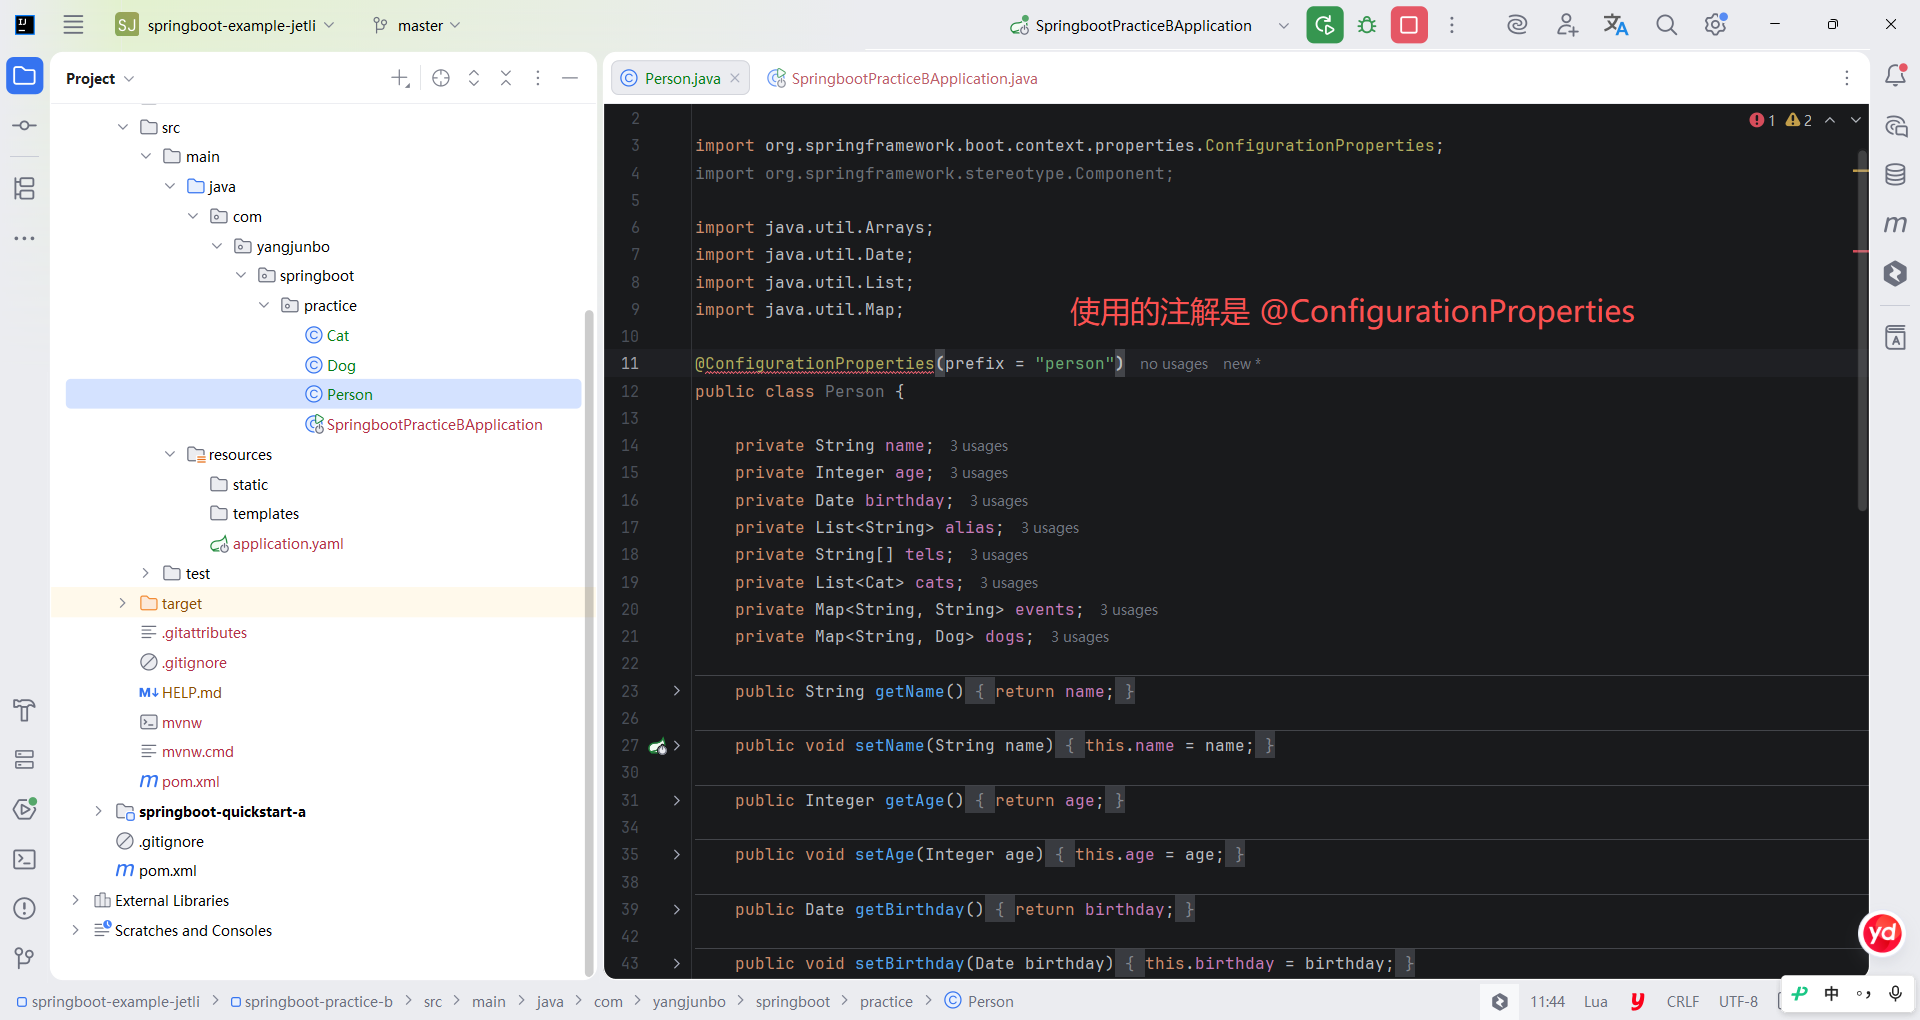
java
package com.yangjunbo.springboot.practice;

import org.springframework.boot.context.properties.ConfigurationProperties;
import org.springframework.stereotype.Component;

import java.util.Arrays;
import java.util.Date;
import java.util.List;
import java.util.Map;

@ConfigurationProperties(prefix = "person")
public class Person {

    private String name;
    private Integer age;
    private Date birthday;
    private List<String> alias;
    private String[] tels;
    private List<Cat> cats;
    private Map<String, String> events;
    private Map<String, Dog> dogs;

    public String getName() {
        return name;
    }

    public void setName(String name) {
        this.name = name;
    }

    public Integer getAge() {
        return age;
    }

    public void setAge(Integer age) {
        this.age = age;
    }

    public Date getBirthday() {
        return birthday;
    }

    public void setBirthday(Date birthday) {
        this.birthday = birthday;
    }

    public List<String> getAlias() {
        return alias;
    }

    public void setAlias(List<String> alias) {
        this.alias = alias;
    }

    public String[] getTels() {
        return tels;
    }

    public void setTels(String[] tels) {
        this.tels = tels;
    }

    public List<Cat> getCats() {
        return cats;
    }

    public void setCats(List<Cat> cats) {
        this.cats = cats;
    }

    public Map<String, String> getEvents() {
        return events;
    }

    public void setEvents(Map<String, String> events) {
        this.events = events;
    }

    public Map<String, Dog> getDogs() {
        return dogs;
    }

    public void setDogs(Map<String, Dog> dogs) {
        this.dogs = dogs;
    }

    @Override
    public String toString() {
        return "Person{" +
                "name='" + name + '\'' +
                ", age=" + age +
                ", birthday=" + birthday +
                ", alias=" + alias +
                ", tels=" + Arrays.toString(tels) +
                ", cats=" + cats +
                ", events=" + events +
                ", dogs=" + dogs +
                '}';
    }

}
java
package com.yangjunbo.springboot.practice;

public class Cat {
    private String name;
    private Integer age;

    public String getName() {
        return name;
    }

    public void setName(String name) {
        this.name = name;
    }

    public Integer getAge() {
        return age;
    }

    public void setAge(Integer age) {
        this.age = age;
    }

    @Override
    public String toString() {
        return "Cat{" +
                "name='" + name + '\'' +
                ", age=" + age +
                '}';
    }

}
java
package com.yangjunbo.springboot.practice;

public class Dog {
    private String name;
    private Integer age;

    public String getName() {
        return name;
    }

    public void setName(String name) {
        this.name = name;
    }

    public Integer getAge() {
        return age;
    }

    public void setAge(Integer age) {
        this.age = age;
    }

    @Override
    public String toString() {
        return "Dog{" +
                "name='" + name + '\'' +
                ", age=" + age +
                '}';
    }

}
要想让 Person 能与配置文件实现映射效果,需要声明一个配置类并标注 @EnableConfigurationProperties(Person.class) 注解(或者到 Spring Boot 主配置类直接标注)。如此一来 IOC 容器中就会创建一个 Person 对象,并实现配置属性绑定。
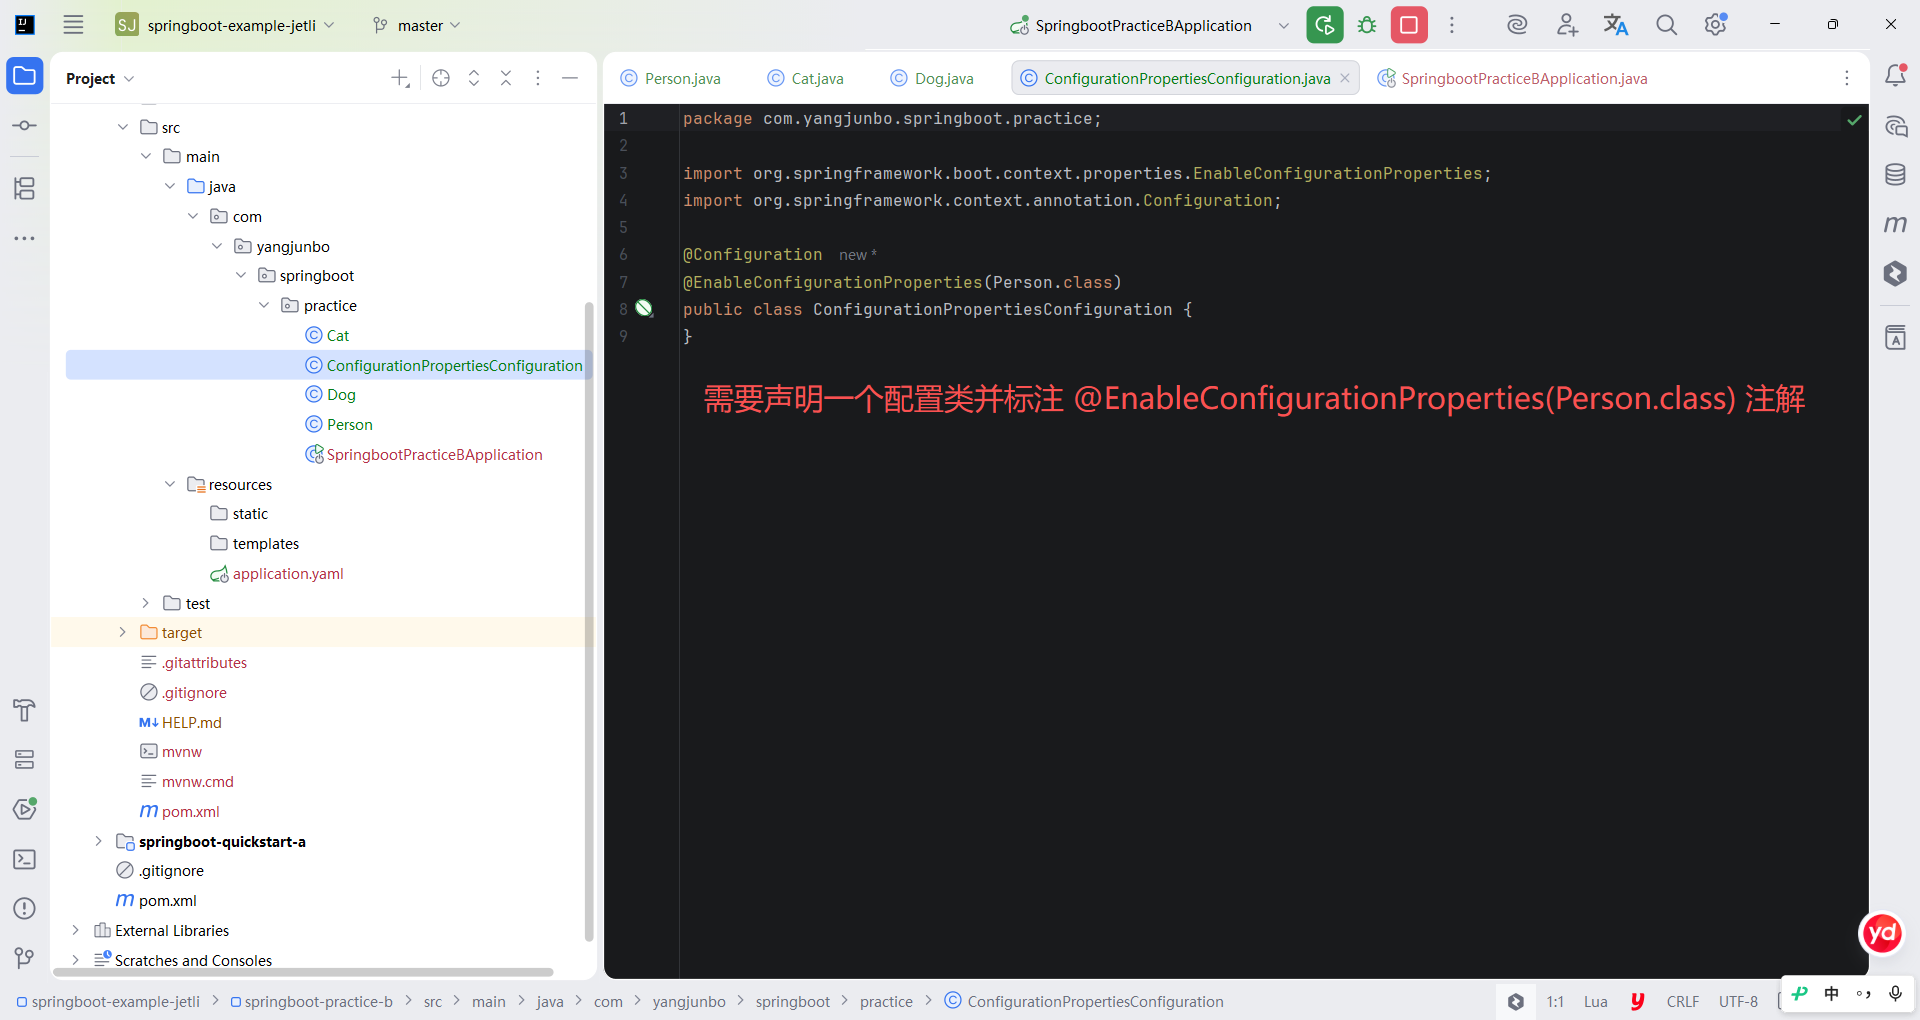
java
package com.yangjunbo.springboot.practice;

import org.springframework.boot.context.properties.EnableConfigurationProperties;
import org.springframework.context.annotation.Configuration;

@Configuration
@EnableConfigurationProperties(Person.class)
public class ConfigurationPropertiesConfiguration {
}
回到 Spring Boot 的主启动类中,使用 IOC 容器直接获取 Person 对象并打印。运行 main 方法后可以发现 application.yml 文件中的属性全部正确映射到了 Person 对象中,@ConfigurationProperties 注解使用成功。
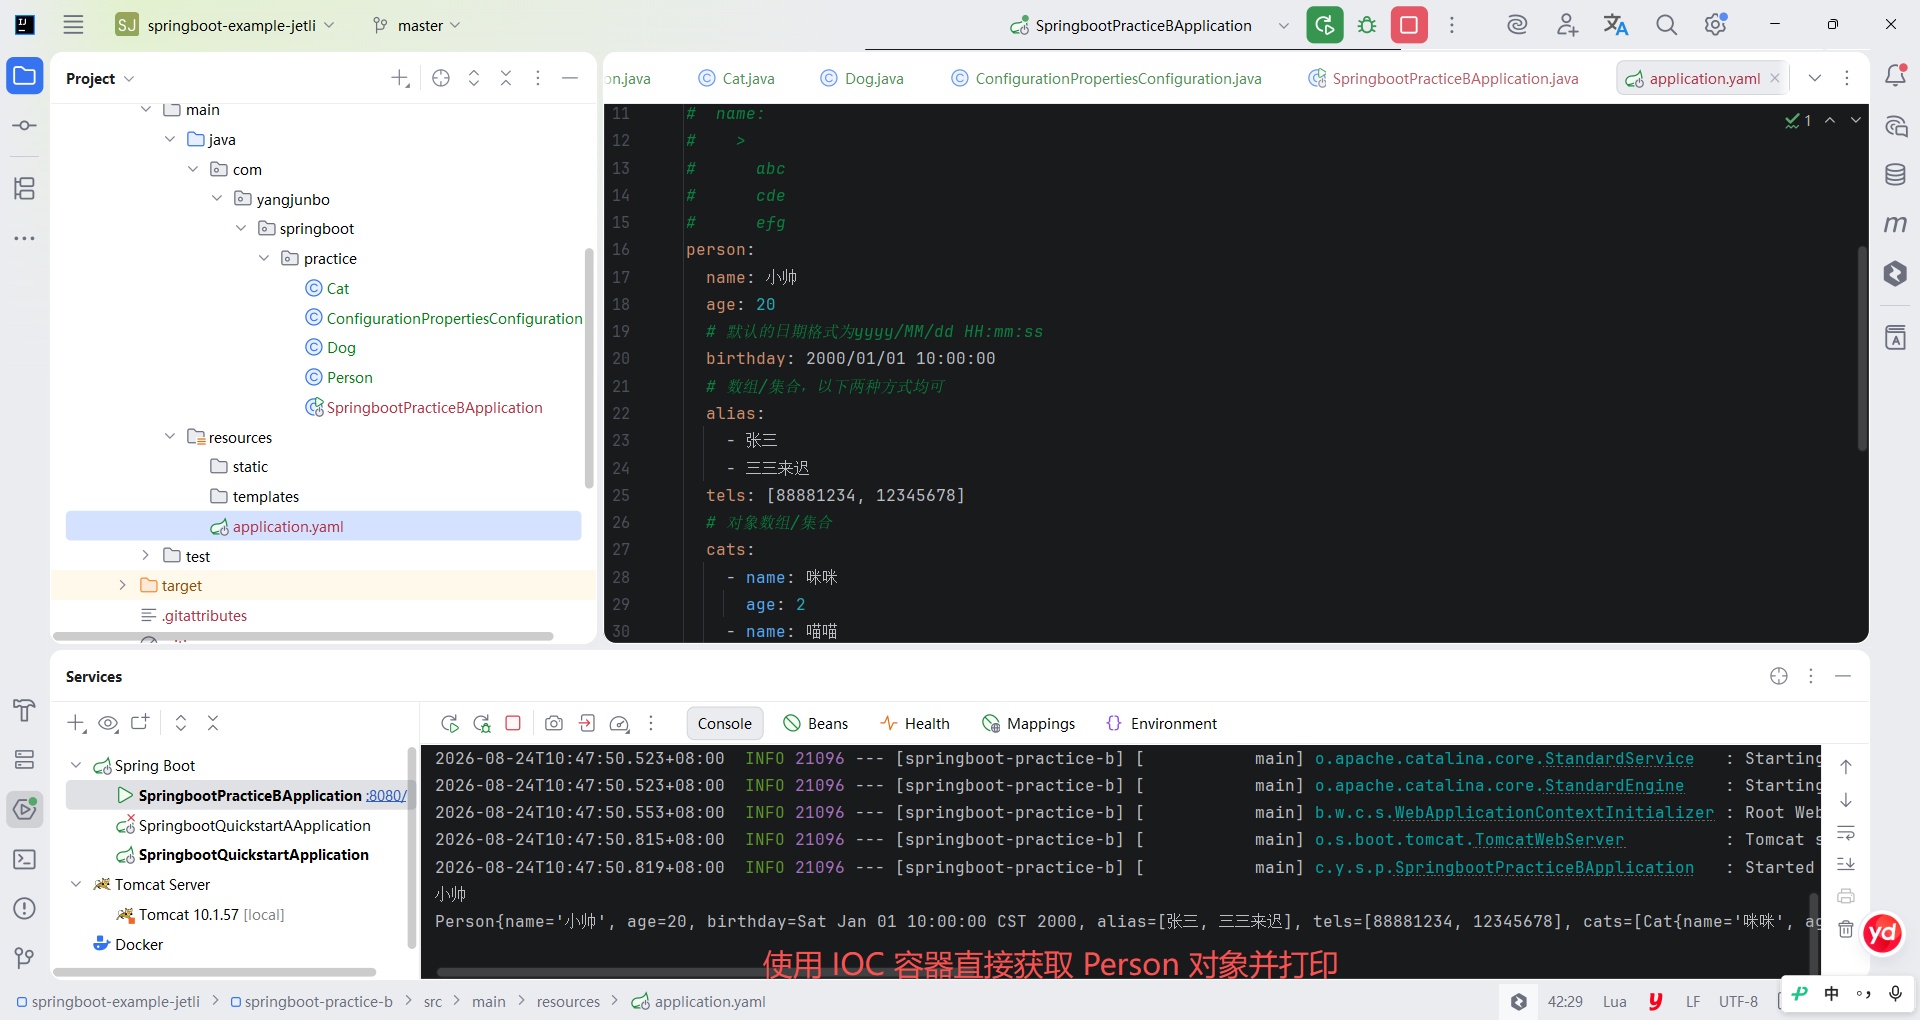
yaml
spring:
  application:
    name: springboot-practice-b
#person:
#  name: '小\t帅'
#  name:
#    |
#    123
#    345
#    567
#  name:
#    >
#      abc
#      cde
#      efg
person:
  name: 小帅
  age: 20
  # 默认的日期格式为yyyy/MM/dd HH:mm:ss
  birthday: 2000/01/01 10:00:00
  # 数组/集合,以下两种方式均可
  alias:
    - 张三
    - 三三来迟
  tels: [88881234, 12345678]
  # 对象数组/集合
  cats:
    - name: 咪咪
      age: 2
    - name: 喵喵
      age: 3
  # Map/嵌套对象
  events:
    eight: 起床
    nine: 撸猫
    twenty: 睡觉
  # Map<String, Object> 对象可以直接用JSON形式
  dogs:
    wang:
      name: 旺旺
      age: 4
    wuwu: {name: 呜呜, age: 5}
2.基于 Bean 的绑定
@ConfigurationProperties 注解除了可以标注在普通的模型类上,还可以标注在注解配置类中被 @Bean 标注的方法上,二者实现的效果相似,都是将配置文件中指定前缀的所有配置属性映射到对应的 Bean 中。不同的是这种方式无须再配合 @EnableConfigurationProperties 注解使用。
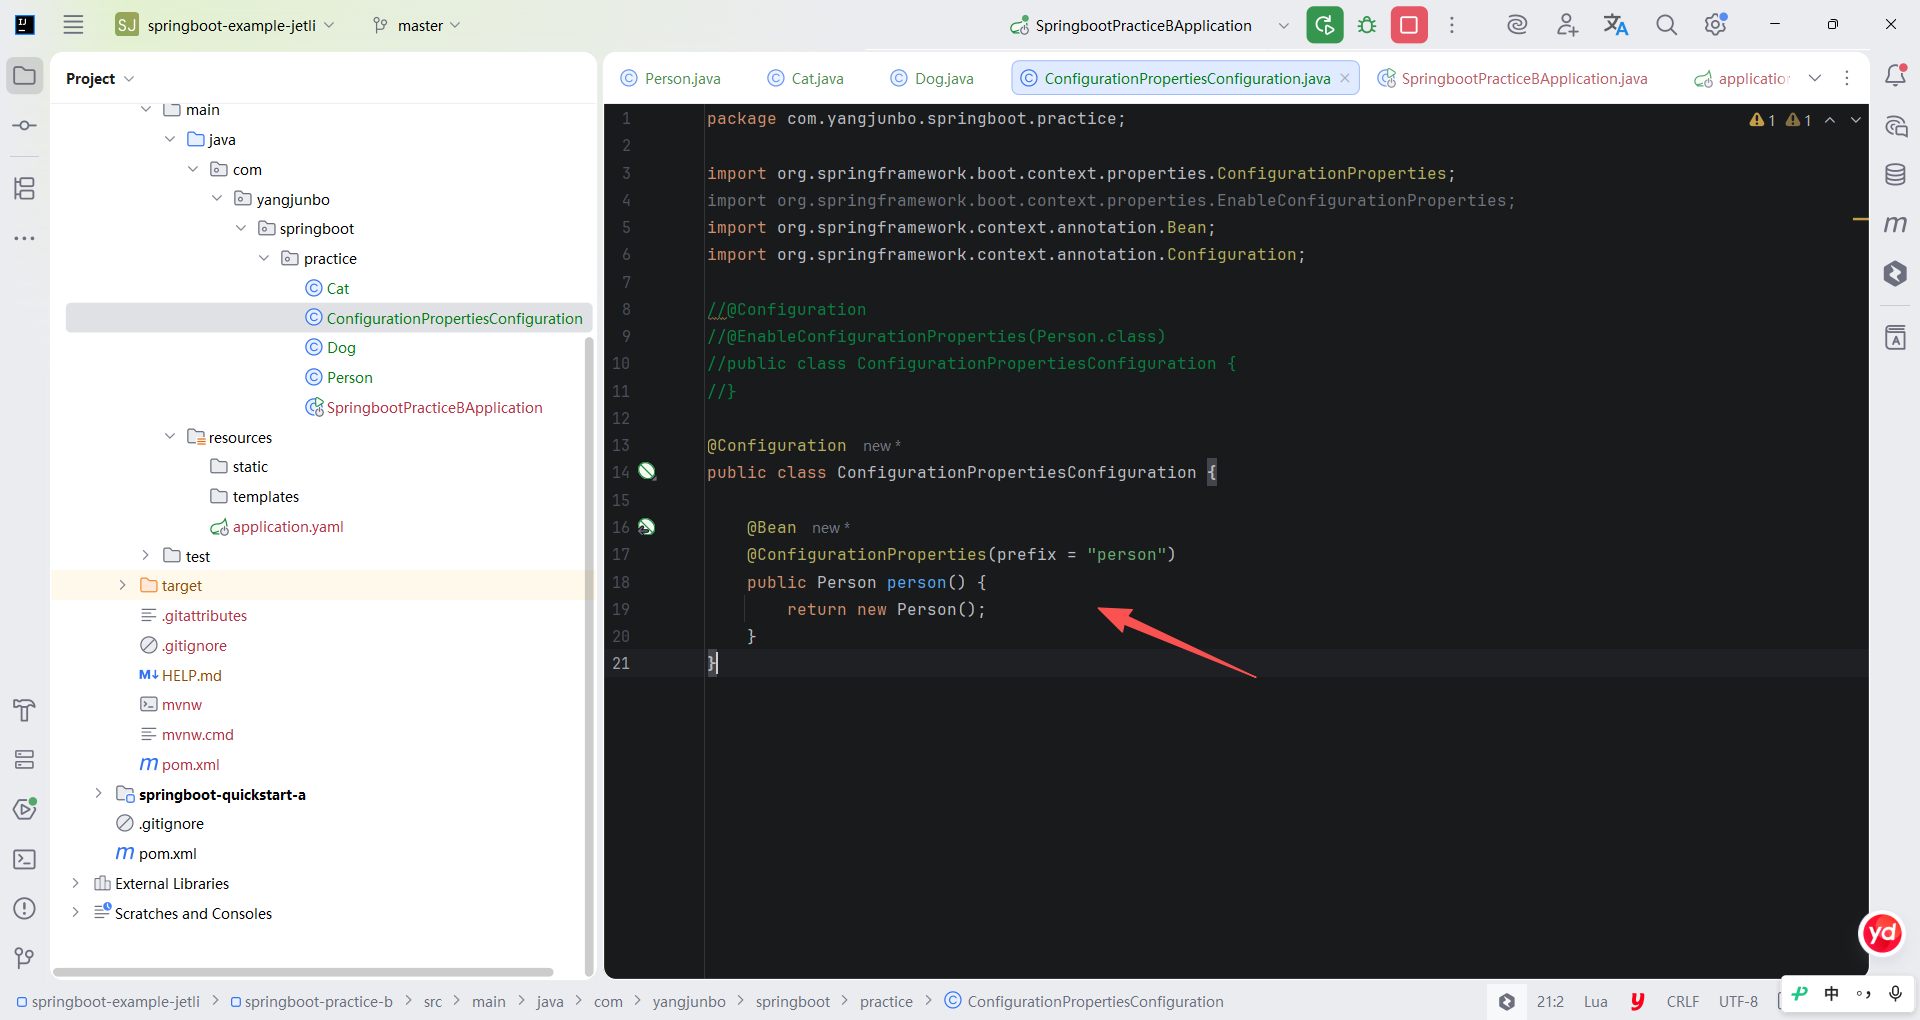
去掉 Person 类上的 @ConfigurationProperties 注解,然后在配置类 ConfigurationPropertiesConfiguration 中将@EnableConfigurationProperties (Person.class) 去掉,并使用 @Bean 注解创建一个 Person 对象,标注 @ConfigurationProperties 注解,重新运行 Spring Boot 主启动类的 main 方法,控制台依然能正常打印,说明基于 @Bean 的方式也可以实现属性绑定。
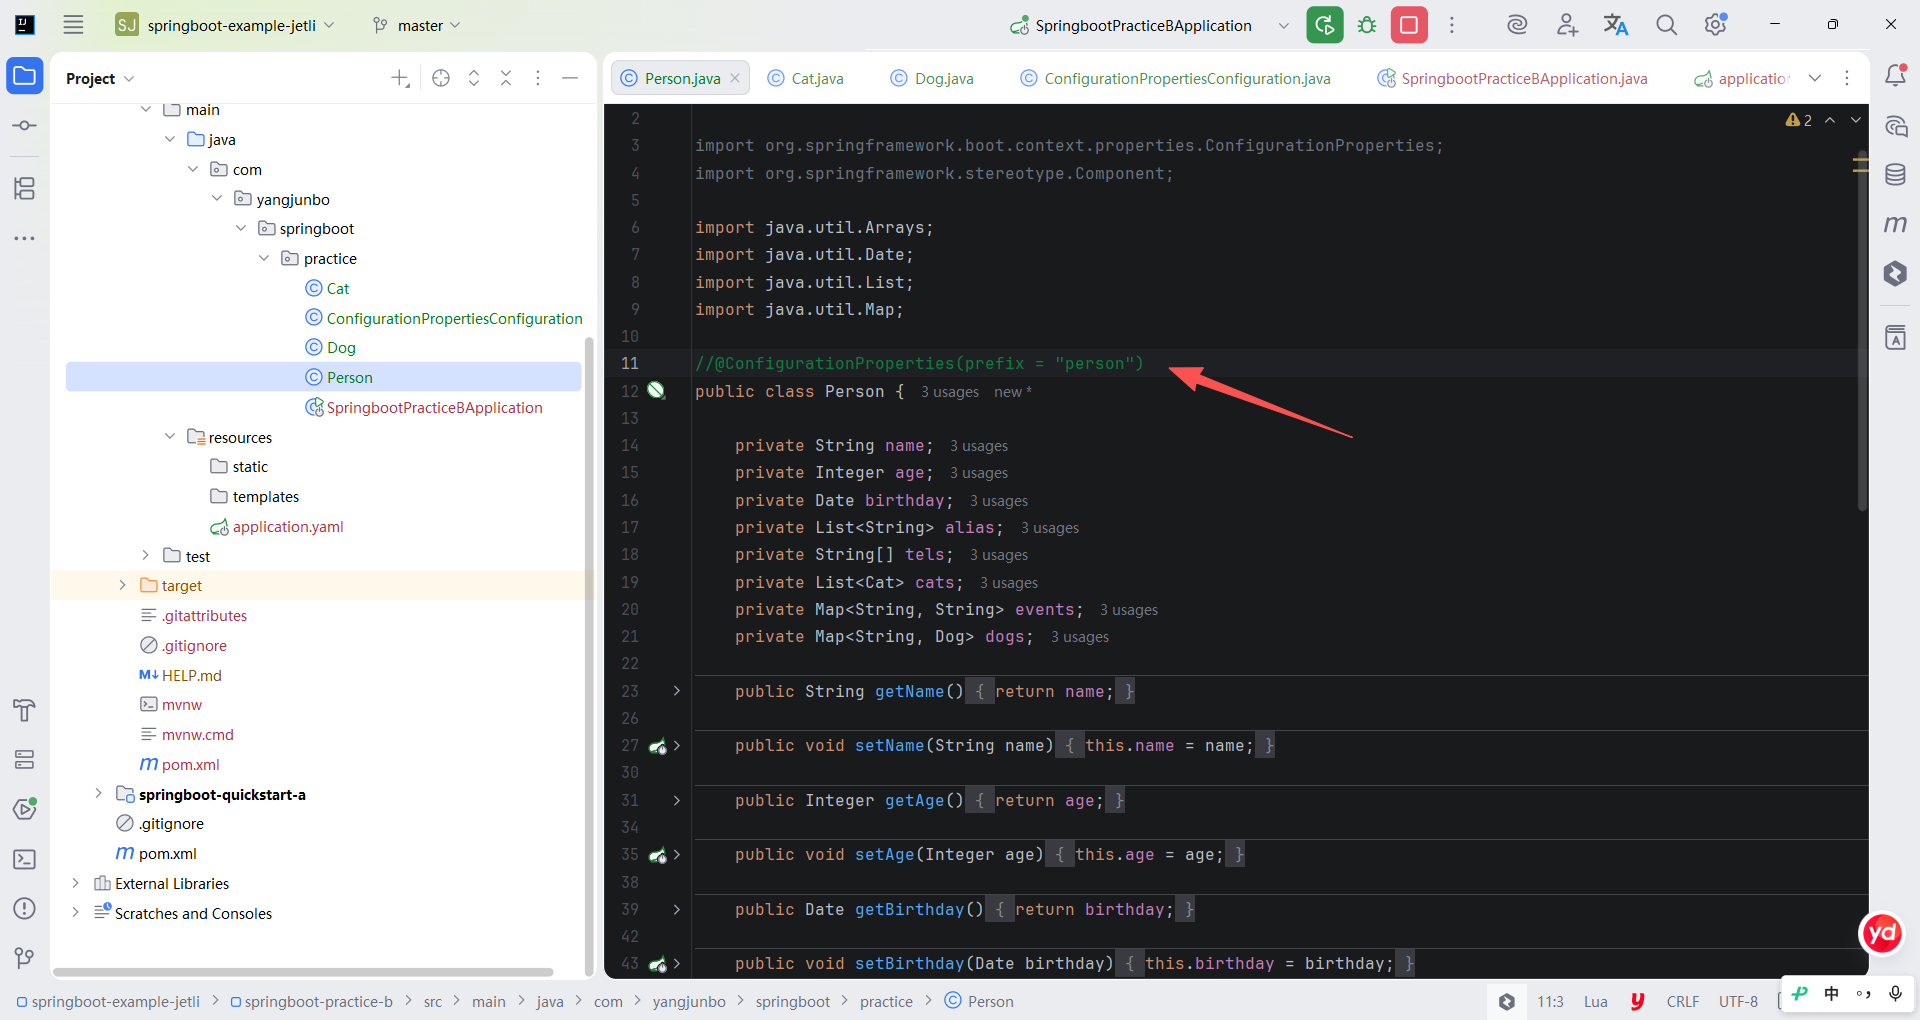
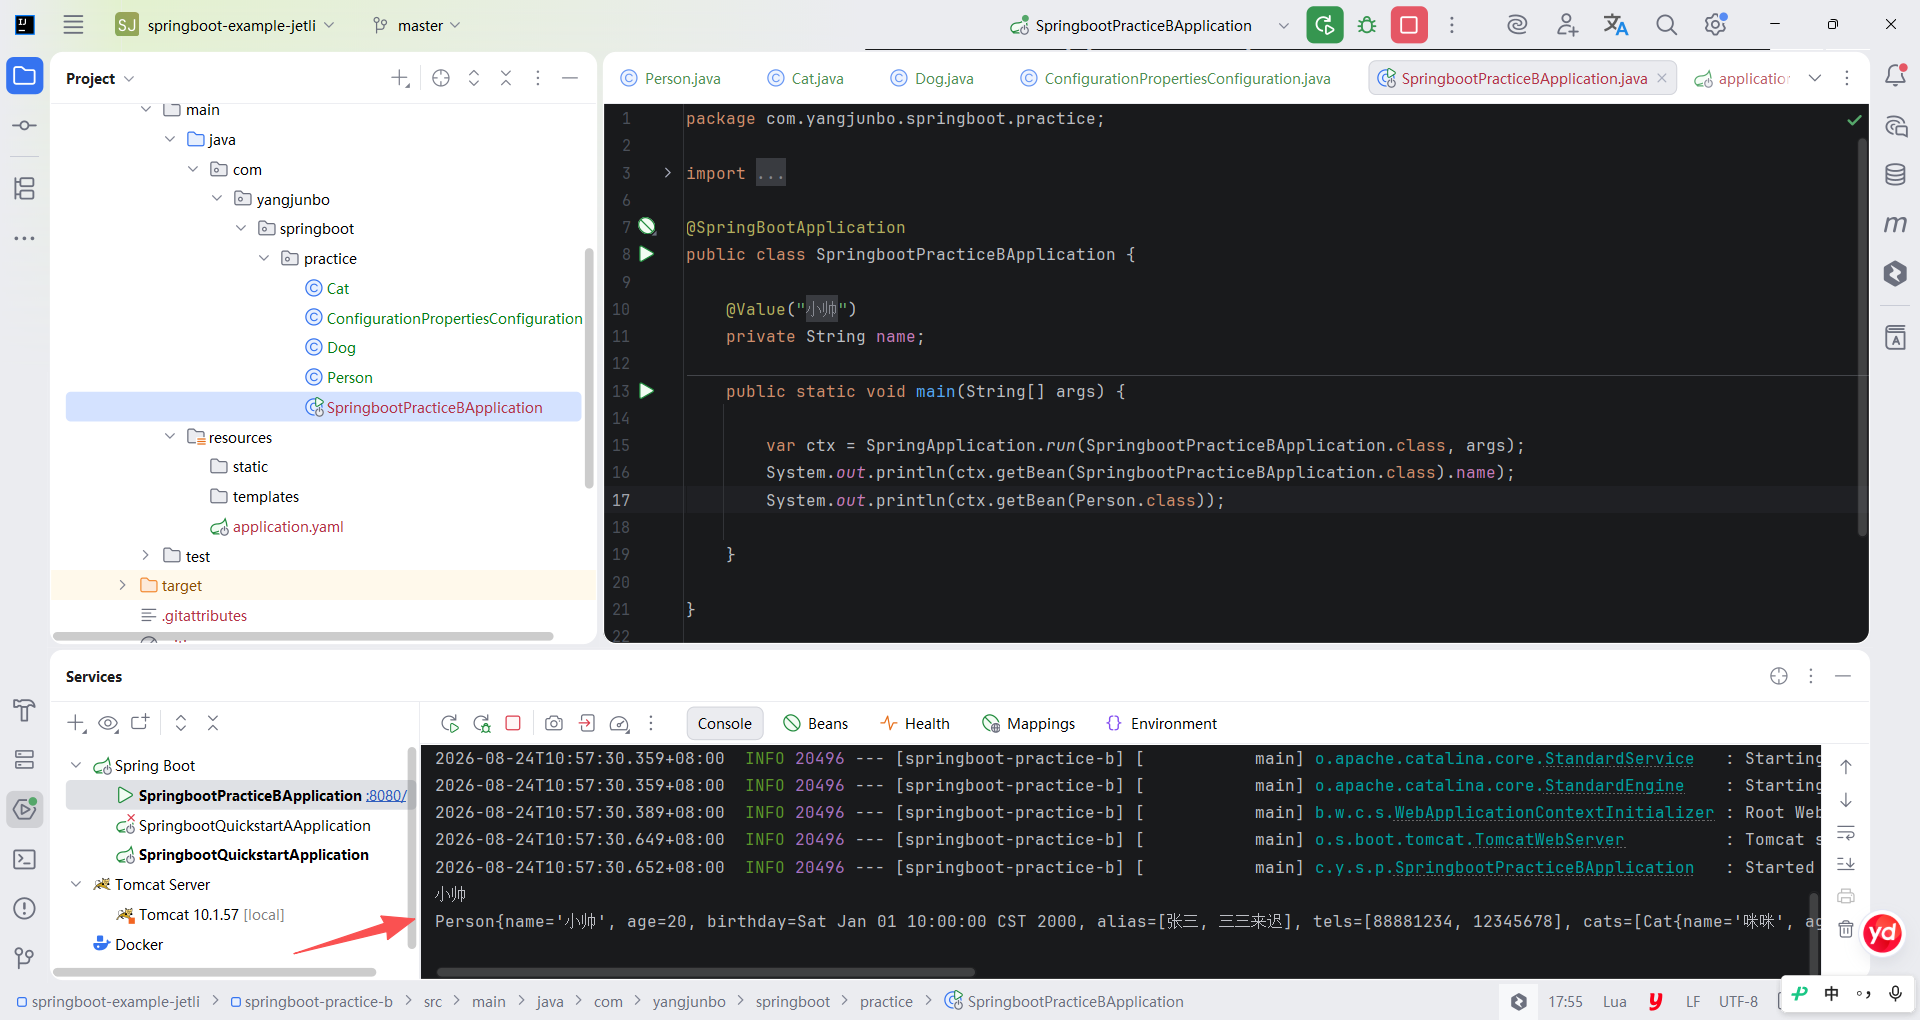
@ConfigurationProperties 注解还可以直接标注在一个被 @Component 注解(或其派生注解)标注的类上,这样即便不用@EnableConfigurationProperties 注解也可以实现属性绑定。所以读者应该能意识到,属性绑定一定是绑定到 IOC 容器中的某个 Bean 上。如果@ConfigurationProperties 注解标注的类没有被注册到 IOC 容器,那么 @EnableConfigura tionProperties 注解的作用就是将对应的类注册到IOC 容器中,然后进行配置属性绑定。
3.属性绑定校验
Spring Boot 提供的属性绑定机制还可以借助 JSR-303 规范中的校验注解实现注入属性的校验,并且 Spring Boot 还有相应的场景启动器。要想使用参数校验,可以在 pom.xml 文件中导入校验场景启动器 spring-boot-starter-validation,这个依赖会默认导入一个 JSR-303 规范的实现HibernateValidator。
xml
<dependency>
    <groupId>org.springframework.boot</groupId>
    <artifactId>spring-boot-starter-validation</artifactId>
</dependency>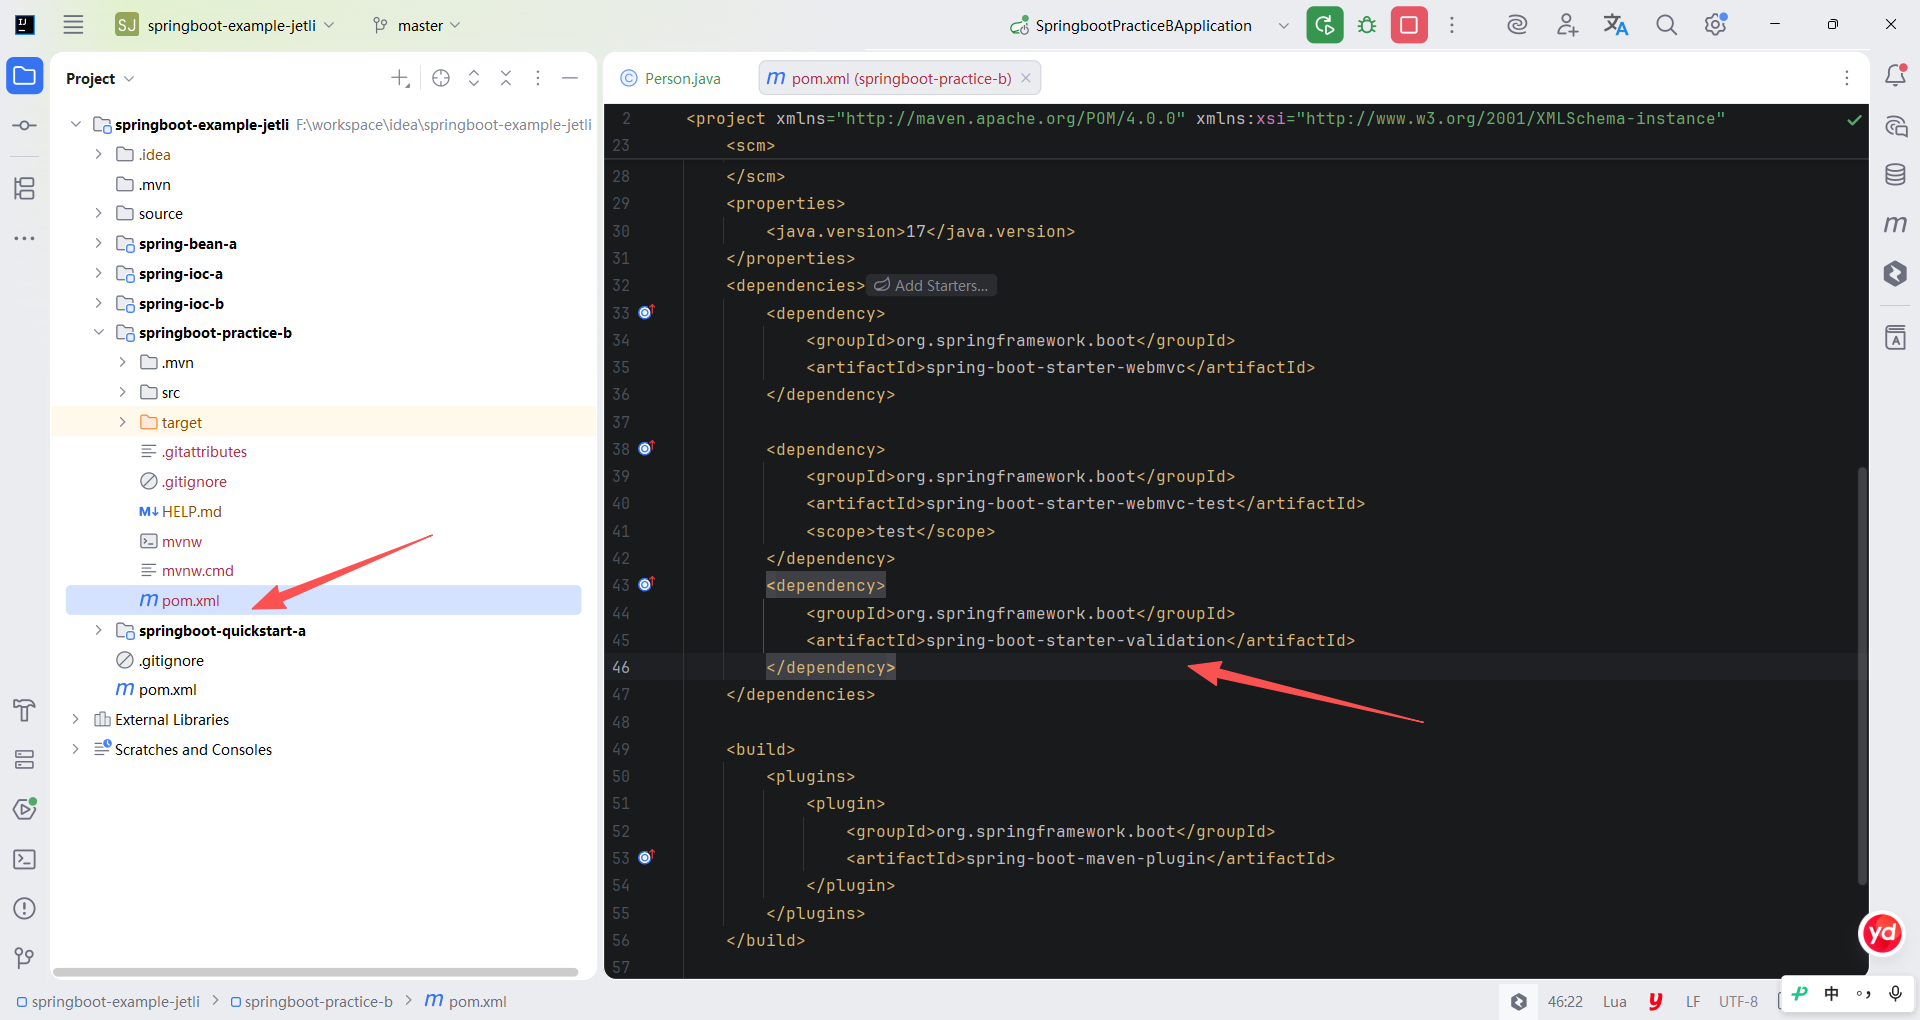
可能有部分读者看到 Hibernate 后会感觉熟悉,但是请读者注意区分,可能读者熟悉的 Hibernate 是一个 ORM 框架,而我们要讲的HibernateValidator 是 Hibernate 组织下的另一个产品,二者在功能和应用上没有瓜葛。
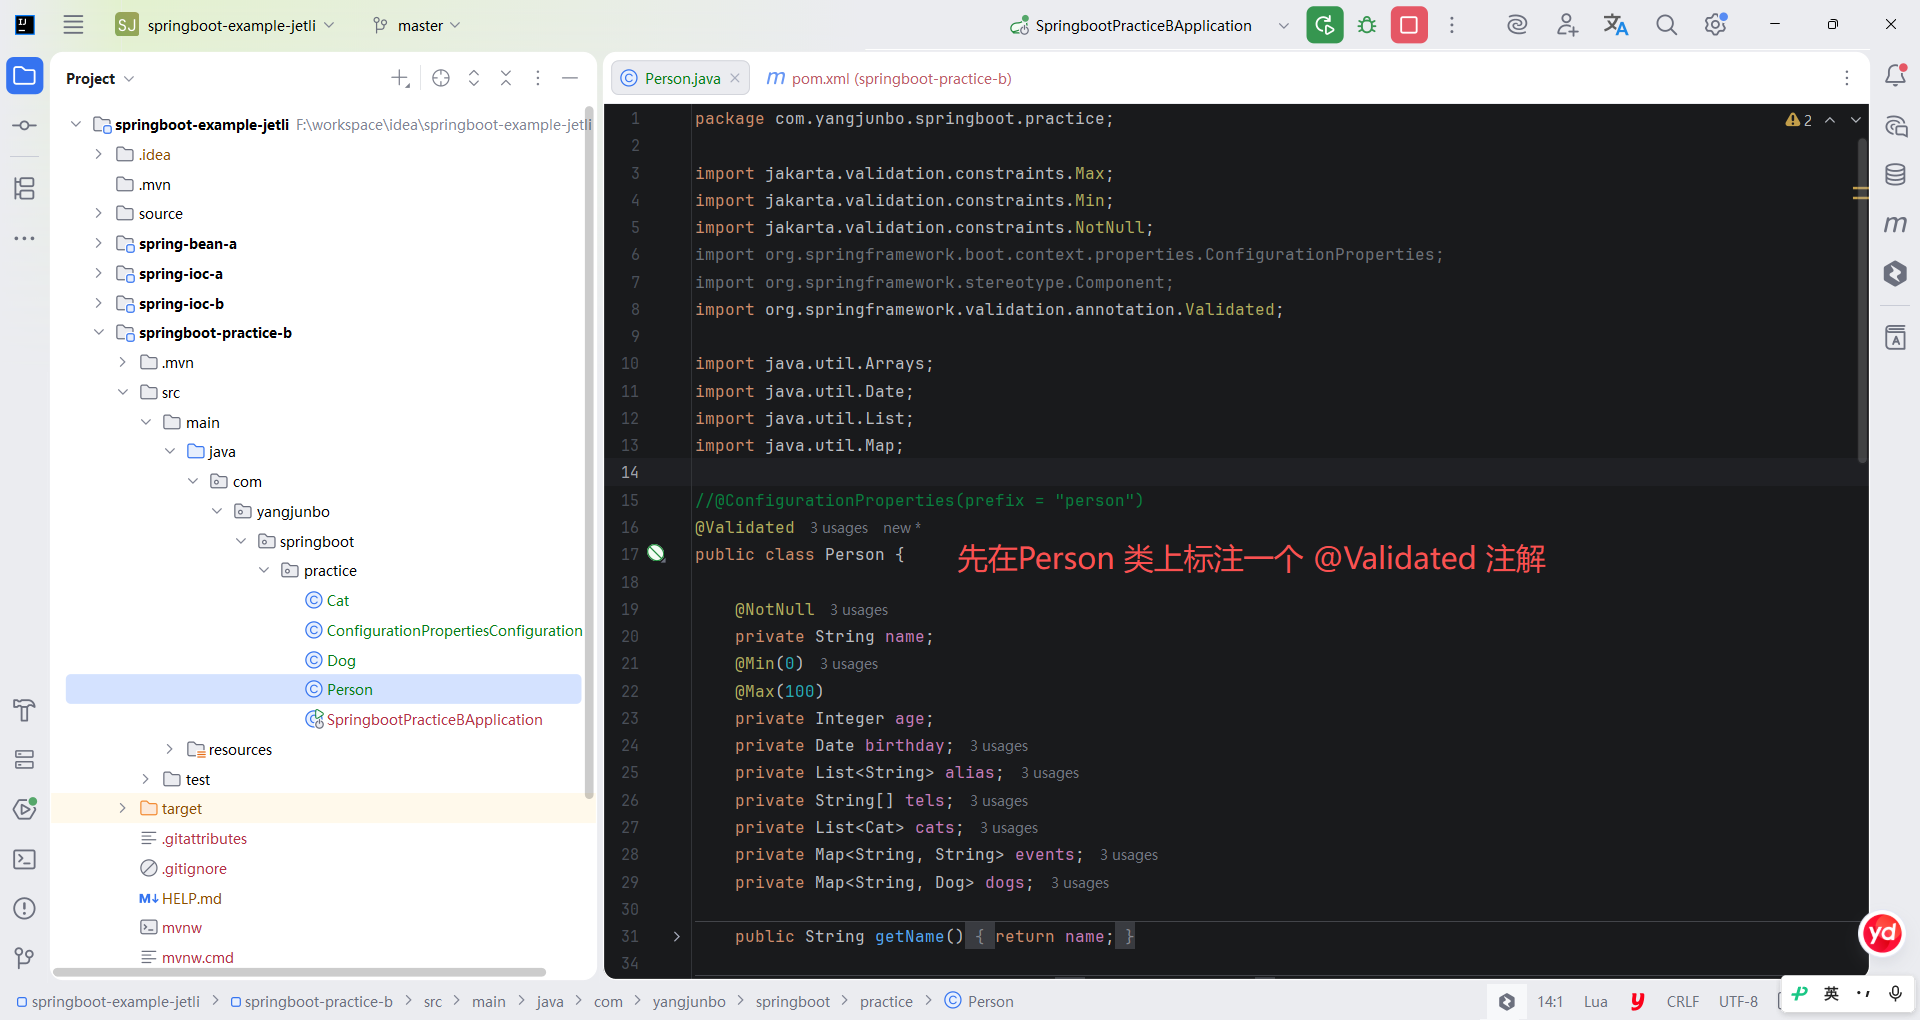
使用 JSR-303 规范的方式非常简单,在需要被校验的属性/参数上标注规范中的注解即可。比如希望给 Person 加以参数校验,则先在Person 类上标注一个 @Validated 注解,代表当前类需要属性/参数校验;之后在 Person 类中给 name 属性加以限制,不允许这个属性为 null,则可以标注一个 @NotNull 注解;另外还希望 age 属性在 0~100 范围内,则可以使用 @Max 和 @Min 注解限定对应的数值范围。
java
package com.yangjunbo.springboot.practice;

import jakarta.validation.constraints.Max;
import jakarta.validation.constraints.Min;
import jakarta.validation.constraints.NotNull;
import org.springframework.boot.context.properties.ConfigurationProperties;
import org.springframework.stereotype.Component;
import org.springframework.validation.annotation.Validated;

import java.util.Arrays;
import java.util.Date;
import java.util.List;
import java.util.Map;

//@ConfigurationProperties(prefix = "person")
@Validated
public class Person {

    @NotNull
    private String name;
    @Min(0)
    @Max(100)
    private Integer age;
    private Date birthday;
    private List<String> alias;
    private String[] tels;
    private List<Cat> cats;
    private Map<String, String> events;
    private Map<String, Dog> dogs;

    public String getName() {
        return name;
    }

    public void setName(String name) {
        this.name = name;
    }

    public Integer getAge() {
        return age;
    }

    public void setAge(Integer age) {
        this.age = age;
    }

    public Date getBirthday() {
        return birthday;
    }

    public void setBirthday(Date birthday) {
        this.birthday = birthday;
    }

    public List<String> getAlias() {
        return alias;
    }

    public void setAlias(List<String> alias) {
        this.alias = alias;
    }

    public String[] getTels() {
        return tels;
    }

    public void setTels(String[] tels) {
        this.tels = tels;
    }

    public List<Cat> getCats() {
        return cats;
    }

    public void setCats(List<Cat> cats) {
        this.cats = cats;
    }

    public Map<String, String> getEvents() {
        return events;
    }

    public void setEvents(Map<String, String> events) {
        this.events = events;
    }

    public Map<String, Dog> getDogs() {
        return dogs;
    }

    public void setDogs(Map<String, Dog> dogs) {
        this.dogs = dogs;
    }

    @Override
    public String toString() {
        return "Person{" +
                "name='" + name + '\'' +
                ", age=" + age +
                ", birthday=" + birthday +
                ", alias=" + alias +
                ", tels=" + Arrays.toString(tels) +
                ", cats=" + cats +
                ", events=" + events +
                ", dogs=" + dogs +
                '}';
    }

}
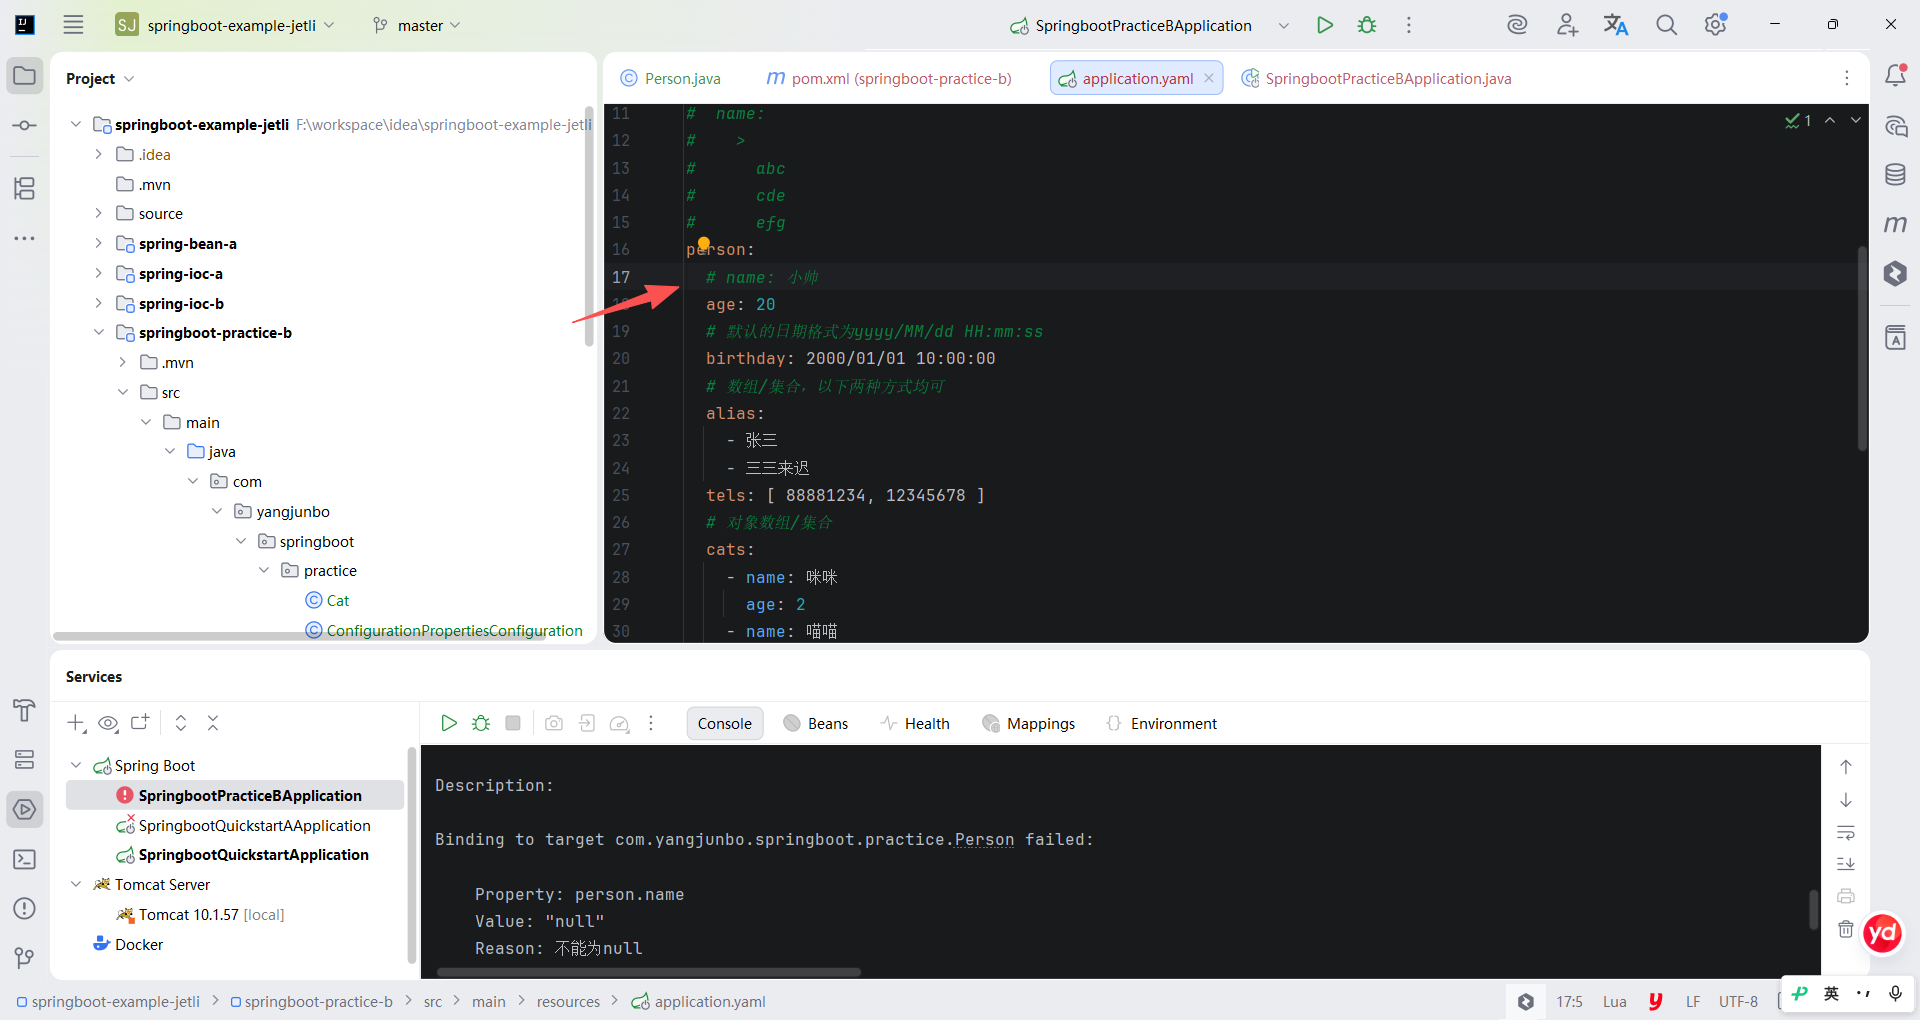
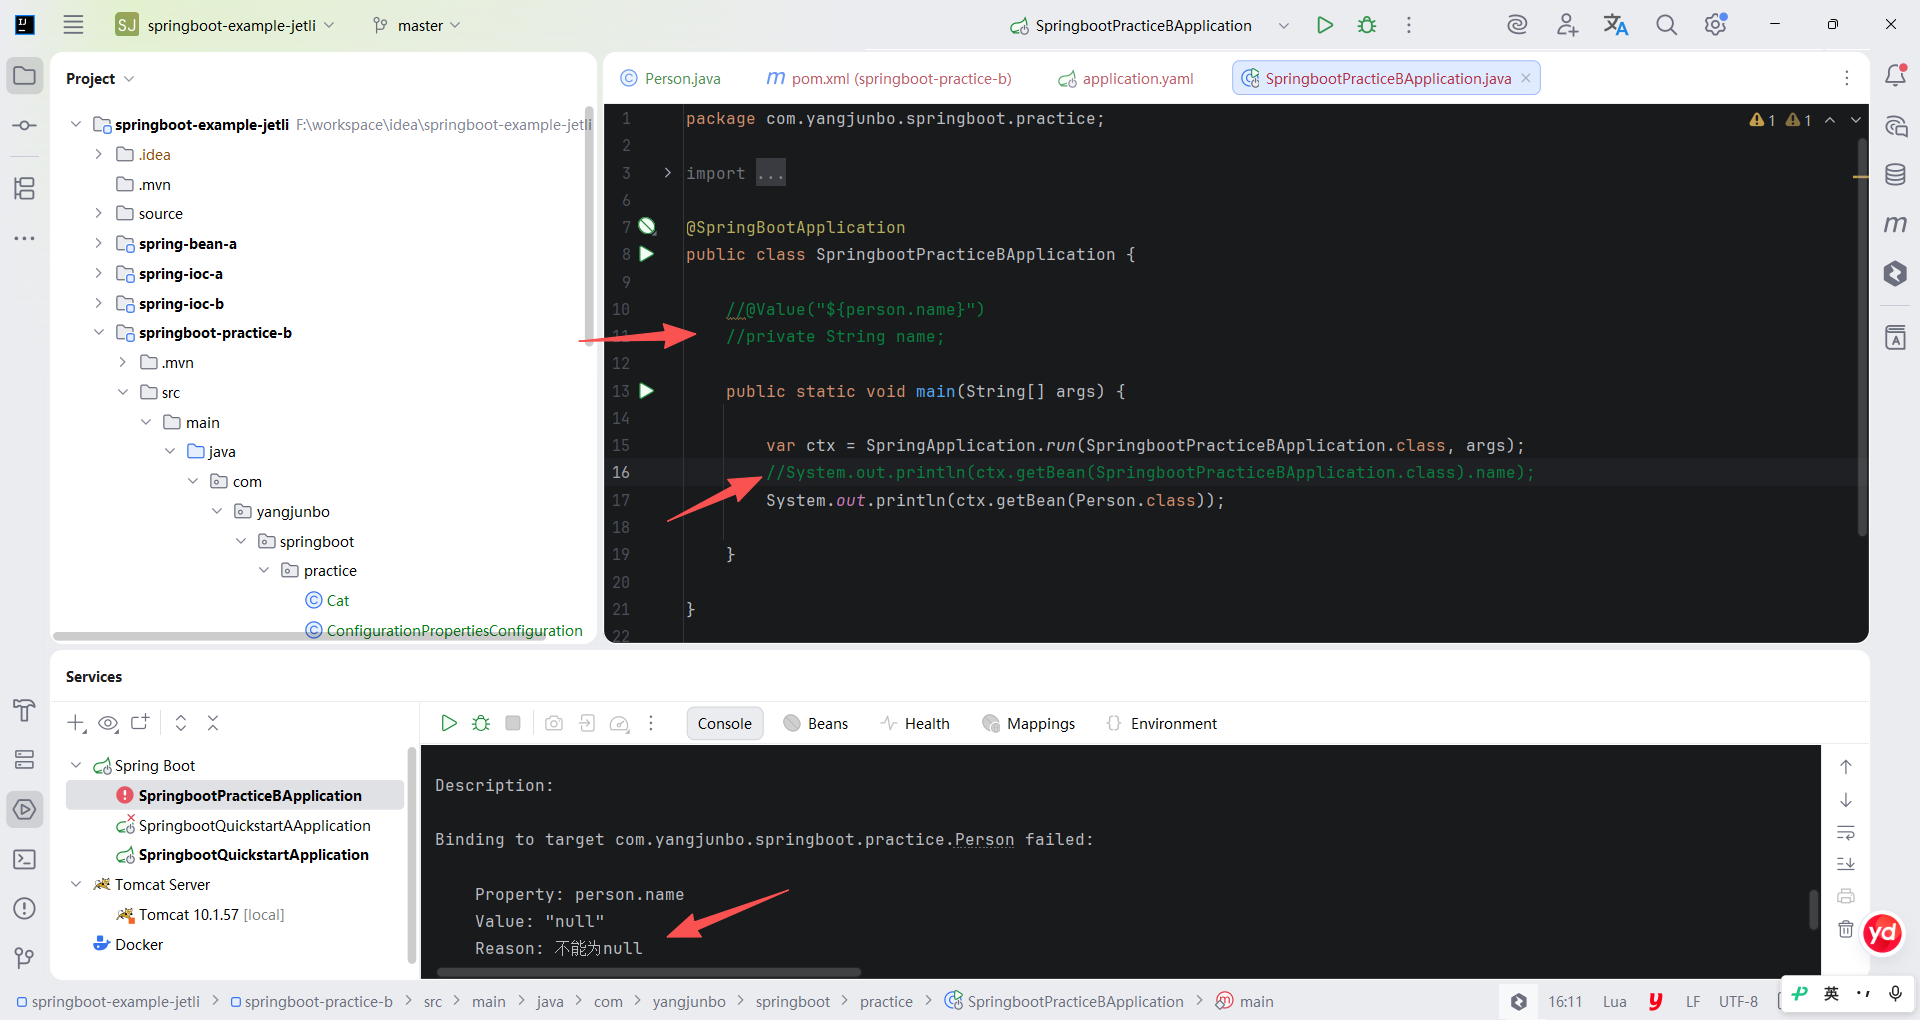
为了演示属性校验的效果,注释掉 application.yml 文件中的 person.name 属性,重新运行 Spring Boot 主启动类后会发现程序启动失败,控制台中打印了如下信息,说明参数校验已经生效。
数据校验的规范在 2017 年 8 月更新到 Bean Validation 2.0 版本,对应的规范为 JSR-380,本书 9.9 节引用数据校验规范时,提及的 JSR-303和 JSR-380 都是指同一套规范。
4.与 @Value 注解的区别
简单对比 @ConfigurationProperties 与 @Value 注解的区别
| 对比维度 | @ConfigurationProperties | @Value |
|---|---|---|
| 松散语法(lastName = last-name) | ✅ | ❌ |
| SpEL 表达式 | ❌ | ✅ |
| JSR-303 规范 | ✅ | ❌ |
| 复杂类型注入 | ✅ | ❌ |
6.2 外部化配置
外部化配置的思想非常重要,将可能发生改动的配置属性抽取为可以任意改动的配置文件,即可实现应用开发完毕后无须改动 Java 代码、无须重新编译就能改变应用的配置。
6.2.1 Spring Boot 支持多种配置源
外部化配置的产物是一组配置源,简单地理解,配置源即配置的来源,在前面几章内容中,
原生 Spring Framework 应用主要使用 XML 配置文件与注解配置类作为应用的配置源驱动 IOC 容器;
而到 Spring Boot 中不再推荐使用 XML 配置文件,因而在 Spring Boot 中的配置源主要就是 properties 文件、YML 文件以及注解配置类,
又由于注解配置类本身是 Java 代码,因此 Spring Boot 的外部化配置源主要就是 properties 和 YML 文件。
当 Spring Boot 应用启动时,Spring Boot 会从当前应用中读取 application.properties 和 application.yml 文件,解析其中的配置属性并装载到IOC 容器中,配合模块装配、条件装配等特性完成组件的注册。
其实外部化配置不仅以 properties 文件、YML 文件形式体现,还可以由环境变量、命令行参数等承载,Spring Boot 对于上述外部化配置源均予以支持。
1.properties 与 YML
properties 和 YML 文件属于 Spring Boot 最推荐使用的方式,使用它们的好处是修改配置文件无须重新编译,前面编写的所有测试代码均使用properties 和 YML 文件。
2.主启动类
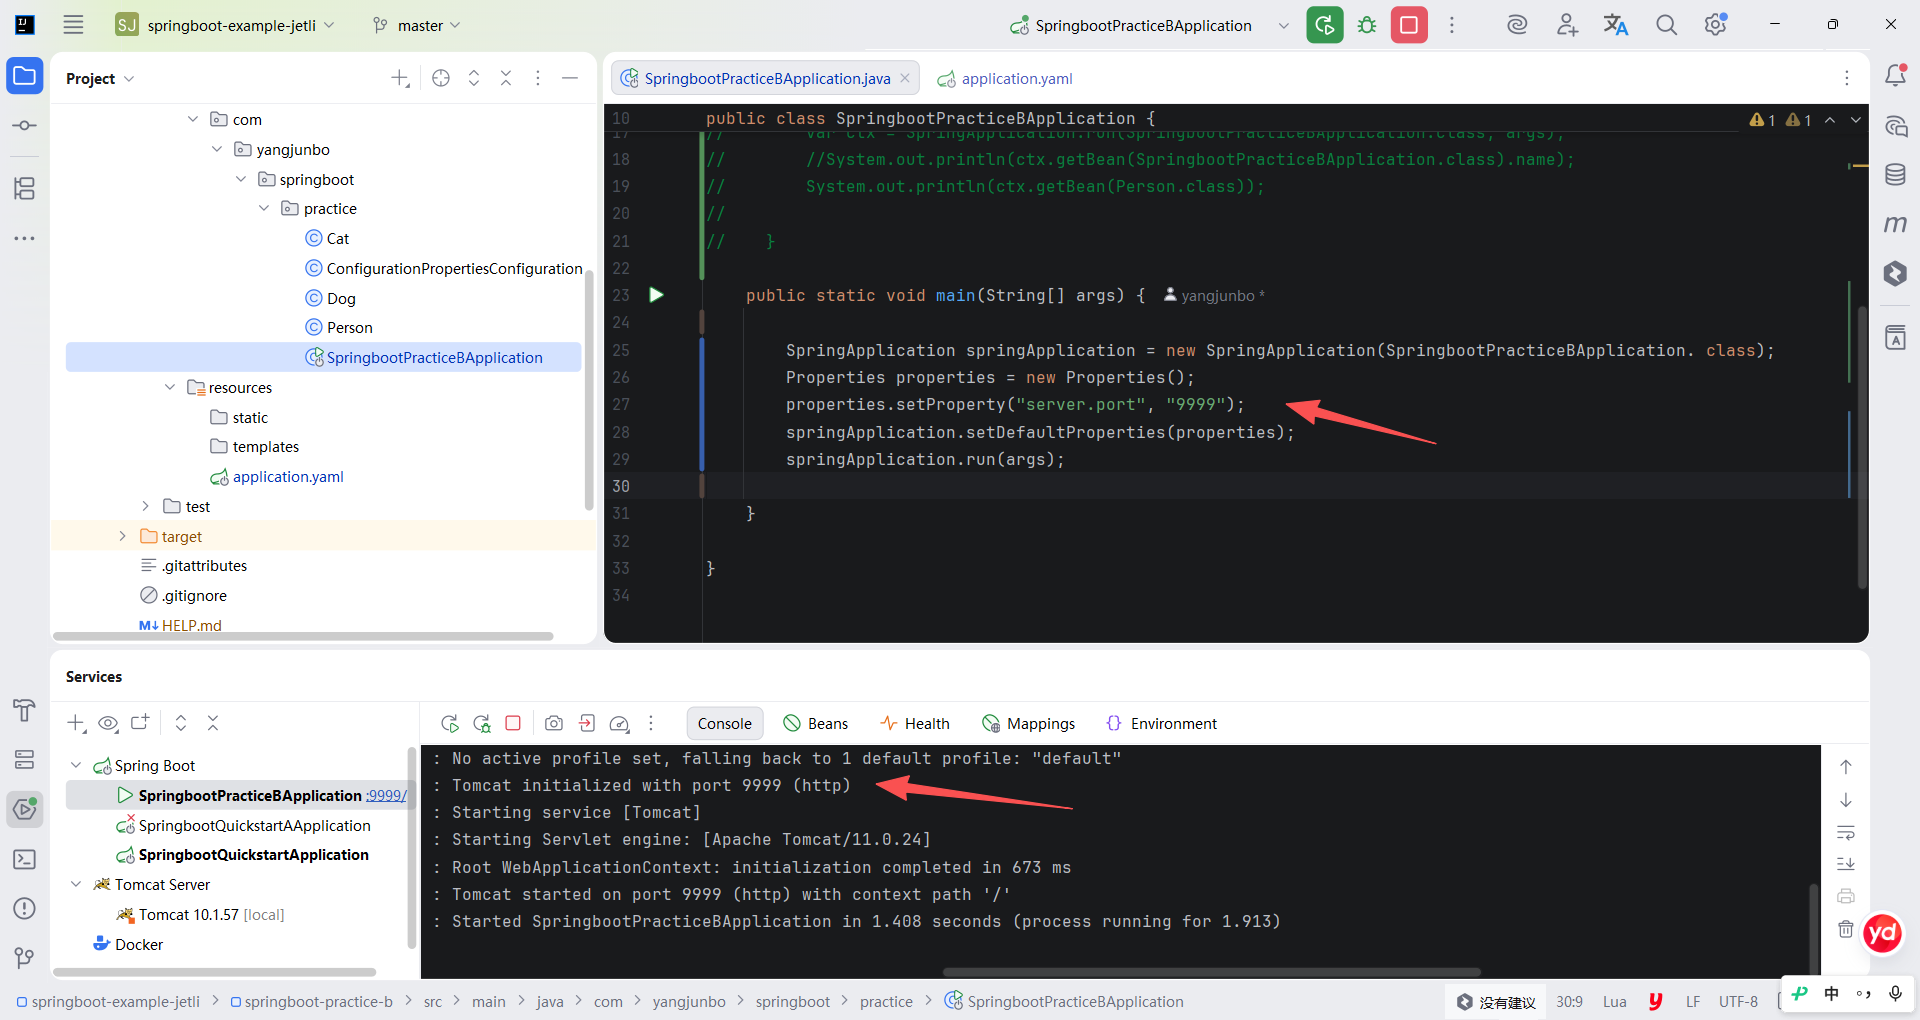
主启动类中也可以指定配置源。Spring Boot 中引导应用启动的 SpringApplication 不仅有静态方法引导,还可以直接使用 new 创建SpringApplication 并返回(此外还有使用 SpringApplicationBuilder 创建的方式,效果一致)。创建完毕的 SpringApplication 对象有一个setDefaultProperties 方法,该方法可以接收一个 Properties 对象或 Map 集合,代表当前应用的默认配置。指定默认的嵌入式 Tomcat 的监听端口为 9999 而非 8080。
运行 main 方法,观察控制台打印的端口号果然为 9999,证明使用 Spring Boot 主启动类中 SpringApplication 的 setDefaultProperties 方法也可以指定配置属性,被输入的 Properties 对象或 Map 集合即配置源。
java
package com.yangjunbo.springboot.practice;

import org.springframework.beans.factory.annotation.Value;
import org.springframework.boot.SpringApplication;
import org.springframework.boot.autoconfigure.SpringBootApplication;

import java.util.Properties;

@SpringBootApplication
public class SpringbootPracticeBApplication {

    //@Value("${person.name}")
    //private String name;

//    public static void main(String[] args) {
//
//        var ctx = SpringApplication.run(SpringbootPracticeBApplication.class, args);
//        //System.out.println(ctx.getBean(SpringbootPracticeBApplication.class).name);
//        System.out.println(ctx.getBean(Person.class));
//
//    }

    public static void main(String[] args) {

        SpringApplication springApplication = new SpringApplication(SpringbootPracticeBApplication. class);
        Properties properties = new Properties();
        properties.setProperty("server.port", "9999");
        springApplication.setDefaultProperties(properties);
        springApplication.run(args);

    }

}
3.命令行参数(临时属性)
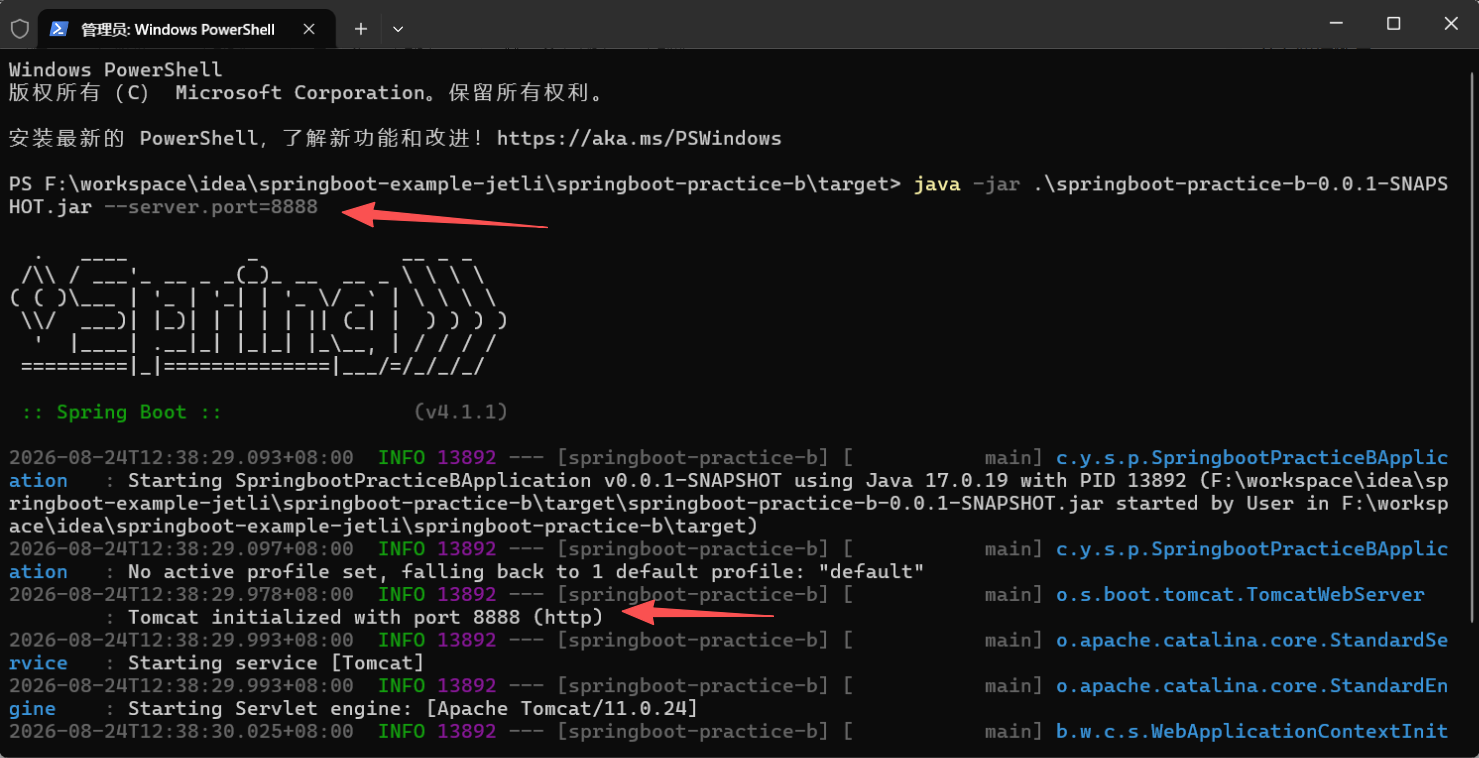
另外一个常用的配置源是在启动 Java 应用时指定的命令行参数,我们可以在运行 Spring Boot 应用时使用 "--key=value" 的方式指定配置属性的值(例如 --server.port=8888),这种方式在 jar 包启动的场景中居多。
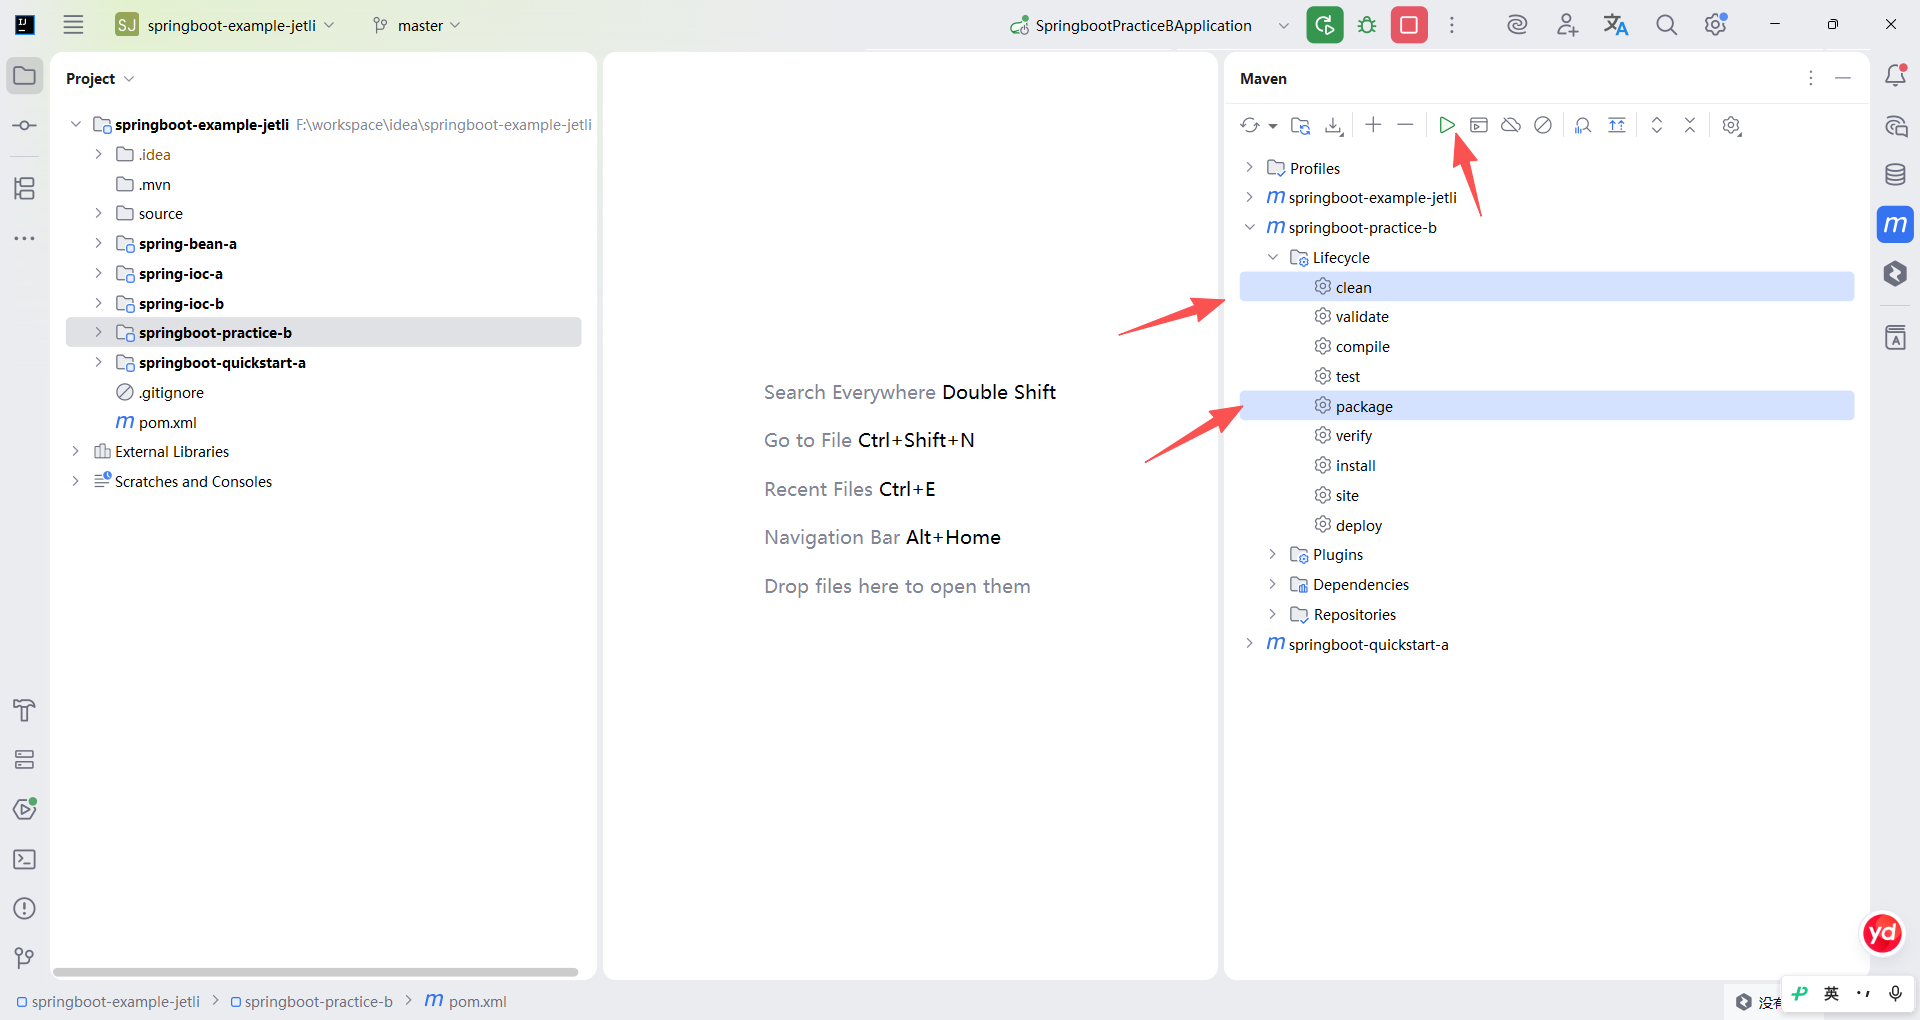
将当前工程打包成可执行 jar 包,并使用 java -jar 命令引导启动,在没有任何命令行参数传递时,Tomcat 的监听端口仍为上面的 9999,而当我们指定命令行参数启动时(java -jar xxx.jar --server.port=8888),应用启动后 Tomcat 会运行在 8888 端口。
如果需要同时配置多个临时属性,可以在 java -jar 命令的末尾无限追加,
例如 java -jar demo.jar --server.port=8888 --spring.application.name=demo。
4.引用其他外部化配置文件
Spring Boot 同样可以使用 @PropertySource 引用其他 properties 文件,具体的使用方式可参考 4.7 节的内容。此外 Spring Boot 还支持在application.properties 中声明 spring.config.import 配置项,指定引用的其他 properties 文件的路径,这种方式与 @PropertySource 的最终效果相同。
5.环境变量
最后介绍一种仅供了解的配置源:环境变量。所有可以运行 Java 应用的机器,其运行的操作系统通常都会有环境变量的配置,Spring Boot 也会将环境变量作为配置源中的一种装载到应用中。之所以是仅供了解,是因为大多数线上生产环境不会真的拿环境变量作为配置源的一部分,使用环境变量,会造成配置内容零散分布在多个位置,不利于后期运维;而特意提及它的原因,则是给读者提个醒,如果在本书后续的高级篇或者自行探究原理时看到了一组与当前操作系统相关的配置时,希望读者能够意识到这是 Spring Boot 采集的环境变量信息。
6.2.2 多环境开发
Spring Boot 依托 Spring Framework 搭建,同样支持 Profile 机制,即基于环境的配置。实际项目开发中通常会遇到一种场景:开发环境、测试环境、生产环境连接的数据库都不一样,这种情况下如果需要切换工程的运行环境,就可以利用 Spring Boot 的 Profile 机制,即多环境开发机制解决。
1.基本使用
Spring Boot 使用多环境开发通常分为两个步骤:定义环境(指定哪些组件和配置属性在哪个环境中生效)、激活环境(指定一个或多个环境使其生效)。
(1) 定义环境
与 Spring Framework 类似,一个工程中包含几种环境,需要预先设计好,譬如在第 4 章的 4.5.1 节中,我们就预先设定了 city 和 wilderness 两个环境,这两个环境下分别会注册不同的 Bean,或者是某些 Bean 只会在指定的环境下注册。此外,没有标注 @Profile 注解的 Bean 会在所有环境中生效。
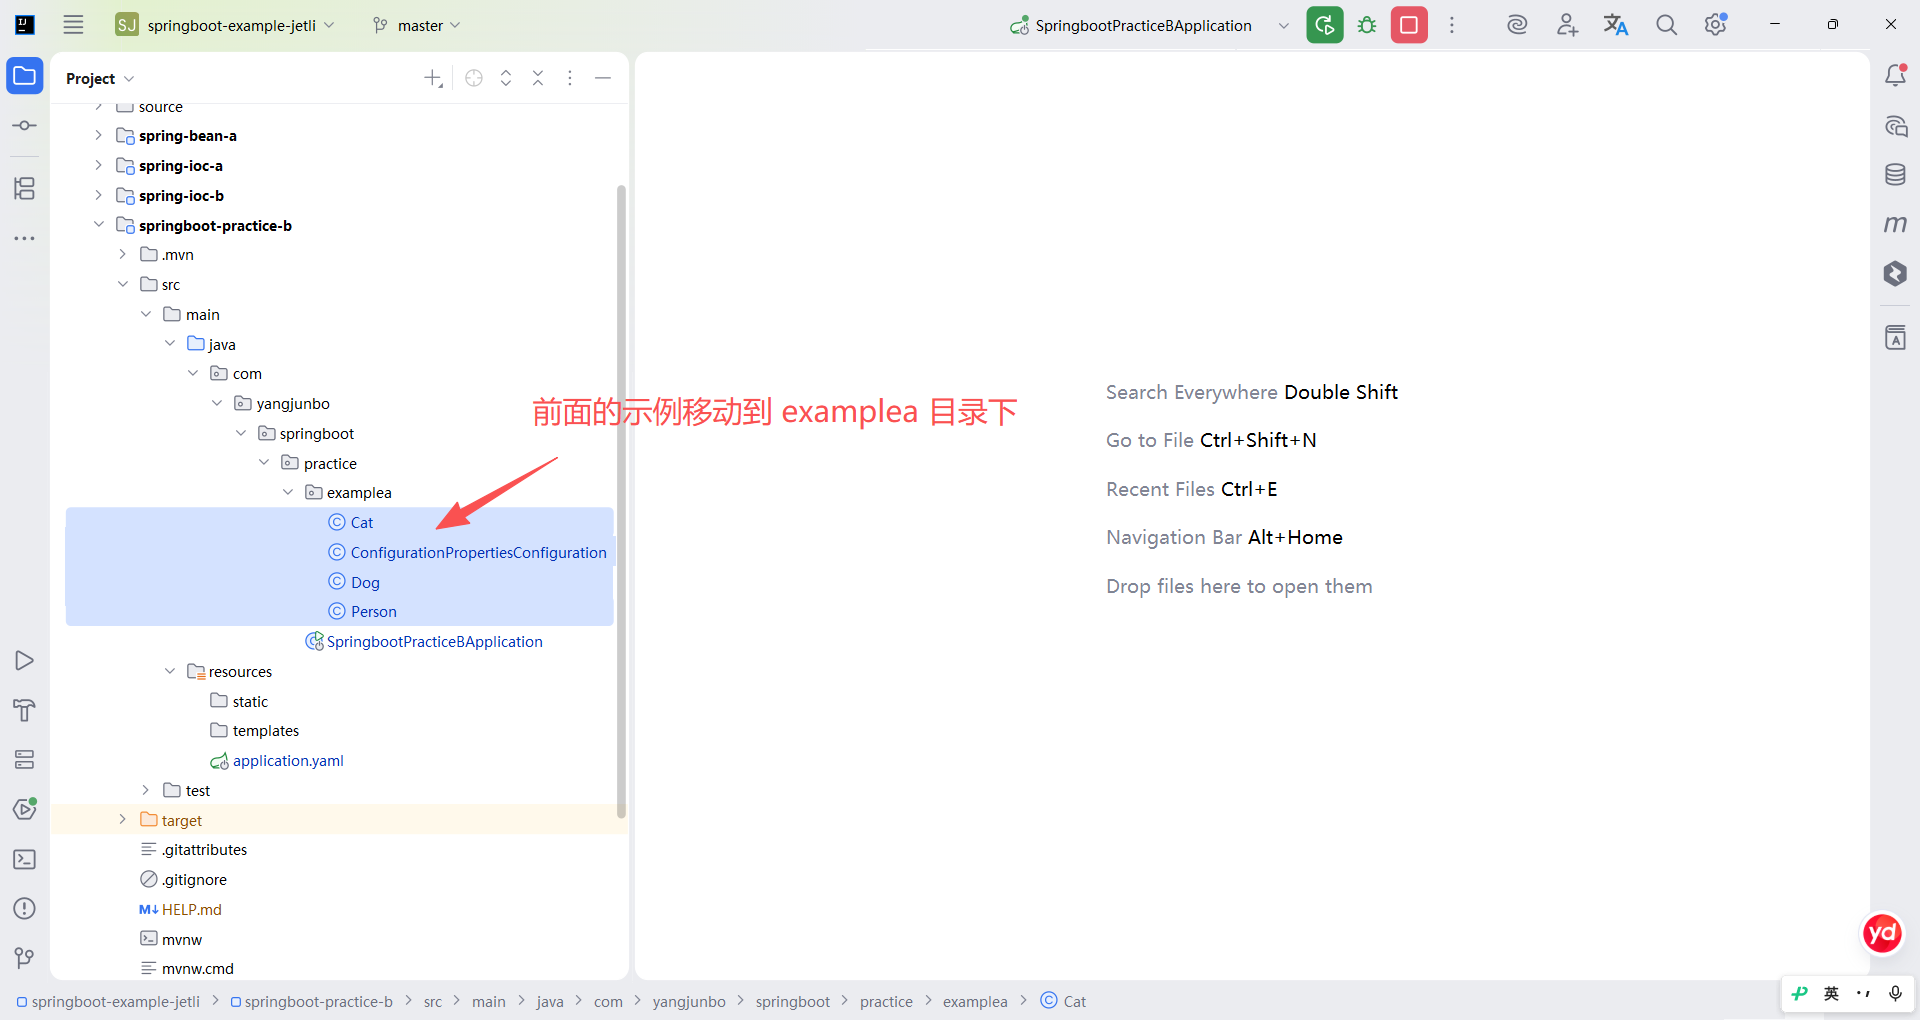
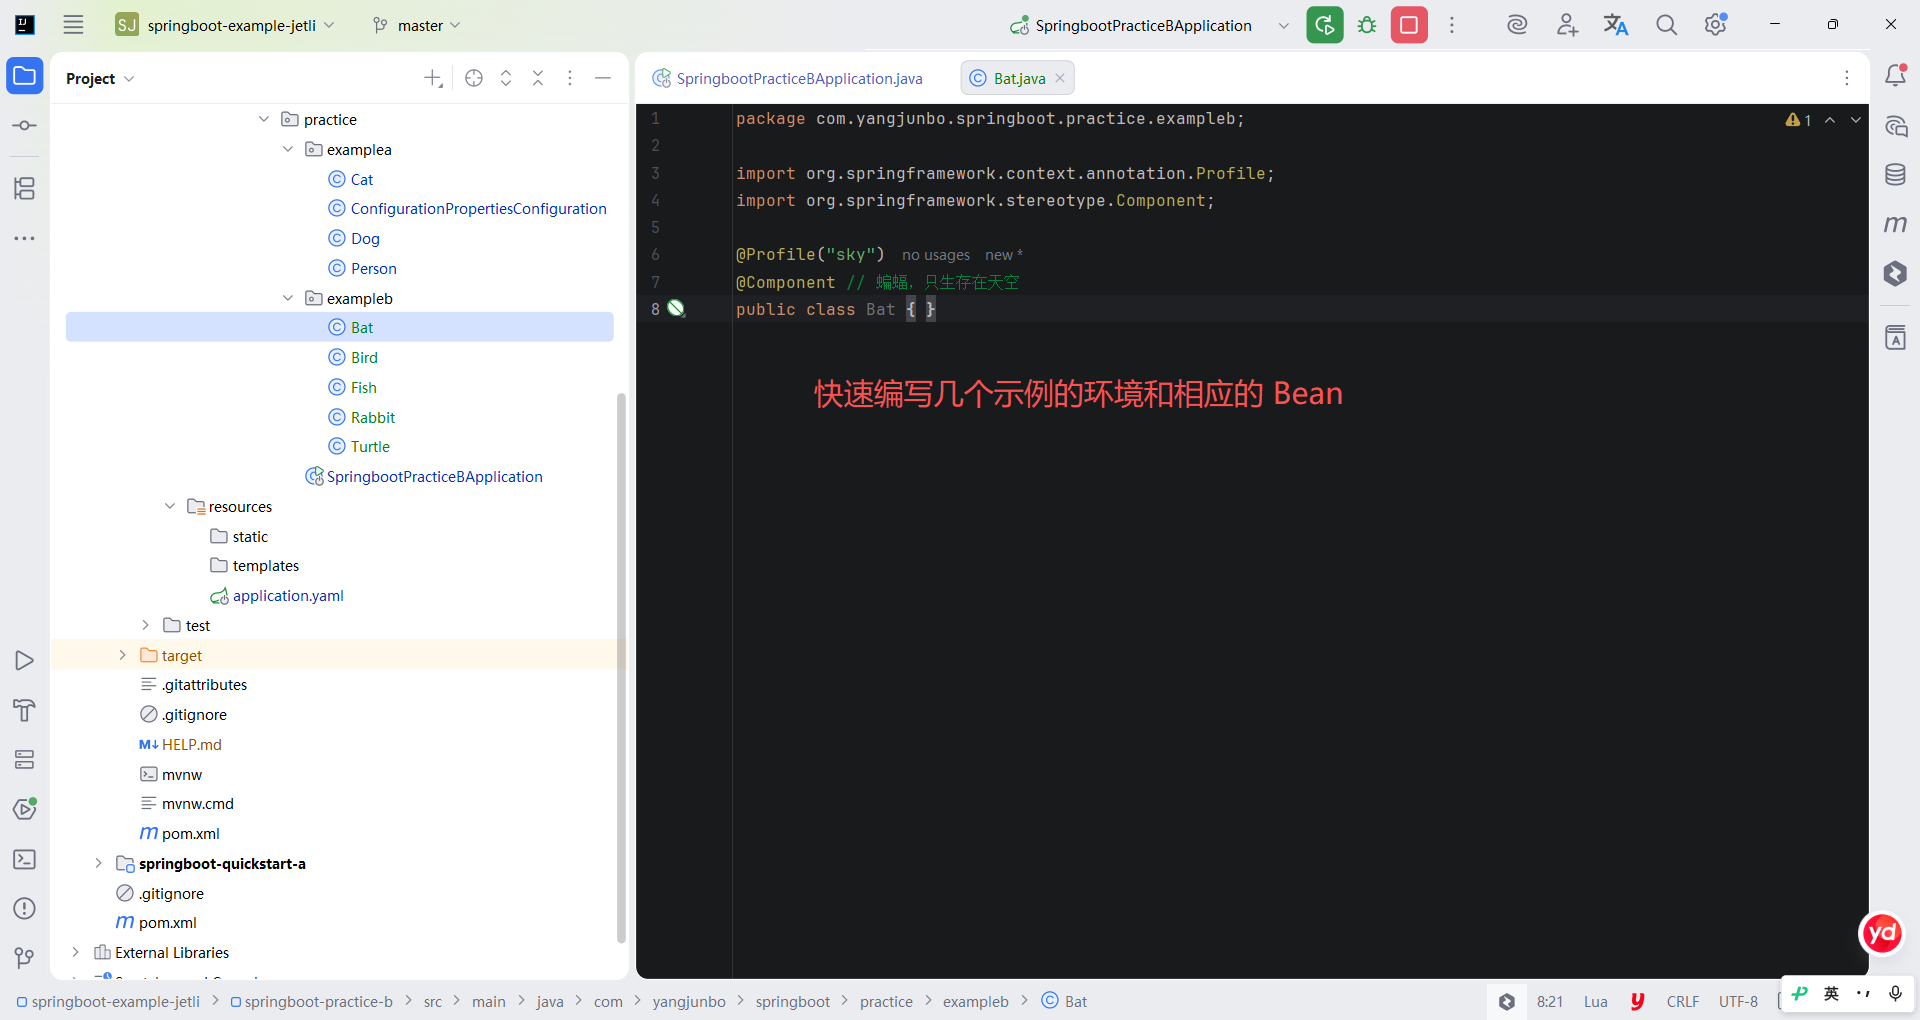
具体定义环境的方式与 4.5.1 节的内容完全相同。为了方便接下来的演示,本节快速编写几个示例的环境和相应的 Bean。代码中共涉及 3 个环境:陆地 land、海洋 ocean、天空 sky。
java
package com.yangjunbo.springboot.practice.exampleb;

import org.springframework.context.annotation.Profile;
import org.springframework.stereotype.Component;

@Profile("sky")
@Component // 蝙蝠,只生存在天空
public class Bat { }
java
package com.yangjunbo.springboot.practice.exampleb;

import org.springframework.context.annotation.Profile;
import org.springframework.stereotype.Component;

@Profile({"land", "sky"})
@Component // 小鸟,可生存在陆地和天空
public class Bird { }
java
package com.yangjunbo.springboot.practice.exampleb;

import org.springframework.context.annotation.Profile;
import org.springframework.stereotype.Component;

@Profile("ocean")
@Component // 鱼,只生存在海洋
public class Fish { }
java
package com.yangjunbo.springboot.practice.exampleb;

import org.springframework.context.annotation.Profile;
import org.springframework.stereotype.Component;

@Profile("land")
@Component // 兔子,只生存在陆地
public class Rabbit { }
java
package com.yangjunbo.springboot.practice.exampleb;

import org.springframework.context.annotation.Profile;
import org.springframework.stereotype.Component;

@Profile({"land", "ocean"})
@Component // 乌龟,可生存在陆地和海洋
public class Turtle { }
(2) 默认环境
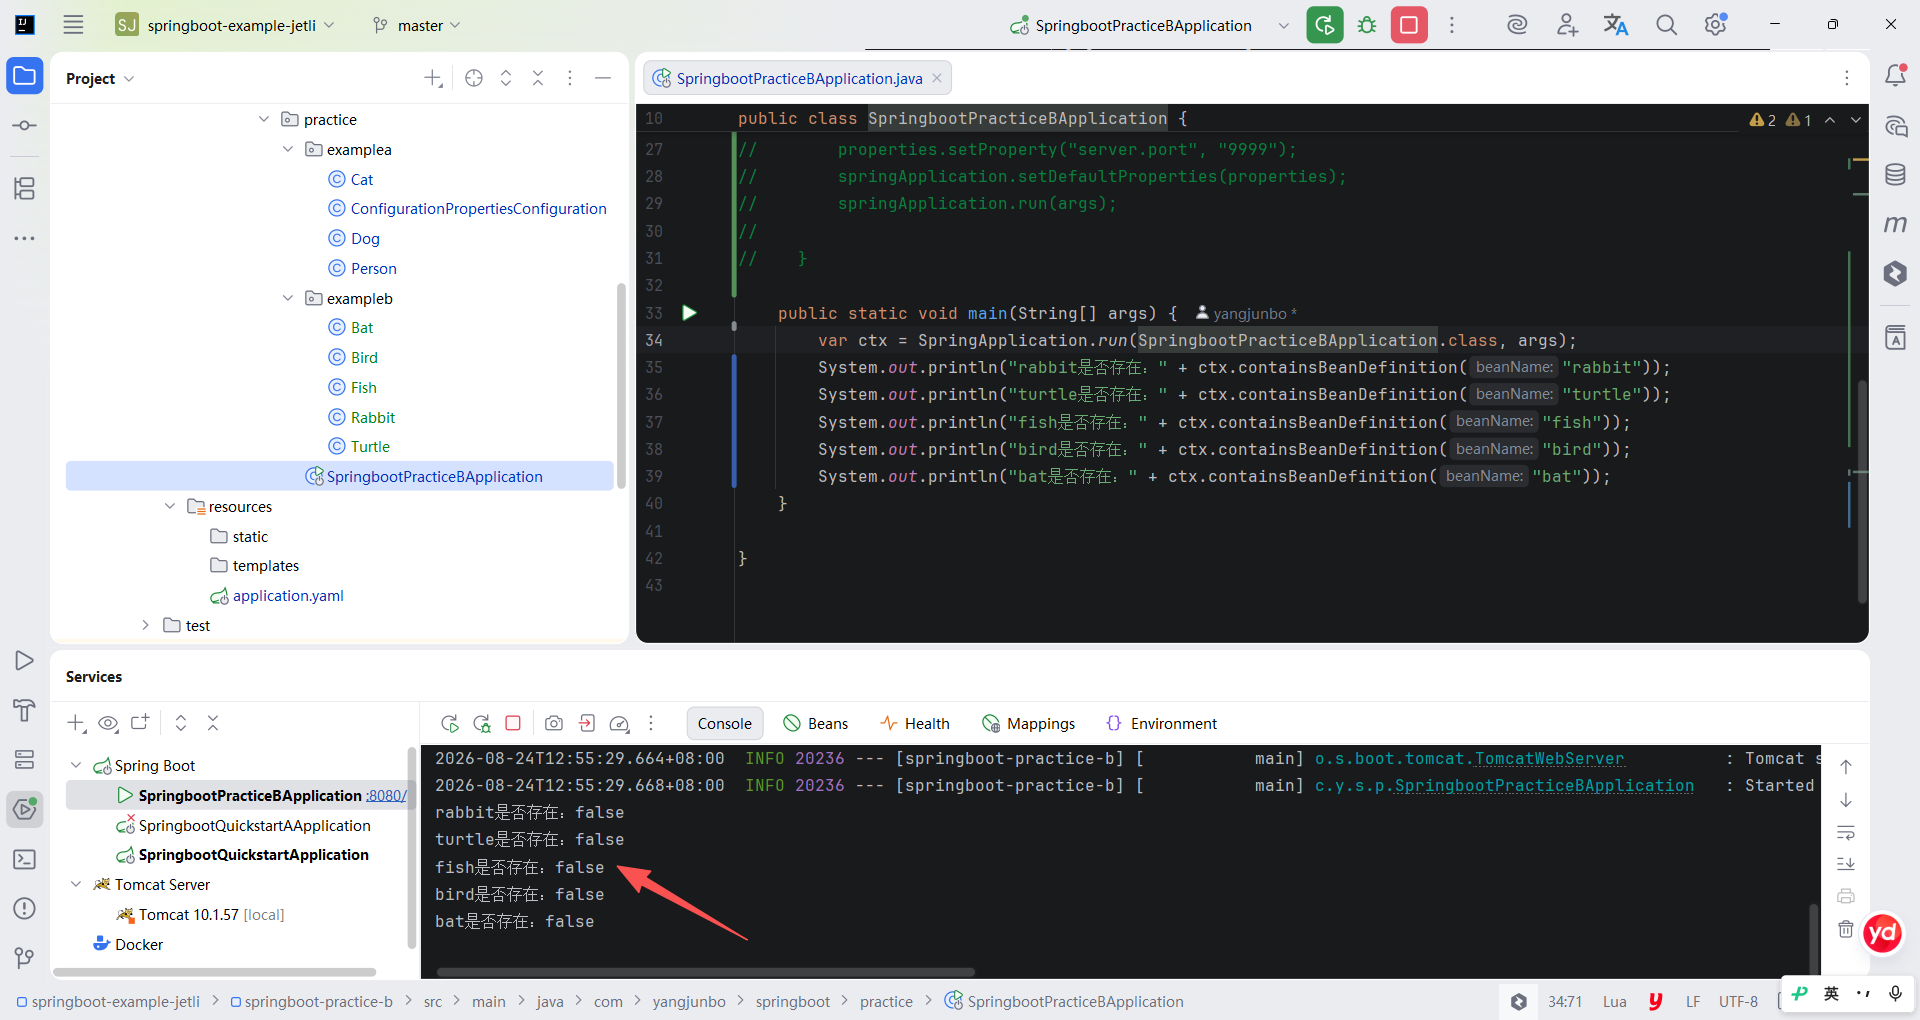
定义好环境后,下面需要激活上述环境,如果不激活任何环境,则上面定义的 5 个 Bean 都不会注册到 IOC 容器中,我们可以在主启动类的main 方法中获取 IOC 容器,并通过 containsBeanDefinition 方法检查容器中是否包含某个 Bean。
如果此时直接运行 main 方法,则控制台中会打印 5 个 false,说明上述 Bean 均未注册到 IOC 容器中。出现这个现象的原因是,Spring Boot 承接自 Spring Framework,它在没有显式指定激活环境时有一个默认的环境:default。很明显,上面的 5 个 Bean 标注的 Profile 中均没有default,所以它们都不会在 IOC 容器中存在。
(3) 激活环境
为了让上述定义的 Bean 能够注册到 IOC 容器中,我们需要显式指定环境,Spring Boot 中指定环境的方式有 3 种,下面逐一介绍。
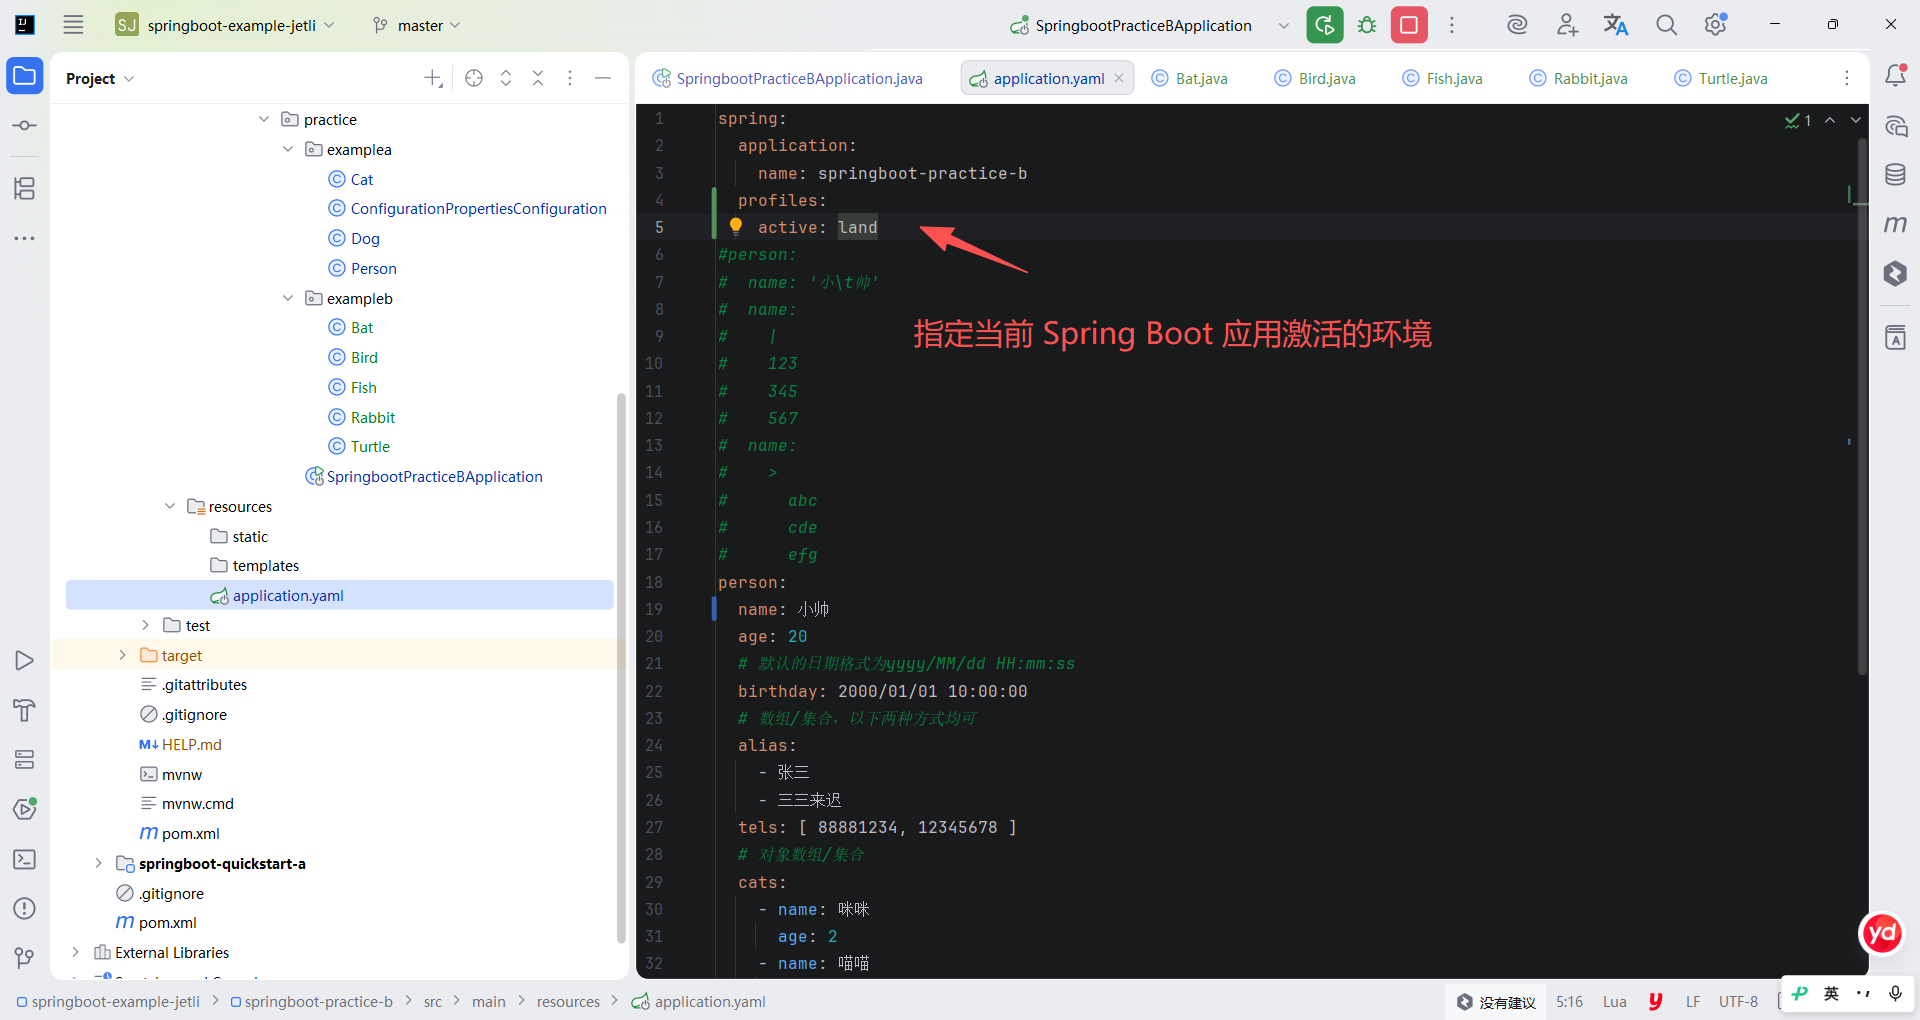
a.通过配置文件指定
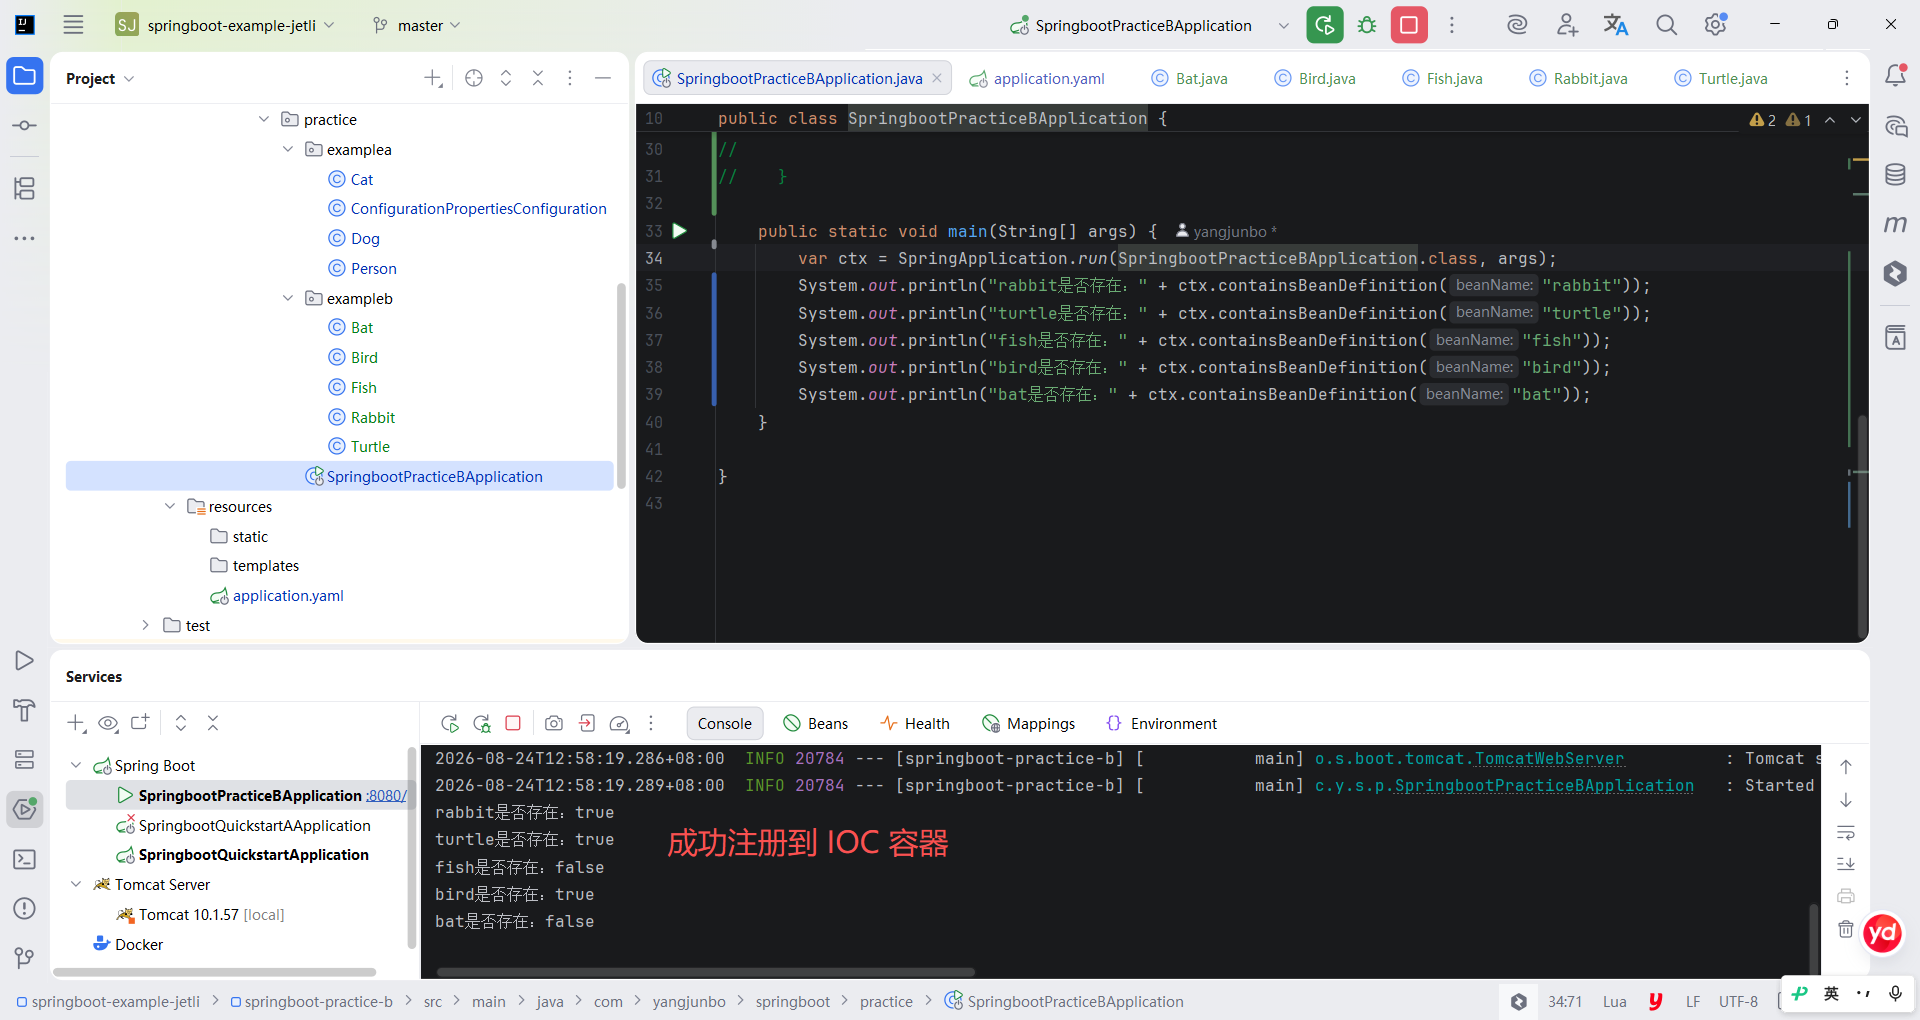
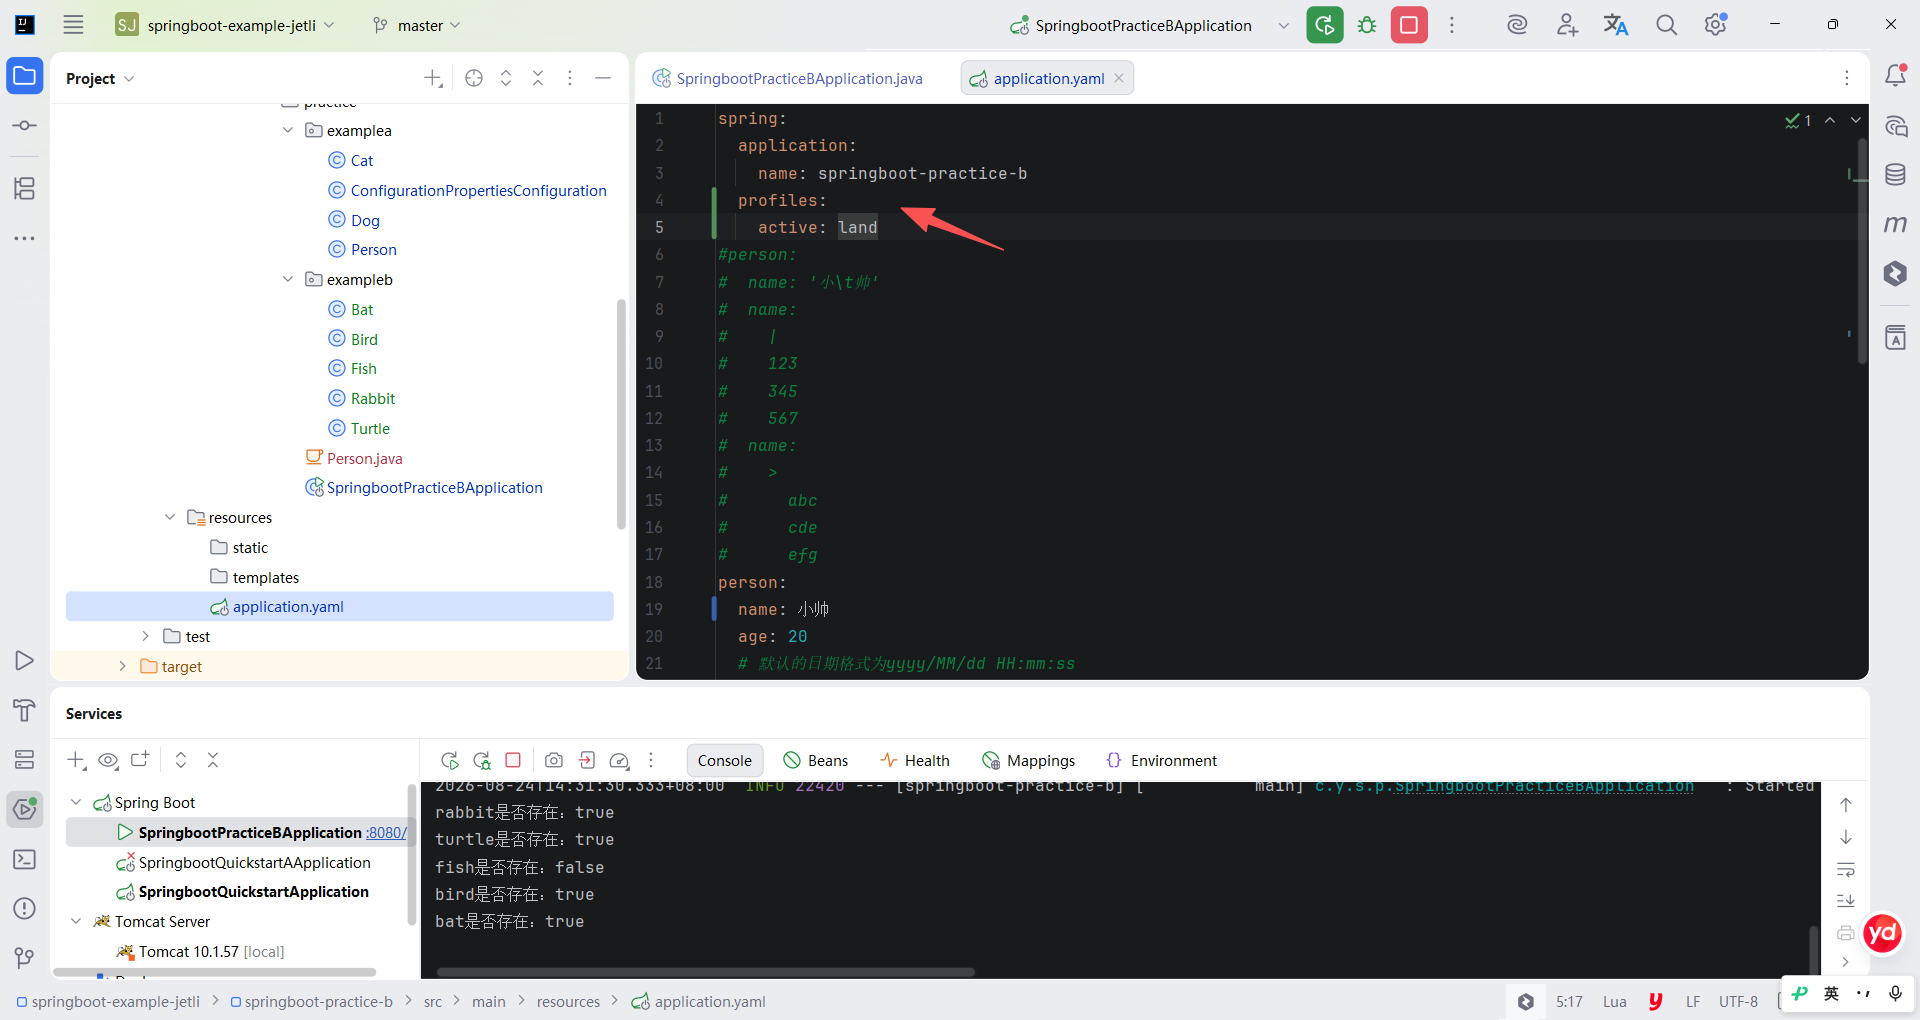
在 application.properties 或 application.yml 文件中,通过配置 spring. profiles.active 属性,可以指定当前 Spring Boot 应用激活的环境。如此指定后,重新运行主启动类的 main 方法,可以发现 rabbit、turtle、bird 成功注册到 IOC 容器,控制台打印结果为 true。注意,spring.profiles.active 可以同时指定多个激活的环境,譬如我们同时指定 ocean 和 sky,则控制台中除了打印 rabbit 为 false,其余都为 true。
b.通过命令行启动参数指定
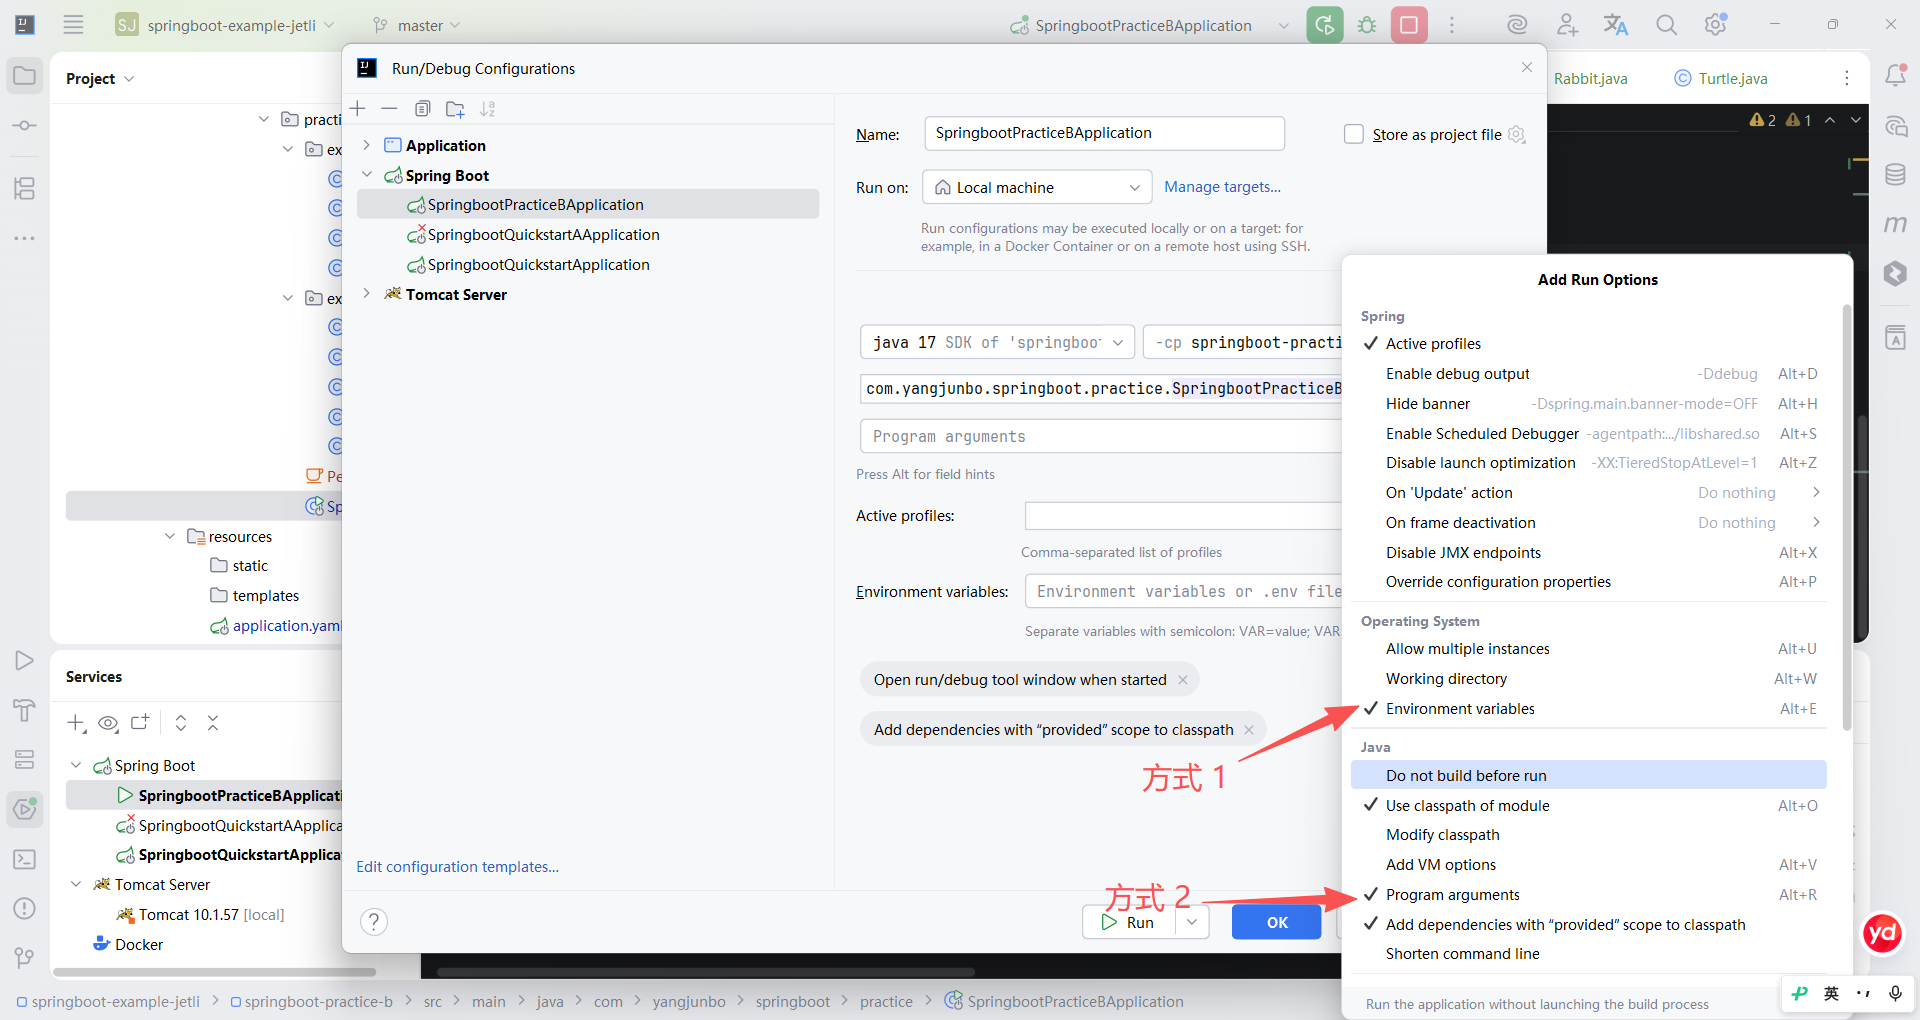
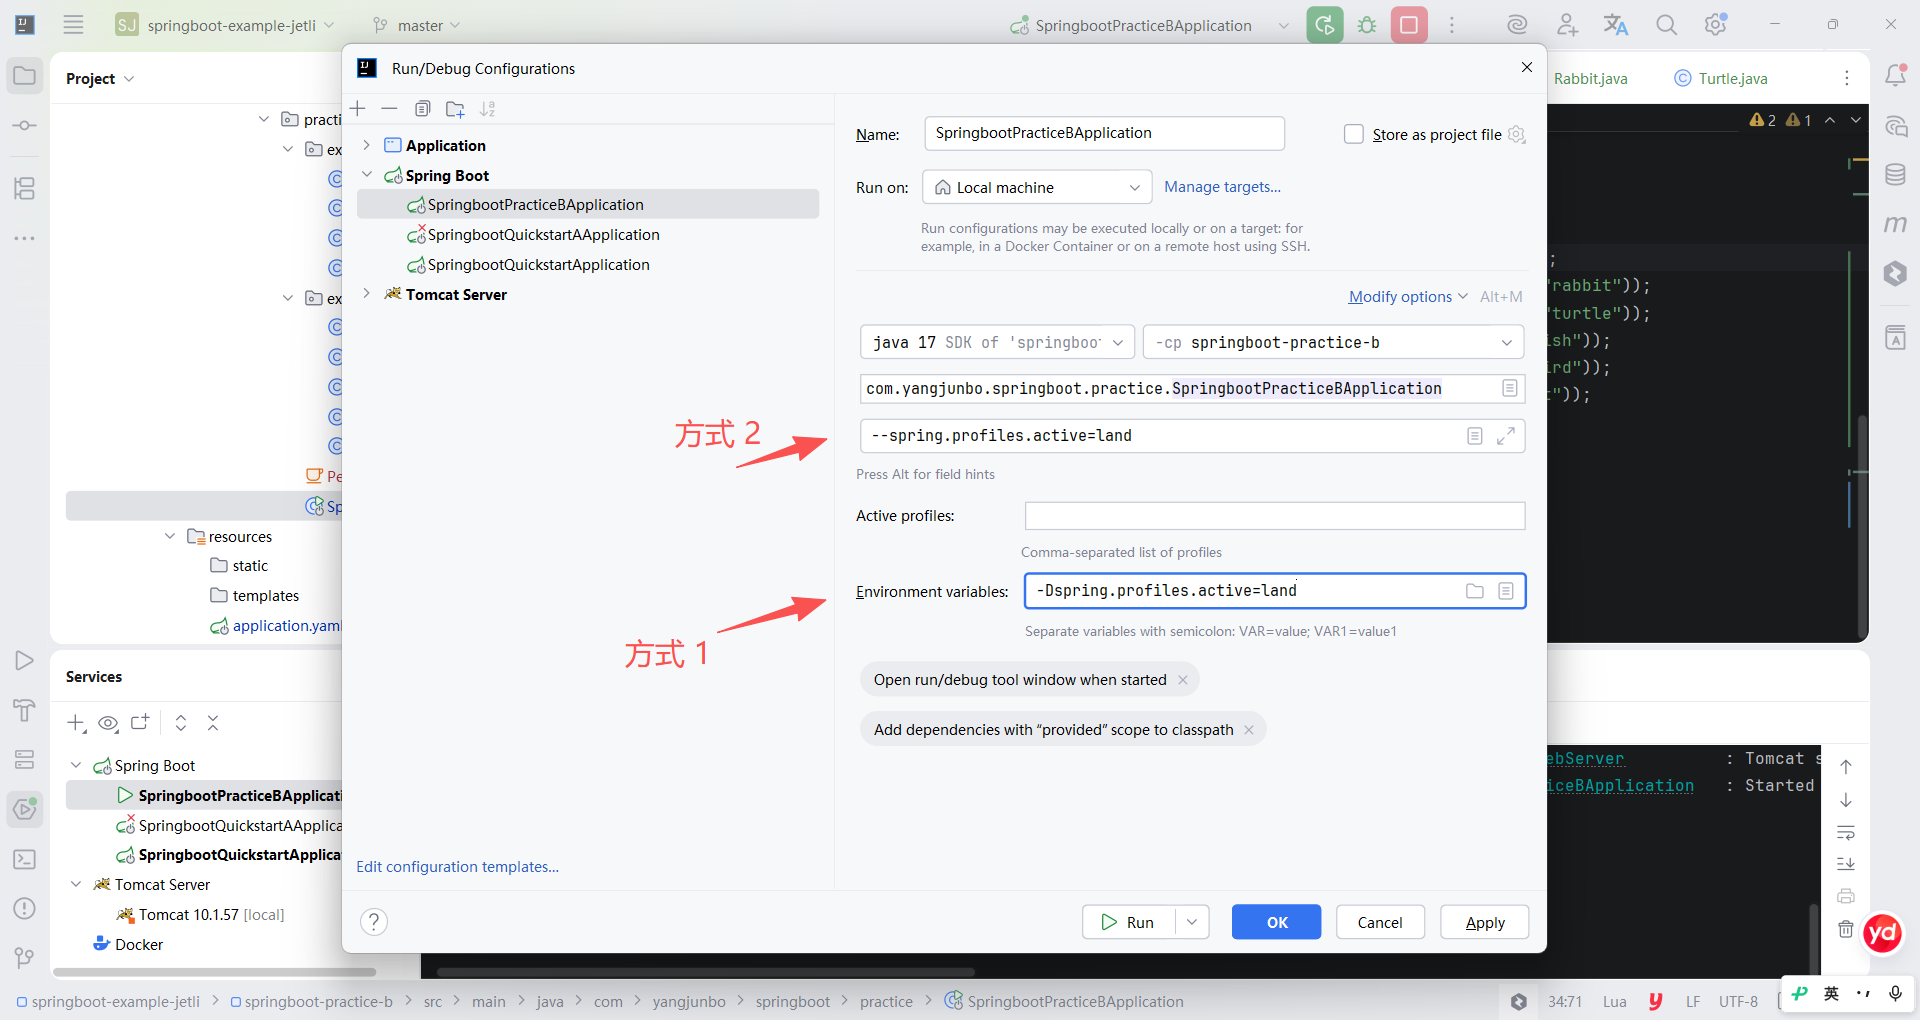
除了在配置文件中指定激活的环境,在 4.5.1 节中还讲过使用命令行参数的方式。Spring Boot 支持两种方式指定激活的环境,
方式 1 是使用 VM 参数指定,方式 2 使用的是 Program Argument 的方式指定,两种指定的方式略有不同。
需要注意的是,命令行参数指定的优先级比配置文件高,换句话说,命令行参数会覆盖配置文件中激活的环境。
c.通过主启动类指定
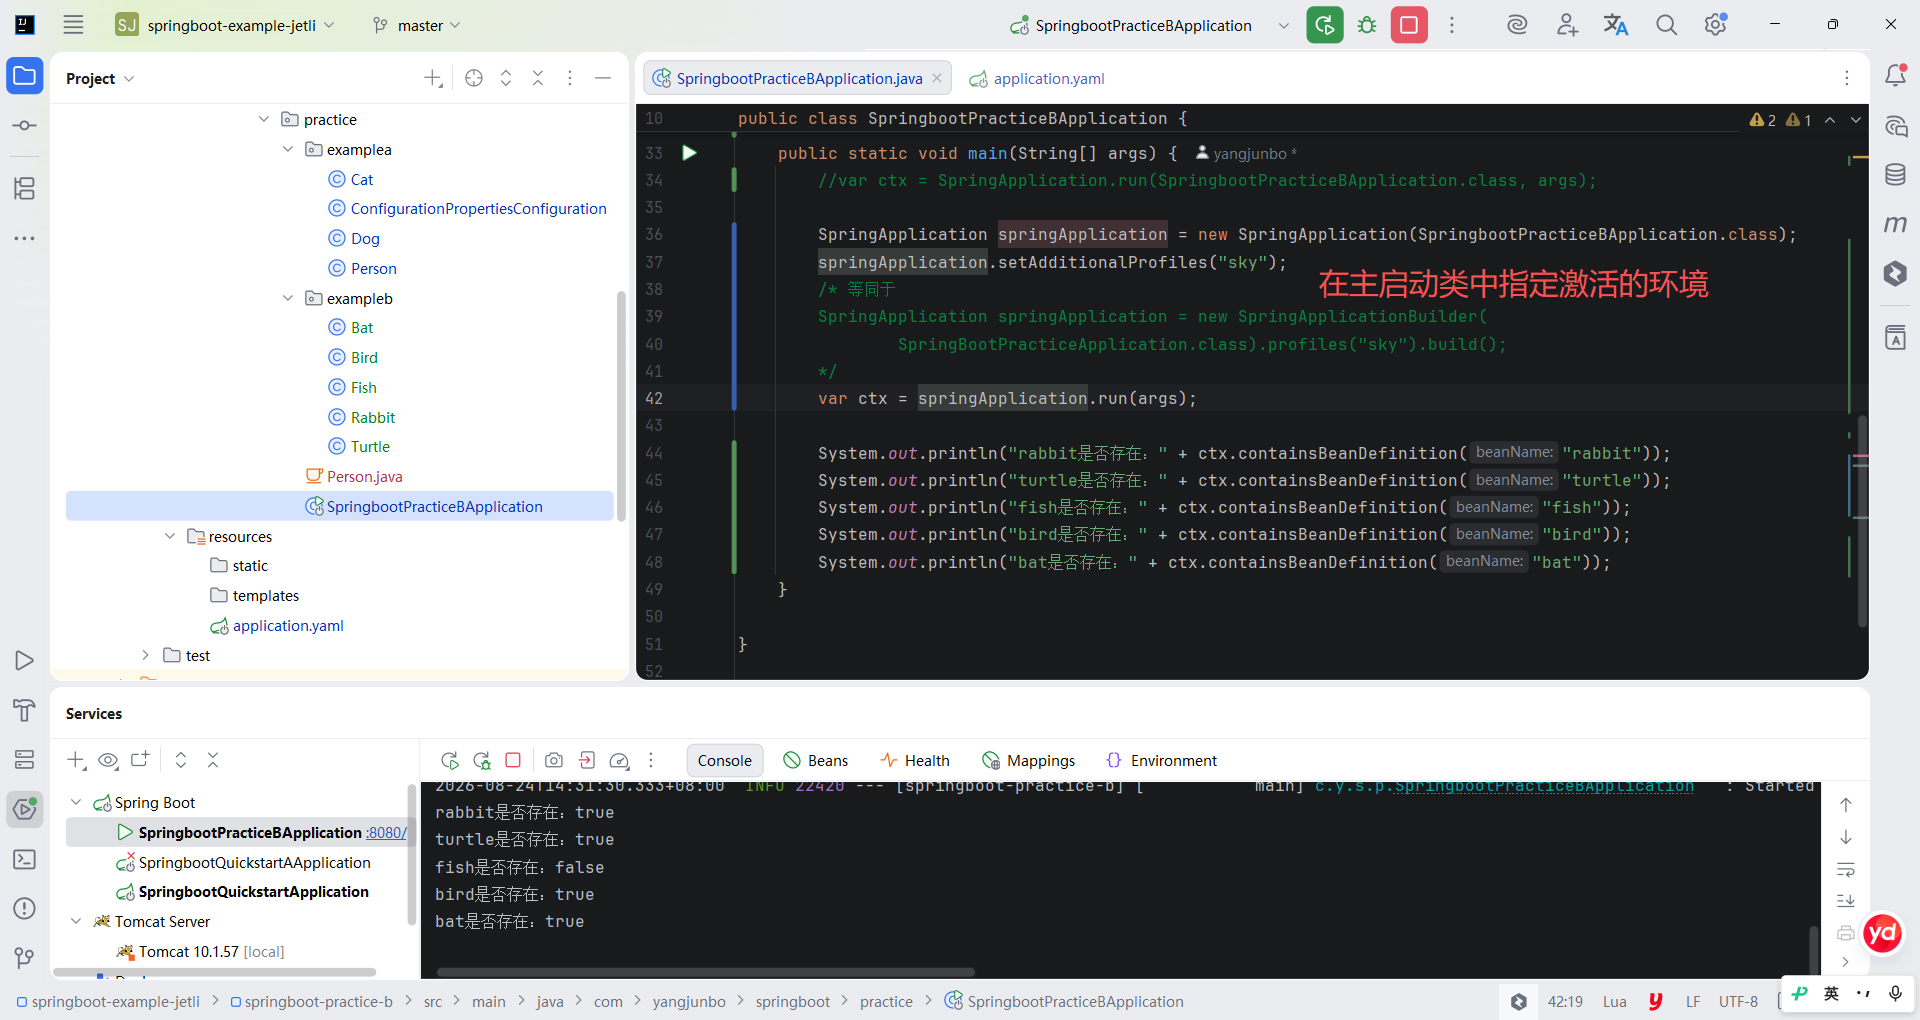
与 Spring Framework 中编程式配置 profile 的方式类似,Spring Boot 也支持在主启动类中指定激活的环境,但不同的是 Spring Boot 只能在原有的基础上追加新的激活环境,而不能直接覆盖配置文件或命令行参数指定的激活环境。两种方式追加新的 profile,分别是直接构造SpringApplication 和借助 SpringApplicationBuilder。
由于是追加新的配置,因此在配置文件激活 land 环境外,在主启动类中再追加 sky 环境,运行的结果是除了 fish 没有注册,其余 Bean 都被注册到 IOC 容器。
2.修改默认环境
上面的 3 种方式都是显式指定激活的环境,Spring Boot 中的默认环境为 default,还可以修改默认环境。譬如约定默认环境为 land,可以在配置文件中指定如下内容。
yaml
spring:
  profiles:
    default: land
spring.profiles.active 会覆盖 spring.profiles.default 的配置。
通常在项目开发中不会直接修改默认环境,使用更多的方式是 spring.profiles.active。
yaml
spring:
  profiles:
#    default: land
    active: land
3.包含环境
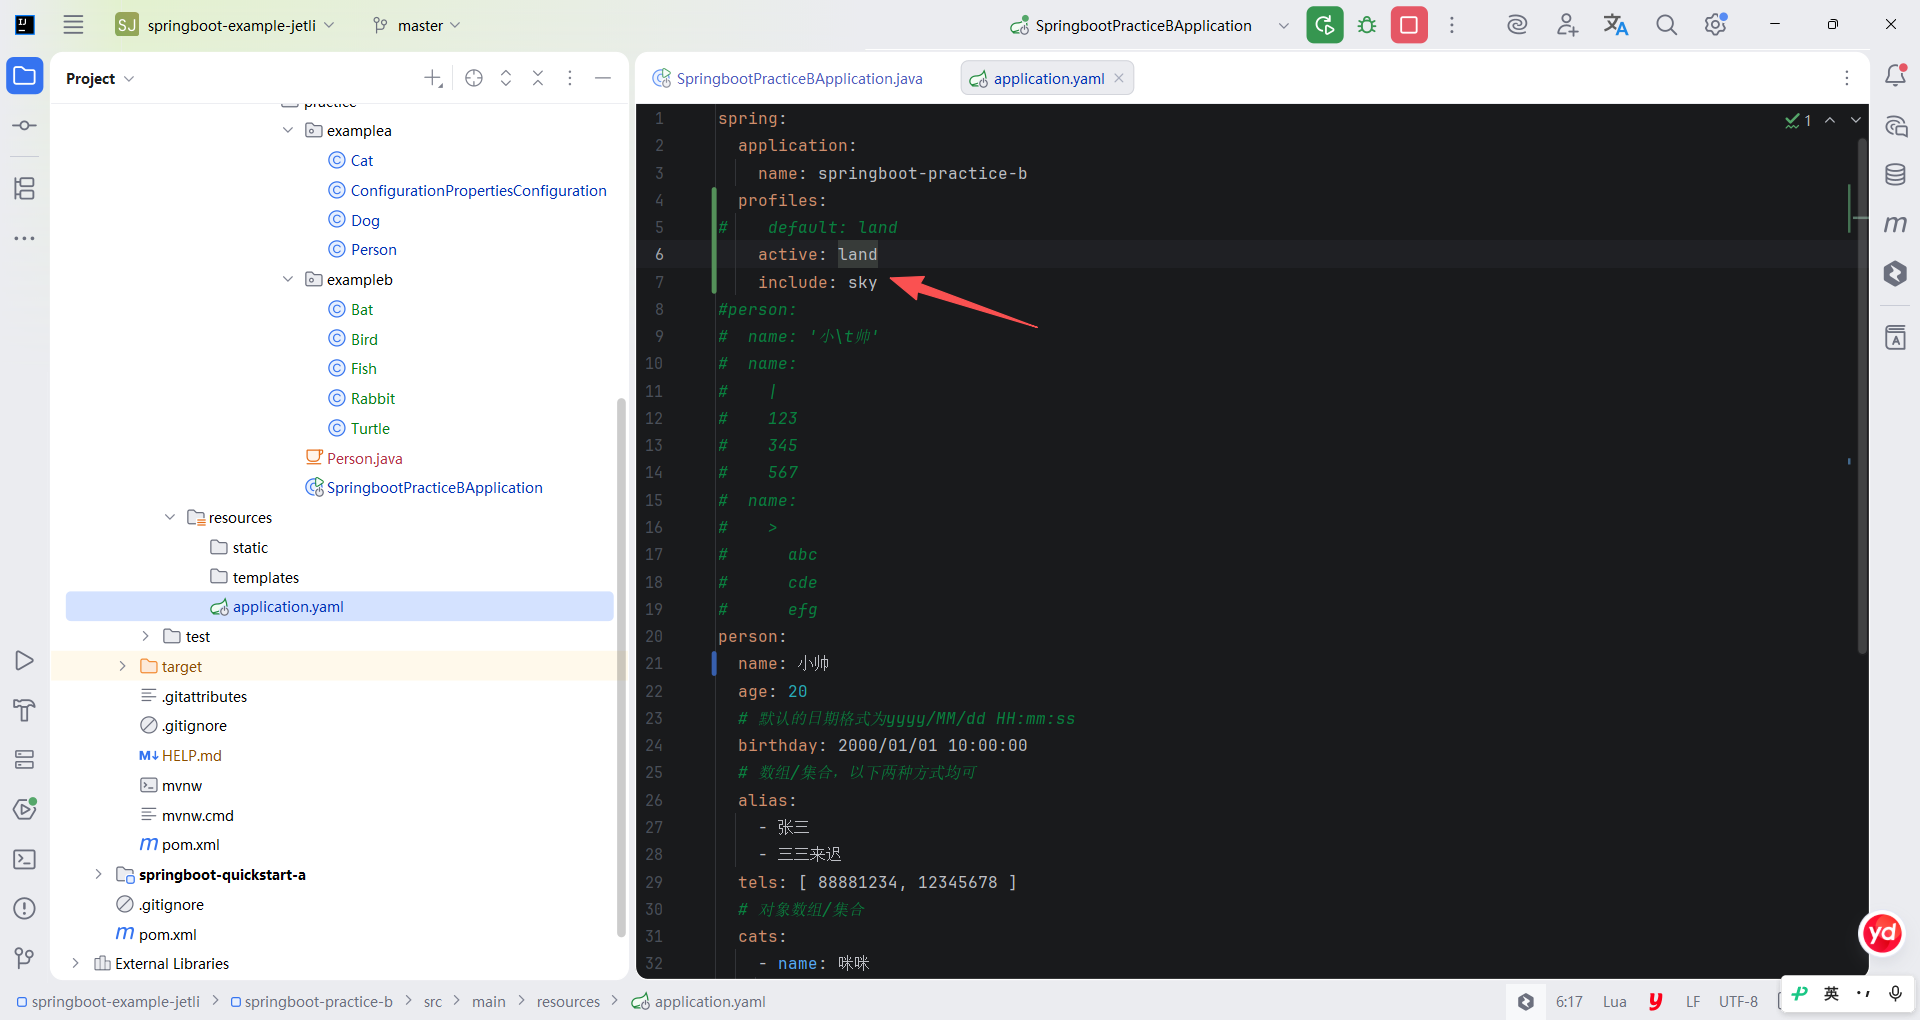
Profile 机制中除了单纯地激活一或多个环境,还有一个环境的 "包含" 机制,即无论激活了哪些环境,被 "包含" 的环境永远会生效。例如无论使用 spring.profiles.active 指定激活了哪些环境,sky 环境永远会激活。
yaml
spring:
  application:
    name: springboot-practice-b
  profiles:
#    default: land
    active: land
    include: sky
#person:
#  name: '小\t帅'
#  name:
#    |
#    123
#    345
#    567
#  name:
#    >
#      abc
#      cde
#      efg
person:
  name: 小帅
  age: 20
  # 默认的日期格式为yyyy/MM/dd HH:mm:ss
  birthday: 2000/01/01 10:00:00
  # 数组/集合,以下两种方式均可
  alias:
    - 张三
    - 三三来迟
  tels: [ 88881234, 12345678 ]
  # 对象数组/集合
  cats:
    - name: 咪咪
      age: 2
    - name: 喵喵
      age: 3
  # Map/嵌套对象
  events:
    eight: 起床
    nine: 撸猫
    twenty: 睡觉
  # Map<String, Object> 对象可以直接用JSON形式
  dogs:
    wang:
      name: 旺旺
      age: 4
    wuwu: { name: 呜呜, age: 5 }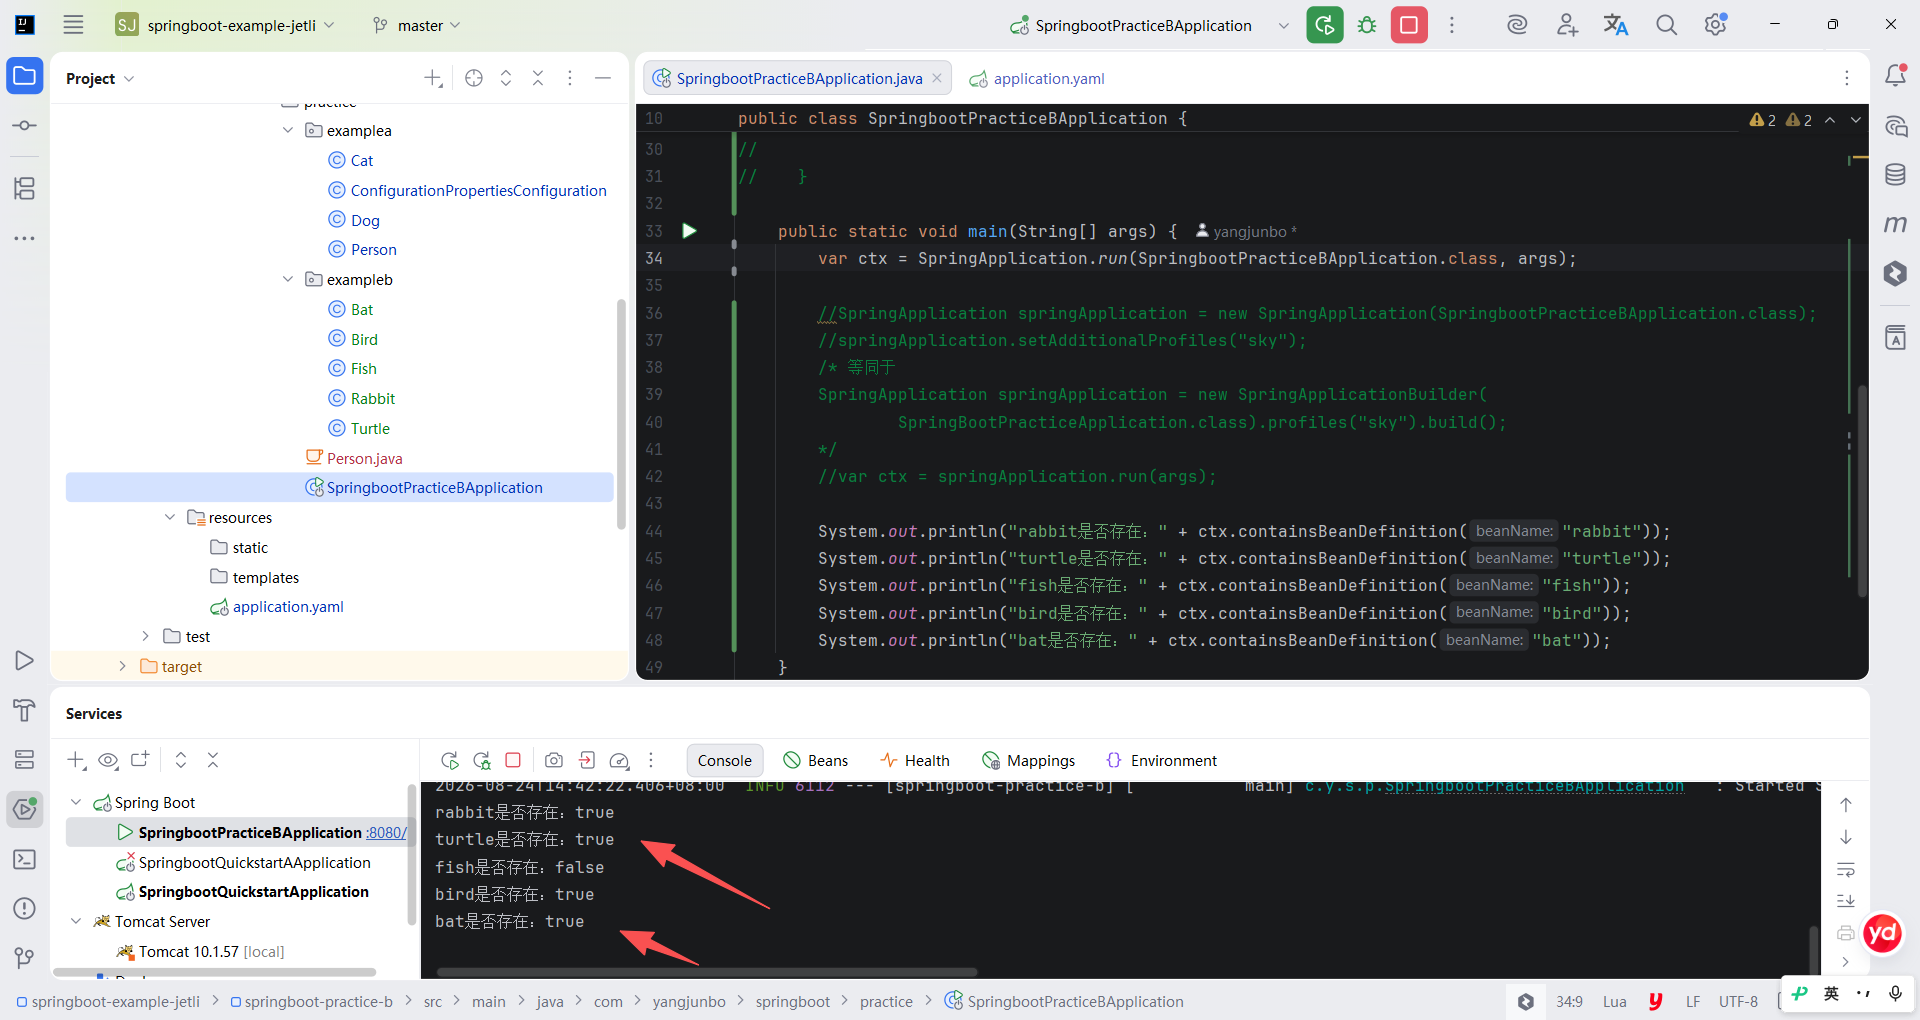
java
package com.yangjunbo.springboot.practice;

import org.springframework.beans.factory.annotation.Value;
import org.springframework.boot.SpringApplication;
import org.springframework.boot.autoconfigure.SpringBootApplication;

import java.util.Properties;

@SpringBootApplication
public class SpringbootPracticeBApplication {

    //@Value("${person.name}")
    //private String name;

//    public static void main(String[] args) {
//
//        var ctx = SpringApplication.run(SpringbootPracticeBApplication.class, args);
//        //System.out.println(ctx.getBean(SpringbootPracticeBApplication.class).name);
//        System.out.println(ctx.getBean(Person.class));
//
//    }

//    public static void main(String[] args) {
//
//        SpringApplication springApplication = new SpringApplication(SpringbootPracticeBApplication. class);
//        Properties properties = new Properties();
//        properties.setProperty("server.port", "9999");
//        springApplication.setDefaultProperties(properties);
//        springApplication.run(args);
//
//    }

    public static void main(String[] args) {
        var ctx = SpringApplication.run(SpringbootPracticeBApplication.class, args);

        //SpringApplication springApplication = new SpringApplication(SpringbootPracticeBApplication.class);
        //springApplication.setAdditionalProfiles("sky");
        /* 等同于
        SpringApplication springApplication = new SpringApplicationBuilder(
                SpringBootPracticeApplication.class).profiles("sky").build();
        */
        //var ctx = springApplication.run(args);

        System.out.println("rabbit是否存在:" + ctx.containsBeanDefinition("rabbit"));
        System.out.println("turtle是否存在:" + ctx.containsBeanDefinition("turtle"));
        System.out.println("fish是否存在:" + ctx.containsBeanDefinition("fish"));
        System.out.println("bird是否存在:" + ctx.containsBeanDefinition("bird"));
        System.out.println("bat是否存在:" + ctx.containsBeanDefinition("bat"));
    }

}
4.环境分组
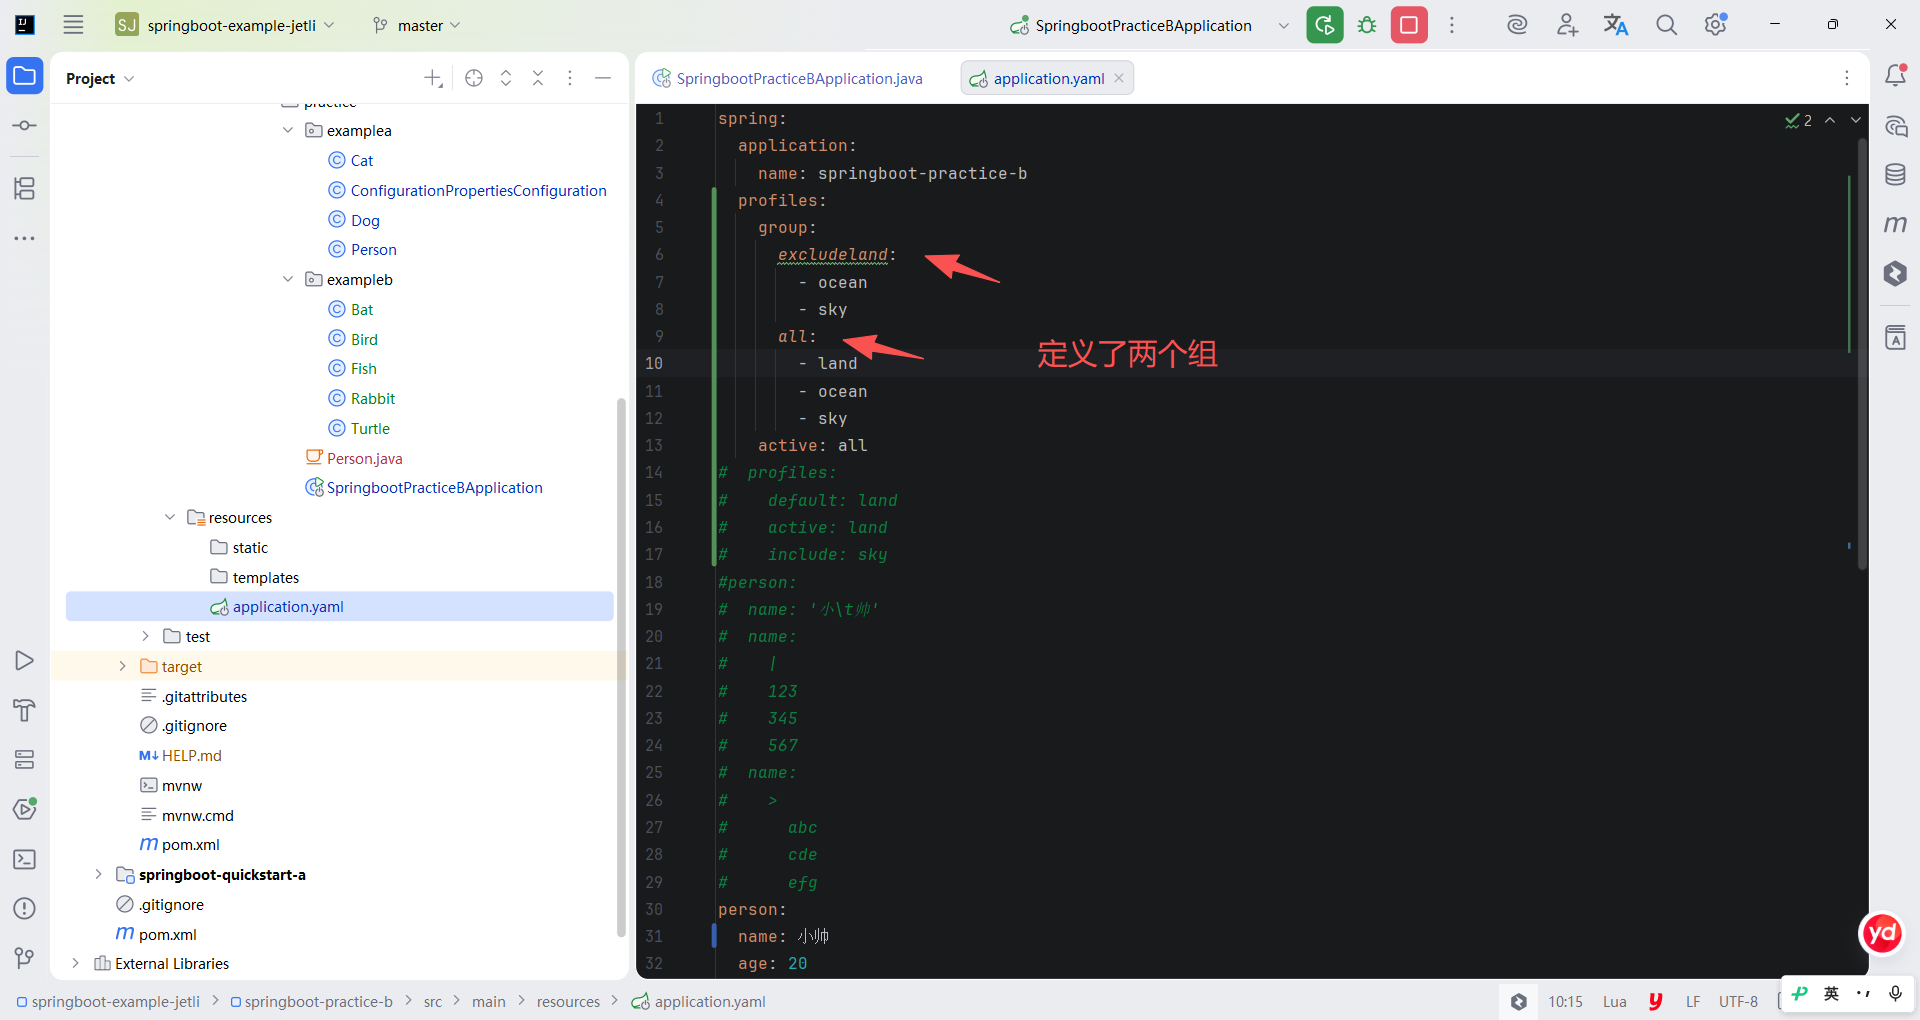
除了直接引用单个 Profile,Spring Boot 还支持把不同的 Profile 进行分组,分组后激活环境时就不需要逐个罗列具体的 Profile,而是直接指定激活的环境组即可。举一个例子,在这个例子中定义了两个组,分别是非陆地组和全环境组,最终激活全环境时声明激活 all 组即可。
yaml
spring:
  application:
    name: springboot-practice-b
  profiles:
    group:
      excludeland:
        - ocean
        - sky
      all:
        - land
        - ocean
        - sky
    active: all
#  profiles:
#    default: land
#    active: land
#    include: sky
#person:
#  name: '小\t帅'
#  name:
#    |
#    123
#    345
#    567
#  name:
#    >
#      abc
#      cde
#      efg
person:
  name: 小帅
  age: 20
  # 默认的日期格式为yyyy/MM/dd HH:mm:ss
  birthday: 2000/01/01 10:00:00
  # 数组/集合,以下两种方式均可
  alias:
    - 张三
    - 三三来迟
  tels: [ 88881234, 12345678 ]
  # 对象数组/集合
  cats:
    - name: 咪咪
      age: 2
    - name: 喵喵
      age: 3
  # Map/嵌套对象
  events:
    eight: 起床
    nine: 撸猫
    twenty: 睡觉
  # Map<String, Object> 对象可以直接用JSON形式
  dogs:
    wang:
      name: 旺旺
      age: 4
    wuwu: { name: 呜呜, age: 5 }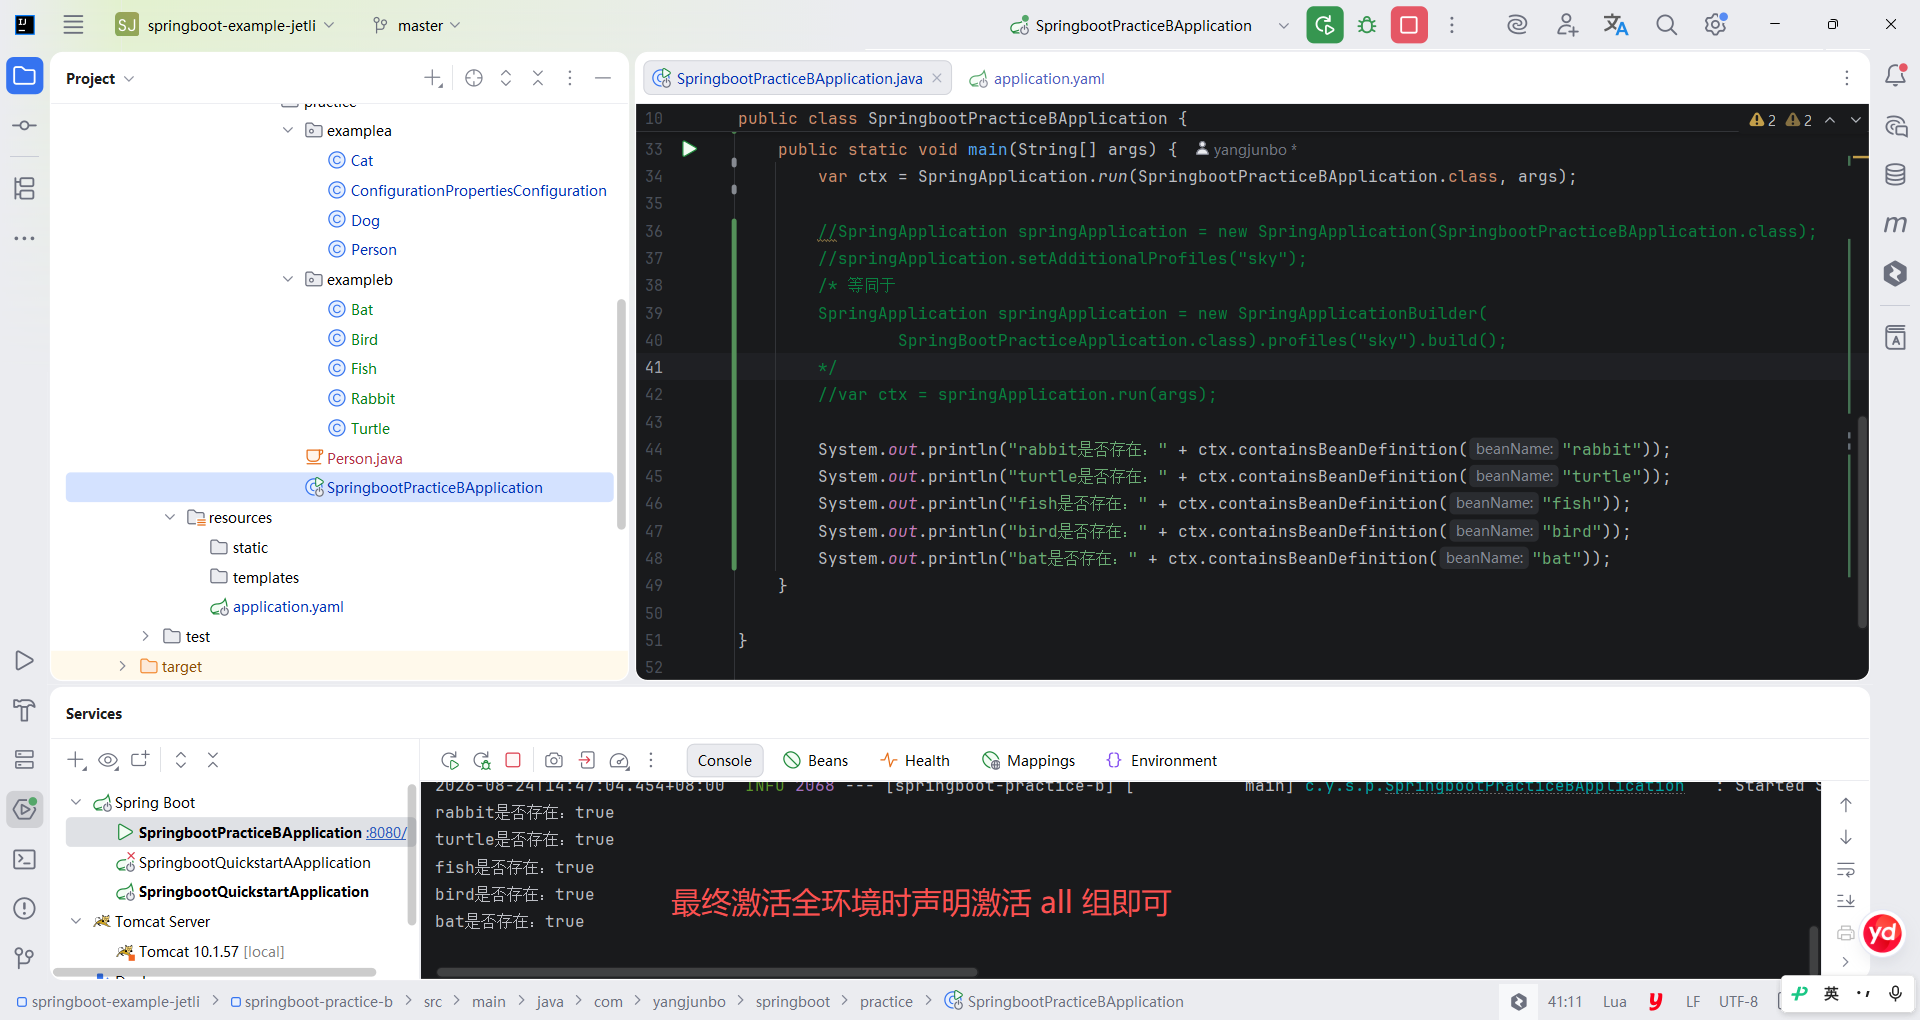
6.2.3 多环境配置文件
与 Profile 多环境开发对应,Spring Boot 支持使用 Profile 区分不同的 properties 或 YML 配置文件,即多环境配置文件,这个机制可以有效地区分开不同环境下的配置属性信息(如数据库连接信息等)。Spring Boot 约定了一个多环境配置文件的命名方式,
即使用 application-{profile}.properties 或 application-{profile}.yml 的文件名格式来定义 properties 或 YML 文件,即可区分配置文件的不同环境,例如 application-dev.properties 代表基于 dev 环境下的配置文件。
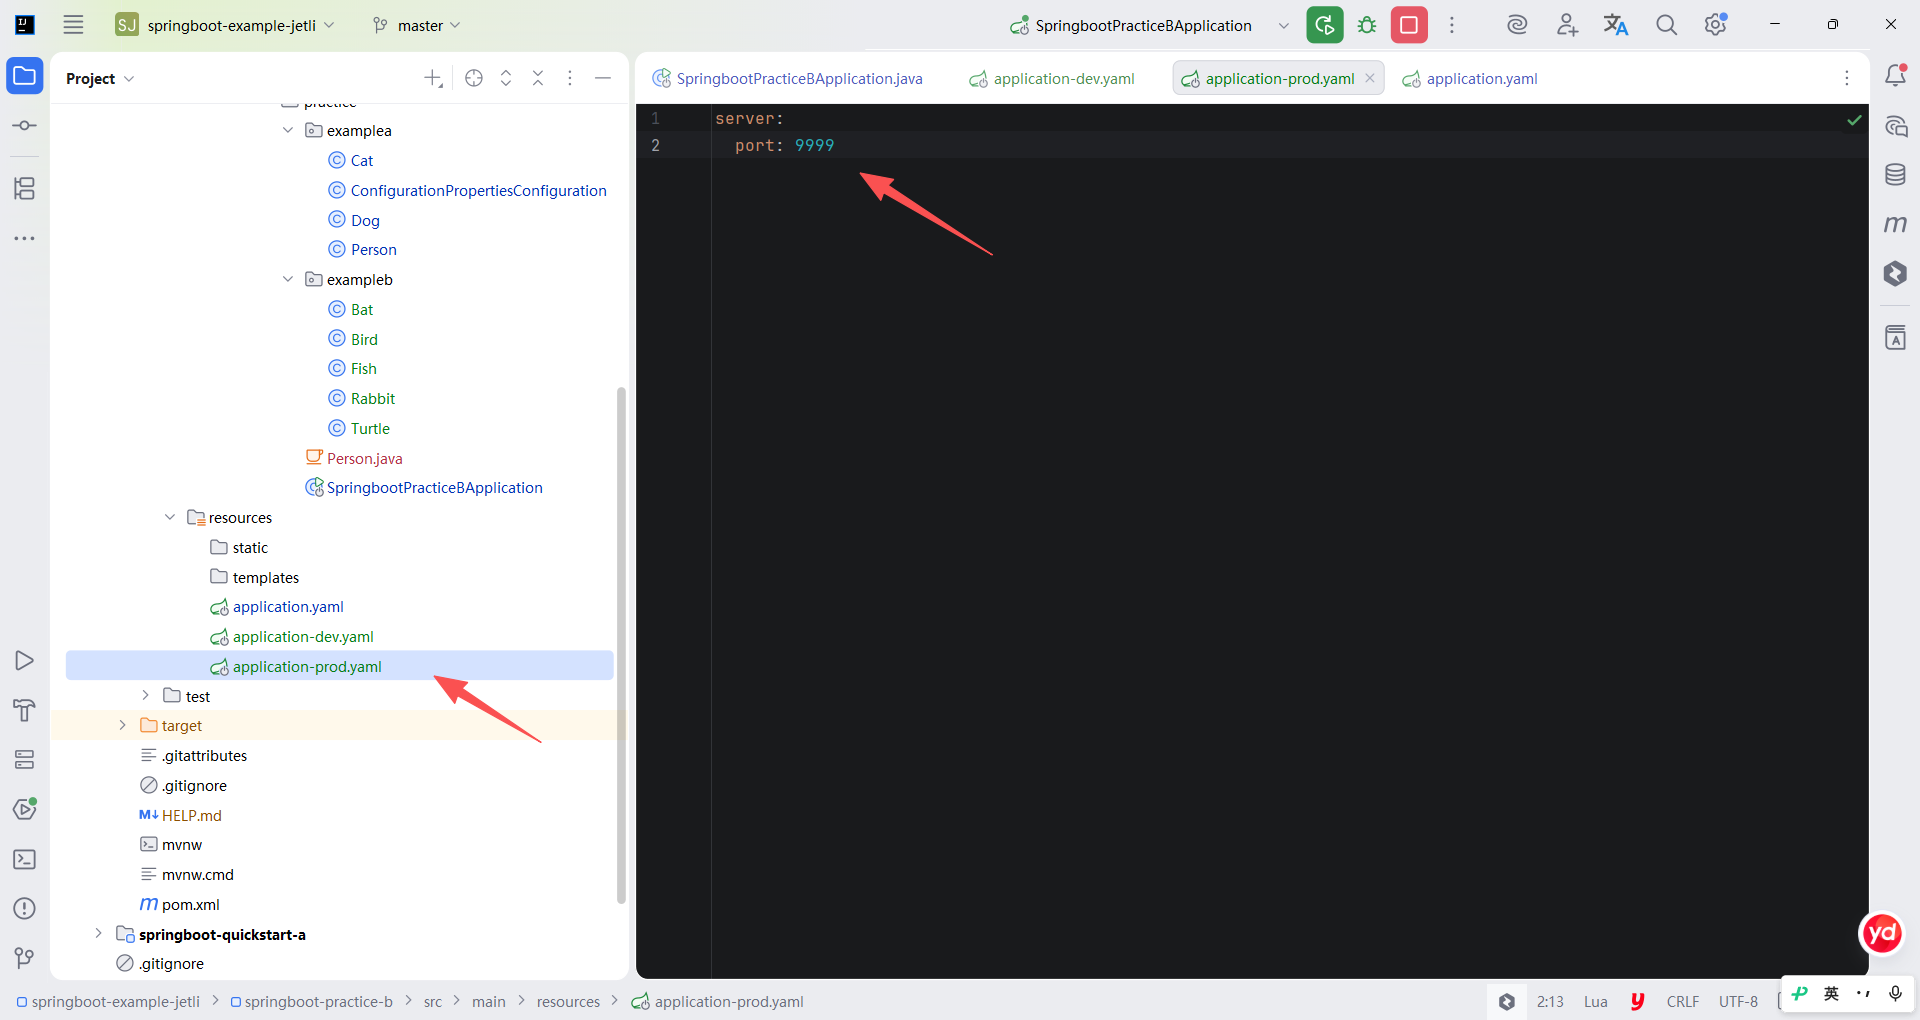
简单演示一下效果,比如我们创建两个文件 application-dev.yaml 与 application-prod.yaml,并分别声明两个不同的 Web 容器监听端口。
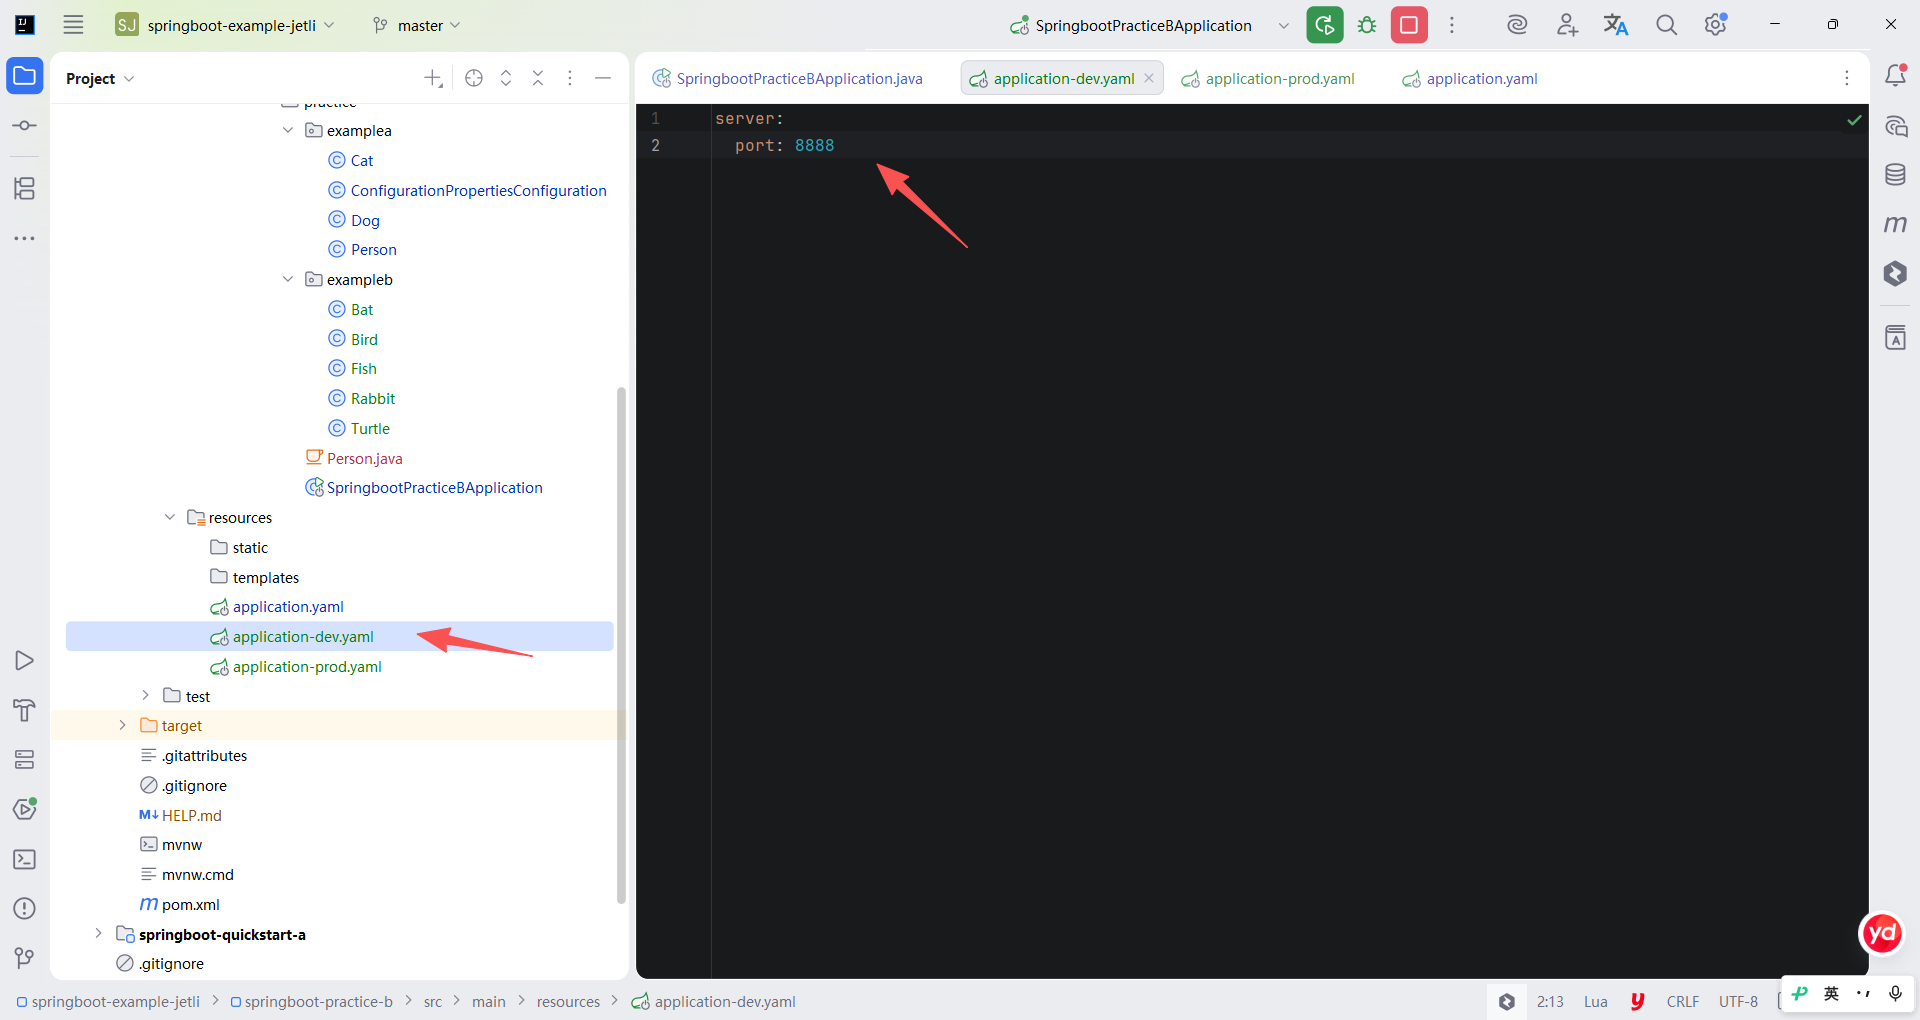
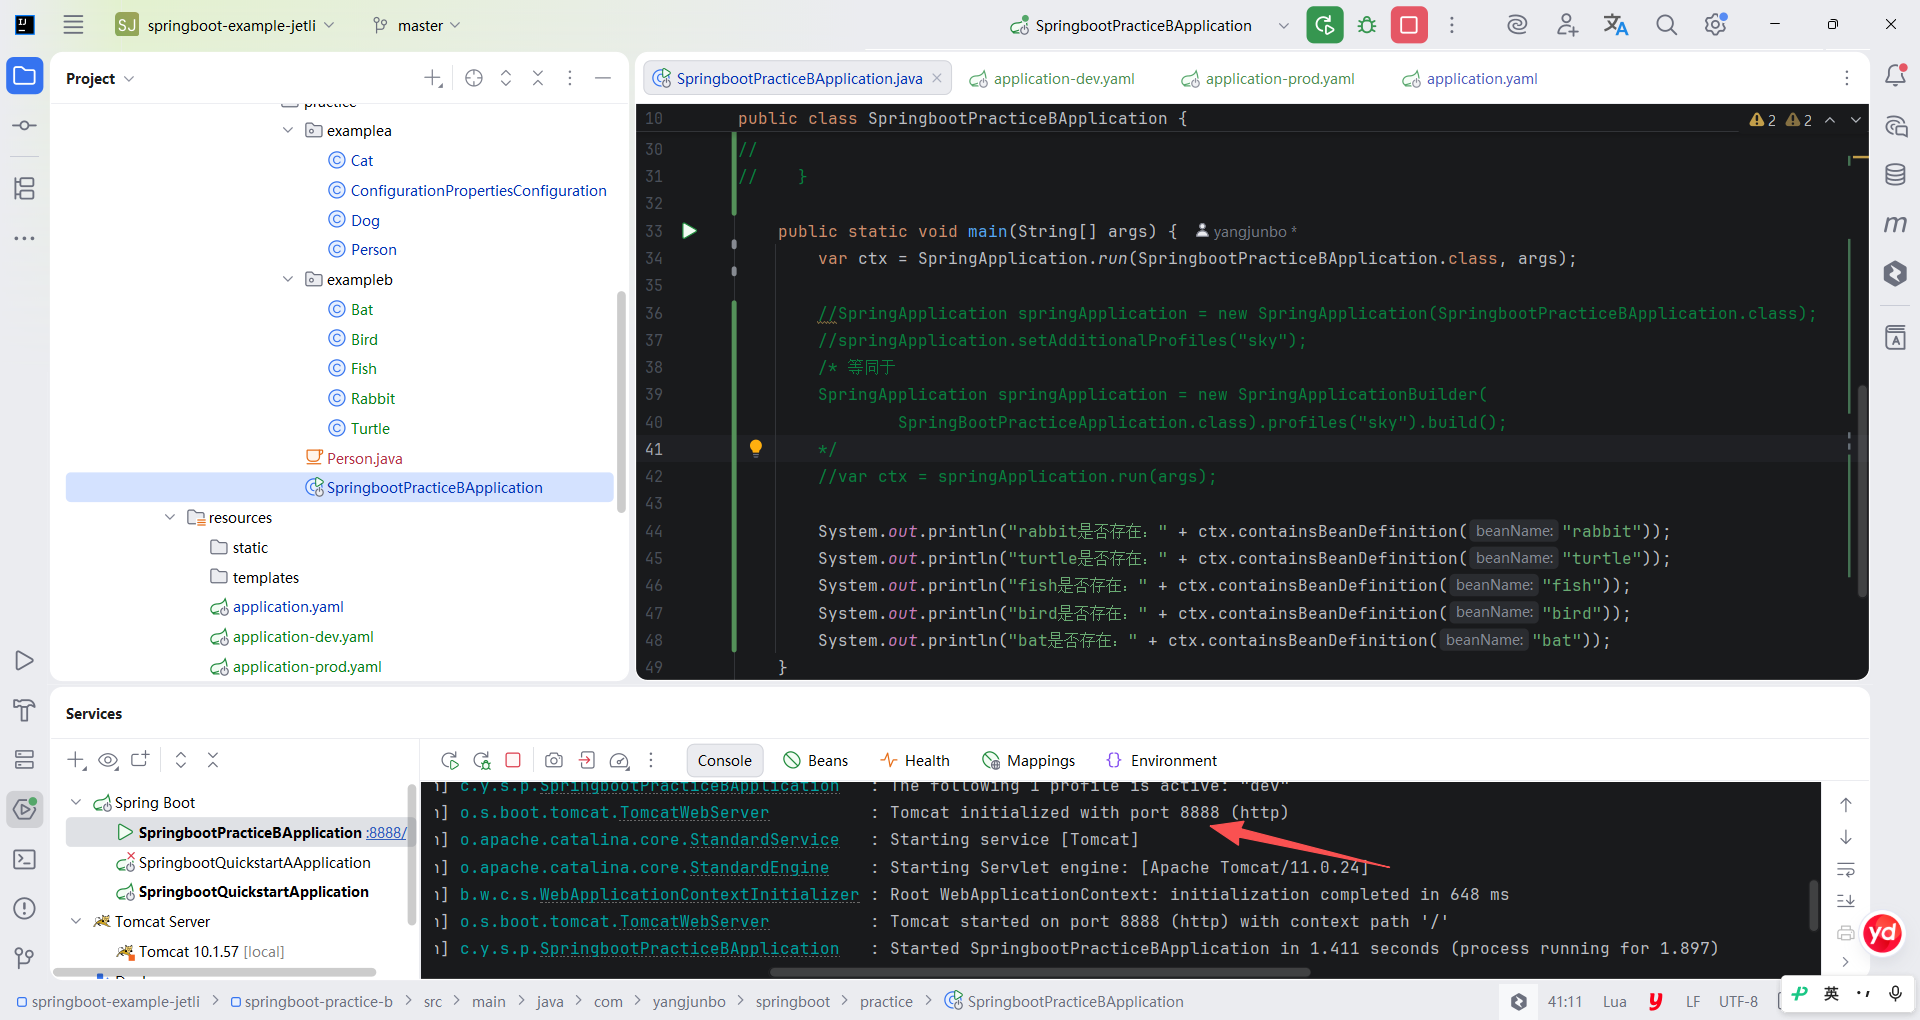
随后我们在 application.yaml 中声明 spring.profiles.active=dev,指定当前环境为 dev,随后启动工程,可以发现当前工程的 Tomcat 会运行在8888 端口,证明 application-dev.yaml 文件已经生效。
除了使用命名规范的方式定义多环境配置文件,Spring Boot 还基于 YML 语法的文本块特性提供了另一种区分多环境配置的方式,不过由于这种方式的维护灵活性相对差,且所有配置需要写到一个 YML 文件中,造成配置文件很庞大,主流的项目开发中不会使用该方式区分多环境,因此本书不再介绍该种方法。
6.2.4 配置优先级
1.配置源类型优先级
上面几节内容中主要接触了 4 种不同类型的配置源,以及配置源的多环境隔离机制,它们之间的配置生效顺序是特定的,Spring Boot 默认支持的配置源及优先级规则由低到高如下:
- SpringApplication.setDefaultProperties 中设置的 Properties 或 Map;
- 使用 @PropertySource 注解或 spring.config.import 属性引入的配置属性文件;
- application.properties 和 application.yml (properties>yml);
- 随机数属性(random.*,仅供了解);
- 操作系统环境变量;
- Java 系统属性(如 JDK 版本、Java 安装路径等);
- JNDI 属性(仅供了解);
- ServletContext 的初始化参数;
- ServletConfig 的初始化参数;
- 环境变量中 SPRING_APPLICATION_JSON 的属性值(以 JSON 对象形式封装);
- 命令行启动参数;
- 单元测试参数;
- 单元测试中使用 @TestPropertySource 引入的配置;
- DevTools 中指定的参数(开发过程中使用,仅供了解)。
配置源的种类非常多,但是我们只需要关心上述几种加粗的配置源。
2.多环境开发的配置文件优先级
针对多环境开发中的特性,Spring Boot 也有对应的配置文件优先级,以下列表中的优先级由低到高:
- jar 包内部的 application.properties 或 application.yml;
- jar 包内部的 application-{profile}.properties 或 application-{profile}. yml;
- jar 包外的 application.properties 或 application.yml;
- jar 包外的 application-{profile}.properties 或 application-{profile}. yml。
一句话总结:jar 包外的优先级高于 jar 包内的,区分环境的优先级高于通用的。
3.配置文件位置的优先级
此外,针对配置文件的存放位置,Spring Boot 也提供了一种规则和相应的优先级,以下列表的优先级由低到高:
- src/main/resources 目录下的 application.properties 或 application. yml;
- src/main/resources/config 目录下的 application.properties 或 application. yml。
4.小结
总结上述 3 种优先级规则的核心,可以得出如下结论:
- 命令行启动参数的优先级最高;
- jar 包外部的配置文件>jar包内部的配置文件;
- 区分环境(带 profile 标识)的配置文件>通用配置文件;
- config 目录下的配置文件>根目录下的配置文件。