1 Yocto原理
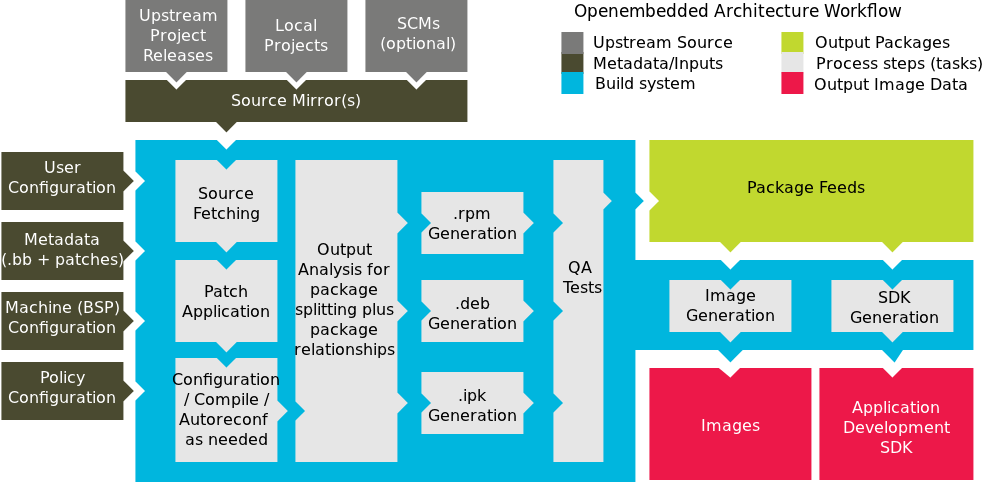
Yocto 编译完整流程
- 环境准备
宿主机要求:Ubuntu 20.04/22.04(推荐),至少 50GB 空闲磁盘,16GB+ 内存。
安装依赖:
sudo apt install gawk wget git diffstat unzip texinfo gcc build-essential \
  chrpath socat cpio python3 python3-pip python3-pexpect xz-utils debianutils \
  iputils-ping python3-git python3-jinja2 libegl1-mesa libsdl1.2-dev \
xterm python3-subunit mesa-common-dev zstd liblz4-tool file locales-
获取 Yocto 源码
克隆 poky(Yocto 参考发行版),选一个 LTS 分支,比如 kirkstone / scarthgap
git clone git://git.yoctoproject.org/poky
cd poky
git checkout scarthgap # 或你需要的版本分支
如果需要额外的 layer(比如 meta-openembedded、芯片厂商 BSP layer),在 poky 同级目录克隆:
git clone git://git.openembedded.org/meta-openembedded
git clone <你的芯片厂商BSP层仓库> # 如 meta-qcom、meta-ti、meta-raspberrypi-
初始化构建环境
source oe-init-build-env build # build 是构建目录名,可自定义
执行后自动进入 build/ 目录,并生成 conf/local.conf 和 conf/bblayers.conf。
- 配置构建参数
编辑 conf/local.conf,关键项:
# 目标机器架构,由 BSP layer 提供,比如 qcom-arm64、raspberrypi4-64
MACHINE ?= "qemuarm64"

# 并行编译加速,按 CPU 核心数设置
BB_NUMBER_THREADS ?= "8"
PARALLEL_MAKE ?= "-j 8"

# 下载目录和缓存目录(可选,复用加速)
DL_DIR ?= "${TOPDIR}/downloads"
SSTATE_DIR ?= "${TOPDIR}/sstate-cache"

# 启用源码包和调试包(可选)
EXTRA_IMAGE_FEATURES ?= "debug-tweaks tools-sdk"
编辑 conf/bblayers.conf,把需要的 layer 加进去:
BBLAYERS ?= " \
  /path/to/poky/meta \
  /path/to/poky/meta-poky \
  /path/to/poky/meta-yocto-bsp \
  /path/to/meta-openembedded/meta-oe \
  /path/to/meta-openembedded/meta-python \
  /path/to/meta-your-bsp \
"- 选择镜像并编译
Yocto 提供几种标准镜像,也可以自定义:
| 镜像名 | 说明 |
|---|---|
core-image-minimal |
最小可启动系统,仅内核+基础 shell |
core-image-base |
基础系统,含常用命令行工具 |
core-image-sato |
带 GUI 桌面的镜像 |
core-image-weston |
Wayland 桌面镜像 |
自定义镜像 |
在自己的 layer 里写 .bb 文件 |
执行编译:
bitbake core-image-minimal首次编译会下载所有源码并全量编译,耗时 1-3 小时(取决于机器和镜像大小)。后续有 sstate 缓存,增量编译几分钟到几十分钟。
- 编译产出物
编译完成后,镜像在:
build/tmp/deploy/images/<MACHINE>/典型文件:
| 文件 | 用途 |
|---|---|
*.wic 或 *.wic.bz2 |
完整 SD 卡/EMMC 烧录镜像 |
Image / zImage |
内核镜像 |
*.dtb |
设备树二进制 |
modules-*.tgz |
内核模块包 |
*.rootfs.tar.bz2 |
rootfs 压缩包 |
烧录到 SD 卡:
bzcat core-image-minimal-<MACHINE>.wic.bz2 | sudo dd of=/dev/sdX bs=4M status=progress- 常用 bitbake 命令
| 命令 | 作用 |
|---|---|
bitbake <recipe> |
编译单个软件包 |
bitbake -c cleansstate <recipe> |
清理某包的编译状态,强制重编 |
bitbake -c menuconfig virtual/kernel |
内核菜单配置 |
| `bitbake -e |
grep VAR` |
bitbake-layers show-layers |
列出当前生效的 layer |
bitbake -g <image> |
生成依赖关系图 |
关键注意点
- 版本对齐:poky 和所有第三方 layer 必须是同一个 Yocto 版本分支(比如都是 scarthgap),混分支大概率编译失败。
- MACHINE 必须匹配 BSP layer :
qemuarm64是 poky 自带的虚拟机目标,真机要换成 BSP layer 提供的机器名。 - 首次编译慢是正常的 :sstate 缓存会让后续编译快很多,建议把
DL_DIR和SSTATE_DIR设到固定路径复用。 - 网络问题 :源码从各地下载,国内建议配置镜像源或提前下载好
downloads/目录。
核心就是layer
Layer 到底是什么
一个 layer 本质上就是一个包含特定结构目录的文件夹,里面放着:
表格
| 内容 | 说明 |
|---|---|
conf/layer.conf |
layer 声明文件,定义名字、优先级、依赖 |
recipes-*/ |
软件包配方(.bb 文件),描述怎么下载、编译、安装某个软件 |
classes/ |
.bbclass 类文件,封装通用构建逻辑(如 autotools、cmake、kernel) |
recipes-bsp/ |
BSP 相关:内核、u-boot、设备树 |
recipes-core/images/ |
自定义镜像配方 |
licenses/ |
许可证文件 |
2 练习计划(分4个阶段)
我使用的WSL 环境,情况如下:
| 项目 | 状态 | 说明 |
|---|---|---|
| Ubuntu 24.04 (x86_64) | ✅ | 可正常跑 Yocto(交叉编译 aarch64 没问题) |
| CPU 12 核 | ✅ | 足够 |
| 磁盘 935G 空闲 | ✅ | 很充足 |
| 内存 7.4G | ⚠️ | Yocto 官方建议 16G+,编译时务必限制并行度,否则会 OOM |
计划主要使用树莓派 5来学习,它是完整 Linux 单板机(ARM64),是 Yocto 的标准练习对象:能从 bootloader、内核一路编到 rootfs,生成完整系统镜像刷 SD 卡启动。学 Yocto 的核心概念(bitbake、layer、recipe、machine、distro)全靠它。
Phase 0 --- 准备环境(约 1 小时)
在 WSL 里装依赖:
sudo apt update && sudo apt install -y gawk wget git diffstat unzip texinfo gcc build-essential chrpath socat cpio python3 python3-pip python3-pexpect xz-utils debianutils iputils-ping python3-git python3-jinja2 libegl1-mesa libsdl1.2-dev pylint3 xterm python3-subunit mesa-common-dev zstd liblz4-tool file locales
sudo locale-gen en_US.UTF-8
Phase 1 --- 跑通最小系统(验证工具链,1~2 小时)
用 qemux86-64 目标快速验证整个链路,这是最快的"闭环"体验:
mkdir -p ~/yocto && cd ~/yocto
git clone -b scarthgap git://git.yoctoproject.org/poky
cd poky
source oe-init-build-env build-qemu
# 编辑 conf/local.conf,追加:
#   BB_NUMBER_THREADS = "4"
#   PARALLEL_MAKE = "-j4"
MACHINE=qemux86-64 bitbake core-image-minimal
runqemu
产出:在 QEMU 里跑起一个微型 Linux。这一步成功 = 环境完全 OK。
Phase 2 --- 为Pi5构建真实镜像(核心练习)
这是真正"学会 Yocto"的阶段:
cd ~/yocto
git clone -b scarthgap git://git.yoctoproject.org/meta-raspberrypi
git clone -b scarthgap git://git.openembedded.org/meta-openembedded
cd poky && source oe-init-build-env build-rpi5
bitbake-layers add-layer ../meta-openembedded/meta-oe
bitbake-layers add-layer ../meta-openembedded/meta-python
bitbake-layers add-layer ../meta-openembedded/meta-networking
bitbake-layers add-layer ../meta-openembedded/meta-multimedia
bitbake-layers add-layer ../meta-raspberrypi
# 编辑 conf/local.conf:MACHINE = "raspberrypi5"
bitbake core-image-base产出:tmp/deploy/images/raspberrypi5/ 下的 SD 卡镜像,拷回 Windows 用树莓派 Imager / balenaEtcher 烧录,插进 Pi 5 就能启动编译的系统。
Phase 3 --- 自定义(真正理解 Yocto 的地方)
- 写自己的 layer + 自定义 recipe(把 hello 程序编进镜像)
- 改内核配置 / 设备树 overlay
- 加分项 :之前正好有
rpi_rdma项目(dmatest / hello_dma_pipe),可以把它们做成内核模块 recipe 打镜像,直接跑在 Pi 5 上------学以致用
Phase 4 --- SDK 交叉编译
bitbake -c populate_sdk 生成 aarch64 交叉编译 SDK,在 WSL 里编好程序拷到 Pi 5 跑。
WSL上编译的特别提醒(重要)
- 构建目录放 WSL 原生文件系统 (
~/yocto),别放/mnt/c------ 跨文件系统 I/O 会慢到怀疑人生 - 内存只有 7.4G → 务必设
BB_NUMBER_THREADS = "4"和PARALLEL_MAKE = "-j4",必要时再加 swap(2~4G) - 国内下载 Yocto 源可能很慢,可配代理;保留
build-*/sstate-cache可让二次构建快数倍 - 烧录流程:WSL 里生成镜像 → Windows 里用烧录工具写 SD 卡
3 环境搭建
搭建结果
| 项目 | 状态 |
|---|---|
| 系统依赖 | ✅ Ubuntu 24.04 全部安装(含 24.04 更名后的 libegl1/mesa-common-dev 等) |
| locale | ✅ en_US.UTF-8 已生成 |
poky (scarthgap) |
✅ 已克隆,分支 scarthgap |
local.conf |
✅ 已针对 7.4G 内存优化 |
| BitBake | ✅ 2.8.1,3 个 layer 加载正常 |
| 变量解析 | ✅ MACHINE=qemux86-64、BB_NUMBER_THREADS=4、PARALLEL_MAKE=-j4 全部生效 |
目录布局(WSL 原生文件系统 /root,避开 /mnt/c 的跨盘慢 I/O)
~/yocto/
├── poky/                      # 发行版源码
│   ├── build/                 # 构建目录(已初始化)
│   │   └── conf/local.conf    # 已优化
│   ├── meta/                  # 核心层
│   ├── meta-poky/             # 发行版层
│   └── meta-yocto-bsp/        # BSP 层
├── downloads/                 # 源码缓存(自动创建)
└── sstate-cache/              # 编译缓存(可大幅加速二次构建)
使用方法
每次进 WSL 后先激活环境(交互 shell,建议在 WSL 终端里手动执行):
cd ~/yocto/poky
source oe-init-build-env build
QEMU 快速验证整条链路
bitbake core-image-minimal    # 首次约 30-60 分钟(下载+编译)
runqemu                       # 启动 QEMU 虚拟 Linux
关键提醒
- 内存只有 7.4G → 已强制
-j4,如仍 OOM 可降到-j2或加 4G swap(sudo fallocate -l 4G /swapfile) - 保留
sstate-cache→ 换镜像目标、改配置后二次构建会快很多 - 构建目录已在
/root(WSL 原生盘),千万别挪到/mnt/c - 首次
bitbake会大量下载源码,国内网络慢可配镜像源(DL_DIR里已有本地缓存路径)
已完成的 5 项操作(均已验证成功)
① 安装系统依赖包
通过 apt-get install 装齐 Yocto 所需的编译/下载工具,已核实关键包版本:
- gawk 5.2.1 · git 2.43.0 · chrpath 0.16 · socat 1.8 · cpio 2.15 · zstd 1.5.5 · file 5.45
- 另装 python3 / python3-pexpect / xz-utils / texinfo / diffstat / unzip / locales 等
- 期间遇到两个包在 Ubuntu 24.04 更名/移除(
libegl1-mesa→libegl1、pylint3被移除),已改用正确包名补装成功。
② 生成 UTF-8 locale
sudo locale-gen en_US.UTF-8,已确认 en_US.utf8 存在于系统。Yocto 编译强制要求 UTF-8 locale,不做后面会报错。
③ 克隆 Yocto 发行版源码 poky(scarthgap 分支)
git clone --single-branch --branch scarthgap https://git.yoctoproject.org/poky已确认分支为 scarthgap(Yocto 5.0 LTS,当前主流稳定版)。这是整个 Yocto 的核心仓库,内含 bitbake、OpenEmbedded 核心层等。
④ 初始化 build 构建目录并优化配置
执行 source oe-init-build-env build 生成 conf/local.conf 和 conf/bblayers.conf。随后针对7.4G 内存 在 local.conf 追加/调整:
MACHINE ??= "qemux86-64"--- 默认目标机(先用 QEMU 虚拟机练手,不碰真机)BB_NUMBER_THREADS = "4"--- 限制并行度防 OOMPARALLEL_MAKE = "-j4"--- 限制 make 并行度DL_DIR = "/root/yocto/downloads"--- 源码缓存目录SSTATE_DIR = "/root/yocto/sstate-cache"--- 编译缓存目录
期间两次修正:第一次脚本转义失败导致 MACHINE 重复写入 8 次、并行度没生效;后用脚本从 sample 重新生成干净的 local.conf 再追加,最终核实无误(第 39/289/290/293/294/297 行配置正确)。
执行 source oe-init-build-env build-qemu 时,脚本会自动生成build/conf/bblayers.conf,内容是这样:
bash
tom@Tom-LAPTOP:~/yocto/poky$ cat ./build/conf/bblayers.conf
# POKY_BBLAYERS_CONF_VERSION is increased each time build/conf/bblayers.conf
# changes incompatibly
POKY_BBLAYERS_CONF_VERSION = "2"

BBPATH = "${TOPDIR}"
BBFILES ?= ""

BBLAYERS ?= " \
  /home/tom/yocto/poky/meta \
  /home/tom/yocto/poky/meta-poky \
  /home/tom/yocto/poky/meta-yocto-bsp \
  "
可以看到,里面有3个layer。
| Layer | 作用 |
|---|---|
meta |
OE-Core 核心层,所有基础软件包、构建类、架构支持 |
meta-poky |
Poky 参考发行版策略,定义默认镜像、distro 配置 |
meta-yocto-bsp |
Yocto 官方 BSP 层,qemux86-64 这个 MACHINE 的定义就在这里面 |
⑤ 验证环境可正常解析
bitbake --version→ BitBake Build Tool Core version 2.8.1bitbake-layers show-layers→ 3 个默认 layer(core/yocto/yoctobsp)正常加载bitbake -e→ 确认 5 个配置变量全部被 bitbake 正确解析生效
4 最小验证系统
当前环境状态
~/yocto/
├── poky/                     # scarthgap 源码(完整克隆)
│   └── build/conf/           # 已初始化并优化好的配置
├── downloads/                # 未创建(首次编译生成)
└── sstate-cache/             # 未创建(首次编译生成)
然后可以开始跑 bitbake core-image-minimal 验证整条链路。结果如下:
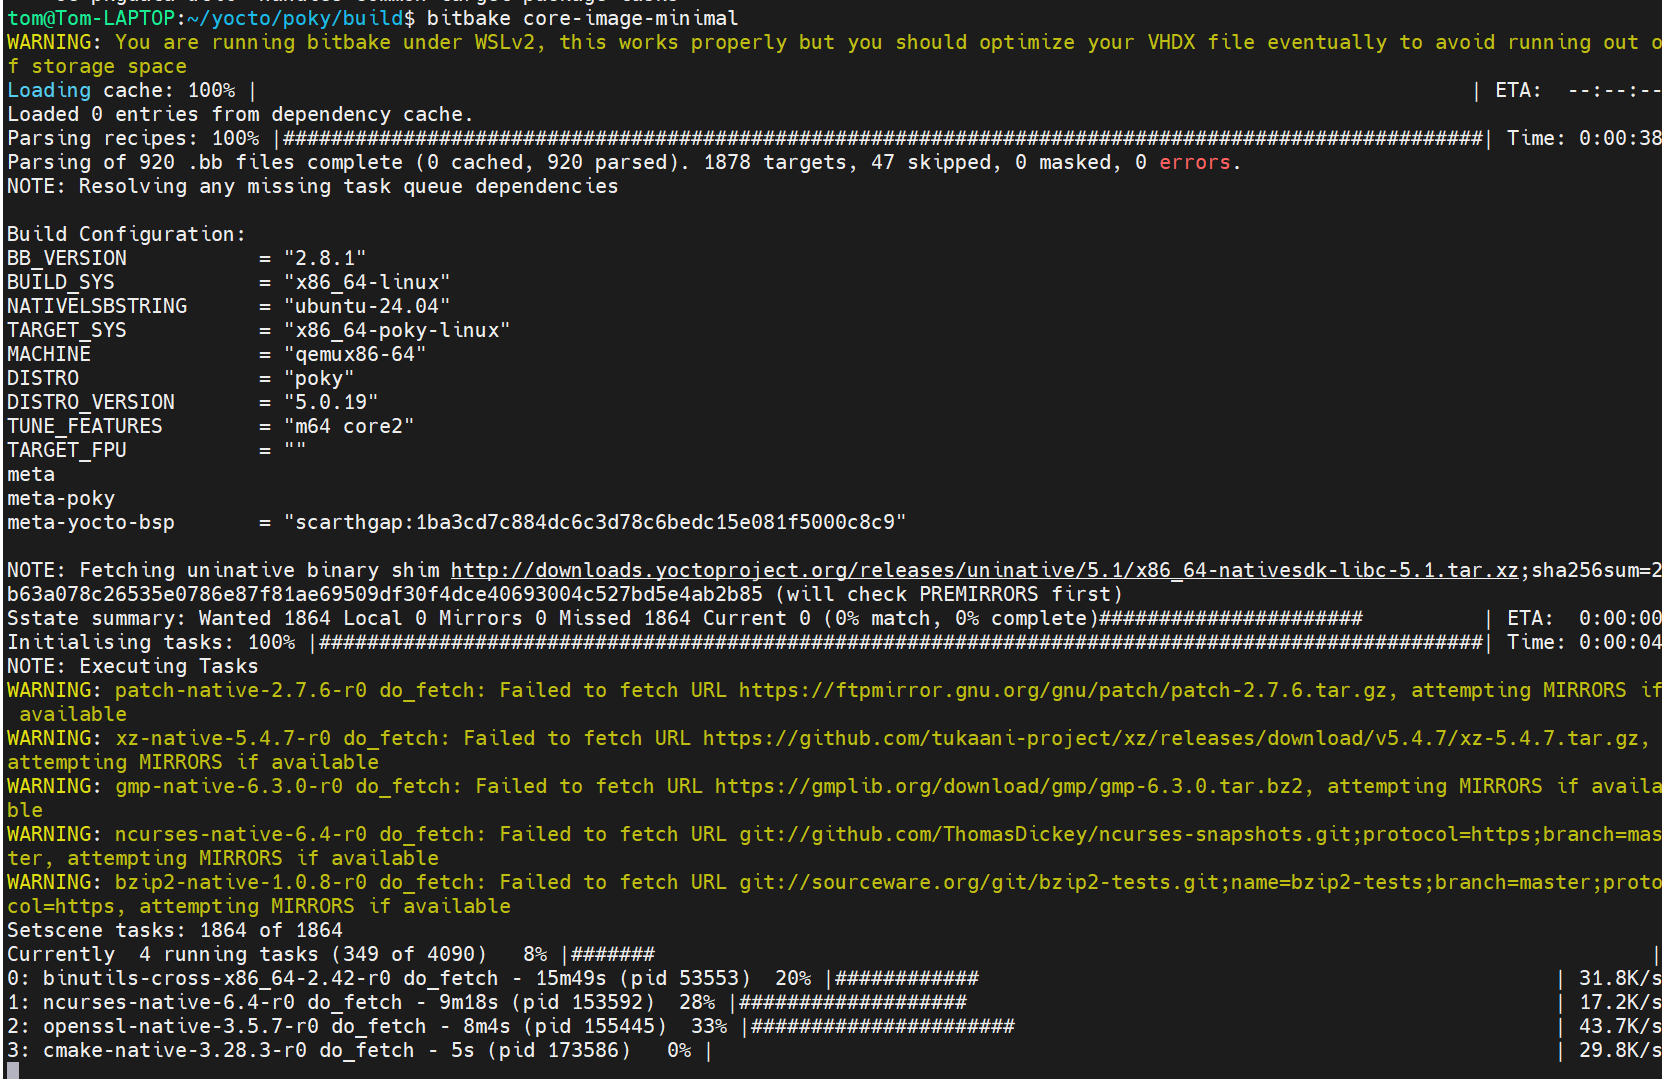
整个耗时非常长,我是通宵开了第二天早上来检查。
bash
tom@Tom-LAPTOP:~$ cd ~/yocto/poky
tom@Tom-LAPTOP:~/yocto/poky$ source oe-init-build-env build
This is the default build configuration for the Poky reference distribution.

### Shell environment set up for builds. ###

You can now run 'bitbake <target>'

Common targets are:
    core-image-minimal
    core-image-full-cmdline
    core-image-sato
    core-image-weston
    meta-toolchain
    meta-ide-support

You can also run generated qemu images with a command like 'runqemu qemux86-64'.

Other commonly useful commands are:
 - 'devtool' and 'recipetool' handle common recipe tasks
 - 'bitbake-layers' handles common layer tasks
 - 'oe-pkgdata-util' handles common target package tasks
tom@Tom-LAPTOP:~/yocto/poky/build$ bitbake core-image-minimal
WARNING: You are running bitbake under WSLv2, this works properly but you should optimize your VHDX file eventually to avoid running out o        f storage space
Loading cache: 100% |                                                                                                     | ETA:  --:--:--
Loaded 0 entries from dependency cache.
Parsing recipes: 100% |####################################################################################################| Time: 0:00:38
Parsing of 920 .bb files complete (0 cached, 920 parsed). 1878 targets, 47 skipped, 0 masked, 0 errors.
NOTE: Resolving any missing task queue dependencies

Build Configuration:
BB_VERSION           = "2.8.1"
BUILD_SYS            = "x86_64-linux"
NATIVELSBSTRING      = "ubuntu-24.04"
TARGET_SYS           = "x86_64-poky-linux"
MACHINE              = "qemux86-64"
DISTRO               = "poky"
DISTRO_VERSION       = "5.0.19"
TUNE_FEATURES        = "m64 core2"
TARGET_FPU           = ""
meta
meta-poky
meta-yocto-bsp       = "scarthgap:1ba3cd7c884dc6c3d78c6bedc15e081f5000c8c9"

NOTE: Fetching uninative binary shim http://downloads.yoctoproject.org/releases/uninative/5.1/x86_64-nativesdk-libc-5.1.tar.xz;sha256sum=2        b63a078c26535e0786e87f81ae69509df30f4dce40693004c527bd5e4ab2b85 (will check PREMIRRORS first)
Sstate summary: Wanted 1864 Local 0 Mirrors 0 Missed 1864 Current 0 (0% match, 0% complete)######################          | ETA:  0:00:00
Initialising tasks: 100% |#################################################################################################| Time: 0:00:04
NOTE: Executing Tasks
WARNING: patch-native-2.7.6-r0 do_fetch: Failed to fetch URL https://ftpmirror.gnu.org/gnu/patch/patch-2.7.6.tar.gz, attempting MIRRORS if         available
WARNING: xz-native-5.4.7-r0 do_fetch: Failed to fetch URL https://github.com/tukaani-project/xz/releases/download/v5.4.7/xz-5.4.7.tar.gz,         attempting MIRRORS if available
WARNING: gmp-native-6.3.0-r0 do_fetch: Failed to fetch URL https://gmplib.org/download/gmp/gmp-6.3.0.tar.bz2, attempting MIRRORS if availa        ble
WARNING: ncurses-native-6.4-r0 do_fetch: Failed to fetch URL git://github.com/ThomasDickey/ncurses-snapshots.git;protocol=https;branch=mas        ter, attempting MIRRORS if available
WARNING: bzip2-native-1.0.8-r0 do_fetch: Failed to fetch URL git://sourceware.org/git/bzip2-tests.git;name=bzip2-tests;branch=master;proto        col=https, attempting MIRRORS if available
WARNING: libunistring-native-1.2-r0 do_fetch: Failed to fetch URL https://ftpmirror.gnu.org/gnu/libunistring/libunistring-1.2.tar.gz, atte        mpting MIRRORS if available
WARNING: libtasn1-native-4.20.0-r0 do_fetch: Failed to fetch URL https://ftpmirror.gnu.org/gnu/libtasn1/libtasn1-4.20.0.tar.gz, attempting         MIRRORS if available
WARNING: rpm-native-1_4.19.1.1-r0 do_fetch: Failed to fetch URL git://github.com/rpm-software-management/rpm;branch=rpm-4.19.x;protocol=ht        tps, attempting MIRRORS if available
WARNING: file-native-5.45-r0 do_fetch: Failed to fetch URL git://github.com/file/file.git;branch=master;protocol=https, attempting MIRRORS         if available
WARNING: readline-native-8.2-r0 do_fetch: Failed to fetch URL https://ftpmirror.gnu.org/gnu/readline/readline-8.2.tar.gz;name=archive, att        empting MIRRORS if available
WARNING: libbsd-native-0.12.1-r0 do_fetch: Failed to fetch URL https://libbsd.freedesktop.org/releases/libbsd-0.12.1.tar.xz, attempting MIRRO     RS if available
WARNING: util-macros-native-1_1.20.0-r0 do_fetch: Failed to fetch URL https://www.x.org/releases//individual/util/util-macros-1.20.0.tar.gz,      attempting MIRRORS if available
WARNING: xorgproto-native-2023.2-r0 do_fetch: Failed to fetch URL https://www.x.org/releases//individual/proto/xorgproto-2023.2.tar.xz, attem     pting MIRRORS if available
WARNING: qemu-native-8.2.7-r0 do_fetch: Failed to fetch URL https://download.qemu.org/qemu-8.2.7.tar.xz, attempting MIRRORS if available
WARNING: libxdmcp-native-1_1.1.4-r0 do_fetch: Failed to fetch URL https://www.x.org/releases//individual/lib/libXdmcp-1.1.4.tar.xz, attemptin     g MIRRORS if available
WARNING: libpthread-stubs-native-0.5-r0 do_fetch: Failed to fetch URL http://xcb.freedesktop.org/dist/libpthread-stubs-0.5.tar.xz, attempting      MIRRORS if available
WARNING: xcb-proto-native-1.16.0-r0 do_fetch: Failed to fetch URL https://xorg.freedesktop.org/archive/individual/proto/xcb-proto-1.16.0.tar.     xz, attempting MIRRORS if available
WARNING: libxau-native-1_1.0.11-r0 do_fetch: Failed to fetch URL https://www.x.org/releases//individual/lib/libXau-1.0.11.tar.xz, attempting      MIRRORS if available
WARNING: xtrans-native-1_1.5.0-r0 do_fetch: Failed to fetch URL https://www.x.org/releases//individual/lib/xtrans-1.5.0.tar.xz, attempting MI     RRORS if available
WARNING: libxcb-native-1.16-r0 do_fetch: Failed to fetch URL http://xcb.freedesktop.org/dist/libxcb-1.16.tar.xz, attempting MIRRORS if availa     ble
WARNING: libx11-native-1_1.8.9-r0 do_fetch: Failed to fetch URL https://www.x.org/releases//individual/lib/libX11-1.8.9.tar.xz, attempting MI     RRORS if available
WARNING: libsolv-native-0.7.28-r0 do_fetch: Failed to fetch URL git://github.com/openSUSE/libsolv.git;branch=master;protocol=https, attemptin     g MIRRORS if available
WARNING: libxext-native-1_1.3.6-r0 do_fetch: Failed to fetch URL https://www.x.org/releases//individual/lib/libXext-1.3.6.tar.xz, attempting      MIRRORS if available
WARNING: libxrender-native-1_0.9.11-r0 do_fetch: Failed to fetch URL https://www.x.org/releases//individual/lib/libXrender-0.9.11.tar.xz, att     empting MIRRORS if available
WARNING: libxfixes-native-1_6.0.1-r0 do_fetch: Failed to fetch URL https://www.x.org/releases//individual/lib/libXfixes-6.0.1.tar.xz, attempt     ing MIRRORS if available
WARNING: libpciaccess-native-0.18-r0 do_fetch: Failed to fetch URL https://www.x.org/releases//individual/lib/libpciaccess-0.18.tar.xz, attem     pting MIRRORS if available
WARNING: libxrandr-native-1_1.5.4-r0 do_fetch: Failed to fetch URL https://www.x.org/releases//individual/lib/libXrandr-1.5.4.tar.xz, attempt     ing MIRRORS if available
WARNING: libdrm-native-2.4.120-r0 do_fetch: Failed to fetch URL http://dri.freedesktop.org/libdrm/libdrm-2.4.120.tar.xz, attempting MIRRORS i     f available
WARNING: xrandr-native-1_1.5.2-r0 do_fetch: Failed to fetch URL https://www.x.org/releases//individual/app/xrandr-1.5.2.tar.xz, attempting MI     RRORS if available
WARNING: libxxf86vm-native-1_1.1.5-r0 do_fetch: Failed to fetch URL https://www.x.org/releases//individual/lib/libXxf86vm-1.1.5.tar.xz, attem     pting MIRRORS if available
WARNING: libxdamage-native-1_1.1.6-r0 do_fetch: Failed to fetch URL https://www.x.org/releases//individual/lib/libXdamage-1.1.6.tar.xz, attem     pting MIRRORS if available
WARNING: makedepend-native-1_1.0.9-r0 do_fetch: Failed to fetch URL https://www.x.org/releases//individual/util/makedepend-1.0.9.tar.gz, atte     mpting MIRRORS if available
WARNING: libxshmfence-native-1.3.2-r0 do_fetch: Failed to fetch URL https://www.x.org/releases//individual/lib/libxshmfence-1.3.2.tar.xz, att     empting MIRRORS if available
WARNING: mesa-native-2_24.0.7-r0 do_fetch: Failed to fetch URL https://mesa.freedesktop.org/archive/mesa-24.0.7.tar.xz, attempting MIRRORS if      available
WARNING: pixman-native-1_0.42.2-r0 do_fetch: Failed to fetch URL https://www.cairographics.org/releases/pixman-0.42.2.tar.gz, attempting MIRR     ORS if available
NOTE: Tasks Summary: Attempted 4090 tasks of which 0 didn't need to be rerun and all succeeded.

Summary: There were 36 WARNING messages.
运行命令如下:
bash
cd ~/yocto/poky
source oe-init-build-env build
runqemu qemux86-64 slirp nographic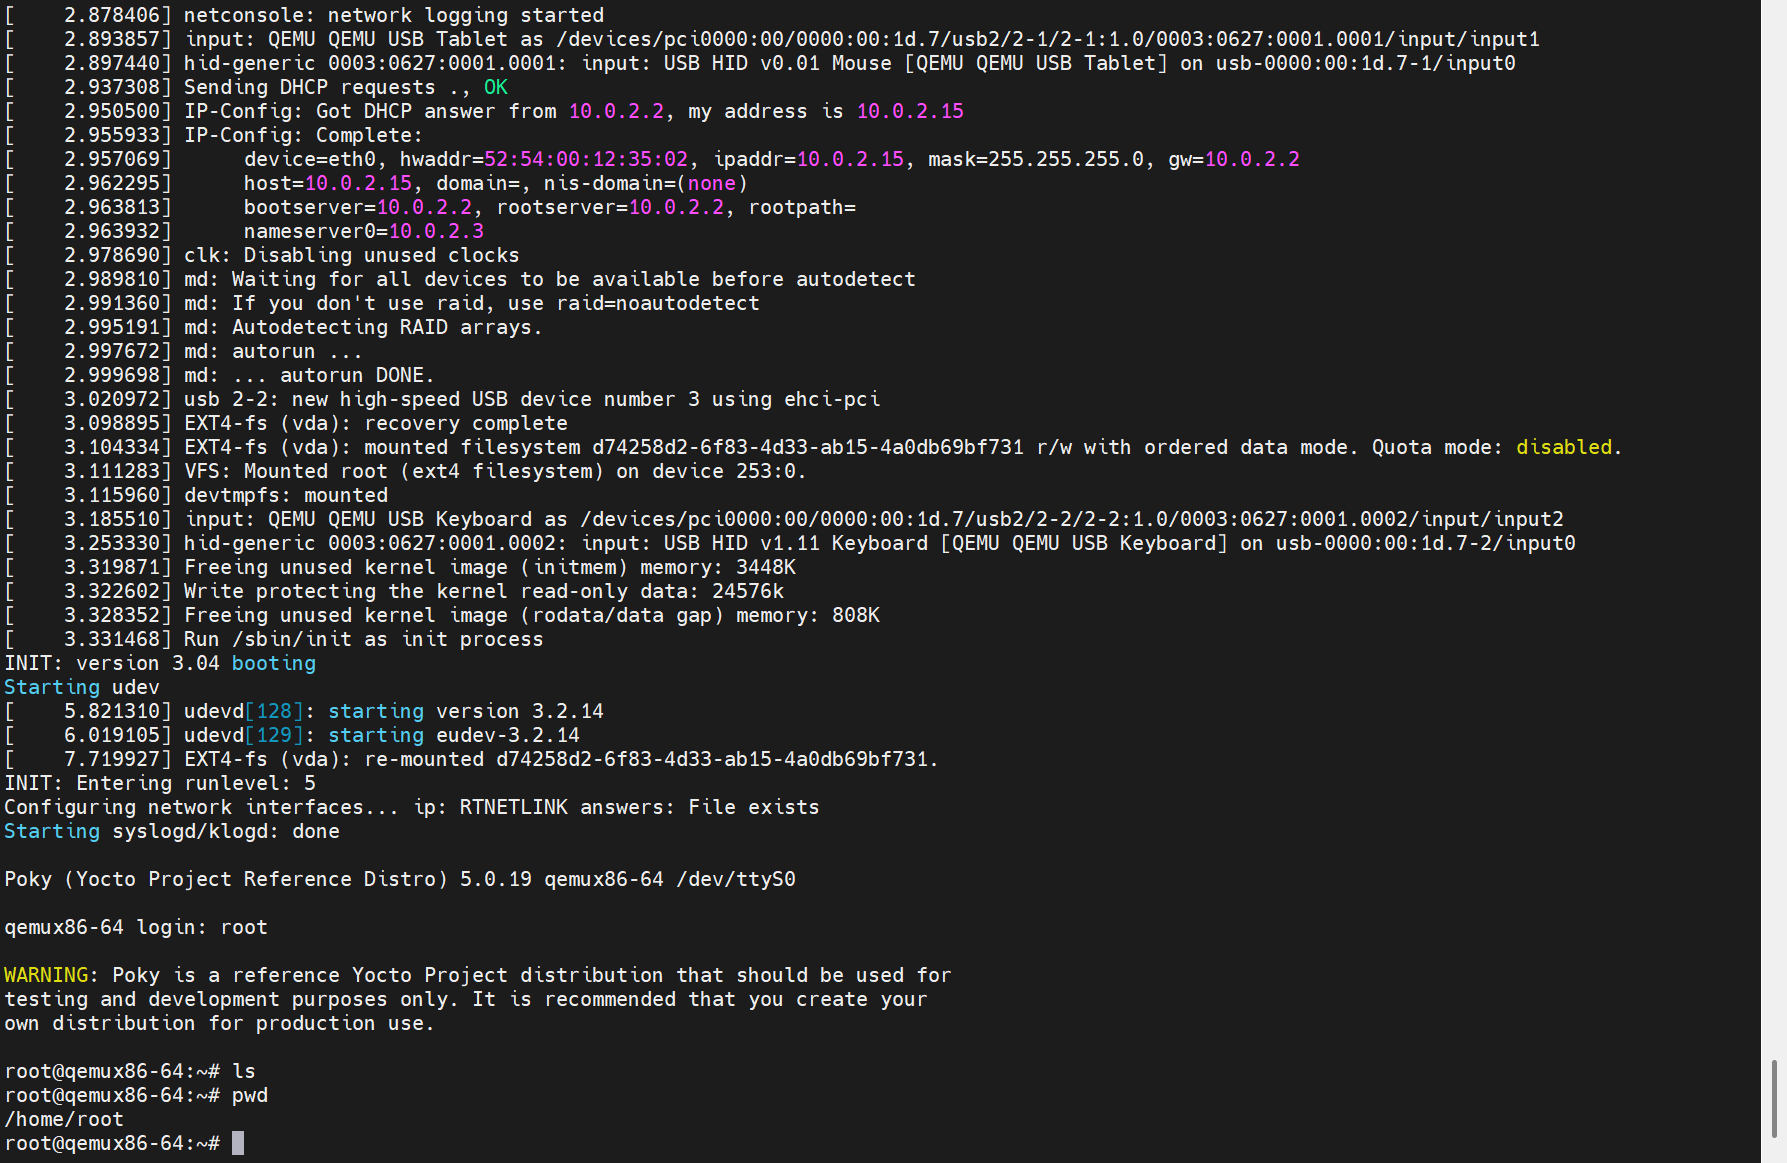
5 常见的换源问题
"换源"在 Yocto 里有 4 层机制,从我们刚才用过的 PREMIRRORS 到最实用的人工放包。下面按实用性从高到低讲。
先理解 Yocto 的下载机制(这是换源的基础)
Yocto 的 fetch(下载)流程是这样的:
recipe 里的 SRC_URI(原始地址)
        ↓ 下载失败
PREMIRRORS(首选镜像)→ 失败
        ↓
MIRRORS(后备镜像)→ 失败
        ↓
报错 "Failed to fetch URL: xxx"
所有下载的文件都统一存到 DL_DIR (你的是 /home/tom/yocto/downloads),下载成功的文件会有一个 .done 标记文件 。bitbake 看到 .done 就不再下载。
方法一:PREMIRRORS(首选镜像,刚用过)
这就是我们在 local.conf 里配的东西。作用:下载任何 URL 时,先尝试走镜像:
PREMIRRORS:prepend = "\
    git://.*/.* http://mirrors.ustc.edu.cn/yocto/git/ \n \
    https://.*/.* http://mirrors.ustc.edu.cn/yocto/sources/ \n \
http://.*/.* http://mirrors.ustc.edu.cn/yocto/sources/ \n"语法规则:<原始URL模式> <镜像URL> \n,.* 是通配。换源 = 把镜像 URL 换成别的(清华/阿里/公司内网镜像)。
方法二:手动下载 + 放 DL_DIR(最实用、最常用)
这是解决"某个包下载失败"最靠谱的方法,尤其高通源码经常在境外服务器。原理:
- bitbake 报
Failed to fetch URL: https://xxx/abc.tar.gz - 用浏览器/迅雷/公司代理把这个文件手动下载下来
- 改名为 bitbake 期望的文件名 (通常是 URL 的最后一段,如
abc.tar.gz) - 放进
DL_DIR,重跑bitbake
注意两个命名细节:
- git 类源码文件名带前缀:如
git2_github.com.xxx.git.tar.gz - 下载完要建一个空的
.done文件(或 bitbake 自动识别),否则它不认
重跑后 bitbake 发现文件已在 DL_DIR,直接跳过下载。
方法三:MIRRORS(后备镜像)
和 PREMIRRORS 语法一样,但优先级低,只在原始地址和 PREMIRRORS 都失败后才用。适合配公司内网的全量备份镜像:
MIRRORS:prepend = "\
    https://.*/.* http://192.168.x.x/yocto/sources/ \n \
    git://.*/.* http://192.168.x.x/yocto/git/ \n"
方法四:批量预下载 + 断点续传
bitbake -c fetchall <目标>--- 先批量下载所有源码再编译(高通用这个先下完,断了再续)- bitbake 下载本身支持断点续传,失败重跑会接着下,已下好的不重下
高通项目的特殊情况
高通 BSP(如 LE.UM、THINFROG)换源时有 3 个与众不同的点:
-
源码大量来自 code.qualcomm.com --- 需要高通账号授权,公共镜像根本下不到,所以"换源"更多是:
- 手动下载 → 放 DL_DIR
- 或把 SRC_URI 改成公司内网 git 服务器(很多公司会镜像高通源码)
-
改 recipe 的 SRC_URI 换源(最彻底):
# 比如某个 recipe 里 SRC_URI = "git://code.qualcomm.com/xxx;protocol=https" # 改成内网镜像 SRC_URI = "git://git.company.com/mirror/xxx;protocol=https" -
经常用
mirror.qualcomm.com或公司私服 配置 PREMIRRORS 指向内网,因为高通源码国外服务器慢且不稳。
可直接套用的操作清单
场景 A:某个包下载失败(最常见)
1. 看报错里的 URL → 手动下载 → 改名 → 放 DL_DIR → 重跑场景 B:整体慢/失败多(整体换源)
改 local.conf 里的 PREMIRRORS,换成更快的镜像,或公司内网镜像场景 C:高通授权源码
改 recipe 的 SRC_URI 指向公司内网 git 服务器,或用 PREMIRRORS 指内网镜像小结
| 方法 | 适用场景 | 操作位置 |
|---|---|---|
| PREMIRRORS | 整体加速/换源 | local.conf |
| MIRRORS | 兜底/公司镜像 | local.conf |
| 手动放 DL_DIR | 单个包下载失败 | ~/yocto/downloads |
| 改 SRC_URI | 授权源码/内网源 | recipe 文件 |
| fetchall | 批量预下载 | 命令行 |