随着AI语音转换技术快速迭代,AI音乐翻唱已成为音频创作、自媒体内容生产的主流方案。传统AI翻唱大多基于NVIDIA CUDA显卡开发部署,在国产算力生态普及的当下,海光DCU(深度学习计算单元)凭借国产化、高算力、高兼容性优势,成为AI音频推理、模型训练的优质替代方案。
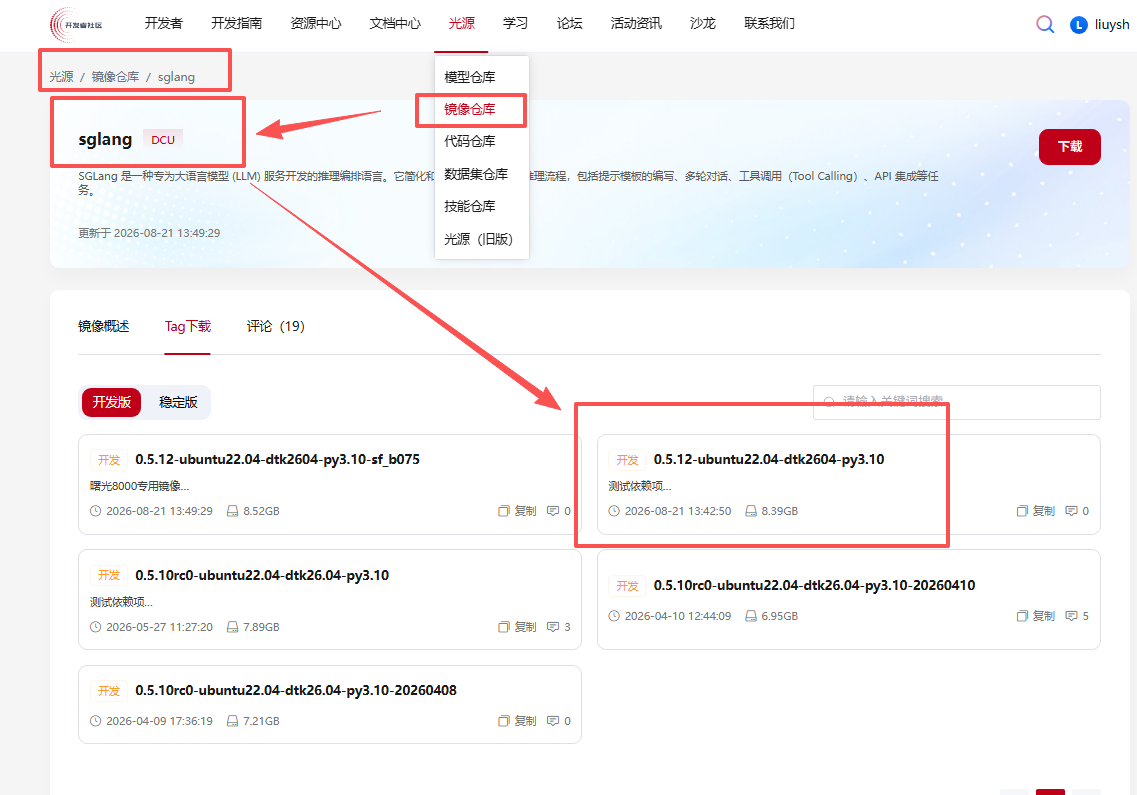
下面所有的都是在容器内进行
docker run -it --network=host --name liuysh-sglang --privileged --device=/dev/kfd --device=/dev/dri --device=/dev/mkfd --group-add video --cap-add=SYS_PTRACE --security-opt seccomp=unconfined --ulimit stack=-1:-1 --ulimit memlock=-1:-1 -u root -v /opt/hyhal/:/opt/hyhal/:ro -v /public:/public harbor.sourcefind.cn:5443/dcu/admin/base/sglang:0.5.12-ubuntu22.04-dtk2604-py3.10 bashSpleeter 音频分离使用指南
1. 进入容器
bash
docker exec -it liuysh-sglang bash2. 创建 Conda 环境
bash
# 接受 conda 服务条款
/root/miniconda3/bin/conda tos accept --override-channels --channel https://repo.anaconda.com/pkgs/main
/root/miniconda3/bin/conda tos accept --override-channels --channel https://repo.anaconda.com/pkgs/r

# 配置清华镜像源
/root/miniconda3/bin/conda config --remove-key custom_channels 2>/dev/null
/root/miniconda3/bin/conda config --remove-key channels 2>/dev/null
/root/miniconda3/bin/conda config --add channels https://mirrors.tuna.tsinghua.edu.cn/anaconda/pkgs/free/
/root/miniconda3/bin/conda config --add channels https://mirrors.tuna.tsinghua.edu.cn/anaconda/pkgs/main/
/root/miniconda3/bin/conda config --set show_channel_urls true

# 创建 Python 3.12 环境
/root/miniconda3/bin/conda create -n py312 python=3.12 -y
3. 安装 ffmpeg
bash
apt-get update -qq && apt-get install -y -qq ffmpeg4. 安装 Spleeter
bash
source /root/miniconda3/bin/activate py312
pip install spleeter
5. 运行音频分离
bash
source /root/miniconda3/bin/activate py312
spleeter separate -p spleeter:2stems -o output audio_example.mp3
-p spleeter:2stems:使用 2 stems 预训练模型(分离人声和伴奏)-o output:输出目录audio_example.mp3:输入音频文件
输出结果
分离后的音频文件将保存在 output/audio_example/ 目录下:
-
vocals.wav:人声(py312) root@m09r4n05:/public/home/liuysh/music_test# spleeter separate -p spleeter:2stems -o /public/home/liuysh/music_test/output /public/home/liuysh/music_test/test.mp3
INFO:spleeter:File /public/home/liuysh/music_test/output/test/accompaniment.wav written succesfully
INFO:spleeter:File /public/home/liuysh/music_test/output/test/vocals.wav written succesfully
音色转换
1.转换脚本
下载源码 https://developer.sourcefind.cn/codes/liuysh/rvc_repo.git
#!/usr/bin/env python3
# -*- coding: utf-8 -*-
"""
人声音色转换 (Voice Conversion) ------ 方案 A: 基于 RVC 的完整实现

本脚本封装了 RVC (Retrieval-based Voice Conversion) 的离线推理流程:
    源人声 (任意格式)  --RVC-->  目标说话人音色的人声

依赖 (已在环境中装好):
    torch, numpy, librosa, faiss-cpu, pyworld, parselmouth, av,
    soundfile, praat-parselmouth, transformers
以及 RVC 推理仓库 (默认 /workspace/rvc_repo)。

用法:
  # 1) 准备目标说话人模型 (二选一)
  #    a. 放入自己的模型:
  #       把  xxx.pth  (和对应的 xxx.index) 放到 <rvc>/assets/weights/
  #    b. 用官方公开 demo 模型快速体验:
  #        python voice_convert.py --download-demo

  # 2) 转换
  python voice_convert.py \
      --input  vocals.wav \
      --model  RVC_Base.pth \
      --output converted.wav

  # 变调 (半音, 例如升 2 个半音):
  python voice_convert.py --input vocals.wav --model RVC_Base.pth \
      --output converted.wav --pitch 2

  # 指定 index / index-rate (特征检索强度, 0~1):
  python voice_convert.py --input vocals.wav --model RVC_Base.pth \
      --index RVC_Base.index --index-rate 0.75 --output converted.wav

说明:
  - 无 GPU/DCU 时自动走 CPU 推理 (本环境即如此), 速度较慢但可用。
  - 若想转换整首歌, 建议先用 Spleeter 分离人声再转换, 最后混回伴奏。
"""

import argparse
import os
import subprocess
import sys
from pathlib import Path

RVC_REPO = os.environ.get("RVC_REPO", "/public/home/liuysh/music_test/rvc_repo")
WEIGHTS_DIR = os.path.join(RVC_REPO, "assets", "weights")

# RVC 公开可用的 base 模型候选源 (用于快速体验, 非特定名人音色)
# 注意: HuggingFace 的 resolve 链接可能失效/私有, 下面给出多个候选, 下载后校验大小。
DEMO_MODEL_URLS = [
    "https://huggingface.co/spaces/kingboy/RVC/resolve/main/assets/weights/RVC_Base.zip",
    "https://huggingface.co/liujing04/rvc-bases/resolve/main/RVC_Base.zip",
]


def check_ffmpeg():
    if subprocess.run(["which", "ffmpeg"], capture_output=True).returncode != 0:
        sys.exit("错误: 未找到 ffmpeg,请先安装 (apt-get install ffmpeg)")


def ensure_wav(path):
    """用 ffmpeg 把任意音频转成 16k 单声道 wav,返回新路径。"""
    p = Path(path)
    if p.suffix.lower() == ".wav":
        return path
    out = str(p.with_suffix("")) + "_16k.wav"
    cmd = ["ffmpeg", "-y", "-i", path, "-ar", "16000", "-ac", "1", "-vn", out]
    subprocess.run(cmd, check=True, stdout=subprocess.DEVNULL, stderr=subprocess.DEVNULL)
    return out


def download_demo():
    """下载 RVC 公开 base 模型作为演示音色 (多源 + 大小校验)。"""
    os.makedirs(WEIGHTS_DIR, exist_ok=True)
    zip_path = os.path.join(WEIGHTS_DIR, "RVC_Base.zip")
    ok = False
    for url in DEMO_MODEL_URLS:
        print(f"[下载] {url}")
        try:
            subprocess.run(
                ["curl", "-L", "--fail", "-o", zip_path, url],
                check=True, stdout=subprocess.DEVNULL, stderr=subprocess.DEVNULL,
            )
        except (FileNotFoundError, subprocess.CalledProcessError):
            print("  失败, 尝试下一个源")
            continue
        if os.path.getsize(zip_path) < 1_000_000:  # 模型应 > 1MB
            print(f"  下载文件过小 ({os.path.getsize(zip_path)} 字节), 跳过")
            continue
        ok = True
        break
    if not ok:
        sys.exit(
            "自动下载失败 (链接失效或网络受限)。请手动下载一个 RVC 模型 (.pth + .index)\n"
            "放入: " + WEIGHTS_DIR + "\n"
            "推荐来源: https://huggingface.co/models?search=rvc  (搜索 rvc pretrained)\n"
            "下载后重新运行: python voice_convert.py --input <人声> --model <文件名>"
        )
    print("[解压] ...")
    subprocess.run(
        ["unzip", "-o", zip_path, "-d", WEIGHTS_DIR],
        check=True, stdout=subprocess.DEVNULL,
    )
    os.remove(zip_path)
    print(f"[完成] 模型已放入 {WEIGHTS_DIR}")


def main():
    p = argparse.ArgumentParser(description="RVC 人声音色转换")
    p.add_argument("--input", help="源人声文件 (wav/mp3/...)")
    p.add_argument("--model", help="模型文件名 (位于 assets/weights/) 或 .pth 路径")
    p.add_argument("--index", default=None, help=".index 文件路径 (可省略)")
    p.add_argument("--output", default="converted.wav")
    p.add_argument("--pitch", type=int, default=0, help="变调 (半音)")
    p.add_argument("--f0-method", choices=["pm", "rmvpe"], default="rmvpe")
    p.add_argument("--index-rate", type=float, default=0.75)
    p.add_argument("--rms-mix-rate", type=float, default=1.0)
    p.add_argument("--protect", type=float, default=0.33)
    p.add_argument("--resample-sr", type=int, default=0)
    p.add_argument(
        "--download-demo",
        action="store_true",
        help="下载 RVC 官方公开 base 模型用于体验",
    )
    args = p.parse_args()

    check_ffmpeg()

    if args.download_demo:
        download_demo()
        return

    if not args.input or not args.model:
        sys.exit("错误: 需提供 --input 和 --model (或用 --download-demo 先下载模型)")

    if not os.path.exists(args.input):
        sys.exit(f"错误: 输入文件不存在: {args.input}")

    # 调用 RVC 仓库自带推理 CLI (最稳, 复用官方逻辑)
    cli = os.path.join(RVC_REPO, "infer", "cli.py")
    if not os.path.exists(cli):
        sys.exit(f"错误: 未找到 RVC 推理入口: {cli} (请先克隆 RVC 仓库)")

    cmd = [
        sys.executable, cli,
        "--model", args.model,
        "--input", ensure_wav(args.input),
        "--output", args.output,
        "--pitch", str(args.pitch),
        "--f0-method", args.f0_method,
        "--index-rate", str(args.index_rate),
        "--rms-mix-rate", str(args.rms_mix_rate),
        "--protect", str(args.protect),
        "--resample-sr", str(args.resample_sr),
        "--overwrite",
    ]
    if args.index:
        # RVC CLI 要求 --index 用绝对路径 (相对路径会被当作相对于仓库根目录)
        idx = Path(args.index)
        if not idx.is_absolute():
            idx = Path(WEIGHTS_DIR) / idx
        if not idx.is_file():
            sys.exit(f"错误: index 文件不存在: {idx}")
        cmd += ["--index", str(idx)]

    print("[RVC] 推理中 (DCU, 请稍候) ...")
    env = dict(os.environ, PYTHONPATH=RVC_REPO + os.pathsep + os.environ.get("PYTHONPATH", ""))
    subprocess.run(cmd, cwd=RVC_REPO, env=env, check=True)
    print(f"[完成] 输出: {args.output}")


if __name__ == "__main__":
    main()
2.执行结果
docker exec liuysh-sglang bash -c "cd /public/home/liuysh/music_test/rvc_repo && RVC_CUDA_GRAPH=0 python3 voice_convert.py --input /public/home/liuysh/music_test/output/test/vocals.wav --model lys.pth --output /public/home/liuysh/music_test/output/test/converted.wav --f0-method pm --index-rate 0"
Current device: cuda:0 | Inference precision: torch.float16
Select model: lys.pth
Speaker ID (0-109): 0
Select index: Not used
Loading weights: 100%|██████████| 213/213 [00:00<00:00, 23204.25it/s]
/usr/local/lib/python3.10/dist-packages/transformers/integrations/sdpa_attention.py:92: UserWarning: sdpa adopt the new interface of flash-attn (Triggered internally at /pytorch/aten/src/ATen/native/transformers/hip/cutlassfa_adapter.h:148.)
  attn_output = torch.nn.functional.scaled_dot_product_attention(
【Single Inference】
Status:Success

Index:Not used
Elapsed time:Features 4.41s | F0 0.18s | Synthesis 3.62s
/public/home/liuysh/music_test/output/test/converted.wav
[RVC] 推理中 (DCU, 请稍候) ...
[完成] 输出: /public/home/liuysh/music_test/output/test/converted.wav
RVC 音色转换问题记录
环境信息
-
容器:liuysh-sglang
-
设备:DCU (Hygon DCU,类似 AMD ROCm)
-
Python:系统 Python 3.10
-
PyTorch:2.10.0 (DCU 版本)
root@m09r4n05:/# pip list |grep das
aiter 0.1.3+das.opt1.dtk2604.torch2100.2607131711.g5de342
causal-conv1d 1.5.4+das.opt1.dtk2604.torch2100.2605141509.g11ee83
dashscope 1.27.1
deep_ep_shca 1.1.0+das.opt1.dtk2604.torch2100.2607012020.gdb7a03
deepgemm 2.1.0+das.opt1.dtk2604.torch2100.2607131438.g1e4537
fastsafetensors 0.3.2+das.dtk2604.torch2100.2606031120.gee639a
flash-attn 2.8.3+das.opt1.dtk2604.torch2100.2607101054.gb15762
flash-mla 1.2.0+das.opt1.dtk2604.torch2100.2607011131.ga38e65
lightop 0.6.0+das.dtk2604.torch2100.2607132037.g20a75f
lmslim 0.3.1+das.opt4.dtk2604.torch2100.2607031757.gf19bc1
mooncake-transfer-engine-shca 0.3.10.post1+das.dtk2604.2607011421.g1591e8
pandas 1.5.3
sglang 0.5.12+das.dtk2604.torch2100.2607131646.g83bed2
sglang-kernel 0.4.2.post2+das.dtk2604.torch2100.2607131646.g83bed2
sglang-router 0.3.2+das.dtk2604.torch2100.2606291518.g86f032
tilelang 0.1.9+das.dtk2604.torch2100.2607061746.g806d0d
torch 2.10.0+das.opt1.dtk2604.2607131149.g995012
torchvision 0.25.0+das.opt1.dtk2604.torch2100.2605071719.g7ffc50
vllm 0.21.0+das.dtk2604.torch2100.2606111143.g8c979d
vllm-hcu 0.21.0+das.dtk2604.torch2100.2607091624.gb9a3cc
问题与解决
1. typing_extensions 版本过低
错误:
ImportError: cannot import name 'TypeIs' from 'typing_extensions'解决:
bash
pip3 install --upgrade typing_extensions2. 缺少依赖包
错误:
No module named 'faiss'
No module named 'parselmouth'
No module named 'librosa'
解决:
bash
pip3 install -i https://mirrors.aliyun.com/pypi/simple/ faiss-cpu praat-parselmouth pyworld torchfcpe librosa soundfile av3. numpy 版本冲突
错误:
numpy.dtype size changed, may indicate binary incompatibility. Expected 96 from C header, got 88 from PyObject原因: torch 编译时使用 numpy 1.x,faiss-cpu 需要 numpy 2.x,两者不兼容。
解决: 安装兼容 numpy 1.x 的版本:
bash
pip3 install -i https://mirrors.aliyun.com/pypi/simple/ 'numpy==1.24.4' 'faiss-cpu==1.7.4'4. faiss-cpu SuperKMeans 命名错误
错误:
NameError: name 'SuperKMeans' is not defined. Did you mean 'SuperKmeans'?原因: faiss-cpu 1.9.0 存在命名 bug。
解决: 使用 faiss-cpu 1.7.4:
bash
pip3 install -i https://mirrors.aliyun.com/pypi/simple/ 'faiss-cpu==1.7.4'5. DCU CUDA Graph 兼容性问题
错误:
RuntimeError: CUDA error: HIPBLAS_STATUS_INTERNAL_ERROR when calling hipblasCreate(handle)
RuntimeError: miopenStatusUnknownError
CUDA Graph capture failed for ('hubert-v2-no-mask',); using eager
原因: DCU 对 CUDA Graph 支持不完整。
解决: 通过环境变量禁用 CUDA Graph:
bash
RVC_CUDA_GRAPH=0 python3 voice_convert.py ...6. Index 检索失败
错误:
RuntimeWarning: invalid value encountered in divide
IndexError: index -1 is out of bounds for axis 0 with size 0
原因: faiss index 文件与当前版本不兼容,检索返回空结果。
解决: 跳过 index 检索,使用 --index-rate 0:
bash
python3 voice_convert.py --input vocals.wav --model lys.pth --output converted.wav --index-rate 0最终成功命令
bash
cd /public/home/liuysh/music_test/rvc_repo && \
RVC_CUDA_GRAPH=0 python3 voice_convert.py \
    --input /public/home/liuysh/music_test/output/test/vocals.wav \
    --model lys.pth \
    --output /public/home/liuysh/music_test/output/test/converted.wav \
    --f0-method pm \
    --index-rate 0
关键配置修改
voice_convert.py 路径修改
python
# 原路径
RVC_REPO = os.environ.get("RVC_REPO", "/workspace/rvc_repo")

# 修改为
RVC_REPO = os.environ.get("RVC_REPO", "/public/home/liuysh/music_test/rvc_repo")
依赖版本汇总
| 包 | 版本 |
|---|---|
| numpy | 1.24.4 |
| faiss-cpu | 1.7.4 |
| typing_extensions | 4.16.0 |
| torch | 2.10.0 (DCU) |
| praat-parselmouth | 0.4.7 |
| pyworld | 0.3.5 |
| librosa | 0.11.0 |