简介
把机房里的服务器从「按开机键、插 U 盘」变成「网页里点一下」完成裸金属服务器开局。
- 支持主流Linux和Windows Server自动化装机
- 可自动化安装系统、密码/密钥、分区、网卡配置等。
- Windows Server 19-25支持自动KMS激活。
- 支持Linux 发行版有Debian 11-13、Ubuntu 20.04+、Rocky 8-10、Centos 7-10。
- 支持BIOS和UEFI的PXE引导,使用IPXE实现。
- Linux 网卡配置支持Bond + VLAN。
官方仓库:Songxwn/Rack-auto · 下载 Release
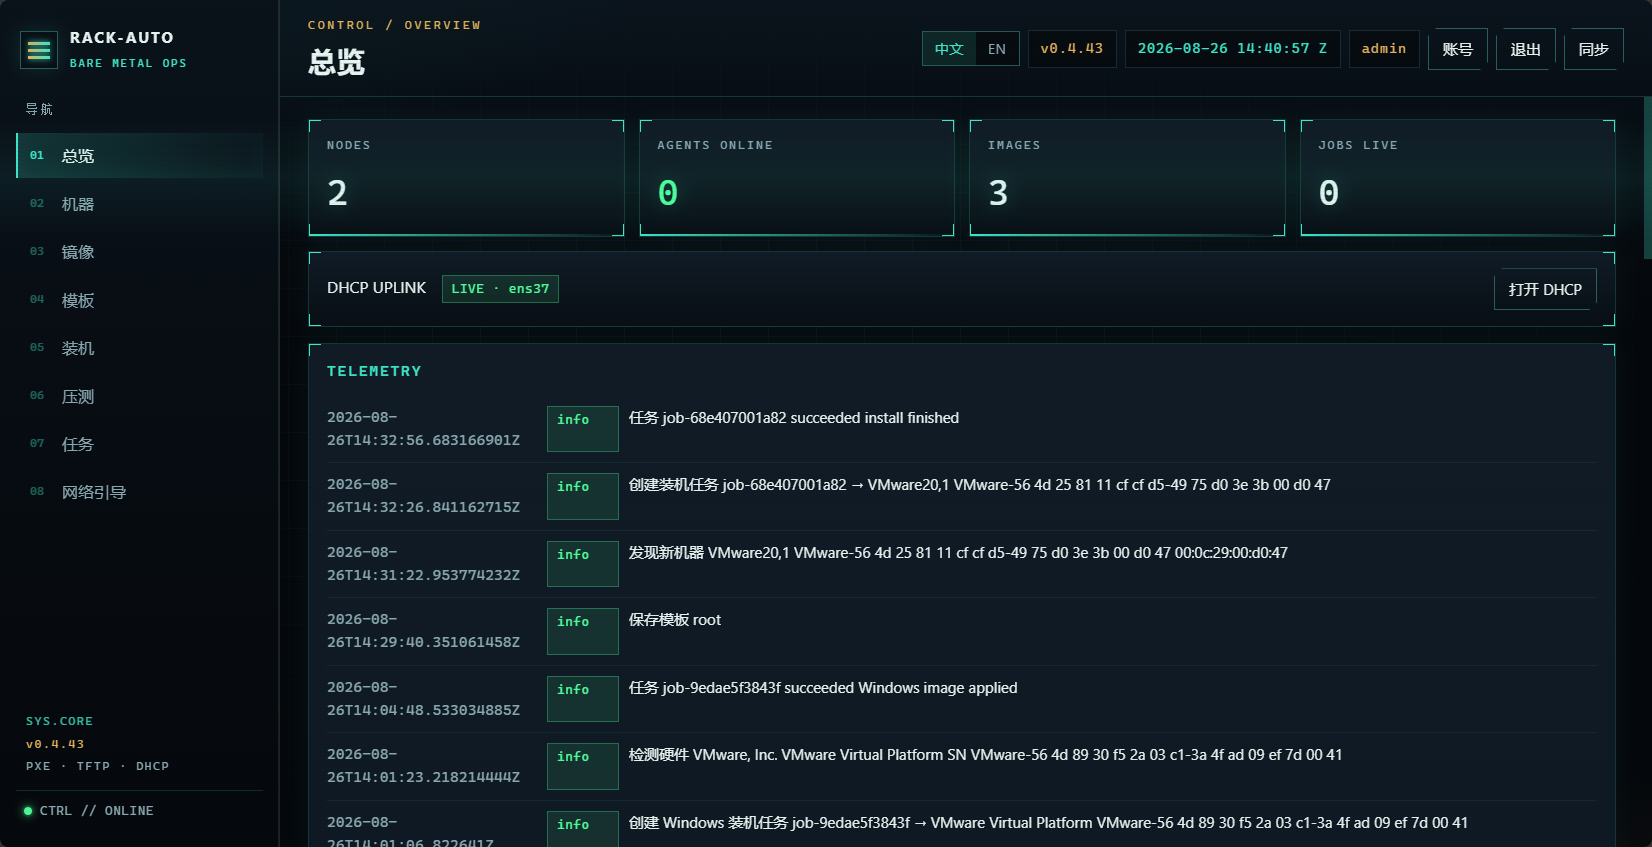
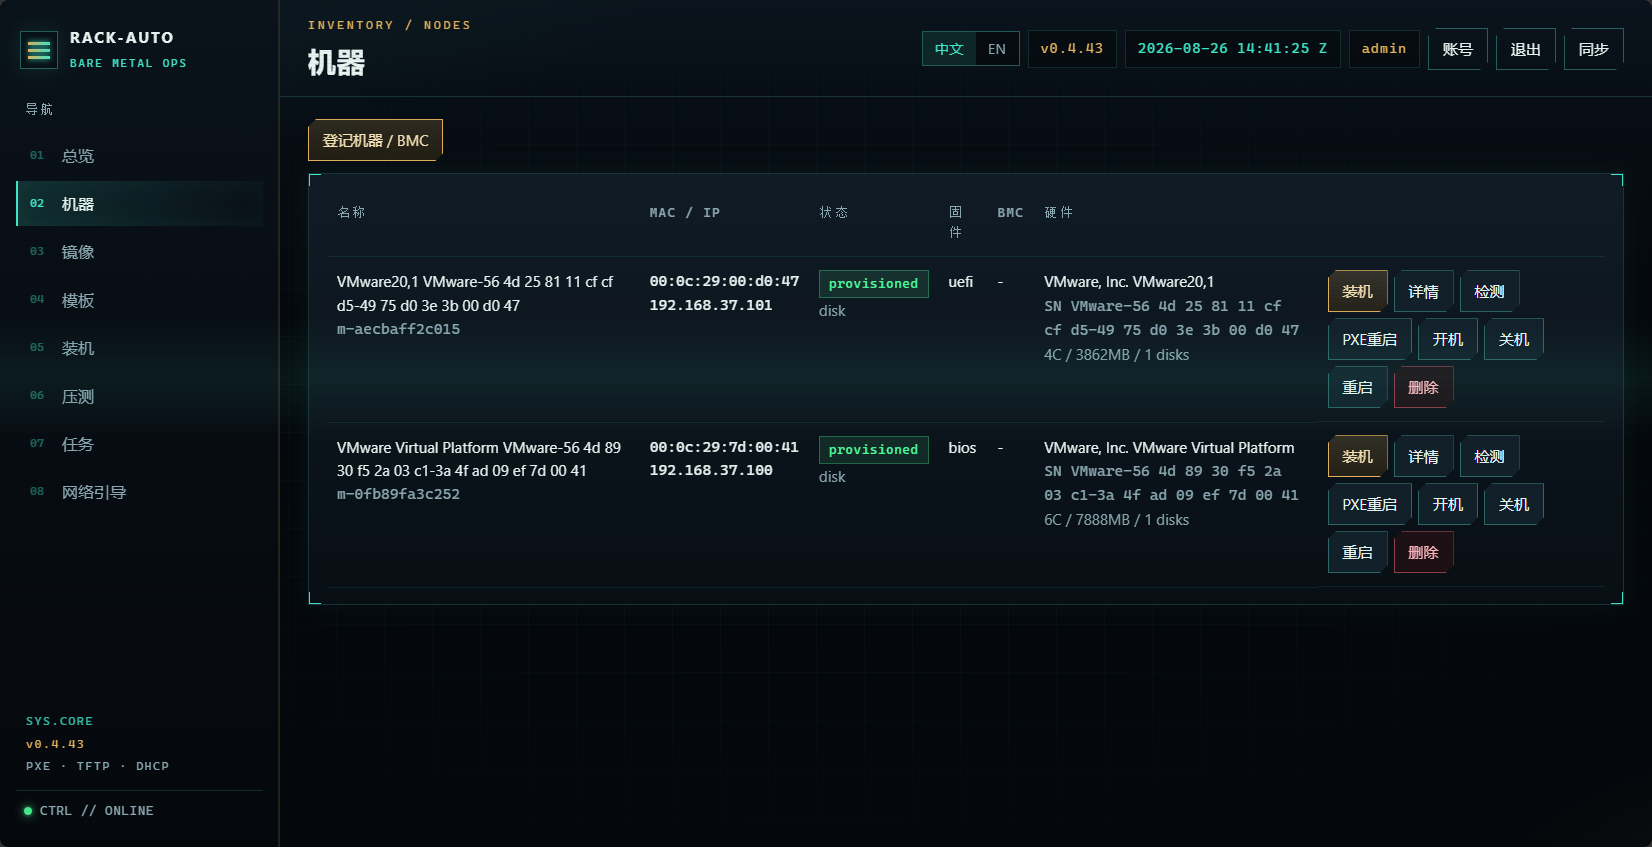
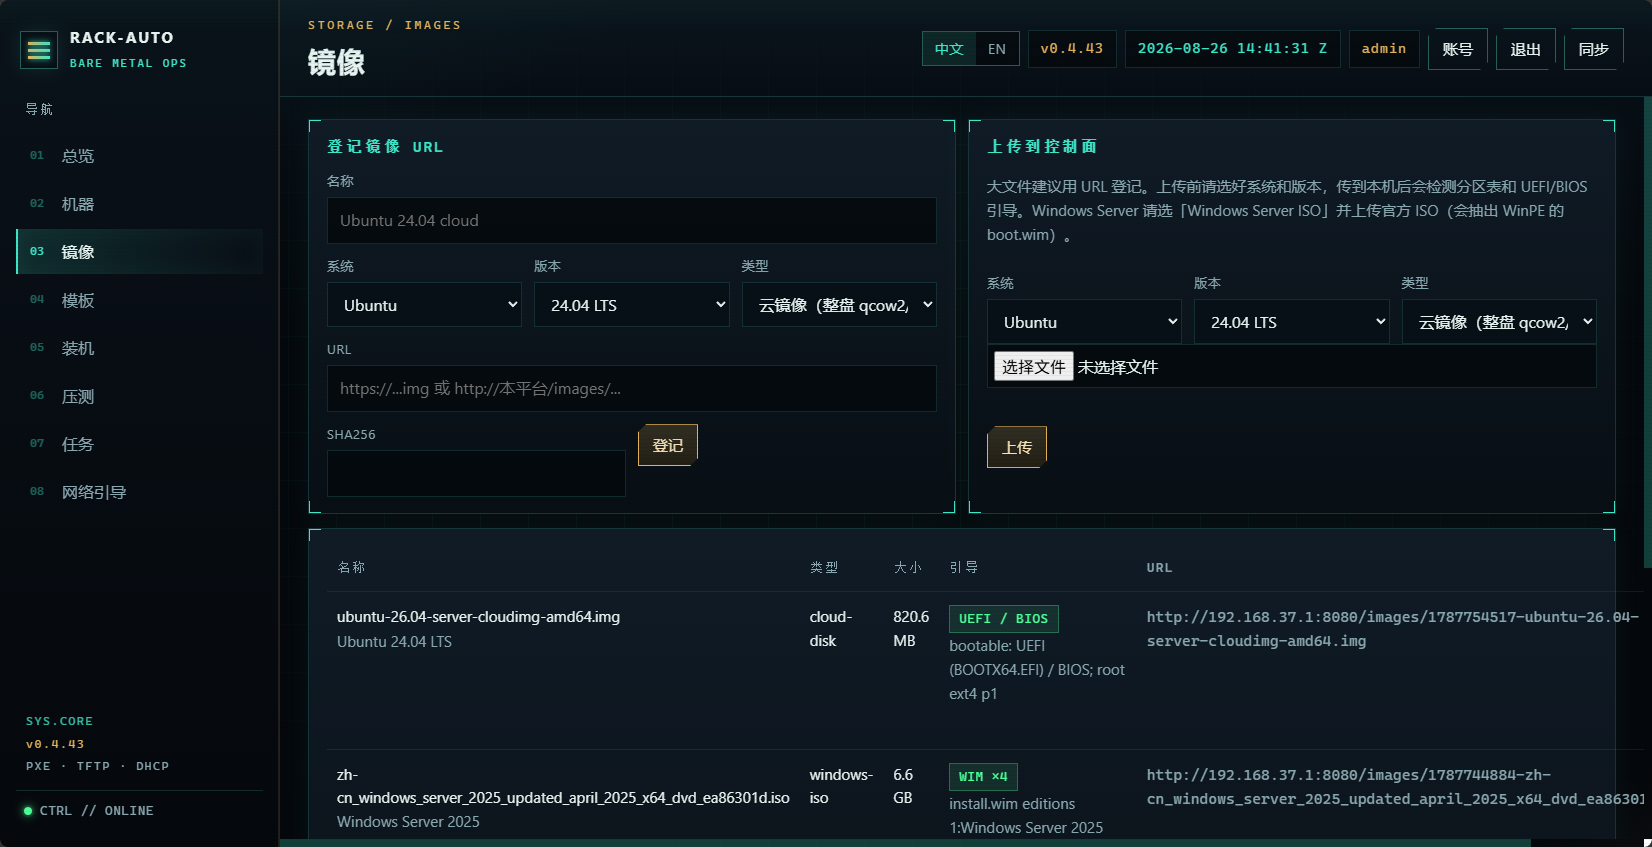
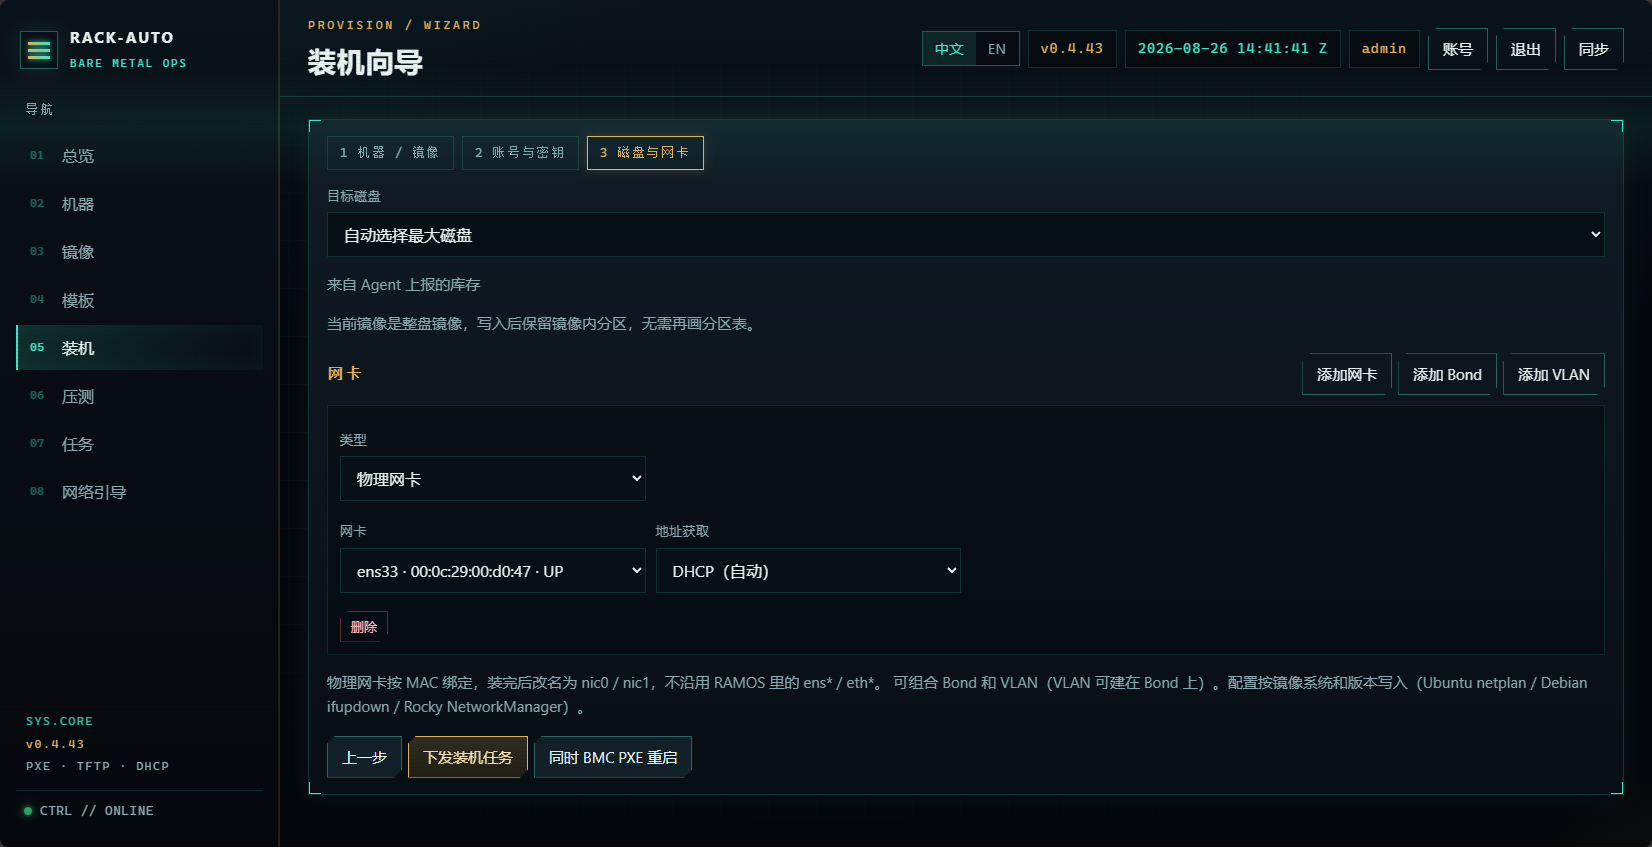
正式安装
你需要这些
| 准备 | 说明 |
|---|---|
| 一台 Debian Linux 12+ | 绑定 UDP 67 / 69端口,然后一台有浏览器的电脑用于查看web界面 |
| 一块独立装机内网网卡 用于PXE + DHCP | 控制面和待装机服务器同一交换机 / 同一 VLAN。 |
| 公网网卡 | 第一次 bootstrap 会公网缓存 Ubuntu live-server ISO(约 2.7GB)。 |
| 待装机机器内存 | 建议 ≥ 8GB。 |
| 控制面磁盘 | RAMOS 大约 5GB,再加上你要存的系统镜像。 推荐100G |
public_url 必须填 待装机服务器能访问的地址 (内网网卡地址) ,不要填 127.0.0.1。机器 PXE 起来后,是它自己来拉内核和镜像的。
- 同一二层不要跑两套 DHCP。实验室空网段用内置 DHCP;机房已有 DHCP 就只改引导文件。
0. 安装基础依赖
bash
apt install nano git sudo curl wimtools -y1. 安装控制面
x86_64 示例。ARM 控制面把下面的 amd64 换成 arm64,Agent 目录换成 aarch64。
bash
sudo mkdir -p /opt/rackauto/{bin,configs,deploy,data/agent/x86_64}
cd /tmp
curl -fLO https://github.com/Songxwn/Rack-auto/releases/latest/download/rackauto-linux-amd64.tar.gz
tar -tzf rackauto-linux-amd64.tar.gz

CTRL=$(ls -1 rackauto rackauto-linux-amd64 2>/dev/null | head -n1)
AGENT=$(ls -1 rackauto-agent rackauto-agent-linux-amd64 2>/dev/null | head -n1)
sudo install -m 0755 "$CTRL" /opt/rackauto/bin/rackauto
sudo install -m 0755 "$AGENT" /opt/rackauto/data/agent/x86_64/rackauto-agent

cd /opt/rackauto/
Release 包里没有配置文件。从仓库拉三份即可,不必 clone:
bash
VER=main
RAW="https://raw.githubusercontent.com/Songxwn/Rack-auto/${VER}"
# 若 raw.githubusercontent.com 打不开,改用:
# RAW="https://cdn.jsdelivr.net/gh/Songxwn/Rack-auto@${VER}"

tmp=$(mktemp)
curl -fL -o "$tmp" "$RAW/configs/rackauto.example.yaml"
sudo install -m 0644 "$tmp" /opt/rackauto/configs/rackauto.example.yaml
sudo test -f /opt/rackauto/configs/rackauto.yaml \
  || sudo cp /opt/rackauto/configs/rackauto.example.yaml /opt/rackauto/configs/rackauto.yaml

curl -fL -o "$tmp" "$RAW/deploy/rackauto.service"
sudo install -m 0644 "$tmp" /opt/rackauto/deploy/rackauto.service
rm -f "$tmp"
PS:若网络不好,可以去最下面的百度云盘下载
2. 改两行配置 - 可不做
bash
ip -br a
sudo nano /opt/rackauto/configs/rackauto.yaml
至少改这几项(IP 换成你装机网网卡上的地址):
yaml
listen: ":8080"
public_url: "http://10.0.0.50:8080"
data_dir: "/opt/rackauto/data"
api_token: "请换成一段随机字符串"
tftp_listen: ":69"public_url:装机网上的控制面,带端口。api_token:给 RAMOS Agent 用,不是网页登录密码。dhcp.enabled可以先保持false,一会儿在网页里开。
3. 准备引导文件(只需一次)下载公网镜像
bash
sudo /opt/rackauto/bin/rackauto bootstrap \
  -config /opt/rackauto/configs/rackauto.yaml \
  -data-dir /opt/rackauto/data
这一步会:
- 把内置 iPXE 写到 TFTP 目录(BIOS:
undionly.kpxe,UEFI:ipxe.efi) - 下载 Ubuntu 26.04 live-server ISO 到控制面(机器不会去拉这 2.7GB)
- 打一份较小的
casper.iso,PXE 时只拉这一份进内存
国内想指定镜像源,在 YAML 里加:
yaml
bootstrap:
  ubuntu_release: "26.04"
  ubuntu_mirror: "https://mirrors.tuna.tsinghua.edu.cn/ubuntu-releases"
已经有 ISO 时填 ubuntu_iso: "/path/to/ubuntu-26.04-live-server-amd64.iso",会跳过下载。
4. 开机长期跑 - 注册为服务
bash
sudo cp /opt/rackauto/deploy/rackauto.service /etc/systemd/system/
sudo systemctl daemon-reload
sudo systemctl enable --now rackauto
curl -sS http://127.0.0.1:8080/api/v1/health
防火墙(内置 DHCP 时 UDP 67 也要开):
bash
# firewalld - RHEL系列
sudo firewall-cmd --add-port=8080/tcp --add-port=69/udp --add-port=67/udp --permanent
sudo firewall-cmd --reload

# ufw - Debian系列
sudo ufw allow 8080/tcp
sudo ufw allow 69/udp
sudo ufw allow 67/udp
Edge / Chrome浏览器打开 http://10.0.0.50:8080(换成你的 IP)。
- 默认账号 admin / admin,进去后点右上角「账号」立刻改掉。
- 登录页右上角可切 中文 / English。
- 左下角变成
CTRL // ONLINE就对了。 - PXE、iPXE、Agent 不走这套网页登录。
5. 打开 DHCP
进控制台 08 网络引导 。上面的 Public URL 必须和 public_url 一致。 (使用内网网卡IP)
Rack-auto 配置DHCP
- 勾选「启用内置 DHCP」
- 接入网卡选连装机交换机的那块,要选内网网卡 (只配置IP掩码即可,不需要网关)
- 网段、地址池会自动填,避开控制面自己的 IP
- 点「保存并应用」,状态变成「运行中」
机房已有 DHCP - 可跳过
不要开内置。把现有 DHCP 的 next-server 指到控制面。页面底部有可复制的 dhcpd / dnsmasq 片段,大意是:
- 传统 BIOS →
undionly.kpxe - UEFI →
ipxe.efi - 已经是 iPXE →
boot.ipxe
6. 装一台 Linux
磁盘会被清空。第一次用可以重装的机器。
登记机器
有 BMC:在「机器」里填名称、PXE 网卡 MAC、固件(UEFI 或 BIOS)、IPMI/Redfish 地址。之后可以用网页开机、PXE 重启。
没有 BMC:到服务器把下次启动改成网卡 PXE,直接开机。进 RAMOS 后 Agent 会报到,列表里会出现这台机器。
准备镜像
打开「镜像」,先选系统和版本(Ubuntu / Debian / Rocky 等)。
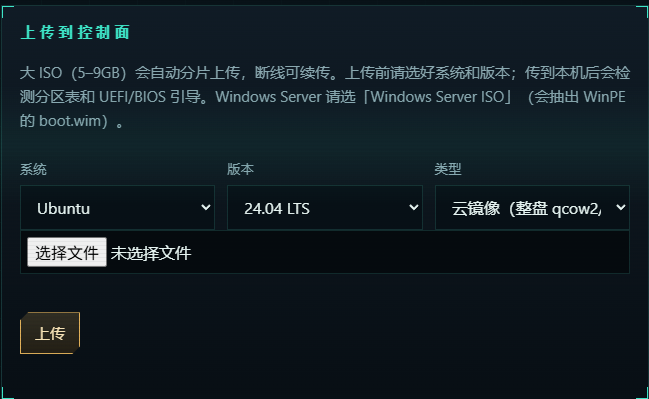
上传本地硬盘镜像/ISO
装机向导
打开「装机」,三步:
- 选机器和镜像,固件、主机名、时区。
- 用户(默认
root)、密码、SSH 公钥。常用账号可先在「模板」里存好,这里点一下就填入。 - 目标磁盘、网卡(DHCP 或静态)。整盘云镜像会保留镜像里的分区,并自动把根分区扩满磁盘。
有 BMC 可勾选「同时 BMC PXE 重启」。到「任务」看进度。成功后机器会切回本地硬盘启动。
装完后的物理网卡按 MAC 绑定,名字是 nic0 / nic1,不是 RAMOS 里的 ens3。
7. 装 Windows Server(2019 / 2022 / 2025)
- 「镜像」选 Windows Server,对应年份。
- 类型选 Windows Server ISO ,把微软官方 ISO 上传到控制面 (必须能抽出
boot.wim)。 - 点「检测」,应看到 Standard / Datacenter 等 edition。
- 「装机」里用户默认
Administrator,密码必填。默认开启RDP和其防火墙。 - 第 3 步选 WIM 版本(默认偏带桌面的 Standard)、磁盘、DHCP 或装完后的静态 IP。
- 下发后这台 MAC 下次 PXE 会进 Windows PE,而不是 Ubuntu。
PS:内置KMS密钥和服务器,可开机联网自动激活。
Rack-auto 原地升级
不会动配置、数据库和镜像。
bash
cd /tmp
curl -fLO https://github.com/Songxwn/Rack-auto/releases/latest/download/rackauto-linux-amd64.tar.gz
tar -xzf rackauto-linux-amd64.tar.gz

CTRL=rackauto
[ -f rackauto-linux-amd64 ] && CTRL=rackauto-linux-amd64
AGENT=rackauto-agent
[ -f rackauto-agent-linux-amd64 ] && AGENT=rackauto-agent-linux-amd64

sudo systemctl stop rackauto
sudo install -m 0755 "$CTRL" /opt/rackauto/bin/rackauto
sudo install -m 0755 "$AGENT" /opt/rackauto/data/agent/x86_64/rackauto-agent
sudo install -m 0755 winpe-curl.exe /opt/rackauto/bin/winpe-curl.exe
sudo systemctl start rackauto
curl -sS http://127.0.0.1:8080/api/v1/health
浏览器强刷控制台,左下角版本应变成新 tag。已经停在旧 RAMOS 里的机器,要再 PXE 一次才会拿到新 Agent。一般不必重跑 bootstrap。
有问题? 卡住了
| 现象 | 先查 |
|---|---|
| 网页打不开 | systemctl status rackauto,防火墙 8080 |
| 左下角不是 ONLINE | 配置路径、是否用 root 起的服务 |
| PXE 没反应 | 是否和 DHCP 同一二层;内置 DHCP 是否绑错网卡 |
| 紫屏 Kernel panic | 用 v0.4.2+,再跑一次 bootstrap,机器内存 ≥ 4GB |
| 进了 Ubuntu 语言选择界面 | 用 v0.4.4+ 后重新 PXE |
| 进了 RAMOS 但列表没有机器 | Agent 没报到:public_url 不通,或 api_token 不一致 |
| 镜像下不下来 | 改成上传到控制面 |
| Windows 进了 Ubuntu | 任务还在等待 WinPE;控制面要够新 |
| WinPE 起来了但 WIM 下不完 | 装机网要有 DHCP,ISO 必须在控制面本地 |
更细的排错、自制 KVM 镜像、Docker,看仓库里的 部署教程。
Linux 官方QCOW2镜像下载
下面按 x86_64 / amd64 架构整理,优先给 官方 Cloud / GenericCloud qcow2 镜像。
注:Ubuntu 官方云镜像后缀通常是
.img,但实际格式通常是 qcow2 ,可用qemu-img info xxx.img确认。
Debian 11 / 12 / 13 qcow2
| 系统 | 代号 | qcow2 下载链接 |
|---|---|---|
| Debian 11 | bullseye | https://cloud.debian.org/images/cloud/bullseye/latest/debian-11-genericcloud-amd64.qcow2 |
| Debian 12 | bookworm | https://cloud.debian.org/images/cloud/bookworm/latest/debian-12-genericcloud-amd64.qcow2 |
| Debian 13 | trixie | https://cloud.debian.org/images/cloud/trixie/latest/debian-13-genericcloud-amd64.qcow2 |
目录页:
text
https://cloud.debian.org/images/cloud/Ubuntu 20.04+ Cloud Image
Ubuntu 官方通常用 .img 后缀,但一般是 qcow2 格式。
| 系统 | 代号 | 下载链接 |
|---|---|---|
| Ubuntu 20.04 LTS | focal | https://cloud-images.ubuntu.com/focal/current/focal-server-cloudimg-amd64.img |
| Ubuntu 22.04 LTS | jammy | https://cloud-images.ubuntu.com/jammy/current/jammy-server-cloudimg-amd64.img |
| Ubuntu 24.04 LTS | noble | https://cloud-images.ubuntu.com/noble/current/noble-server-cloudimg-amd64.img |
| Ubuntu 26.04 LTS | resolute | https://cloud-images.ubuntu.com/releases/server/26.04/release/ubuntu-26.04-server-cloudimg-amd64.img |
目录页:
text
https://cloud-images.ubuntu.com/
https://cloud-images.ubuntu.com/releases/
检查格式:
bash
qemu-img info focal-server-cloudimg-amd64.img如果显示:
text
file format: qcow2就可以直接当 qcow2 用。
Rocky Linux 8 / 9 / 10 qcow2
目录页:
text
https://dl.rockylinux.org/pub/rocky/CentOS 7 / Stream 8 / Stream 9 / Stream 10 qcow2
注意:
CentOS Linux 8 已 EOL,CentOS 9/10 是 CentOS Stream,不是传统 CentOS Linux。
目录页:
text
https://cloud.centos.org/centos/批量下载示例
bash
wget https://cloud.debian.org/images/cloud/bookworm/latest/debian-12-genericcloud-amd64.qcow2

wget https://cloud-images.ubuntu.com/noble/current/noble-server-cloudimg-amd64.img

wget https://dl.rockylinux.org/pub/rocky/9/images/x86_64/Rocky-9-GenericCloud-Base.latest.x86_64.qcow2

wget https://cloud.centos.org/centos/9-stream/x86_64/images/CentOS-Stream-GenericCloud-9-latest.x86_64.qcow2
如果平台强制要求 .qcow2 后缀
例如 Ubuntu 下载的是 .img:
bash
qemu-img info noble-server-cloudimg-amd64.img确认是 qcow2 后,可以直接改名:
bash
mv noble-server-cloudimg-amd64.img ubuntu-24.04-noble-amd64.qcow2或者转换:
bash
qemu-img convert -O qcow2 noble-server-cloudimg-amd64.img ubuntu-24.04-noble-amd64.qcow2Windows Server ISO下载
https://next.itellyou.cn/Original/Index
百度云盘下载二进制包和系统镜像
关注公众号,后台回复 Rack-auto 获取下载链接。
bash
apt install tar nano git sudo curl wimtools -y

# 先在Debian 安装基础包


cd /opt

tar -zxvf  rack-auto-AIO.tar.gz

# 将rack-auto-AIO.tar.gz 上传到 /opt 解压缩离线包

sudo /opt/rackauto/bin/rackauto bootstrap \
  -config /opt/rackauto/configs/rackauto.yaml \
  -data-dir /opt/rackauto/data

# 联网初始化下载

sudo cp /opt/rackauto/deploy/rackauto.service /etc/systemd/system/
sudo systemctl daemon-reload
sudo systemctl enable --now rackauto
curl -sS http://127.0.0.1:8080/api/v1/health
Edge / Chrome浏览器打开 http://10.0.0.50:8080(换成你的 IP)。
实验室已测试过安装镜像
| 系统 | 引导 | 实现功能 |
|---|---|---|
| Debian 12 | BIOS/UEFI | |
| Ubuntu 26.04 | BIOS/UEFI | |
| Windows Server 2022/2025 | BIOS/UEFI |