OpenCV学习:人脸识别
前言 :上一篇我们学习了基于 Haar 级联分类器的人脸检测与微笑识别。本篇我们将更进一步------从"检测出人脸"升级为"识别出这个人是谁"。人脸识别技术广泛应用于手机解锁、门禁系统、支付验证等场景。OpenCV 的 face 模块提供了三种主流的人脸识别算法:LBPH 、EigenFace 和 FisherFace。本篇我们将从数据准备开始,一步步实现完整的实时人脸识别系统。
目录
- 一、人脸识别概述
- 二、三种人脸识别算法
- 三、数据准备与预处理
- 四、模型训练与预测
- 五、实时人脸识别
- 六、总结
一、人脸识别概述
1.1 人脸检测 vs 人脸识别
| 概念 | 说明 |
|---|---|
| 人脸检测 | 在图像中找到人脸的位置(画框),不关心是谁 |
| 人脸识别 | 判断检测到的人脸具体是哪个人 |
简单来说:人脸检测是"找到脸",人脸识别是"认出是谁"。
1.2 人脸识别的基本流程
采集人脸样本 → 预处理 → 训练模型 → 实时检测人脸 → 识别身份二、三种人脸识别算法
OpenCV 的 cv2.face 模块提供了三种经典的人脸识别算法:
| 算法 | 原理 | 特点 |
|---|---|---|
| LBPH | 局部二值模式直方图 | 最常用,对光照和表情变化鲁棒 |
| EigenFace | PCA 降维 + 特征脸 | 最早的主流方法,对光照敏感 |
| FisherFace | LDA 降维 + 线性判别 | 比 EigenFace 更鲁棒,区分能力更强 |
2.1 LBPH(局部二值模式直方图)
LBPH 是目前最常用的人脸识别方法。它通过计算图像的局部二值模式(LBP) 直方图来描述人脸纹理特征,对光照变化、表情变化都有较好的鲁棒性。
python
recognizer = cv2.face.LBPHFaceRecognizer_create(threshold=10000)2.2 EigenFace(特征脸)
EigenFace 是最早的人脸识别算法之一,其核心思想是主成分分析(PCA)。它将人脸图像降维到低维空间,在这个空间中不同的"特征脸"构成了人脸空间的基础。
python
recognizer = cv2.face.EigenFaceRecognizer_create(threshold=10000)2.3 FisherFace(线性判别分析)
FisherFace 在 EigenFace 的基础上引入了线性判别分析(LDA)。它不仅考虑降维,还考虑了不同类别之间的区分度,使得同类样本更紧凑,不同类样本更分散。
python
recognizer = cv2.face.FisherFaceRecognizer_create(threshold=10000)2.4 三种算法对比
| 对比维度 | LBPH | EigenFace | FisherFace |
|---|---|---|---|
| 核心原理 | LBP 纹理直方图 | PCA 降维 | LDA 降维 |
| 对光照敏感度 | 鲁棒 | 敏感 | 中等 |
| 对表情变化 | 鲁棒 | 敏感 | 中等 |
| 训练速度 | 快 | 快 | 中等 |
| 识别精度 | 最佳 | 一般 | 较好 |
| 适用场景 | 大多数场景 | 可控光照环境 | 一般环境 |
2.5 三种算法选择建议
| 场景 | 推荐算法 |
|---|---|
| 光照变化大、表情丰富 | LBPH(首选) |
| 光照可控环境 | EigenFace |
| 一般环境,需要区分能力 | FisherFace |
三、数据准备与预处理
3.1 数据集说明
本案例使用三位人物的人脸样本,每人 3 张图片,共 9 张训练样本。图片按以下规则命名:
| 类别 | 标签 | 样本文件 |
|---|---|---|
| 彭于晏 | 0 | pyy_1.png、pyy_2.png、pyy_3.png |
| 吴京 | 1 | wj_1.png、wj_2.png、wj_3.png |
| 杨洋 | 2 | yy_1.png、yy_2.png、yy_3.png |
3.2 数据加载与预处理
python
import cv2
import numpy as np
from PIL import Image, ImageDraw, ImageFont

# ====================中文绘制函数====================
def cv2AddChineseText(img, text, position, textColor=(0, 255, 0), textSize=30):
    if isinstance(img, np.ndarray):
        img = Image.fromarray(cv2.cvtColor(img, cv2.COLOR_BGR2RGB))
    draw = ImageDraw.Draw(img)
    fontStyle = ImageFont.truetype("simsun.ttc", textSize, encoding="utf-8")
    draw.text(position, text, textColor, font=fontStyle)
    return cv2.cvtColor(np.asarray(img), cv2.COLOR_RGB2BGR)


# ====================加载训练数据====================
images = []
labels = []
IMG_SIZE = (120, 180)

# 彭于晏 (标签0)
img = cv2.imread(r".\faces\pyy_1.png", 0)
img = cv2.resize(img, IMG_SIZE)
images.append(img)
labels.append(0)

img = cv2.imread(r".\faces\pyy_2.png", 0)
img = cv2.resize(img, IMG_SIZE)
images.append(img)
labels.append(0)

img = cv2.imread(r".\faces\pyy_3.png", 0)
img = cv2.resize(img, IMG_SIZE)
images.append(img)
labels.append(0)

# 吴京 (标签1)
img = cv2.imread(r".\faces\wj_1.png", 0)
img = cv2.resize(img, IMG_SIZE)
images.append(img)
labels.append(1)

img = cv2.imread(r".\faces\wj_2.png", 0)
img = cv2.resize(img, IMG_SIZE)
images.append(img)
labels.append(1)

img = cv2.imread(r".\faces\wj_3.png", 0)
img = cv2.resize(img, IMG_SIZE)
images.append(img)
labels.append(1)

# 杨洋 (标签2)
img = cv2.imread(r".\faces\yy_1.png", 0)
img = cv2.resize(img, IMG_SIZE)
images.append(img)
labels.append(2)

img = cv2.imread(r".\faces\yy_2.png", 0)
img = cv2.resize(img, IMG_SIZE)
images.append(img)
labels.append(2)

img = cv2.imread(r".\faces\yy_3.png", 0)
img = cv2.resize(img, IMG_SIZE)
images.append(img)
labels.append(2)

labels = np.array(labels)
print(f"加载 {len(images)} 张训练样本")
四、模型训练与预测
4.1 完整代码
python
# ====================训练 LBPH 模型====================
recognizer = cv2.face.LBPHFaceRecognizer_create(threshold=10000)
recognizer.train(images, labels)

# ====================预测测试====================
name_dict = {0: "彭于晏", 1: "吴京", 2: "杨洋", -1: "无法识别"}

test_img = cv2.imread(r".\faces\wj.png", 0)
test_img = cv2.resize(test_img, IMG_SIZE)

label, confidence = recognizer.predict(test_img)
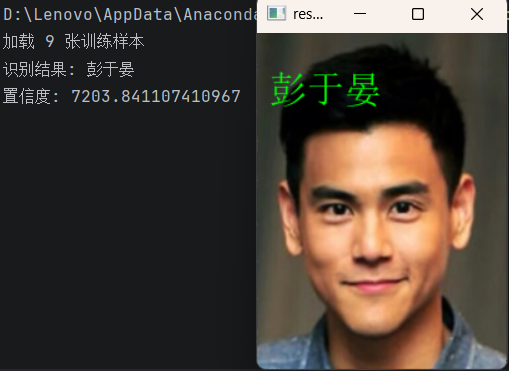
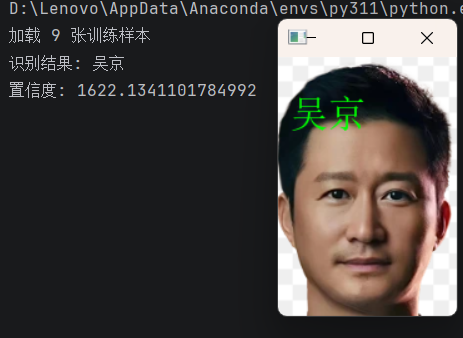
print(f"识别结果: {name_dict[label]}")
print(f"置信度: {confidence}")

# ====================结果展示====================
result_img = cv2.imread(r".\faces\wj.png")
result_img = cv2AddChineseText(result_img, name_dict[label], (10, 30), textColor=(0, 255, 0), textSize=30)
cv2.imshow("result", result_img)
cv2.waitKey(0)
cv2.destroyAllWindows()
4.2 置信度说明
置信度(confidence)表示识别结果的可靠程度,数值越小表示越可靠。不同算法的置信度范围不同,需要根据实际情况设置合理的阈值:
| 算法 | 置信度特点 |
|---|---|
| LBPH | 通常小于 100,越小越匹配 |
| EigenFace | 通常小于 10000,越小越匹配 |
| FisherFace | 通常小于 5000,越小越匹配 |
4.3 三种算法切换
在代码中替换对应的识别器创建语句即可切换算法:
python
# LBPH(推荐)
recognizer = cv2.face.LBPHFaceRecognizer_create(threshold=10000)

# EigenFace
recognizer = cv2.face.EigenFaceRecognizer_create(threshold=10000)

# FisherFace
recognizer = cv2.face.FisherFaceRecognizer_create(threshold=10000)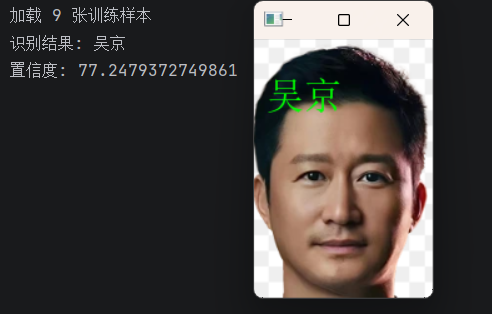
五、实时人脸识别
将人脸检测与识别结合起来,实现摄像头实时人脸识别。
5.1 完整代码
python
import cv2
import numpy as np
from PIL import Image, ImageDraw, ImageFont
import os

# ====================中文绘制函数====================
def cv2AddChineseText(img, text, position, textColor=(0, 255, 0), textSize=25):
    if isinstance(img, np.ndarray):
        img = Image.fromarray(cv2.cvtColor(img, cv2.COLOR_BGR2RGB))
    draw = ImageDraw.Draw(img)
    fontStyle = ImageFont.truetype("simsun.ttc", textSize, encoding="utf-8")
    draw.text(position, text, textColor, font=fontStyle)
    return cv2.cvtColor(np.asarray(img), cv2.COLOR_RGB2BGR)


# ====================加载训练数据====================
images = []
labels = []
IMG_SIZE = (120, 180)

# 彭于晏 (标签0)
img = cv2.imread(r".\faces\pyy_1.png", 0)
img = cv2.resize(img, IMG_SIZE)
images.append(img)
labels.append(0)
img = cv2.imread(r".\faces\pyy_2.png", 0)
img = cv2.resize(img, IMG_SIZE)
images.append(img)
labels.append(0)
img = cv2.imread(r".\faces\pyy_3.png", 0)
img = cv2.resize(img, IMG_SIZE)
images.append(img)
labels.append(0)

# 吴京 (标签1)
img = cv2.imread(r".\faces\wj_1.png", 0)
img = cv2.resize(img, IMG_SIZE)
images.append(img)
labels.append(1)
img = cv2.imread(r".\faces\wj_2.png", 0)
img = cv2.resize(img, IMG_SIZE)
images.append(img)
labels.append(1)
img = cv2.imread(r".\faces\wj_3.png", 0)
img = cv2.resize(img, IMG_SIZE)
images.append(img)
labels.append(1)

# 杨洋 (标签2)
img = cv2.imread(r".\faces\yy_1.png", 0)
img = cv2.resize(img, IMG_SIZE)
images.append(img)
labels.append(2)
img = cv2.imread(r".\faces\yy_2.png", 0)
img = cv2.resize(img, IMG_SIZE)
images.append(img)
labels.append(2)
img = cv2.imread(r".\faces\yy_3.png", 0)
img = cv2.resize(img, IMG_SIZE)
images.append(img)
labels.append(2)

labels = np.array(labels)
print(f"加载样本总数:{len(images)}")

# ====================训练 LBPH 模型====================
recognizer = cv2.face.LBPHFaceRecognizer_create(threshold=10000)
recognizer.train(images, labels)

# ====================配置====================
name_dict = {0: "彭于晏", 1: "吴京", 2: "杨洋", -1: "无法识别"}
CONFIDENCE_THRESHOLD = 100

# ====================人脸检测====================
face_cascade = cv2.CascadeClassifier("haarcascade_frontalface_default.xml")

# ====================摄像头实时识别====================
cap = cv2.VideoCapture(0)

while True:
    ret, frame = cap.read()
    if not ret:
        break

    gray = cv2.cvtColor(frame, cv2.COLOR_BGR2GRAY)

    faces = face_cascade.detectMultiScale(gray, scaleFactor=1.1, minNeighbors=4, minSize=(60, 60))

    for (x, y, w, h) in faces:
        # 绘制人脸框
        cv2.rectangle(frame, (x, y), (x + w, y + h), (255, 0, 0), 2)

        # 裁剪并缩放人脸
        face_roi = gray[y:y + h, x:x + w]
        face_roi = cv2.resize(face_roi, IMG_SIZE)

        # 识别
        pred_label, confidence = recognizer.predict(face_roi)

        # 阈值判断
        if confidence > CONFIDENCE_THRESHOLD:
            show_name = name_dict[-1]
        else:
            show_name = name_dict[pred_label]

        # 显示名字
        frame = cv2AddChineseText(frame, show_name, (x, y - 30), textColor=(0, 255, 0), textSize=24)

    cv2.imshow("Face Recognition", frame)

    if cv2.waitKey(1) & 0xFF == 27:
        break

cap.release()
cv2.destroyAllWindows()
5.2 关键逻辑说明
| 步骤 | 说明 |
|---|---|
| 1. 加载样本 | 从 faces 文件夹读取三类人脸图片,统一缩放到 120×180 |
| 2. 训练模型 | 使用 LBPH 算法训练人脸识别模型 |
| 3. 人脸检测 | Haar 级联分类器检测人脸位置 |
| 4. 人脸识别 | 将检测到的人脸缩放后送入模型识别 |
| 5. 阈值判断 | 置信度超过阈值则判定为"无法识别" |
六、总结
核心函数速查
| 函数 | 用途 |
|---|---|
cv2.face.LBPHFaceRecognizer_create() |
创建 LBPH 识别器(推荐) |
cv2.face.EigenFaceRecognizer_create() |
创建 EigenFace 识别器 |
cv2.face.FisherFaceRecognizer_create() |
创建 FisherFace 识别器 |
recognizer.train(images, labels) |
训练模型 |
recognizer.predict(image) |
预测单张人脸,返回 (标签, 置信度) |
三种算法选择建议
| 场景 | 推荐算法 |
|---|---|
| 光照变化大、表情丰富 | LBPH(首选) |
| 光照可控环境 | EigenFace |
| 一般环境,需要区分能力 | FisherFace |
注意事项
| 要点 | 说明 |
|---|---|
| 样本数量 | 每人至少 5-10 张不同光照、表情的样本 |
| 图像尺寸 | 训练集和预测图像尺寸必须一致 |
| 置信度阈值 | 需要根据实际数据调整,避免误识别 |
| 灰度图像 | 所有算法都要求输入灰度图 |
| 中文显示 | cv2.putText() 不支持中文,需借助 PIL |
系列直达
- 上篇 :OpenCV学习:人脸检测与微笑识别
- 本篇:OpenCV学习:人脸识别(本文)
- 下篇:敬请期待