从 Docker 到 Containerd:Kubernetes 时代容器运行时完全指南(安装 + 镜像 + 容器 + nerdctl + crictl 一站式实战)
📖 阅读时间 :约 25 ~ 30 分钟
🎯 适合人群 :Docker 运维人员、Kubernetes 初学者、云原生技术爱好者
📝 本文字数:约 1.8 万字 | 含 80+ 实战命令
📋 摘要
随着 Kubernetes 1.20 宣布弃用 Docker 作为容器运行时,Containerd 已经成为云原生时代的事实标准。本文从 Containerd 的诞生背景讲起,系统梳理其架构设计,并提供 YUM 安装 与二进制安装 两种部署方式。随后通过大量实战命令,覆盖 ctr 镜像管理、容器生命周期管理、Harbor 私有仓库对接、Namespace 隔离,以及 nerdctl (Docker 兼容 CLI)和 crictl(Kubernetes CRI 调试工具)的完整使用方法。文末附五大容器 CLI 命令对照表,帮助你从 Docker 平滑迁移到 Containerd。
📌 本文核心收获:读完本文,你将掌握 Containerd 的完整运维能力,并能够在 Kubernetes 集群中熟练使用 containerd 作为容器运行时。
📑 目录
- [一、Containerd 深度解析:从诞生到架构](#一、Containerd 深度解析:从诞生到架构)
- [1.1 什么是 Containerd](#1.1 什么是 Containerd)
- [1.2 Containerd 的前世今生](#1.2 Containerd 的前世今生)
- [1.3 Containerd 架构详解](#1.3 Containerd 架构详解)
- [二、Containerd 安装部署](#二、Containerd 安装部署)
- [2.1 YUM 方式安装](#2.1 YUM 方式安装)
- [2.2 二进制方式安装](#2.2 二进制方式安装)
- [三、Containerd 镜像管理(ctr 命令)](#三、Containerd 镜像管理(ctr 命令))
- [四、Containerd 容器管理(ctr 命令)](#四、Containerd 容器管理(ctr 命令))
- [五、对接私有镜像仓库 Harbor](#五、对接私有镜像仓库 Harbor)
- [六、Namespace 命名空间管理](#六、Namespace 命名空间管理)
- [七、nerdctl 实战:Docker 兼容的 Containerd CLI](#七、nerdctl 实战:Docker 兼容的 Containerd CLI)
- [7.1 nerdctl 安装与配置](#7.1 nerdctl 安装与配置)
- [7.2 nerdctl 镜像管理](#7.2 nerdctl 镜像管理)
- [7.3 nerdctl 容器管理](#7.3 nerdctl 容器管理)
- [7.4 nerdctl 网络管理](#7.4 nerdctl 网络管理)
- [7.5 nerdctl 存储管理](#7.5 nerdctl 存储管理)
- [7.6 nerdctl 命名空间管理](#7.6 nerdctl 命名空间管理)
- [八、crictl 实战:Kubernetes CRI 调试工具](#八、crictl 实战:Kubernetes CRI 调试工具)
- [8.1 crictl 介绍](#8.1 crictl 介绍)
- [8.2 crictl 安装与配置](#8.2 crictl 安装与配置)
- [8.3 crictl 命令实践](#8.3 crictl 命令实践)
- [8.4 五大容器 CLI 命令对照表](#8.4 五大容器 CLI 命令对照表)
- 九、总结与展望
前言:为什么我们需要 Containerd?
2020 年 12 月,Kubernetes 社区宣布 v1.20 版本将弃用 Docker 作为容器运行时,这一消息在技术圈引起了广泛讨论。很多人第一反应是:"Docker 要被淘汰了吗?"
事实上,被弃用的只是 Kubernetes 中名为 dockershim 的适配层。Docker 本身仍然是优秀的容器开发工具,只是在 Kubernetes 的生产环境中,更轻量、更稳定的 Containerd 成为了首选运行时。
🔑 关键概念:Containerd 是一个工业级的容器运行时,它不直接面向终端用户,而是被集成到 Kubernetes、Swarm 等编排系统中。它负责镜像拉取、容器生命周期管理、网络和存储等底层操作,具体运行容器则由符合 OCI 规范的 runC 完成。
本文将带你从零开始,全面掌握 Containerd 的使用。无论你是正在从 Docker 迁移,还是准备搭建 Kubernetes 集群,这篇文章都能为你提供可直接落地的操作指南。
一、Containerd 深度解析:从诞生到架构
1.1 什么是 Containerd
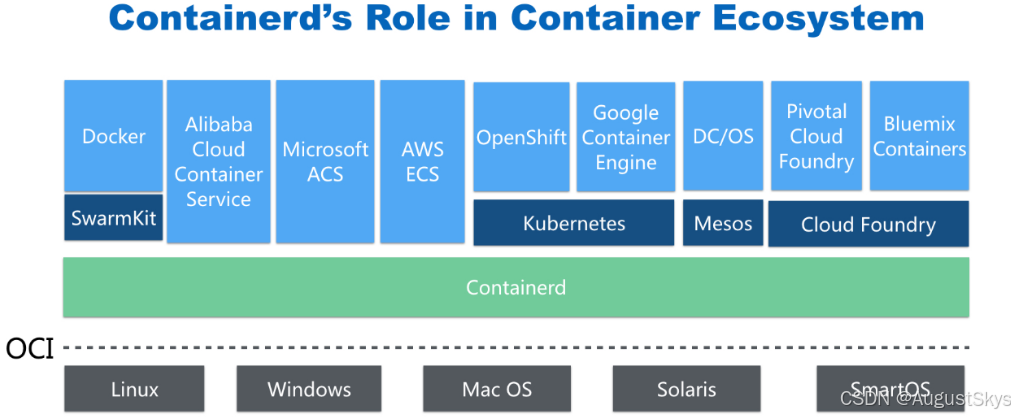
早在 2016 年 3 月,Docker 1.11 的 Docker Engine 中就已经包含了 containerd。而现在,containerd 被从 Docker Engine 中彻底剥离出来,作为一个独立的开源项目发展,目标是提供一个更加开放、稳定的容器运行基础设施。
📌 核心特点:
- containerd 不是直接面向最终用户的,而是主要集成到更上层的系统中,如 Swarm、Kubernetes、Mesos 等容器编排系统
- containerd 以 Daemon 形式运行在系统上,通过暴露底层的 gRPC API,上层系统可以通过这些 API 管理机器上的容器
- 每个 containerd 只负责一台机器:Pull 镜像、容器操作(启动、停止等)、网络、存储都由 containerd 完成
- 具体运行容器由 runC 负责,实际上只要符合 OCI 规范的容器运行时都可以支持
- 对于容器编排服务来说,运行时只需使用
containerd + runC,更加轻量、容易管理- 独立之后 containerd 的特性演进可以和 Docker Engine 分开,专注容器运行时管理,更稳定
1.2 Containerd 的前世今生
要理解 Containerd 的地位,需要回顾一段容器技术的博弈史。
第一阶段:Docker 崛起与 Google 的应对(2013 年)
2013 年 Docker 公司推出 Docker 产品后,对全球技术产生了巨大影响力。Google 感觉到自己内部使用的 Borg 系统地位受到威胁,希望 Docker 公司能联合打造一款开源容器运行时作为 Docker 核心依赖,但 Docker 公司拒绝了。
随后 Google 联合 RedHat、IBM 等公司,说服 Docker 把其容器核心技术 libcontainer 捐给中立社区 OCI(Open Container Initiative,开放容器计划) ,并更名为 runC。
为了进一步避免 Docker 在容器市场一家独大,Google 带领 RedHat、IBM 等成立了 CNCF(Cloud Native Computing Foundation,云原生计算基金会) 。CNCF 的目标很明确------既然在容器应用领域无法与 Docker 抗衡,那就做 Google 更有经验的市场:大规模容器编排 。Google 将内部使用的 Borg 系统开源,这就是 Kubernetes。
第二阶段:Docker Swarm vs Kubernetes(2016 - 2017 年)
2016 年 Docker 公司推出了 Docker Swarm,意在一统 Docker 生态,让 Docker 既可以实现容器应用管理,也可以实现大规模容器编排。经过近一年的市场验证,Docker 发现在容器编排方面无法独立抗衡 Kubernetes,于是在 2017 年正式宣布原生支持 Kubernetes。
至此,Docker 在大规模容器编排市场败下阵来。但 Docker 依然不甘心,把核心依赖 Containerd 捐给了 CNCF,以此说明 Docker 依旧是一个 PaaS 平台。
第三阶段:Kubernetes 弃用 Docker(2020 年至今)
2020 年 CNCF 宣布 Kubernetes 1.20 版本将不再仅支持 Docker 容器管理工具。此事的起因与 Containerd 密切相关:
- 早期为了让 Kubernetes 能使用 Docker,专门在 Kubernetes 组件中集成了一个 shim(垫片) 技术,将 Kubernetes 的 CRI(Container Runtime Interface)调用翻译成 Docker 的 API
- 随着 Kubernetes 广泛应用,更多容器管理工具出现,它们都希望借助 Kubernetes 被用户使用
- 于是社区提出了标准化的 CRI 容器运行时接口,只要适配了这个接口就可以集成到 Kubernetes 生态中
- Kubernetes 取消了对 shim 的维护,而 Containerd 可以无缝对接 Kubernetes,因此成为 Kubernetes 容器运行时的主角
💡 一句话总结:Containerd 是容器技术标准化博弈的最终产物,它代表了"轻量、开放、标准化"的云原生方向。
1.3 Containerd 架构详解
1.3.1 整体架构
Containerd 设计的目的是为了嵌入到 Kubernetes 中使用,它是一个工业级的容器运行时,不提供给开发人员和终端用户直接使用,这样就避免了与 Docker 产生竞争。但事实上,Containerd 已经实现了大多数容器管理功能,例如:容器生命周期管理、容器镜像传输和管理、容器存储与网络管理等。
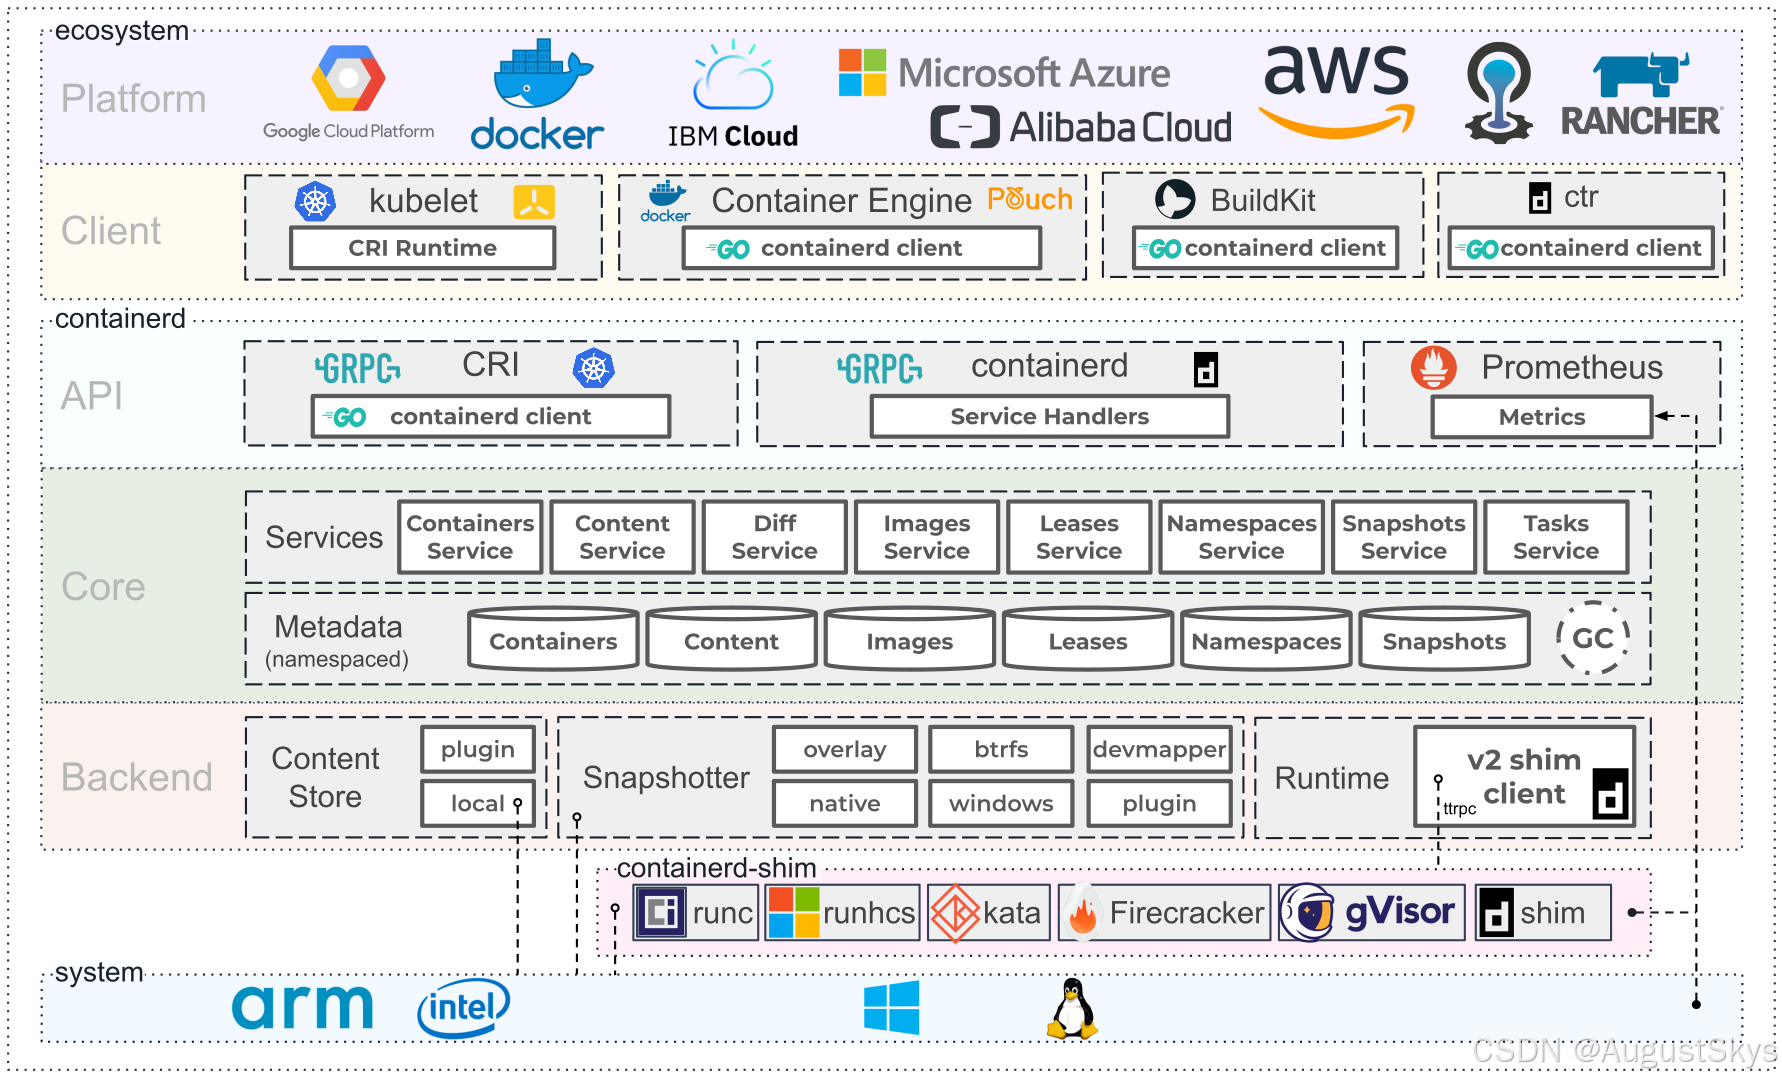
Containerd 采用标准的 C/S 架构:
- 服务端通过 gRPC 协议提供稳定的 API
- 客户端通过调用服务端的 API 进行高级操作
为了实现解耦,Containerd 将不同的职责划分给不同的组件,每个组件相当于一个子系统(subsystem)。连接不同子系统的组件被称为模块。
Containerd 有两大子系统:
| 子系统 | 作用 |
|---|---|
| Bundle | 包含配置、元数据和根文件系统数据,可以理解为容器的文件系统。Bundle 子系统允许用户从镜像中提取和打包 Bundles |
| Runtime | 用来执行 Bundles,比如创建容器 |
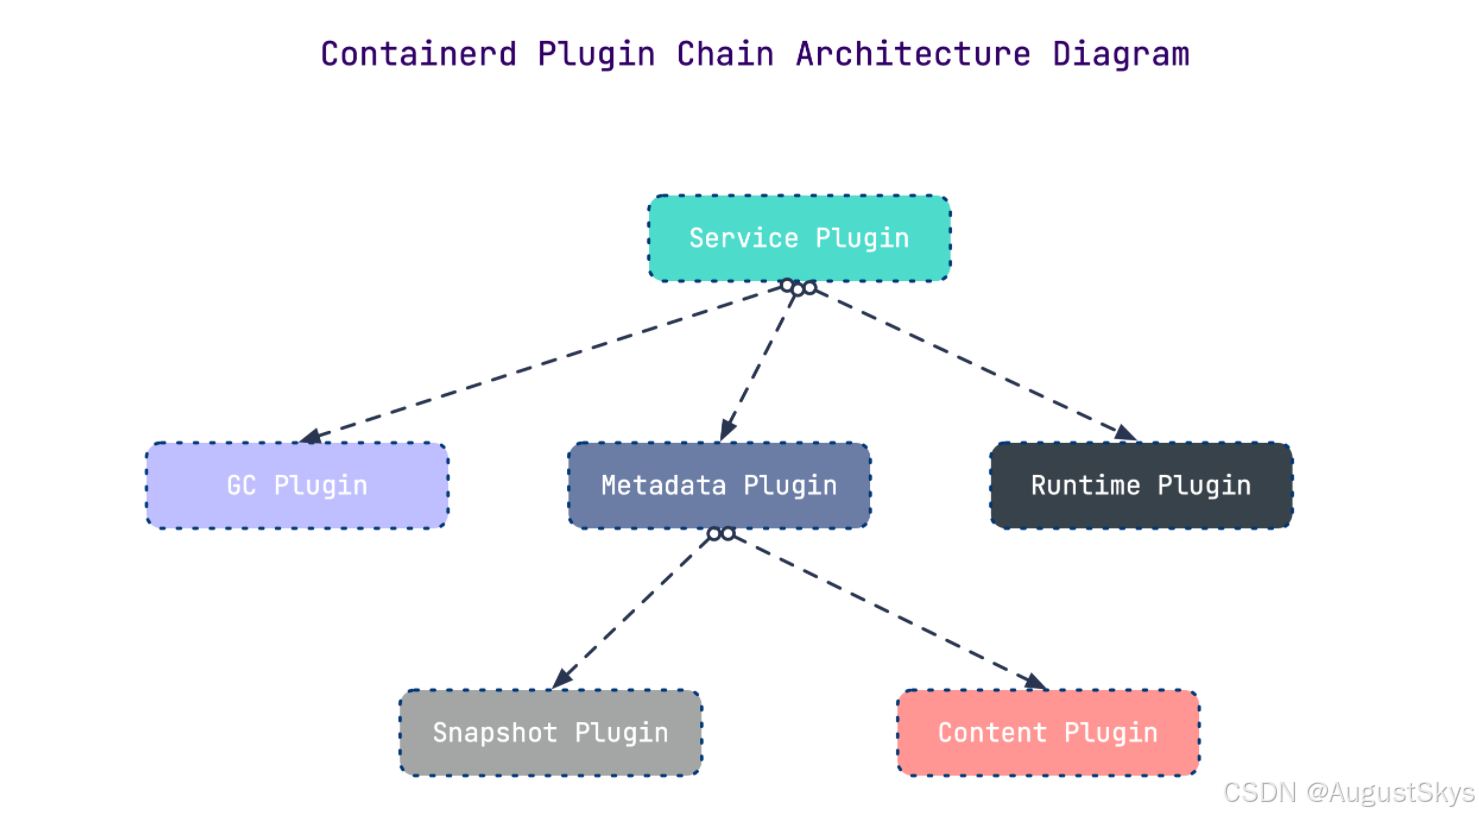
🔑 关键概念 :每一个子系统的行为都由一个或多个模块协作完成。每一种类型的模块都以插件的形式集成到 Containerd 中,而且插件之间是相互依赖的。例如 Service Plugin 会依赖 Metadata Plugin、GC Plugin 和 Runtime Plugin;Metadata Plugin 又依赖 Containers Plugin、Content Plugin 等。
1.3.2 核心插件
| 插件名称 | 功能说明 |
|---|---|
| Content Plugin | 提供对镜像中可寻址内容的访问,所有不可变的内容都被存储在这里 |
| Snapshot Plugin | 管理容器镜像的文件系统快照。镜像中的每一个 layer 都会被解压成文件系统快照,类似于 Docker 中的 graphdriver |
| Metrics | 暴露各个组件的监控指标 |
1.3.3 架构缩略图
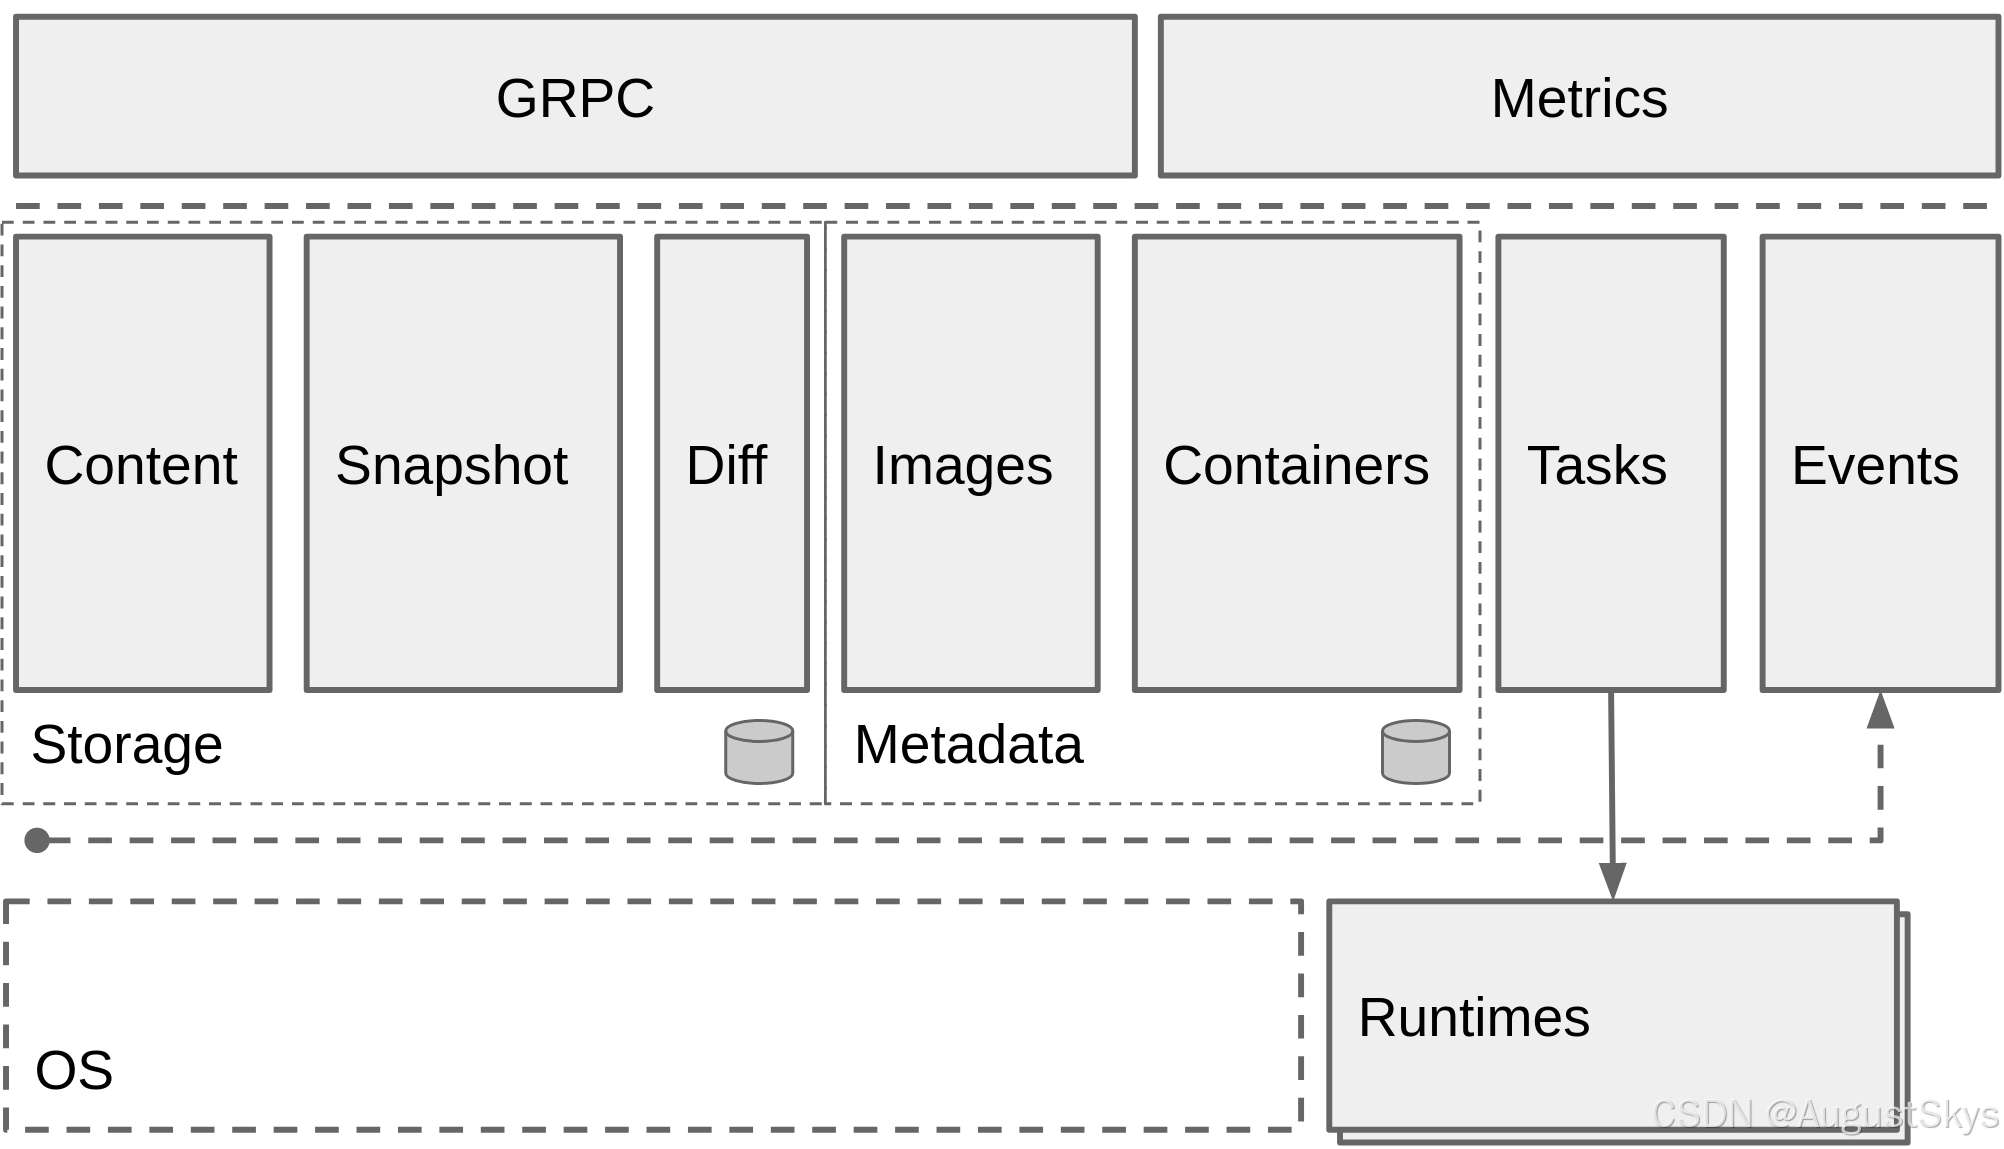
从更高层次看,Containerd 被分为三个大块:
┌─────────────────────────────────────────────┐
│              Storage(存储)                  │
│   Content Store + Snapshot Store             │
├─────────────────────────────────────────────┤
│              Metadata(元数据)               │
│   Image / Container / Namespace 元信息管理    │
├─────────────────────────────────────────────┤
│              Runtime(运行时)                │
│   Task 管理 + Shim + runC                    │
└─────────────────────────────────────────────┘
1.3.4 与其它容器运行时性能对比
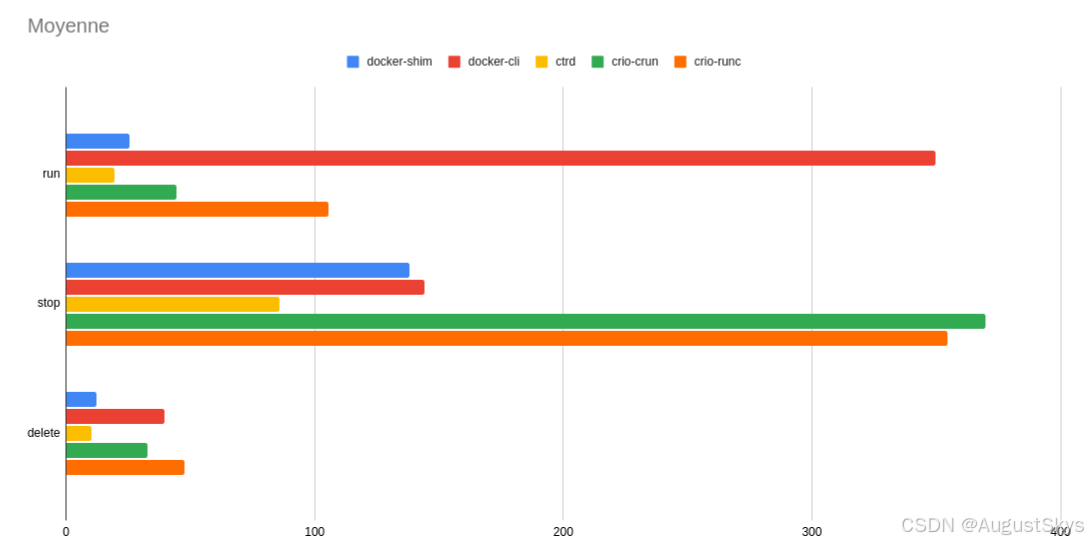
以下是使用 bucketbench 对 Docker、crio 和 Containerd 的性能测试结果,包括启动、停止和删除容器的耗时对比:
📌 性能结论 :Containerd 在各个方面都表现良好,总体性能优于 Docker 和 crio。这也是 Kubernetes 选择 Containerd 作为默认运行时的重要原因之一。
二、Containerd 安装部署
⚠️ 环境说明 :以下安装操作基于 CentOS Stream 8 操作系统,其他发行版请根据包管理器调整命令。
2.1 YUM 方式安装
基于 CentOS-Stream-8 模板克隆一台虚拟机,命名为 Containerd。
第一步:安装必要工具
bash
[root@localhost ~]# yum install -y yum-utils device-mapper-persistent-data lvm2 vim第二步:安装 Containerd
bash
# 1. 添加阿里云 YUM 源
[root@localhost ~]# yum-config-manager --add-repo https://mirrors.aliyun.com/docker-ce/linux/centos/docker-ce.repo
[root@localhost ~]# yum makecache

# 2. 查看 YUM 源中 Containerd 软件
[root@localhost ~]# yum list | grep containerd
containerd.io.x86_64    1.6.32-3.1.el8    docker-ce-stable

# 3. 安装 containerd.io
[root@localhost ~]# yum -y install containerd.io

# 4. 验证安装
[root@localhost ~]# rpm -qa | grep containerd
containerd.io-1.6.32-3.1.el8.x86_64

# 5. 设置 containerd 服务开机自启动并立即启动
[root@localhost ~]# systemctl enable containerd --now
[root@localhost ~]# systemctl status containerd

# 6. 验证版本(安装 containerd 时 ctr 命令亦可使用)
[root@localhost ~]# ctr version
Client:
  Version:  1.6.32
  Revision: 8b3b7ca2e5ce38e8f31a34f35b2b68ceb8470d89
  Go version: go1.21.10

Server:
  Version:  1.6.32
  Revision: 8b3b7ca2e5ce38e8f31a34f35b2b68ceb8470d89
  UUID: 979940af-68e0-4681-a560-189eeaefbdfc
💡 提示 :
ctr是 containerd 自带的命令行客户端,主要用于管理容器及容器镜像等。
2.2 二进制方式安装
Containerd 有两种安装包,需要根据场景选择:
| 安装包类型 | 包含内容 | 适用场景 |
|---|---|---|
containerd-xxx |
不包含 runC,需提前安装 | 单机测试 |
cri-containerd-cni-xxxx |
包含 runC 和 K8s 所需相关文件 | Kubernetes 集群 |
⚠️ 注意 :第二种包虽然包含 runC,但依赖系统中的 seccomp(安全计算模式,用于限制容器调用系统资源)。
2.2.1 安装 Containerd
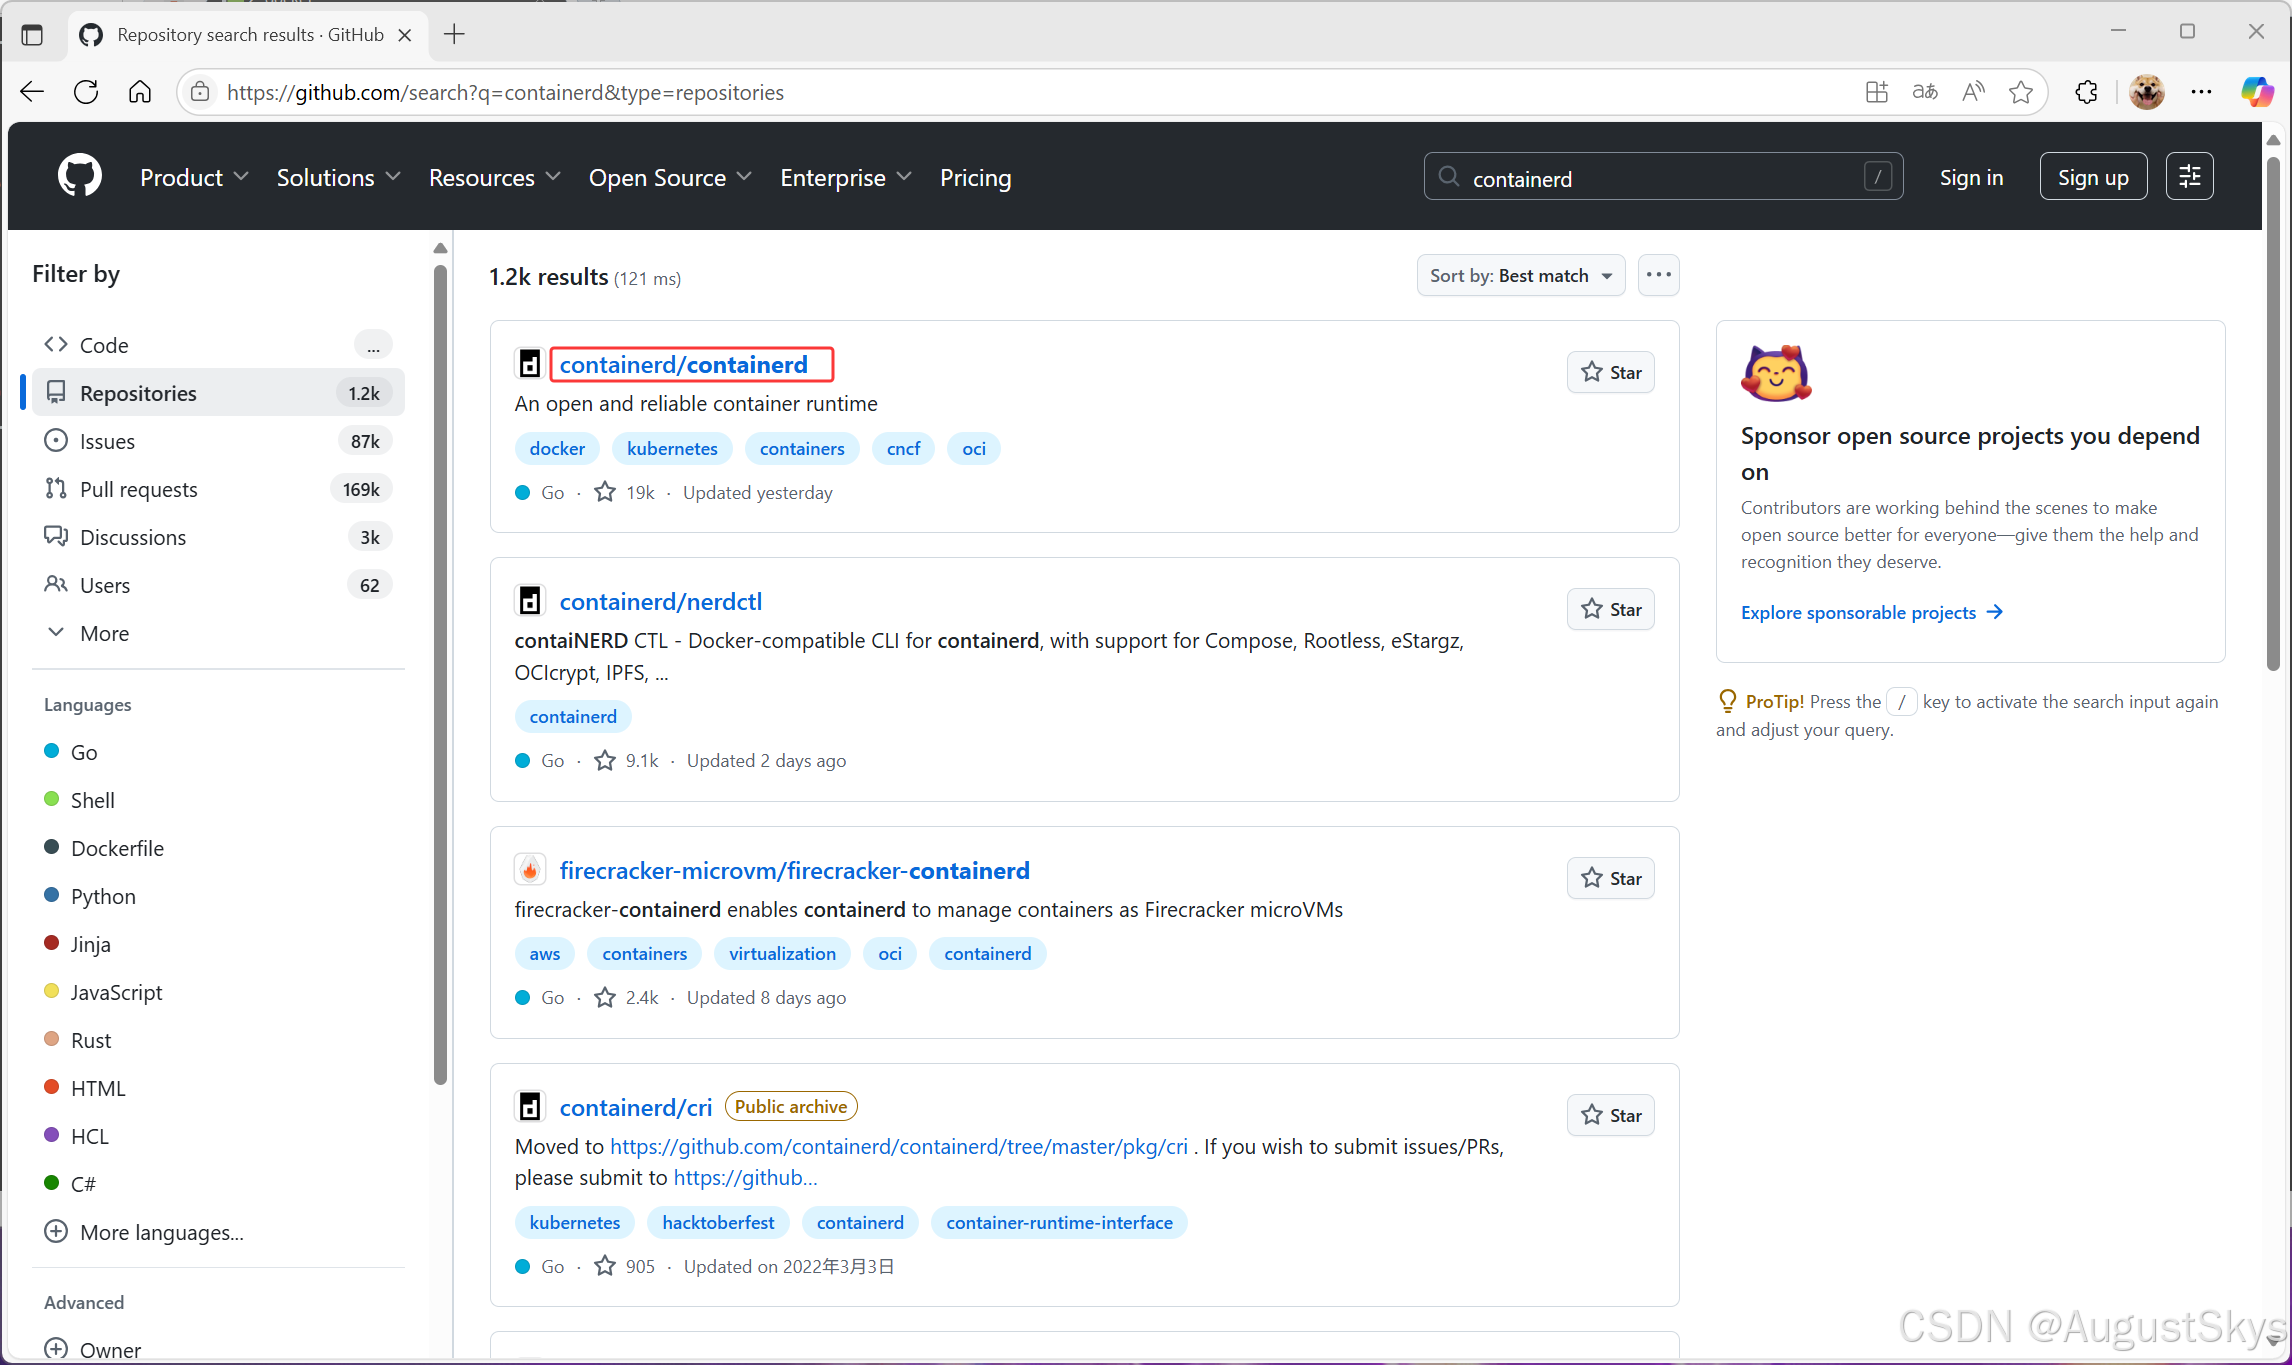
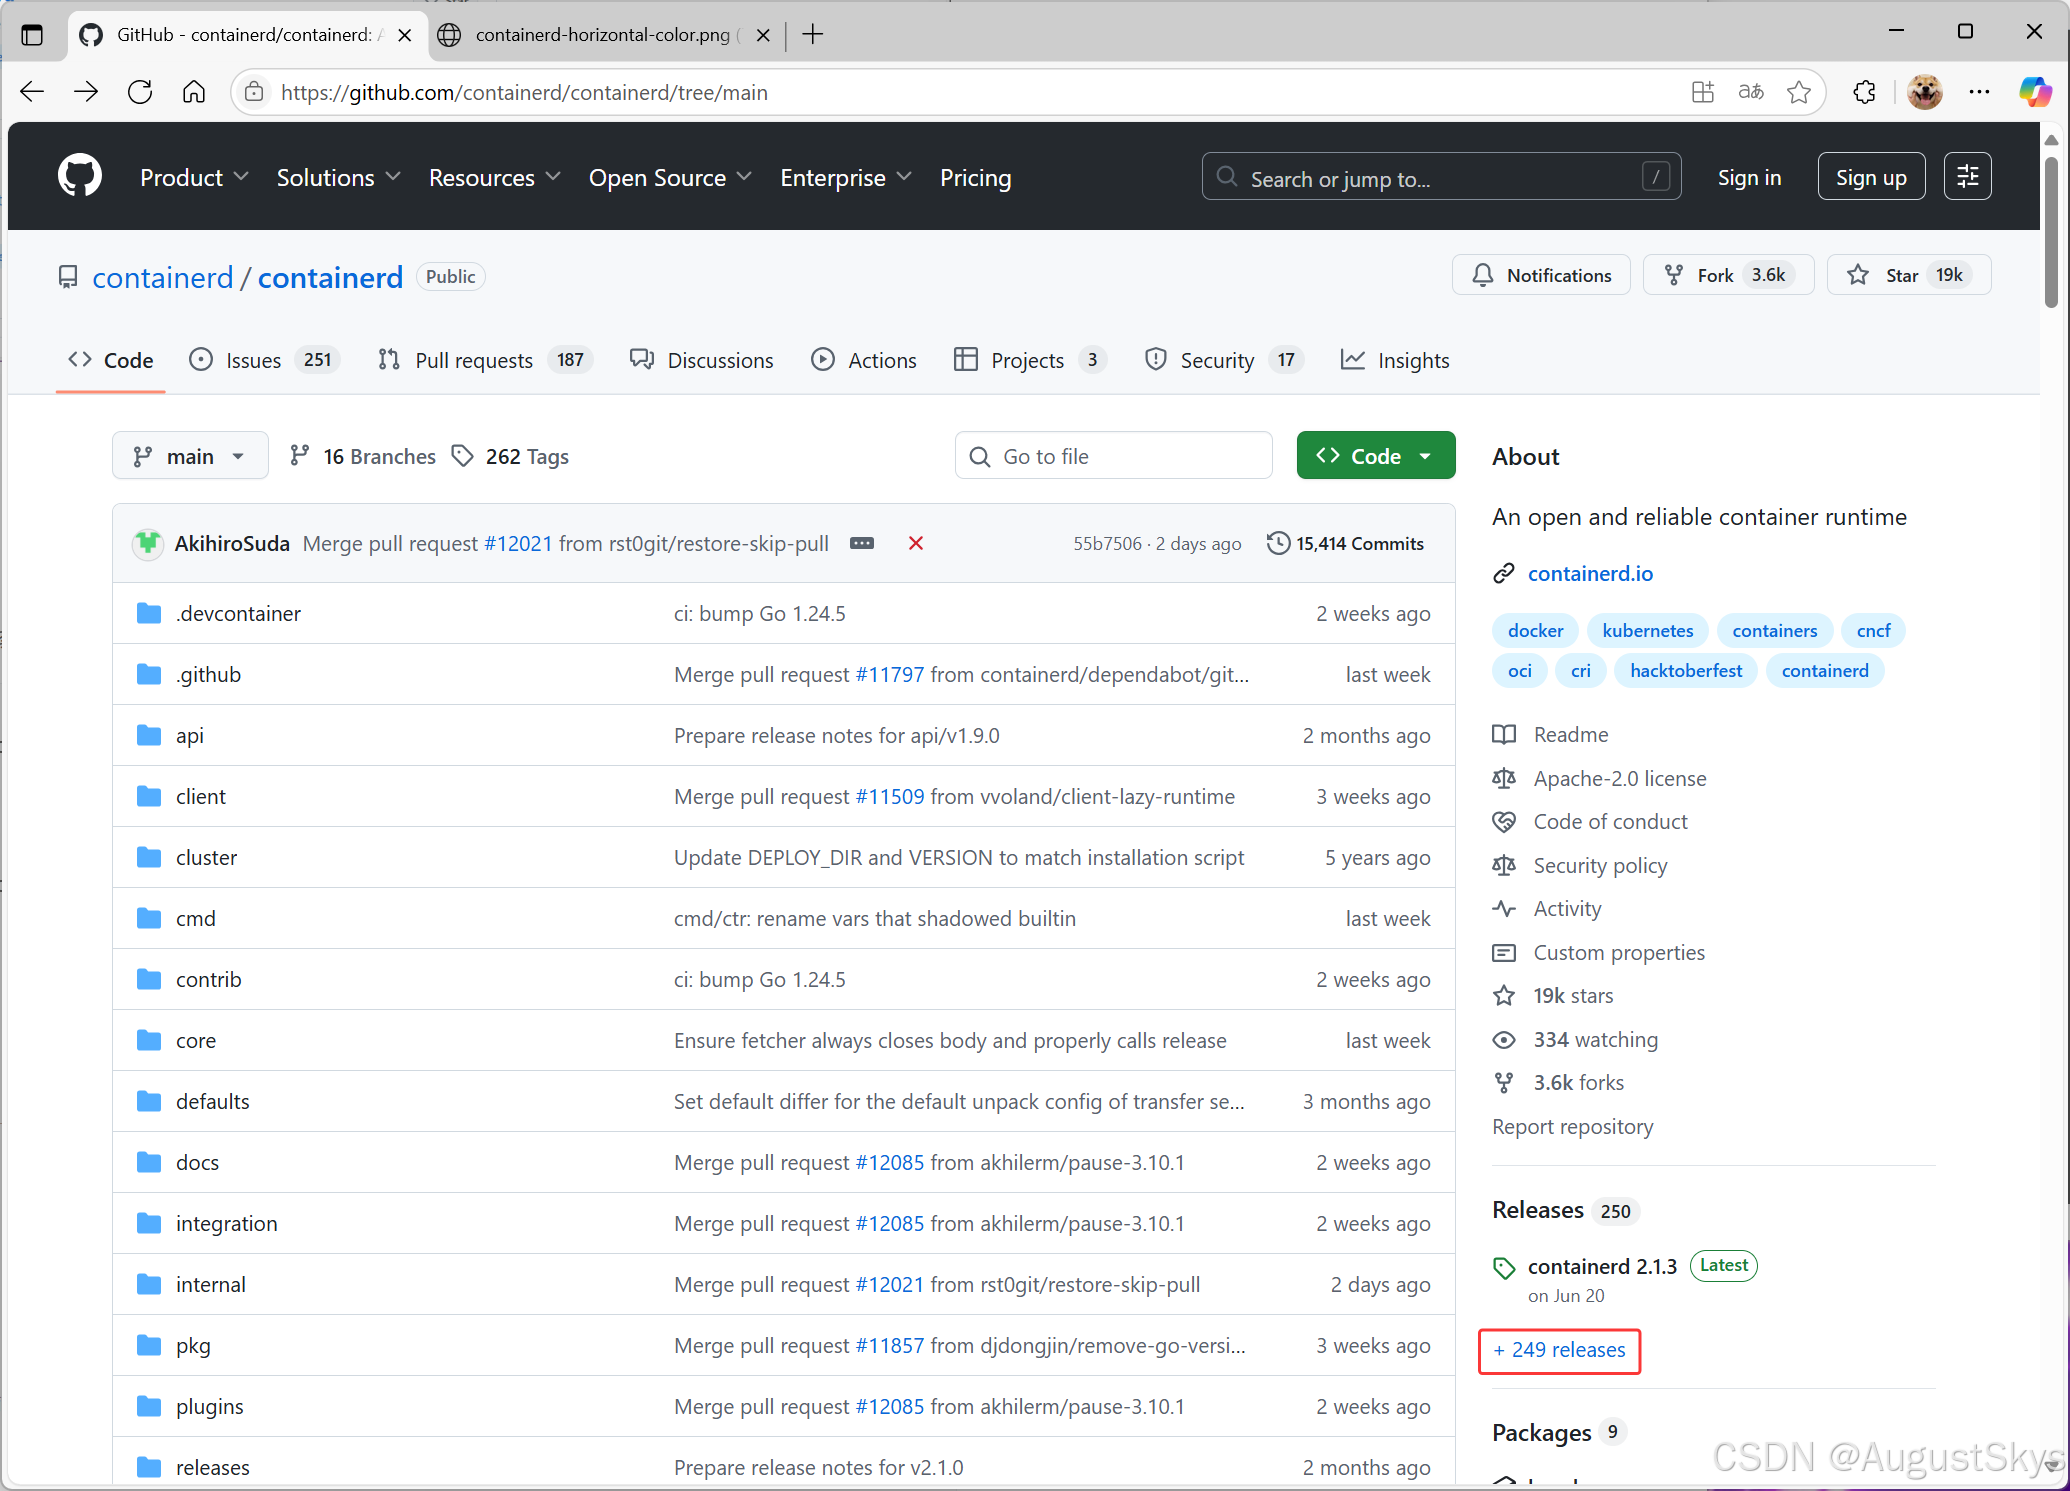
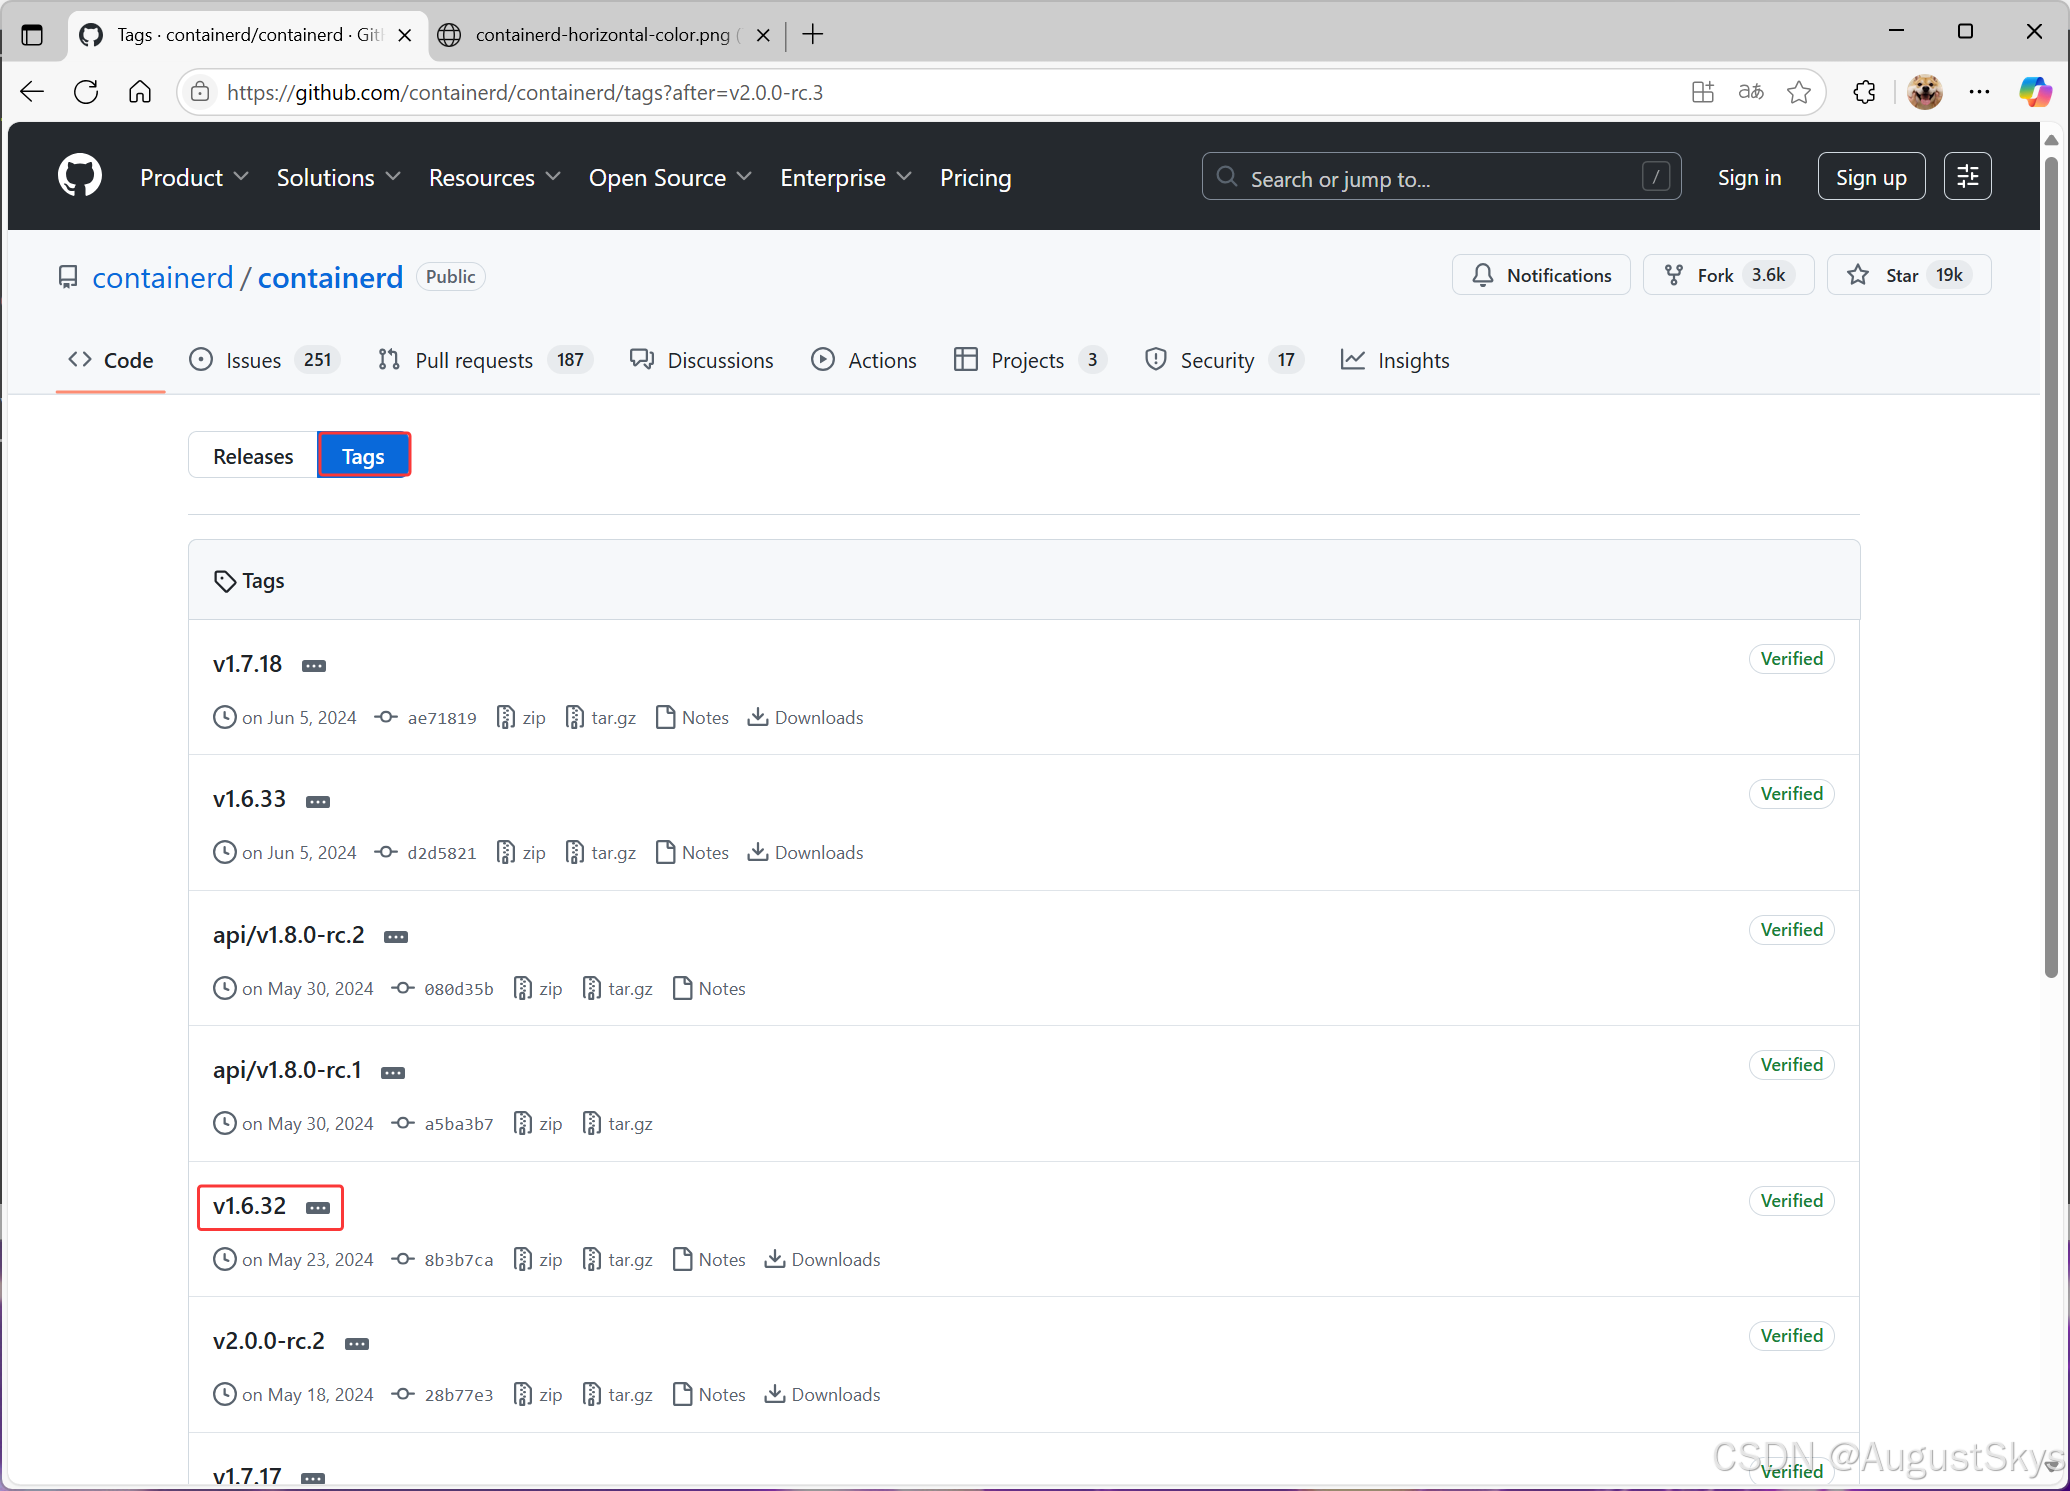
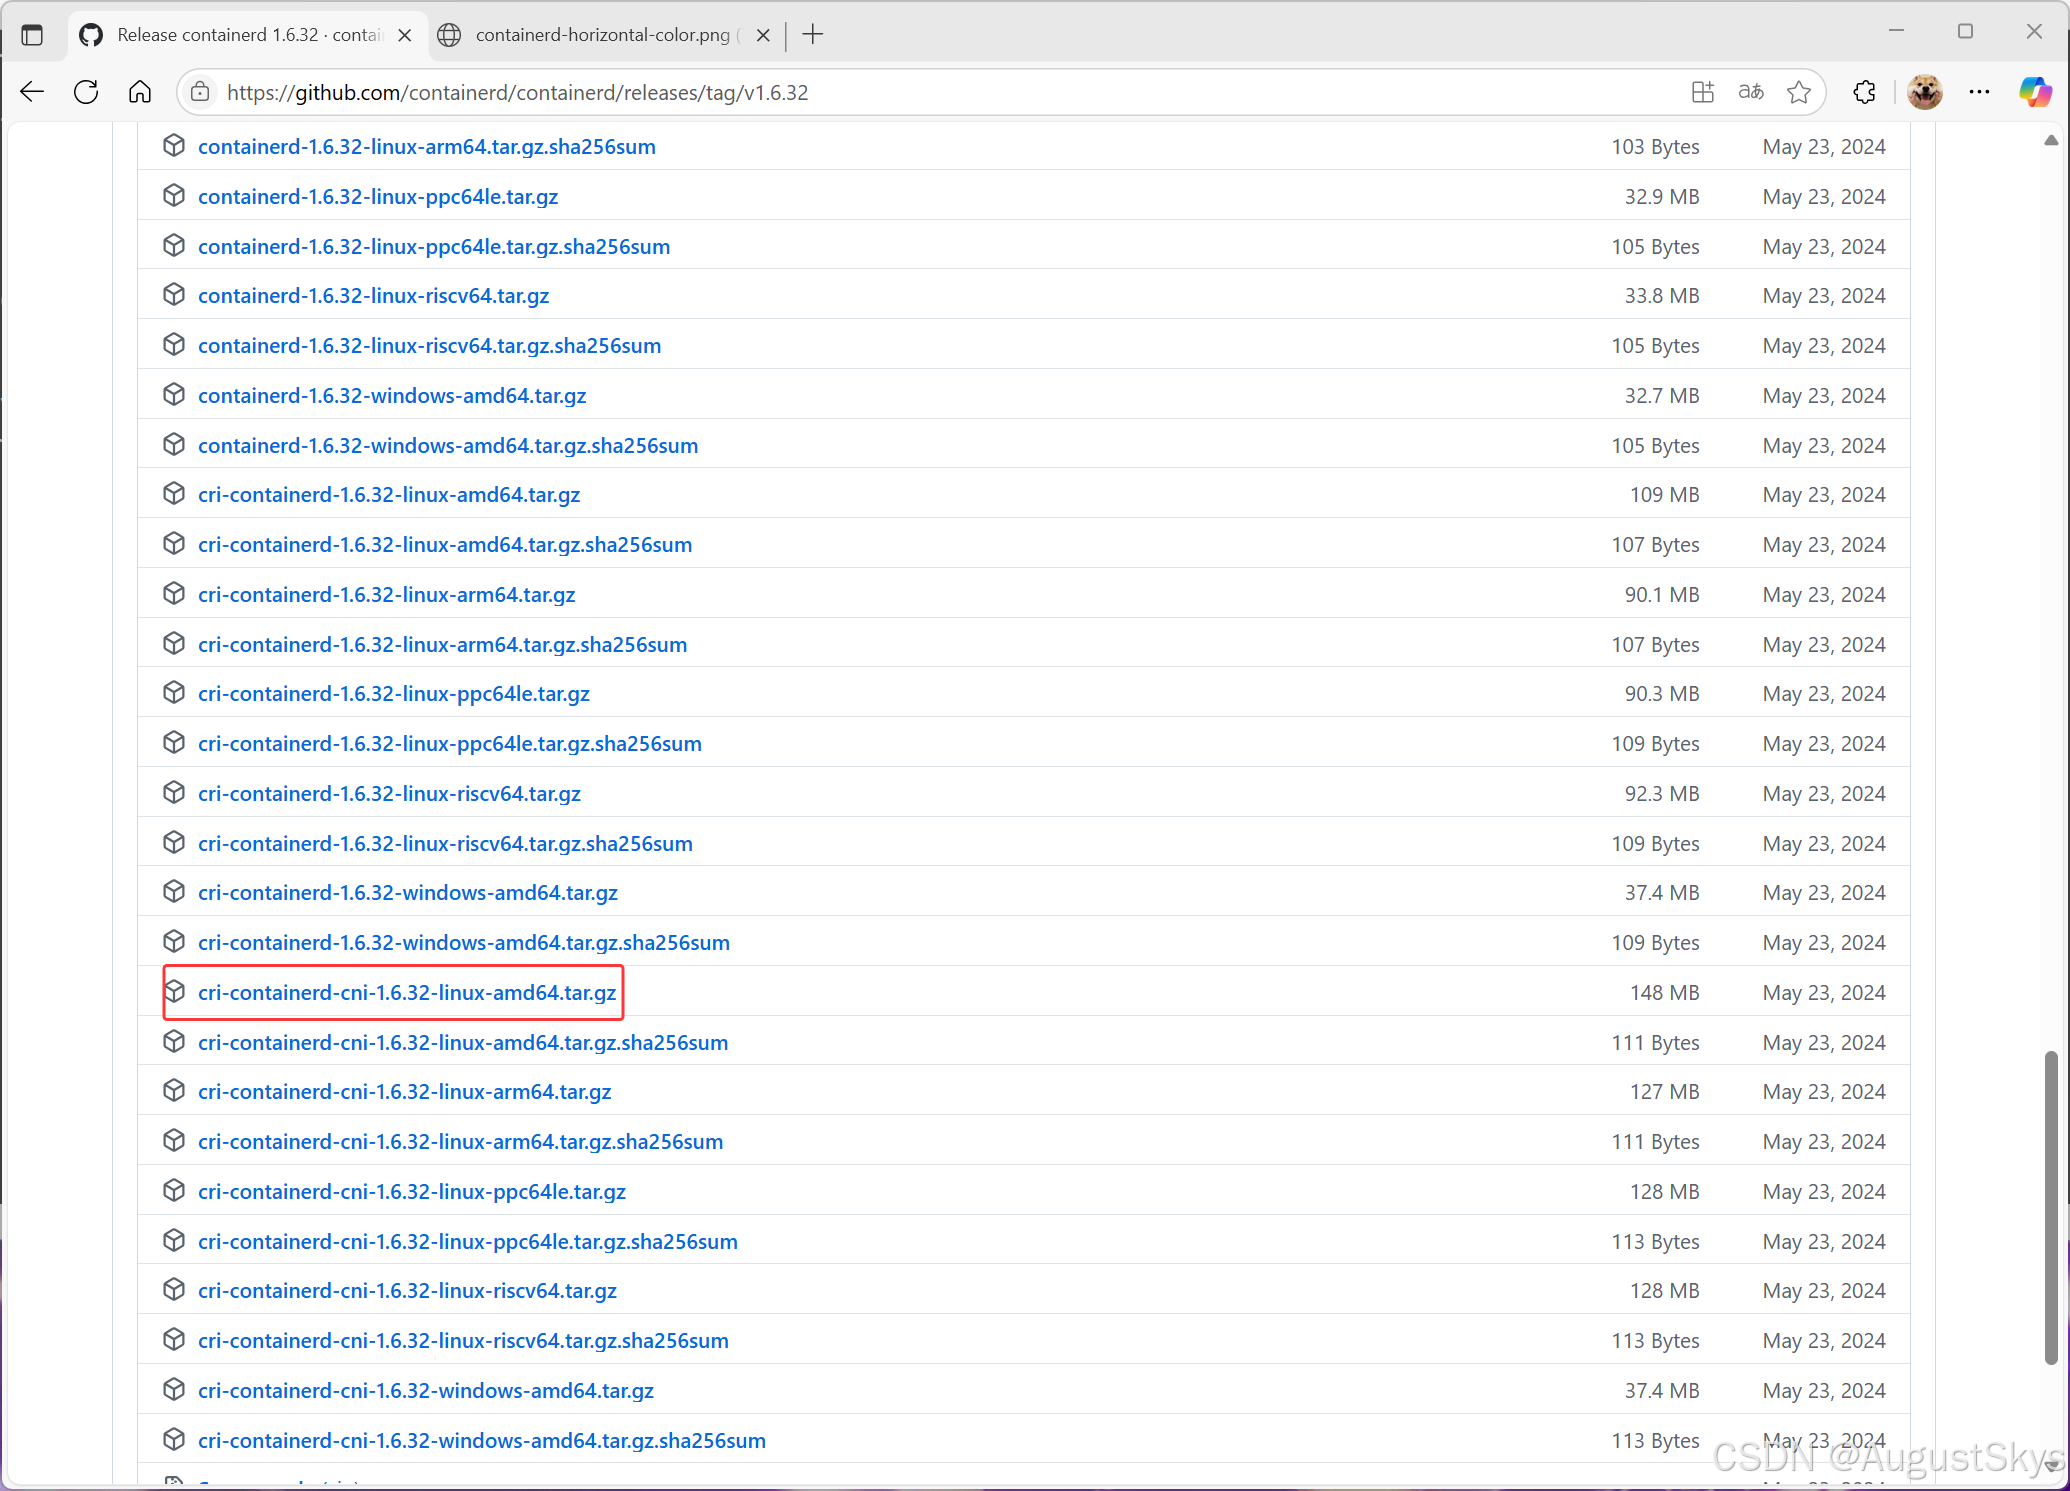
从 GitHub 下载安装包:
https://github.com/containerd/containerd/releases/download/v1.6.32/cri-containerd-cni-1.6.32-linux-amd64.tar.gz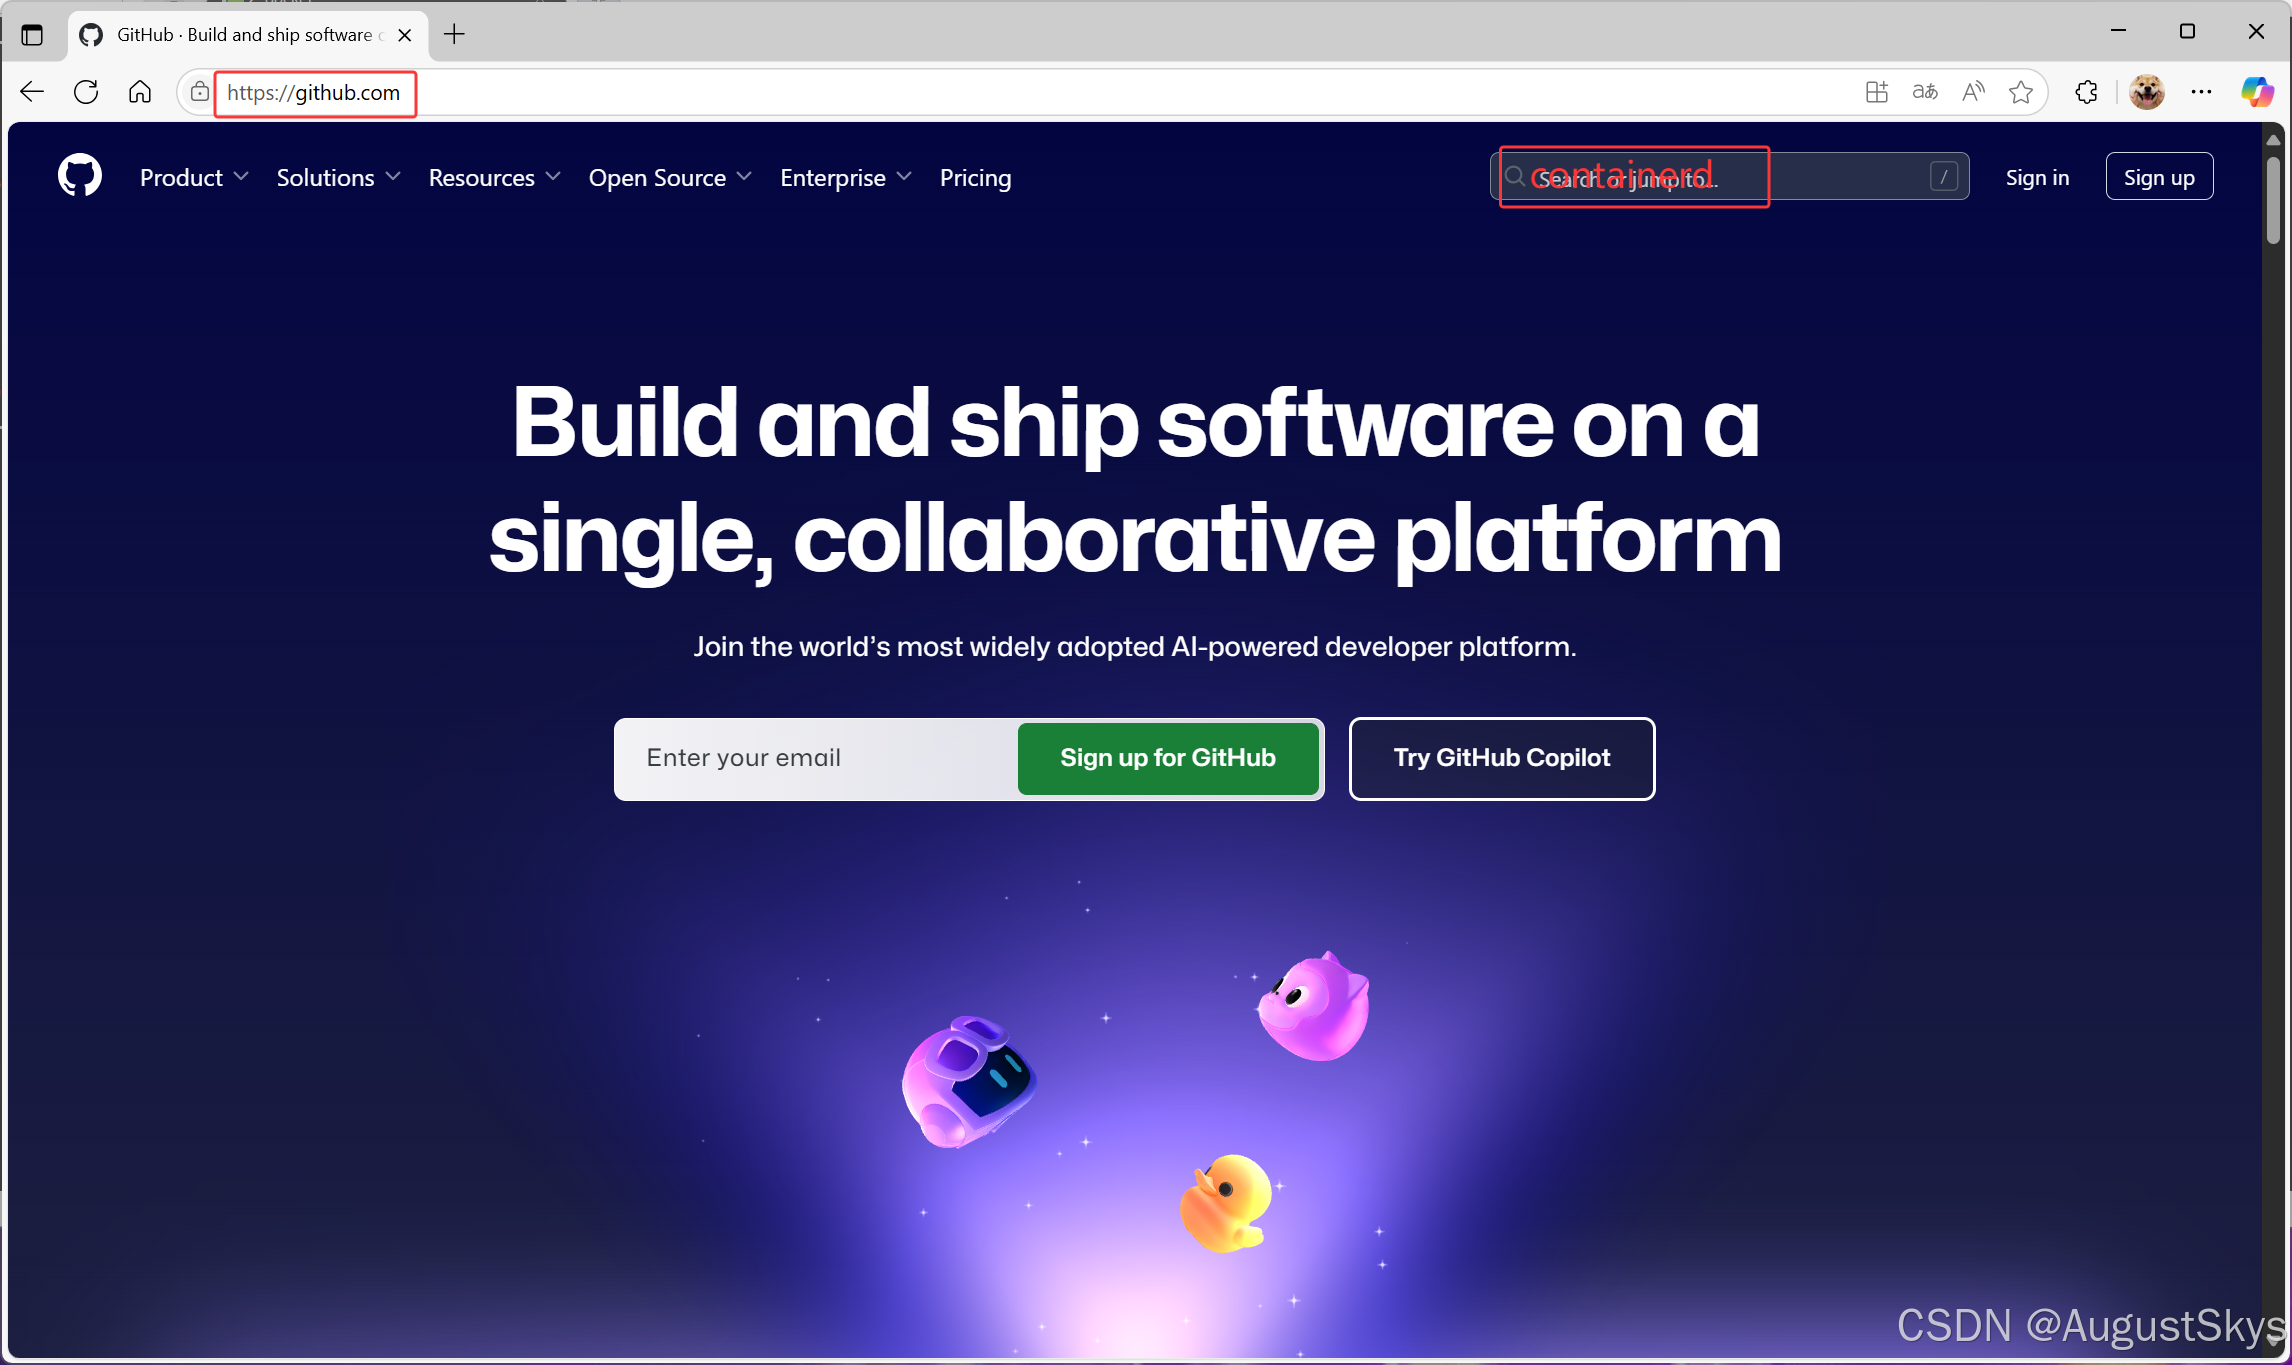
bash
# 1. 下载 Containerd 安装包(此处下载的是第二种 cri-containerd-cni 包)
[root@localhost ~]# wget https://github.com/containerd/containerd/releases/download/v1.6.32/cri-containerd-cni-1.6.32-linux-amd64.tar.gz

# 2. 解压安装包
[root@localhost ~]# mkdir containerd
[root@localhost ~]# tar xf cri-containerd-cni-1.6.32-linux-amd64.tar.gz -C containerd/
[root@localhost ~]# cd containerd/
[root@localhost containerd]# ls
cri-containerd.DEPRECATED.txt  etc  opt  usr

[root@localhost containerd]# tree
.
├── cri-containerd.DEPRECATED.txt
├── etc             # etc 目录:containerd 服务管理配置文件及 CNI 虚拟网卡配置文件
│   ├── cni
│   │   └── net.d
│   │       └── 10-containerd-net.conflist    # 网络插件配置文件
│   ├── crictl.yaml
│   └── systemd
│       └── system
│           └── containerd.service            # 服务配置文件
├── opt             # opt 目录:GCE 环境中使用 containerd 配置文件及 CNI 插件
│   ├── cni         # 网络插件
│   │   └── bin
│   │       ├── bandwidth, bridge, dhcp, firewall, host-device, host-local,
│   │       ├── ipvlan, loopback, macvlan, portmap, ptp, sbr, static,
│   │       ├── tuning, vlan, vrf
│   └── containerd
│       └── cluster
│           ├── gce
│           │   ├── cloud-init (master.yaml, node.yaml)
│           │   ├── cni.template, configure.sh, env
│           └── version
└── usr             # usr 目录:containerd 运行时文件,包含 runc
    └── local       # bin, sbin 命令
        ├── bin
        │   ├── containerd, containerd-shim, containerd-shim-runc-v1,
        │   ├── containerd-shim-runc-v2, containerd-stress, crictl,
        │   ├── critest, ctd-decoder, ctr
        └── sbin
            └── runc

16 directories, 36 files
查看 containerd.service 文件,了解 containerd 文件安装位置:
bash
[root@localhost containerd]# cat etc/systemd/system/containerd.service
[Unit]
Description=containerd container runtime
Documentation=https://containerd.io
After=network.target local-fs.target

[Service]
ExecStartPre=-/sbin/modprobe overlay
ExecStart=/usr/local/bin/containerd    # 把 containerd 二进制文件放置于此处即可完成安装

Type=notify
Delegate=yes
KillMode=process
Restart=always
RestartSec=5
LimitNPROC=infinity
LimitCORE=infinity
LimitNOFILE=infinity
TasksMax=infinity
OOMScoreAdjust=-999

[Install]
WantedBy=multi-user.target
执行安装:
bash
# 复制 containerd 运行时文件至系统
[root@localhost containerd]# cp usr/local/bin/* /usr/local/bin

# 添加 containerd.service 文件至系统
[root@localhost containerd]# cp etc/systemd/system/containerd.service /usr/lib/systemd/system/containerd.service

# 生成 containerd 默认配置文件(可自定义配置,如私有镜像仓库等)
[root@localhost containerd]# mkdir /etc/containerd
[root@localhost containerd]# containerd config default > /etc/containerd/config.toml
生成的默认配置文件 config.toml 内容如下(关键部分):
toml
disabled_plugins = []
imports = []
oom_score = 0
plugin_dir = ""
required_plugins = []
root = "/var/lib/containerd"
state = "/run/containerd"
version = 2

[cgroup]
  path = ""

[grpc]
  address = "/run/containerd/containerd.sock"
  max_recv_message_size = 16777216
  max_send_message_size = 16777216

[plugins]
  [plugins."io.containerd.grpc.v1.cri"]
    sandbox_image = "registry.k8s.io/pause:3.6"
    [plugins."io.containerd.grpc.v1.cri".cni]
      bin_dir = "/opt/cni/bin"
      conf_dir = "/etc/cni/net.d"
    [plugins."io.containerd.grpc.v1.cri".containerd]
      default_runtime_name = "runc"
      snapshotter = "overlayfs"
      [plugins."io.containerd.grpc.v1.cri".containerd.runtimes.runc]
        runtime_type = "io.containerd.runc.v2"
        [plugins."io.containerd.grpc.v1.cri".containerd.runtimes.runc.options]
          SystemdCgroup = false
    [plugins."io.containerd.grpc.v1.cri".registry]
      config_path = ""
💡 提示 :完整配置文件包含所有插件的默认参数,以上仅展示关键部分。实际使用中最常修改的是
registry.mirrors(镜像加速)和SystemdCgroup(Kubernetes 推荐设为 true)。
启动并验证:
bash
[root@localhost ~]# systemctl enable containerd --now
[root@localhost ~]# systemctl status containerd
[root@localhost ~]# ctr version
Client:
  Version:  v1.6.32
  Revision: 8b3b7ca2e5ce38e8f31a34f35b2b68ceb8470d89
  Go version: go1.21.10

Server:
  Version:  v1.6.32
  Revision: 8b3b7ca2e5ce38e8f31a34f35b2b68ceb8470d89
  UUID: 3ece67b1-4d8e-4059-afae-b837672ede83
2.2.2 安装 runC
由于二进制包中提供的 runC 默认需要系统中安装 seccomp 支持,且不同版本 runC 对 seccomp 版本要求一致,因此建议单独下载 runC 二进制包进行安装(里面已包含 seccomp 模块支持)。
下载地址:https://github.com/opencontainers/runc/releases
bash
# 使用 wget 下载 runc
[root@localhost ~]# wget https://github.com/opencontainers/runc/releases/download/v1.3.0/runc.amd64

# 安装 runc
[root@localhost ~]# mv runc.amd64 /usr/sbin/runc

# 为 runc 添加可执行权限
[root@localhost ~]# chmod +x /usr/sbin/runc

# 验证安装
[root@localhost ~]# runc -v
runc version 1.3.0
commit: v1.3.0-0-g4ca628d1
spec: 1.2.1
go: go1.23.8
libseccomp: 2.5.6
三、Containerd 镜像管理(ctr 命令)
🔑 关键概念:Containerd 环境中有三套镜像管理命令,分别对应不同场景:
工具 命令 适用场景 Docker docker imagesDocker 环境 ctr ctr images单机 containerd,containerd 自带 CLI crictl crictl imagesKubernetes 环境,Kubernetes 社区专用 CLI
3.1 命令帮助
bash
# ctr 命令总帮助
[root@localhost ~]# ctr --help
NAME:
   ctr -
        __
  _____/ /______
 / ___/ __/ ___/
/ /__/ /_/ /
\___/\__/_/

containerd CLI

USAGE:
   ctr [global options] command [command options] [arguments...]

VERSION:
   v1.6.32

COMMANDS:
   plugins, plugin            提供 containerd 插件信息
   version                    打印客户端和服务端版本
   containers, c, container   管理容器
   content                    管理内容
   events, event              显示 containerd 事件
   images, image, i           管理镜像
   leases                     管理租约
   namespaces, namespace, ns  管理命名空间
   pprof                      提供 golang pprof 输出
   run                        运行容器
   snapshots, snapshot        管理快照
   tasks, t, task             管理任务
   install                    安装新包
   oci                        OCI 工具
   shim                       直接与 shim 交互
   help, h                    显示命令列表

GLOBAL OPTIONS:
   --debug                      启用调试输出
   --address value, -a value    gRPC 服务器地址(默认: "/run/containerd/containerd.sock")
   --namespace value, -n value  命名空间(默认: "default")
bash
# 镜像子命令帮助
[root@localhost ~]# ctr images --help
COMMANDS:
   check                    检查已有镜像确保所有内容在本地可用
   export                   导出镜像
   import                   导入镜像
   list, ls                 列出镜像
   mount                    挂载镜像到目标路径
   unmount                  卸载镜像
   pull                     从远程拉取镜像
   push                     推送镜像到远程
   delete, del, remove, rm  删除一个或多个镜像
   tag                      给镜像打标签
   label                    设置和清除镜像标签
   convert                  转换镜像
3.2 查看镜像
bash
[root@localhost ~]# ctr images list
REF TYPE DIGEST SIZE PLATFORMS LABELS

# 以下写法等价
[root@localhost ~]# ctr images ls
[root@localhost ~]# ctr image list
[root@localhost ~]# ctr image ls
[root@localhost ~]# ctr i list
[root@localhost ~]# ctr i ls
3.3 拉取镜像
Containerd 支持 OCI 标准镜像,因此可以直接使用 Docker 官方或 Dockerfile 构建的镜像。
⚠️ 注意 :
ctr images pull拉取镜像时,不能直接写简名 (如nginx:alpine),必须写完整的仓库地址。
bash
[root@localhost ~]# ctr images pull 054b8ac70e8010d90f2ac00ef29e6580.mirror.swr.myhuaweicloud.com/library/nginx:latest

# 验证
[root@localhost ~]# ctr image ls
REF                                                                                TYPE                                    DIGEST                                                                  SIZE     PLATFORMS                                                                                                               LABELS
054b8ac70e8010d90f2ac00ef29e6580.mirror.swr.myhuaweicloud.com/library/nginx:latest application/vnd.oci.image.index.v1+json sha256:84ec966e61a8c7846f509da7eb081c55c1d56817448728924a87ab32f12a72fb 68.9 MiB linux/386,linux/amd64,linux/arm/v5,linux/arm/v7,linux/arm64/v8,linux/mips64le,linux/ppc64le,linux/s390x,unknown/unknown -
3.4 镜像挂载
方便查看镜像中包含的文件内容:
bash
# 挂载镜像到 /mnt 目录
[root@localhost ~]# ctr images mount 054b8ac70e8010d90f2ac00ef29e6580.mirror.swr.myhuaweicloud.com/library/nginx:latest /mnt
sha256:3c1159cd77f83ede793fc21502ae30b39b04378b6b1b625451d701d555cc1cb9
/mnt

# 查看镜像内容
[root@localhost ~]# ls /mnt
bin  boot  dev  docker-entrypoint.d  docker-entrypoint.sh  etc  home  lib  lib64  media  mnt  opt  proc  root  run  sbin  srv  sys  tmp  usr  var

# 卸载
[root@localhost ~]# umount /mnt
3.5 镜像导出
bash
# --platform linux/amd64:导出指定平台镜像
[root@localhost ~]# ctr i export --platform linux/amd64 nginx.tar 054b8ac70e8010d90f2ac00ef29e6580.mirror.swr.myhuaweicloud.com/library/nginx:latest

[root@localhost ~]# ls
nginx.tar
3.6 镜像删除
bash
# 查看删除帮助
[root@localhost ~]# ctr image rm --help
NAME:
   ctr images delete - remove one or more images by reference
OPTIONS:
   --sync  同步删除镜像及所有关联资源

# 删除指定镜像
[root@localhost ~]# ctr image rm 054b8ac70e8010d90f2ac00ef29e6580.mirror.swr.myhuaweicloud.com/library/nginx:latest

# 验证
[root@localhost ~]# ctr image ls
REF TYPE DIGEST SIZE PLATFORMS LABELS
3.7 镜像导入
bash
# 导入镜像
[root@localhost ~]# ctr images import --platform linux/amd64 nginx.tar
unpacking 054b8ac70e8010d90f2ac00ef29e6580.mirror.swr.myhuaweicloud.com/library/nginx:latest (sha256:84ec966e61a8c7846f509da7eb081c55c1d56817448728924a87ab32f12a72fb)...done

# 验证
[root@localhost ~]# ctr image ls
REF                                                                                TYPE                                    DIGEST                                                                  SIZE     PLATFORMS                                                                                                               LABELS
054b8ac70e8010d90f2ac00ef29e6580.mirror.swr.myhuaweicloud.com/library/nginx:latest application/vnd.oci.image.index.v1+json sha256:84ec966e61a8c7846f509da7eb081c55c1d56817448728924a87ab32f12a72fb 68.9 MiB linux/386,linux/amd64,linux/arm/v5,linux/arm/v7,linux/arm64/v8,linux/mips64le,linux/ppc64le,linux/s390x,unknown/unknown -
3.8 修改镜像 Tag
bash
# 将长镜像名修改为短名 nginx:latest
[root@localhost ~]# ctr images tag 054b8ac70e8010d90f2ac00ef29e6580.mirror.swr.myhuaweicloud.com/library/nginx:latest nginx:latest
nginx:latest

# 验证:两个 tag 指向同一个镜像
[root@localhost ~]# ctr image ls
REF                                                                                TYPE                                    DIGEST                                                                  SIZE     PLATFORMS                                                                                                               LABELS
054b8ac70e8010d90f2ac00ef29e6580.mirror.swr.myhuaweicloud.com/library/nginx:latest application/vnd.oci.image.index.v1+json sha256:84ec966e61a8c7846f509da7eb081c55c1d56817448728924a87ab32f12a72fb 68.9 MiB linux/386,linux/amd64,linux/arm/v5,linux/arm/v7,linux/arm64/v8,linux/mips64le,linux/ppc64le,linux/s390x,unknown/unknown -
nginx:latest                                                                       application/vnd.oci.image.index.v1+json sha256:84ec966e61a8c7846f509da7eb081c55c1d56817448728924a87ab32f12a72fb 68.9 MiB linux/386,linux/amd64,linux/arm/v5,linux/arm/v7,linux/arm64/v8,linux/mips64le,linux/ppc64le,linux/s390x,unknown/unknown -
四、Containerd 容器管理(ctr 命令)
🔑 核心概念:静态容器 vs 动态容器
在 Containerd 中,容器分为两个层面:
- Container(静态容器) :使用
ctr container create创建后,容器并没有运行,只是包含了运行容器所需的资源及配置的数据结构(namespaces、rootfs、配置已初始化),但用户进程还没有启动- Task(动态容器) :使用
ctr task start启动后,容器中的进程才真正运行,对应宿主机上的一个进程
4.1 命令帮助
bash
# 静态容器命令帮助
[root@localhost ~]# ctr container --help
COMMANDS:
   create                   创建容器
   delete, del, remove, rm  删除一个或多个已有容器
   info                     获取容器信息
   list, ls                 列出容器
   label                    设置和清除容器标签
   checkpoint               检查点容器
   restore                  从检查点恢复容器

# 一步运行容器命令帮助
[root@localhost ~]# ctr run --help
# ctr run 可以创建静态容器并使其运行,一步到位
OPTIONS:
   --rm                                    运行后删除容器(不能与 --detach 同用)
   --detach, -d                            启动后脱离任务(不能与 --rm 同用)
   --cni                                   为容器启用 CNI 网络
   --net-host                              启用 host 网络(容器 IP 即宿主机 IP)
   --privileged                            运行特权容器
   --tty, -t                               分配 TTY
   --memory-limit value                    内存限制(字节)
   --cpus value                            CPU 配额
   ...
4.2 查看容器与任务
bash
# 查看静态容器(container 可简写为 c)
[root@localhost ~]# ctr container ls     # 等价于 ctr c ls
CONTAINER    IMAGE    RUNTIME

# 查看动态任务(task 表示容器里跑的进程,可简写为 t)
[root@localhost ~]# ctr task ls          # 等价于 ctr t ls
TASK    PID    STATUS
4.3 创建静态容器
bash
[root@localhost ~]# ctr container create nginx:latest nginx1
[root@localhost ~]# ctr container ls
CONTAINER    IMAGE           RUNTIME
nginx1       nginx:latest    io.containerd.runc.v2

# 查看容器详细信息
[root@localhost ~]# ctr container info nginx1
4.4 静态容器启动为动态容器
bash
[root@localhost ~]# ctr task ls
TASK    PID    STATUS

# 启动 task(-d 表示后台运行)
[root@localhost ~]# ctr task start -d nginx1

[root@localhost ~]# ctr task ls
TASK      PID      STATUS
nginx1    22614    RUNNING

# 容器是以宿主机进程的方式存在的
[root@localhost ~]# ps aux | grep 22614
root  22614  0.0  0.0  11468  7196 ?  Ss  15:40  0:00 nginx: master process nginx -g daemon off;
4.5 进入容器操作
bash
# --exec-id 为 exec 进程设定一个唯一 ID,可以使用 $RANDOM 变量
[root@localhost ~]# ctr task exec --exec-id $RANDOM -t nginx1 /bin/sh
#
4.6 直接运行一个动态容器
bash
# --net-host 代表容器的 IP 就是宿主机的 IP(相当于 Docker 里的 host 网络)
[root@localhost ~]# ctr run -d --net-host nginx:latest nginx2
4.7 暂停、恢复、停止与删除容器
bash
# 暂停容器
[root@localhost ~]# ctr tasks pause nginx2
[root@localhost ~]# ctr task ls
TASK      PID      STATUS
nginx1    22614    RUNNING
nginx2    25569    PAUSED        # 状态为 PAUSED

# 恢复容器
[root@localhost ~]# ctr tasks resume nginx2
[root@localhost ~]# ctr task ls
TASK      PID      STATUS
nginx1    22614    RUNNING
nginx2    25569    RUNNING       # 恢复为 RUNNING

# 停止容器
[root@localhost ~]# ctr tasks kill nginx2
[root@localhost ~]# ctr tasks ls
TASK      PID      STATUS
nginx1    22614    RUNNING
nginx2    25569    STOPPED       # 停止后 STATUS 为 STOPPED

# 删除容器:必须先停止/删除 task,再删除容器
[root@localhost ~]# ctr tasks delete nginx2
[root@localhost ~]# ctr tasks ls
TASK      PID      STATUS
nginx1    22614    RUNNING

# 此时静态容器仍然存在
[root@localhost ~]# ctr container ls
CONTAINER    IMAGE           RUNTIME
nginx1       nginx:latest    io.containerd.runc.v2
nginx2       nginx:latest    io.containerd.runc.v2

# 删除静态容器
[root@localhost ~]# ctr container delete nginx2
[root@localhost ~]# ctr container ls
CONTAINER    IMAGE           RUNTIME
nginx1       nginx:latest    io.containerd.runc.v2
⚠️ 重要 :删除容器的正确顺序是 先删除 task(动态容器),再删除 container(静态容器)。如果容器正在运行,直接删除 container 会失败。
五、对接私有镜像仓库 Harbor
bash
# 1. 在 containerd 宿主机上添加域名解析(如果已有 DNS 解析可忽略)
[root@localhost ~]# vim /etc/hosts
192.168.108.30 my.harbor.com

# 2. 从 Harbor 拉取镜像
#    Harbor 仓库需提前在 192.168.108.30 上部署,镜像需提前上传
#    如果没有使用 HTTPS,可以使用 --plain-http 指定 HTTP 协议
[root@localhost ~]# ctr image pull --plain-http 192.168.108.30/cloud/nginx:latest

# 3. 上传镜像到 Harbor
#    先给镜像打 Harbor 标签
[root@localhost ~]# ctr images tag nginx:latest my.harbor.com/cloud/nginx:latest
#    再推送(--user 指定 Harbor 用户名和密码)
[root@localhost ~]# ctr image push --platform linux/amd64 --plain-http --user "images_admin:Cloud12#$" my.harbor.com/cloud/nginx:latest
manifest-sha256:6533ddd664582430971e93e69cf343e3bfffceadeaaa97d4379c4d7a29f21d47: done |++++++++++++++++++++++++++++++++++++++|
config-sha256:2cd1d97f893f70cee86a38b7160c30e5750f3ed6ad86c598884ca9c6a563a501:   done |++++++++++++++++++++++++++++++++++++++|
elapsed: 0.1 s
💡 提示 :如果 Harbor 使用了自签名证书,需要将 CA 证书放置到
/etc/containerd/certs.d/<域名>/目录下,并在config.toml中配置config_path。
六、Namespace 命名空间管理
Containerd 中的 Namespace 用于隔离运行的容器和镜像,不同 Namespace 之间的资源互不可见。
bash
# 1. 列出已有 namespace
[root@localhost ~]# ctr namespace ls
NAME    LABELS
default           # containerd 默认工作在 default 命名空间

# 在 Docker 环境中查看
[root@docker ~]# ctr namespace ls
NAME LABELS
moby              # Docker 默认工作在 moby 空间

# 2. 创建 namespace
[root@localhost ~]# ctr namespace create myns
[root@localhost ~]# ctr namespace create testns
[root@localhost ~]# ctr namespace ls
NAME    LABELS
default
myns
testns

# 3. 删除 namespace
[root@localhost ~]# ctr namespace rm testns
testns
[root@localhost ~]# ctr namespace ls
NAME    LABELS
default
myns

# 4. 查看指定 namespace 中的镜像
[root@localhost ~]# ctr -n myns images ls
REF TYPE DIGEST SIZE PLATFORMS LABELS

# 5. 查看指定 namespace 中是否有用户进程在运行
[root@localhost ~]# ctr -n myns tasks ls
TASK    PID    STATUS

# 6. 在指定 namespace 中下载镜像
[root@localhost ~]# ctr -n myns images pull 054b8ac70e8010d90f2ac00ef29e6580.mirror.swr.myhuaweicloud.com/library/nginx:latest
[root@localhost ~]# ctr -n myns images ls
REF                                                                                TYPE                                    DIGEST                                                                  SIZE     PLATFORMS                                                                                                               LABELS
054b8ac70e8010d90f2ac00ef29e6580.mirror.swr.myhuaweicloud.com/library/nginx:latest application/vnd.oci.image.index.v1+json sha256:84ec966e61a8c7846f509da7eb081c55c1d56817448728924a87ab32f12a72fb 68.9 MiB linux/386,linux/amd64,linux/arm/v5,linux/arm/v7,linux/arm64/v8,linux/mips64le,linux/ppc64le,linux/s390x,unknown/unknown -

# 7. 在指定 namespace 中创建静态容器
[root@localhost ~]# ctr -n myns container create 054b8ac70e8010d90f2ac00ef29e6580.mirror.swr.myhuaweicloud.com/library/nginx:latest mynginx

# 8. 查看并启动指定 namespace 中的容器
[root@localhost ~]# ctr -n myns container ls
CONTAINER    IMAGE                                                                                 RUNTIME
mynginx      054b8ac70e8010d90f2ac00ef29e6580.mirror.swr.myhuaweicloud.com/library/nginx:latest    io.containerd.runc.v2

[root@localhost ~]# ctr -n myns task start -d mynginx
[root@localhost ~]# ctr -n myns tasks ls
TASK       PID     STATUS
mynginx    5873    RUNNING
📌 重点 :使用
-n <namespace>参数可以在任意 ctr 命令中指定命名空间。不同 Namespace 中的镜像、容器、任务完全隔离,这在多租户场景中非常有用。
七、nerdctl 实战:Docker 兼容的 Containerd CLI
💡 为什么推荐 nerdctl?
ctr命令虽然功能强大,但语法与 Docker 差异较大,且不支持 Docker Compose、镜像构建等高级功能。nerdctl 是一个与 Docker CLI 语法高度兼容的 containerd 客户端,几乎所有 Docker 命令都可以直接替换为 nerdctl 使用,学习成本极低。
7.1 nerdctl 安装与配置
项目地址:https://github.com/containerd/nerdctl/releases
CNI 插件地址:https://github.com/containernetworking/plugins/releases
bash
# 1. 下载并安装 nerdctl
[root@localhost ~]# wget https://github.com/containerd/nerdctl/releases/download/v1.4.0/nerdctl-1.4.0-linux-amd64.tar.gz
[root@localhost ~]# tar -xf nerdctl-1.4.0-linux-amd64.tar.gz -C /usr/bin/

# 2. 配置 nerdctl 命令自动补全
[root@localhost ~]# nerdctl completion bash > /etc/bash_completion.d/nerdctl
[root@localhost ~]# source /etc/bash_completion.d/nerdctl

# 3. 下载 nerdctl 所需的 CNI 插件
[root@localhost ~]# wget https://github.com/containernetworking/plugins/releases/download/v1.3.0/cni-plugins-linux-amd64-v1.3.0.tgz
[root@localhost ~]# mkdir -p /opt/cni/bin
[root@localhost ~]# tar -xf cni-plugins-linux-amd64-v1.3.0.tgz -C /opt/cni/bin
⚠️ 常见问题 :如果配置补全时报错
_get_comp_words_by_ref: command not found,需要安装bash-completion:
bash[root@localhost ~]# yum install -y bash-completion
配置镜像加速
bash
# 1. 生成默认配置(如果不存在)
[root@localhost ~]# containerd config default > /etc/containerd/config.toml

# 2. 编辑配置文件,搜索关键字 "config_path",修改为 certs.d 目录
[root@localhost ~]# vim /etc/containerd/config.toml
[plugins."io.containerd.grpc.v1.cri".registry]
  config_path = "/etc/containerd/certs.d"          # 修改这里

# 3. 创建 docker.io 的镜像加速配置
[root@localhost ~]# mkdir -p /etc/containerd/certs.d/docker.io
[root@localhost ~]# vim /etc/containerd/certs.d/docker.io/hosts.toml
server = "https://054b8ac70e8010d90f2ac00ef29e6580.mirror.swr.myhuaweicloud.com"
[host."https://054b8ac70e8010d90f2ac00ef29e6580.mirror.swr.myhuaweicloud.com"]
  capabilities = ["pull", "resolve"]

# 4. 重启 containerd 服务生效
[root@localhost ~]# systemctl restart containerd
7.2 nerdctl 镜像管理
bash
[root@localhost ~]# nerdctl image <tab><tab>
build    从 Dockerfile 构建镜像(需要 buildkitd 运行)
convert  转换镜像
decrypt  解密镜像
encrypt  加密镜像层
history  显示镜像构建历史
inspect  显示一个或多个镜像的详细信息
load     从 tar 包或 STDIN 加载镜像
ls       列出镜像
prune    删除未使用的镜像
pull     从仓库拉取镜像
push     推送镜像到仓库
rm       删除一个或多个镜像
save     保存一个或多个镜像到 tar 包
tag      给镜像打标签
ls --- 查看镜像
bash
[root@localhost ~]# nerdctl image ls
REPOSITORY    TAG    IMAGE ID    CREATED    PLATFORM    SIZE    BLOB SIZE

# 可简写为
[root@localhost ~]# nerdctl images
pull --- 拉取镜像
bash
# 下载 busybox
[root@localhost ~]# nerdctl image pull busybox

# 可简写为下载 httpd
[root@localhost ~]# nerdctl pull httpd

[root@localhost ~]# nerdctl image ls
REPOSITORY    TAG       IMAGE ID        CREATED           PLATFORM       SIZE         BLOB SIZE
busybox       latest    f9a104fddb33    19 minutes ago    linux/amd64    4.1 MiB      2.1 MiB
httpd         latest    fbc12199ccad    44 seconds ago    linux/amd64    152.4 MiB    55.8 MiB
rm --- 删除镜像
bash
[root@localhost ~]# nerdctl image rm httpd
[root@localhost ~]# nerdctl rmi busybox

[root@localhost ~]# nerdctl images
REPOSITORY    TAG       IMAGE ID        CREATED           PLATFORM       SIZE       BLOB SIZE
busybox       latest    f9a104fddb33    19 minutes ago    linux/amd64    4.1 MiB    2.1 MiB
tag --- 打标签
bash
[root@localhost ~]# nerdctl tag busybox busybox_containerd
[root@localhost ~]# nerdctl images
REPOSITORY            TAG       IMAGE ID        CREATED           PLATFORM       SIZE       BLOB SIZE
busybox               latest    f9a104fddb33    34 minutes ago    linux/amd64    4.1 MiB    2.1 MiB
busybox_containerd    latest    f9a104fddb33    3 seconds ago     linux/amd64    4.1 MiB    2.1 MiB
save --- 导出镜像
bash
[root@localhost ~]# nerdctl image save busybox -o busybox.tar
# 可简写为
[root@localhost ~]# nerdctl save busybox -o busybox.tar
load --- 导入镜像
bash
[root@localhost ~]# nerdctl image load -i busybox.tar
# 可简写为
[root@localhost ~]# nerdctl load -i busybox.tar
history --- 查看镜像历史
bash
[root@localhost ~]# nerdctl image history busybox
SNAPSHOT                                                                   CREATED          CREATED BY                           SIZE       COMMENT
sha256:65014c70e84b6817fac42bb201ec5c1ea460a8da246cac0e481f5c9a9491eac0    10 months ago    BusyBox 1.37.0 (glibc), Debian 12    4.1 MiB
inspect --- 查看镜像详情
bash
[root@localhost ~]# nerdctl image inspect busybox
[
    {
        "Id": "sha256:6d3e4188a38af91b0c1577b9e88c53368926b2fe0e1fb985d6e8a70040520c4d",
        "RepoTags": ["busybox:latest"],
        "Created": "2024-09-26T21:31:42Z",
        "Architecture": "amd64",
        "Os": "linux",
        "Size": 4337664,
        ...
    }
]
prune --- 清理未使用镜像
bash
[root@localhost ~]# nerdctl image prune --all --force
[root@localhost ~]# nerdctl image ls
REPOSITORY    TAG    IMAGE ID    CREATED    PLATFORM    SIZE    BLOB SIZE
7.3 nerdctl 容器管理
bash
[root@localhost ~]# nerdctl container --help
Commands:
  commit   从容器更改创建新镜像
  cp       在运行容器和本地文件系统之间复制文件
  create   创建新容器
  exec     在运行容器中执行命令
  inspect  显示一个或多个容器的详细信息
  kill     杀死一个或多个运行容器
  logs     获取容器日志
  ls       列出容器
  pause    暂停容器内所有进程
  port     列出端口映射
  prune    删除所有已停止容器
  rename   重命名容器
  restart  重启容器
  rm       删除一个或多个容器
  run      在新容器中运行命令
  start    启动一个或多个已停止容器
  stop     停止一个或多个运行容器
  unpause  恢复容器内所有进程
  update   更新一个或多个运行容器
  wait     阻塞直到容器停止
ls --- 查看容器
bash
[root@localhost ~]# nerdctl container ls
CONTAINER ID    IMAGE    COMMAND    CREATED    STATUS    PORTS    NAMES

# 可简写为
[root@localhost ~]# nerdctl ps

# 使用 -a 查看所有容器(包括未运行的)
[root@localhost ~]# nerdctl container ls -a
常用选项:
-a, --all:显示所有容器(默认只显示运行中的)-f, --filter:按条件过滤容器--format:使用 Go 模板格式化输出
run --- 创建并运行容器
bash
# 交互式运行 ubuntu
[root@localhost ~]# nerdctl container run -it ubuntu
root@0da9aad32119:/# exit
exit

# 可简写为
[root@localhost ~]# nerdctl run -it ubuntu

# 查看容器状态(退出后状态为 Exited)
[root@localhost ~]# nerdctl container ls -a
CONTAINER ID    IMAGE                              COMMAND        CREATED           STATUS                         PORTS    NAMES
0da9aad32119    docker.io/library/ubuntu:latest    "/bin/bash"    3 minutes ago     Exited (130) 2 minutes ago              ubuntu-0da9a
常用选项:
| 选项 | 说明 |
|---|---|
-d, --detach |
后台运行容器 |
-i, --interactive |
保持 STDIN 打开 |
-t, --tty |
分配伪终端 |
--name |
指定容器名称 |
-e, --env |
设置环境变量 |
-m, --memory |
内存限制 |
--cpus |
CPU 数量限制 |
--net |
网络模式(bridge/host/none) |
--privileged |
特权容器 |
--restart |
重启策略(no/always/on-failure:n/unless-stopped) |
--rm |
退出后自动删除容器 |
-v, --volume |
挂载数据卷 |
-p |
端口映射 |
rm --- 删除容器
bash
[root@localhost ~]# nerdctl container rm 0da9aad32119
0da9aad32119
prune --- 清理所有停止的容器
bash
[root@localhost ~]# nerdctl container run ubuntu
[root@localhost ~]# nerdctl container run ubuntu
[root@localhost ~]# nerdctl container ls -a
CONTAINER ID    IMAGE                              COMMAND        CREATED           STATUS                       PORTS    NAMES
3778651cfacb    docker.io/library/ubuntu:latest    "/bin/bash"    5 seconds ago     Exited (0) 5 seconds ago              ubuntu-37786
3e8221845ab4    docker.io/library/ubuntu:latest    "/bin/bash"    11 seconds ago    Exited (0) 11 seconds ago             ubuntu-3e822

[root@localhost ~]# nerdctl container prune --force
Deleted Containers:
3778651cfacba1cd489b065ff7017b272b9edddc71211e2a6e567d9d0ec8ac54
3e8221845ab479f18a091c04443d26632946c9ced264c21a490f6b3052bde0b2
rename --- 重命名容器
bash
[root@localhost ~]# nerdctl container run --name ubuntu-1 ubuntu
[root@localhost ~]# nerdctl container rename ubuntu-1 ubuntu
[root@localhost ~]# nerdctl container ls -a
CONTAINER ID    IMAGE                              COMMAND        CREATED           STATUS                       PORTS    NAMES
61384145427a    docker.io/library/ubuntu:latest    "/bin/bash"    26 seconds ago    Exited (0) 26 seconds ago             ubuntu
stop / start --- 停止和启动容器
bash
[root@localhost ~]# nerdctl container run -d --name nginx1 nginx
[root@localhost ~]# nerdctl container ls --format "{{.Names}} {{.Status}}"
nginx1 Up

[root@localhost ~]# nerdctl container stop nginx1
nginx1
[root@localhost ~]# nerdctl container ls --format "{{.Names}} {{.Status}}" -a
nginx1 Exited (0) 13 seconds ago

[root@localhost ~]# nerdctl container start nginx1
nginx1
[root@localhost ~]# nerdctl container ls --format "{{.Names}} {{.Status}}"
nginx1 Up
restart --- 重启容器
bash
[root@localhost ~]# nerdctl container restart nginx1
nginx1
pause / unpause --- 暂停和恢复容器
bash
[root@localhost ~]# nerdctl container pause nginx1
nginx1
[root@localhost ~]# nerdctl container ls --format "{{.Names}} {{.Status}}" -a
nginx1 Paused

[root@localhost ~]# nerdctl container unpause nginx1
nginx1
[root@localhost ~]# nerdctl container ls --format "{{.Names}} {{.Status}}" -a
nginx1 Up
kill --- 强制杀死容器
bash
# 默认发送 KILL 信号
[root@localhost ~]# nerdctl container kill nginx1
945c89b61aafc3475317e8801ad8526fdf337b038bfa315472e4c723bf5406f1
[root@localhost ~]# nerdctl container ls -a --format "{{.Names}} {{.Status}}"
nginx1 Exited (137) 8 seconds ago
exec --- 在容器内执行命令
bash
[root@localhost ~]# nerdctl container start nginx1
nginx1
[root@localhost ~]# nerdctl container exec -it nginx1 bash
root@945c89b61aaf:/# exit
exit
cp --- 宿主机与容器之间复制文件
bash
# 宿主机文件复制到容器
[root@localhost ~]# nerdctl container cp /etc/hostname nginx1:
[root@localhost ~]# nerdctl container exec nginx1 ls hostname
hostname
💡 思考 :如果需要将容器中的文件拷贝到宿主机,语法为
nerdctl container cp <容器名>:<容器内路径> <宿主机路径>。
inspect --- 查看容器详细信息
bash
[root@localhost ~]# nerdctl container inspect nginx1
[
    {
        "Id": "945c89b61aafc3475317e8801ad8526fdf337b038bfa315472e4c723bf5406f1",
        "Created": "2025-08-02T14:07:36.213384887Z",
        "State": {
            "Status": "running",
            "Running": true,
            "Pid": 49359,
            "ExitCode": 0
        },
        "Image": "docker.io/library/nginx:latest",
        "Name": "nginx1",
        "NetworkSettings": {
            "IPAddress": "10.4.0.15",
            "MacAddress": "32:81:21:fb:b4:72"
        }
        ...
    }
]
logs --- 查看容器日志
bash
[root@localhost ~]# nerdctl container logs nginx1
/docker-entrypoint.sh: Configuration complete; ready for start up
2025/08/02 14:10:40 [notice] 1#1: using the "epoll" event method
2025/08/02 14:10:40 [notice] 1#1: nginx/1.29.0
2025/08/02 14:10:40 [notice] 1#1: start worker process 22
...
port --- 查看端口映射
bash
[root@localhost ~]# nerdctl container run --name nginx -d -p 8080:80 nginx
2d0923e9f7c816d9fc8f5fa30b1be332c90fff0e354c981b919fc67bd1f97101
[root@localhost ~]# nerdctl container port nginx
80/tcp -> 0.0.0.0:8080
commit --- 将容器提交为镜像
bash
[root@localhost ~]# nerdctl commit nginx nginx_containerd
sha256:6e60d18c9e7f7968f49edfacae16e39df2a995d3119b0b23356fd501cd8348a6
[root@localhost ~]# nerdctl images
REPOSITORY          TAG       IMAGE ID        CREATED           PLATFORM       SIZE         BLOB SIZE
nginx               latest    84ec966e61a8    17 minutes ago    linux/amd64    194.4 MiB    68.9 MiB
nginx_containerd    latest    d59a30a56f7f    3 seconds ago     linux/amd64    194.4 MiB    68.9 MiB
7.4 nerdctl 网络管理
Containerd 中的网络与 Docker 类似,所有网络接口默认都是虚拟接口。
当使用 nerdctl 创建容器时,nerdctl 会创建一个名为 bridge 的 Linux 网桥(其上有一个 nerdctl0 内部接口),利用 Linux 虚拟网络技术(veth pair),在本地主机和容器内分别创建一个虚拟接口并让它们彼此连通。
bash
# 运行一个测试容器
[root@localhost ~]# nerdctl run -d busybox -- sleep infinity
b721795e02103578656152662f414e88f32191e64976ccafe60c4af10a8fa8c8

[root@localhost ~]# nerdctl exec busybox-b7217 -- ip a
1: lo: <LOOPBACK,UP,LOWER_UP> mtu 65536
    inet 127.0.0.1/8 scope host lo
2: eth0@if5: <BROADCAST,MULTICAST,UP,LOWER_UP,M-DOWN> mtu 1500
    link/ether f6:fc:0b:35:5e:2c brd ff:ff:ff:ff:ff:ff
    inet 10.4.0.18/24 brd 10.4.0.255 scope global eth0
📌 要点 :容器内看到的网卡
eth0@if5,@if5代表对端是宿主机的 5 号网卡。在宿主机上执行ip a可以看到对应的veth790d9140@if2,@if2代表对端是容器内的 2 号网卡,二者形成一对 veth pair。
bash
# 查看网络列表
[root@localhost ~]# nerdctl network ls
NETWORK ID      NAME      FILE
17f29b073143    bridge    /etc/cni/net.d/nerdctl-bridge.conflist
                host
                none

# 查看 bridge 网络详情
[root@localhost ~]# nerdctl network inspect bridge
[
    {
        "Name": "bridge",
        "Id": "17f29b073143d8cd97b5bbe492bdeffec1c5fee55cc1fe2112c8b9335f8b6121",
        "IPAM": {
            "Config": [{"Subnet": "10.4.0.0/24", "Gateway": "10.4.0.1"}]
        }
    }
]

# 宿主机上 nerdctl0 就是容器的网关
[root@localhost ~]# ip addr show nerdctl0
3: nerdctl0: <BROADCAST,MULTICAST,UP,LOWER_UP> mtu 1500
    inet 10.4.0.1/24 brd 10.4.0.255 scope global nerdctl0

# 使用 brctl 查看网桥和端口连接
[root@localhost ~]# brctl show
bridge name     bridge id               STP enabled     interfaces
nerdctl0        8000.3a1a93b7ead7       no              veth790d9140
nerdctl network 命令帮助:
bash
[root@localhost ~]# nerdctl network --help
Commands:
  create   创建网络
  inspect  显示网络详细信息
  ls       列出网络
  prune    删除所有未使用网络
  rm       删除一个或多个网络
7.5 nerdctl 存储管理
nerdctl 创建容器时,可以使用 -v 选项将本地目录挂载给容器,实现数据持久化。
方式一:绑定挂载(Bind Mount)
bash
[root@localhost ~]# mkdir /data
[root@localhost ~]# nerdctl run -d -v /data:/data busybox -- sleep infinity
d00a1646169a199e3038851f86b82bff03ac2db6ffd8ea3e875789d2a6d1a000
[root@localhost ~]# touch /data/f1
[root@localhost ~]# nerdctl exec busybox-d00a1 -- ls /data
f1
方式二:匿名 Volume(只写容器内路径)
bash
# 直接写容器目录,会自动生成匿名 volume
[root@localhost ~]# nerdctl run -d -v /data busybox -- sleep infinity
29c94622886a219c93b5f6cd1c1ab190f998c66e3b4cbce75437507803b82eea
[root@localhost ~]# nerdctl exec busybox-29c94 -- touch /data/f2
# 数据存储在 /var/lib/nerdctl/xx/volumes/default/<volume-id>/_data/
方式三:命名 Volume(指定 volume 名称)
bash
[root@localhost ~]# nerdctl run -d -v data:/data busybox -- sleep infinity
1b1fc00e88471a5abd8787bae438ab8d5ab08f4ec4fa073805407f9fffe2fe73
[root@localhost ~]# nerdctl exec busybox-1b1fc -- touch /data/f3

# 查看 volume 列表
[root@localhost ~]# nerdctl volume ls
VOLUME NAME                                                         DIRECTORY
0c70033c26bcf456d9a0dc3f7dfe723f232e48dee2c8898bf987f8aeebacc1c7    /var/lib/nerdctl/1935db59/volumes/default/0c70033c.../_data
data                                                                /var/lib/nerdctl/1935db59/volumes/default/data/_data
nerdctl volume 命令帮助:
bash
[root@localhost ~]# nerdctl volume --help
Commands:
  create   创建 volume
  inspect  显示 volume 详细信息
  ls       列出 volume
  prune    删除所有未使用的本地 volume
  rm       删除一个或多个 volume
7.6 nerdctl 命名空间管理
bash
[root@localhost ~]# nerdctl namespace
Unrelated to Linux namespaces and Kubernetes namespaces

Commands:
  create   创建新命名空间
  inspect  显示命名空间详细信息
  ls       列出 containerd 命名空间
  remove   删除一个或多个命名空间
  update   更新命名空间标签

# 示例
[root@localhost ~]# nerdctl namespace ls
NAME       CONTAINERS    IMAGES    VOLUMES    LABELS
default    10            4         2
⚠️ 注意 :nerdctl 的 namespace 与 Linux namespace 和 Kubernetes namespace 无关,它是 containerd 层面的资源隔离机制。
八、crictl 实战:Kubernetes CRI 调试工具
8.1 crictl 介绍
crictl 是遵循 CRI(Container Runtime Interface) 接口规范的命令行工具,通常用于检查和管理 kubelet 节点上的容器运行时和镜像。
在 Kubernetes 集群环境中,当执行 kubectl 命令时,kubelet 代理会自动调用 CRI 接口管理镜像和容器。而手动执行 crictl 命令,一般用于调试和排查容器运行时问题。
8.2 crictl 安装与配置
配置 Kubernetes YUM 源:
bash
[root@localhost ~]# vim /etc/yum.repos.d/kubernetes.repo
[kubernetes]
name=Kubernetes
baseurl=https://mirrors.aliyun.com/kubernetes-new/core/stable/v1.30/rpm/
enabled=1
gpgcheck=1
gpgkey=https://mirrors.aliyun.com/kubernetes-new/core/stable/v1.30/rpm/repodata/repomd.xml.key
安装 cri-tools:
bash
[root@localhost ~]# yum install -y cri-tools配置 crictl 连接 containerd:
使用 crictl 之前,需要先配置 /etc/crictl.yaml,指定后端运行时:
yaml
[root@localhost ~]# vim /etc/crictl.yaml
runtime-endpoint: unix:///run/containerd/containerd.sock
image-endpoint: unix:///run/containerd/containerd.sock
timeout: 5
debug: false
也可以通过命令行动态设置:
bash
[root@localhost ~]# crictl config runtime-endpoint unix:///run/containerd/containerd.sock
[root@localhost ~]# crictl config image-endpoint unix:///run/containerd/containerd.sock
8.3 crictl 命令实践
帮助信息:
bash
[root@localhost ~]# crictl
NAME:
   crictl - client for CRI

VERSION:
   v1.30.1

COMMANDS:
   attach              附加到运行中的容器
   create              创建新容器
   exec                在运行容器中执行命令
   version             显示运行时版本信息
   images, image, img  列出镜像
   inspect             显示容器状态
   inspecti            显示镜像状态
   imagefsinfo         显示镜像文件系统信息
   inspectp            显示 Pod 状态
   logs                获取容器日志
   port-forward        转发本地端口到 Pod
   ps                  列出容器
   pull                从仓库拉取镜像
   run                 在 sandbox 中运行新容器
   runp                运行新 Pod
   rm                  删除一个或多个容器
   rmi                 删除一个或多个镜像
   rmp                 删除一个或多个 Pod
   pods                列出 Pod
   start               启动已创建的容器
   info                显示容器运行时信息
   stop                停止一个或多个运行容器
   stopp               停止一个或多个运行 Pod
   stats               列出容器资源使用统计
   events              流式显示容器事件
help, h 显示帮助实战示例:
bash
# 拉取镜像
[root@localhost ~]# crictl pull 054b8ac70e8010d90f2ac00ef29e6580.mirror.swr.myhuaweicloud.com/library/nginx:latest
Image is up to date for sha256:9f33606b36859ee2db3b761a893fb7c2fc8a13c0fe5f24e304b129f3caf499ad

# 查看镜像
[root@localhost ~]# crictl images
IMAGE                     TAG                 IMAGE ID            SIZE
docker.io/library/httpd   latest              65005131d37e9       45.2MB
crictl 命令分类:
| 类别 | 命令 |
|---|---|
| 镜像命令 | images / pull / inspecti / imagefsinfo / rmi |
| 容器命令 | ps / create / run / inspect / info / attach / exec / logs / update / stats / start / stop / rm |
| Pod 命令 | pods / runp / inspectp / statsp / port-forward / stopp / rmp |
| 其他命令 | version / config / completion / events |
8.4 五大容器 CLI 命令对照表
📌 速查表:从 Docker 迁移到 Containerd 时,这张对照表是最实用的参考工具。
| 命令功能 | docker | podman | nerdctl | ctr | crictl |
|---|---|---|---|---|---|
| 查看容器状态 | docker ps |
podman ps |
nerdctl ps |
ctr task ls / ctr container ls |
crictl ps |
| 查看镜像 | docker images |
podman images |
nerdctl images |
ctr image ls |
crictl images |
| 查看容器日志 | docker logs |
podman logs |
nerdctl logs |
无 | crictl logs |
| 查看容器信息 | docker inspect |
podman inspect |
nerdctl inspect |
ctr container info |
crictl inspect |
| 查看容器资源 | docker stats |
podman stats |
nerdctl stats |
无 | crictl stats |
| 运行新容器 | docker run |
podman run |
nerdctl run |
ctr run |
无 |
| 修改镜像标签 | docker tag |
podman tag |
nerdctl tag |
ctr image tag |
无 |
| 创建新容器 | docker create |
podman create |
nerdctl create |
ctr container create |
crictl create |
| 导入镜像 | docker load |
podman load |
nerdctl load |
ctr image import |
无 |
| 导出镜像 | docker save |
podman save |
nerdctl save |
ctr image export |
无 |
| 删除容器 | docker rm |
podman rm |
nerdctl rm |
ctr container rm |
crictl rm |
| 删除镜像 | docker rmi |
podman rmi |
nerdctl rmi |
ctr image rm |
crictl rmi |
| 拉取镜像 | docker pull |
podman pull |
nerdctl pull |
ctr image pull |
crictl pull |
| 推送镜像 | docker push |
podman push |
nerdctl push |
ctr image push |
无 |
| 在容器内执行命令 | docker exec |
podman exec |
nerdctl exec |
无 | crictl exec |
💡 怀旧技巧 :如果你对 Docker 命令念念不忘,可以执行
alias docker=nerdctl,这样就能继续使用熟悉的 Docker 命令语法了。
nerdctl vs crictl 对比:
| 维度 | nerdctl | crictl |
|---|---|---|
| 开发者 | Docker 创始人之一 Akihiro Suda | Kubernetes 项目社区 |
| 设计目的 | 兼容 Docker CLI 的 containerd 客户端 | 与任何实现 CRI 接口的运行时交互 |
| 功能范围 | 容器生命周期、镜像、网络、卷管理等 | 主要用于调试,从 K8s API Server 角度检查运行时行为 |
| 适用场景 | 需要 Docker CLI 兼容性的用户和开发环境 | 需要调试和理解 Kubernetes CRI 运行时行为的运维人员 |
九、总结与展望
本文回顾
本文系统地介绍了 Containerd 从诞生到实战的完整知识体系:
-
理论层面:梳理了 Containerd 从 Docker 中剥离、成为 Kubernetes 默认运行时的历史背景,解析了其 C/S 架构、Bundle/Runtime 两大子系统和插件化设计,并通过性能对比数据说明了 Containerd 的优势。
-
安装部署:提供了 YUM 和二进制两种安装方式,覆盖了 containerd 主程序、runC 运行时、systemd 服务配置和默认配置文件生成的完整流程。
-
原生 CLI(ctr):详细演示了镜像的增删改查、导入导出、挂载,以及容器的静态/动态分离模型(container + task),包括创建、启动、进入、暂停、恢复、停止、删除等全生命周期操作。
-
生态工具:
- nerdctl:Docker 兼容 CLI,覆盖镜像、容器、网络、存储、命名空间五大管理域,是从 Docker 迁移的最佳选择
- crictl:Kubernetes CRI 调试工具,适合在 K8s 节点上排查运行时问题
-
企业级特性:Harbor 私有仓库对接、Namespace 资源隔离、镜像加速配置,满足生产环境需求。
关键要点回顾
📌 核心结论:
- Containerd 是 Kubernetes 1.20+ 的默认容器运行时,轻量、稳定、性能优于 Docker
- ctr 是 containerd 原生 CLI,区分静态容器(container)和动态容器(task)
- nerdctl 语法与 Docker 几乎一致,推荐日常使用,可通过
alias docker=nerdctl无缝过渡- crictl 是 Kubernetes 运维排障工具,遵循 CRI 接口规范
- 不同 Namespace 之间的镜像和容器完全隔离,可用于多租户场景
学习建议
- 初学者:先掌握 nerdctl,用熟悉的 Docker 语法快速上手 Containerd
- 运维人员:重点学习 ctr 和 crictl,这是 K8s 节点排障的必备技能
- 进阶方向:深入研究 containerd 插件机制、CRI 接口实现、以及与 Kubernetes kubelet 的集成原理
容器技术的标准化之路还在继续,Containerd 作为云原生基础设施的核心组件,值得每一位云原生从业者深入掌握。希望本文能为你的 Containerd 学习之路提供一份实用的参考指南。
📝 声明:本文基于 Containerd 1.6.32、nerdctl 1.4.0、crictl 1.30.1 版本编写,如版本更新导致命令差异,请以官方文档为准。
🌟 如果本文对你有帮助,欢迎点赞、收藏、关注!有任何问题欢迎在评论区交流。