目录
- [一. 前提条件](#一. 前提条件)
-
- [1.1 `squid`简介](#1.1
squid简介) - [1.2 环境简介](#1.2 环境简介)
- [1.1 `squid`简介](#1.1
- [二. squid](#二. squid)
-
- [2.1 安装](#2.1 安装)
- [2.2 配置](#2.2 配置)
-
- [2.2.1 查看默认配置](#2.2.1 查看默认配置)
- [2.2.2 备份默认配置](#2.2.2 备份默认配置)
- [2.2.3 创建新的配置文件](#2.2.3 创建新的配置文件)
- [2.2.4 创建代理服务器认证用的账号和密码](#2.2.4 创建代理服务器认证用的账号和密码)
- [2.2.5 确认配置文件是否可以解析](#2.2.5 确认配置文件是否可以解析)
- [2.3 启动](#2.3 启动)
- [2.4 确认3128端口是否被占用](#2.4 确认3128端口是否被占用)
- [三. 访问代理服务器](#三. 访问代理服务器)
-
- [3.1 不指定代理服务器的用户和密码直接访问](#3.1 不指定代理服务器的用户和密码直接访问)
- [3.2 指定代理服务器和代理服务器的用户和密码访问](#3.2 指定代理服务器和代理服务器的用户和密码访问)
- [四. 同一个wifi下的其他设备将虚拟机当做代理服务器](#四. 同一个wifi下的其他设备将虚拟机当做代理服务器)
-
- [4.1 虚拟机(代理服务器)上配置`.pac`脚本文件](#4.1 虚拟机(代理服务器)上配置
.pac脚本文件) -
- [4.1.1 配置安装nginx](#4.1.1 配置安装nginx)
- [4.1.2 编辑`.pac`脚本文件](#4.1.2 编辑
.pac脚本文件)
- [4.2 VMware配置NAT端口转发](#4.2 VMware配置NAT端口转发)
- [4.3 宿主机相关配置](#4.3 宿主机相关配置)
-
- [4.3.1 设置防火墙,打开指定端口,允许同一个网段的设备访问](#4.3.1 设置防火墙,打开指定端口,允许同一个网段的设备访问)
- [4.3.2 宿主机设置代理,使用`.pac`脚本文件](#4.3.2 宿主机设置代理,使用
.pac脚本文件) - [4.3.3 效果](#4.3.3 效果)
- [4.5 同一个wifi下的其他设备将虚拟机当做代理服务器访问网络](#4.5 同一个wifi下的其他设备将虚拟机当做代理服务器访问网络)
- [4.1 虚拟机(代理服务器)上配置`.pac`脚本文件](#4.1 虚拟机(代理服务器)上配置
一. 前提条件
1.1 squid简介
🔷Squid 是一个专门用于HTTP/HTTPS 代理的服务器软件,可以控制谁通过代理访问互联网、访问什么网站、是否需要认证,并记录访问日志。Squid 最核心的定位其实就是 Forward Proxy(正向代理)。流程示意图如下:
bash
                   Internet
                      ▲
                      │
                      │
               ┌──────┴──────┐
               │    Squid    │
               │ 192.168.5.x │
               │    :3128    │
               │             │
               │  Auth + ALC │
               └──────▲──────┘
                      │
              192.168.5.x代理服务器
                      │
       ┌──────────────┼──────────────┐
       │              │              │
       ▲              ▲              ▲
    Windows          手机          Termux
 192.168.5.x     192.168.5.x    192.168.5.x
🔷Squid中最重要的功能
bash
                    Squid
                      │
       ┌──────────────┼──────────────┐
       │              │              │
       ▼              ▼              ▼
    正向代理        访问控制         身份认证
       │              │              │
       ▼              ▼              ▼
   Internet        ACL规则         用户/密码
       │
       ├──────────────┐
       ▼              ▼
      缓存            日志
1.2 环境简介
- Win10宿主机
- 【无线局域网适配器WLAN】的IP:
192.168.3.24 - 【以太网适配器 以太网 3】的IP:
192.168.137.1
- 【无线局域网适配器WLAN】的IP:
- Win10上的vm虚拟机
- IP:
192.168.137.129
- IP:
- 和Win10宿主机在同一个wifi下的安卓手机上的
Termux- IP:
192.168.3.23
- IP:
二. squid
2.1 安装
bash
sudo apt update

# 使用该包内的 htpasswd 命令生成密码
sudo apt install apache2-utils -y
# squid本体
sudo apt install squid -y
bash
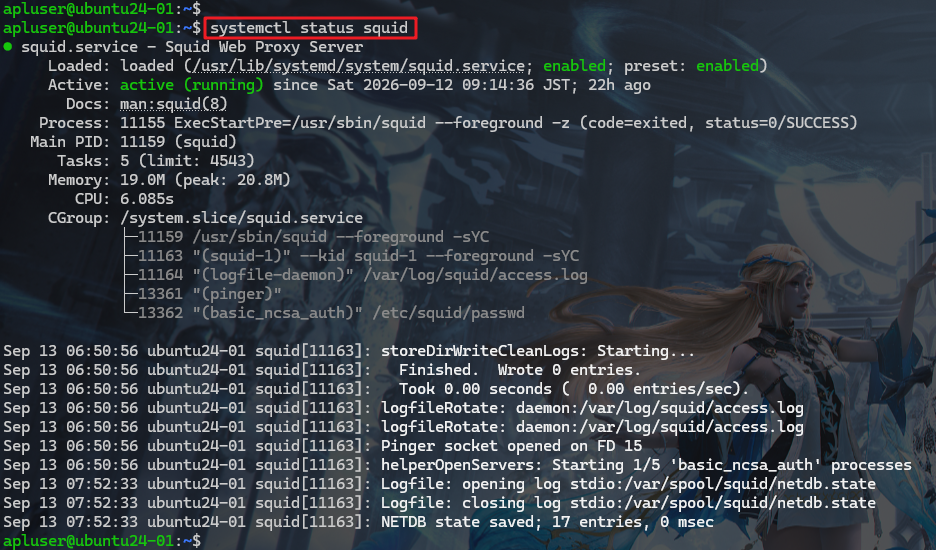
apluser@ubuntu24-01:~$ squid --version | head -n 3
Squid Cache: Version 6.14
Service Name: squid
Ubuntu linux
apluser@ubuntu24-01:~$
systemctl status squid
2.2 配置
2.2.1 查看默认配置
bash
apluser@ubuntu24-01:~$
apluser@ubuntu24-01:~$ grep -vP '^\s*(#|$)' /etc/squid/squid.conf | head
acl localnet src 0.0.0.1-0.255.255.255  # RFC 1122 "this" network (LAN)
acl localnet src 10.0.0.0/8             # RFC 1918 local private network (LAN)
acl localnet src 100.64.0.0/10          # RFC 6598 shared address space (CGN)
acl localnet src 169.254.0.0/16         # RFC 3927 link-local (directly plugged) machines
acl localnet src 172.16.0.0/12          # RFC 1918 local private network (LAN)
acl localnet src 192.168.0.0/16         # RFC 1918 local private network (LAN)
acl localnet src fc00::/7               # RFC 4193 local private network range
acl localnet src fe80::/10              # RFC 4291 link-local (directly plugged) machines
acl SSL_ports port 443
acl Safe_ports port 80          # http
apluser@ubuntu24-01:~$
apluser@ubuntu24-01:~$ grep -vE '^[[:space:]]*(#|$)' /etc/squid/squid.conf | head
acl localnet src 0.0.0.1-0.255.255.255  # RFC 1122 "this" network (LAN)
acl localnet src 10.0.0.0/8             # RFC 1918 local private network (LAN)
acl localnet src 100.64.0.0/10          # RFC 6598 shared address space (CGN)
acl localnet src 169.254.0.0/16         # RFC 3927 link-local (directly plugged) machines
acl localnet src 172.16.0.0/12          # RFC 1918 local private network (LAN)
acl localnet src 192.168.0.0/16         # RFC 1918 local private network (LAN)
acl localnet src fc00::/7               # RFC 4193 local private network range
acl localnet src fe80::/10              # RFC 4291 link-local (directly plugged) machines
acl SSL_ports port 443
acl Safe_ports port 80          # http
apluser@ubuntu24-01:~$
2.2.2 备份默认配置
bash
sudo cp /etc/squid/squid.conf /etc/squid/squid.conf.bak2.2.3 创建新的配置文件
bash
apluser@ubuntu24-01:~$ cat /etc/squid/squid.conf
# ==========================================
# Squid 家庭实验环境
# ==========================================

# squid的代理监听端口
http_port 3128

# ==========================================
# Basic Authentication
# ==========================================
auth_param basic program /usr/lib/squid/basic_ncsa_auth /etc/squid/passwd
auth_param basic children 5
auth_param basic realm Home Proxy
auth_param basic credentialsttl 2 hours

# ==========================================
# ACL
# ==========================================
# VM/NAT网络
# ===========
# acl vmnet src 192.168.137.0/24
# ===========
# 家庭局域网
# ===========
# WLAN所在的网段(wifi)
acl localnet src 192.168.3.0/24
# 虚拟网卡所在的网段
acl localnet src 192.168.137.0/24

# 已认证用户
acl authenticated proxy_auth REQUIRED
# HTTP/HTTPS 安全端口
acl SSL_ports port 443
acl Safe_ports port 80
acl Safe_ports port 443

# ==========================================
# 安全限制
# ==========================================
http_access deny !Safe_ports
http_access deny CONNECT !SSL_ports

# ==========================================
# 允许通过认证家庭局域网用户
# ==========================================
http_access allow localnet authenticated

# ==========================================
# 其他全部拒绝
# ==========================================
http_access deny all
apluser@ubuntu24-01:~$
2.2.4 创建代理服务器认证用的账号和密码
- 账号:fengyehong
- 密码:1234
bash
apluser@ubuntu24-01:~$ sudo htpasswd -c /etc/squid/passwd fengyehong
New password:
Re-type new password:
Adding password for user fengyehong
apluser@ubuntu24-01:~$
2.2.5 确认配置文件是否可以解析
bash
apluser@ubuntu24-01:~$ sudo squid -k parse
2026/09/13 08:17:30| Processing Configuration File: /etc/squid/squid.conf (depth 0)
2026/09/13 08:17:30| Processing: http_port 3128
2026/09/13 08:17:30| Processing: auth_param basic program /usr/lib/squid/basic_ncsa_auth /etc/squid/passwd
2026/09/13 08:17:30| Processing: auth_param basic children 5
2026/09/13 08:17:30| Processing: auth_param basic realm Home Proxy
2026/09/13 08:17:30| Processing: auth_param basic credentialsttl 2 hours
2026/09/13 08:17:30| Processing: acl vmnet src 192.168.137.0/24
2026/09/13 08:17:30| Processing: acl localnet src 192.168.3.0/24
2026/09/13 08:17:30| Processing: acl authenticated proxy_auth REQUIRED
2026/09/13 08:17:30| Processing: acl SSL_ports port 443
2026/09/13 08:17:30| Processing: acl Safe_ports port 80
2026/09/13 08:17:30| Processing: acl Safe_ports port 443
2026/09/13 08:17:30| Processing: http_access deny !Safe_ports
2026/09/13 08:17:30| Processing: http_access deny CONNECT !SSL_ports
2026/09/13 08:17:30| Processing: http_access allow localnet authenticated
2026/09/13 08:17:30| Processing: http_access deny all
apluser@ubuntu24-01:~$
2.3 启动
bash
# 重新加载 systemd 系统管理器的配置文件,并重建所有服务的依赖关系树
sudo systemctl daemon-reload
# 重新加载配置文件
sudo systemctl reload squid

# 启动, 停止, 重启
sudo systemctl start squid
sudo systemctl stop squid
sudo systemctl restart squid

# 查看状态
sudo systemctl status squid
2.4 确认3128端口是否被占用
bash
apluser@ubuntu24-01:~$ sudo ss -lntp | grep 3128
LISTEN 0      256                *:3128             *:*    users:(("squid",pid=2217,fd=12))
apluser@ubuntu24-01:~$
三. 访问代理服务器
3.1 不指定代理服务器的用户和密码直接访问
- 提示:
407 Proxy Authentication Required
bash
[FengYeHong-HP] Desktop $ curl -I --proxy http://192.168.137.129:3128 https://www.baidu.com
HTTP/1.1 407 Proxy Authentication Required
Server: squid/6.14
Mime-Version: 1.0
Date: Sat, 12 Sep 2026 23:45:54 GMT
Content-Type: text/html;charset=utf-8
Content-Length: 3070
X-Squid-Error: ERR_CACHE_ACCESS_DENIED 0
Vary: Accept-Language
Content-Language: en
Proxy-Authenticate: Basic realm="Home Proxy"
Cache-Status: ubuntu24-01
Via: 1.1 ubuntu24-01 (squid/6.14)
Connection: keep-alive

curl: (56) CONNECT tunnel failed, response 407
[FengYeHong-HP] Desktop $
3.2 指定代理服务器和代理服务器的用户和密码访问
- 访问成功
bash
[FengYeHong-HP] Desktop $ curl -I --proxy http://192.168.137.129:3128 --proxy-user fengyehong:1234 https://www.baidu.com
HTTP/1.1 200 Connection established

HTTP/1.1 200 OK
Cache-Control: private, no-cache, no-store, proxy-revalidate, no-transform
Content-Length: 0
Content-Type: text/html
Date: Sat, 12 Sep 2026 23:46:28 GMT
Pragma: no-cache
Server: bfe

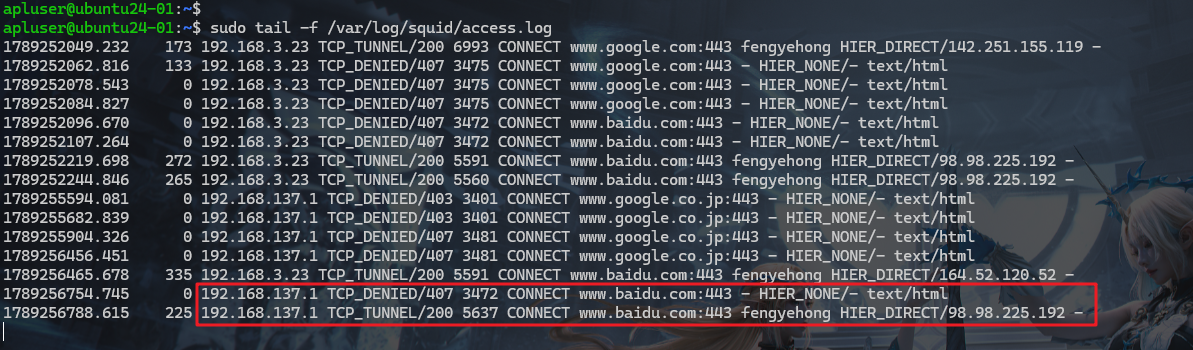
[FengYeHong-HP] Desktop $- 并且在后台的日志中也可以看到访问记录
四. 同一个wifi下的其他设备将虚拟机当做代理服务器
bash
┌─────────────────────────────────────────────────────────────────────┐
│                    家庭局域网 192.168.3.0/24                         │
│                                                                     │
│   Android / Termux                                                  │
│   192.168.3.23                                                      │
│        │                                                            │
│        │ ① 获取 PAC 文件                                             │
│        │    http://192.168.3.24:9096/proxy.pac                      │
│        │                                                            │
│        │ ② 根据 PAC 决定代理                                          │
│        │                                                            │
│        ▼                                                            │
│   Windows 宿主机                                                     │
│   192.168.3.24                                                      │
│        │                                                            │
│        │                                                            │
│        ▼                                                            │
│   NAT 端口转发                                                 │
│   ┌───────────────────────────────────────────────────────────┐     │
│   │ 192.168.3.24:9096 ──────────► 192.168.137.129:80      PAC │     │
│   │ 192.168.3.24:9097 ──────────► 192.168.137.129:3128  Squid │     │
│   └───────────────────────────────────────────────────────────┘     │
│                                                                     │
└──────────────────────────────┬──────────────────────────────────────┘
                               │
                               │ NAT
                               ▼
┌─────────────────────────────────────────────────────────────────────┐
│                    Ubuntu 虚拟机                                     │
│                    192.168.137.129                                  │
│                                                                     │
│   ┌─────────────────────────┐                                       │
│   │ :80端口                 │                                       │
│   │ proxy.pac               │                                       │
│   └─────────────────────────┘                                       │
│                                                                     │
│   ┌─────────────────────────┐                                       │
│   │ :3128端口               │                                       │
│   │ Squid                   │                                       │
│   │                         │                                       │
│   │ Basic Authentication    │                                       │
│   └────────────┬────────────┘                                       │
│                │                                                    │
└────────────────┼────────────────────────────────────────────────────┘
                 │
                 │ 代理访问 Internet
                 ▼
          ┌───────────────┐
          │   Internet    │
          │   Baidu 等   │
          └───────────────┘
4.1 虚拟机(代理服务器)上配置.pac脚本文件
4.1.1 配置安装nginx
bash
# 安装
sudo apt install nginx
# 查看状态
systemctl status nginx
4.1.2 编辑.pac脚本文件
javascript
apluser@ubuntu24-01:~$ cat /var/www/html/proxy.pac
function FindProxyForURL(url, host) {

    if (isInNet(host, "192.168.137.0", "255.255.255.0")) {
        return "DIRECT";
    }

    if (isPlainHostName(host)) {
        return "DIRECT";
    }

    // return "PROXY 192.168.137.129:3128";

    // 返回vm宿主机的9097端口
    return "PROXY 192.168.3.24:9097";
}
apluser@ubuntu24-01:~$
4.2 VMware配置NAT端口转发
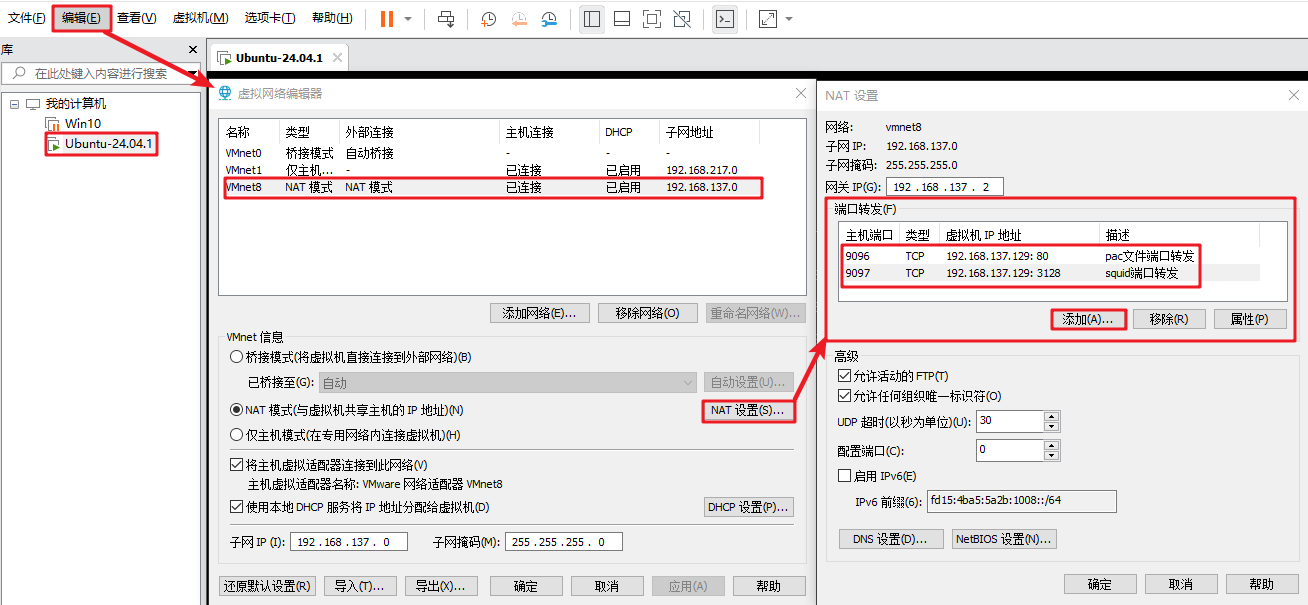
🔷同一个wifi下的其他设备可以访问同一个网段中的宿主机,但是没有办法访问宿主机中的虚拟机。通过NAT端口转发的方式将宿主机中的端口转发给虚拟机中的指定端口实现间接访问。
- 宿主机的9096端口 → NAT端口转发 → 虚拟机的80端口,访问
.pac脚本文件 - 宿主机的9097端口 → NAT端口转发 → 虚拟机的3128端口,访问
squid代理服务
4.3 宿主机相关配置
4.3.1 设置防火墙,打开指定端口,允许同一个网段的设备访问
- 使用管理员权限执行下面的脚本
powershell
# 打开本机的 9096 端口
New-NetFirewallRule -DisplayName "PAC NAT 9096" -Direction Inbound -Protocol TCP -LocalPort 9096 -Action Allow
# 打开本机的 9097 端口
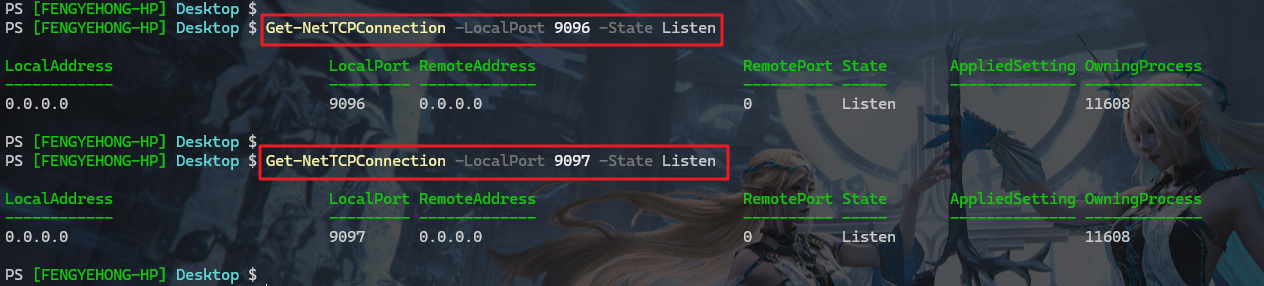
New-NetFirewallRule -DisplayName "Squid NAT 9097" -Direction Inbound -Protocol TCP -LocalPort 9097 -Action Allow- 设置完成后,可以在防火墙的入站规则中看到指定的端口已经被打开
- 当然也可以不使用powershell命令,直接使用防火墙的GUI进行设置
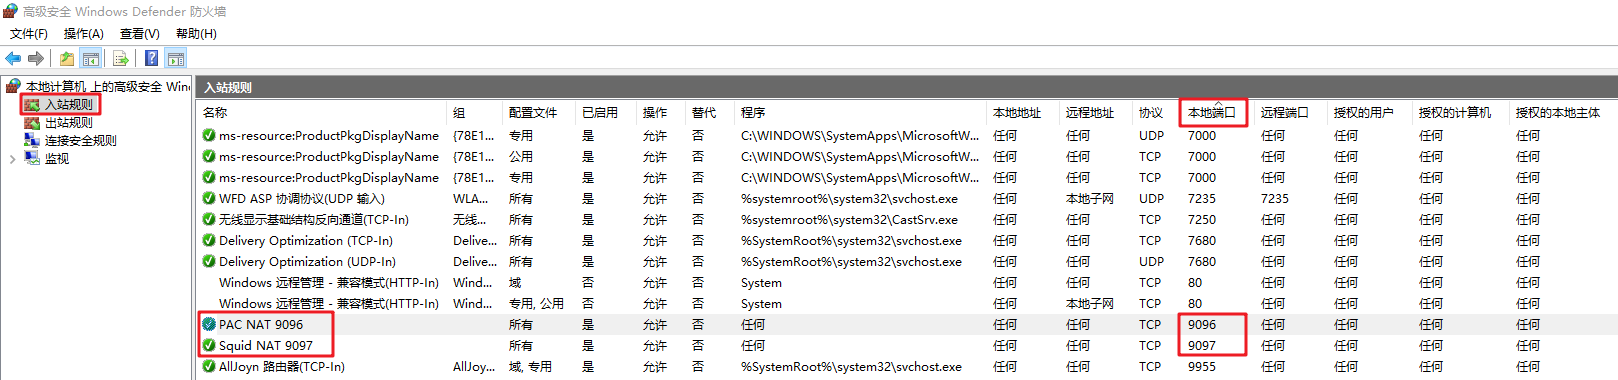
- 通过powershell脚本也可以看到,指定的端口正处于被监听的状态
4.3.2 宿主机设置代理,使用.pac脚本文件
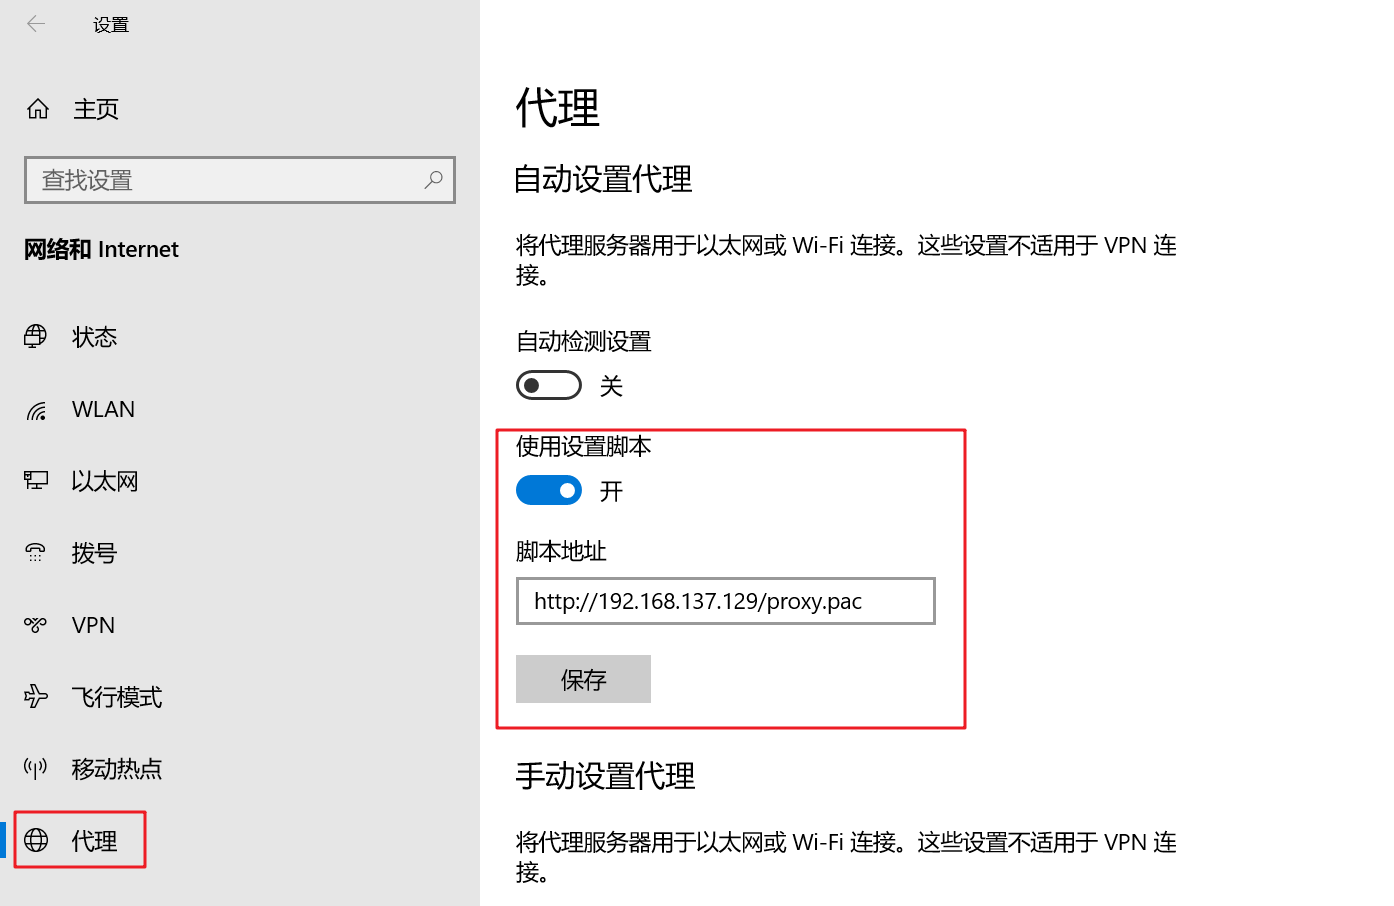
🔷使用宿主机尝试访问vm中的pac脚本文件
http://192.168.3.24:9096/proxy.pac:- 访问宿主机的9096端口,然后转发虚拟机的80端口实现访问pac文件
- 如果同一个wifi下的其他笔记本电脑也想要经过vm虚拟机的实现代理的话,就使用这个地址
http://192.168.137.129/proxy.pac:- 宿主机直接访问vm虚拟机中的pac文件
powershell
PS [FENGYEHONG-HP] Desktop $ curl.exe http://192.168.3.24:9096/proxy.pac
function FindProxyForURL(url, host) {

    if (isInNet(host, "192.168.137.0", "255.255.255.0")) {
        return "DIRECT";
    }

    if (isPlainHostName(host)) {
        return "DIRECT";
    }

    // return "PROXY 192.168.137.129:3128";

    // 返回vm宿主机的9097端口
    return "PROXY 192.168.3.24:9097";
}
PS [FENGYEHONG-HP] Desktop $
PS [FENGYEHONG-HP] Desktop $ curl.exe http://192.168.137.129/proxy.pac
function FindProxyForURL(url, host) {

    if (isInNet(host, "192.168.137.0", "255.255.255.0")) {
        return "DIRECT";
    }

    if (isPlainHostName(host)) {
        return "DIRECT";
    }

    // return "PROXY 192.168.137.129:3128";

    // 返回vm宿主机的9097端口
    return "PROXY 192.168.3.24:9097";
}
PS [FENGYEHONG-HP] Desktop $- 宿主机设置并使用代理脚本
4.3.3 效果
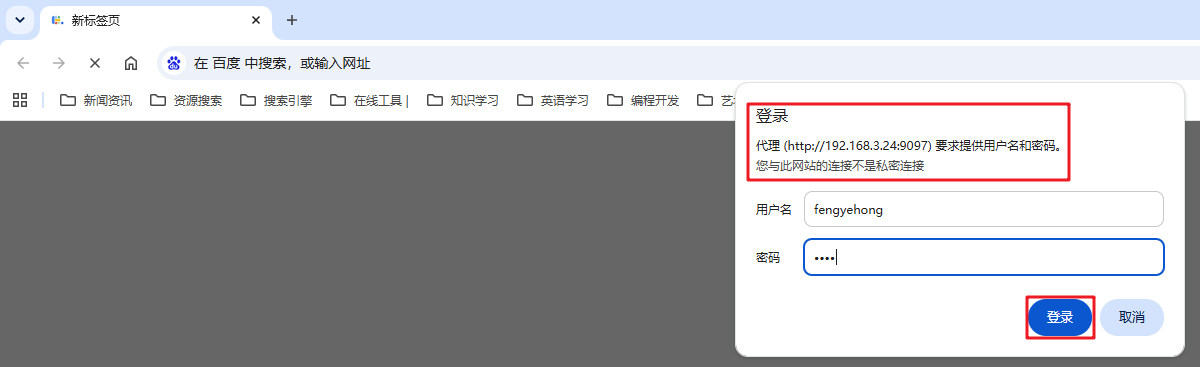
- 由于pac脚本的最后一行写的是:
return "PROXY 192.168.3.24:9097"; - 所以当访问外部网络时,代理服务器会要求进行认证,当认证通过之后,就可以访问外部网络了
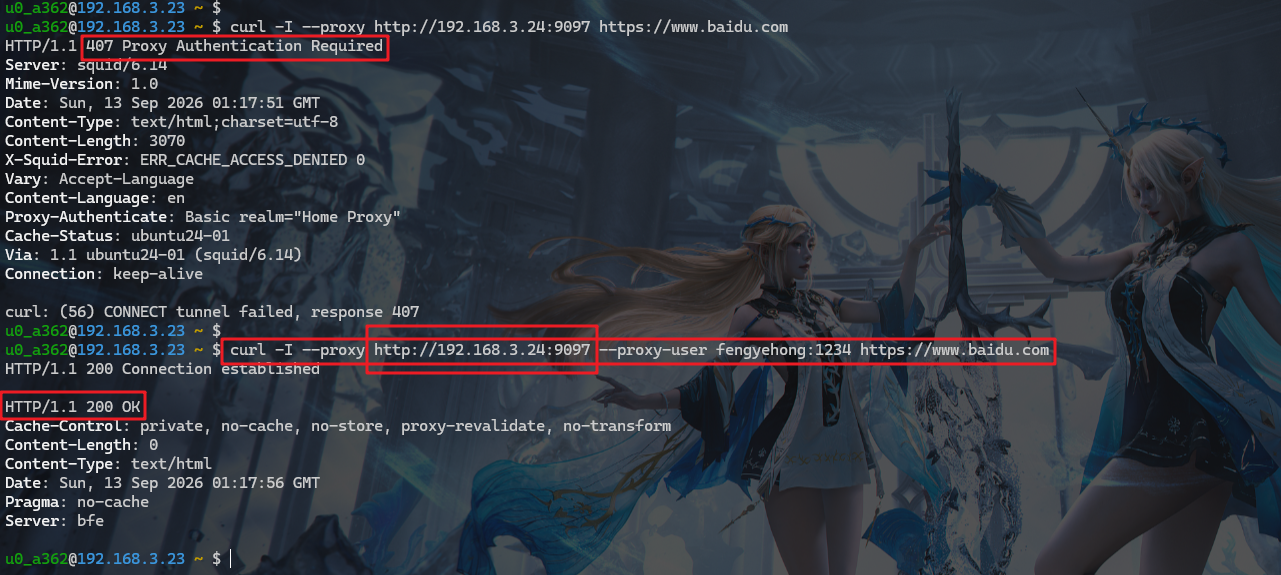
4.5 同一个wifi下的其他设备将虚拟机当做代理服务器访问网络
- 不使用代理服务器的认证用户和密码则访问网络失败
🔷流程图如下:
bash
安卓Termux(192.168.3.23)
  │
  │
  ▼
  └─ 笔记本电脑(192.168.3.24:9097)
              │
              │
              ▼
      Windows NAT 端口转发
              │
              │
              ▼
 VM虚拟机(192.168.137.129:3128)
              │
              │
              ▼
            Squid
              │
              │
              ▼
           Internet