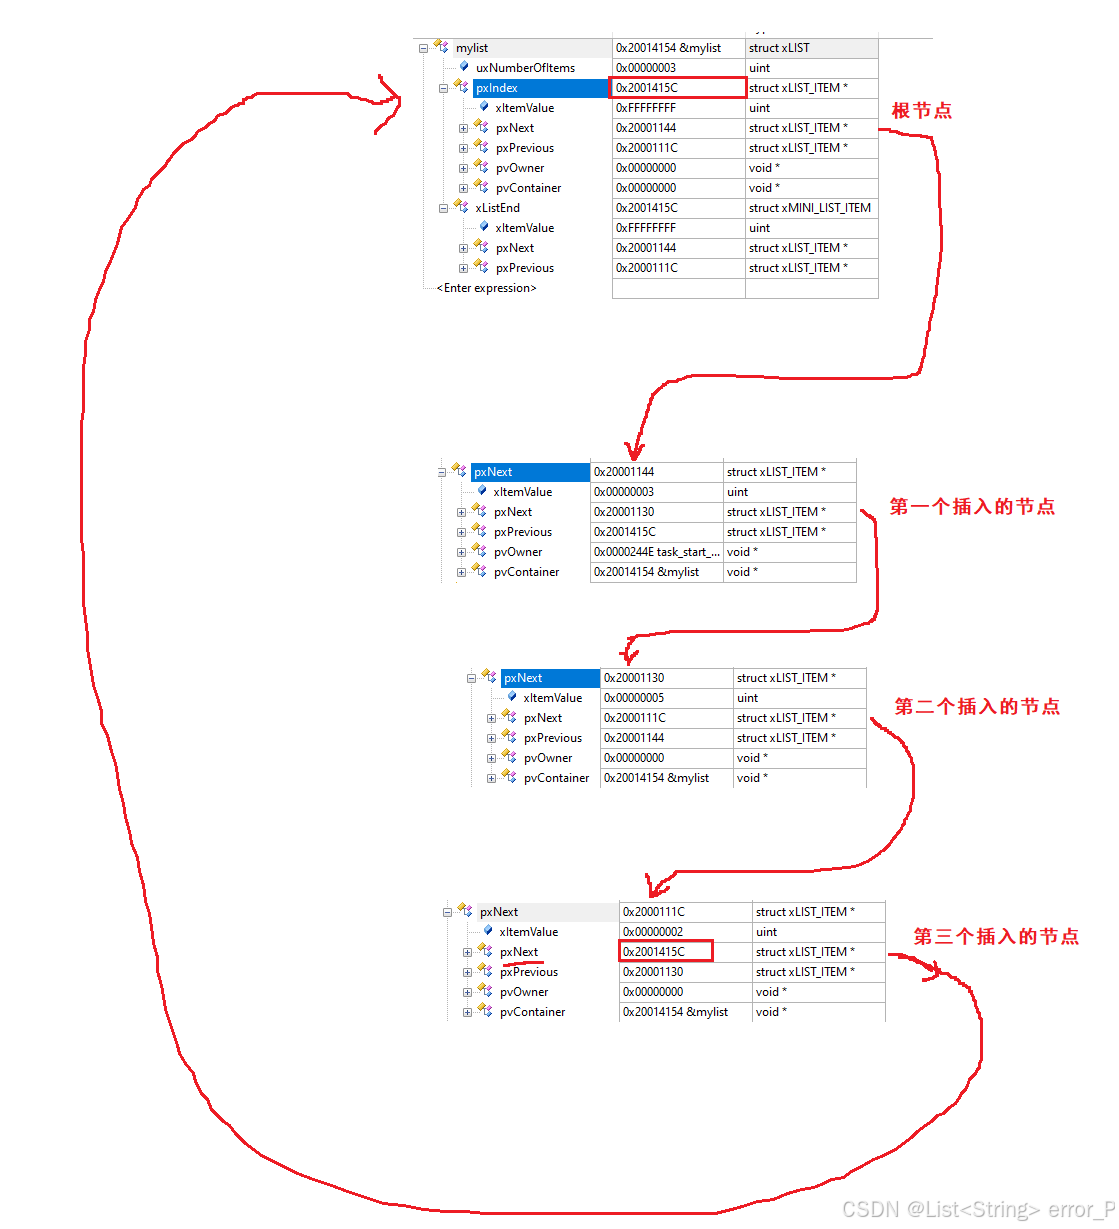
freertos内置链表库,以SWM320为例,链表库的数据结构如下:
①根节点数据结构
cpp
//链表的数据结构
typedef struct xLIST
{
    listFIRST_LIST_INTEGRITY_CHECK_VALUE                /*用于检查链表是否损坏,我们没有开启检查功能,所以不存在这一行*/
    configLIST_VOLATILE UBaseType_t uxNumberOfItems;    //节点数
    ListItem_t * configLIST_VOLATILE pxIndex;            /* ?不明确是什么含义 */
    MiniListItem_t xListEnd;                            /* 猜测: 根节点,->pxNext 就是我们插入的第一个节点*/
    listSECOND_LIST_INTEGRITY_CHECK_VALUE                /*用于检查链表是否损坏,我们没有开启检查功能,所以不存在这一行*/
} List_t;
②节点数据结构
cpp
//节点的数据类型
struct xLIST_ITEM
{
    listFIRST_LIST_ITEM_INTEGRITY_CHECK_VALUE            /*用于检查链表是否损坏,我们没有开启检查功能,所以不存在这一行*/
    configLIST_VOLATILE TickType_t xItemValue;            /*用于节点做排序 */
    struct xLIST_ITEM * configLIST_VOLATILE pxNext;        /*指向下一个节点*/
    struct xLIST_ITEM * configLIST_VOLATILE pxPrevious;    /*指向上一个节点 */
    void * pvOwner;                                        /*这一个节点的主人 TCB*/
    void * configLIST_VOLATILE pvContainer;                /*指向节点所在的链表 */
    listSECOND_LIST_ITEM_INTEGRITY_CHECK_VALUE            /*用于检查链表是否损坏,我们没有开启检查功能,所以不存在这一行*/
};

//类型重定义
typedef struct xLIST_ITEM ListItem_t;                    /* For some reason lint wants this as two separate definitions. */

//迷你版的节点数据类型
struct xMINI_LIST_ITEM
{
    listFIRST_LIST_ITEM_INTEGRITY_CHECK_VALUE            /*< Set to a known value if configUSE_LIST_DATA_INTEGRITY_CHECK_BYTES is set to 1. */
    configLIST_VOLATILE TickType_t xItemValue;            /*用于节点做排序 */
    struct xLIST_ITEM * configLIST_VOLATILE pxNext;
    struct xLIST_ITEM * configLIST_VOLATILE pxPrevious;
};
//类型重定义
typedef struct xMINI_LIST_ITEM MiniListItem_t;
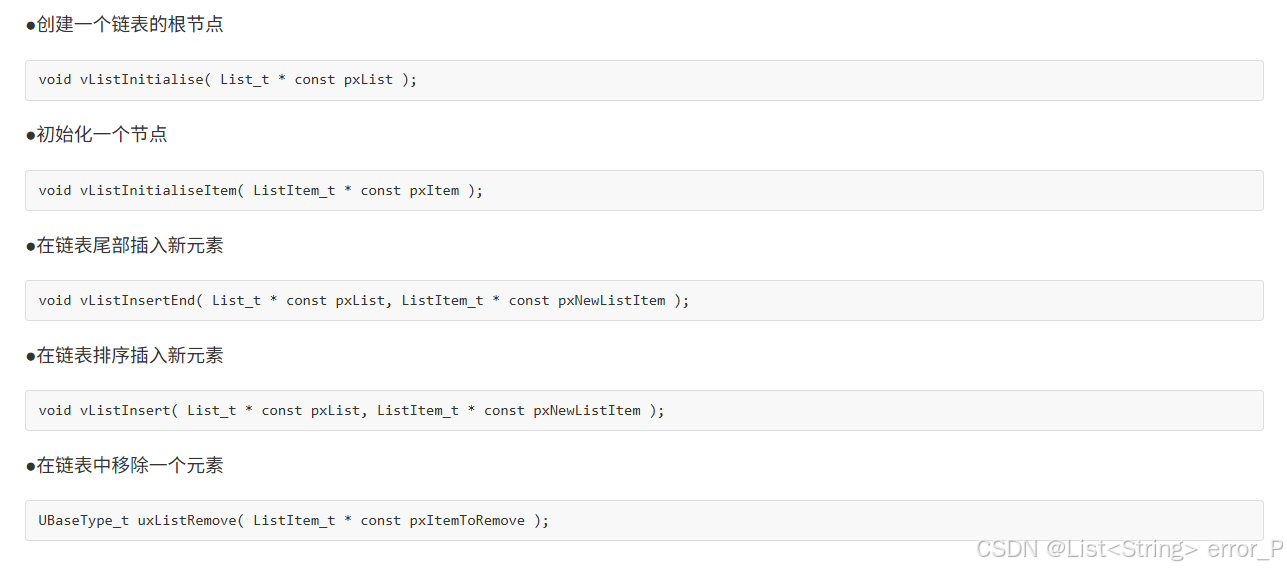
SWM320RET7库有着以下基本操作函数:
并且有一些链表的操作宏:
cpp
//设置节点的主人 拥有者
#define listSET_LIST_ITEM_OWNER( pxListItem, pxOwner )        ( ( pxListItem )->pvOwner = ( void * ) ( pxOwner ) )

//设置 节点的值
#define listSET_LIST_ITEM_VALUE( pxListItem, xValue )    ( ( pxListItem )->xItemValue = ( xValue ) )

//获取 节点的值
#define listGET_LIST_ITEM_VALUE( pxListItem )    ( ( pxListItem )->xItemValue )

//获取 表头节点的值
#define listGET_ITEM_VALUE_OF_HEAD_ENTRY( pxList )    ( ( ( pxList )->xListEnd ).pxNext->xItemValue )

//获取 当前节点的下一个节点
#define listGET_NEXT( pxListItem )    ( ( pxListItem )->pxNext )

//获取 链表的最后一个节点
#define listGET_END_MARKER( pxList )    ( ( ListItem_t const * ) ( &( ( pxList )->xListEnd ) ) )

//判断链表是否为空
#define listLIST_IS_EMPTY( pxList )    ( ( BaseType_t ) ( ( pxList )->uxNumberOfItems == ( UBaseType_t ) 0 ) )

//获取链表的节点数
#define listCURRENT_LIST_LENGTH( pxList )    ( ( pxList )->uxNumberOfItems )

//获取链表第一个节点的 OWNER,明确是TCB
#define listGET_OWNER_OF_NEXT_ENTRY( pxTCB, pxList )                                        \
{                                                                                            \
List_t * const pxConstList = ( pxList );                                                    \
    /* Increment the index to the next item and return the item, ensuring */                \
    /* we don't return the marker used at the end of the list.  */                            \
    ( pxConstList )->pxIndex = ( pxConstList )->pxIndex->pxNext;                            \
    if( ( void * ) ( pxConstList )->pxIndex == ( void * ) &( ( pxConstList )->xListEnd ) )    \
    {                                                                                        \
        ( pxConstList )->pxIndex = ( pxConstList )->pxIndex->pxNext;                        \
    }                                                                                        \
    ( pxTCB ) = ( pxConstList )->pxIndex->pvOwner;                                            \
}

//获取链表第一个节点的 OWNER
#define listGET_OWNER_OF_HEAD_ENTRY( pxList )  ( (&( ( pxList )->xListEnd ))->pxNext->pvOwner )
下面看看怎么使用这个链表,我们把代码写在 task_start.c中:
分为尾部插入和排序插入:
cpp
List_t mylist;        //链表根节点

void task_start_entry(void *arg)
{
    uint32_t tick = 0;
    printf("%s\r\n",__FUNCTION__);

    //初始化 myprintf
    cslock_init();
    //创建其他任务
    create_task_of_host();
    create_task_of_listen();
    create_task_of_ctrl();

    //在栈中(函数内)分配链表节点
    ListItem_t node0;
    ListItem_t node1;
    ListItem_t node2;

    //①初始化链表的根节点
    vListInitialise( &mylist ) ;

    //②初始化 所有节点
    vListInitialiseItem( &node0 );
    vListInitialiseItem( &node1 );
    vListInitialiseItem( &node2 );

    node0.xItemValue = 3;
    node1.xItemValue = 5;
    node2.xItemValue = 2;

    //③把这些节点插入到链表里面去
#if ( 0 )
    //排序插入
    vListInsert( &mylist,&node0 );
    vListInsert( &mylist,&node1 );
    vListInsert( &mylist,&node2 );


#else
    //插入到尾部
    vListInsertEnd( &mylist,&node0 );
    vListInsertEnd( &mylist,&node1 );
    vListInsertEnd( &mylist,&node2 );

#endif
    //④遍历链表,把所有元素都打印出来
    ListItem_t* node = listGET_HEAD_ENTRY( &mylist );
    while( 1 )
    {
        //如果当前的节点,就是链表的根节点 pxIndex ,说明就是表尾,表尾即退出循环
        if( node == mylist.pxIndex ) break;

        myprintf(" val = %08x\r\n",node->xItemValue );

        node = node->pxNext;
    }

    while(1)
    {
        vTaskDelay( pdMS_TO_TICKS( 1000 ) );
    }
}
我们可以借助MDK的仿真功能,深入理解链表数据结构: