模拟实现采用的是 SGI 版本的哈希表。
一、哈希:本质与冲突
哈希是一种组织数据的方式,本质上就是通过哈希函数把关键字 Key 跟存储位置建立一个映射关系。查找时通过哈希函数计算出 Key 的存储位置,实现接近 O(1) 的查找。
听起来很美好,但马上会撞上两个问题:
1、哈希冲突
不同的 Key 经过哈希函数后,可能算出相同的下标,这就是哈希冲突(Hash Collision)。
2、负载因子
假设哈希表中已经映射存储了 N 个值,哈希表的大小为 M,那么负载因子 = N / M。
负载因子越大,哈希冲突概率越高,但空间利用率越高;
负载因子越小,哈希冲突概率越低,但空间利用率越低。
解决哈希冲突主要有两种方法:开放定址法 和 链地址法。我们两种都讲一遍,然后选一种作为 unordered_set/map 的底层。
二、开放定址法
开放定址法把所有元素都放到同一张哈希表里,按照某种"探测函数"找到一个空位置进行存储。它要求负载因子 < 0.7,否则探测链会变得很长。
探测函数有线性探测、二次探测等,我们选最直观的线性探测就行。
开放定址法有个本质问题:解决冲突占用的还是同一张表的空间,元素之间始终会互相影响。这是它的固有缺陷,后面看到链地址法怎么解决。
1、基础结构与状态标记
底层就是一个 vector,里面放元素数据。先封装出基础结构:
cpp
// HashTable.h
namespace open_address
{
    enum State
    {
        EMPTY,    // 空:没存过任何东西
        DELETE,   // 假删除:曾经存过,后来删了
        EXIST     // 真实存在
    };

    template<class K, class V>
    struct HashData
    {
        std::pair<K, V> _kv;
        State _state;

        HashData() = default;
    };

    template<class K, class V, class Hash = HashFunc<K>>
    class HashTable
    {
    public:
        HashTable()
            :_table(__stl_next_prime(0))  // 默认先开 53 个(SGI 素数表第一项)
            , _n(0)
        {}

    private:
        std::vector<HashData<K, V>> _table;
        size_t _n;  // 有效元素个数
    };
}
为什么需要 DELETE 状态?不能删了就直接置 EMPTY 吗?
设想:依次插入 5、15(都映射到桶 3),它们会占桶 3 和桶 4。然后删 5,如果直接把桶 3 置 EMPTY,再 Find(15) ------ Find 从桶 3 开始,看到 EMPTY 就停,永远找不到桶 4 的 15。
所以必须区分"真没存过"(EMPTY)和"存过但删了"(DELETE)。这是开放定址法的关键设计。
2、插入 Insert
cpp
bool Insert(const std::pair<K, V>& kv)
{
    // 1. 去重
    if (Find(kv.first)) return false;

    // 2. 扩容:负载因子 >= 0.7 触发
    if (_n * 10 / _table.size() >= 7)
    {
        HashTable<K, V> newht;
        newht._table.resize(__stl_next_prime(_table.size() + 1));

        for (auto& e : _table)
        {
            if (e._state == EXIST)
            {
                newht.Insert(e._kv);  // 复用 Insert,让它在新表重新算 hash
            }
        }
        _table.swap(newht._table);
    }

    // 3. 线性探测找空位
    size_t hash0 = hash(kv.first) % _table.size();
    size_t hashi = hash0;
    size_t i = 1;
    while (_table[hashi]._state == EXIST)
    {
        hashi = (hash0 + i) % _table.size();  // 到表尾绕回表头
        ++i;
    }

    _table[hashi]._kv = kv;
    _table[hashi]._state = EXIST;
    ++_n;
    return true;
}
注意三个细节:
① 负载因子判断 _n * 10 / _table.size() >= 7
乍一看像是整除漏判(_n=7, size=10 时 70/10=7 刚好触发;_n=6, size=10 时 60/10=6 不触发)------ 但这是正确的 等价于 _n >= 0.7 * size 的整数写法。因为整数除法 _n*10 / size >= 7 恰好等价于 _n*10 >= 7*size,即 _n/size >= 0.7。
② 扩容不能直接拷贝 vector
表大小变了,每个元素的映射位置都变了。所以不能 _table = new_table(直接复制),要复用 Insert 让它在新表里重新算 hash。
但又不能调自己的 Insert(_table 是成员),所以 新建一个 HashTable 对象 + 调它的 Insert ,最后 swap 即可。
③ 探测循环判断 _state == EXIST,不是 != EMPTY
因为如果探测到 DELETE 位置,我们可以占用它(探测链已经"穿过"了 DELETE,链上其它元素都已安置),所以要越过 DELETE 继续往后找,只在 EXIST 时停下换下一个桶。
测试一下:
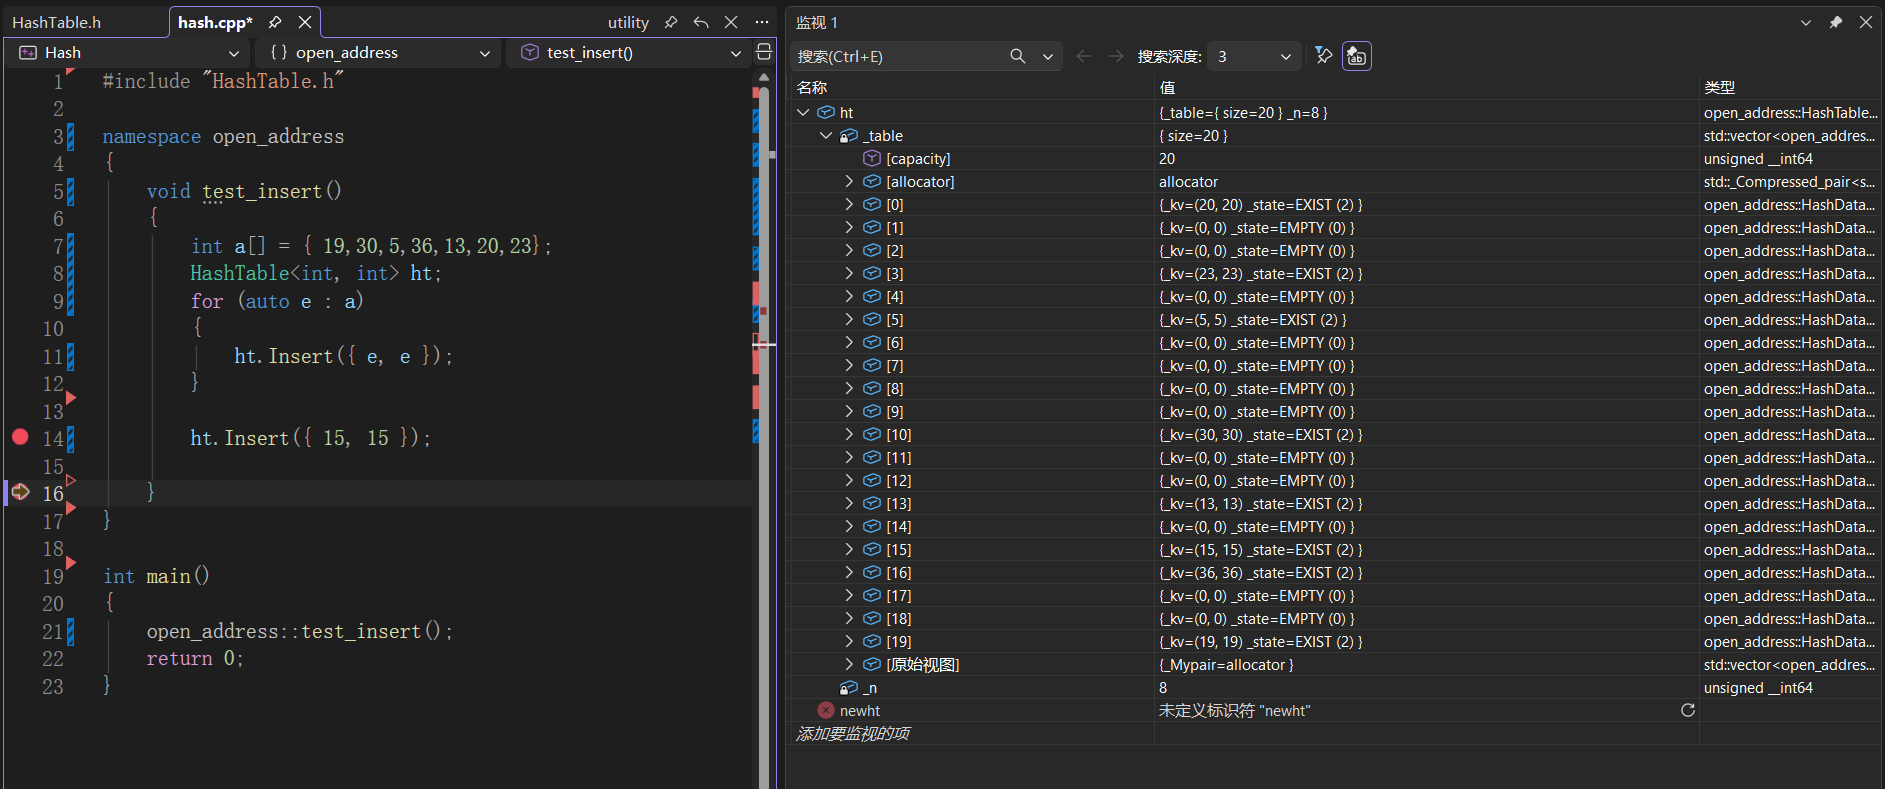
插入 8 个元素时触发扩容(53 个空间的第 38 个,38/53 ≈ 0.717 ≥ 0.7),正常进行。
3、查找 Find
cpp
HashData<K, V>* Find(const K& key)
{
    if (_n == 0) return nullptr;

    size_t hash0 = hash(key) % _table.size();
    size_t hashi = hash0;
    size_t i = 1;

    while (_table[hashi]._state != EMPTY)  // 撞到 EMPTY 才停
    {
        if (_table[hashi]._state == EXIST &&
            _table[hashi]._kv.first == key)
        {
            return &_table[hashi];
        }
        hashi = (hash0 + i) % _table.size();
        ++i;
    }

    return nullptr;
}
这里判断的是 != EMPTY,不是 != EXIST ------ 因为要穿过 DELETE 继续找。和 Insert 的"== EXIST"刚好相反,要记牢。
4、删除 Erase
cpp
bool Erase(const K& key)
{
    HashData<K, V>* ret = Find(key);
    if (ret == nullptr) return false;

    ret->_state = DELETE;
    --_n;
    return true;
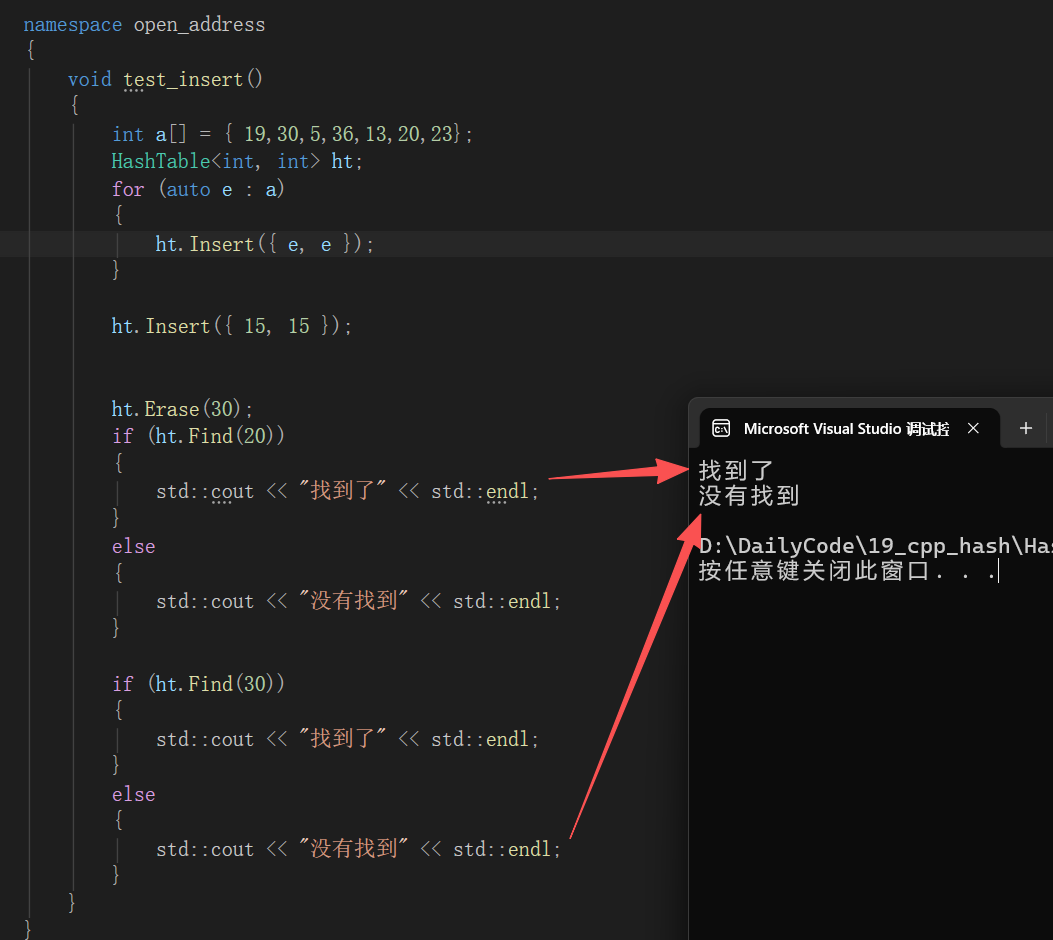
}只改状态,不真正删数据。这就是前面设计 DELETE 状态的用意。
测试:
5、仿函数与 string 特化
上面我们一直假设 key 是非负整数(hash(kv.first) % size 直接取模)。但 key 可能是 std::string 这种自定义类型,怎么取出 key 做映射?
办法是仿函数 ,并把 Hash 作为模板参数传进去。同时为常用类型(std::string)做特化。
cpp
template<class K>
struct HashFunc
{
    size_t operator()(const K& key)
    {
        return (size_t)key;  // 整数类型直接强转
    }
};

// string 特化:BKDR 哈希
template<>
struct HashFunc<std::string>
{
    size_t operator()(const std::string& s)
    {
        size_t ch = 0;
        for (auto& e : s)
        {
            ch *= 131;
            ch += e;
        }
        return ch;
    }
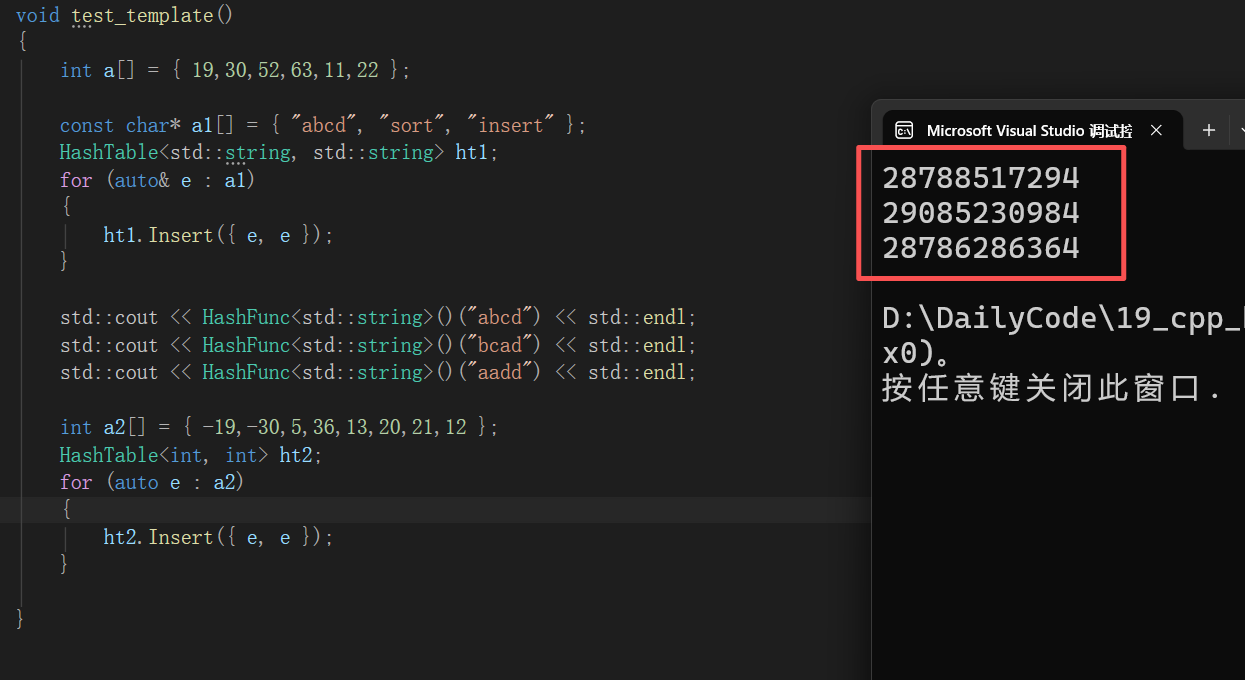
};BKDR(ch = ch * 131 + e)是字符串哈希里最常用的算法之一,冲突率低、分布均匀。
测试:
6、素数表
开放定址法有个细节:哈希表的容量最好取素数,可以减少冲突的规律性。SGI STL 维护了一张素数表:
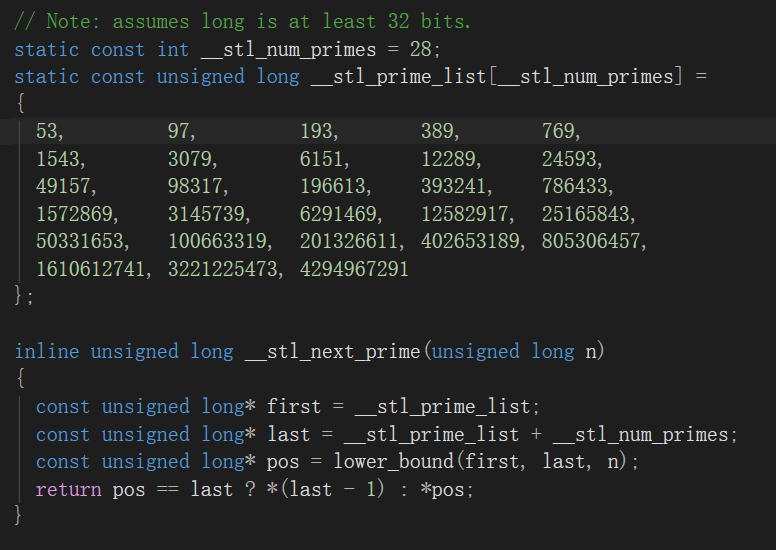
代码上用 __stl_next_prime(n) 返回 ≥ n 的最小素数。在默认构造和扩容时都调它:
cpp
HashTable() : _table(__stl_next_prime(0)), _n(0) {}
cpp
newht._table.resize(__stl_next_prime(_table.size() + 1));7、开放定址法的弊端
开放定址法解决冲突不管使用哪种方法,占用的都是哈希表中的空间,始终存在互相影响的问题。
意思是即使负载因子不高,已存在的元素也会"占位",导致后来的元素要绕路。如果某一片区被插得密集,这一片的所有后续插入都要长距离探测。
更优的方案是链地址法(哈希桶)------ 它把冲突的元素挂到同一个桶的链表上,桶之间互相独立,不存在"探测链打架"的问题。
三、链地址法(哈希桶)
哈希桶的本质是数组 + 链表的组合:数组每个位置存一个节点指针,指针下面挂着一串链表,冲突的元素全部塞到同一个桶里。
我们同样先给出基础结构:
cpp
template<class K, class V, class Hash>
struct HashNode
{
    std::pair<K, V> _kv;
    HashNode* _next;

    HashNode(const std::pair<K, V>& kv)
        :_kv(kv)
        , _next(nullptr)
    {}
};

template<class K, class V, class Hash>
class HashTable
{
public:
    using Node = HashNode<K, V, Hash>;

    HashTable()
        :_table(__stl_next_prime(0))
        , _n(0)
    {}

private:
    std::vector<Node*> _table;
    size_t _n;
};
我们尝试编译一下:
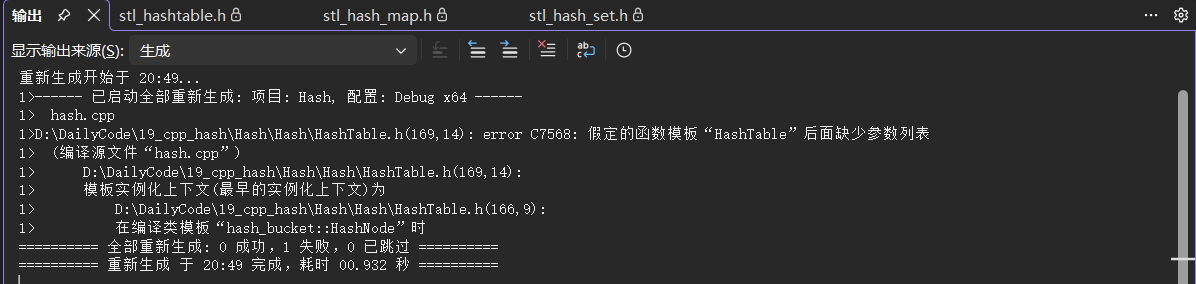
报错了!
踩坑点 1:HashNode 不知道 HashTable 的存在
仔细看 HashNode,里面有一行 using HT = HashTable<K, V, Hash>;(迭代器设计里要用到),但 HashNode 出现在 HashTable 之前,编译器这时还不认识 HashTable。
解决:在 HashNode 前面加一个前置声明。
cpp
template<class K, class V, class Hash>
class HashTable;  // 前置声明

template<class K, class V, class Hash>
struct HashNode
{
    using HT = HashTable<K, V, Hash>;
    // ...
};
此时即可编译成功。前置声明告诉编译器"这个类存在,具体定义后面再看",解决循环依赖。
1、插入 Insert
cpp
bool Insert(const std::pair<K, V>& kv)
{
    // 头插到桶里
    size_t hashi = hash(kv.first) % _table.size();
    Node* newnode = new Node(kv);

    Node* cur = _table[hashi];
    if (cur == nullptr)
    {
        _table[hashi] = newnode;
    }
    else
    {
        newnode->_next = cur;
        _table[hashi] = newnode;
    }
    ++_n;

    return true;
}
显然还需要考虑扩容。
链地址法的扩容判断
对于哈希桶,我们判断当负载因子 == 1 时扩容(不像开放定址法 0.7 那么保守)。因为链地址法是独立链表,桶之间互相不干扰,1.0 也不会有"探测链打架"的问题。
2、扩容:为什么不能"new + Insert"
开放定址法我们用"创建新对象 + Insert"扩容。哈希桶能不能也这么干?
绝对不能!
如果创建新对象 + Insert,完成交换之后:
- 旧表的
vector可以自动析构 - 但 vector 里面的链表呢?每个 Node 都是
new出来的,没人 delete,直接内存泄漏
那该怎么搞?
答案就是创建 vector,把旧表的每个桶都拉下来,挂在新表上,最终进行 swap:
cpp
// 扩容(初版)
if (_n == _table.size())
{
    std::vector<Node*> v(__stl_next_prime(_table.size() + 1));

    for (int i = 0; i < _table.size(); i++)
    {
        Node* cur = _table[i];
        while (cur)
        {
            Node* next = cur->_next;
            cur->_next = v[i];  // ⚠️ 用旧下标 i
            v[i] = cur;
            cur = next;
        }
        _table[i] = nullptr;
    }
    _table.swap(v);
}
踩坑点 2:扩容必须每个节点重新算 hash,不能用旧桶下标
上面代码用旧下标 v[i] 是错的!新表大小变了,同一个桶链上的节点 hash % 新表大小 不一定还落在桶 i。
比如旧表 size=10,新表 size=19。链上 key 算出来 hash=5,hash%10=5(都在桶 5),hash%19=5(仍然在桶 5)。但 hash=14,hash%10=4,hash%19=14(散到桶 14 了)。
正确做法:每个节点分别算 hash,按新位置挂到新表:
cpp
// 扩容(修正版)
if (_n == _table.size())
{
    std::vector<Node*> v(__stl_next_prime(_table.size() + 1));

    for (int i = 0; i < _table.size(); i++)
    {
        Node* cur = _table[i];
        while (cur)
        {
            Node* next = cur->_next;

            // 每个节点分别算在新表的位置
            size_t hashi = hash(cur->_kv.first) % v.size();
            cur->_next = v[hashi];
            v[hashi] = cur;

            cur = next;
        }
        _table[i] = nullptr;
    }
    _table.swap(v);
}
为什么这个 bug 平时不容易暴露?
因为 test_set1 只插 10 个元素,test_map1 只插 6 个元素,初始 size=53,_n == _table.size() 永远不会成立,扩容代码根本没执行过。一旦数据量超过 53,扩容就会触发,bug 立刻显形。
写个测试验证一下:插入 60 个 key 触发扩容后,Find 失败 19 个(41 个 key 能找到,但有 19 个 key 永远找不到了):
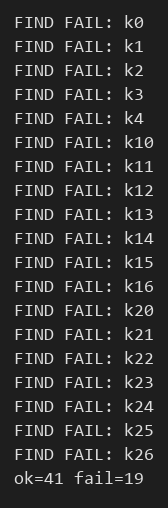
为什么 fail 41 而不是 0? 因为插入顺序:先插的 key 的 hash 碰巧 % 新size 还落在桶 i 的那几个能找回来,后面插的 key 散到新桶就找不到了(扩容时它们被塞回了桶 i,但 Find 时按新 hash 找去别的桶)。
测试:
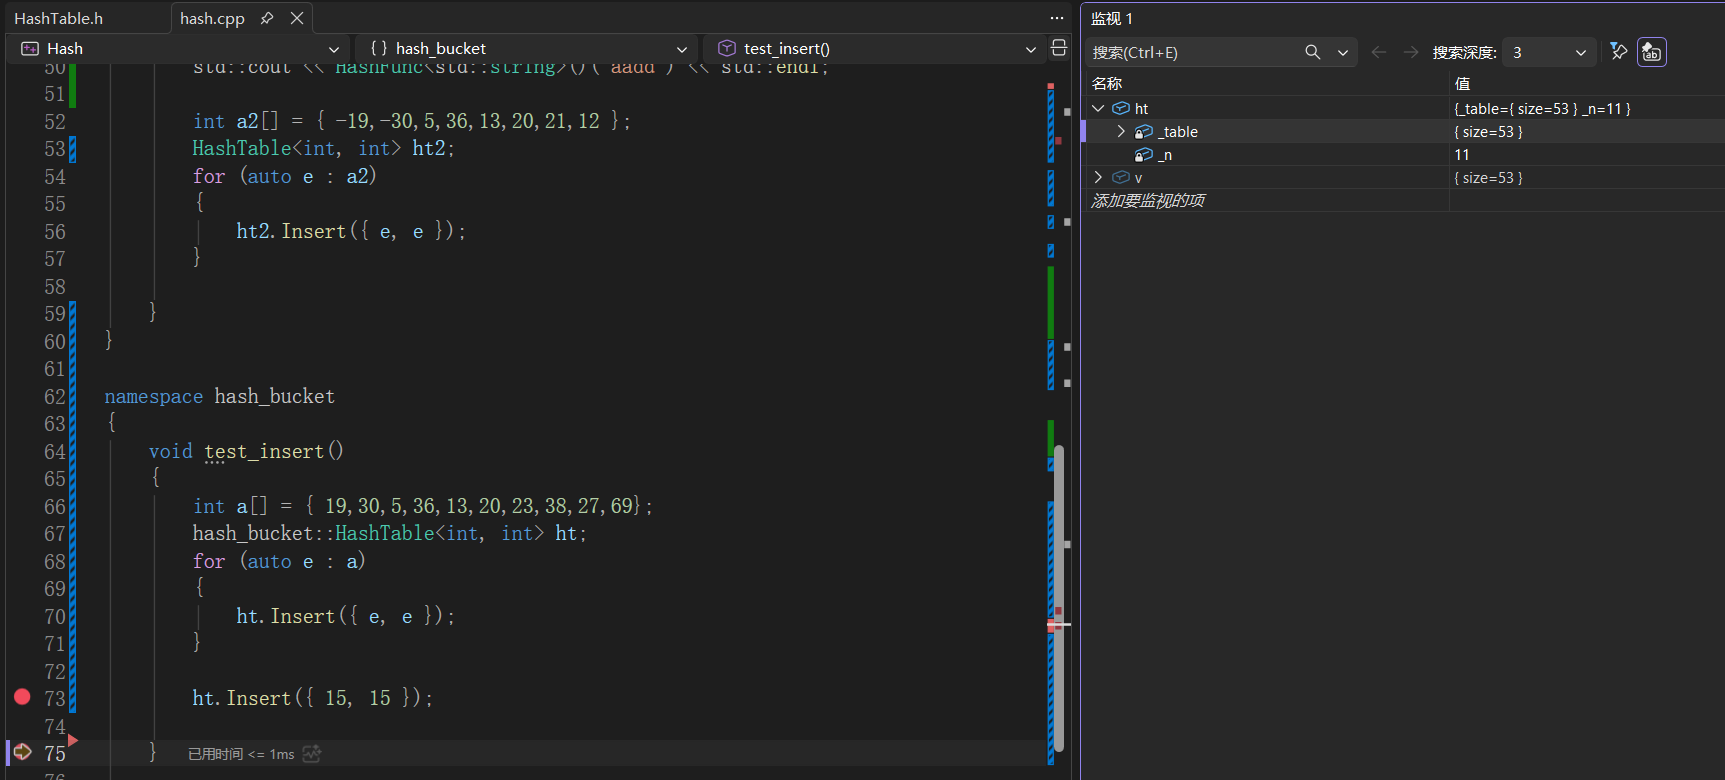
3、查找 Find
cpp
std::pair<K, V>* Find(const K& key)
{
    Hash hash;
    size_t hashi = hash(key) % _table.size();
    Node* cur = _table[hashi];
    while (cur)
    {
        if (cur->_kv.first == key) return cur;
        cur = cur->_next;
    }
    return nullptr;
}
先算桶位置,再遍历桶里的链表。同样在插入之前进行 Find 检查去重。
4、删除 Erase
cpp
bool Erase(const K& key)
{
    Hash hash;
    size_t hashi = hash(key) % _table.size();

    Node* prev = nullptr;
    Node* cur = _table[hashi];
    while (cur)
    {
        if (cur->_kv.first == key)
        {
            if (prev == nullptr)
            {
                // 头节点
                _table[hashi] = cur->_next;
            }
            else
            {
                prev->_next = cur->_next;
            }
            delete cur;
            --_n;
            return true;
        }
        else
        {
            prev = cur;
            cur = cur->_next;
        }
    }
    return false;
}注意要区分头节点 和非头节点 :删头节点要修改 _table[hashi],删中间节点要修改 prev->_next。
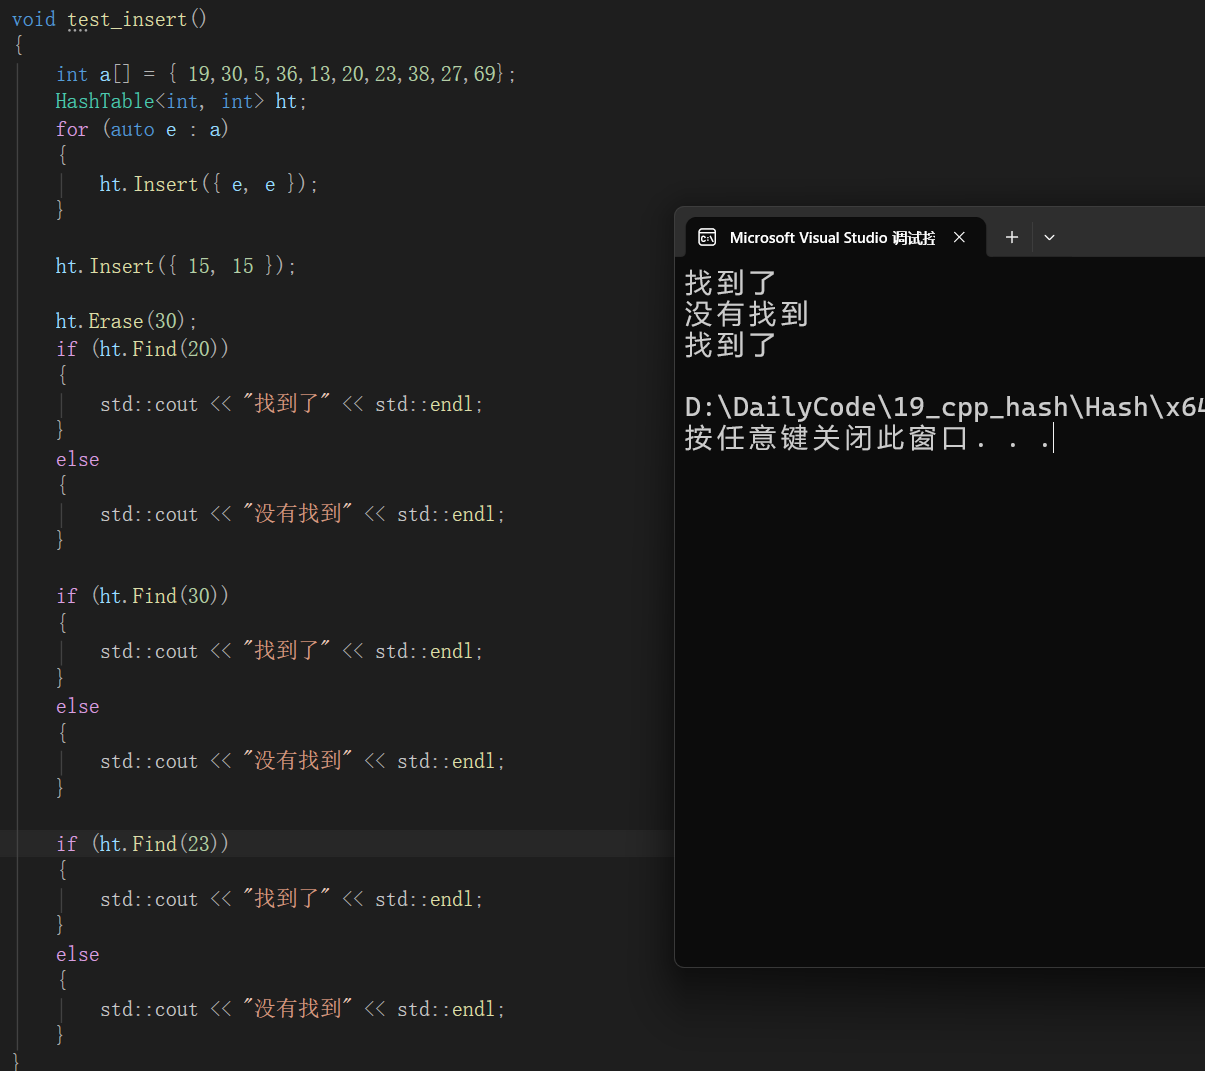
测试:
5、为什么链地址法优于开放定址法
- 桶之间互不干扰:一个桶再长也不影响其它桶的查找
- 负载因子可以到 1.0:不像开放定址法必须 < 0.7
- 删除简单:直接 delete 节点,不用 DELETE 状态那一套
因此我们选择链地址法实现的哈希表作为 unordered_set/map 的底层。
但要支持迭代器(让用户能用 range-for 遍历),还要再做一层改造------下一篇。
四、迭代器设计
哈希表不像 vector 一段连续内存,没办法用原生指针当迭代器;
因此需要自己封装
1、底层设计
参考 SGI 版本的实现,迭代器底层有两个东西:
- 节点指针:指向当前节点,用来遍历哈希表
- 哈希表指针:用来确定位置(找下一个非空桶)
cpp
template<class K, class V, class Hash>
class HashIterator
{
public:
    using Node = HashNode<K, V, Hash>;
    using HT = HashTable<K, V, Hash>;

    HashIterator(Node* node, HT* ht)
        :_node(node)
        , _ht(ht)
    {}

private:
    Node* _node;
    HT* _ht;
};
2、核心接口:Ref/Ptr 模板
接着实现 operator* 和 operator->:
operator*返回引用(让用户能改值)operator->返回地址
cpp
Ref operator*() { return _node->_kv; }
Ptr operator->() { return &_node->_kv; }
问题:普通迭代器和 const 迭代器,难道要写两份?
- 普通迭代器:
*it = 1能改 - const 迭代器:
*it = 1不能改
根据之前手撕 list 的经验,引入两个模板参数 Ref/Ptr 就能解决冗余问题:
cpp
template<class K, class V, class Hash, class Ref, class Ptr>
class HashIterator
{
    using Self = HashIterator<K, V, Hash, Ref, Ptr>;
    // ...
    Ref operator*() { return _node->_kv; }
    Ptr operator->() { return &_node->_kv; }
};在 HashTable 里 typedef 出普通迭代器和 const 迭代器两种:
cpp
using iterator       = HashIterator<K, V, Hash, std::pair<K, V>&, std::pair<K, V>*>;
using const_iterator = HashIterator<K, V, Hash, const std::pair<K, V>&, const std::pair<K, V>*>;
这样 Ref/Ptr 在普通迭代器里是普通引用/指针,在 const 迭代器里是 const 引用/指针,一套模板顶两份用。
3、operator++
继续实现 ++ 和 !=。
为什么实现 !=?
使用迭代器遍历时判断条件是 it != end(),所以必须重载 !=。
++ 的逻辑:
- 如果当前节点不是桶的最后一个,直接走
_next - 如果是最后一个,要找下一个非空桶
- 如果所有桶都走完了,把
_node置 nullptr(表示 end)
cpp
Self& operator++()
{
    if (_node->_next)
    {
        _node = _node->_next;
    }
    else
    {
        Hash hash;
        size_t hashi = hash(_node->_kv.first) % _ht->_table.size();
        ++hashi;
        while (hashi < _ht->_table.size())
        {
            if (_ht->_table[hashi] != nullptr)
            {
                _node = _ht->_table[hashi];
                return *this;
            }
            ++hashi;
        }
        _node = nullptr;
    }
    return *this;
}

bool operator!=(const Self& s)
{
    return _node != s._node;
}
4、begin / end
begin 找第一个非空桶,end 就是 _node == nullptr:
cpp
iterator Begin()
{
    if (_n == 0) return End();
    for (int i = 0; i < _table.size(); i++)
    {
        if (_table[i]) return { _table[i], this };
    }
    return End();
}

iterator End() { return { nullptr, this }; }
const 版本几乎一样,只是返回值类型是 const_iterator。
然后给外层用户调用的 begin() / end() 接口:
cpp
iterator begin() { return Begin(); }
iterator end()   { return End(); }

const_iterator begin() const { return Begin(); }
const_iterator end() const { return End(); }
5、踩坑点 3:const 迭代器需要 _ht 是 const HT*
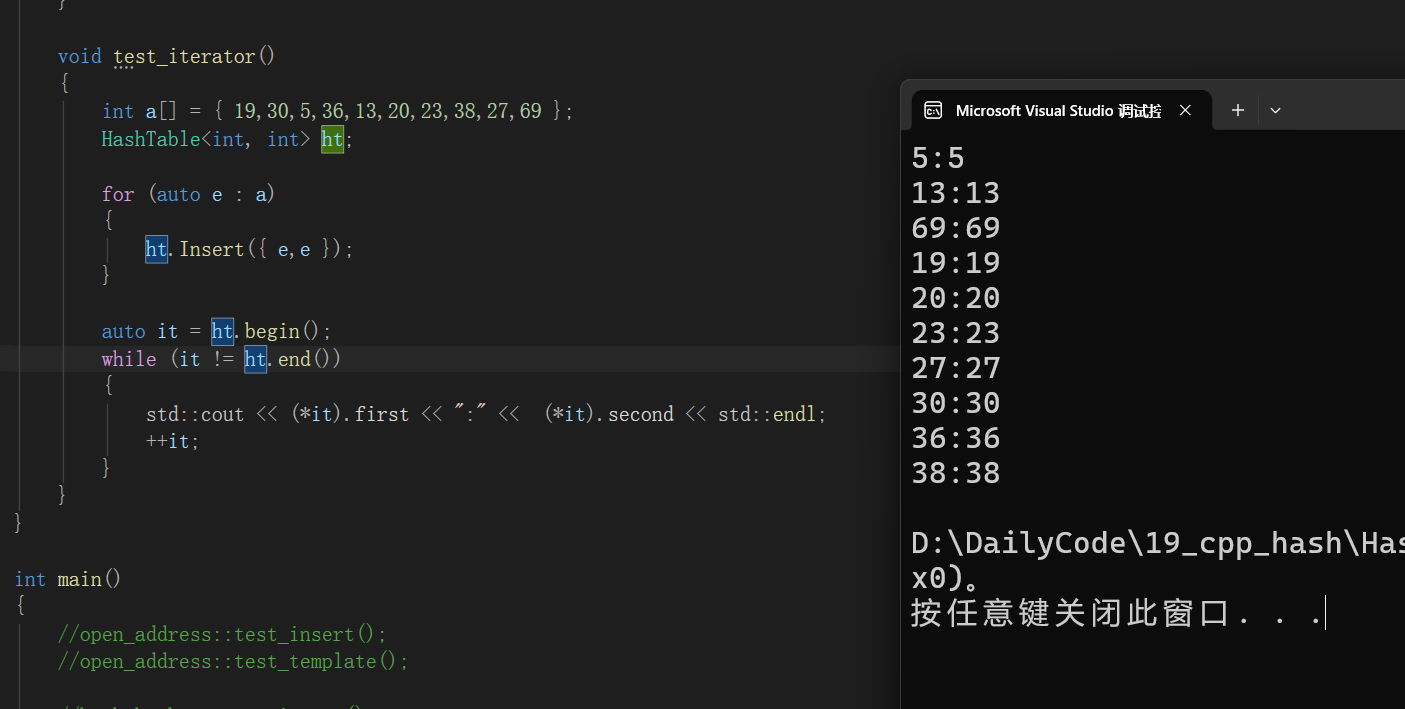
测试一下:
cpp
void test_iterator()
{
    int a[] = { 19,30,5,36,13,20,23,38,27,69 };
    HashTable<int, int> ht;
    for (auto e : a) ht.Insert({ e, e });

    auto it = ht.begin();
    while (it != ht.end())
    {
        std::cout << (*it).first << ":" << (*it).second << std::endl;
        ++it;
    }
}
报错:
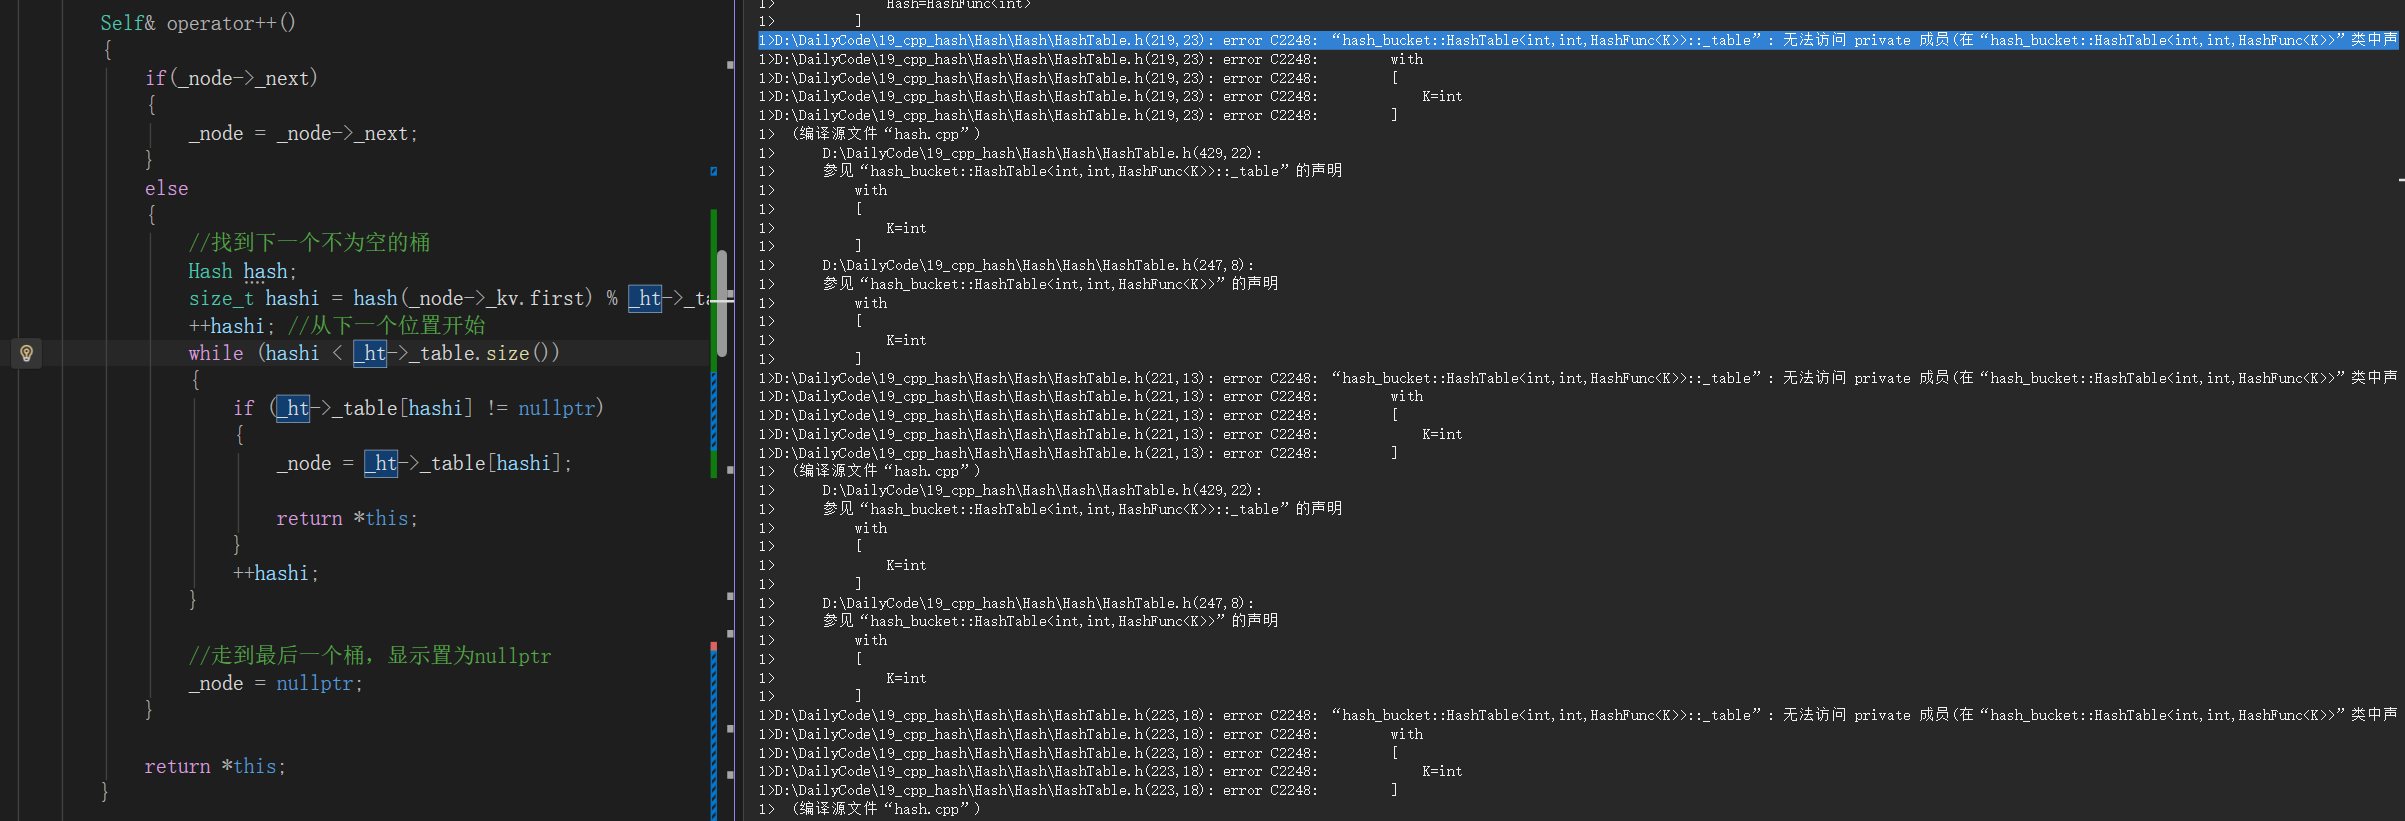
踩坑点 3:const 迭代器
错误提示:无法访问 private 成员。原因是:
const Begin()里this是const HashTable*const_iterator的_ht成员是HT*(非 const)const HashTable*不能初始化HT*(类型不兼容,且 const 不能丢)
解决:直接把 _ht 改成 const HT*,让它既能存 const 也能存非 const(const 指针可以指向非 const 对象,但反过来不行):
cpp
template<class K, class V, class Hash, class Ref, class Ptr>
class HashIterator
{
    // ...
    const HT* _ht;  // ← 改成 const HT*

    HashIterator(Node* node, const HT* ht)
        :_node(node), _ht(ht)
    {}
};
这样对于非 const 版本的迭代器传的也是 const HT*,不能修改 _ht,没问题。
测试成功:
6、踩坑点 4:迭代器需要访问 HashTable 的 private
实现了迭代器,那就直接把 Insert 和 Find 的返回值改成迭代器类型。
但是 :迭代器要访问 HashTable 的私有成员 _table(operator++ 里要用),编译报"无法访问 private 成员"。
解决:加友元。
cpp
template<class K, class V, class Hash>
class HashTable
{
    template<class K, class V, class Hash, class Ref, class Ptr>
    friend struct HashIterator;
    // ...
};
五、修改底层:统一类型 T 与 KeyOfT
到目前为止,HashTable 存的是 std::pair<K, V>。但 unordered_set 只存 K(没有 V),unordered_map 存 std::pair<K, V>。类型不统一,没法直接套壳。
解决办法:把底层存储类型改成泛化 T ,再通过 KeyOfT 仿函数取出 Key。
1、HashNode 改造
cpp
template<class K, class T, class KeyOfT, class Hash>
struct HashNode
{
    using Node = HashNode<K, T, KeyOfT, Hash>;
    using HT = HashTable<K, T, KeyOfT, Hash>;

    T _data;
    Node* _next;

    HashNode(const T& data)
        :_data(data)
        , _next(nullptr)
    {}
};
T 就是真正存的数据类型,KeyOfT 是从 T 里取出 Key 的仿函数。
2、HashTable 改造
HashTable 同步加 T 和 KeyOfT 模板参数,Insert/Find 都用 T 和 KeyOfT:
cpp
template<class K, class T, class KeyOfT, class Hash>
class HashTable
{
    // ... friend HashIterator<K,T,KeyOfT,Hash,Ref,Ptr> ...

    using Node = HashNode<K, T, KeyOfT, Hash>;
    using iterator       = HashIterator<K, T, KeyOfT, Hash, T&, T*>;
    using const_iterator = HashIterator<K, T, KeyOfT, Hash, const T&, const T*>;

    std::pair<iterator, bool> Insert(const T& data)
    {
        KeyOfT kot;
        iterator ret = Find(kot(data));
        if (ret != End()) return { ret, false };

        Hash hash;
        // 扩容(修正版:每节点重算 hash)
        if (_n == _table.size())
        {
            std::vector<Node*> v(__stl_next_prime(_table.size() + 1));
            for (int i = 0; i < _table.size(); i++)
            {
                Node* cur = _table[i];
                while (cur)
                {
                    Node* next = cur->_next;
                    size_t hashi = hash(kot(cur->_data)) % v.size();  // ← 每节点重算
                    cur->_next = v[hashi];
                    v[hashi] = cur;
                    cur = next;
                }
                _table[i] = nullptr;
            }
            _table.swap(v);
        }

        size_t hashi = hash(kot(data)) % _table.size();
        Node* newnode = new Node(data);

        Node* cur = _table[hashi];
        if (cur == nullptr) _table[hashi] = newnode;
        else { newnode->_next = cur; _table[hashi] = newnode; }
        ++_n;

        return { iterator(newnode, this), true };
    }

    iterator Find(const K& key)
    {
        KeyOfT kot;
        Hash hash;
        size_t hashi = hash(key) % _table.size();
        Node* cur = _table[hashi];
        while (cur)
        {
            if (kot(cur->_data) == key) return iterator{ cur, this };
            cur = cur->_next;
        }
        return End();
    }

    // Erase 类似
    // ...
};
注意扩容的修正:每个节点都要用 hash(kot(cur->_data)) % v.size() 重算。
六、封装 unordered_set
底层统一成 T + KeyOfT 之后,封装 set/map 就成了套壳。
1、SetOfKey 仿函数
set 只存 K,所以 T = const K(const 是因为 set 的 key 不能改)。SetOfKey 就是把 K 本身返回:
cpp
template<class K, class Hash = HashFunc<K>>
class unordered_set
{
public:
    struct SetOfKey
    {
        const K& operator()(const K& key)
        {
            return key;
        }
    };
};
2、套壳:把 HashTable 的接口包一层
cpp
template<class K, class Hash = HashFunc<K>>
class unordered_set
{
public:
    struct SetOfKey { /* ... */ };

public:
    using iterator       = hash_bucket::HashTable<K, const K, SetOfKey, Hash>::iterator;
    using const_iterator = hash_bucket::HashTable<K, const K, SetOfKey, Hash>::const_iterator;

    iterator begin() { return _ht.Begin(); }
    iterator end()   { return _ht.End(); }

    const_iterator begin() const { return _ht.Begin(); }
    const_iterator end() const   { return _ht.End(); }

    std::pair<iterator, bool> Insert(const K& key)
    {
        return _ht.Insert(key);
    }

    iterator Find(const K& key) { return _ht.Find(key); }
    bool Erase(const K& key)    { return _ht.Erase(key); }

private:
    hash_bucket::HashTable<K, const K, SetOfKey, Hash> _ht;
};
注意 T = const K,iterator 的 operator* 自动返回 const K&,所以 *it = 1 编译失败,正好符合 set 的语义(key 不可改)。
测试:
cpp
void test_set1()
{
    int a[] = { 3,11,86,7,88,82,1,881,5,6,7,6 };
    unordered_set<int> s;
    for (auto e : a) s.Insert(e);

    unordered_set<int>::iterator it = s.begin();
    while (it != s.end())
    {
        // *it = 1;  // 编译失败:const 不可改
        std::cout << *it << " ";
        ++it;
    }
    std::cout << std::endl;

    for (auto e : s)
    {
        std::cout << e << " ";
    }
    std::cout << std::endl;
}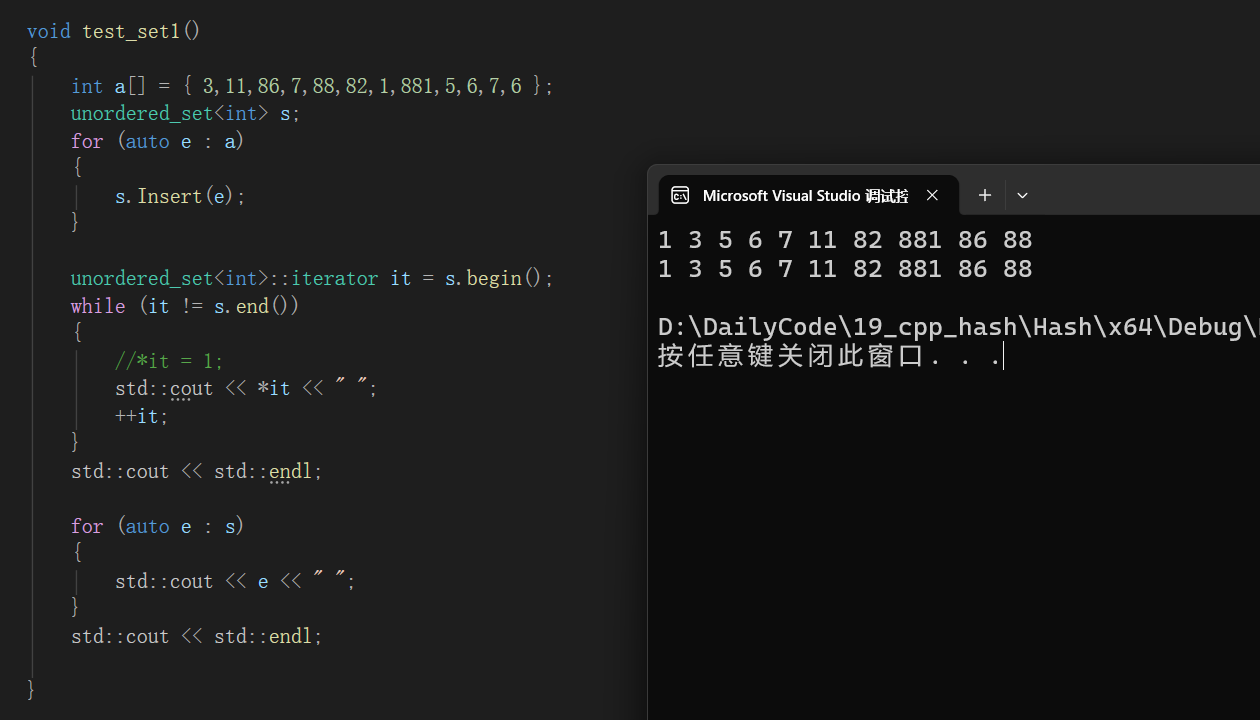
输出:
1 3 5 6 7 11 82 881 86 88
1 3 5 6 7 11 82 881 86 88
去重后 10 个元素,两次遍历(while 和 range-for)结果一致。
七、封装 unordered_map
和 unordered_set 一样,先实现 MapOfT 仿函数。
1、MapOfT 仿函数
map 存 std::pair<const K, V>(key 是 const,不可改)。MapOfT 从 pair 里取出 key:
cpp
template<class K, class V, class Hash = HashFunc<K>>
class unordered_map
{
public:
    struct MapOfT
    {
        const K& operator()(const std::pair<K, V>& kv)
        {
            return kv.first;
        }
    };

    using iterator       = hash_bucket::HashTable<K, std::pair<const K, V>, MapOfT, Hash>::iterator;
    using const_iterator = hash_bucket::HashTable<K, std::pair<const K, V>, MapOfT, Hash>::const_iterator;

    iterator begin() { return _ht.Begin(); }
    iterator end()   { return _ht.End(); }

    const_iterator begin() const { return _ht.Begin(); }
    const_iterator end() const   { return _ht.End(); }

    std::pair<iterator, bool> Insert(const std::pair<K, V>& kv)
    {
        return _ht.Insert(kv);
    }

    iterator Find(const K& key) { return _ht.Find(key); }
    bool Erase(const K& key)    { return _ht.Erase(key); }

    // operator[]:复用 Insert 的逻辑
    V& operator[](const K& key)
    {
        std::pair<iterator, bool> ret = Insert({ key, V() });
        return ret.first->second;
    }

private:
    hash_bucket::HashTable<K, std::pair<const K, V>, MapOfT, Hash> _ht;
};
2、operator\[\]
operator[] 是 map 的灵魂。它做了两件事:
- 如果 key 已存在,返回对应 value 的引用(可直接读 / 写)
- 如果 key 不存在,插入
{key, V()}(默认构造的 V),再返回引用
实现思路:直接复用 Insert。
cpp
V& operator[](const K& key)
{
    std::pair<iterator, bool> ret = Insert({ key, V() });
    return ret.first->second;
}
Insert 返回 pair<iterator, bool>,bool 表示是否新插入:
- true:新插入,ret.first 指向新节点
- false:key 已存在,ret.first 指向已存在的节点
无论哪种情况,ret.first->second 都是要返回的引用,一行搞定。
测试:
cpp
void test_map1()
{
    unordered_map<std::string, std::string> dict;
    dict.Insert({ "sort", "排序" });
    dict.Insert({ "字符串", "string" });

    dict.Insert({ "sort", "排序" });  // 重复,Insert 返回 false
    dict.Insert({ "left", "左边" });
    dict.Insert({ "right", "右边" });

    dict["left"] = "左边,剩余";   // 修改 value
    dict["insert"] = "插入";        // operator[] 插入新 key
    dict["string"];                 // operator[] 插入新 key 但 value 默认空串

    for (auto& kv : dict)
    {
        std::cout << kv.first << ":" << kv.second << std::endl;
    }
    std::cout << std::endl;

    unordered_map<std::string, std::string>::iterator it = dict.begin();
    while (it != dict.end())
    {
        // it->first += 'x';  // 编译失败:first 是 const
        it->second += 'x';     // second 可以改
        std::cout << it->first << ":" << it->second << std::endl;
        ++it;
    }
    std::cout << std::endl;
}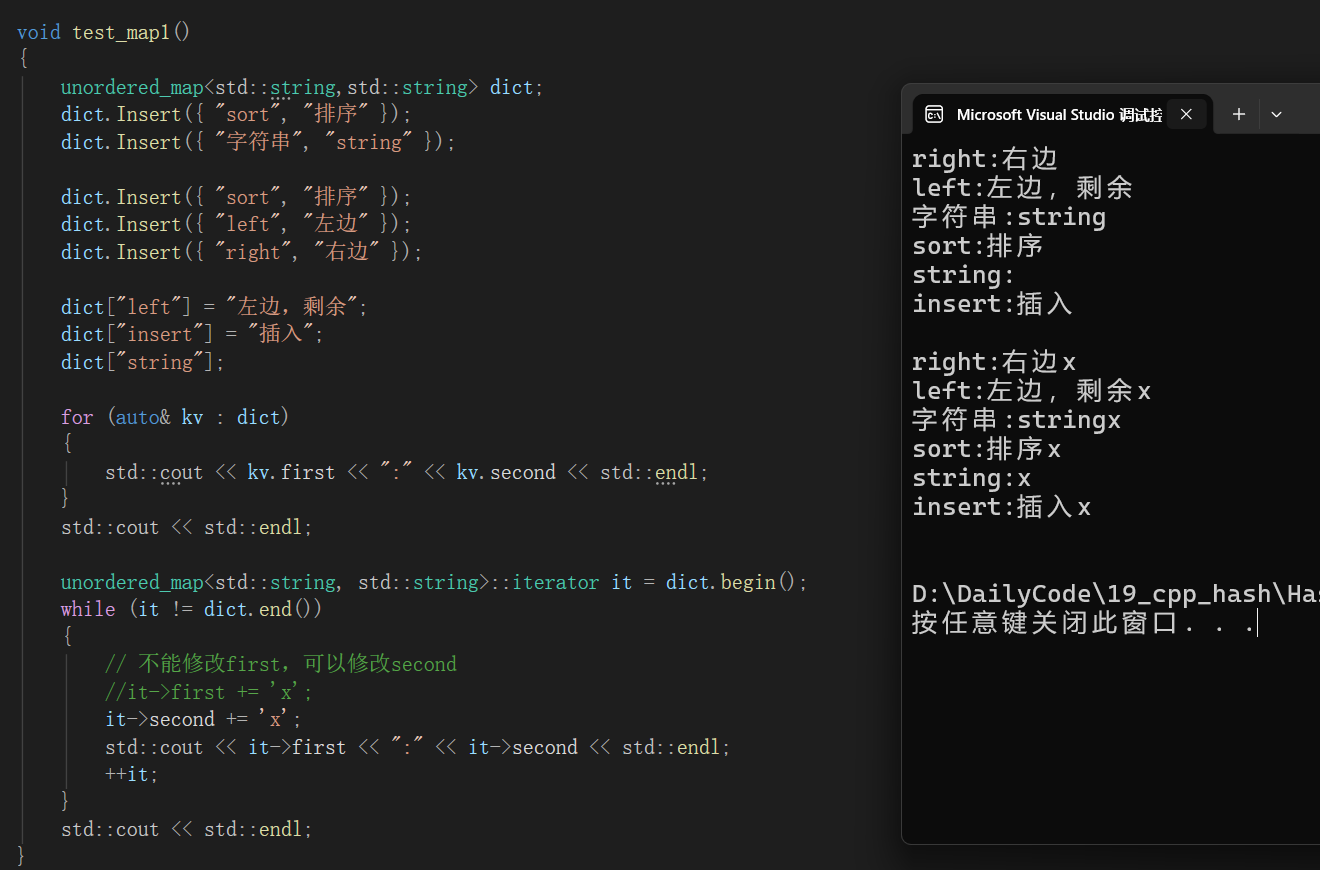
几个细节:
dict["left"] = "左边,剩余":左边被修改成了"左边,剩余"dict["string"]:只读,不赋值,但 operator\[\] 还是把"string"插进去了(value 默认空串)it->first是const K,不能 +=;it->second是V,可以 += 'x'- 两个 for 循环遍历顺序一致(迭代器实现保证了)
八、总结
这一篇从最底层的"哈希是什么"开始,按真实写代码的顺序,一步一步把 unordered_set 和 unordered_map 拼了出来:
- 开放定址法:用状态标记处理删除冲突,但元素互相挤占空间
- 链地址法(哈希桶):独立链表,桶之间互不干扰,成为最终底层
- 迭代器:自己封装的"指针",要穿过链表找下一个非空桶
- 改底层:把 pair<K,V> 泛化成 T + KeyOfT,让 set/map 都能套
- 封装 set/map:套壳 + 仿函数取 key,operator\[\] 复用 Insert