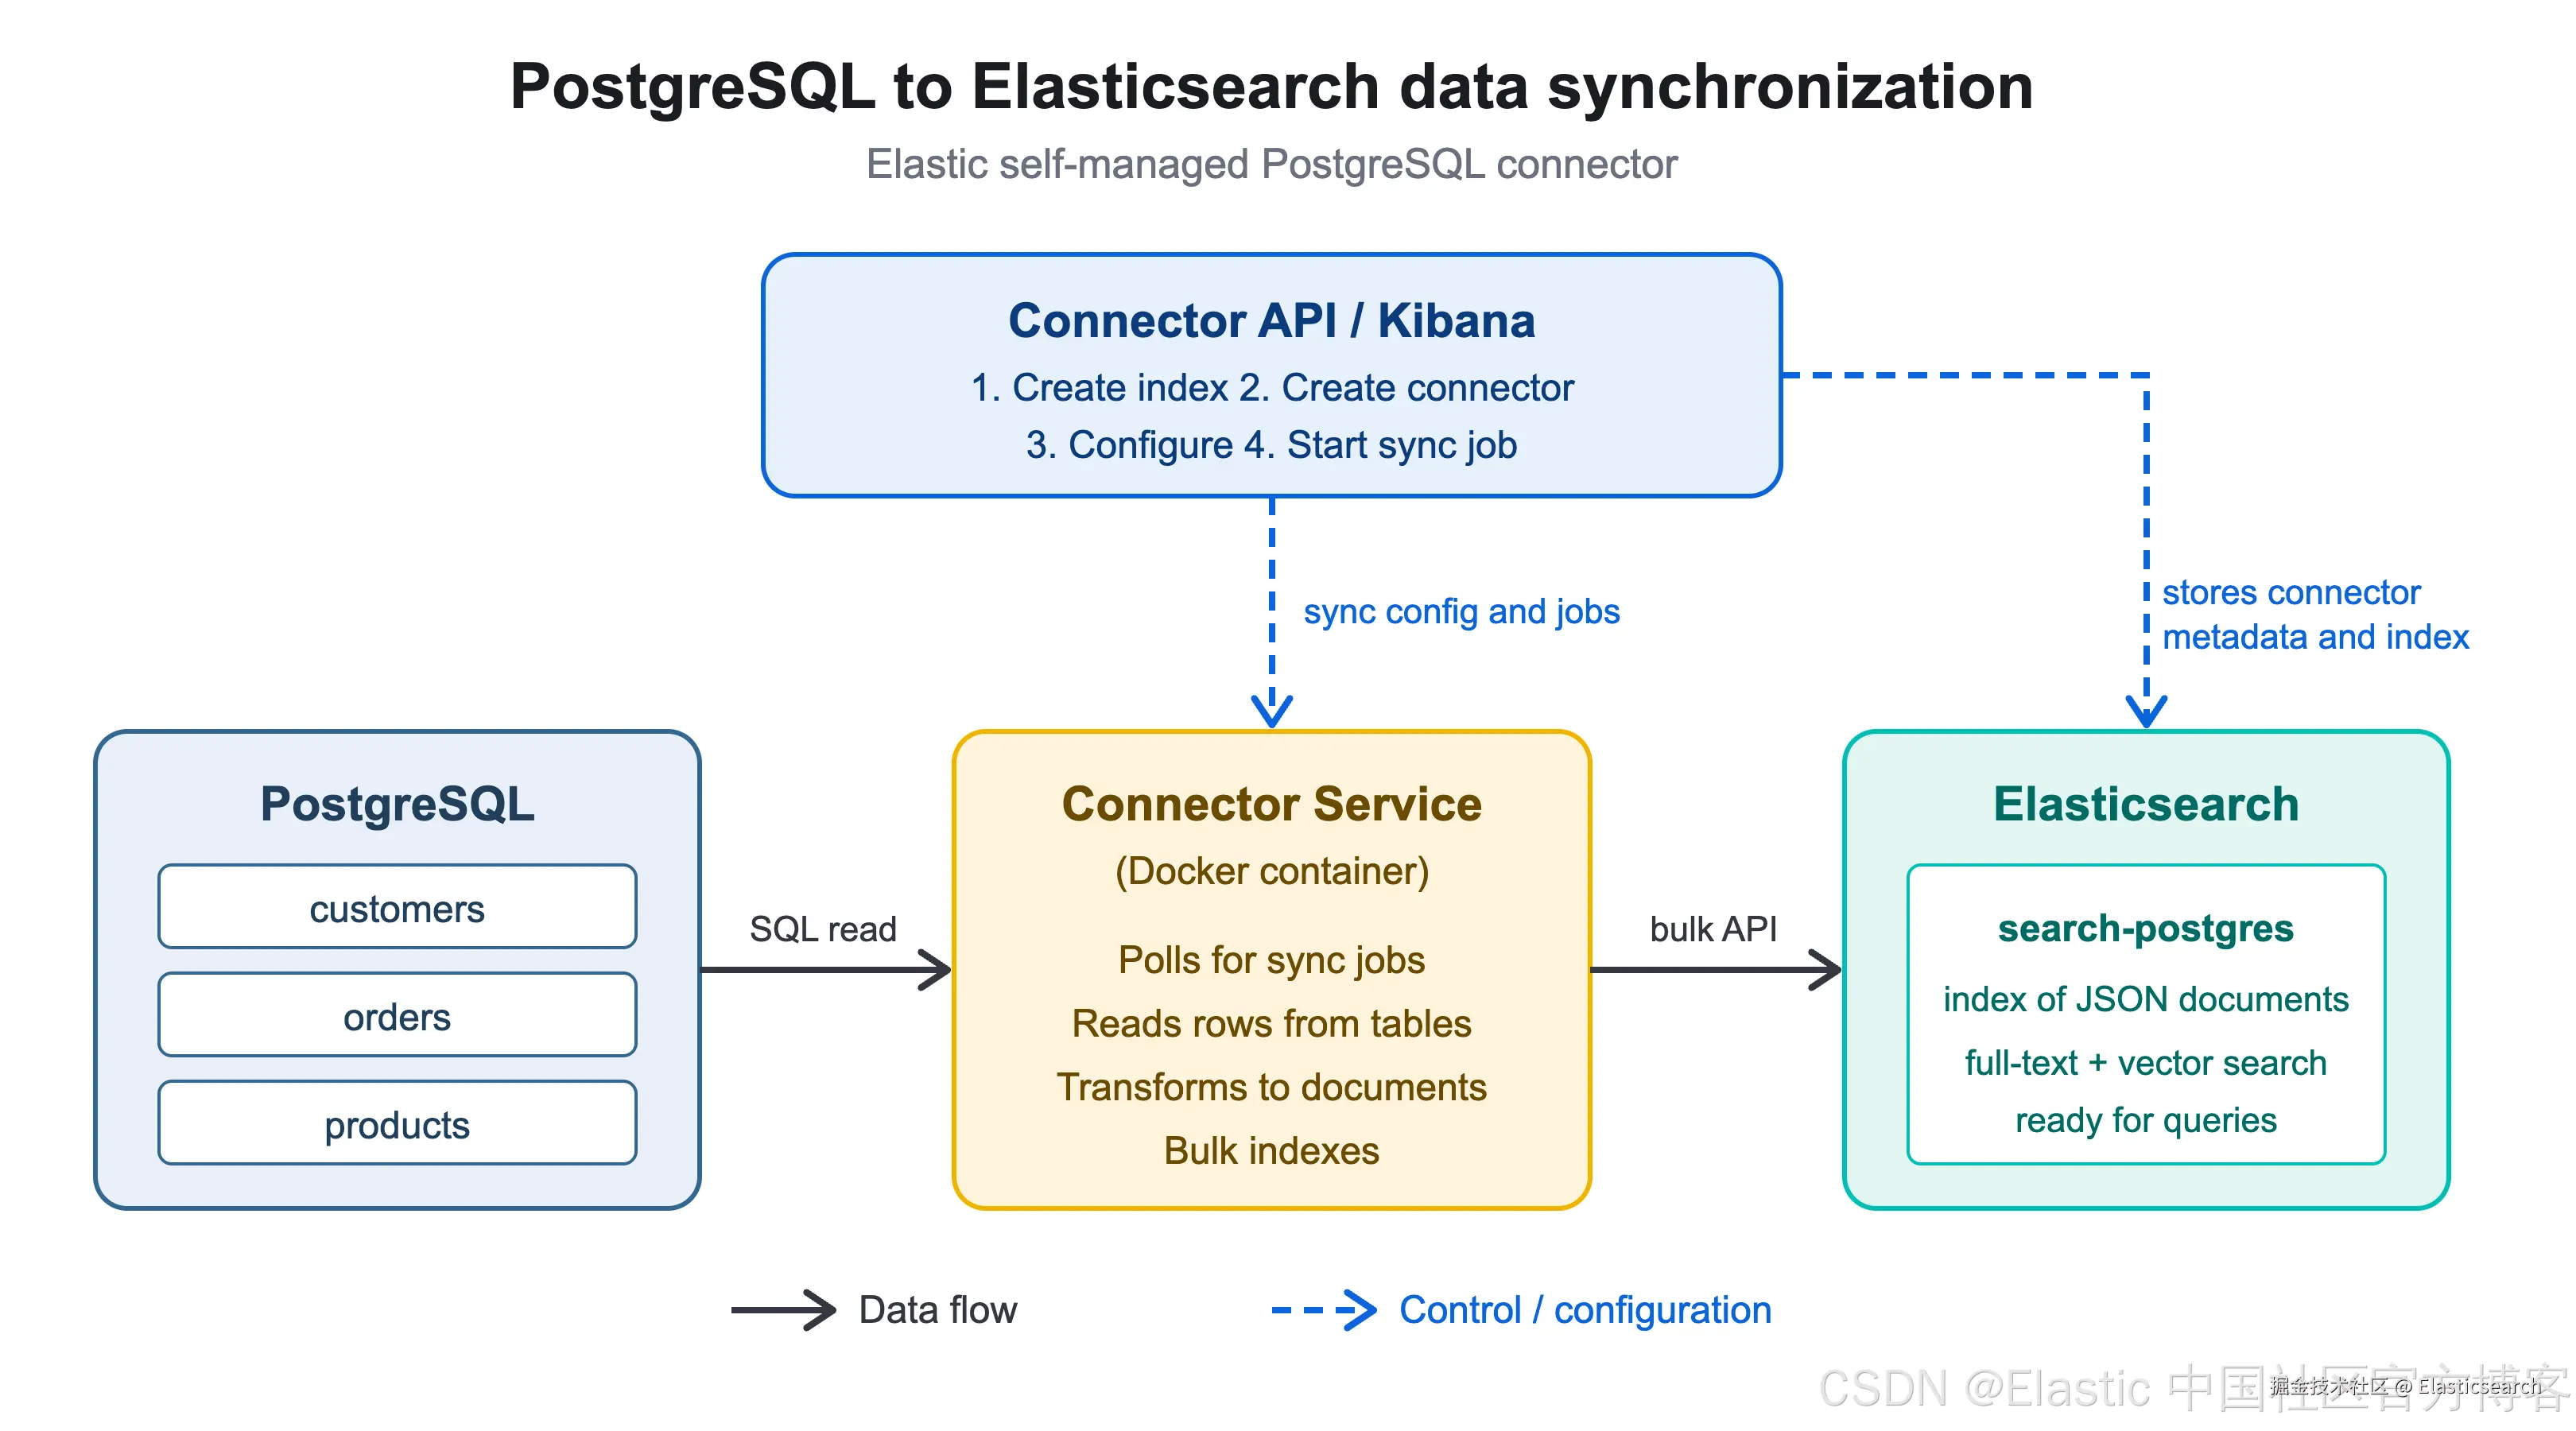
学习如何使用 Elasticsearch Connector API 配置一个自行管理的连接器(Self-managed Connector)。
在本示例中,我们将使用 PostgreSQL 连接器,将 PostgreSQL 数据库中的数据同步到 Elasticsearch。
我们将通过 Docker 启动一个简单的 PostgreSQL 实例,并导入一些示例数据。随后,创建一个连接器,并将数据库中的数据同步到 Elasticsearch。
你也可以按照相同的步骤,为其他数据源配置连接器,实现数据同步。
提示:本教程重点介绍如何在自己的基础设施上运行自行管理的连接器(Self-managed Connector),并通过 Connector API 管理数据同步任务。
如果你刚开始接触 Elasticsearch,本教程可能会有一定难度。建议先阅读 Elasticsearch 快速入门指南(Quickstart),了解更适合初学者的基础知识。
如果你刚开始使用连接器(Connector),也可以先从图形用户界面(UI)入手。请参考以下教程,学习如何通过 UI 管理连接器:
配置自行管理的 PostgreSQL 连接器(Set up a self-managed PostgreSQL connector)。
前提条件
-
熟悉连接器(Connectors)的基本工作原理。 你应该了解 Elasticsearch Connector 的相关概念,以便理解各个 API 调用与连接器整体配置流程之间的关系。
-
安装 Docker Desktop。 你需要事先安装 Docker Desktop,用于运行 PostgreSQL 数据库容器。
-
准备 Elasticsearch 环境和 API Key。 你需要确保 Elasticsearch 已经启动并正常运行,同时拥有一个可用于访问 Elasticsearch 的 API Key(API 密钥)。如果尚未部署 Elasticsearch,请参考下一节了解具体的配置步骤。
安装 Elasticsearch 及 Kibana
我们可以参考之前的文章 "使用 start-local 脚本在本地运行 Elasticsearch" 来进行安装。
sql
`curl -fsSL https://elastic.co/start-local | sh`AI代码解释
markdown
``
1. $ pwd
2. /Users/liuxg/data/local
3. $ curl -fsSL https://elastic.co/start-local | sh
5. ______ _ _ _
6. | ____| | | | (_)
7. | |__ | | __ _ ___| |_ _ ___
8. | __| | |/ _` / __| __| |/ __|
9. | |____| | (_| \__ \ |_| | (__
10. |______|_|\__,_|___/\__|_|\___|
11. -------------------------------------------------
12. 🚀 Run Elasticsearch and Kibana for local testing
13. -------------------------------------------------
15. ℹ️ Do not use this script in a production environment
17. ⌛️ Setting up Elasticsearch and Kibana v9.5.5-arm64...
19. - Generated random passwords
20. - Created the elastic-start-local folder containing the files:
21. - .env, with settings
22. - docker-compose.yml, for Docker services
23. - start/stop/uninstall commands
24. - Running docker compose up --wait
26. [+] up 31/31
27. ✔ Image docker.elastic.co/kibana/kibana:9.5.5-arm64 Pulled 110.3s
28. ✔ Image docker.elastic.co/elasticsearch/elasticsearch:9.5.5-arm64 Pulled 101.7s
29. ✔ Network elastic-start-local_default Created 0.0s
30. ✔ Volume elastic-start-local_dev-kibana Created 0.0s
31. ✔ Volume elastic-start-local_dev-elasticsearch Created 0.0s
32. ✔ Container es-local-dev Healthy 22.1s
33. ✔ Container kibana-local-settings Exited 21.8s
34. ✔ Container kibana-local-dev Healthy 41.8s
36. 🎉 Congrats, Elasticsearch and Kibana are installed and running in Docker!
38. 🌐 Open your browser at http://localhost:5601
40. Username: elastic
41. Password: uqJjhQ6W
43. 🔌 Elasticsearch API endpoint: http://localhost:9200
44. 🔑 API key: NHl5ZVBhRUJSVHZIQjNDQllYRjk6NWJuQWZiU2NodUNBUlljQzdBdVN2QQ==
46. Learn more at https://github.com/elastic/start-local
``AI代码解释警告(Warning)
此 Elasticsearch 配置仅用于开发和测试目的,切勿在生产环境中使用该配置。
有关生产级 Elasticsearch 的安装和部署说明(包括使用 Docker 部署),请参阅官方文档:配置 Elasticsearch(Set up Elasticsearch)
我们记下上面的用户名及密码:
yaml
 `1.     Username: elastic
2.     Password: uqJjhQ6W`AI代码解释
我们也可以在如下的文件里找到我们需要的配置:
markdown
`1. $ pwd
2. /Users/liuxg/data
3. $ cd local/
4. $ ls
5. elastic-start-local
6. $ cd elastic-start-local/
7. $ ls -al
8. total 40
9. drwxr-xr-x 8 liuxg staff 256 Oct 15 11:38 .
10. drwxr-xr-x 3 liuxg staff 96 Oct 15 11:29 ..
11. -rw-r--r-- 1 liuxg staff 587 Oct 15 11:32 .env
12. drwxr-xr-x 3 liuxg staff 96 Oct 15 11:29 config
13. -rw-r--r-- 1 liuxg staff 3262 Oct 15 11:29 docker-compose.yml
14. -rwxr-xr-x 1 liuxg staff 2099 Oct 15 11:29 start.sh
15. -rwxr-xr-x 1 liuxg staff 191 Oct 15 11:29 stop.sh
16. -rwxr-xr-x 1 liuxg staff 2014 Oct 15 11:29 uninstall.sh
17. $ vi .env` AI代码解释
ini
`
1. START_LOCAL_VERSION=0.14.0
2. ES_LOCAL_VERSION=9.5.5-arm64
3. ES_LOCAL_CONTAINER_NAME=es-local-dev
4. ES_LOCAL_PASSWORD=uqJjhQ6W
5. ES_LOCAL_PORT=9200
6. ES_LOCAL_URL=http://localhost:${ES_LOCAL_PORT}
7. ES_LOCAL_DISK_SPACE_REQUIRED=1gb
8. ES_LOCAL_LICENSE_EXPIRE_DATE=1794626998
9. ES_LOCAL_JAVA_OPTS="-Xms128m -Xmx2g"
10. KIBANA_LOCAL_CONTAINER_NAME=kibana-local-dev
11. KIBANA_LOCAL_SETTINGS_CONTAINER_NAME=kibana-local-settings
12. KIBANA_LOCAL_PORT=5601
13. KIBANA_LOCAL_PASSWORD=E4gOYP0s
14. KIBANA_ENCRYPTION_KEY=I4sK9Gj81d9K31XvQ24ljmx8LgADGa3q
15. ES_LOCAL_API_KEY=NHl5ZVBhRUJSVHZIQjNDQllYRjk6NWJuQWZiU2NodUNBUlljQzdBdVN2QQ==
`AI代码解释对于生产环境,务必确保 Elasticsearch 集群已启用安全功能(Security),以保障集群和数据的安全。我们可以使用如下的方法来进行测试:
bash
`
1. $ pwd
2. /Users/liuxg/data/local
3. $ export ELASTIC_PASSWORD="uqJjhQ6W"
4. $ curl -s -X GET -u elastic:$ELASTIC_PASSWORD http://localhost:9200
5. {
6. "name" : "c81a751c261f",
7. "cluster_name" : "docker-cluster",
8. "cluster_uuid" : "sJntvjJoT8yb750d_qzoeQ",
9. "version" : {
10. "number" : "9.5.5",
11. "build_flavor" : "default",
12. "build_type" : "docker",
13. "build_hash" : "48acba663b09e70b115dd879329141506c377890",
14. "build_date" : "2026-09-30T22:12:03.984586187Z",
15. "build_snapshot" : false,
16. "lucene_version" : "10.5.1",
17. "minimum_wire_compatibility_version" : "8.19.0",
18. "minimum_index_compatibility_version" : "8.0.0"
19. },
20. "tagline" : "You Know, for Search"
21. }
`AI代码解释上面测试安装是成功的。
执行 API 调用(Running API Calls)
你可以通过以下方式执行 API 调用:使用 Kibana 中的 Dev Tools Console(开发工具控制台)、在终端中使用 curl 命令,或者使用 Elasticsearch 提供的各种编程语言客户端。
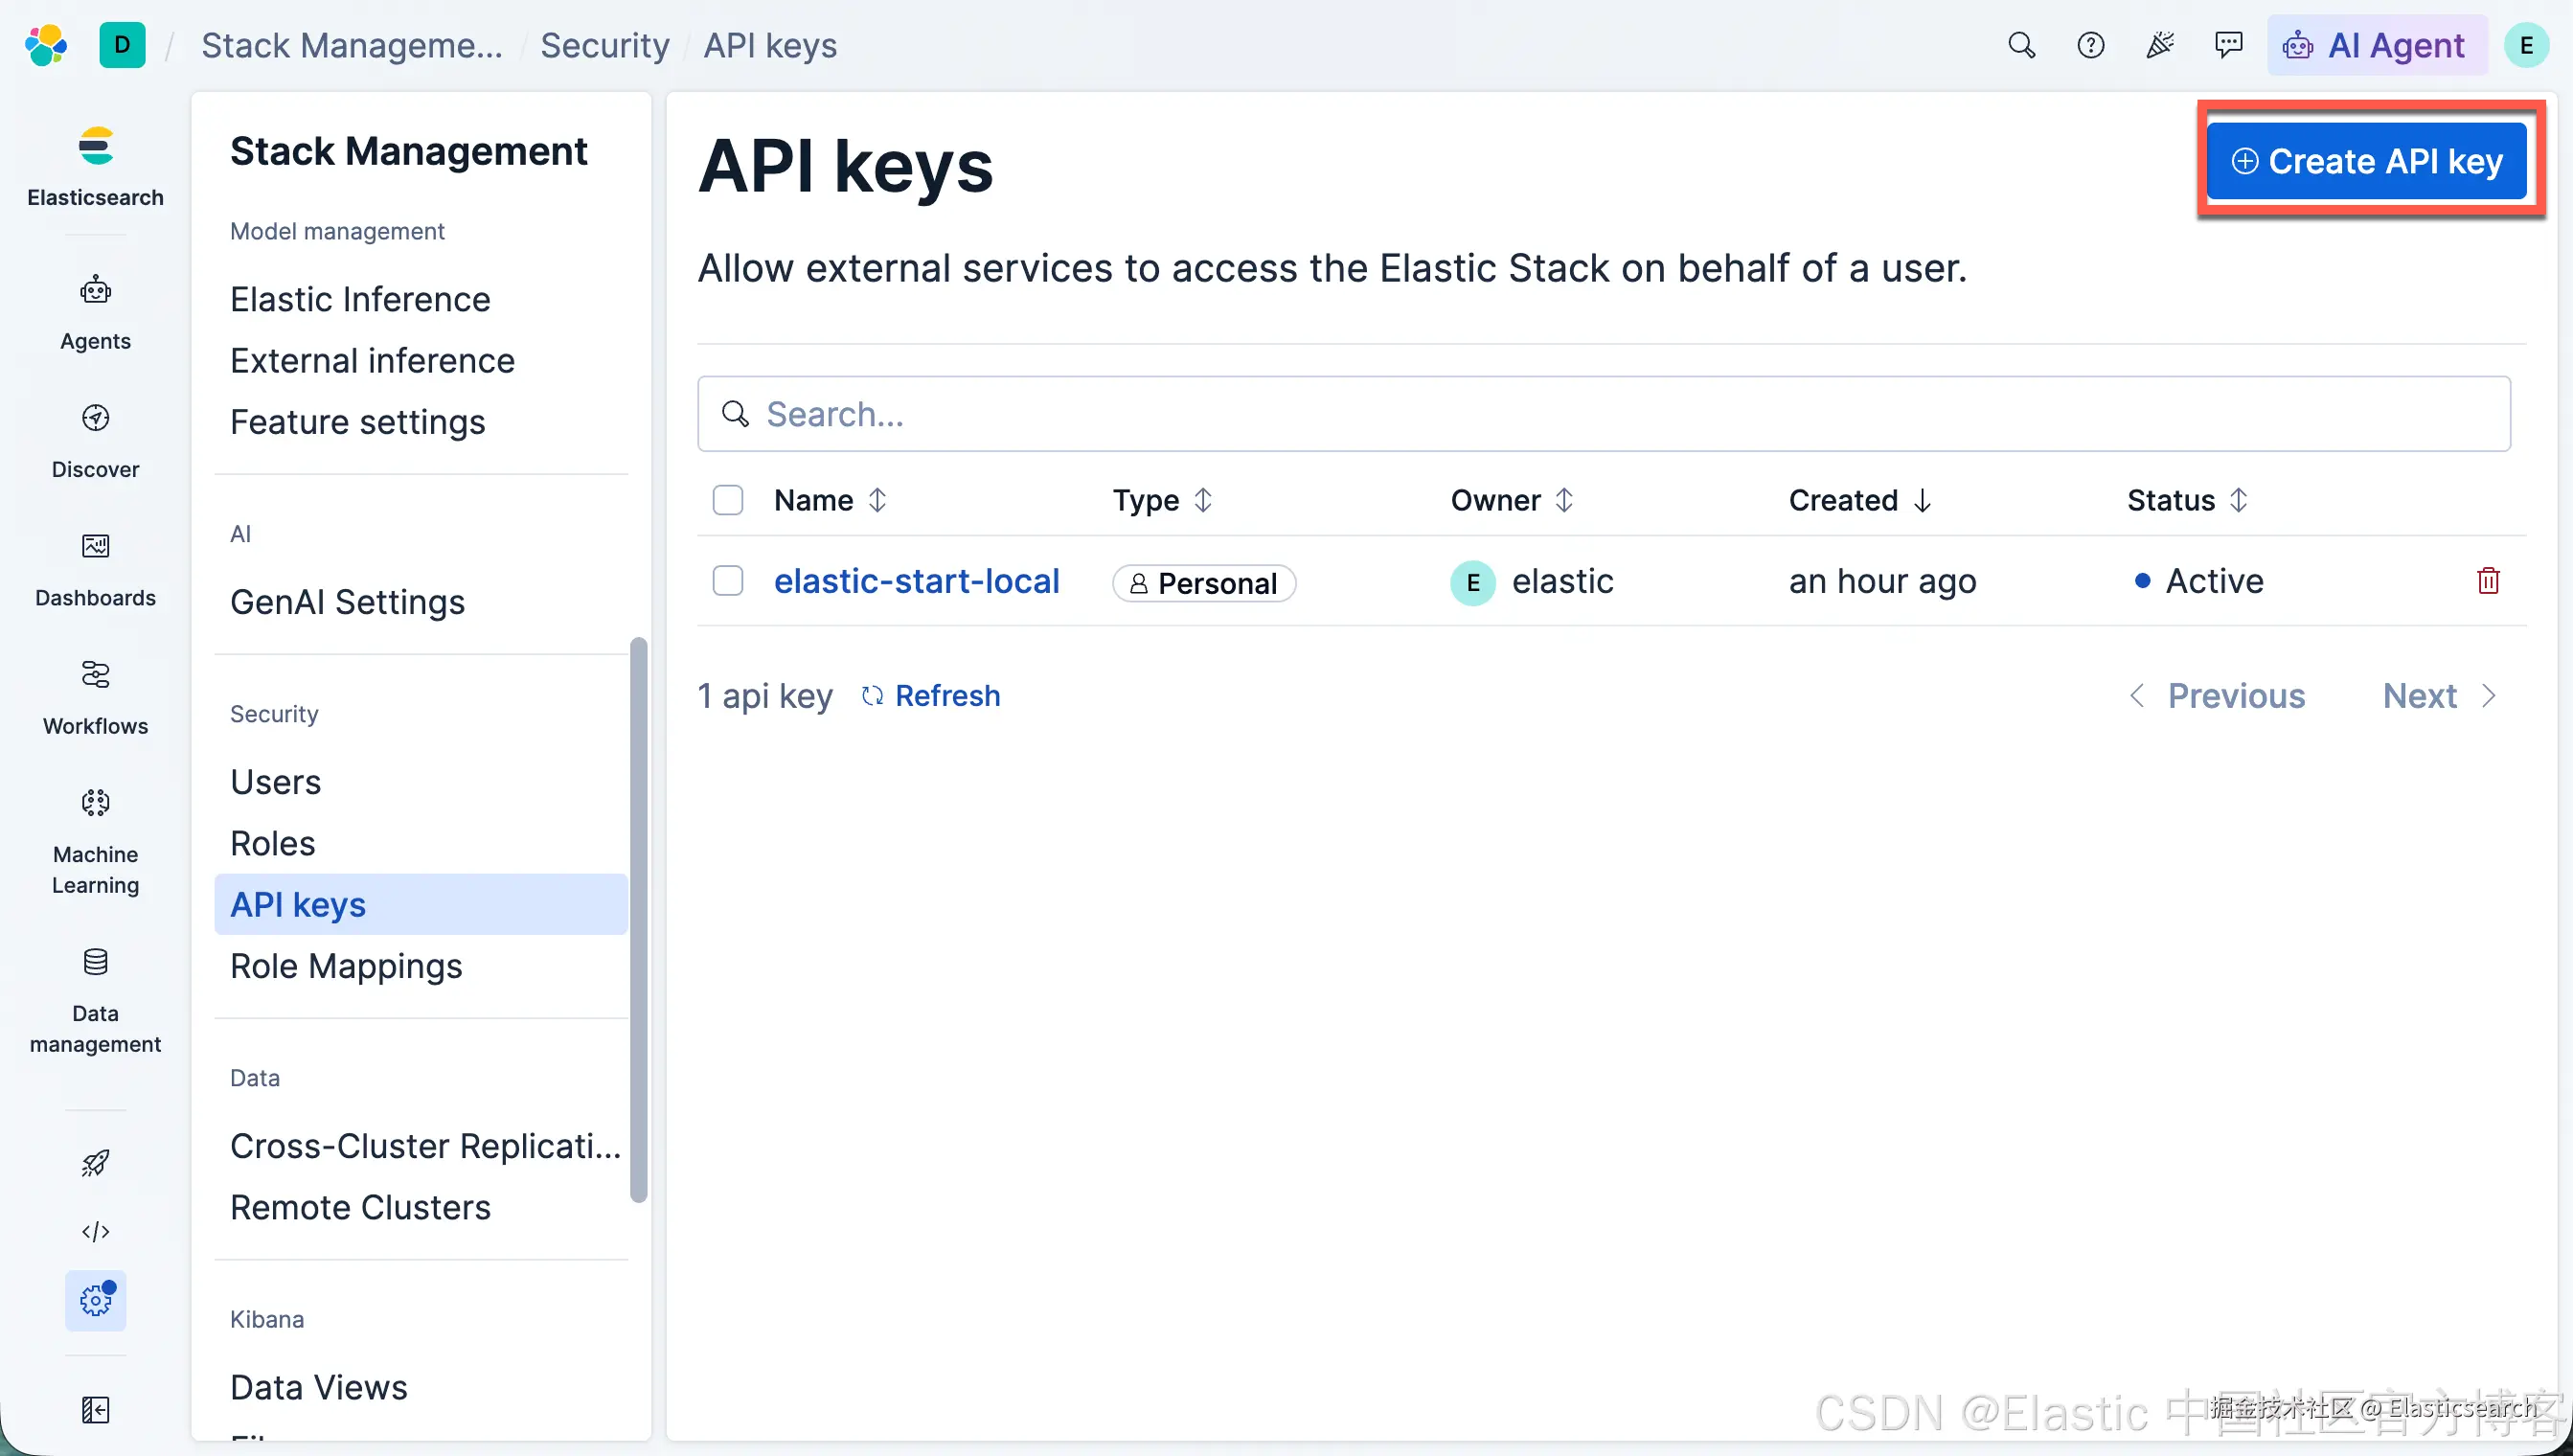
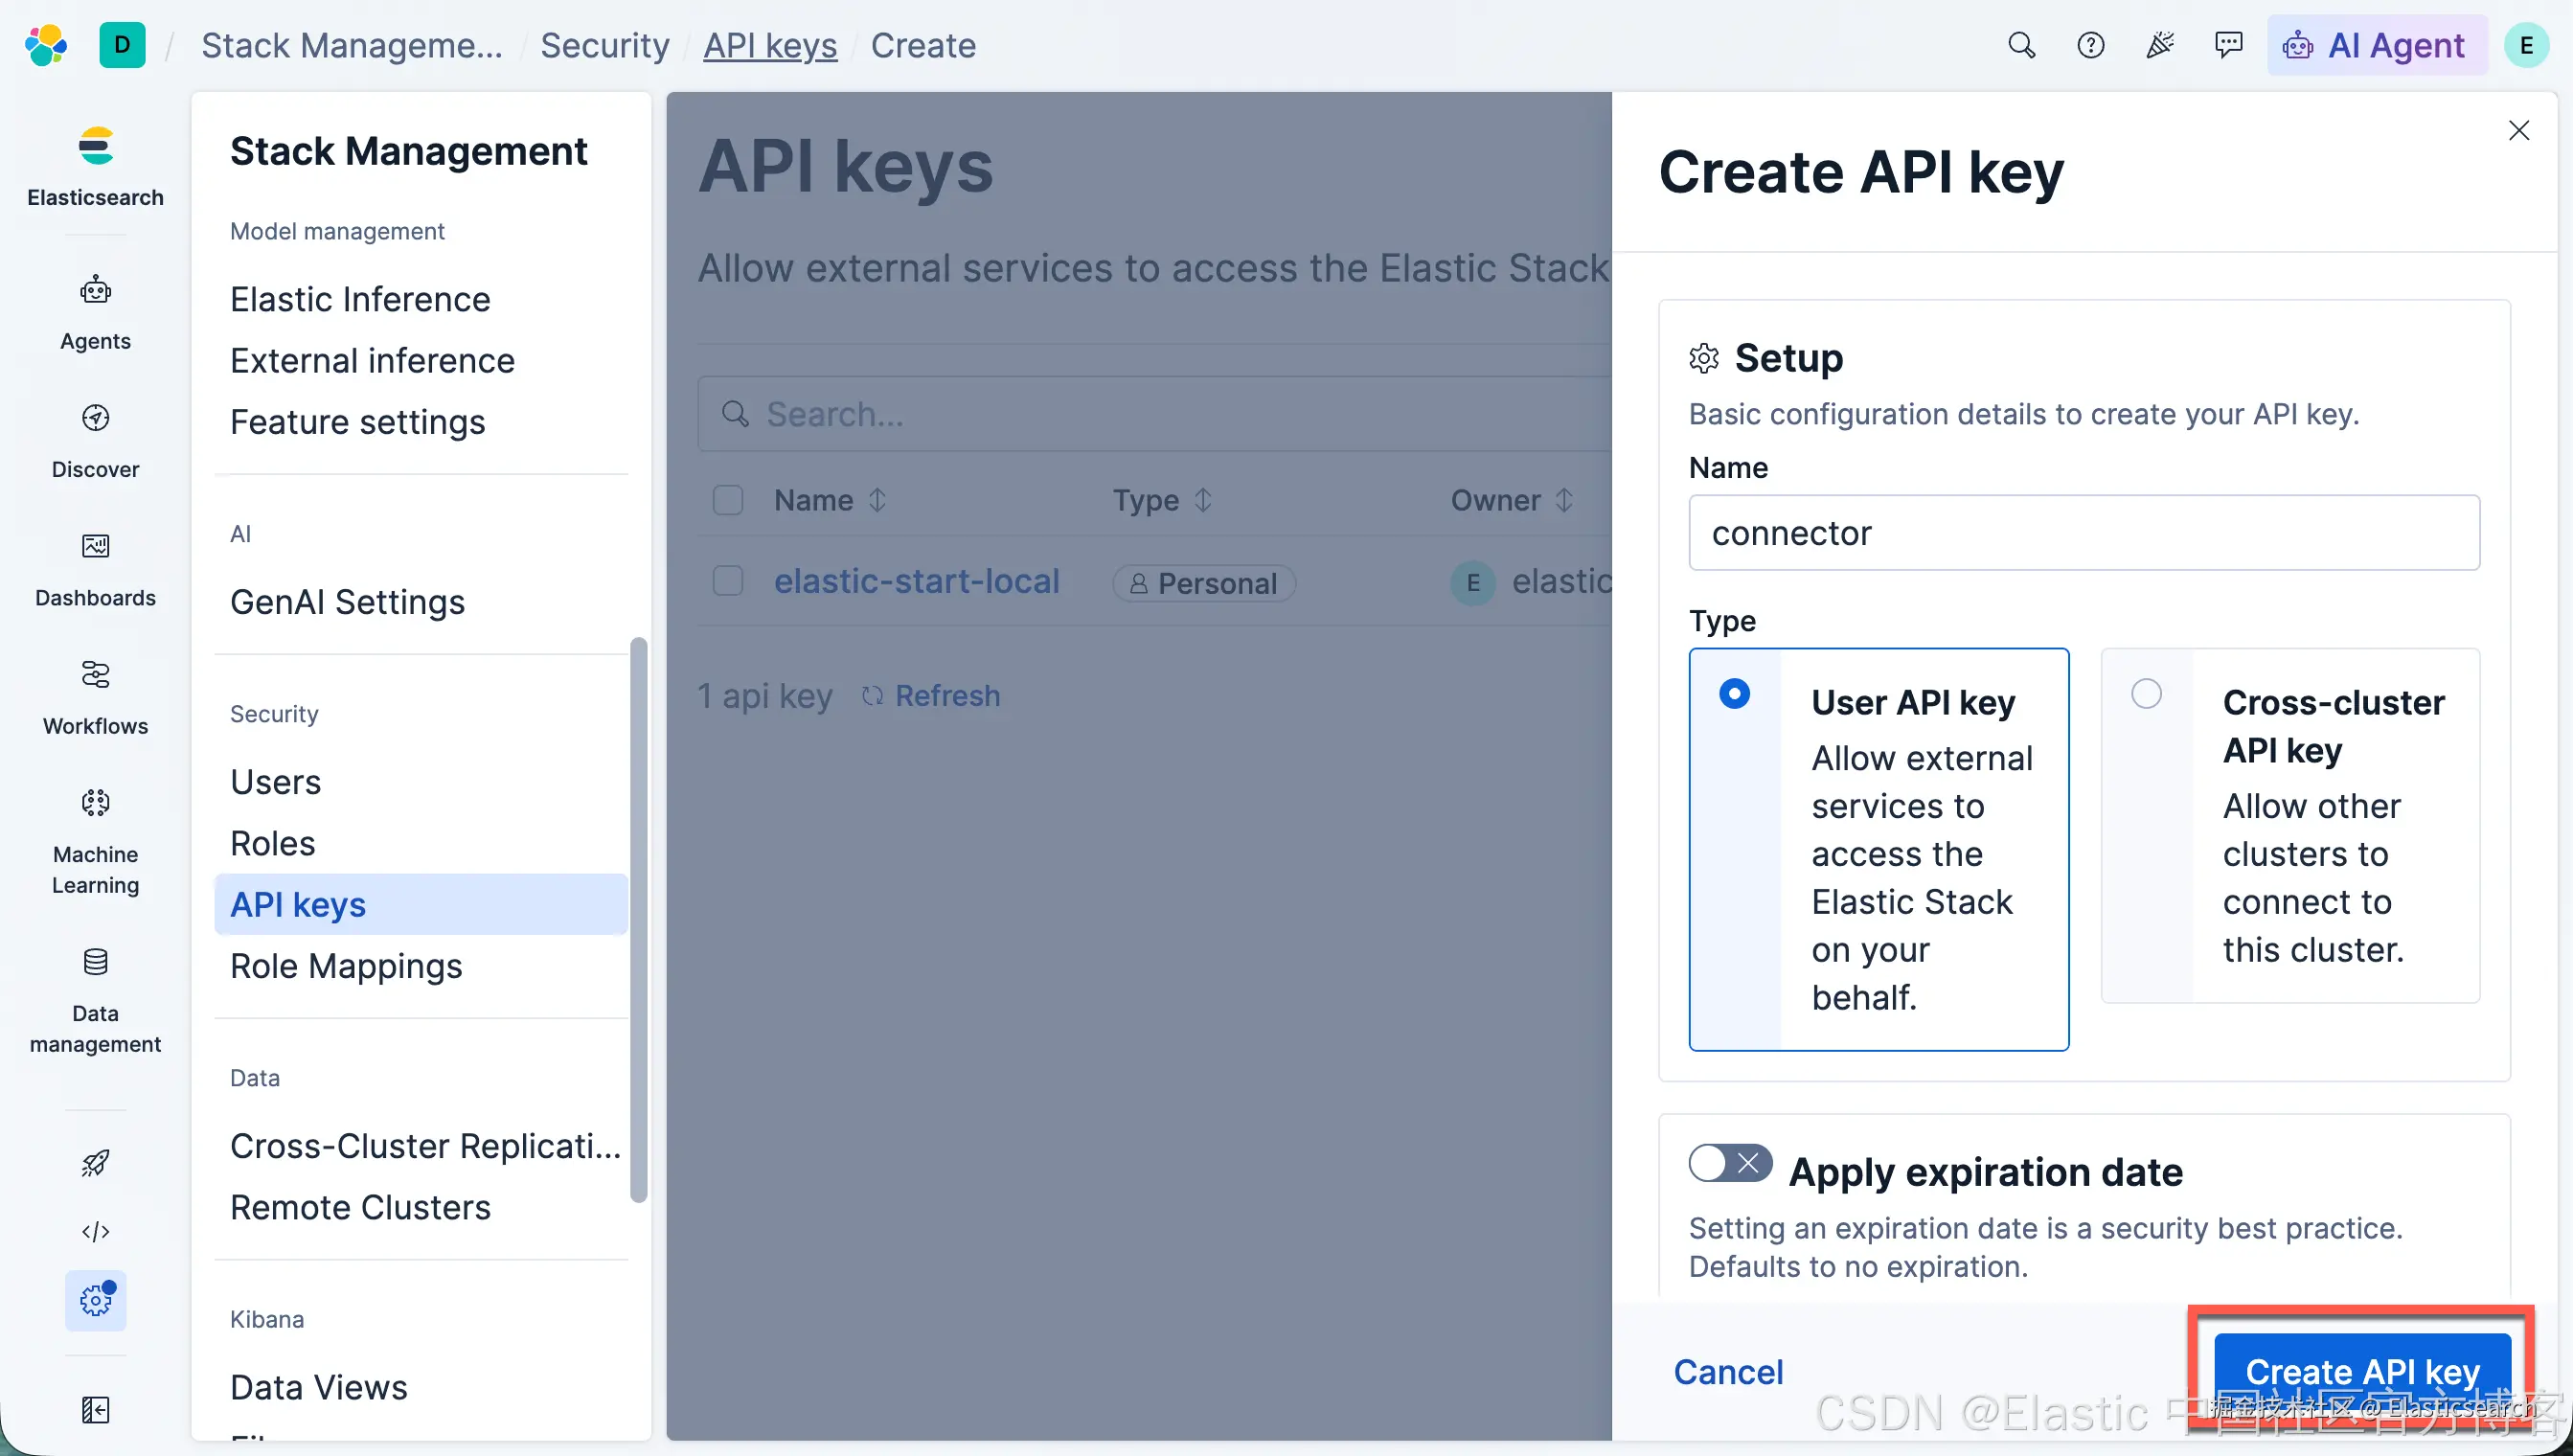
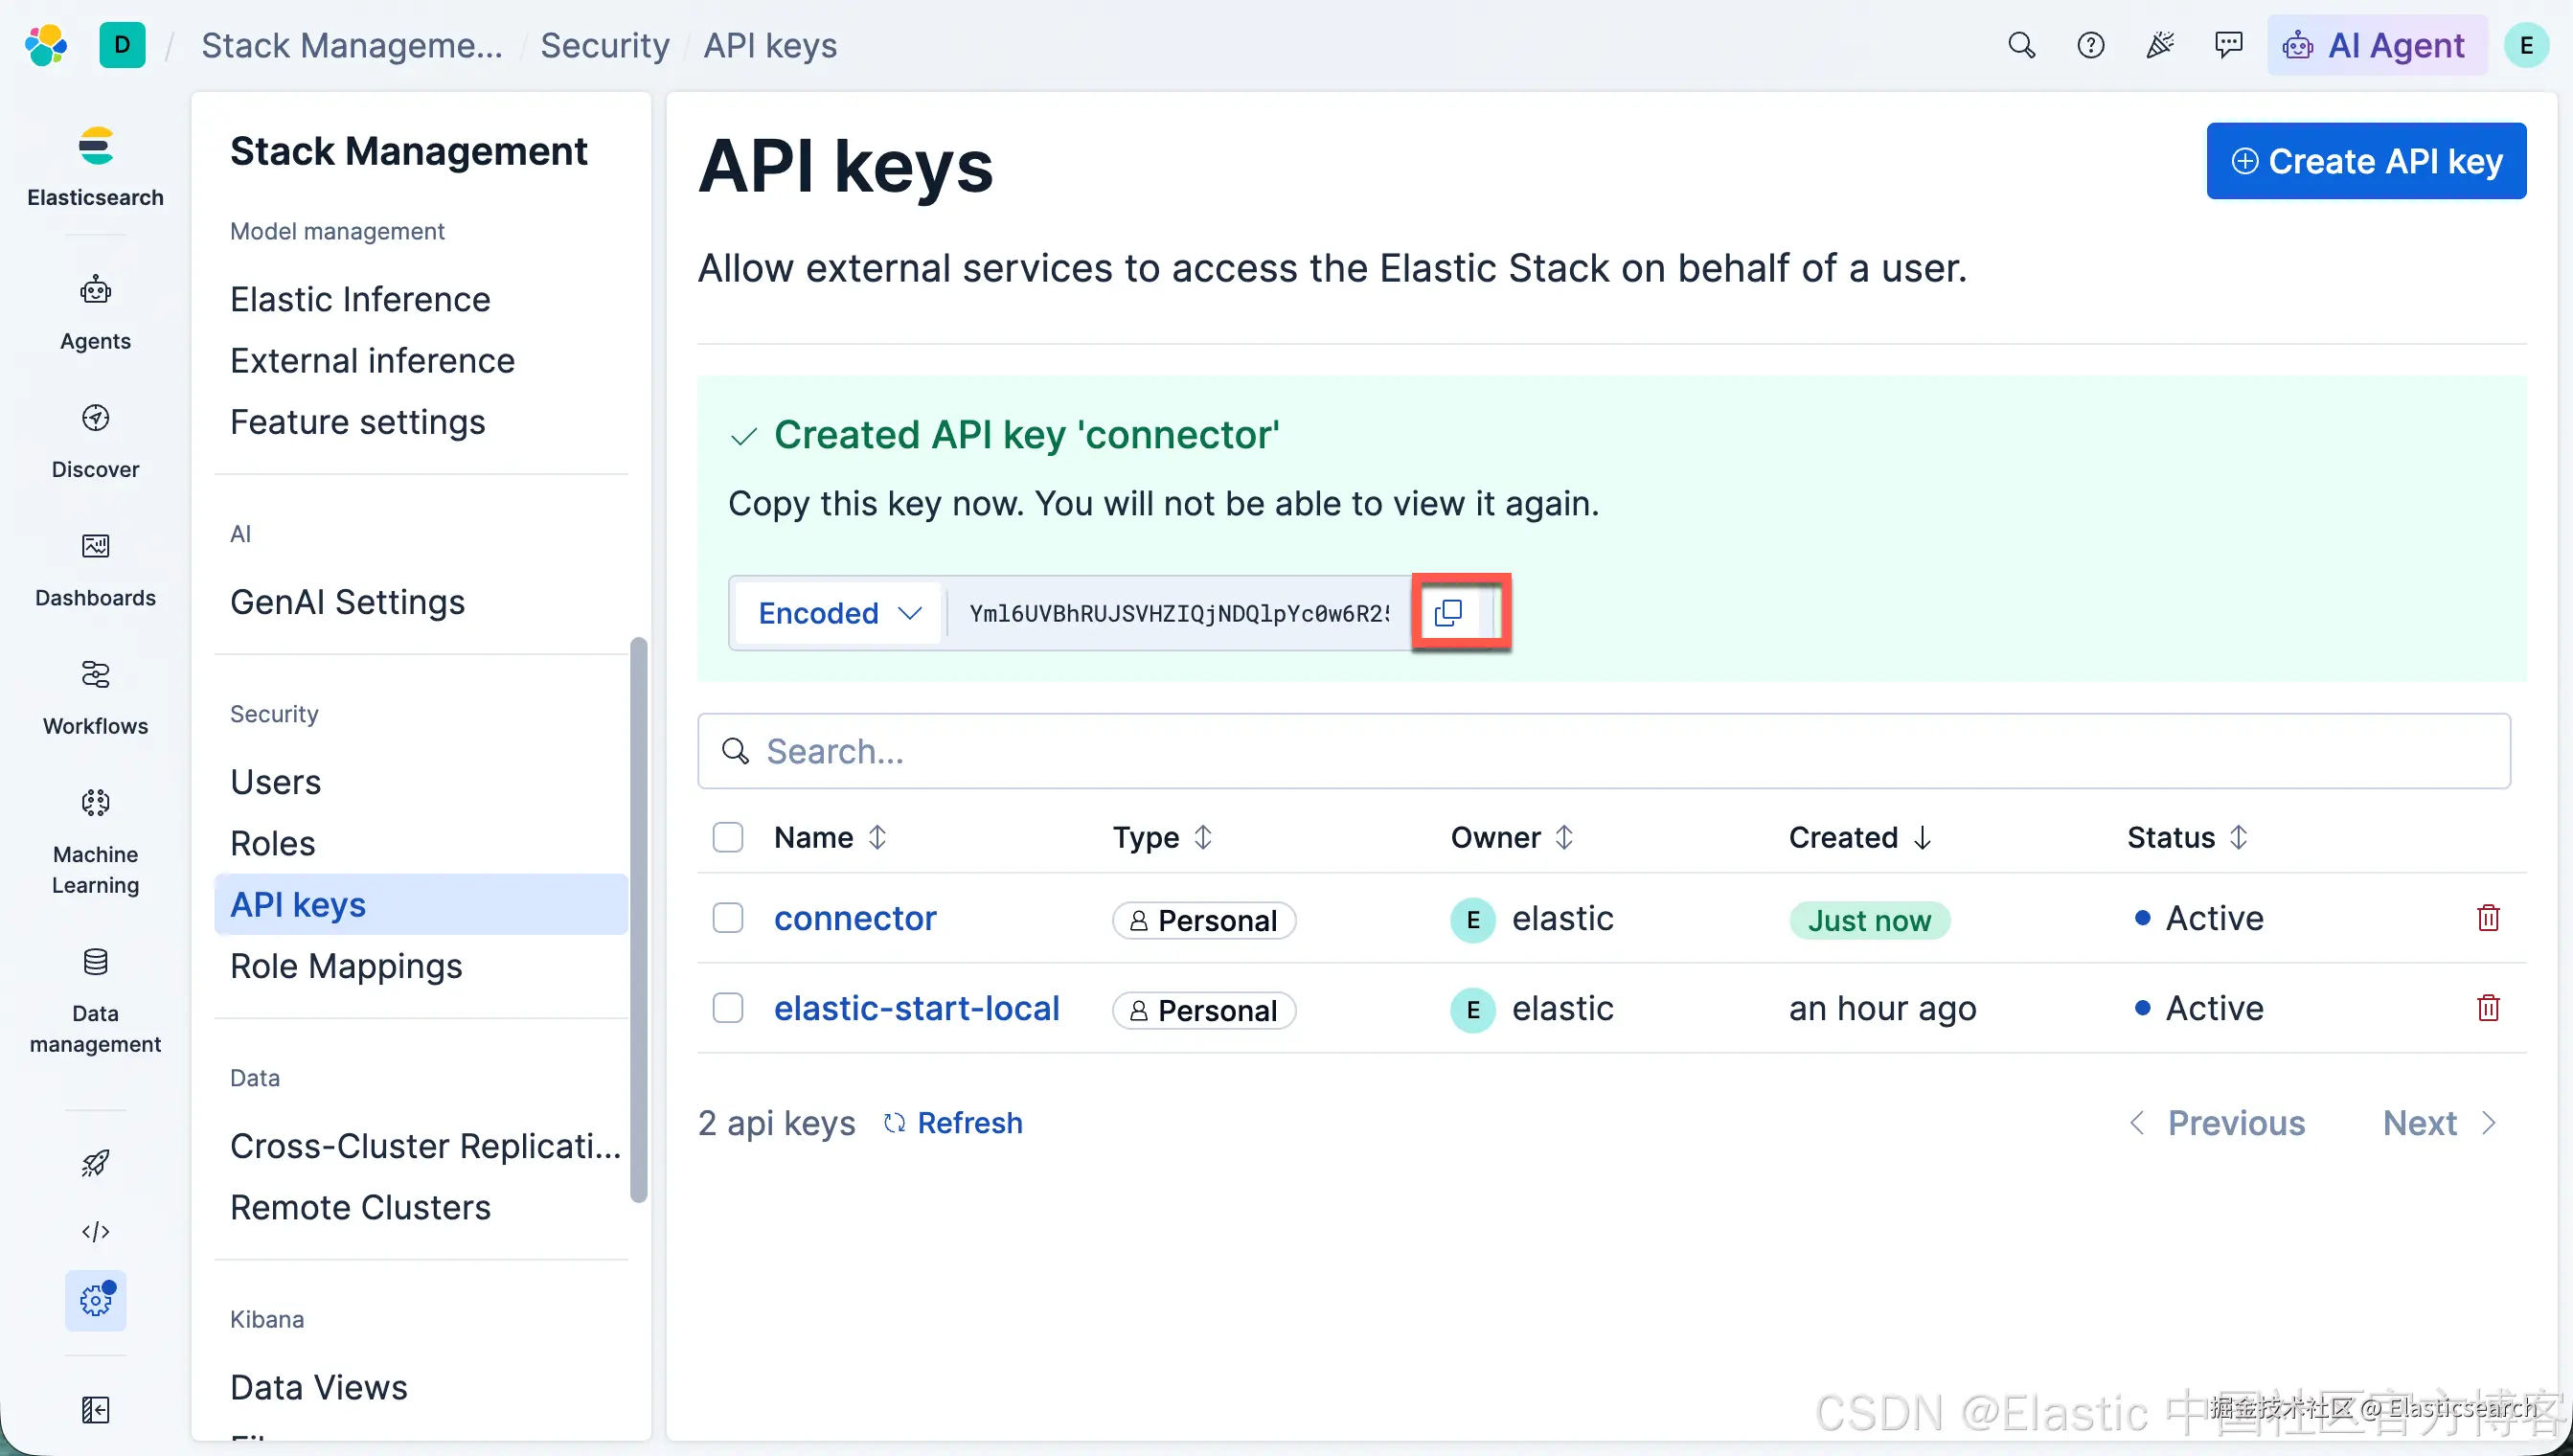
如果使用 curl,则需要在请求中添加身份验证请求头(Authentication Headers)。
下面是一个如何添加身份验证信息的示例。
注意 : 如果希望系统自动生成连接器 ID(Connector ID),请使用
POST _connectorAPI 端点。
ini
`export APIKEY=Yml6UVBhRUJSVHZIQjNDQlpYc0w6R25BRnhRWFJ4MWlmZHRDR1VhNzRsQQ==`AI代码解释
arduino
`

1.  curl -s -X PUT http://localhost:9200/_connector/my-connector-id \
2.  -H "Authorization: APIKey $APIKEY" \
3.  -H "Content-Type: application/json" \
4.  -d '{
5.    "name": "Music catalog",
6.    "index_name":  "music",
7.    "service_type": "postgresql"
8.  }'

`AI代码解释
vbnet
`

1.  > -H "Authorization: APIKey $APIKEY" \
2.  > -H "Content-Type: application/json" \
3.  > -d '{
4.  >   "name": "Music catalog",
5.  >   "index_name":  "music",
6.  >   "service_type": "postgresql"
7.  > }'
8.  {"id":"my-connector-id","result":"created"}

`AI代码解释
有关如何创建 API Key(API 密钥)的详细说明,请参阅 配置自行管理的 PostgreSQL 连接器(Set up a self-managed PostgreSQL connector) 教程。
在 Docker 中运行 PostgreSQL 实例
在本教程中,我们将通过 Docker 启动一个 PostgreSQL 实例,并导入一些示例数据。
当然,如果你已经拥有正在运行的 PostgreSQL 实例,可以跳过这一步,直接使用现有的 PostgreSQL 数据库。
需要注意的是,如果使用不同的 PostgreSQL 实例,可能需要对后续步骤中介绍的连接器配置进行相应调整。
接下来,让我们启动一个 PostgreSQL Docker 容器,配置数据库用户名和密码,并将服务通过 5432 端口对外提供访问:
css
`docker run --name postgres -e POSTGRES_USER=myuser -e POSTGRES_PASSWORD=mypassword -p 5432:5432 -d postgres`AI代码解释下载并导入示例数据
bash
`mkdir -p ~/data`AI代码解释我们将使用 Chinook 数据集 作为示例数据。
运行以下命令,将该数据集文件下载到 ~/data 目录中:
bash
`curl -L https://raw.githubusercontent.com/lerocha/chinook-database/master/ChinookDatabase/DataSources/Chinook_PostgreSql.sql -o ~/data/Chinook_PostgreSql.sql`AI代码解释
bash
`

1.  $ pwd
2.  /Users/liuxg/data
3.  $ ls Chinook_PostgreSql.sql
4.  Chinook_PostgreSql.sql

`AI代码解释
现在,我们需要将示例数据导入 PostgreSQL 容器,并创建相应的数据库表。
运行以下 Docker 命令,将示例数据文件复制到容器中,然后执行 psql 脚本,完成数据表的创建和示例数据的导入:
bash
`

1.  docker cp ~/data/Chinook_PostgreSql.sql postgres:/
2.  docker exec -it postgres psql -U myuser -f /Chinook_PostgreSql.sql

`AI代码解释
sql
`
1. $ docker cp ~/data/Chinook_PostgreSql.sql postgres:/
2. Successfully copied 600kB (transferred 602kB) to postgres:/
3. $ docker exec -it postgres psql -U myuser -f /Chinook_PostgreSql.sql
4. psql:/Chinook_PostgreSql.sql:19: NOTICE: database "chinook" does not exist, skipping
5. DROP DATABASE
6. CREATE DATABASE
7. You are now connected to database "chinook" as user "myuser".
8. CREATE TABLE
9. CREATE TABLE
10. CREATE TABLE
11. CREATE TABLE
12. CREATE TABLE
13. CREATE TABLE
14. CREATE TABLE
15. CREATE TABLE
16. CREATE TABLE
17. CREATE TABLE
18. CREATE TABLE
19. ALTER TABLE
20. CREATE INDEX
21. ALTER TABLE
22. CREATE INDEX
23. ALTER TABLE
24. CREATE INDEX
25. ALTER TABLE
26. CREATE INDEX
27. ALTER TABLE
28. CREATE INDEX
29. ALTER TABLE
30. CREATE INDEX
31. ALTER TABLE
32. CREATE INDEX
33. ALTER TABLE
34. CREATE INDEX
35. ALTER TABLE
36. CREATE INDEX
37. ALTER TABLE
38. CREATE INDEX
39. ALTER TABLE
40. CREATE INDEX
41. INSERT 0 25
42. INSERT 0 5
43. INSERT 0 275
44. INSERT 0 347
45. INSERT 0 1000
46. INSERT 0 1000
47. INSERT 0 1000
48. INSERT 0 503
49. INSERT 0 8
50. INSERT 0 59
51. INSERT 0 412
52. INSERT 0 1000
53. INSERT 0 1000
54. INSERT 0 240
55. INSERT 0 18
56. INSERT 0 1000
57. INSERT 0 1000
58. INSERT 0 1000
59. INSERT 0 1000
60. INSERT 0 1000
61. INSERT 0 1000
62. INSERT 0 1000
63. INSERT 0 1000
64. INSERT 0 715
66. What's next:
67. Try Docker Debug for seamless, persistent debugging tools in any container or image → docker debug postgres
68. Learn more at https://docs.docker.com/go/debug-cli/
`AI代码解释收起代码块接下来,让我们验证 chinook 数据库中的数据表是否已正确创建:
bash
`docker exec -it postgres psql -U myuser -d chinook -c "\dt"`AI代码解释
less
`
1. $ docker exec -it postgres psql -U myuser -d chinook -c "\dt"
2. List of tables
3. Schema | Name | Type | Owner
4. --------+----------------+-------+--------
5. public | album | table | myuser
6. public | artist | table | myuser
7. public | customer | table | myuser
8. public | employee | table | myuser
9. public | genre | table | myuser
10. public | invoice | table | myuser
11. public | invoice_line | table | myuser
12. public | media_type | table | myuser
13. public | playlist | table | myuser
14. public | playlist_track | table | myuser
15. public | track | table | myuser
16. (11 rows)
19. What's next:
20. Try Docker Debug for seamless, persistent debugging tools in any container or image → docker debug postgres
21. Learn more at https://docs.docker.com/go/debug-cli/
`AI代码解释album 表应包含 347 条记录,而 artist 表应包含 275 条记录。
现在,终于到了最有趣的环节!我们将配置一个连接器(Connector),在 Elasticsearch 中创建 PostgreSQL 数据的可搜索镜像副本,以便对数据库中的数据进行搜索。
创建连接器
我们将使用 Create Connector API(创建连接器 API),创建一个 PostgreSQL 连接器实例。
请使用 Dev Tools Console(开发工具控制台) 或 curl 执行以下 API 请求:
bash
`

1.  PUT _connector/my-connector-id
2.  {
3.    "name": "Music catalog",
4.    "index_name":  "music",
5.    "service_type": "postgresql"
6.  }

`AI代码解释
实际上,我们已经在上面的 curl 指令使用 API key 在 terminal 中已经创建了这个 my-connector-id:
bash
`GET _connector/my-connector-id`AI代码解释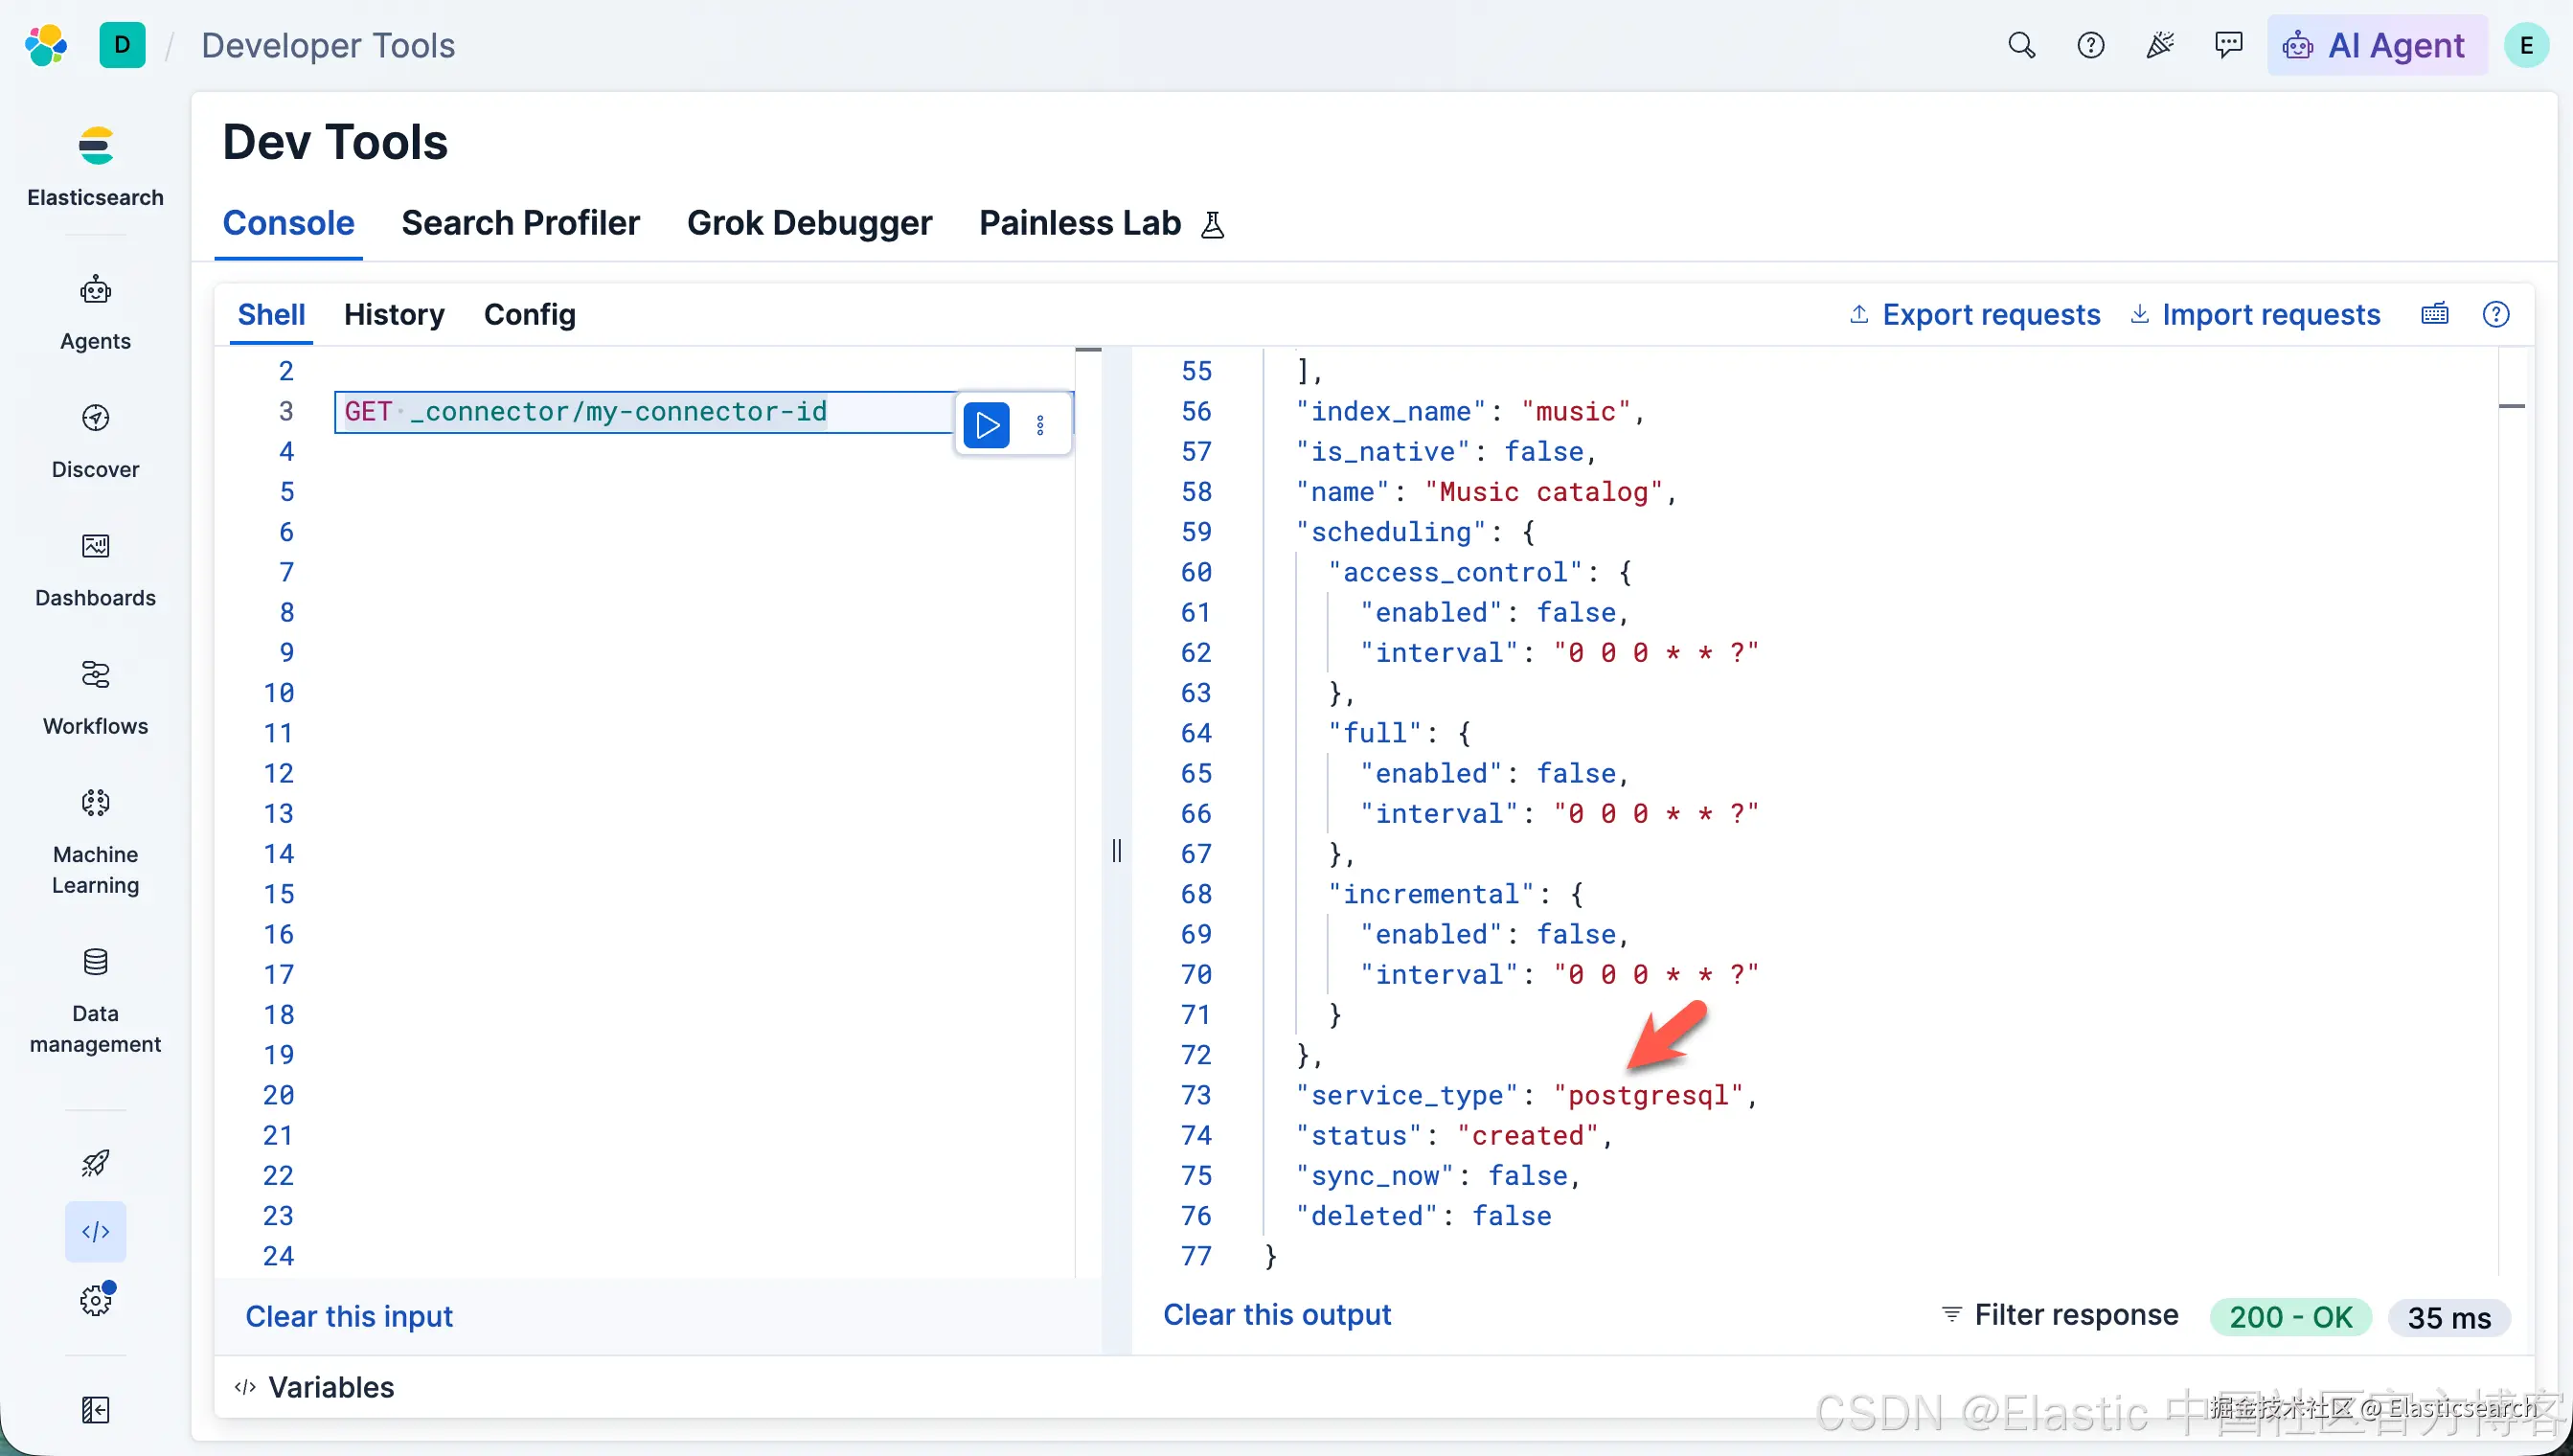
提示
service_type指的是连接器所连接的第三方数据源类型。
请注意,我们在 PUT 请求中明确指定了连接器 ID:my-connector-id。后续在本地配置和运行连接器服务(Connector Service)时,需要使用这个连接器 ID。
如果你希望 Elasticsearch 自动生成连接器 ID,可以将:
bash
`PUT _connector/my-connector-id`AI代码解释替换为:
go
`POST _connector`AI代码解释配置连接器服务
现在,我们将运行连接器服务,以便开始将 PostgreSQL 实例中的数据同步到 Elasticsearch。
我们将按照 通过 Docker 容器运行连接器服务(Running from a Docker Container) 文档中介绍的步骤进行操作。
当你在自己的基础设施上运行连接器服务时,需要提供一个配置文件,其中包含以下信息:
-
elasticsearch.host:Elasticsearch 服务的访问地址(Endpoint)。 -
elasticsearch.api_key:用于访问 Elasticsearch 的 API Key(API 密钥)。 -
service_type:第三方数据源的类型。 -
connector_id:连接器的唯一标识符(Connector ID)。
创建 API Key
如果你尚未创建用于访问 Elasticsearch 的 API Key,可以通过 _security/api_key API 创建。
在这里,我们假设目标 Elasticsearch 索引名称为 music。
bash
`
1. POST /_security/api_key
2. {
3. "name": "music-connector",
4. "role_descriptors": {
5. "music-connector-role": {
6. "cluster": [
7. "monitor",
8. "manage_connector"
9. ],
10. "indices": [
11. {
12. "names": [
13. "music",
14. ".search-acl-filter-music",
15. ".elastic-connectors*"
16. ],
17. "privileges": [
18. "all"
19. ],
20. "allow_restricted_indices": false
21. }
22. ]
23. }
24. }
25. }
`AI代码解释你需要使用 API 响应中返回的 encoded 值,作为配置文件中 elasticsearch.api_key 的值。
提示
你也可以通过 Kibana 和 Serverless 的图形用户界面(UI)创建 API Key(API 密钥)。就像我们上面在 Kibana 中创建 API 可以那样。
准备配置文件
接下来,让我们创建一个目录和一个 config.yml 文件,用于存储连接器(Connector)的配置信息:
arduino
`

1.  mkdir -p ~/connectors-config
2.  touch ~/connectors-config/config.yml

`AI代码解释
现在,让我们将连接器的详细配置信息添加到配置文件中。
打开 config.yml 文件,粘贴以下配置内容,并将其中的占位符替换为你自己的实际配置值:
yaml
`

1.  elasticsearch.host: <ELASTICSEARCH_ENDPOINT>  #1
2.  elasticsearch.api_key: <ELASTICSEARCH_API_KEY>  #2

4.  connectors:
5.    - connector_id: "my-connector-id"
6.      service_type: "postgresql"

`AI代码解释-
Elasticsearch 服务地址(Endpoint)
-
Elasticsearch API Key(API 密钥)
你可以参考 elastic/connectors GitHub 仓库中提供的示例配置文件
针对我们的情况:
yaml
`

1.  elasticsearch.host: http://localhost:9200
2.  elasticsearch.api_key: Yml6UVBhRUJSVHZIQjNDQlpYc0w6R25BRnhRWFJ4MWlmZHRDR1VhNzRsQQ==

4.  connectors:
5.    - connector_id: "my-connector-id"
6.      service_type: "postgresql"

`AI代码解释
运行连接器服务
现在,我们已经完成了配置文件的设置,接下来可以在本地运行连接器服务(Connector Service)。
连接器服务将根据配置文件中的信息,将你的连接器实例连接到对应的 Elasticsearch 部署环境。
运行以下 Docker 命令,启动连接器服务:
markdown
`

1.  docker run \
2.  -v "$HOME/connectors-config:/config" \
3.  --rm \
4.  --tty -i \
5.  --network host \
6.  docker.elastic.co/integrations/elastic-connectors:9.5.5 \
7.  /app/bin/elastic-ingest \
8.  -c /config/config.yml

`AI代码解释通过获取连接器的状态(status)和 last_seen 字段,验证连接器是否已成功连接到 Elasticsearch。
less
`
1. $ pwd
2. /Users/liuxg/connectors-config
3. $ ls
4. config.yml
5. $ docker run \
6. > -v "$HOME/connectors-config:/config" \
7. > --rm \
8. > --tty -i \
9. > --network host \
10. > docker.elastic.co/integrations/elastic-connectors:9.5.5 \
11. > /app/bin/elastic-ingest \
12. > -c /config/config.yml
13. Unable to find image 'docker.elastic.co/integrations/elastic-connectors:9.5.5' locally
14. 9.5.5: Pulling from integrations/elastic-connectors
15. 15d50077706d: Pull complete
16. c6e22a7bfbe7: Pull complete
17. 50cf3e9ded32: Pull complete
18. a50edd35211b: Pull complete
19. ab5e6c18c617: Pull complete
20. ddb661e2b37e: Pull complete
21. 9ec9c2bf70ec: Pull complete
22. 338c7e165c2b: Pull complete
23. 9c4938f9a550: Pull complete
24. d78c37e557a9: Pull complete
25. 67c7b6446184: Pull complete
26. eea86ce2d15d: Pull complete
27. bd9ddc54bea9: Pull complete
28. 90846bbced28: Pull complete
29. 968352321036: Pull complete
30. Digest: sha256:a04354a27ca2b042b3bd2d3ecbbf0ac175ea2d6e82a87823852e641a25eb2400
31. Status: Downloaded newer image for docker.elastic.co/integrations/elastic-connectors:9.5.5
32. [FMWK][07:08:58][INFO] Running connector service version 9.5.5
33. [FMWK][07:08:58][INFO] Loading config from /config/config.yml
34. [FMWK][07:08:58][INFO] Running preflight checks
35. [FMWK][07:08:58][INFO] Waiting for Elasticsearch at http://localhost:9200 (so far: 0 secs)
36. [FMWK][07:08:58][INFO] Elasticsearch 9.5.5 and Connectors 9.5.5 are compatible
37. [FMWK][07:08:58][INFO] Extraction service is not configured, skipping its preflight check.
38. [FMWK][07:08:58][INFO] [job_scheduling_service] Job Scheduling Service started, listening to events from http://localhost:9200
39. [FMWK][07:08:58][INFO] [content_sync_job_execution_service] Content sync job execution service started, listening to events from http://localhost:9200
40. [FMWK][07:08:58][INFO] [access_control_sync_job_execution_service] Access control sync job execution service started, listening to events from http://localhost:9200
41. [FMWK][07:08:58][INFO] [Connector id: my-connector-id, index name: music] Connector is not configured yet. Finish connector configuration in Kibana to make it possible to run a sync.
42. [FMWK][07:09:28][INFO] [Connector id: my-connector-id, index name: music] Connector is not configured yet. Finish connector configuration in Kibana to make it possible to run a sync.
43. [FMWK][07:09:58][INFO] [Connector id: my-connector-id, index name: music] Connector is not configured yet. Finish connector configuration in Kibana to make it possible to run a sync.
44. [FMWK][07:10:28][INFO] [Connector id: my-connector-id, index name: music] Connector is not configured yet. Finish connector configuration in Kibana to make it possible to run a sync.
45. [FMWK][07:10:58][INFO] [Connector id: my-connector-id, index name: music] Connector is not configured yet. Finish connector configuration in Kibana to make it possible to run a sync.
46. [FMWK][07:11:28][INFO] [Connector id: my-connector-id, index name: music] Connector is not configured yet. Finish connector configuration in Kibana to make it possible to run a sync.
47. [FMWK][07:11:58][INFO] [Connector id: my-connector-id, index name: music] Connector is not configured yet. Finish connector configuration in Kibana to make it possible to run a sync.
48. [FMWK][07:12:28][INFO] [Connector id: my-connector-id, index name: music] Connector is not configured yet. Finish connector configuration in Kibana to make it possible to run a sync.
49. [FMWK][07:12:58][INFO] [Connector id: my-connector-id, index name: music] Connector is not configured yet. Finish connector configuration in Kibana to make it possible to run a sync.
50. [FMWK][07:13:28][INFO] [Connector id: my-connector-id, index name: music] Connector is not configured yet. Finish connector configuration in Kibana to make it possible to run a sync.
51. [FMWK][07:13:59][INFO] [Connector id: my-connector-id, index name: music] Connector is not configured yet. Finish connector configuration in Kibana to make it possible to run a sync.
52. [FMWK][07:14:29][INFO] [Connector id: my-connector-id, index name: music] Connector is not configured yet. Finish connector configuration in Kibana to make it possible to run a sync.
`AI代码解释收起代码块连接器的状态应为 needs_configuration(需要配置)。
注意 :
last_seen字段中的时间采用 UTC(协调世界时)表示。last_seen字段表示连接器最近一次与 Elasticsearch 成功通信的时间,可用于确认连接器是否已成功连接到 Elasticsearch。
bash
`GET _connector/my-connector-id`AI代码解释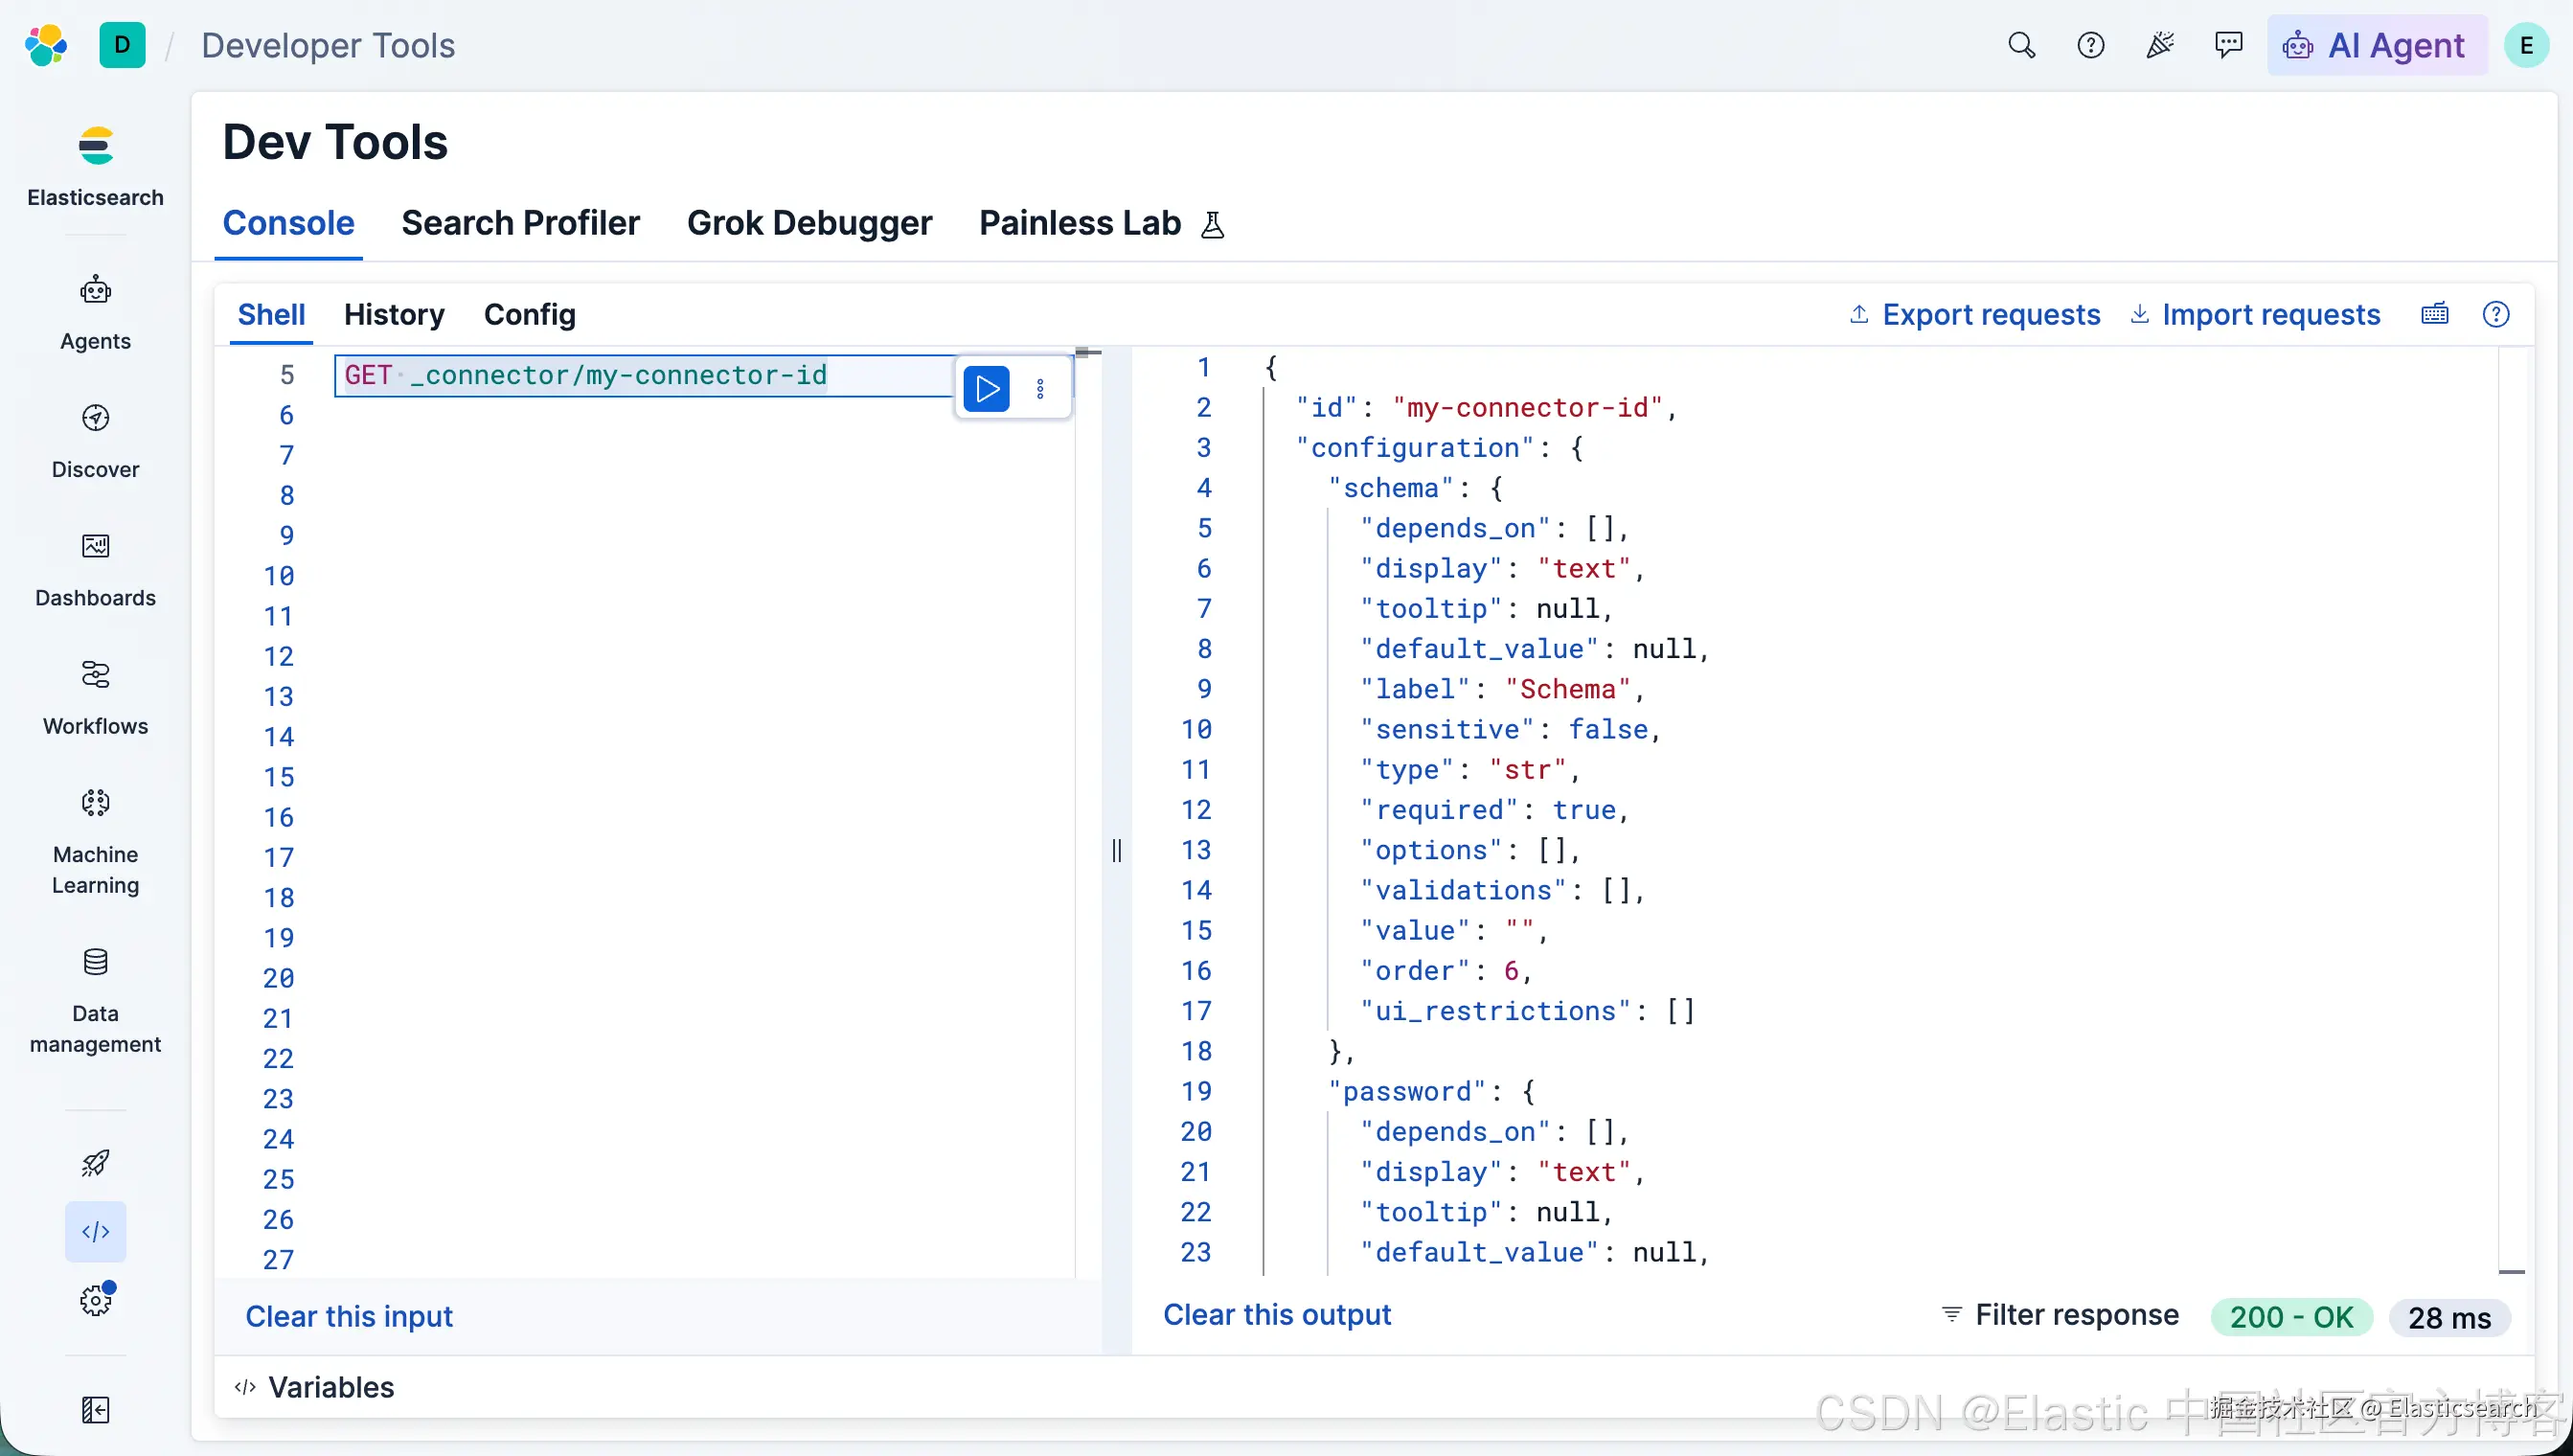
配置连接器
现在,我们的连接器实例已经启动并正常运行,但它还不知道应该从哪里同步数据。
配置过程的最后一步,就是为连接器提供 PostgreSQL 实例的详细连接信息。
如果你通过 Elastic Cloud 或 Serverless 的图形用户界面(UI)配置连接器,系统会提示你直接在界面中填写这些信息。
不过,由于本教程重点介绍如何通过编程方式管理连接器,因此我们将使用 Update Connector Configuration API(更新连接器配置 API),添加所需的配置信息。
提示
在配置连接器之前,请确保连接器服务已经注册了配置模式。对于自行管理的连接器,在
config.yml文件填写完成后,连接器服务会在启动时自动注册配置模式。只有在配置模式注册完成后,才能通过 API 更新连接器配置。你可以通过检查
GET _connector/my-connector-id请求返回的configuration属性来验证。该属性的内容应不为空。
运行以下 API 请求,使用 PostgreSQL 的详细配置信息来配置连接器:
bash
`
1. PUT _connector/my-connector-id/_configuration
2. {
3. "values": {
4. "host": "127.0.0.1",
5. "port": 5432,
6. "username": "myuser",
7. "password": "mypassword",
8. "database": "chinook",
9. "schema": "public",
10. "tables": "album,artist"
11. }
12. }
`AI代码解释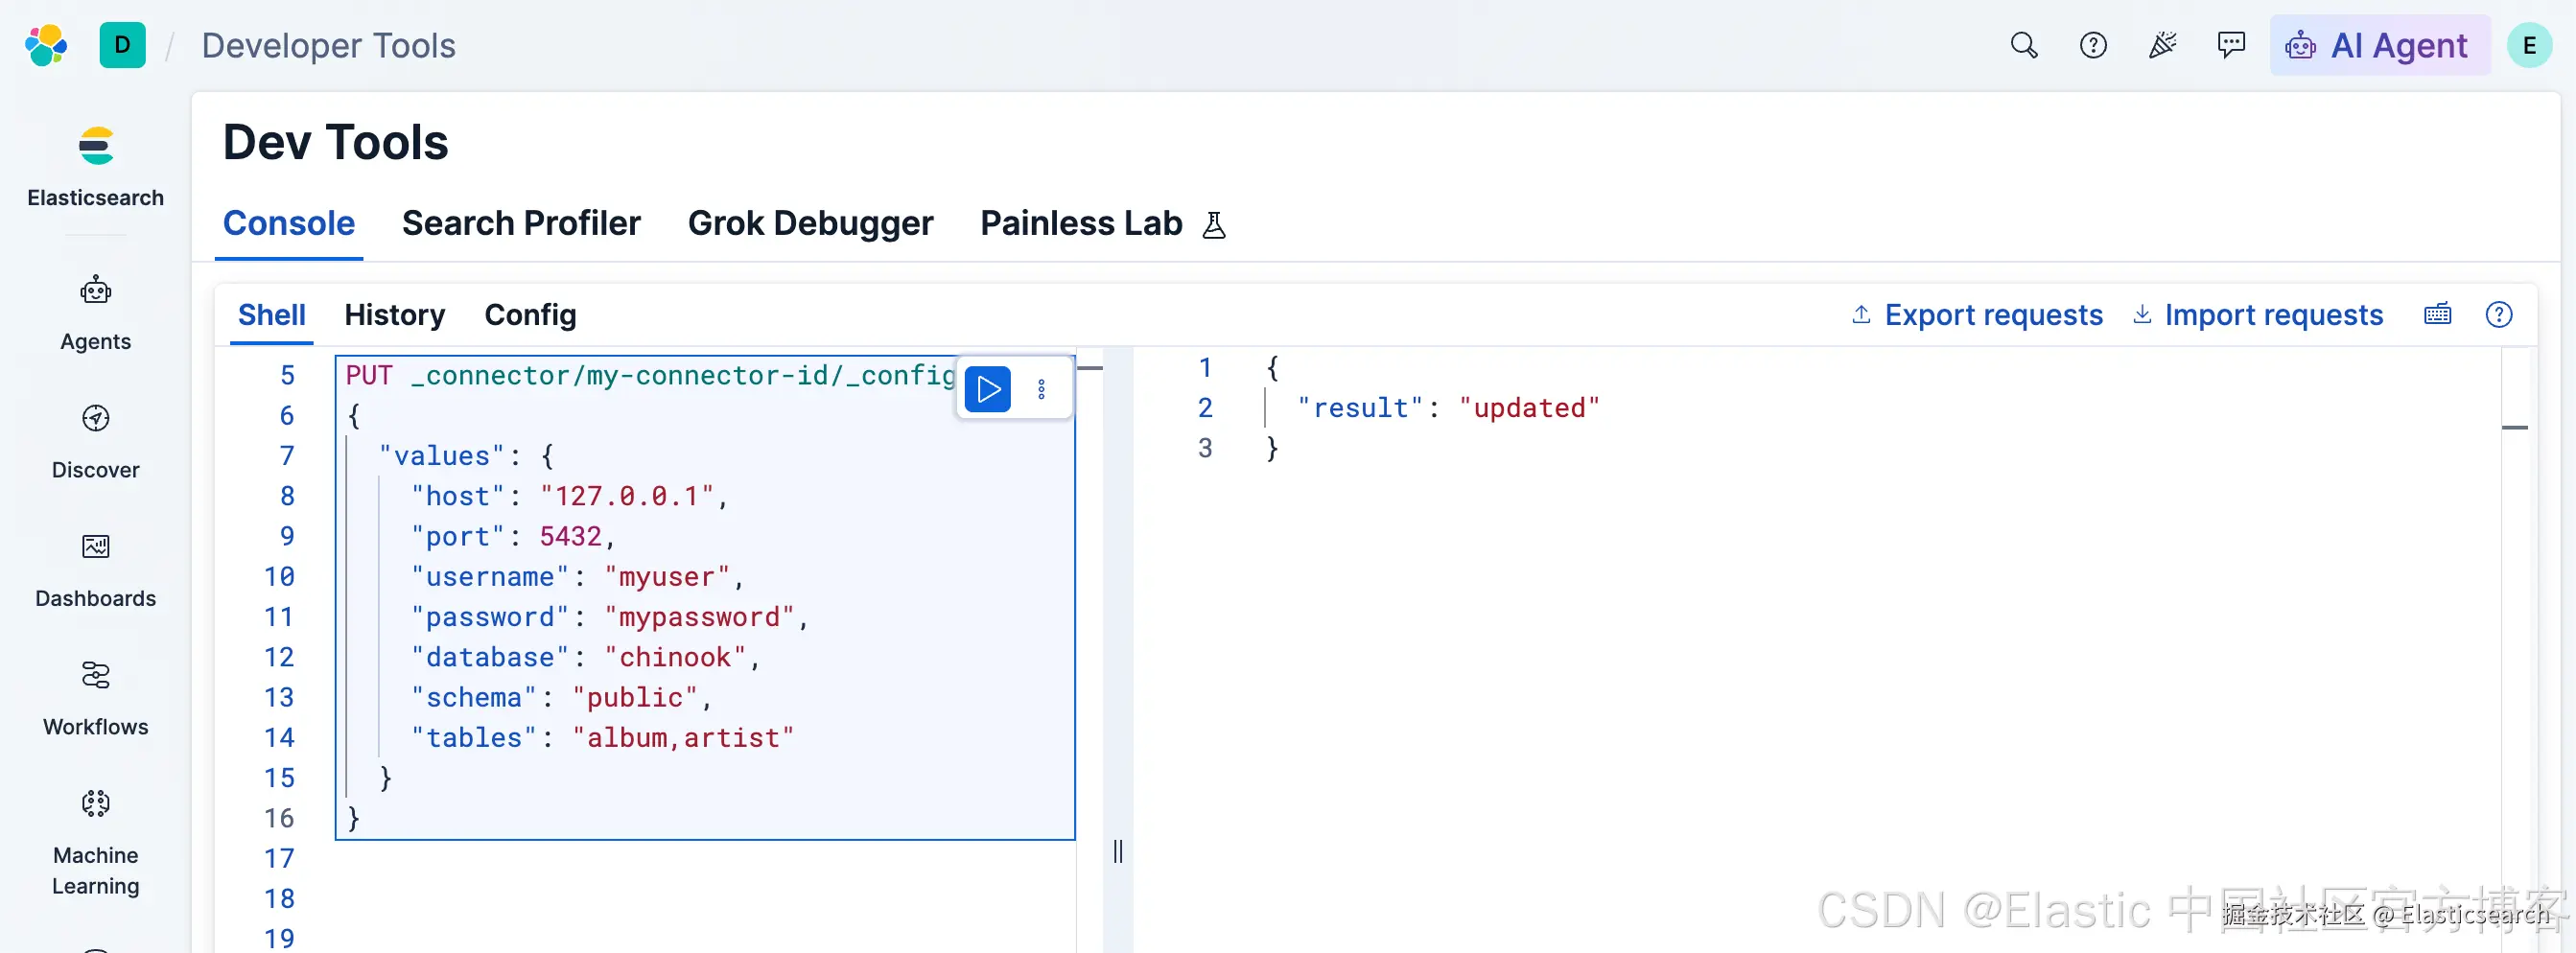
注意
配置信息因连接器类型而异。根据所连接的第三方数据源不同,配置中的键和值也会有所不同。
有关这些配置信息的详细说明,请参阅各个连接器的参考文档。
同步数据
现在,我们已经准备好将 PostgreSQL 数据同步到 Elasticsearch。运行以下 API 请求,启动完整同步任务:
bash
`

1.  POST _connector/_sync_job
2.  {
3.      "id": "my-connector-id",
4.      "job_type": "full"
5.  }

`AI代码解释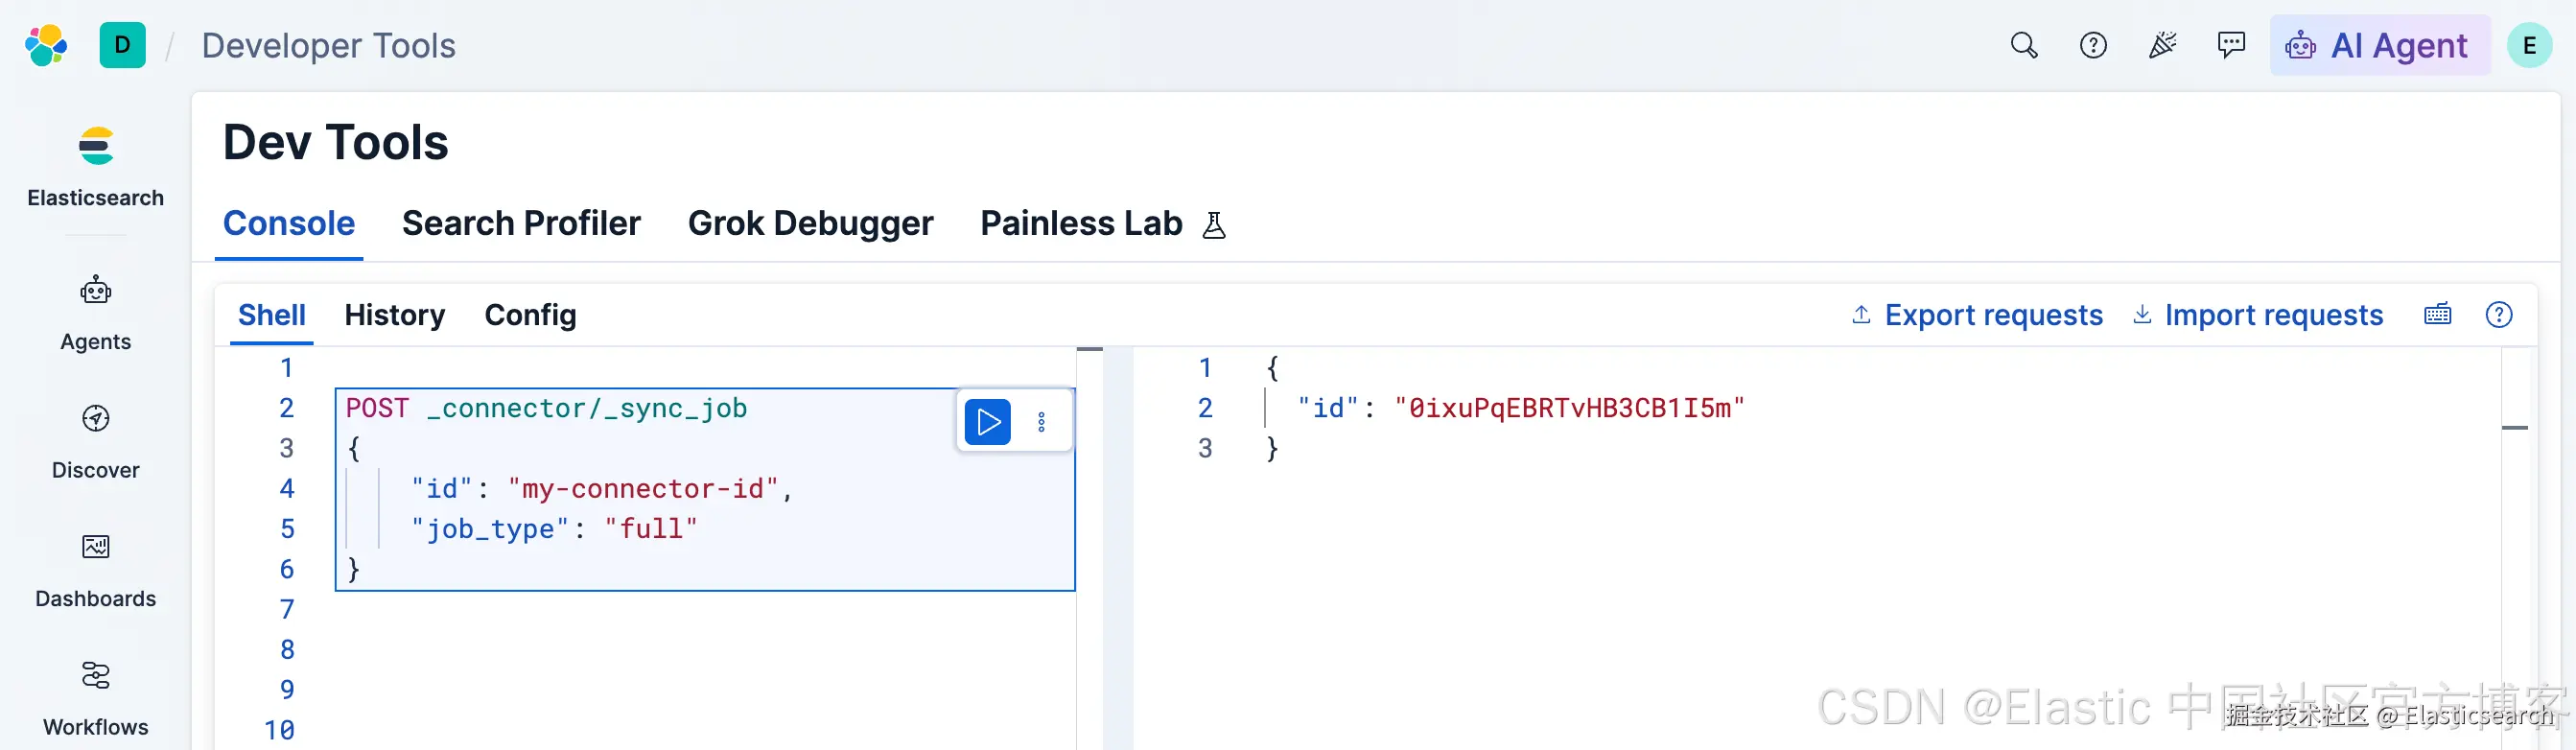
为了将数据存储到 Elasticsearch 中,连接器需要创建一个索引。在创建连接器时,我们指定了 music 索引。连接器会在启动同步任务之前,创建并配置这个 Elasticsearch 索引。
提示
在我们采用的这种方式中,连接器会使用动态映射,自动推断各个字段的数据类型。在实际应用场景中,你通常会先使用 Elasticsearch 的创建索引 API,创建具有指定字段映射和索引设置的索引。提前定义自己的字段映射,可以让你更精确地控制数据的索引方式。
我们在 Docker 运行的界面也可以看到一些输出的日子信息:
less
`
1. $ pwd
2. /Users/liuxg/connectors-config
3. $ ls
4. config.yml
5. $ docker run \
6. > -v "$HOME/connectors-config:/config" \
7. > --rm \
8. > --tty -i \
9. > --network host \
10. > docker.elastic.co/integrations/elastic-connectors:9.5.5 \
11. > /app/bin/elastic-ingest \
12. > -c /config/config.yml
13. Unable to find image 'docker.elastic.co/integrations/elastic-connectors:9.5.5' locally
14. 9.5.5: Pulling from integrations/elastic-connectors
15. 15d50077706d: Pull complete
16. c6e22a7bfbe7: Pull complete
17. 50cf3e9ded32: Pull complete
18. a50edd35211b: Pull complete
19. ab5e6c18c617: Pull complete
20. ddb661e2b37e: Pull complete
21. 9ec9c2bf70ec: Pull complete
22. 338c7e165c2b: Pull complete
23. 9c4938f9a550: Pull complete
24. d78c37e557a9: Pull complete
25. 67c7b6446184: Pull complete
26. eea86ce2d15d: Pull complete
27. bd9ddc54bea9: Pull complete
28. 90846bbced28: Pull complete
29. 968352321036: Pull complete
30. Digest: sha256:a04354a27ca2b042b3bd2d3ecbbf0ac175ea2d6e82a87823852e641a25eb2400
31. Status: Downloaded newer image for docker.elastic.co/integrations/elastic-connectors:9.5.5
32. [FMWK][07:08:58][INFO] Running connector service version 9.5.5
33. [FMWK][07:08:58][INFO] Loading config from /config/config.yml
34. [FMWK][07:08:58][INFO] Running preflight checks
35. [FMWK][07:08:58][INFO] Waiting for Elasticsearch at http://localhost:9200 (so far: 0 secs)
36. [FMWK][07:08:58][INFO] Elasticsearch 9.5.5 and Connectors 9.5.5 are compatible
37. [FMWK][07:08:58][INFO] Extraction service is not configured, skipping its preflight check.
38. [FMWK][07:08:58][INFO] [job_scheduling_service] Job Scheduling Service started, listening to events from http://localhost:9200
39. [FMWK][07:08:58][INFO] [content_sync_job_execution_service] Content sync job execution service started, listening to events from http://localhost:9200
40. [FMWK][07:08:58][INFO] [access_control_sync_job_execution_service] Access control sync job execution service started, listening to events from http://localhost:9200
41. [FMWK][07:08:58][INFO] [Connector id: my-connector-id, index name: music] Connector is not configured yet. Finish connector configuration in Kibana to make it possible to run a sync.
42. [FMWK][07:09:28][INFO] [Connector id: my-connector-id, index name: music] Connector is not configured yet. Finish connector configuration in Kibana to make it possible to run a sync.
43. [FMWK][07:09:58][INFO] [Connector id: my-connector-id, index name: music] Connector is not configured yet. Finish connector configuration in Kibana to make it possible to run a sync.
44. [FMWK][07:10:28][INFO] [Connector id: my-connector-id, index name: music] Connector is not configured yet. Finish connector configuration in Kibana to make it possible to run a sync.
45. [FMWK][07:10:58][INFO] [Connector id: my-connector-id, index name: music] Connector is not configured yet. Finish connector configuration in Kibana to make it possible to run a sync.
46. [FMWK][07:11:28][INFO] [Connector id: my-connector-id, index name: music] Connector is not configured yet. Finish connector configuration in Kibana to make it possible to run a sync.
47. [FMWK][07:11:58][INFO] [Connector id: my-connector-id, index name: music] Connector is not configured yet. Finish connector configuration in Kibana to make it possible to run a sync.
48. [FMWK][07:12:28][INFO] [Connector id: my-connector-id, index name: music] Connector is not configured yet. Finish connector configuration in Kibana to make it possible to run a sync.
49. [FMWK][07:12:58][INFO] [Connector id: my-connector-id, index name: music] Connector is not configured yet. Finish connector configuration in Kibana to make it possible to run a sync.
50. [FMWK][07:13:28][INFO] [Connector id: my-connector-id, index name: music] Connector is not configured yet. Finish connector configuration in Kibana to make it possible to run a sync.
51. [FMWK][07:13:59][INFO] [Connector id: my-connector-id, index name: music] Connector is not configured yet. Finish connector configuration in Kibana to make it possible to run a sync.
52. [FMWK][07:14:29][INFO] [Connector id: my-connector-id, index name: music] Connector is not configured yet. Finish connector configuration in Kibana to make it possible to run a sync.
53. [FMWK][07:14:59][INFO] [Connector id: my-connector-id, index name: music] Connector is not configured yet. Finish connector configuration in Kibana to make it possible to run a sync.
54. [FMWK][07:15:29][INFO] [Connector id: my-connector-id, index name: music] Connector is not configured yet. Finish connector configuration in Kibana to make it possible to run a sync.
55. [FMWK][07:15:59][INFO] [Connector id: my-connector-id, index name: music] Connector is not configured yet. Finish connector configuration in Kibana to make it possible to run a sync.
56. [FMWK][07:16:29][INFO] [Connector id: my-connector-id, index name: music] Connector is not configured yet. Finish connector configuration in Kibana to make it possible to run a sync.
57. [FMWK][07:16:59][INFO] [Connector id: my-connector-id, index name: music] Connector is not configured yet. Finish connector configuration in Kibana to make it possible to run a sync.
58. [FMWK][07:20:29][INFO] [Connector id: my-connector-id, index name: music, Sync job id: 0ixuPqEBRTvHB3CB1I5m] Executing full sync
59. [FMWK][07:20:29][INFO] [Connector id: my-connector-id, index name: music, Sync job id: 0ixuPqEBRTvHB3CB1I5m] Filtering validation started
60. [FMWK][07:20:29][INFO] [Connector id: my-connector-id, index name: music, Sync job id: 0ixuPqEBRTvHB3CB1I5m] Filtering validation result: FilteringValidationState.VALID
61. [FMWK][07:20:29][INFO] [Connector id: my-connector-id, index name: music, Sync job id: 0ixuPqEBRTvHB3CB1I5m] Creating content index: music
62. [FMWK][07:20:29][INFO] [Connector id: my-connector-id, index name: music, Sync job id: 0ixuPqEBRTvHB3CB1I5m] Content index successfully created: music
63. [FMWK][07:20:29][INFO] [Connector id: my-connector-id, index name: music, Sync job id: 0ixuPqEBRTvHB3CB1I5m] Collecting local document ids
64. [FMWK][07:20:29][INFO] [Connector id: my-connector-id, index name: music, Sync job id: 0ixuPqEBRTvHB3CB1I5m] Iterating on remote documents
65. [FMWK][07:20:29][INFO] [Connector id: my-connector-id, index name: music, Sync job id: 0ixuPqEBRTvHB3CB1I5m] Successfully connected to Postgresql.
66. [FMWK][07:20:29][INFO] [Connector id: my-connector-id, index name: music, Sync job id: 0ixuPqEBRTvHB3CB1I5m] Fetching user configured tables: ['album', 'artist']
67. [FMWK][07:20:29][INFO] [Connector id: my-connector-id, index name: music, Sync job id: 0ixuPqEBRTvHB3CB1I5m] Fetching records for table 'album'
68. [FMWK][07:20:29][WARNING] [Connector id: my-connector-id, index name: music, Sync job id: 0ixuPqEBRTvHB3CB1I5m] Something went wrong while getting cursor. Exception: (sqlalchemy.dialects.postgresql.asyncpg.Error) <class 'asyncpg.exceptions.ObjectNotInPrerequisiteStateError'>: could not get commit timestamp data
69. HINT: Make sure the configuration parameter "track_commit_timestamp" is set.
70. [SQL: SELECT MAX(pg_xact_commit_timestamp(xmin)) FROM "public"."album"]
71. (Background on this error at: https://sqlalche.me/e/20/dbapi)
72. [FMWK][07:20:31][WARNING] [Connector id: my-connector-id, index name: music, Sync job id: 0ixuPqEBRTvHB3CB1I5m] Something went wrong while getting cursor. Exception: (sqlalchemy.dialects.postgresql.asyncpg.Error) <class 'asyncpg.exceptions.ObjectNotInPrerequisiteStateError'>: could not get commit timestamp data
73. HINT: Make sure the configuration parameter "track_commit_timestamp" is set.
74. [SQL: SELECT MAX(pg_xact_commit_timestamp(xmin)) FROM "public"."album"]
75. (Background on this error at: https://sqlalche.me/e/20/dbapi)
76. [FMWK][07:20:35][WARNING] [Connector id: my-connector-id, index name: music, Sync job id: 0ixuPqEBRTvHB3CB1I5m] Something went wrong while getting cursor. Exception: (sqlalchemy.dialects.postgresql.asyncpg.Error) <class 'asyncpg.exceptions.ObjectNotInPrerequisiteStateError'>: could not get commit timestamp data
77. HINT: Make sure the configuration parameter "track_commit_timestamp" is set.
78. [SQL: SELECT MAX(pg_xact_commit_timestamp(xmin)) FROM "public"."album"]
79. (Background on this error at: https://sqlalche.me/e/20/dbapi)
80. [FMWK][07:20:35][WARNING] [Connector id: my-connector-id, index name: music, Sync job id: 0ixuPqEBRTvHB3CB1I5m] Unable to fetch last_updated_time for table 'album'
81. [FMWK][07:20:35][INFO] [Connector id: my-connector-id, index name: music, Sync job id: 0ixuPqEBRTvHB3CB1I5m] Sync progress -- extracted: 1 | filtered: 0 | skipped: 0 | created: 0 | updated: 0 | deleted: 0
82. [FMWK][07:20:35][INFO] [Connector id: my-connector-id, index name: music, Sync job id: 0ixuPqEBRTvHB3CB1I5m] Sync progress -- extracted: 101 | filtered: 0 | skipped: 0 | created: 100 | updated: 0 | deleted: 0
83. [FMWK][07:20:35][INFO] [Connector id: my-connector-id, index name: music, Sync job id: 0ixuPqEBRTvHB3CB1I5m] Sync progress -- extracted: 201 | filtered: 0 | skipped: 0 | created: 200 | updated: 0 | deleted: 0
84. [FMWK][07:20:35][INFO] [Connector id: my-connector-id, index name: music, Sync job id: 0ixuPqEBRTvHB3CB1I5m] Sync progress -- extracted: 301 | filtered: 0 | skipped: 0 | created: 300 | updated: 0 | deleted: 0
85. [FMWK][07:20:35][INFO] [Connector id: my-connector-id, index name: music, Sync job id: 0ixuPqEBRTvHB3CB1I5m] Found 348 records from table 'album'
86. [FMWK][07:20:35][INFO] [Connector id: my-connector-id, index name: music, Sync job id: 0ixuPqEBRTvHB3CB1I5m] Fetching records for table 'artist'
87. [FMWK][07:20:35][WARNING] [Connector id: my-connector-id, index name: music, Sync job id: 0ixuPqEBRTvHB3CB1I5m] Something went wrong while getting cursor. Exception: (sqlalchemy.dialects.postgresql.asyncpg.Error) <class 'asyncpg.exceptions.ObjectNotInPrerequisiteStateError'>: could not get commit timestamp data
88. HINT: Make sure the configuration parameter "track_commit_timestamp" is set.
89. [SQL: SELECT MAX(pg_xact_commit_timestamp(xmin)) FROM "public"."artist"]
90. (Background on this error at: https://sqlalche.me/e/20/dbapi)
91. [FMWK][07:20:37][WARNING] [Connector id: my-connector-id, index name: music, Sync job id: 0ixuPqEBRTvHB3CB1I5m] Something went wrong while getting cursor. Exception: (sqlalchemy.dialects.postgresql.asyncpg.Error) <class 'asyncpg.exceptions.ObjectNotInPrerequisiteStateError'>: could not get commit timestamp data
92. HINT: Make sure the configuration parameter "track_commit_timestamp" is set.
93. [SQL: SELECT MAX(pg_xact_commit_timestamp(xmin)) FROM "public"."artist"]
94. (Background on this error at: https://sqlalche.me/e/20/dbapi)
95. [FMWK][07:20:41][WARNING] [Connector id: my-connector-id, index name: music, Sync job id: 0ixuPqEBRTvHB3CB1I5m] Something went wrong while getting cursor. Exception: (sqlalchemy.dialects.postgresql.asyncpg.Error) <class 'asyncpg.exceptions.ObjectNotInPrerequisiteStateError'>: could not get commit timestamp data
96. HINT: Make sure the configuration parameter "track_commit_timestamp" is set.
97. [SQL: SELECT MAX(pg_xact_commit_timestamp(xmin)) FROM "public"."artist"]
98. (Background on this error at: https://sqlalche.me/e/20/dbapi)
99. [FMWK][07:20:41][WARNING] [Connector id: my-connector-id, index name: music, Sync job id: 0ixuPqEBRTvHB3CB1I5m] Unable to fetch last_updated_time for table 'artist'
100. [FMWK][07:20:41][INFO] [Connector id: my-connector-id, index name: music, Sync job id: 0ixuPqEBRTvHB3CB1I5m] Sync progress -- extracted: 401 | filtered: 0 | skipped: 0 | created: 400 | updated: 0 | deleted: 0
101. [FMWK][07:20:41][INFO] [Connector id: my-connector-id, index name: music, Sync job id: 0ixuPqEBRTvHB3CB1I5m] Sync progress -- extracted: 501 | filtered: 0 | skipped: 0 | created: 500 | updated: 0 | deleted: 0
102. [FMWK][07:20:41][INFO] [Connector id: my-connector-id, index name: music, Sync job id: 0ixuPqEBRTvHB3CB1I5m] Sync progress -- extracted: 601 | filtered: 0 | skipped: 0 | created: 600 | updated: 0 | deleted: 0
103. [FMWK][07:20:41][INFO] [Connector id: my-connector-id, index name: music, Sync job id: 0ixuPqEBRTvHB3CB1I5m] Found 276 records from table 'artist'
104. [FMWK][07:20:45][INFO] [Connector id: my-connector-id, index name: music, Sync job id: 0ixuPqEBRTvHB3CB1I5m] Both Extractor and Sink tasks are successfully stopped.
105. [FMWK][07:20:45][INFO] [Connector id: my-connector-id, index name: music, Sync job id: 0ixuPqEBRTvHB3CB1I5m] Sync ended with status completed -- created: 622 | updated: 0 | deleted: 0 (took 16 seconds)
106. [FMWK][07:20:45][INFO] [Connector id: my-connector-id, index name: music, Sync job id: 0ixuPqEBRTvHB3CB1I5m] --- Counters ---
107. [FMWK][07:20:45][INFO] [Connector id: my-connector-id, index name: music, Sync job id: 0ixuPqEBRTvHB3CB1I5m] 'bulk_item_responses.index' : 622
108. [FMWK][07:20:45][INFO] [Connector id: my-connector-id, index name: music, Sync job id: 0ixuPqEBRTvHB3CB1I5m] 'bulk_operations.index' : 622
109. [FMWK][07:20:45][INFO] [Connector id: my-connector-id, index name: music, Sync job id: 0ixuPqEBRTvHB3CB1I5m] 'deleted_document_count' : 0
110. [FMWK][07:20:45][INFO] [Connector id: my-connector-id, index name: music, Sync job id: 0ixuPqEBRTvHB3CB1I5m] 'doc_creates_queued' : 622
111. [FMWK][07:20:45][INFO] [Connector id: my-connector-id, index name: music, Sync job id: 0ixuPqEBRTvHB3CB1I5m] 'docs_extracted' : 622
112. [FMWK][07:20:45][INFO] [Connector id: my-connector-id, index name: music, Sync job id: 0ixuPqEBRTvHB3CB1I5m] 'indexed_document_count' : 622
113. [FMWK][07:20:45][INFO] [Connector id: my-connector-id, index name: music, Sync job id: 0ixuPqEBRTvHB3CB1I5m] 'indexed_document_volume' : 1
114. [FMWK][07:20:45][INFO] [Connector id: my-connector-id, index name: music, Sync job id: 0ixuPqEBRTvHB3CB1I5m] 'result_successes' : 622
115. [FMWK][07:20:45][INFO] [Connector id: my-connector-id, index name: music, Sync job id: 0ixuPqEBRTvHB3CB1I5m] full counters dictionary: {'docs_extracted': 622, 'doc_creates_queued': 622, 'bulk_operations.index': 622, 'bulk_item_responses.index': 622, 'result_successes': 622, 'indexed_document_count': 622, 'indexed_document_volume': 1, 'deleted_document_count': 0}
116. [FMWK][07:20:45][INFO] [Connector id: my-connector-id, index name: music, Sync job id: 0ixuPqEBRTvHB3CB1I5m] ----------------
117. [FMWK][07:20:45][INFO] [Connector id: my-connector-id, index name: music, Sync job id: 0ixuPqEBRTvHB3CB1I5m] Job terminated. Cleaning up.
118. [FMWK][07:20:46][INFO] [Connector id: my-connector-id, index name: music, Sync job id: 0ixuPqEBRTvHB3CB1I5m] Both Extractor and Sink tasks are successfully stopped.
`AI代码解释收起代码块检查同步状态
使用获取同步任务 API 跟踪同步任务的状态和进度。默认情况下,最近的任务状态会优先返回。
运行以下 API 请求,检查同步任务的状态:
ini
`GET _connector/_sync_job?connector_id=my-connector-id&size=1`AI代码解释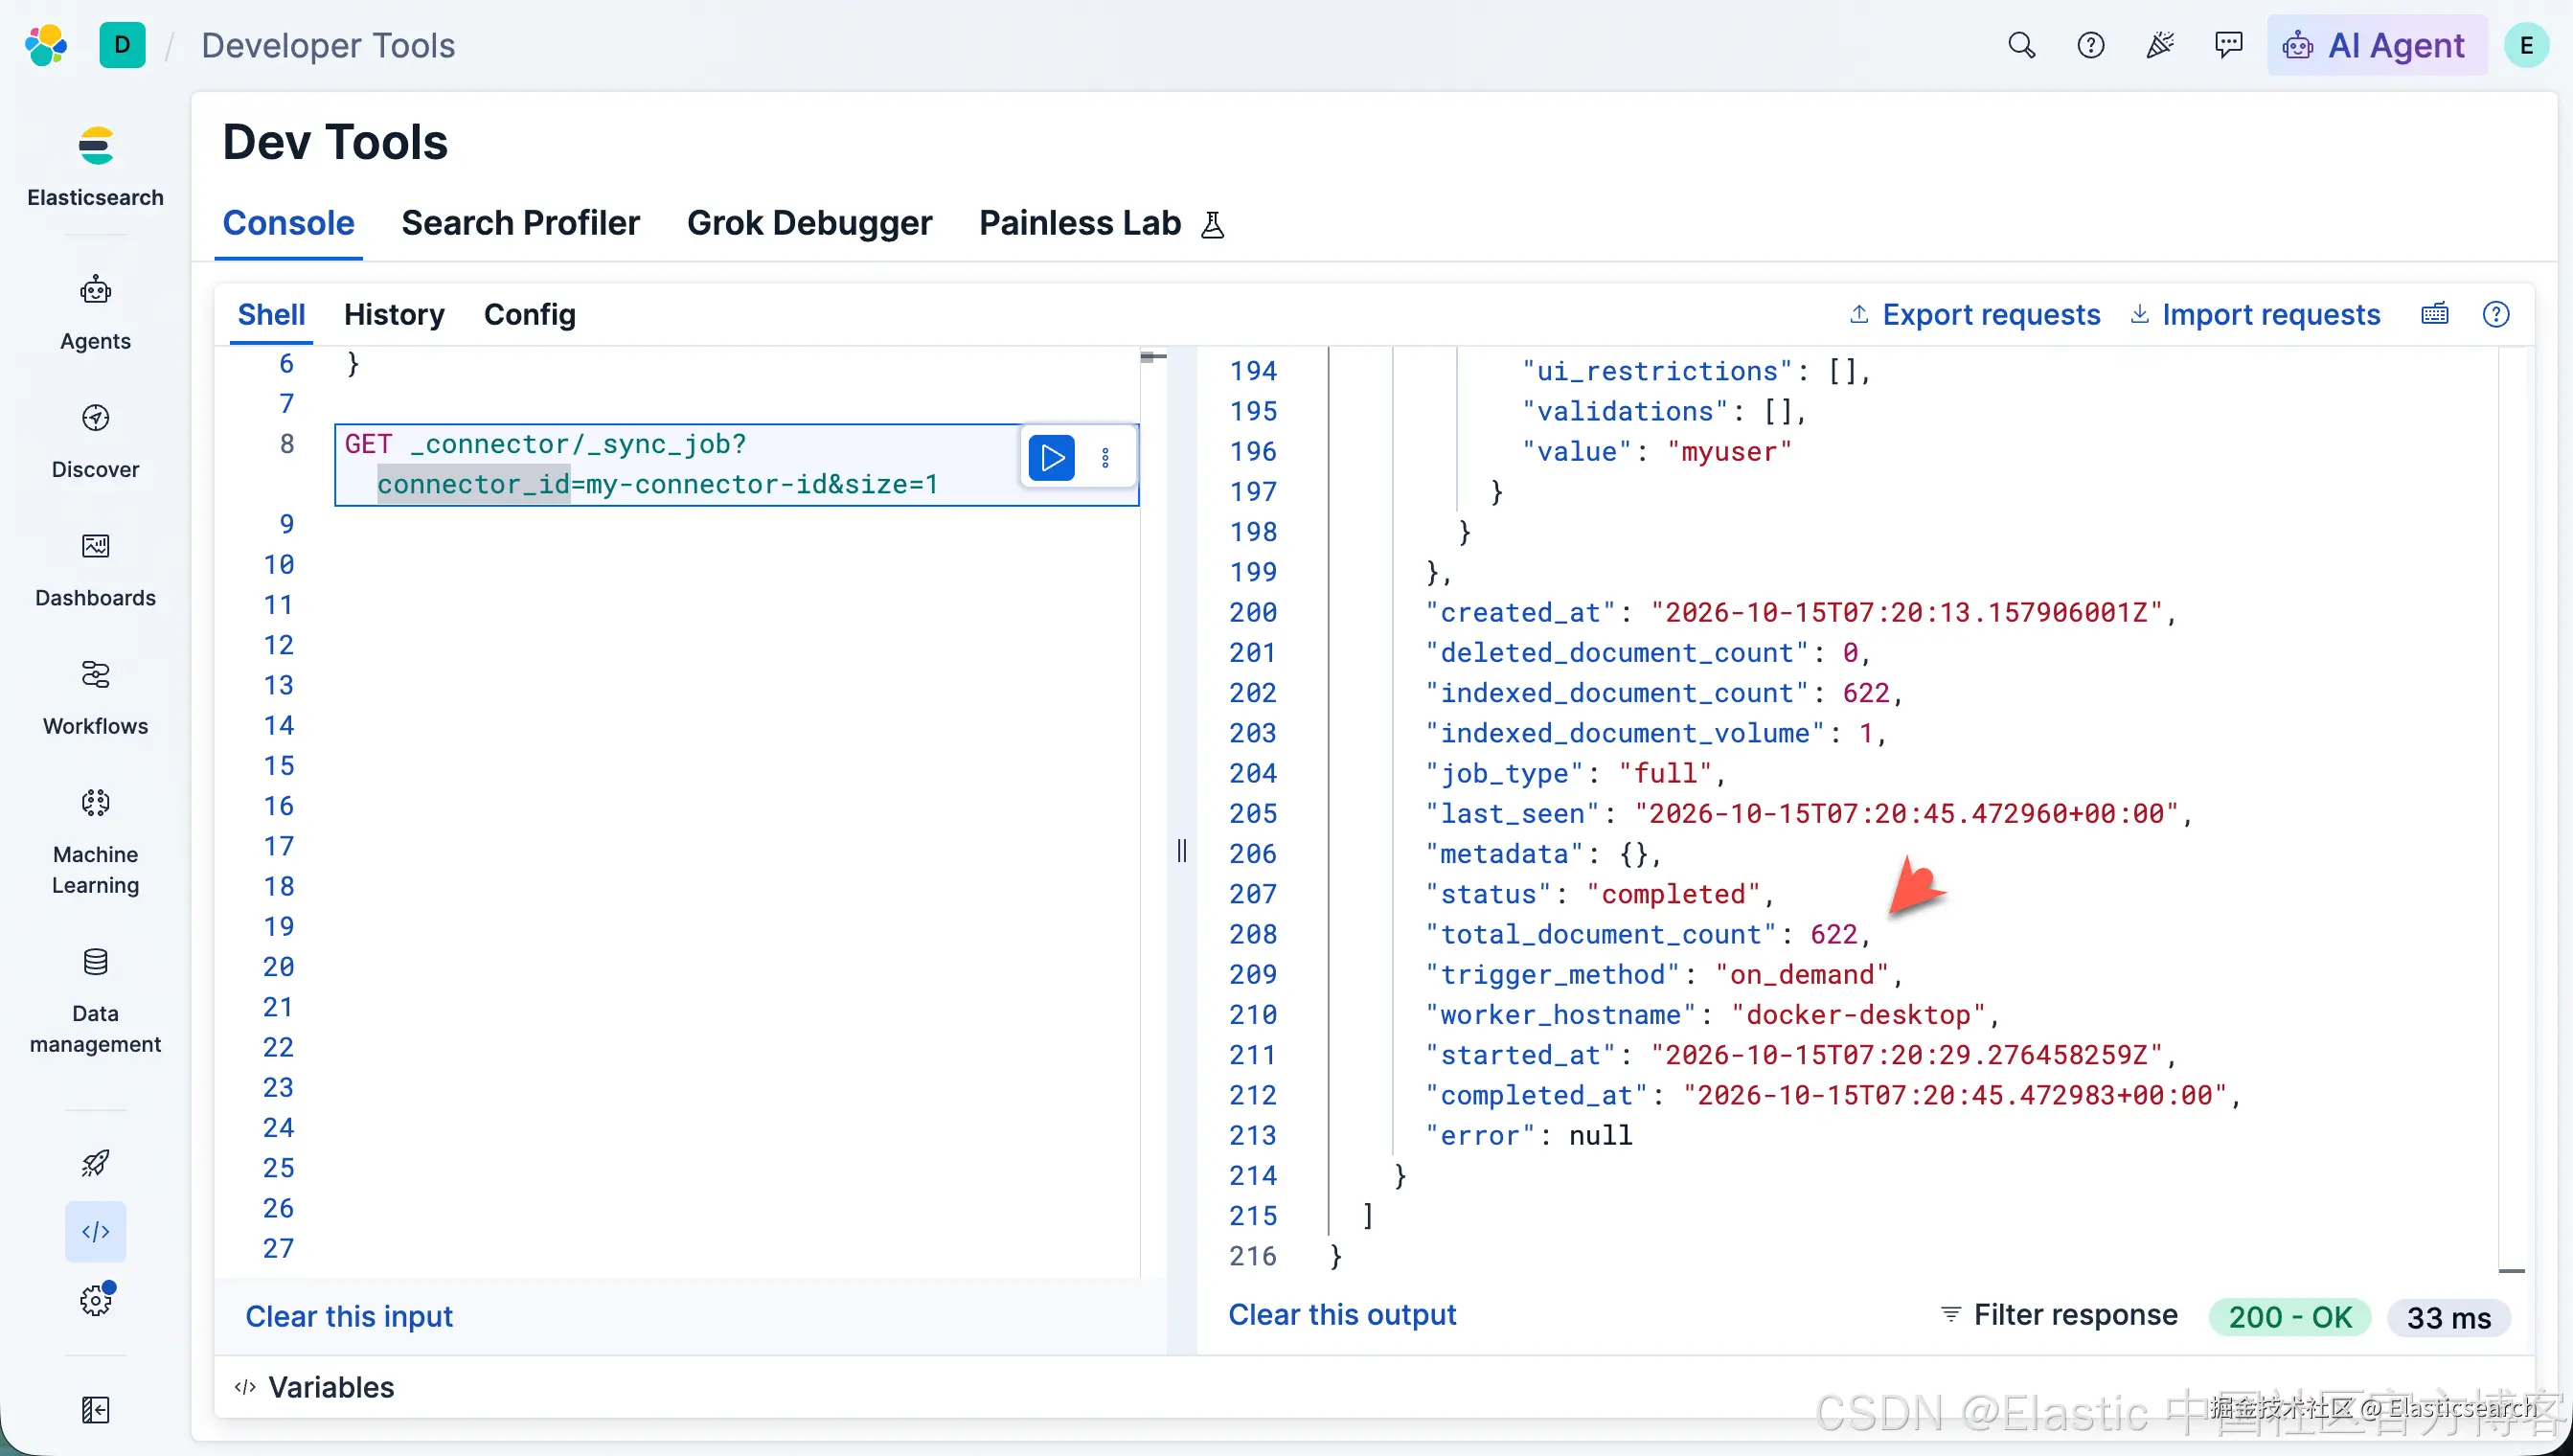
随着同步任务的进行,任务文档会不断更新。你可以根据需要随时查询该文档,以轮询方式获取最新进度。
同步任务完成后,状态应为 completed(已完成),并且 indexed_document_count(已索引文档数)应为 622。
查询数据
运行以下 API 请求,验证 music 索引中是否已存在数据:
bash
`GET music/_count`AI代码解释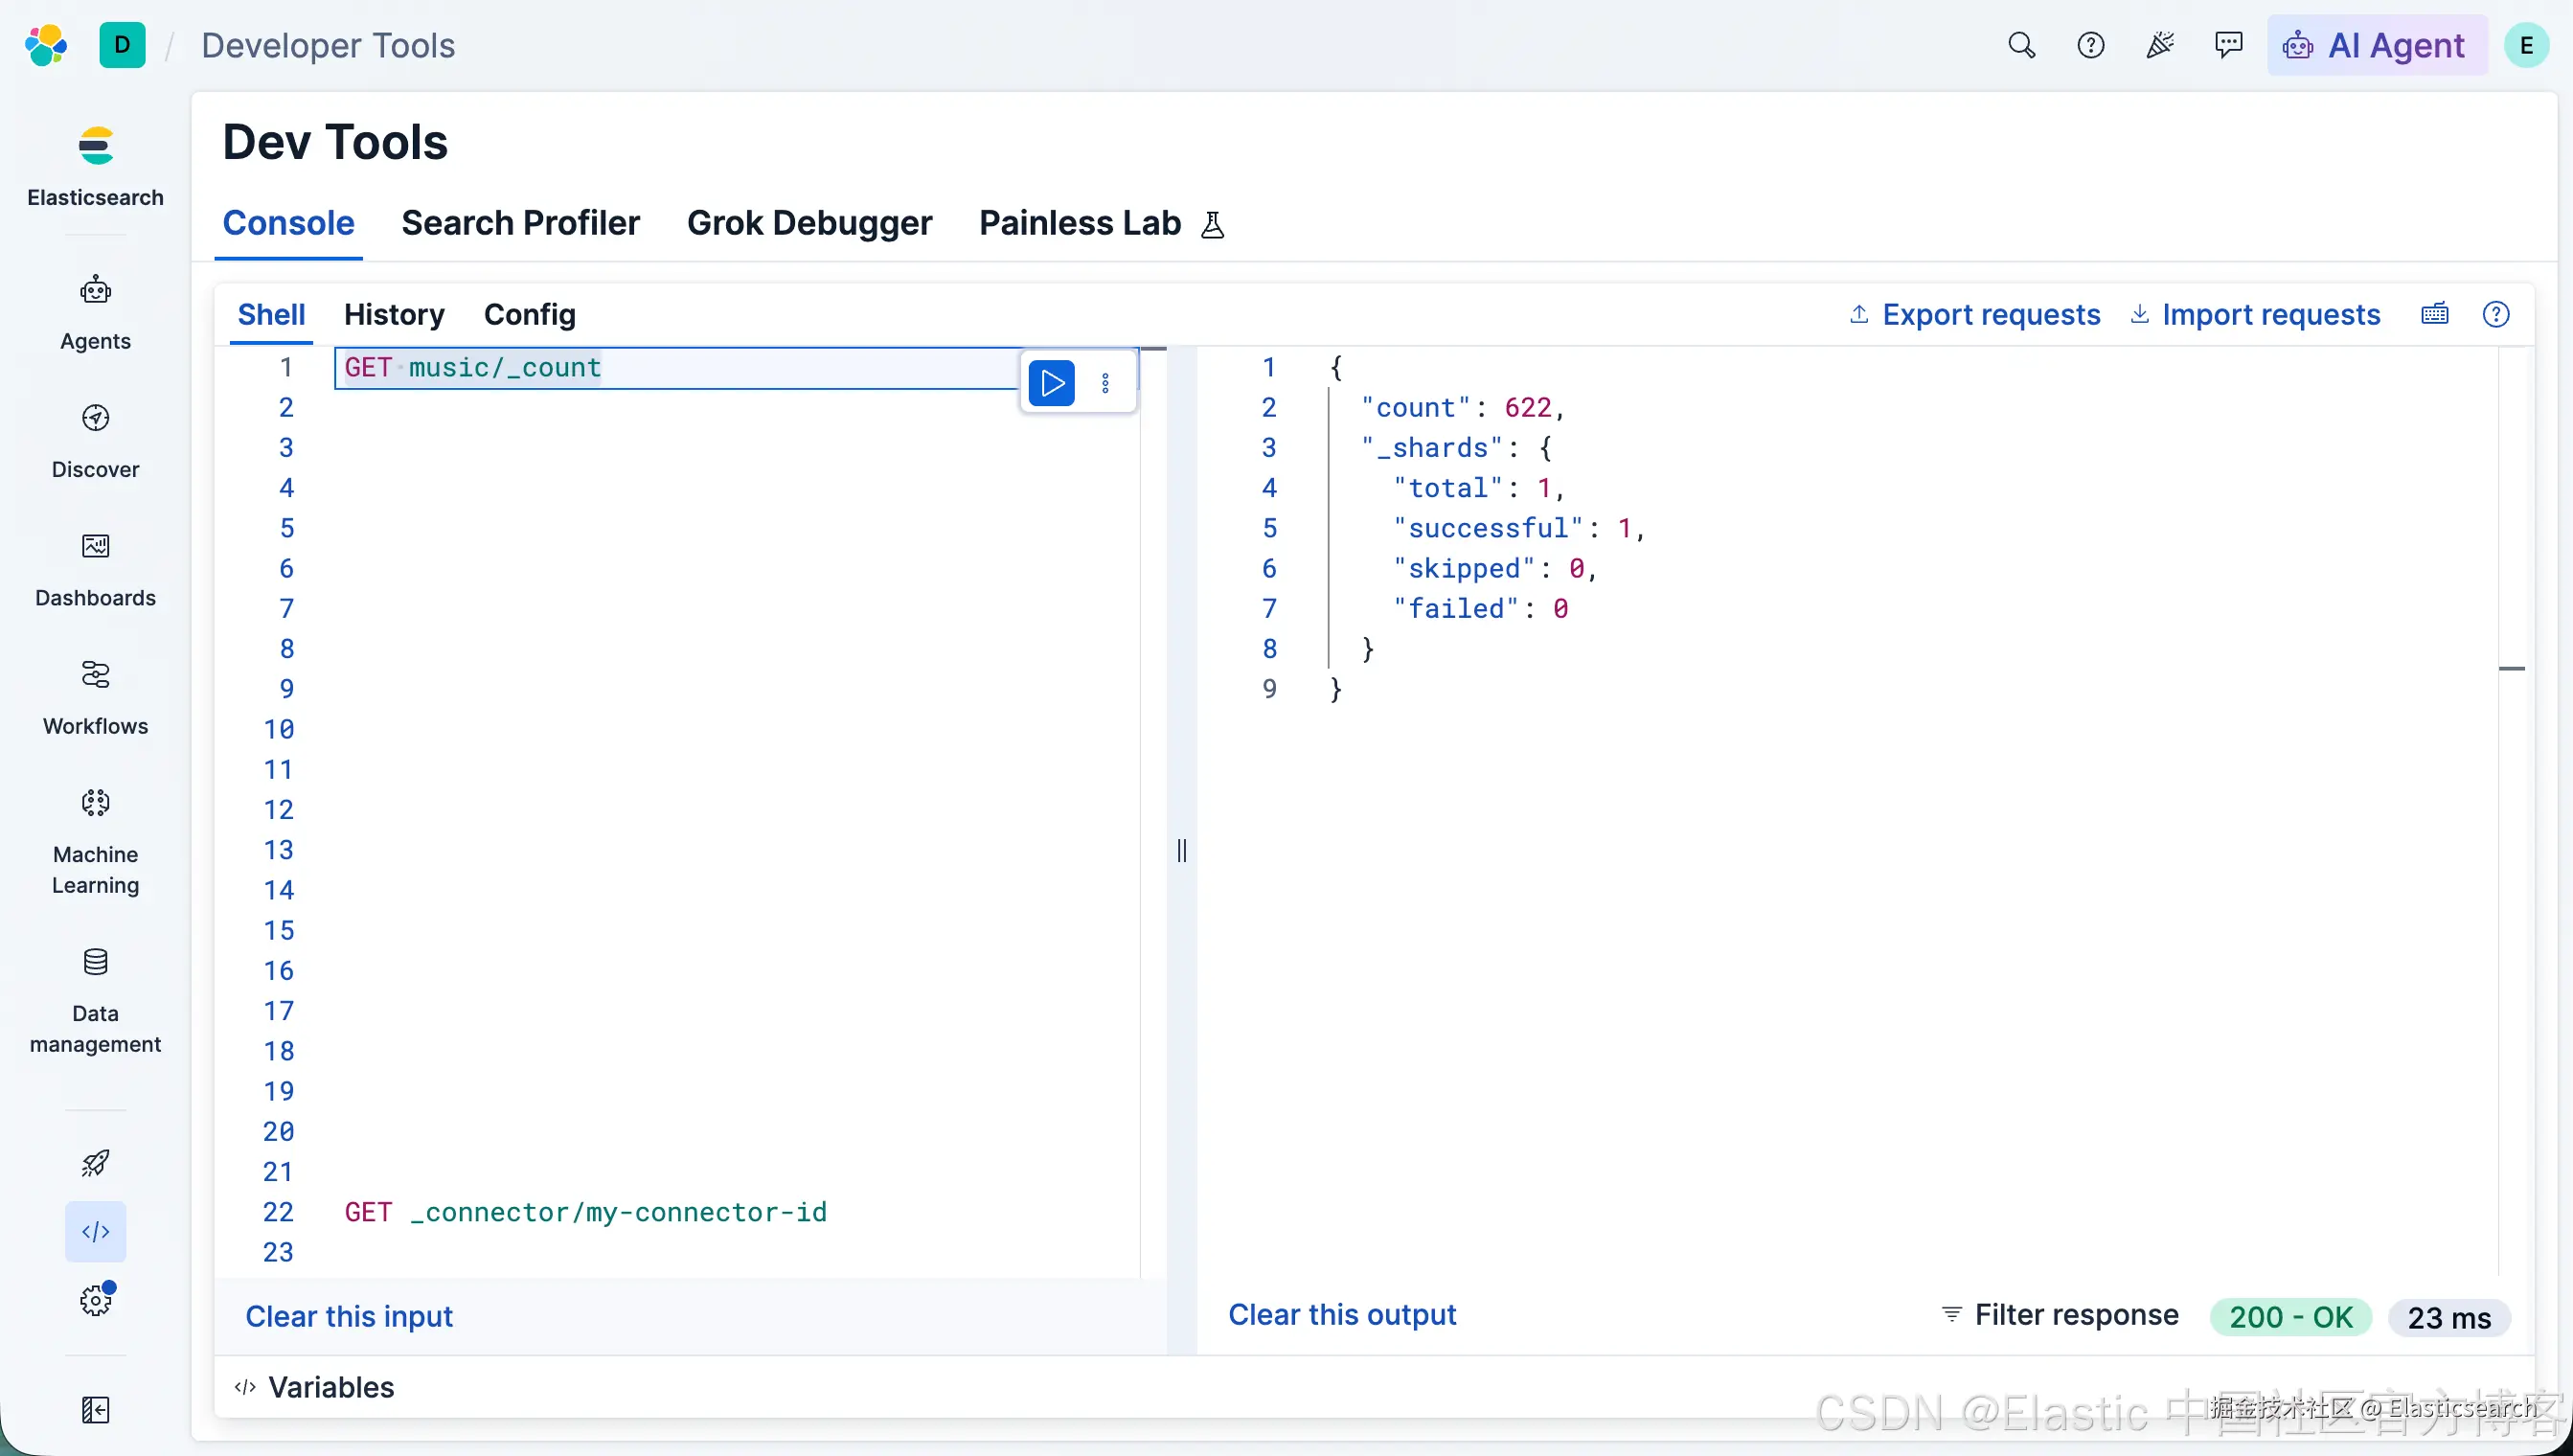
Elasticsearch 将数据存储在文档中,每个文档都是一个 JSON 对象。
运行以下 API 请求,列出各个文档:
bash
`GET music/_search`AI代码解释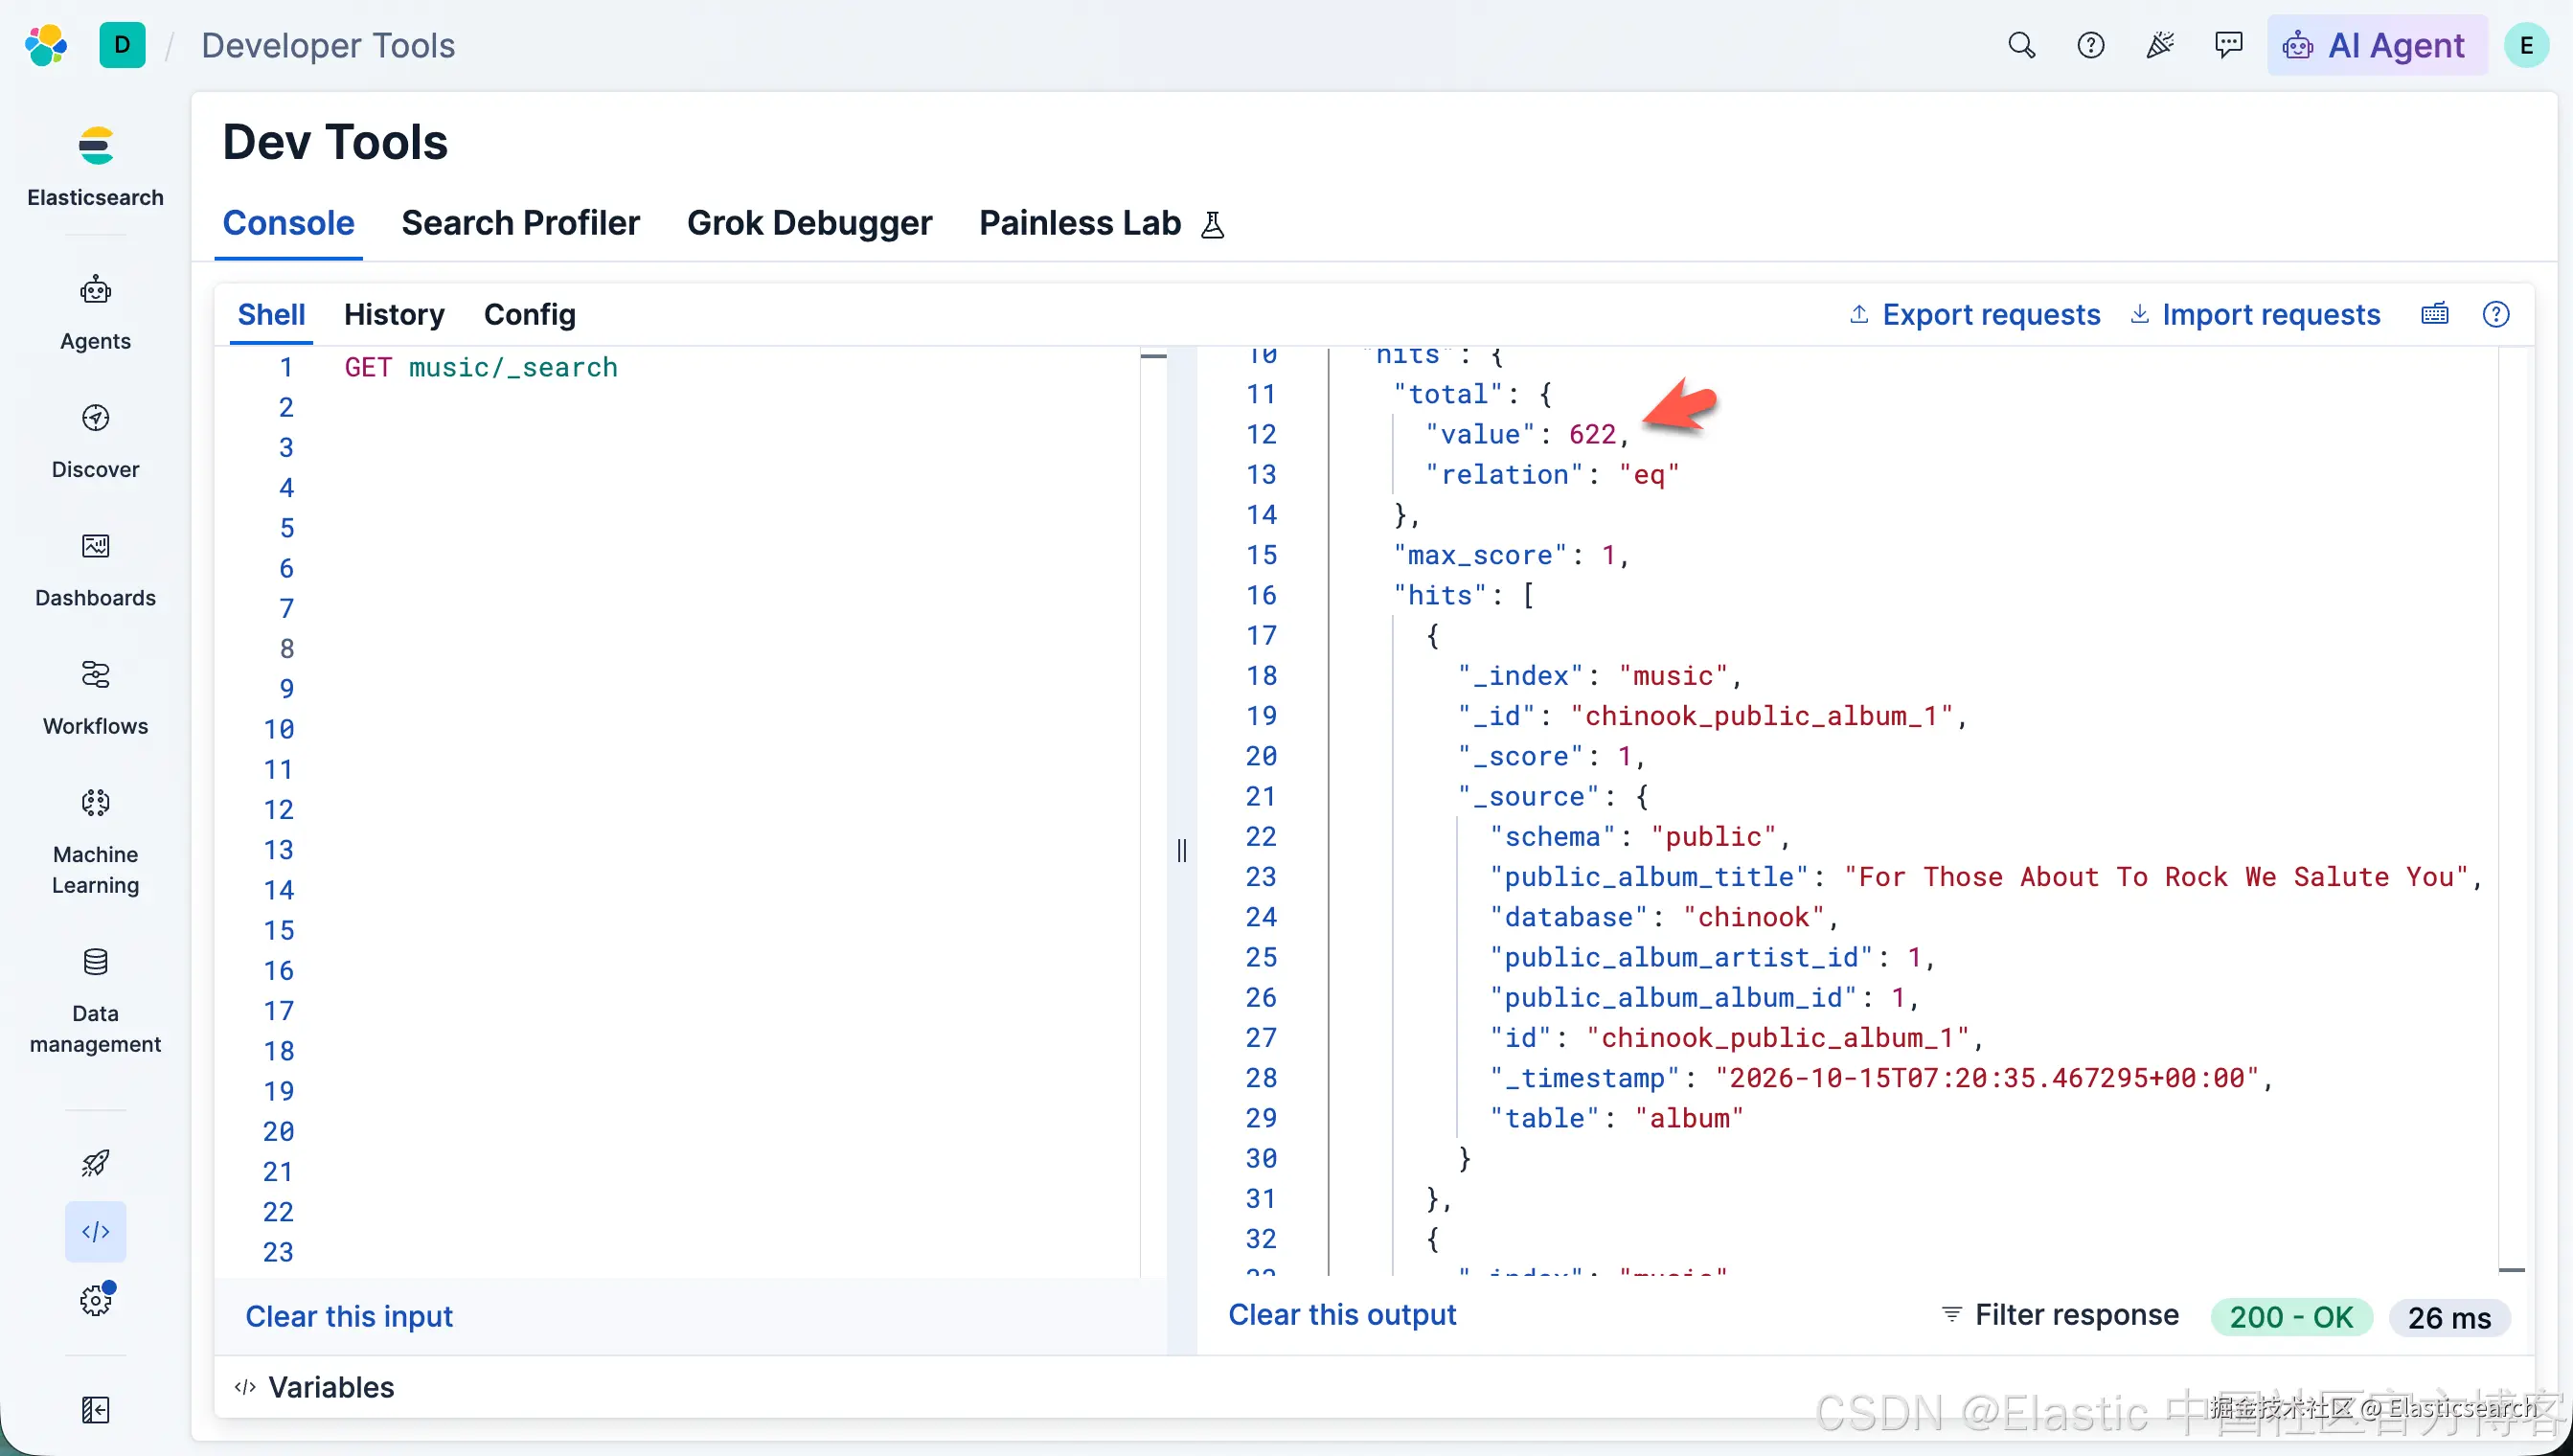
故障排查
使用以下命令检查最新同步任务的状态:
ini
`GET _connector/_sync_job?connector_id=my-connector-id&size=1`AI代码解释如果连接器在同步过程中遇到任何错误,你可以在 error 字段中查看相关错误信息。
清理资源
要删除连接器及其关联的同步任务,请运行以下命令:
ini
`DELETE _connector/my-connector-id&delete_sync_jobs=true`AI代码解释这不会删除连接器为存储数据而创建的 Elasticsearch 索引。
运行以下命令,删除 music 索引:
go
`DELETE music`AI代码解释要删除 PostgreSQL 容器,请运行以下命令:
markdown
`

1.  docker stop postgres
2.  docker rm postgres

`AI代码解释
要删除连接器服务,请运行以下命令:
markdown
`

1.  docker stop <container_id>
2.  docker rm <container_id>

`AI代码解释其中,<container_id> 表示容器 ID。
第一条命令用于停止容器,第二条命令用于删除容器。