目录
[2、nginx web服务](#2、nginx web服务)
[events 块](#events 块)
[worker_connections: -- 一个工作者可以处理的最大连接数](#worker_connections: -- 一个工作者可以处理的最大连接数)
[http 块](#http 块)
[4.2、default_server 参数](#4.2、default_server 参数)
1、nginx介绍
1、nginx简介
Nginx(发音同engine x)是一款由俄罗斯程序员Igor Sysoev所开发轻量级的网页服务器、反向代理服务器以及电子邮件(IMAP/POP3)代理服务器。起初是供俄国大型的门户网站及搜索引擎Rambler(俄语:Рамблер)使用。此软件BSD-like协议下发行,可以在UNIX、GNU/Linux、BSD、Mac OS X、Solaris,以及Microsoft Windows等操作系统中运行。
Nginx 因具有高并发(特別是静态资源)、 占用系统资源少等特性,目.功能丰富而逐渐流行起来。
在功能应用方面,Nginx 不但是一个优秀的 Web 服务软件,还具有反向代理负载均衡功能和缓存服务功能。
Nginx 的官方介绍见 http://nginx.org/en/
2、nginx排名
Netcraft公司统计的web服务器市场占有率:


3、Nginx 的重要特性
Nginx
具备如下基本特性。
□ 可针对静态资源高速高并发访问及缓存。
□ 可使用反向代理加速,并且可进行数据缓存。
□ 具有简单负载均衡、节点健康检查和容错功能。
□ 支持远程 FastCGI 服务的缓存加速。
□ 支持 FastCGI 、Uwsgi 、SCGI 、 Memcached Servers 的加速和缓存。
□ 支持 SSL 、TLS 、SNI。
□ 具有模块化的架构:过滤器包括 gzip 压缩 、ranges 支持、chunked 响应 、 XSLT、SSI 及图像缩放等功能。在 SSI 过滤器中,一个包含多个 SSI 的页面,如果经由FastCGI 或反向代理处理,可被并行处理。
它所具备的其他 WWW 服务特性如下:
□ 支持基于名字、端口及 IP 的多虚拟主机站点。
□ 支持 Keep-alive 和 pipelined 连接。
□ 可进行简单 、方便、灵活的配置和管理。
□ 支持修改 Nginx 配置,并且在代码上线时,可平滑重启,不中断业务访问。
□ 可自定义访问日志格式,临时缓冲写日志操作,快速日志轮询及通过 rsyslog 处理日志。
□ 可利用信号控制 Nginx 进程。
□ 支持 3xx-5xx HTTP 状态码重定向。
□ 支持 rewrite 模块,支持 URI 重写及正则表达式E配。
□ 支持基于客户端 IP 地址和 HTTP 基本认证的访问控制。
□ 支持 PUT 、 DELETE 、 MKCOL 、 COPY 及 MOVE 等较特殊的 HTTP 请求方法。
□ 支持 FLV 流和 MP4 流技术产品应用。
□ 支持 HTTP 响应速率限制。
□ 支持同一 IP 地址的并发连接或请求数限制。
□ 支持邮件服务代理。
4、Nginx 软件的主要企业功能应用
( 1 ) 作为 Web 服务软件
( 2 ) 反向代理或负载均衡服务
( 3 ) 前端业务数据缓存服务
2、nginx web服务
1、Nginx Web 服务介绍
Nginx 作为 Web 服务器的主要应用场景包括:
□ 使用 Nginx 运行 HTML、JS 、CSS 、 小图片等静态数据(此功能类似 Lighttpd 软件 )。
□ Nginx 结合 FastCGI 运行 PHP 等动态程序(例如使用 fastcgi_pass 方式)。
□ Nginx 结合 Tomcat/Resin 等支持 Java 动态程序(常用 proxy_pass 方式)
2、为什么 Nginx 总体性能比 Apache 高
Nginx 使用最新的 epoll ( Linux 2.6 内核)和 kqueue ( freebsd ) 异步网络 I/O 模型,而 Apache 使用的是传统的 select 模型。目前 Linux 下能够承受高并发访问的 Squid 、Memcached 软件采用的都是 epoll 模型。
处理大量连接的读写时,Apache 所采用的 select 网络 I/O 模型比较低效。下面用两个通俗的比喻来解释 Apache 采用的 select 模型和 Nginx 采用的 epoll 模型之间的区别。
第一个比喻:假设你在大学读书,住的宿舍楼有很多房间,你的朋友要来找你。select 版宿管大妈就会带着你的朋友到各房间挨个去找,直到找到你为止。而 epoll 版宿管大妈会先记下每位入住同学的房间号,你的朋友来找你时,只需告诉你的朋友你住在哪个房间即可,不用亲自带着你的朋友满宿舍楼找人了。如果同时来了 100 个人,都要找自己住这栋楼的同学,select 版和 epoll 版宿管大妈,谁的效率更高,就很明显了。
第二个比喻: select 的调用复杂度是线性的,即0(11)。举个例子,一个保姆照看一群孩子,如果把孩子是否需要尿尿比作网络 I/O 事件,select 的作用就好比这个保姆挨个询问每个孩子"你要尿尿吗?" 如果孩子回答是,保姆则把孩子领出来放到另外一个地方。当所有孩子询问完之后,保姆领着这些要尿尿的孩子去上厕所(处理网络 I/O 事件)。在 epoll 机制下,保姆不再需要挨个询问每个孩子是否需要尿尿。取而代之的是,如果孩子需要尿尿,他就自己主动站到事先约定好的地方,而保姆的职责就是查看事先约定好的地方是否有孩子。如果有小孩,则领着孩子去上厕所(网络事件处理)。因此,epoll 的这种机制,能够高效地处理成千上万的并发连接,而且性能不会随着连接数增加而下降太多。
Apache select 和 Nginx epoll 的技术对比

3、配置nginx服务
3.1、软件安装
系统openEuler 23.09
安装nginx --使用yum网络源,也可以到官网自行下载使用centos 或者红帽可以配置一个阿里云的网络源ehel
bash
[root@localhost ~] yum install nginx
OS                                                              13 kB/s | 2.2 kB     00:00
everything                                                      14 kB/s | 2.3 kB     00:00
EPOL                                                            14 kB/s | 2.3 kB     00:00
debuginfo                                                       14 kB/s | 2.3 kB     00:00
source                                                          14 kB/s | 2.2 kB     00:00
update                                                          13 kB/s | 2.2 kB     00:00
update-source                                                   10 kB/s | 2.2 kB     00:00
Dependencies resolved.
===============================================================================================
 Package                           Architecture Version                 Repository        Size
===============================================================================================
Installing:
 nginx                             x86_64       1:1.23.3-1.oe2309       everything       498 k
Installing dependencies:
 gd                                x86_64       2.3.3-4.oe2309          OS               124 k
 gperftools-libs                   x86_64       2.10-3.oe2309           OS               266 k
 libXpm                            x86_64       3.5.16-1.oe2309         OS                42 k
 libunwind                         x86_64       2:1.6.2-7.oe2309        OS                55 k
 libwebp                           x86_64       1.3.1-2.oe2309          OS               248 k
 libxslt                           x86_64       1.1.38-1.oe2309         OS               177 k
 nginx-all-modules                 noarch       1:1.23.3-1.oe2309       everything       6.9 k
 nginx-filesystem                  noarch       1:1.23.3-1.oe2309       everything       7.9 k
 nginx-mod-http-image-filter       x86_64       1:1.23.3-1.oe2309       everything        17 k
 nginx-mod-http-perl               x86_64       1:1.23.3-1.oe2309       everything        27 k
 nginx-mod-http-xslt-filter        x86_64       1:1.23.3-1.oe2309       everything        16 k
 nginx-mod-mail                    x86_64       1:1.23.3-1.oe2309       everything        48 k
 nginx-mod-stream                  x86_64       1:1.23.3-1.oe2309       everything        71 k
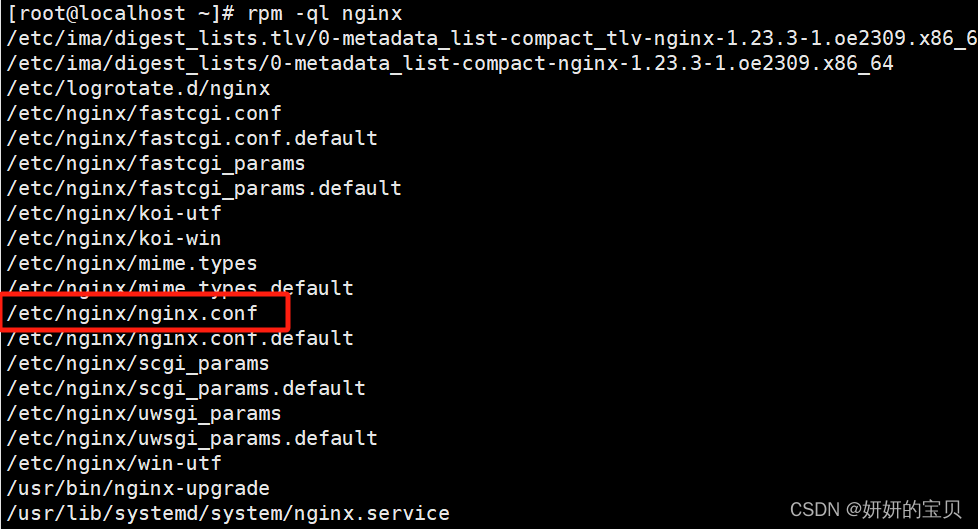
查看安装nginx产生了哪些文件
bash
[root@localhost ~] rpm -ql nginx主配置文件nginx.conf

3.2、介绍配置文件
bash
[root@localhost ~] cd /etc/nginx
[root@localhost nginx] ll
total 76
drwxr-xr-x. 2 root root 4096 Sep 21  2023 conf.d
drwxr-xr-x. 2 root root 4096 Sep 21  2023 default.d
-rw-r--r--. 1 root root 1077 Sep 21  2023 fastcgi.conf
-rw-r--r--. 1 root root 1077 Sep 21  2023 fastcgi.conf.default
-rw-r--r--. 1 root root 1007 Sep 21  2023 fastcgi_params
-rw-r--r--. 1 root root 1007 Sep 21  2023 fastcgi_params.default
-rw-r--r--. 1 root root 2837 Sep 21  2023 koi-utf
-rw-r--r--. 1 root root 2223 Sep 21  2023 koi-win
-rw-r--r--. 1 root root 5349 Sep 21  2023 mime.types
-rw-r--r--. 1 root root 5349 Sep 21  2023 mime.types.default
-rw-r--r--. 1 root root 2305 Sep 21  2023 nginx.conf
-rw-r--r--. 1 root root 2656 Sep 21  2023 nginx.conf.default
-rw-r--r--. 1 root root  636 Sep 21  2023 scgi_params
-rw-r--r--. 1 root root  636 Sep 21  2023 scgi_params.default
-rw-r--r--. 1 root root  664 Sep 21  2023 uwsgi_params
-rw-r--r--. 1 root root  664 Sep 21  2023 uwsgi_params.default
-rw-r--r--. 1 root root 3610 Sep 21  2023 win-utf
conf.d和default.d: 这两个目录通常用来存放额外的配置片段,可以用来覆盖或扩展主配置文件中的设置。
fastcgi.conf,fastcgi.conf.default,fastcgi_params,fastcgi_params.default: 这些文件包含FastCGI相关的参数设置,FastCGI是一种在Web服务器和应用程序之间通信的协议,这些文件定义了如何与FastCGI应用进行交互的默认参数。
koi-utf,koi-win,win-utf: 这些文件包含了字符编码转换规则,用于处理不同的字符集之间的转换,例如KOI8-R到UTF-8或Windows-1251到UTF-8。
mime.types,mime.types.default: 这些文件定义了MIME类型和文件扩展名之间的映射,这对于正确识别和处理不同类型的文件非常重要。
nginx.conf,nginx.conf.default: 这是Nginx的主要配置文件 ,包含了服务器的所有配置指令。nginx.conf.default通常是未修改前的原始版本,作为备份或参考。
scgi_params,scgi_params.default: 这些文件包含了SCGI(Simple Common Gateway Interface)的参数设置,SCGI是另一种Web服务器和应用程序之间的通信协议。
uwsgi_params,uwsgi_params.default: 这些文件包含了uWSGI协议的参数设置,uWSGI是一个网络应用服务器,能够与Nginx协同工作,处理Python、Ruby等语言编写的Web应用。
3.2.1、mine.types文件
在mine.types里面写着所有支持文件的类型
bash
[root@localhost nginx] cat mime.types

types {
    text/html                                        html htm shtml;
    text/css                                         css;
    text/xml                                         xml;
    image/gif                                        gif;
    image/jpeg                                       jpeg jpg;
    application/javascript                           js;
    application/atom+xml                             atom;
    application/rss+xml                              rss;

    text/mathml                                      mml;
    text/plain                                       txt;
    text/vnd.sun.j2me.app-descriptor                 jad;
    text/vnd.wap.wml                                 wml;
    text/x-component                                 htc;

    image/avif                                       avif;
    image/png                                        png;
    image/svg+xml                                    svg svgz;
    image/tiff                                       tif tiff;
    image/vnd.wap.wbmp                               wbmp;
    image/webp                                       webp;
    image/x-icon                                     ico;
    image/x-jng                                      jng;
    image/x-ms-bmp                                   bmp;

    font/woff                                        woff;
    font/woff2                                       woff2;

    application/java-archive                         jar war ear;
    application/json                                 json;
    application/mac-binhex40                         hqx;
    application/msword                               doc;
    application/pdf                                  pdf;
    application/postscript                           ps eps ai;
    application/rtf                                  rtf;
    application/vnd.apple.mpegurl                    m3u8;
    application/vnd.google-earth.kml+xml             kml;
    application/vnd.google-earth.kmz                 kmz;
    application/vnd.ms-excel                         xls;
    application/vnd.ms-fontobject                    eot;
    application/vnd.ms-powerpoint                    ppt;
    application/vnd.oasis.opendocument.graphics      odg;
    application/vnd.oasis.opendocument.presentation  odp;
    application/vnd.oasis.opendocument.spreadsheet   ods;
    application/vnd.oasis.opendocument.text          odt;
    application/vnd.openxmlformats-officedocument.presentationml.presentation
                                                     pptx;
    application/vnd.openxmlformats-officedocument.spreadsheetml.sheet
                                                     xlsx;
    application/vnd.openxmlformats-officedocument.wordprocessingml.document
                                                     docx;
    application/vnd.wap.wmlc                         wmlc;
    application/wasm                                 wasm;
    application/x-7z-compressed                      7z;
    application/x-cocoa                              cco;
    application/x-java-archive-diff                  jardiff;
    application/x-java-jnlp-file                     jnlp;
    application/x-makeself                           run;
    application/x-perl                               pl pm;
    application/x-pilot                              prc pdb;
    application/x-rar-compressed                     rar;
    application/x-redhat-package-manager             rpm;
    application/x-sea                                sea;
    application/x-shockwave-flash                    swf;
    application/x-stuffit                            sit;
    application/x-tcl                                tcl tk;
    application/x-x509-ca-cert                       der pem crt;
    application/x-xpinstall                          xpi;
    application/xhtml+xml                            xhtml;
    application/xspf+xml                             xspf;
    application/zip                                  zip;

    application/octet-stream                         bin exe dll;
    application/octet-stream                         deb;
    application/octet-stream                         dmg;
    application/octet-stream                         iso img;
    application/octet-stream                         msi msp msm;

    audio/midi                                       mid midi kar;
    audio/mpeg                                       mp3;
    audio/ogg                                        ogg;
    audio/x-m4a                                      m4a;
    audio/x-realaudio                                ra;

    video/3gpp                                       3gpp 3gp;
    video/mp2t                                       ts;
    video/mp4                                        mp4;
    video/mpeg                                       mpeg mpg;
    video/quicktime                                  mov;
    video/webm                                       webm;
    video/x-flv                                      flv;
    video/x-m4v                                      m4v;
    video/x-mng                                      mng;
    video/x-ms-asf                                   asx asf;
    video/x-ms-wmv                                   wmv;
    video/x-msvideo                                  avi;
}
3.2.2、nginx.conf文件
bash
[root@localhost nginx] cat nginx.conf.bak
# For more information on configuration, see:
#   * Official English Documentation: http://nginx.org/en/docs/
#   * Official Russian Documentation: http://nginx.org/ru/docs/

user nginx;
worker_processes auto;
error_log /var/log/nginx/error.log notice;
pid /run/nginx.pid;

# Load dynamic modules. See /usr/share/doc/nginx/README.dynamic.
include /usr/share/nginx/modules/*.conf;

events {
    worker_connections 1024;
}

http {
    log_format  main  '$remote_addr - $remote_user [$time_local] "$request" '
                      '$status $body_bytes_sent "$http_referer" '
                      '"$http_user_agent" "$http_x_forwarded_for"';

    access_log  /var/log/nginx/access.log  main;

    sendfile            on;
    tcp_nopush          on;
    keepalive_timeout   65;
    types_hash_max_size 4096;

    include             /etc/nginx/mime.types;
    default_type        application/octet-stream;

    # Load modular configuration files from the /etc/nginx/conf.d directory.
    # See http://nginx.org/en/docs/ngx_core_module.html#include
    # for more information.
    include /etc/nginx/conf.d/*.conf;

    server {
        listen       80;
        listen       [::]:80;
        server_name  _;
        root         /usr/share/nginx/html;

        # Load configuration files for the default server block.
        include /etc/nginx/default.d/*.conf;

        error_page 404 /404.html;
        location = /404.html {
        }

        error_page 500 502 503 504 /50x.html;
        location = /50x.html {
        }
    }

# Settings for a TLS enabled server.
#
#    server {
#        listen       443 ssl http2;
#        listen       [::]:443 ssl http2;
#        server_name  _;
#        root         /usr/share/nginx/html;
#
#        ssl_certificate "/etc/pki/nginx/server.crt";
#        ssl_certificate_key "/etc/pki/nginx/private/server.key";
#        ssl_session_cache shared:SSL:1m;
#        ssl_session_timeout  10m;
#        ssl_ciphers PROFILE=SYSTEM;
#        ssl_prefer_server_ciphers on;
#
#        # Load configuration files for the default server block.
#        include /etc/nginx/default.d/*.conf;
#
#        error_page 404 /404.html;
#        location = /404.html {
#        }
#
#        error_page 500 502 503 504 /50x.html;
#        location = /50x.html {
#        }
#    }

}
接下来对主配置文件进行操作,将所有空号和注释给去掉
bash
[root@localhost nginx] egrep -v '#|^$' nginx.conf.default > nginx.conf
bash
# 定义Nginx的工作进程数量,通常设置为服务器的CPU核心数以充分利用硬件资源。
worker_processes  1;

events {
    # 每个工作进程允许的最大同时连接数。对于高并发场景,可以适当增加此值。
    worker_connections  1024;
}

http {
    # 包含MIME类型文件,用于识别和处理各种文件格式。
    include       mime.types;

    # 默认的MIME类型,当无法确定文件类型时使用。
    default_type  application/octet-stream;

    # 开启sendfile优化,利用操作系统内核直接读取文件数据到网络缓冲区,提高传输效率。
    sendfile        on;

    # 设置keep-alive连接的超时时间,单位为秒。
    keepalive_timeout  65;

    # 开始定义服务器块,每个服务器块可以监听不同的端口或处理不同的域名。
    server {
        # 监听的端口号,这里是标准的HTTP端口80。
        listen       80;

        # 服务器名称,可以是一个或多个域名或IP地址,用于虚拟主机的区分。
        server_name  localhost;

        # 定义location块,处理特定的URL请求。
        location / {
            # 根目录,所有的静态文件将从这个目录下查找。
            root   html;

            # 默认索引文件,当访问目录时,Nginx会尝试按顺序找到并显示这些文件之一。
            index  index.html index.htm;
        }

        # 错误页面处理,当出现500, 502, 503, 504错误时,显示特定的错误页面。
        error_page   500 502 503 504  /50x.html;

        # 特定URL的location块,这里处理的是/50x.html这个路径,用于显示自定义的错误页面。
        location = /50x.html {
            # 错误页面的根目录,与上面的root指令作用相同,但只针对这个location块。
            root   html;
        }
    }
}
配置好文件之后重启服务之后输入linux主机的网址就能看到他的网站了
bash
[root@localhost nginx] systemctl rstart nginx

接下来逐个解释主配置文件里面的参数是什么意思
worker_processes参数
bash
worker_processes 1;如下图只有一个nginx进程,此nginx子进程是由root用户管理的进程,在nginx上所有操作都是由nginx这个用户去进行的,worker_processes 1; 就是指定了nginx这个用户进程的数量

假如把worker_processes参数的值改为10会发生什么呢?
可以发现他的进程变成了10个,这就是worker_processes参数的作用,一般是电脑有几个核心就给他几个进程才能最大的发挥nginx并发的作用。

events 块
在Nginx配置文件中,
events块是用来配置事件处理机制的部分,主要涉及到如何处理客户端连接和数据接收/发送的过程。Nginx使用了一种高效的事件驱动模型来处理多个并发连接,这使得它能够轻松地处理成千上万的连接而不牺牲性能。
events块中的配置选项主要包括:
worker_connections: -- 一个工作者可以处理的最大连接数
这个指令用于设置每个worker进程可以同时处理的最大客户端连接数。默认值通常较小,但在高并发场景下,可能需要增加这个值以提高并发处理能力。
http 块
在Nginx的配置文件中,http块是配置中最为核心的部分之一,它包含了所有HTTP相关的行为和设置,如服务器的默认行为、MIME类型、日志、缓存、压缩、安全设置等。http块可以包含多个子块,如server块和其他全局性的HTTP设置。下面详细解释http块中一些常见的配置项:
include:
用于引入++其他配置文件++,例如MIME类型、默认参数等。例如:
bash
include mime.types;default_type:
设置当Nginx无法确定文件类型时,默认的MIME类型。例如:
1default_type application/octet-stream;log_format:
定义日志的格式,可以自定义访问日志和错误日志的输出格式。例如:
bash
log_format main '$remote_addr - $remote_user [$time_local] "$request" '
                '$status $body_bytes_sent "$http_referer" '
'"$http_user_agent" "$http_x_forwarded_for"';access_log:
配置访问日志的记录方式,包括日志文件的位置和日志格式。例如:
bash
access_log logs/access.log main;sendfile:
控制是否使用sendfile机制来传输文件,这可以提高文件传输效率。例如:
bash
sendfile on;keepalive_timeout:
设置keep-alive连接的超时时间,单位是秒。例如:
bash
keepalive_timeout 65;gzip:
控制是否开启HTTP压缩,可以减少传输的数据量。例如:
bash
gzip on;
gzip_types text/plain text/css application/json application/javascript text/xml application/xml application/xml+rss text/javascript;server块:
每个server块定义了一个独立的虚拟服务器,可以监听不同的端口或处理不同的域名。在server块中可以配置监听端口、服务器名称、请求路由、错误页等。
在Nginx的配置中,server块是至关重要的组成部分,用于定义独立的虚拟服务器,每个虚拟服务器可以配置监听不同的端口、处理特定的域名,并拥有自己的一套请求处理规则。server块允许在同一台物理服务器上运行多个独立的网站或应用,每个网站都可以有不同的配置,如SSL证书、静态文件路径、动态内容处理逻辑等。
一个典型的server块可能包含以下配置项:
listen:指定Nginx监听的端口和IP地址。例如,
listen 80;表示监听标准的HTTP端口80,listen [::]:443 ssl ipv6only=on;表示监听HTTPS端口443,同时只接受IPv6连接。
server_name:指定服务器名称,用于处理特定的域名请求。例如,
server_name example.com www.example.com;表示处理example.com和www.example.com这两个域名的请求。
root:指定网站的根目录,Nginx将从这个目录下查找请求的文件。例如,
root /var/www/html;表示网站的根目录是/var/www/html。
index:指定当访问目录时,Nginx应优先尝试显示的文件列表。例如,
index index.html index.htm;表示优先显示index.html或index.htm文件。
location:定义请求URL的处理规则。
location块可以基于URL路径、正则表达式等来匹配请求,并执行特定的操作,如返回静态文件、转发请求到后端服务器、执行Lua脚本等。
error_page:定义错误页面,当发生特定错误时显示自定义的HTML页面。例如,
error_page 404 /404.html;表示当发生404错误时,显示/404.html页面。
ssl_certificate和ssl_certificate_key:当配置HTTPS时,指定SSL证书和私钥的文件路径。例如,
ssl_certificate /etc/nginx/ssl/example.crt;和ssl_certificate_key /etc/nginx/ssl/example.key;。
return:立即结束请求处理,并返回指定的状态码和响应体。例如,
return 200 "Hello World";。
rewrite:
用于重写URL,可以实现URL重定向或内部重写,以达到SEO优化、访问控制等目的。
3.3、开始实验
3.3.1、单IP单端口
对主配置文件进行操作,将所有空号和注释给去掉
bash
# 创建目录
[root@localhost /] mkdir -p /web/one

# 递归目录给予权限
[root@localhost /]# chmod  -R 755 /web/

# 将空行去掉
[root@localhost nginx] egrep -v '#|^$' nginx.conf.default > nginx.conf

# 关闭防火墙和selinux
[root@localhost nginx] systemctl stop firewalld.service
[root@localhost nginx] setenforce 0
下面就是nginx.conf的最少代码
bash
worker_processes  1;
events {
    worker_connections  1024;
}
http {
    include       mime.types;
    default_type  application/octet-stream;
    server {
        listen       80;
        server_name  localhost;
        location / {
            root    /web/one/school/index;
            index  index.html index.htm;
        }


    }
}
检查语法是否正确,重启服务
bash
[root@localhost nginx] nginx -t
nginx: the configuration file /etc/nginx/nginx.conf syntax is ok
nginx: configuration file /etc/nginx/nginx.conf test is successful
[root@localhost nginx] systemctl restart nginx.service
输入虚拟机地址指定80端口显示效果

但这样只能显示一个网址,怎么显示多个网址呢?
3.3.2、单IP多端口
(开启三个不同的端口)
代码如下:增加两个代码块
bash
[root@localhost /] mkdir -p /web/{two,three}
bash
worker_processes  1;
events {
    worker_connections  1024;
}
http {
    include       mime.types;
    default_type  application/octet-stream;
    server {
        listen       80;
        server_name  localhost;
        location / {
            root    /web/one/school/index;
            index  index.html index.htm;
        }


    }

    server {
        listen       81;
        server_name  localhost;
        location / {
            root    /web/two;
            index   index.html index.htm;
        }
}

    server {
        listen       82;
        server_name  localhost;
        location / {
            root    /web/three;
            index   index.html index.htm;
        }
    }
}
给文件增加一些内容
bash
[root@localhost three] echo this is three > index.html
[root@localhost three] echo this is two > /web/two/index.html
检查语法是否正确,重启服务
bash
[root@localhost nginx] nginx -t
nginx: the configuration file /etc/nginx/nginx.conf syntax is ok
nginx: configuration file /etc/nginx/nginx.conf test is successful
[root@localhost nginx] systemctl restart nginx.service
实现效果


3.3.3、多IP单端口
增加一个IP地址
bash
[root@localhost ~] nmcli connection modify ens33 +ipv4.addresses 192.168.239.155/24 ipv4.gateway 192.168.239.2 修改配置
bash
worker_processes  1;
events {
    worker_connections  1024;
}
http {
    include       mime.types;
    default_type  application/octet-stream;
    server {
        listen       192.168.239.138:80;
        server_name  localhost;
        location / {
            root    /web/one/school/index;
            index  index.html index.htm;
        }


    }

    server {
        listen       192.168.239.155:80;
        server_name  localhost;
        location / {
            root    /web/two;
            index   index.html index.htm;
        }
}

    server {
        listen       82;
        server_name  localhost;
        location / {
            root    /web/three;
            index   index.html index.htm;
        }
    }
}
检查语法是否正确,重启服务
bash
[root@localhost nginx] nginx -t
nginx: the configuration file /etc/nginx/nginx.conf syntax is ok
nginx: configuration file /etc/nginx/nginx.conf test is successful
[root@localhost nginx] systemctl restart nginx.service
实现效果


3.3.4、多域名多网站
打开另一台虚拟机配置DNS服务器(CentOS 7.9)
yum install bind
bash
[root@localhost named] vim /etc/named.conf

options {   //里面参数是全局生效的
        listen-on port 53 { 192.168.239.148; };
        directory       "/var/named";
        allow-query     { any; };
};


zone "shuyan.com" IN {
        type master;
        file "named.shuyan.com";
};
bash
[root@localhost named] vim /var/named/named.shuyan.com

$TTL  1D
shuyan.com.             IN      SOA             @       root.localhost. (
                                                   20240317
                                                   2D
                                                   4H
                                                   1D
                                                   1D   )
shuyan.com.             IN      NS                      dns.shuyan.com.
dns             IN      A                       192.168.239.148
www             IN      A                       192.168.239.155
ftp             IN      A                       192.168.239.138
修改windows下的dns服务器地址为刚刚配置的DNS服务器地址

windows上查看正向解析是否成功

root@localhost nginx\]# vim nginx.conf # 前两个server修改了端口都为80,server_name参数改为域名
bash
worker_processes  1;
events {
    worker_connections  1024;
}
http {
    include       mime.types;
    default_type  application/octet-stream;
    server {
        listen       80;
        server_name  www.shuyan.com;
        location / {
            root    /web/one/school/index;
            index  index.html index.htm;
        }


    }

    server {
        listen       80;
        server_name  ftp.shuyan.com;
        location / {
            root    /web/two;
            index   index.html index.htm;
        }
}

    server {
        listen       82;
        server_name  localhost;
        location / {
            root    /web/three;
            index   index.html index.htm;
        }
    }
}
实现效果


4、其他参数说明
4.1、include参数
Nginx 中的 include 参数用于包含外部配置文件。当我们在配置文件中使用 include 参数时,Nginx 会读取指定的配置文件,并将其内容插入到当前的位置。这样做的好处是可以将一些通用的配置项抽取出来,避免重复书写相同的代码。
例如,如果我们想在多个 server 模块中使用相同的日志配置,我们可以创建一个单独的日志配置文件,并在每个 server 模块中通过 include 参数引用该文件,如下所示:
4.1.1、主配置文件
root@localhost nginx\]# vim nginx.conf
bash
# 工作进程数,默认为 1
worker_processes  1;

# 事件模块设置
events {
    # 连接数的最大并发数
    worker_connections  1024;
}

# HTTP 协议处理模块
http {
    # 包含 MIME 类型定义文件
    include       mime.types;

    # 默认的 MIME 类型为 octet-stream
    default_type  application/octet-stream;

    # 包含自定义配置文件
    include       /etc/nginx/conf.d/*.conf;
}
4.1.2、创建138地址配置文件
root@localhost conf.d\]# vim /etc/nginx/conf.d/138.conf
bash
server {
        listen       192.168.239.138:80;
        server_name  localhost;
        location / {
            root    /web/one/school/index;
            index  index.html index.htm;
        }
    }
检查nginx语法重载nginx配置文件
bash
[root@localhost conf.d] nginx -t
nginx: the configuration file /etc/nginx/nginx.conf syntax is ok
nginx: configuration file /etc/nginx/nginx.conf test is successful
[root@localhost conf.d] systemctl reload nginx
实现效果

4.1.3、创建155地址配置文件
root@localhost conf.d\]# vim /etc/nginx/conf.d/155.conf
bash
server {
        listen       192.168.239.155:80;
        server_name  localhost;
        location / {
            root    /web/two;
            index   index.html index.htm;
        }
}
4.2、default_server 参数
修改windows上hosts文件夹增加本地缓存

修改文件名称,并且修改配置文件
root@localhost conf.d\]# mv 138.conf a.conf \[root@localhost conf.d\]# mv 155.conf b.conf
修改配置文件参数 server_name 参数为值为 域名
root@localhost conf.d\]# vim a.conf
bash
server {
        listen       80;
        server_name  a.shuyan.com;
        location / {
            root    /web/one/school/index;
            index  index.html index.htm;
        }
    }
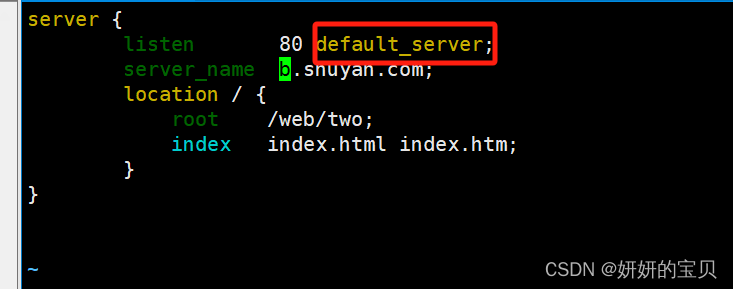
root@localhost conf.d\]# vim b.conf **# 在b文件内增加 default_server 参数**
bash
server {
        listen       80 default_server;
        server_name  b.shuyan.com;
        location / {
            root    /web/two;
            index   index.html index.htm;
        }
}
重新加载配置文件
bash
[root@localhost conf.d] nginx -t
nginx: the configuration file /etc/nginx/nginx.conf syntax is ok
nginx: configuration file /etc/nginx/nginx.conf test is successful
[root@localhost conf.d] systemctl reload nginx
a b 网址均可访问


接下来将a网址配置文件修改名称
bash
[root@localhost conf.d] mv a.conf a.conf.bak
[root@localhost conf.d] ls
a.conf.bak  b.conf

[root@localhost conf.d] systemctl restart nginx.service 
4.3、nginx模块autoindex
bash
server {
        listen       80;
        server_name  a.shuyan.com;
        location / {
            autoindex on;   # 开启索引功能
            root    /web/one/school/index;
            index  index.html index.htm;
        }
    }
root@localhost conf.d\]# systemctl reload nginx.service
bash
[root@localhost index] pwd
/web/one/school/index

[root@localhost index] ls
index.html     学校简介.html  教务系统.html  视频播放器.html
学工系统.html  学校领导.html  新年寄语.html

[root@localhost index] mv index.html 1.html   # 修改index文件名称
[root@localhost index] ls
1.html  学工系统.html  学校简介.html  学校领导.html  教务系统.html  新年寄语.html  视频播放器.html
实现效果
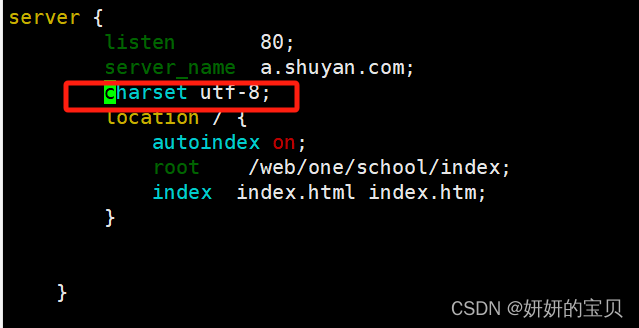
会发现一个问题:乱码 --这是由于编码格式导致的

解决方法:更变编码格式
charset 参数

root@localhost conf.d\]# systemctl reload nginx.service
重新打开就正常了
