mmdetection的生物图像实例分割全流程记录
第三章 自定义数据集的测试、重建与分析
文章目录
前言
mmdetection是一个比较容易入门且上手的深度学习检测框架,其官网为https://github.com/open-mmlab/mmdetection,相关文档https://mmdetection.readthedocs.io/zh-cn/latest/overview.html。
版本为mmdetection 3.3.0.这里可供借鉴。

一、测试集的推理
1.模型测试
找到文件位置:tools/test.py,复制为tools/test_ac3ac4.py,并进行如下更改:
python
# Copyright (c) OpenMMLab. All rights reserved.
import argparse
import os
import os.path as osp
import warnings
from copy import deepcopy

from mmengine import ConfigDict
from mmengine.config import Config, DictAction
from mmengine.runner import Runner

from mmdet.engine.hooks.utils import trigger_visualization_hook
from mmdet.evaluation import DumpDetResults
from mmdet.registry import RUNNERS
from mmdet.utils import setup_cache_size_limit_of_dynamo


# TODO: support fuse_conv_bn and format_only
def parse_args():
    parser = argparse.ArgumentParser(
        description='MMDet test (and eval) a model')
    # parser.add_argument('config', help='test config file path')
    # parser.add_argument('checkpoint', help='checkpoint file')
    parser.add_argument('--config', default='Path/to/your/mmdetection/mmdet/configs/mask_rcnn/mask_rcnn_r50_fpn_2x_ac3ac4.py',
                        help='test config file path')
    parser.add_argument('--checkpoint', default='Path/to/your/DataLog/AC3AC4/MRCNN/epoch_best.pth',
                        help='checkpoint file')
    parser.add_argument(
        '--work-dir', default='Path/to/your/DataLog/AC3AC4/MRCNNOUT/',
        help='the directory to save the file containing evaluation metrics')
    parser.add_argument(
        '--out',
        type=str, default='Path/to/your/DataLog/AC3AC4/MRCNNOUT/predictions.pkl',
        help='dump predictions to a pickle file for offline evaluation')
    # parser.add_argument(
    #     '--show', action='store_true', help='show prediction results')
    parser.add_argument(
        '--show', default=True, help='show prediction results')
    parser.add_argument(
        '--show-dir',
        default='Path/to/your/DataLog/AC3AC4/MRCNNOUT/show_dir/',
        help='directory where painted images will be saved. '
        'If specified, it will be automatically saved '
        'to the work_dir/timestamp/show_dir')
    parser.add_argument(
        '--wait-time', type=float, default=2, help='the interval of show (s)')
    parser.add_argument(
        '--cfg-options',
        nargs='+',
        action=DictAction,
        help='override some settings in the used config, the key-value pair '
        'in xxx=yyy format will be merged into config file. If the value to '
        'be overwritten is a list, it should be like key="[a,b]" or key=a,b '
        'It also allows nested list/tuple values, e.g. key="[(a,b),(c,d)]" '
        'Note that the quotation marks are necessary and that no white space '
        'is allowed.')
    parser.add_argument(
        '--launcher',
        choices=['none', 'pytorch', 'slurm', 'mpi'],
        default='none',
        help='job launcher')
    parser.add_argument('--tta', action='store_true')
    # When using PyTorch version >= 2.0.0, the `torch.distributed.launch`
    # will pass the `--local-rank` parameter to `tools/train.py` instead
    # of `--local_rank`.
    parser.add_argument('--local_rank', '--local-rank', type=int, default=0)
    args = parser.parse_args()
    if 'LOCAL_RANK' not in os.environ:
        os.environ['LOCAL_RANK'] = str(args.local_rank)
    return args


def main():
    args = parse_args()

    # Reduce the number of repeated compilations and improve
    # testing speed.
    setup_cache_size_limit_of_dynamo()

    # load config
    cfg = Config.fromfile(args.config)
    cfg.launcher = args.launcher
    if args.cfg_options is not None:
        cfg.merge_from_dict(args.cfg_options)

    # work_dir is determined in this priority: CLI > segment in file > filename
    if args.work_dir is not None:
        # update configs according to CLI args if args.work_dir is not None
        cfg.work_dir = args.work_dir
    elif cfg.get('work_dir', None) is None:
        # use config filename as default work_dir if cfg.work_dir is None
        cfg.work_dir = osp.join('./work_dirs',
                                osp.splitext(osp.basename(args.config))[0])

    cfg.load_from = args.checkpoint

    if args.show or args.show_dir:
        cfg = trigger_visualization_hook(cfg, args)

    if args.tta:

        if 'tta_model' not in cfg:
            warnings.warn('Cannot find ``tta_model`` in config, '
                          'we will set it as default.')
            cfg.tta_model = dict(
                type='DetTTAModel',
                tta_cfg=dict(
                    nms=dict(type='nms', iou_threshold=0.5), max_per_img=100))
        if 'tta_pipeline' not in cfg:
            warnings.warn('Cannot find ``tta_pipeline`` in config, '
                          'we will set it as default.')
            test_data_cfg = cfg.test_dataloader.dataset
            while 'dataset' in test_data_cfg:
                test_data_cfg = test_data_cfg['dataset']
            cfg.tta_pipeline = deepcopy(test_data_cfg.pipeline)
            flip_tta = dict(
                type='TestTimeAug',
                transforms=[
                    [
                        dict(type='RandomFlip', prob=1.),
                        dict(type='RandomFlip', prob=0.)
                    ],
                    [
                        dict(
                            type='PackDetInputs',
                            meta_keys=('img_id', 'img_path', 'ori_shape',
                                       'img_shape', 'scale_factor', 'flip',
                                       'flip_direction'))
                    ],
                ])
            cfg.tta_pipeline[-1] = flip_tta
        cfg.model = ConfigDict(**cfg.tta_model, module=cfg.model)
        cfg.test_dataloader.dataset.pipeline = cfg.tta_pipeline

    # build the runner from config
    if 'runner_type' not in cfg:
        # build the default runner
        runner = Runner.from_cfg(cfg)
    else:
        # build customized runner from the registry
        # if 'runner_type' is set in the cfg
        runner = RUNNERS.build(cfg)

    # add `DumpResults` dummy metric
    if args.out is not None:
        assert args.out.endswith(('.pkl', '.pickle')), \
            'The dump file must be a pkl file.'
        runner.test_evaluator.metrics.append(
            DumpDetResults(out_file_path=args.out))

    # start testing
    runner.test()


if __name__ == '__main__':
    main()
若使用指定GPU,可以在命令行执行:
powershell
CUDA_VISIBLE_DEVICES=0 Path/to/your/envs/mmlab3/bin/python Path/to/your/mmdetection/tools/train_cremi.py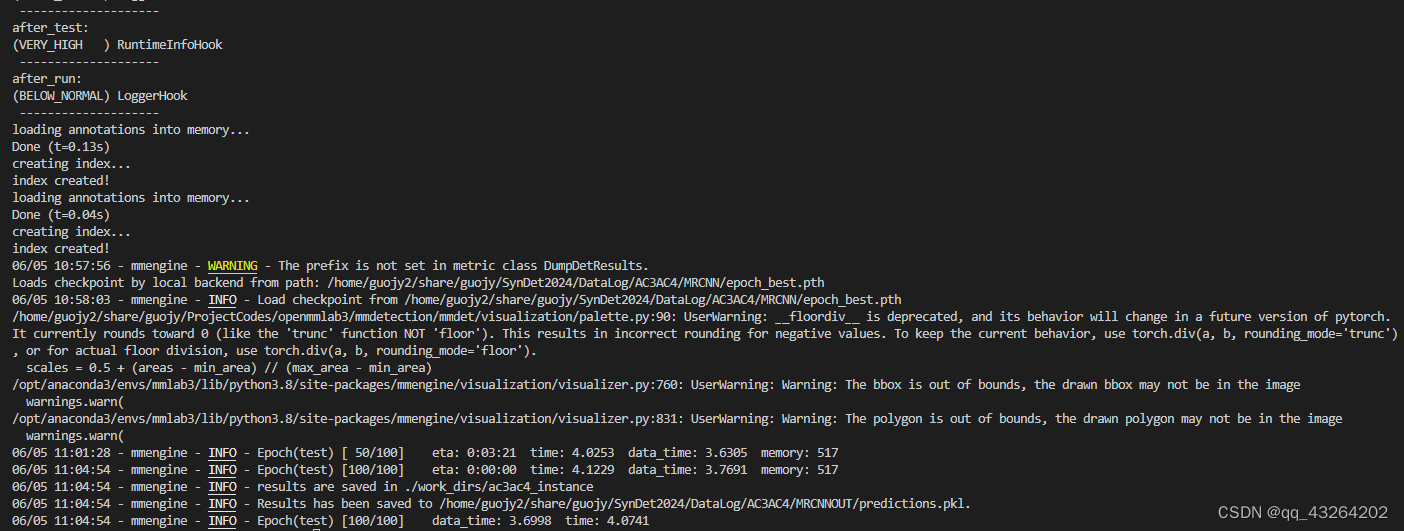
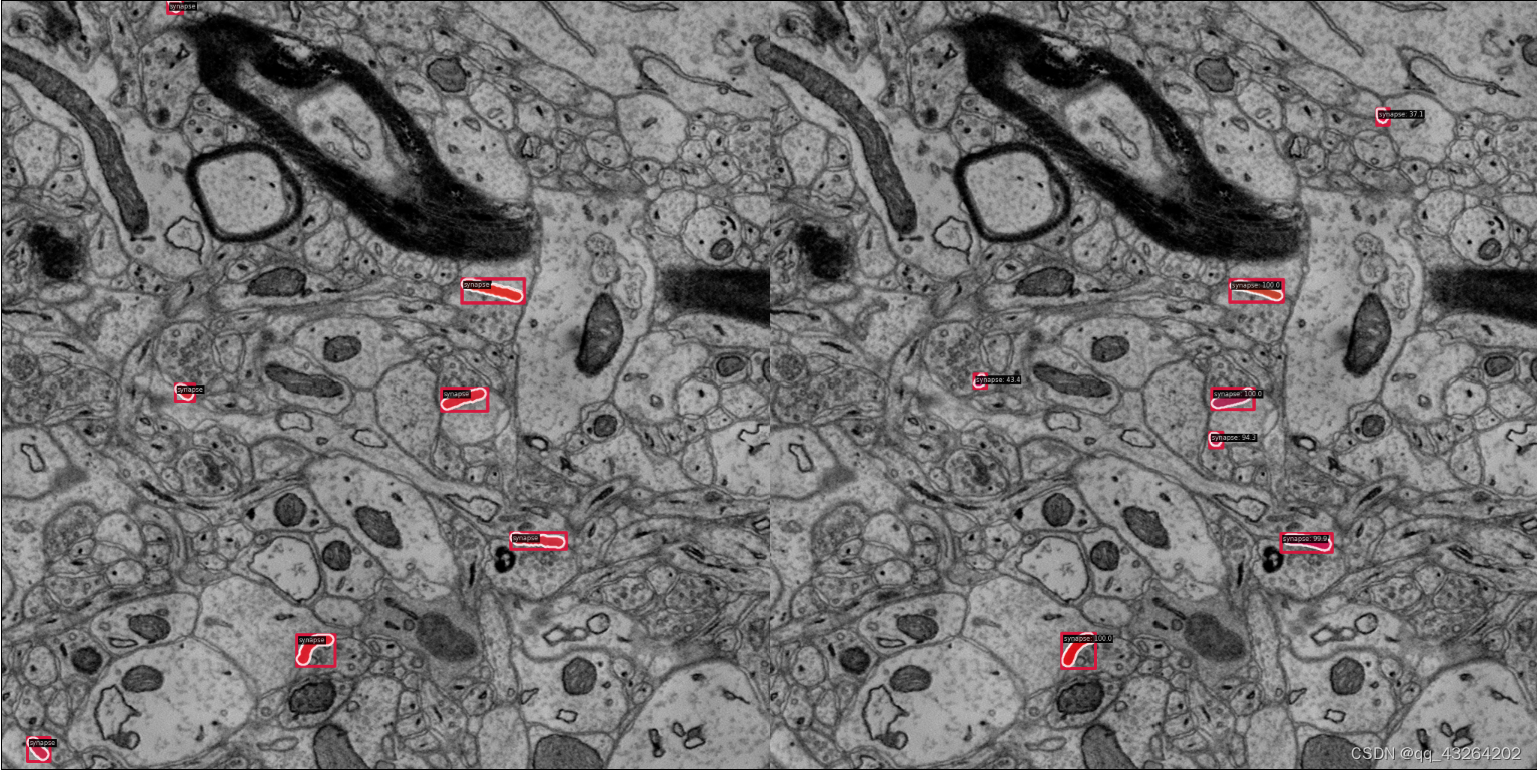
可以看到,在DataLog/AC3AC4/MRCNNOUT/show_dir/路径下已经出现测试的结果,左边是真值,右边是测试结果:
2.测试数据解析
对于已经推理出来的数据,我们可能不仅仅是作为可视化,还想将其还原为体积数据,进行后续的处理分析。打开我们存放的pkl文件,可以看到:
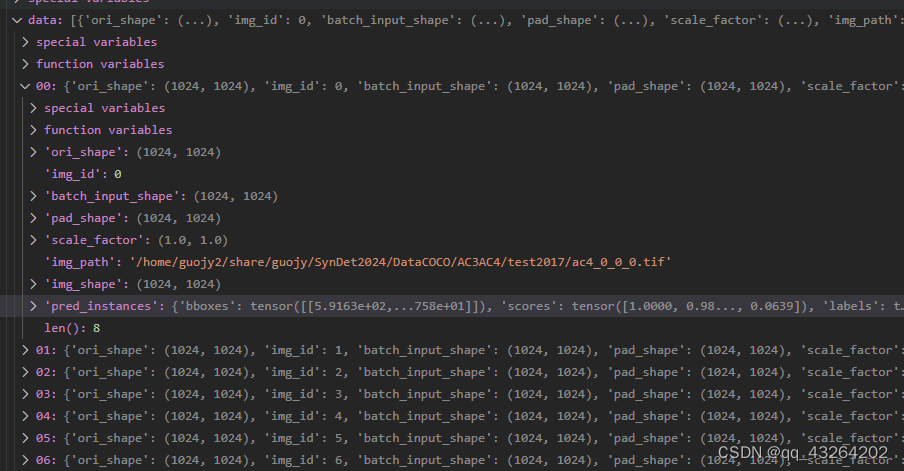
其中保存的data为list格式,长度是我们所的测试的图像数量,对于从标注到真实的mask还原的函数,官方给的数据在mmdet/visualization/local_visualizer.py这里。我们根据我们数据的命名方式,将pkl数据重新还原为体积数据:
其实在mmdet/evaluation/metrics/coco_metric.py路径下,我们可以看到官网中已经给出了Mask信息,并将其编码为RLE格式:
python
            # encode mask to RLE
            if 'masks' in pred:
                result['masks'] = encode_mask_results(
                    pred['masks'].detach().cpu().numpy()) if isinstance(
                        pred['masks'], torch.Tensor) else pred['masks']
我们同样调用pycocotools.mask进行解码,代码如下:
python
import os
from os.path import join
import pickle
from tqdm import tqdm
from skimage import io
import numpy as np
import pycocotools.mask as mask_util

def pkl2stack(pkl_path, save_path,
              y_range = [[0, 1024]],
              x_range = [[0, 1024]],
              score_thre = 0.6):
    os.makedirs(save_path, exist_ok=True)
    with open(pkl_path, 'rb') as file:
        data = pickle.load(file)
        for single_item in tqdm(data):
            img_path = single_item['img_path']
            img_name = img_path.split('/')[-1].split('.')[0]
            stack_name, z_name, y_name, x_name = img_name.split('_')
            save_img_name = z_name + '.tif'
            save_sub_path = join(save_path, stack_name)
            os.makedirs(save_sub_path, exist_ok=True)
            if os.path.isfile(join(save_sub_path, save_img_name)):
                save_array = io.imread(join(save_sub_path, save_img_name))
            else:
                save_array = np.zeros(shape=(y_range[-1][-1], x_range[-1][-1]), dtype=np.uint8)
            pred_scores = single_item['pred_instances']['scores'].numpy()
            pred_masks = mask_util.decode(single_item['pred_instances']['masks'])
            for scores_index in range(pred_scores.shape[0]):
                item_score = pred_scores[scores_index]
                if item_score > score_thre:
                    save_array[y_range[int(y_name)][0]:y_range[int(y_name)][1],
                               x_range[int(x_name)][0]:x_range[int(x_name)][1]] += pred_masks[:, :, scores_index]
            save_array[save_array>0] = 1
            io.imsave(join(save_sub_path, save_img_name), save_array)

if __name__ == '__main__':
    pkl2stack(pkl_path="Path/to/your/DataLog/AC3AC4/MRCNNOUT/predictions.pkl",
              save_path='Path/to/your/DataPred/MRCNN/AC3AC4/')
可以看到相关的路径下已经为每一个体积数据创建了一个文件夹,并将每一个2D结果进行了保存。
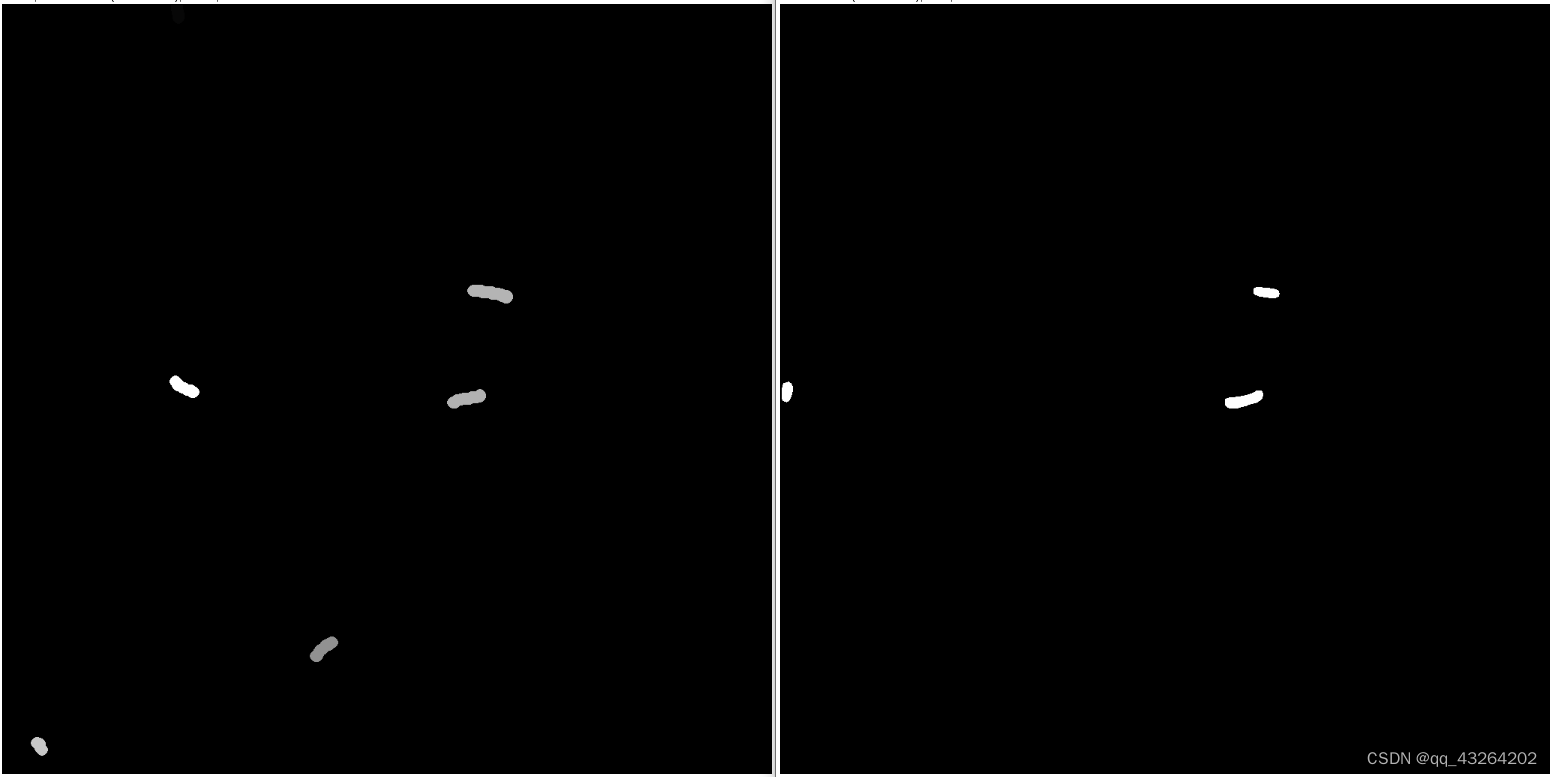
这里可以发现它和真值的结果差异是十分大的。这是由于我们目前的demo仅仅训练了20个epoch,模型可能并未收敛,这里只展示基本流程。同时我们并没有对其中的3D信息,实例信息进行关联。下一节将会简要介绍简单的细胞器重建方法。
二、测试结果的数据整合
2D实例分割模型仅仅是得到了2D层面的结果,但是我们还需要将其整合为3D体积数据,最简单的方式是直接通过连通域进行实例化。然而这样的方法往往会出现大量的假阴和假阳结果。实例化的方法在众多的电镜数据集中都有涉及,包括突触、线粒体等。这里使用最简单的形态学后处理方法进行实现。
未完待续...
三、生物结构的重建效果
未完待续...