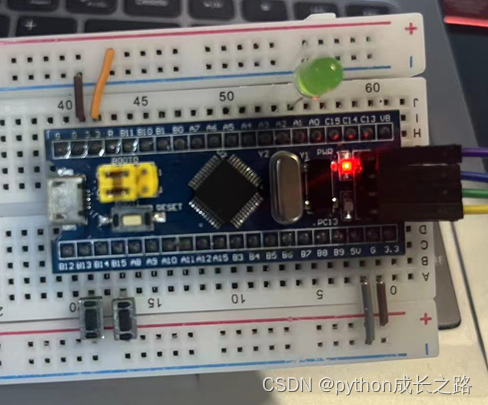
说明:外部中断的方式通过按键来实现,stm32的配置为江科大stm32教程中的配置。
1.内容:
通过中断的方式,按下B15按键Led亮,按下B13按键Led灭。
2.硬件设计:

3.代码:
3.1中断底层
EXTI.c
cpp
#include "stm32f10x.h"
#include "Led.h"

void inter_Init(void)
{
	/*开启RCC时钟*/
	RCC_APB2PeriphClockCmd(RCC_APB2Periph_GPIOB,ENABLE);
	/*AFIOʱÖÓ*/
	RCC_APB2PeriphClockCmd(RCC_APB2Periph_AFIO,ENABLE);

    /*配置GPIO*/
	GPIO_InitTypeDef GPIO_InitSturct;
	GPIO_InitSturct.GPIO_Mode=GPIO_Mode_IPD;
	GPIO_InitSturct.GPIO_Pin=GPIO_Pin_15|GPIO_Pin_13;
	GPIO_InitSturct.GPIO_Speed=GPIO_Speed_50MHz;
	GPIO_Init(GPIOB,&GPIO_InitSturct);


	/*配置EXTI*/
	GPIO_EXTILineConfig(GPIO_PortSourceGPIOB,GPIO_PinSource15);
	GPIO_EXTILineConfig(GPIO_PortSourceGPIOB,GPIO_PinSource13);

	EXTI_InitTypeDef EXTI_InitStructure;
	EXTI_InitStructure.EXTI_Line=EXTI_Line15|EXTI_Line13;
	EXTI_InitStructure.EXTI_LineCmd=ENABLE;
	EXTI_InitStructure.EXTI_Mode=EXTI_Mode_Interrupt;
	EXTI_InitStructure.EXTI_Trigger=EXTI_Trigger_Falling;
	EXTI_Init(&EXTI_InitStructure);

	/*配置NVIC*/
	NVIC_PriorityGroupConfig(NVIC_PriorityGroup_2);
	NVIC_InitTypeDef NVIC_InitStructure;
	NVIC_InitStructure.NVIC_IRQChannel=EXTI15_10_IRQn;
	NVIC_InitStructure.NVIC_IRQChannelCmd=ENABLE;
	NVIC_InitStructure.NVIC_IRQChannelPreemptionPriority=1;
	NVIC_InitStructure.NVIC_IRQChannelSubPriority=1;
	NVIC_Init(&NVIC_InitStructure);
}


/*中断服务函数*/
void EXTI15_10_IRQHandler(void)
{
	if((GPIO_ReadInputDataBit(GPIOB,GPIO_Pin_15)==1))
	{
		LED1_ON();
	}
	if((GPIO_ReadInputDataBit(GPIOB,GPIO_Pin_13)==1))
	{
		LED1_OFF();
	}
	EXTI_ClearITPendingBit(EXTI_Line15|EXTI_Line14);
}
EXTI.h
cpp
#ifndef __EXTI_H
#define __EXTI_H

void inter_Init(void);

#endif
3.2 Led底层
Led.c
cpp
#include "stm32f10x.h"

void LED_Init(void)
{
	RCC_APB2PeriphClockCmd(RCC_APB2Periph_GPIOA,ENABLE);

	GPIO_InitTypeDef GPIO_InitStruct2;
	GPIO_InitStruct2.GPIO_Mode=GPIO_Mode_Out_PP;
	GPIO_InitStruct2.GPIO_Pin=GPIO_Pin_1;
	GPIO_InitStruct2.GPIO_Speed=GPIO_Speed_50MHz;

	GPIO_Init(GPIOA,&GPIO_InitStruct2);

}

void LED1_ON(void)
{
	GPIO_ResetBits(GPIOA,GPIO_Pin_1);
}

void LED1_OFF(void)
{
	GPIO_SetBits(GPIOA,GPIO_Pin_1);
}
Led.h
cpp
#ifndef __LED_H
#define __LED_H

void LED_Init(void);
void LED1_ON(void);
void LED1_OFF(void);

#endif
3.3 main函数
cpp
#include "stm32f10x.h"                  // Device header
#include "EXTI.h"
#include "Led.h"

int main(void)
{
	LED_Init();
	inter_Init();
	LED1_OFF();
	while (1)
	{

	}
}