一、简介
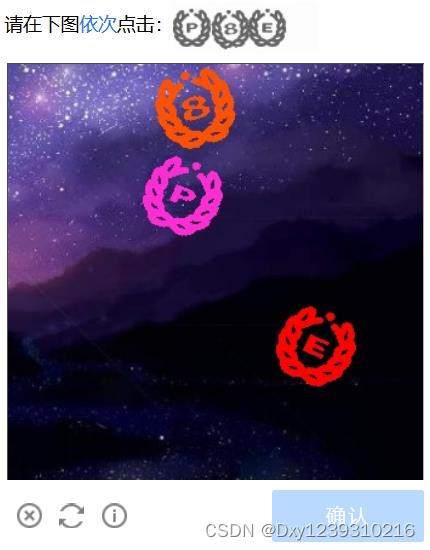
极验的图标点选验证码有很多种,今天我们就来讲其中一种的识别方法。如上图所示,这种图标的是特点是,中间是数字、字母。外圈有一种装饰作为干扰。由于外圈的装饰占了很大一部分,所以对识别的干扰比较大。
我根据实际情况分别做了两种识别方式,一种是原图识别、另一种是截图识别。
二、原图识别
网站上,如果能获取到html,就能获取图片的url链接,这样就可以通过图片链接下载原图。原图如下所示:

识别代码
python
import base64
import requests
import datetime
from io import BytesIO
from PIL import Image, ImageDraw, ImageFont

t1 = datetime.datetime.now()

#PIL图片保存为base64编码
def PIL_base64(img, coding='utf-8'):
    img_format = img.format
    if img_format == None:
        img_format = 'JPEG'

    format_str = 'JPEG'
    if 'png' == img_format.lower():
        format_str = 'PNG'
    if 'gif' == img_format.lower():
        format_str = 'gif'

    if img.mode == "P":
        img = img.convert('RGB')
    if img.mode == "RGBA":
        format_str = 'PNG'
        img_format = 'PNG'

    output_buffer = BytesIO()
    # img.save(output_buffer, format=format_str)
    img.save(output_buffer, quality=100, format=format_str)
    byte_data = output_buffer.getvalue()
    base64_str = 'data:image/' + img_format.lower() + ';base64,' + base64.b64encode(byte_data).decode(coding)
    # base64_str = base64.b64encode(byte_data).decode(coding)

    return base64_str

# 加载图片
img1 = Image.open(r'E:\Python\lixin_project\OpenAPI接口测试\test_img\51-1.jpg')
# 图片转base64
img1_base64 = PIL_base64(img1)

# 验证码识别接口
url = "http://www.detayun.cn/openapi/verify_code_identify/"
data = {
    # 用户的key
    "key":"MNhRvR5V6ArzCXAw16yY",
    # 验证码类型
    "verify_idf_id":"51",
    # 原图
    "img1":img1_base64,
    "img2":'',
}
header = {"Content-Type": "application/json"}

# 发送请求调用接口
response = requests.post(url=url, json=data, headers=header)

# 获取响应数据,识别结果
print(response.text)
print("耗时:", datetime.datetime.now() - t1)

# 标记识别结果
draw = ImageDraw.Draw(img1)
# 字体设置
font_type = "./msyhl.ttc"
font_size = 20
font = ImageFont.truetype(font_type, font_size)
# 获取结果列表
y = response.json()['data']['res_str']
point_list = eval(y)
# 标记点击序号
for i, point in enumerate(point_list):
    draw.ellipse((point[0] - 15, point[1] - 15,point[0] + 15, point[1] + 15), fill=(255, 0, 0))
    draw.text((point[0] - 5, point[1] - 15), str(i + 1), fill=(255, 255, 255), font=font)

img1.show()
三、截图识别
因为有很多场景获取图片链接的难度比较大,比如手机端。这样我们就可以采取截图的方式,需要分别截取点击区域的大图、点击顺序小图,如下图所示:

识别代码如下
python
import base64
import requests
import datetime
from io import BytesIO
from PIL import Image, ImageDraw, ImageFont

t1 = datetime.datetime.now()

#PIL图片保存为base64编码
def PIL_base64(img, coding='utf-8'):
    img_format = img.format
    if img_format == None:
        img_format = 'JPEG'

    format_str = 'JPEG'
    if 'png' == img_format.lower():
        format_str = 'PNG'
    if 'gif' == img_format.lower():
        format_str = 'gif'

    if img.mode == "P":
        img = img.convert('RGB')
    if img.mode == "RGBA":
        format_str = 'PNG'
        img_format = 'PNG'

    output_buffer = BytesIO()
    # img.save(output_buffer, format=format_str)
    img.save(output_buffer, quality=100, format=format_str)
    byte_data = output_buffer.getvalue()
    base64_str = 'data:image/' + img_format.lower() + ';base64,' + base64.b64encode(byte_data).decode(coding)
    # base64_str = base64.b64encode(byte_data).decode(coding)

    return base64_str

# 加载图片(点击区大图)
img1 = Image.open(r'E:\Python\lixin_project\OpenAPI接口测试\test_img\51-2.jpg')
# 图片转base64
img1_base64 = PIL_base64(img1)
# 加载图片(点击顺序小图)
img2 = Image.open(r'E:\Python\lixin_project\OpenAPI接口测试\test_img\51-3.jpg')
# 图片转base64
img2_base64 = PIL_base64(img2)

# 验证码识别接口
url = "http://www.detayun.cn/openapi/verify_code_identify/"
data = {
    # 用户的key
    "key":"MNhRvR5V6ArzCXAw16yY",
    # 验证码类型
    "verify_idf_id":"51",
    # 点击区大图
    "img1":img1_base64,
    # 点击顺序小图
    "img2":img2_base64,
}
header = {"Content-Type": "application/json"}

# 发送请求调用接口
response = requests.post(url=url, json=data, headers=header)

# 获取响应数据,识别结果
print(response.text)
print("耗时:", datetime.datetime.now() - t1)

# 标记识别结果
draw = ImageDraw.Draw(img1)
# 字体设置
font_type = "./msyhl.ttc"
font_size = 20
font = ImageFont.truetype(font_type, font_size)
# 获取结果列表
y = response.json()['data']['res_str']
point_list = eval(y)
# 标记点击序号
for i, point in enumerate(point_list):
    draw.ellipse((point[0] - 15, point[1] - 15,point[0] + 15, point[1] + 15), fill=(255, 0, 0))
    draw.text((point[0] - 5, point[1] - 15), str(i + 1), fill=(255, 255, 255), font=font)

img1.show()
四、总结
原图识别,截图识别的区别就在于参数不一样。一个是一张图片,一个是两张图片
原图参数
python
data = {
    # 用户的key
    "key":"MNhRvR5V6ArzCXAw16yY",
    # 验证码类型
    "verify_idf_id":"51",
    # 原图
    "img1":img1_base64,
    "img2":'',
}
截图参数
python
data = {
    # 用户的key
    "key":"MNhRvR5V6ArzCXAw16yY",
    # 验证码类型
    "verify_idf_id":"51",
    # 点击区大图
    "img1":img1_base64,
    # 点击顺序小图
    "img2":img2_base64,
}想了解更多验证码识别,请访问:得塔云