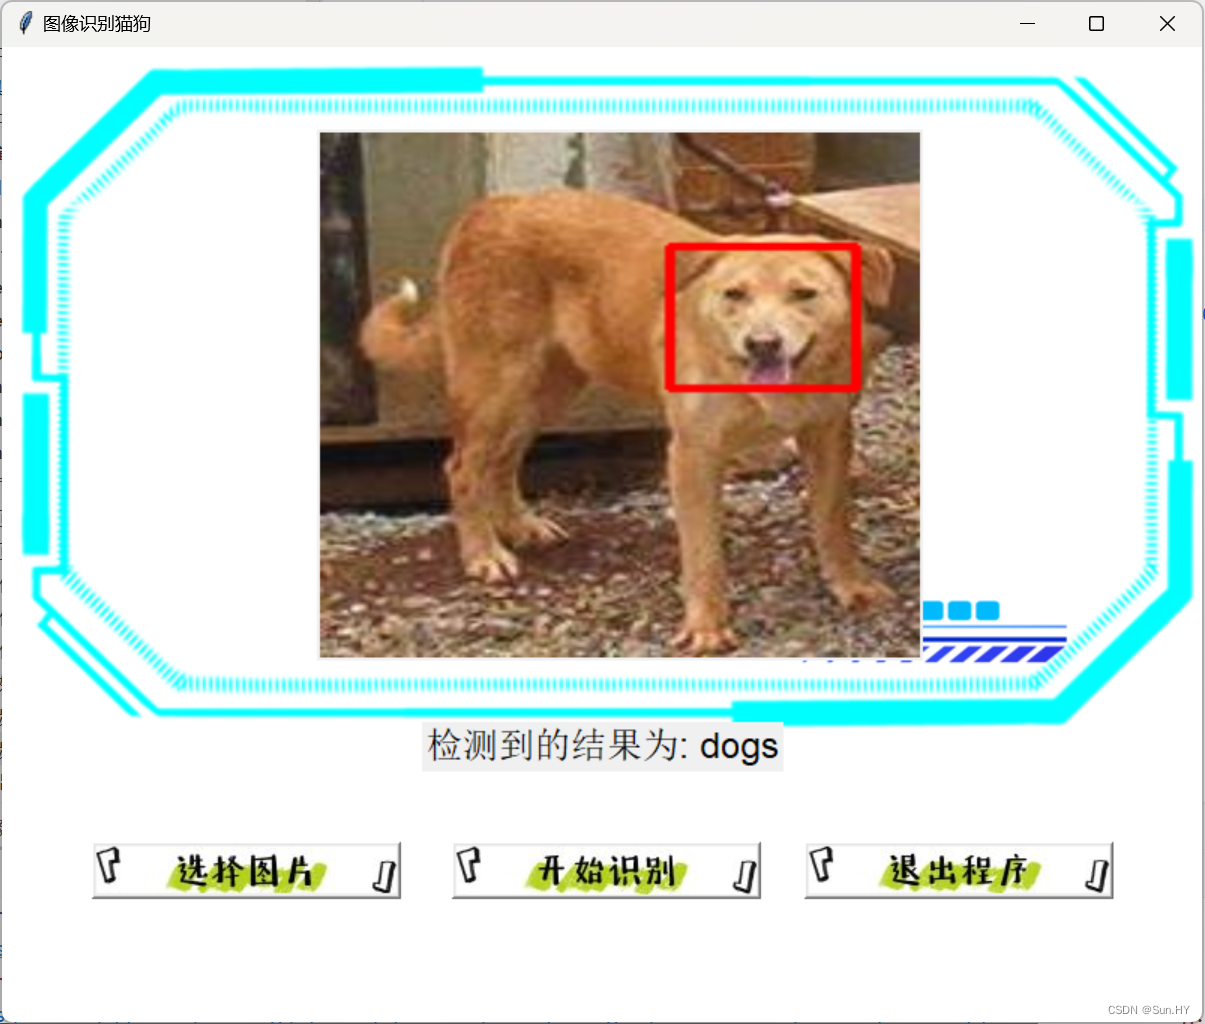
猫狗识别---静态图像识别
1. 导入必要的库:
python
复制代码
import torch
import numpy as np
import torchvision
from os import path
from torchvision import datasets, models
import torch.nn as nn
import torch.optim as optim
from torch.utils.data import DataLoader
import torchvision.transforms as transforms
import os
import tkinter as tk
from PIL import Image, ImageTk
from tkinter import filedialog
import cv2
import subprocess
from tkinter import messagebox
2. 设置数据目录和模型路径:
data_dir变量设置了数据目录的路径,model_path变量设置了预训练模型的路径。
python
复制代码
#设置数据目录和模型路径
data_dir = r'data'
model_path = 'cat_dog_classifier.pth'
3. 定义图像转换
python
复制代码
data_transforms = {
    'test': transforms.Compose([
        transforms.Resize(size=224),
        transforms.CenterCrop(size=224),
        transforms.ToTensor(),
        transforms.Normalize([0.485, 0.456, 0.406], [0.229, 0.224, 0.225])
    ]),
}
4. 使用GPU
python
复制代码
device = torch.device("cuda:0" if torch.cuda.is_available() else "cpu")
5. 加载没有预训练权重的ResNet模型
python
复制代码
model = models.resnet50(pretrained=False)  # 使用pretrained=False
num_ftrs = model.fc.in_features
model.fc = nn.Linear(num_ftrs, 2)
model.load_state_dict(torch.load(model_path))
model = model.to(device)
model.eval()
6. 创建Tkinter窗口:
python
复制代码
#创建Tkinter窗口
root = tk.Tk()
root.title('图像识别猫狗')
root.geometry('800x650')

image = Image.open("图像识别背景.gif")
image = image.resize((800, 650))  # 调整背景图片大小
photo1 = ImageTk.PhotoImage(image)
canvas = tk.Label(root, image=photo1)
canvas.pack()


#添加文本标签来显示识别结果
result_label = tk.Label(root, text="", font=('Helvetica', 18))
result_label.place(x=280, y=450)

#原始图像标签
image_label = tk.Label(root, text="", image="")
image_label.place(x=210, y=55)

#保存用户选择的图片路径
selected_image_path = None

#加载测试数据集
image_datasets = {x: datasets.ImageFolder(root=os.path.join(data_dir, x),
                                          transform=data_transforms[x])
                  for x in ['test']}
dataloaders = {x: DataLoader(image_datasets[x], batch_size=1, shuffle=False)
               for x in ['test']}
dataset_sizes = {x: len(image_datasets[x]) for x in ['test']}
class_names = image_datasets['test'].classes  # 定义class_names


#加载Haar特征级联分类器
cat_cascade = cv2.CascadeClassifier(cv2.data.haarcascades + 'haarcascade_frontalcatface.xml')
dog_cascade = cv2.CascadeClassifier(cv2.data.haarcascades + 'haarcascade_frontalface_alt2.xml')
7.定义选择图片的函数:
python
复制代码
#定义一个函数来打开文件选择对话框并显示图片
def choose_image():
    global selected_image_path
    file_path = filedialog.askopenfilename(initialdir=data_dir, title="选择图片",
                                           filetypes=(("图片文件", "*.png *.jpg *.jpeg *.gif *.bmp"), ("所有文件", "*.*")))
    if file_path:
        selected_image_path = file_path
        img = Image.open(file_path)
        img = img.resize((400, 350), Image.LANCZOS)
        imgTk = ImageTk.PhotoImage(img)
        image_label.config(image=imgTk)
        image_label.image = imgTk
8.定义预测图片的函数:
python
复制代码
#定义一个函数来使用模型进行预测
def predict_image():
    global selected_image_path
    if selected_image_path:
        img = Image.open(selected_image_path)
        transform = data_transforms['test']
        img_tensor = transform(img).unsqueeze(0).to(device)

        with torch.no_grad():
            outputs = model(img_tensor)
            _, preds = torch.max(outputs, 1)

        prediction = class_names[preds.item()]  # 使用str()来将整数转换为字符串
        result_label.config(text=f"检测到的结果为: {prediction}")

        # 使用OpenCV在原始图像上绘制矩形框
        img_cv2 = cv2.cvtColor(np.array(img), cv2.COLOR_RGB2BGR)

        if prediction == 'cats':
            cats = cat_cascade.detectMultiScale(img_cv2, scaleFactor=1.1, minNeighbors=5, minSize=(30, 30))
            for (x, y, w, h) in cats:
                cv2.rectangle(img_cv2, (x, y), (x + w, y + h), (0, 0, 255), 2)  # 红色矩形框
            if len(cats) > 0:
                cv2.imwrite("detected_cats_image.jpg", img_cv2)  # 保存带有猫矩形框的图像
                img_detected_cats = Image.open("detected_cats_image.jpg").resize((350, 300), Image.LANCZOS)
                imgTk_detected_cats = ImageTk.PhotoImage(img_detected_cats)
                image_label.config(image=imgTk_detected_cats)
                image_label.image = imgTk_detected_cats
        elif prediction == 'dogs':
            dogs = dog_cascade.detectMultiScale(img_cv2, scaleFactor=1.1, minNeighbors=5, minSize=(30, 30))
            for (x, y, w, h) in dogs:
                cv2.rectangle(img_cv2, (x, y), (x + w, y + h), (0, 0, 255), 2)  # 红色矩形框
            if len(dogs) > 0:
                cv2.imwrite("detected_dogs_image.jpg", img_cv2)  # 保存带有狗矩形框的图像
                img_detected_dogs = Image.open("detected_dogs_image.jpg").resize((350, 300), Image.LANCZOS)
                imgTk_detected_dogs = ImageTk.PhotoImage(img_detected_dogs)
                image_label.config(image=imgTk_detected_dogs)
                image_label.image = imgTk_detected_dogs
        else:
            print("未检测到猫或狗。")
            # 显示修改后的图像
        img = cv2.cvtColor(img_cv2, cv2.COLOR_BGR2RGB)
        img = cv2.resize(img, (400, 350))
        imgTk = ImageTk.PhotoImage(image=Image.fromarray(img))
        image_label.config(image=imgTk)
        image_label.image = imgTk
    else:
        print("请先选择一张图片。")
9.退出程序的函数:
python
复制代码
#退出程序的函数
def close():
    subprocess.Popen(["python","主页面.py"])
    root.destroy()
10.创建按钮:
python
复制代码
#创建按钮
image = Image.open("选择图片.gif")  # 加载一张图片
photo2 = ImageTk.PhotoImage(image)
bt1 = tk.Button(root, image=photo2, width=200, height=32, command=choose_image)
bt1.place(x=60, y=530)

image = Image.open("开始识别.gif")  # 加载一张图片
photo3 = ImageTk.PhotoImage(image)
bt1 = tk.Button(root, image=photo3, width=200, height=32, command=predict_image)
bt1.place(x=300, y=530)

image = Image.open("退出程序.gif")  # 加载一张图片
photo4 = ImageTk.PhotoImage(image)
bt1 = tk.Button(root, image=photo4, width=200, height=32, command=close)
bt1.place(x=535, y=530)
11.运行Tkinter事件循环:
python
复制代码
#运行Tkinter事件循环
root.mainloop()
12. 完整代码+运行结果
完整代码:
python
复制代码
import torch
import numpy as np
import torchvision
from os import path
from torchvision import datasets, models
import torch.nn as nn
import torch.optim as optim
from torch.utils.data import DataLoader
import torchvision.transforms as transforms
import os
import tkinter as tk
from PIL import Image, ImageTk
from tkinter import filedialog
import cv2
import subprocess
from tkinter import messagebox

# 设置数据目录和模型路径
data_dir = r'data'
model_path = 'cat_dog_classifier.pth'

# 定义图像转换
data_transforms = {
    'test': transforms.Compose([
        transforms.Resize(size=224),
        transforms.CenterCrop(size=224),
        transforms.ToTensor(),
        transforms.Normalize([0.485, 0.456, 0.406], [0.229, 0.224, 0.225])
    ]),
}

# 使用GPU
device = torch.device("cuda:0" if torch.cuda.is_available() else "cpu")

# 加载没有预训练权重的ResNet模型
model = models.resnet50(pretrained=False)  # 使用pretrained=False
num_ftrs = model.fc.in_features
model.fc = nn.Linear(num_ftrs, 2)
model.load_state_dict(torch.load(model_path))
model = model.to(device)
model.eval()

# 创建Tkinter窗口
root = tk.Tk()
root.title('图像识别猫狗')
root.geometry('800x650')

image = Image.open("图像识别背景.gif")
image = image.resize((800, 650))  # 调整背景图片大小
photo1 = ImageTk.PhotoImage(image)
canvas = tk.Label(root, image=photo1)
canvas.pack()


# 添加文本标签来显示识别结果
result_label = tk.Label(root, text="", font=('Helvetica', 18))
result_label.place(x=280, y=450)

# 原始图像标签
image_label = tk.Label(root, text="", image="")
image_label.place(x=210, y=55)

# 保存用户选择的图片路径
selected_image_path = None

# 加载测试数据集
image_datasets = {x: datasets.ImageFolder(root=os.path.join(data_dir, x),
                                          transform=data_transforms[x])
                  for x in ['test']}
dataloaders = {x: DataLoader(image_datasets[x], batch_size=1, shuffle=False)
               for x in ['test']}
dataset_sizes = {x: len(image_datasets[x]) for x in ['test']}
class_names = image_datasets['test'].classes  # 定义class_names


# 加载Haar特征级联分类器
cat_cascade = cv2.CascadeClassifier(cv2.data.haarcascades + 'haarcascade_frontalcatface.xml')
dog_cascade = cv2.CascadeClassifier(cv2.data.haarcascades + 'haarcascade_frontalface_alt2.xml')

# 定义一个函数来打开文件选择对话框并显示图片
def choose_image():
    global selected_image_path
    file_path = filedialog.askopenfilename(initialdir=data_dir, title="选择图片",
                                           filetypes=(("图片文件", "*.png *.jpg *.jpeg *.gif *.bmp"), ("所有文件", "*.*")))
    if file_path:
        selected_image_path = file_path
        img = Image.open(file_path)
        img = img.resize((400, 350), Image.LANCZOS)
        imgTk = ImageTk.PhotoImage(img)
        image_label.config(image=imgTk)
        image_label.image = imgTk

# 定义一个函数来使用模型进行预测
def predict_image():
    global selected_image_path
    if selected_image_path:
        img = Image.open(selected_image_path)
        transform = data_transforms['test']
        img_tensor = transform(img).unsqueeze(0).to(device)

        with torch.no_grad():
            outputs = model(img_tensor)
            _, preds = torch.max(outputs, 1)

        prediction = class_names[preds.item()]  # 使用str()来将整数转换为字符串
        result_label.config(text=f"检测到的结果为: {prediction}")

        # 使用OpenCV在原始图像上绘制矩形框
        img_cv2 = cv2.cvtColor(np.array(img), cv2.COLOR_RGB2BGR)

        if prediction == 'cats':
            cats = cat_cascade.detectMultiScale(img_cv2, scaleFactor=1.1, minNeighbors=5, minSize=(30, 30))
            for (x, y, w, h) in cats:
                cv2.rectangle(img_cv2, (x, y), (x + w, y + h), (0, 0, 255), 2)  # 红色矩形框
            if len(cats) > 0:
                cv2.imwrite("detected_cats_image.jpg", img_cv2)  # 保存带有猫矩形框的图像
                img_detected_cats = Image.open("detected_cats_image.jpg").resize((350, 300), Image.LANCZOS)
                imgTk_detected_cats = ImageTk.PhotoImage(img_detected_cats)
                image_label.config(image=imgTk_detected_cats)
                image_label.image = imgTk_detected_cats
        elif prediction == 'dogs':
            dogs = dog_cascade.detectMultiScale(img_cv2, scaleFactor=1.1, minNeighbors=5, minSize=(30, 30))
            for (x, y, w, h) in dogs:
                cv2.rectangle(img_cv2, (x, y), (x + w, y + h), (0, 0, 255), 2)  # 红色矩形框
            if len(dogs) > 0:
                cv2.imwrite("detected_dogs_image.jpg", img_cv2)  # 保存带有狗矩形框的图像
                img_detected_dogs = Image.open("detected_dogs_image.jpg").resize((350, 300), Image.LANCZOS)
                imgTk_detected_dogs = ImageTk.PhotoImage(img_detected_dogs)
                image_label.config(image=imgTk_detected_dogs)
                image_label.image = imgTk_detected_dogs
        else:
            print("未检测到猫或狗。")
            # 显示修改后的图像
        img = cv2.cvtColor(img_cv2, cv2.COLOR_BGR2RGB)
        img = cv2.resize(img, (400, 350))
        imgTk = ImageTk.PhotoImage(image=Image.fromarray(img))
        image_label.config(image=imgTk)
        image_label.image = imgTk
    else:
        print("请先选择一张图片。")


# 退出程序的函数
def close():
    subprocess.Popen(["python","主页面.py"])
    root.destroy()

# 创建按钮
image = Image.open("选择图片.gif")  # 加载一张图片
photo2 = ImageTk.PhotoImage(image)
bt1 = tk.Button(root, image=photo2, width=200, height=32, command=choose_image)
bt1.place(x=60, y=530)

image = Image.open("开始识别.gif")  # 加载一张图片
photo3 = ImageTk.PhotoImage(image)
bt1 = tk.Button(root, image=photo3, width=200, height=32, command=predict_image)
bt1.place(x=300, y=530)

image = Image.open("退出程序.gif")  # 加载一张图片
photo4 = ImageTk.PhotoImage(image)
bt1 = tk.Button(root, image=photo4, width=200, height=32, command=close)
bt1.place(x=535, y=530)

# 运行Tkinter事件循环
root.mainloop()
运行结果:
