文章目录
Opencv高级图像处理
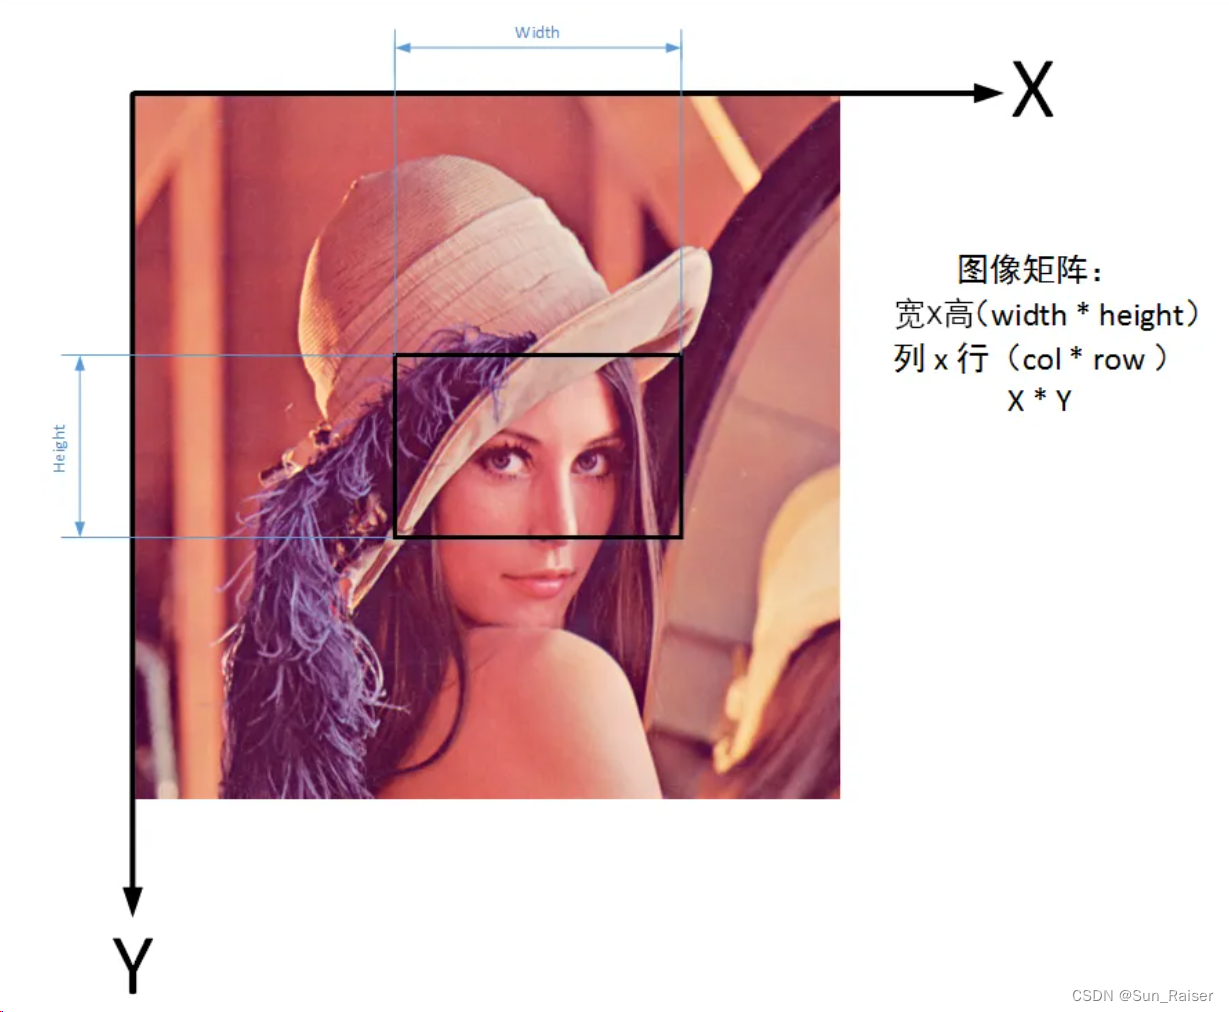
图像坐标

row=height=Point.y
col=width=Point.x
二值化
python
import cv2
import numpy as np

# 打开图像
image_path = 'your_image_path.jpg'  # 图片路径
image = cv2.imread(image_path, cv2.IMREAD_GRAYSCALE)  # 以灰度模式读取图像

# 检查图像是否正确读取
if image is None:
    print(f"Could not open or find the image: {image_path}")
    exit(0)

# 选择二值化方法,这里使用简单的阈值法
# 你可以调整阈值(127, 255)来得到不同的效果
# 第一个参数是源图像,第二个参数是用于分类像素的阈值,
# 第三个参数是赋予超过阈值的像素的新值,第四个参数是二值化的类型
ret, binary_image = cv2.threshold(image, 127, 255, cv2.THRESH_BINARY)

# 保存处理后的图像
output_path = 'binary_image.jpg'  # 保存路径
cv2.imwrite(output_path, binary_image)
滤波
高斯滤波
python
blurred = cv2.GaussianBlur(image, (11, 11), 0)中值滤波
python
result = cv2.medianBlur(image, 3)开闭运算
python
op_open = cv2.morphologyEx(blurred_raw, cv2.MORPH_OPEN, k) # 开运算
op_close = cv2.morphologyEx(blurred_raw, cv2.MORPH_CLOSE, k) # 闭运算
检测
霍夫圆检测
函数 cv2.HoughCircles()
| 参数 | 含义 |
|---|---|
| image | 原始图像 |
| method | 目前只支持cv2.HOUGH_GRADIENT |
| dp | 图像解析的反向比例。1为原始大小,2为原始大小的一半 |
| minDist | 圆心之间的最小距离。过小会增加圆的误判,过大会丢失存在的圆 |
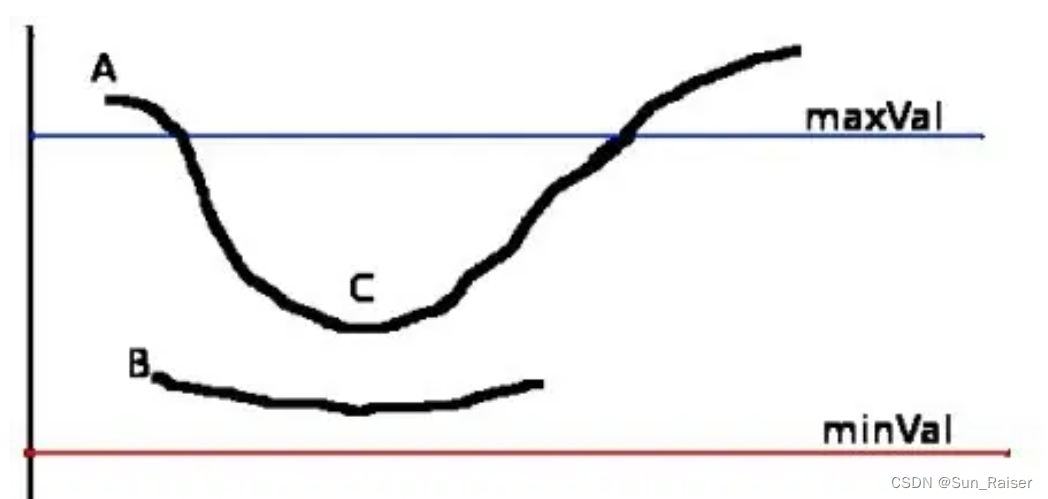
| param1(maxval) | Canny检测器的高阈值,用于检测边缘点的阈值,大于此值才被检测出来。 |
| param2(minval) | 检测阶段圆心的累加器阈值(thresh)。越小的话,会增加不存在的圆;越大的话,则检测到的圆就更加接近完美的圆形,检测到圆所需要的最小边缘点数,边缘点数小于此值则舍弃。 |
| minRadius | 检测的最小圆的半径 |
| maxRadius | 检测的最大圆的半径 |
python
# 霍夫圆检测
circles = cv2.HoughCircles(image=raw, cv2.HOUGH_GRADIENT, dp=1, minDist=20, param1=150, param2=100,minRadius=0, maxRadius=0)

# 绘制检测圆
if circles is not None:
    print(f"检测到圆的个数:{len(circles)}")
    # print(f"{circles}")
    circles = np.round(circles[0, :]).astype("int")
    for (x, y, r) in circles:
        cv2.circle(image, (x, y), r, (0, 255, 0), 1)
else:
    print("未检测到圆")
边缘检测
Canny边缘检测
- 目的:Canny边缘检测算法的目的是识别图像中的一维边缘。该算法通过多步骤过程检测图像中的边缘,包括平滑图像以减少噪声、计算图像梯度以找到潜在的边缘点、应用非极大值抑制(NMS)以获得细边缘,以及使用双阈值算法和边缘连接通过滞后阈值处理确定最终边缘。
- 输出:Canny算法输出的是一个二值图像,其中边缘上的像素为白色(或1),其余像素为黑色(或0)。

python
edges = cv2.Canny(blurred_raw, threshold1=10, threshold2=70)
# edges 是检测之后的图像
原理 :参考链接:知乎文章
findContours
- 目的 :
findContours函数的目的是从二值图像中提取轮廓线。轮廓可以被视为连续的点(沿着边界)组成的曲线,适用于形状分析和对象检测和识别。 - 工作方式 :
findContours通过追踪二值图像中的白色(或前景)部分的边缘来查找轮廓。这通常是在应用了阈值处理或边缘检测之后进行。 - 输出:该函数返回两个主要的输出:轮廓本身(一个点的列表,这些点连续地定义了边界)和每个轮廓的层级信息(表示轮廓之间的父子关系)。
python
# 边缘检测
ret, thresh = cv2.threshold(src=blurred_image, thresh=60, maxval=255, type=0)
contours, hierarchy = cv2.findContours(image=thresh, mode=cv2.RETR_TREE, method=cv2.CHAIN_APPROX_SIMPLE)

# image,单通道图像矩阵,可以是灰度图,但更常用的是二值图像,一般是经过Canny、拉普拉斯等边缘检测算子处理过的二值图像

# 绘制边缘
image = cv2.drawContours(image=image, contours=contours, contourIdx=-1, color=(0, 255, 0), thickness=3)
区别
- 应用场景 :Canny边缘检测主要用于边缘识别,适合于图像中边缘的检测和跟踪。而
findContours用于提取轮廓信息,适用于更高级的形状分析和对象识别。 - 输出类型 :Canny边缘检测输出一个二值图像,其中包含检测到的边缘。
findContours则返回轮廓点的集合,这些点可以用来描述对象的形状。 - 后续处理 :Canny检测出的边缘通常用作其他图像处理操作的预处理步骤,比如轮廓提取。
findContours通常是形状分析或对象识别流程中的一步,它依赖于边缘检测的结果。
简而言之,Canny边缘检测专注于识别图像中的边缘,而findContours则用于基于这些边缘或其他图像特征提取和分析轮廓。在许多实际应用中,这两个步骤经常连续使用:首先应用Canny边缘检测来找到边缘,然后使用findContours来提取这些边缘形成的轮廓。
傅里叶变换-高/低通滤波
使用傅里叶变换进行高/低通滤波。
python
import cv2
import numpy as np
from matplotlib import pyplot as plt

def fourier_filter(image_path, output_path_lowpass, output_path_highpass, d0):
    # 读取图像
    img = cv2.imread(image_path, 0)

    # 进行傅里叶变换
    dft = cv2.dft(np.float32(img), flags=cv2.DFT_COMPLEX_OUTPUT)
    dft_shift = np.fft.fftshift(dft)

    # 创建低通和高通滤波器掩模
    rows, cols = img.shape
    crow, ccol = rows // 2, cols // 2
    mask_lowpass = np.zeros((rows, cols, 2), np.uint8)
    mask_highpass = np.ones((rows, cols, 2), np.uint8)
    r = d0 // 2
    center = [crow, ccol]
    x, y = np.ogrid[:rows, :cols]
    mask_area_lowpass = (x - center[0]) ** 2 + (y - center[1]) ** 2 <= r*r
    mask_lowpass[mask_area_lowpass] = 1
    mask_highpass[mask_area_lowpass] = 0

    # 应用滤波器并进行逆DFT
    fshift_lowpass = dft_shift * mask_lowpass
    fshift_highpass = dft_shift * mask_highpass
    f_ishift_lowpass = np.fft.ifftshift(fshift_lowpass)
    f_ishift_highpass = np.fft.ifftshift(fshift_highpass)
    img_back_lowpass = cv2.idft(f_ishift_lowpass)
    img_back_highpass = cv2.idft(f_ishift_highpass)
    img_back_lowpass = cv2.magnitude(img_back_lowpass[:, :, 0], img_back_lowpass[:, :, 1])
    img_back_highpass = cv2.magnitude(img_back_highpass[:, :, 0], img_back_highpass[:, :, 1])

    # 归一化到0-255并保存结果
    img_back_lowpass = cv2.normalize(img_back_lowpass, None, alpha=0, beta=255, norm_type=cv2.NORM_MINMAX, dtype=cv2.CV_8UC1)
    img_back_highpass = cv2.normalize(img_back_highpass, None, alpha=0, beta=255, norm_type=cv2.NORM_MINMAX, dtype=cv2.CV_8UC1)

    # 保存图像
    cv2.imwrite(output_path_lowpass, img_back_lowpass)
    cv2.imwrite(output_path_highpass, img_back_highpass)

    # 显示图像(可选)
    plt.subplot(131), plt.imshow(img, cmap='gray'), plt.title('Input Image')
    plt.subplot(132), plt.imshow(img_back_lowpass, cmap='gray'), plt.title('Lowpass Filter')
    plt.subplot(133), plt.imshow(img_back_highpass, cmap='gray'), plt.title('Highpass Filter')
    plt.show()

# 使用示例:
image_path = 'path_to_your_image.jpg'  # 请替换为你的图像文件路径
output_path_lowpass = 'output_lowpass.jpg'  # 低通滤波后的输出文件路径
output_path_highpass = 'output_highpass.jpg'  # 高通滤波后的输出文件路径
d0 = 60  # 滤波器的直径,可根据需要调整
fourier_filter(image_path, output_path_lowpass, output_path_highpass, d0)
直线检测
python
# 将彩色图片灰度化
gray = cv2.cvtColor(img, cv2.COLOR_BGR2GRAY)
gray = cv2.GaussianBlur(gray,(11, 11), 0)
# 进行Hough_line直线检测
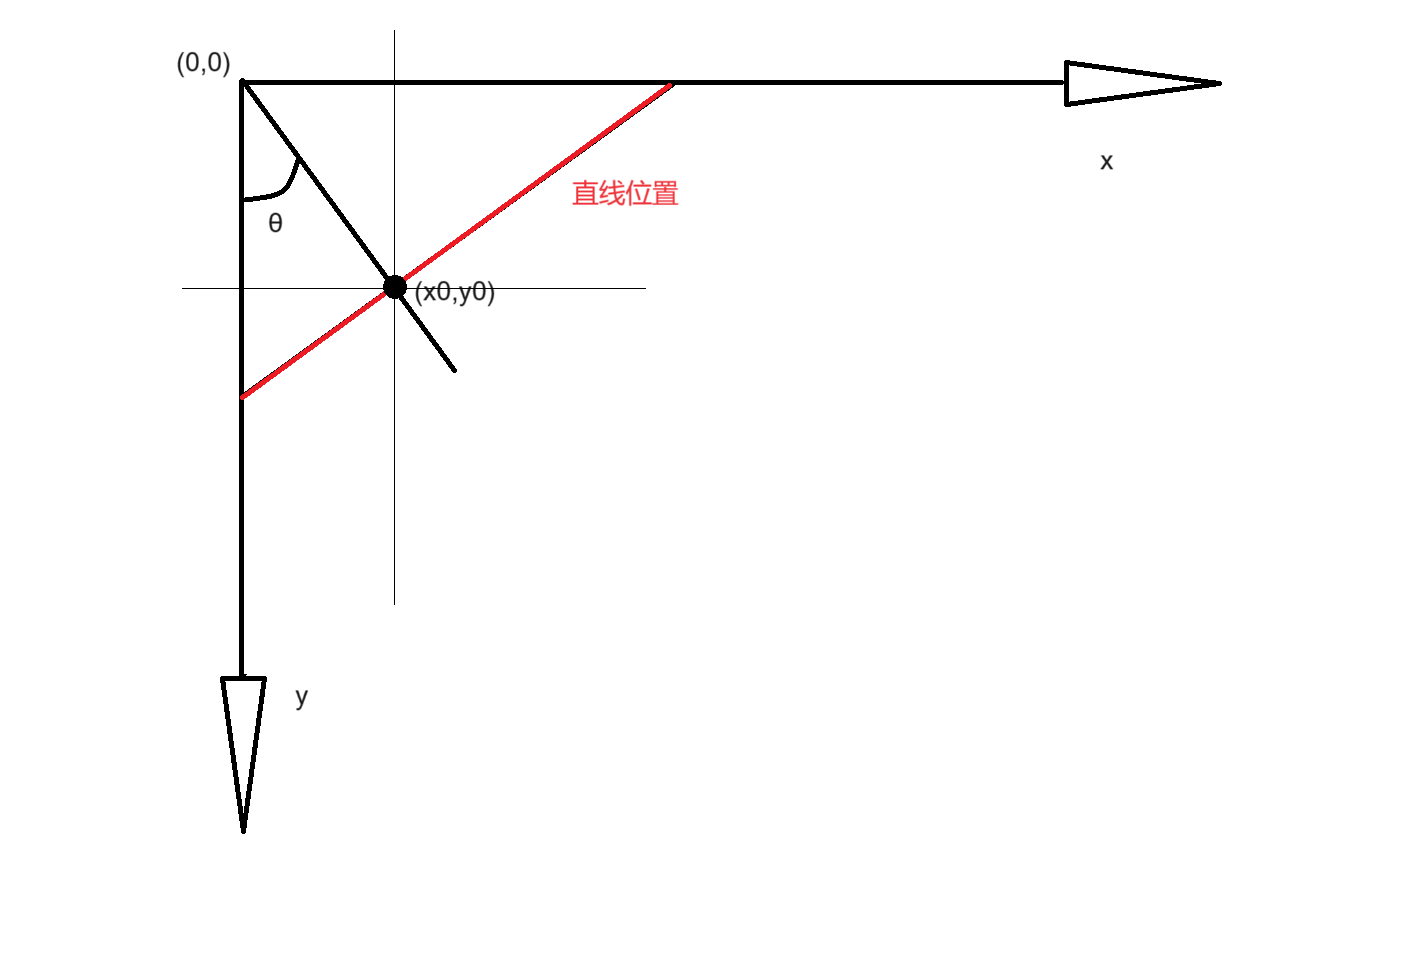
lines = cv2.HoughLines(edges, 1, np.pi / 180, 240)
print(len(lines))
print(lines)
直线的绘制
python
# 遍历每一个r和theta
for i in range(len(lines)):
    r, theta = lines[i, 0, 0], lines[i, 0, 1]
    a = np.cos(theta)  # cos(theta)
    b = np.sin(theta)  # sin(theta)
    x0 = a * r  # rcos(theta)
    y0 = b * r  # rsin(theta)
    x1 = int(x0 + 1000 * (-b))  # rcos(theta)-1000sin(theta)
    y1 = int(y0 + 1000 * (a))  # rsin(theta)+1000cos(theta)
    x2 = int(x0 - 1000 * (-b))  # rcos(theta)+1000sin(theta)
    y2 = int(y0 - 1000 * (a))  # rsin(theta)-1000cos(theta)
    cv2.line(img, (x1, y1), (x2, y2), (0, 255, 0), 1)  # 绘制直线结果
相机标定
**相机标定的主要作用和目的是为了提高机器视觉系统在三维测量和识别中的应用精度。**具体来说,相机标定可以解决以下问题:
- 被测平面不确定性:在实际应用中,被测平面的位置可能无法精确控制,而且镜头也不是理想的小孔模型,因此无法直接使用简单的公式计算实际距离。
- 镜头畸变:镜头可能存在畸变,这会影响图像的正确性,使得无法直接使用小孔成像模型来计算距离。
- 非理想坐标平面转换:在三维空间中,需要将任意坐标平面转换到理想坐标平面上,并对有畸变的图像进行校正,以便进行后续的尺寸和位置测量。
通过相机标定,可以确定相机的内参和外参,包括镜头的焦距、畸变参数、光轴中心坐标和像元尺寸等。这些参数是唯一确定的,当摄像机和镜头确定时。通过这些参数的转换和校正,可以实现对三维空间中任意平面上尺寸与位置的测量,从而提高机器视觉系统的测量和定位精度。
python
# 相机标定
retval, cameraMatrix, distCoeffs, rvecs, tvecs = cv2.calibrateCamera(objectPoints, imagePoints, imageSize)
参数
retval:标定误差
cameraMatrix: 内在相机矩阵
distCoeffs: 镜头畸变系数。
rvecs: 为 3×1 旋转向量。向量的方向指定旋转轴,向量的大小指定旋转角度。
tvecs: 3×1 平移向量。
校准因素
python
import cv2
import numpy as np
import glob


def main():
    # 参数设置
    criteria = (cv2.TERM_CRITERIA_EPS + cv2.TERM_CRITERIA_MAX_ITER, 30, 0.001)
    w, h = 11, 8  # 棋盘格内角点数量(亲自数)
    objp = np.zeros((w * h, 3), np.float32)
    objp[:, :2] = np.mgrid[0:w, 0:h].T.reshape(-1, 2)

    # 存储角点信息
    objpoints = []  # 三维世界坐标
    imgpoints = []  # 二维图像坐标

    # 加载并处理图像
    images = glob.glob('data/d2/*.jpg')
    for fname in images:
        img = cv2.imread(fname)
        # img = cv2.resize(img, (768, 1024))  # 统一图像大小
        gray = cv2.cvtColor(img, cv2.COLOR_BGR2GRAY)
        # gray = cv2.GaussianBlur(gray, (11, 11), 0)  # 滤波处理

        # 寻找棋盘格角点
        ret, corners = cv2.findChessboardCorners(gray, (w, h), None)

        if ret:
            corners = cv2.cornerSubPix(gray, corners, (11, 11), (-1, -1), criteria)  # 亚像素级角点检测
            m = [c[0] for c in corners]
            pass

            objpoints.append(objp)
            imgpoints.append(corners)

            # 可视化和保存结果
            cv2.drawChessboardCorners(img, (w, h), corners, True)
            cv2.imshow('Corners Found', img)
            cv2.waitKey(100)
            # 根据需要保存图像,这里以序号命名
            cv2.imwrite(f"result/mm_{len(imgpoints)}.jpg", img)
        else:
            print(f"Calibration failed for image: {fname}")

    cv2.destroyAllWindows()

    # 相机标定
    ret, mtx, dist, rvecs, tvecs = cv2.calibrateCamera(objpoints, imgpoints, (768, 1024), None, None)

    # 输出标定结果
    print("Calibration Error:", ret)
    print("Intrinsic Matrix:\n", mtx)
    print("Distortion Coefficients:\n", dist.ravel())
    # 如果需要,可以保存或进一步处理旋转向量和平移向量
    # print("Rotation Vectors:\n", rvecs)
    # print("Translation Vectors:\n", tvecs)


if __name__ == '__main__':
main()详细阅读:参考链接
视频处理
视频格式
python
code ={"mp4":"mp4v","avi":"I420","flv":"FLV1"}


cv2.VideoWriter_fourcc('I','4','2','0')
# 这个选项是一个未压缩的YUV编码,4:2:0色度子采样。这种编码广泛兼容,但会产生大文件。文件扩展名应为.avi。

cv2.VideoWriter_fourcc('P','I','M','1')
# 此选项为MPEG-1。文件扩展名应为.avi。

cv2.VideoWriter_fourcc('X','V','I','D')
# 此选项是一个相对较旧的MPEG-4编码。如果要限制结果视频的大小,这是一个很好的选择。文件扩展名应为.avi。

cv2.VideoWriter_fourcc('M','J','P','G')
# 此选项为motion-jpeg视频。文件扩展名应为.avi。

cv2.VideoWriter_fourcc('X','2','6','4'):
# 这个选项是一种比较新的MPEG-4编码方式。如果你想限制结果视频的大小,这可能是最好的选择。文件扩展名应为.mp4。

cv2.VideoWriter_fourcc('H','2','6','4'):
# 这个选项是传统的H264编码方式。如果你想限制结果视频的大小,这可能是很好的选择。文件扩展名应为.mp4。

cv2.VideoWriter_fourcc('m', 'p', '4', 'v')
# 此选项是另一个相对较旧的MPEG-4编码。如果要限制结果视频的大小,这是一个很好的选择。文件扩展名应为.m4v。

cv2.VideoWriter_fourcc('T','H','E','O')
# 这个选项是Ogg Vorbis。文件扩展名应为.ogv。

cv2.VideoWriter_fourcc('F','L','V','1')
# 此选项为Flash视频。文件扩展名应为.flv。
模板
摄像头处理(带参调节)
python
import cv2
import traceback

def callback(value):
    print(value)


def detect(img, k_size, min_val, max_val):
    return img

if __name__ == '__main__':
    h = BaslerCam(szSettingFile='xxx.pfs', szName='Test_use_01')
    cv2.namedWindow("img")
    cv2.resizeWindow("img", (1024, 768))
    cv2.createTrackbar("k_size", "img", 10, 90, callback)
    cv2.createTrackbar("c_minval", "img", 10, 90, callback)
    cv2.createTrackbar("c_maxval", "img", 10, 90, callback)
    base_size = 10
    base_minval = 10
    base_maxval = 10
    while True:
        b, hFrames = h.ReadFrames(1)
        try:
            if len(hFrames) == 0:
                continue
            p = hFrames[0]
            try:
                k_size = cv2.getTrackbarPos("k_size", "img")
                k_size = k_size if k_size % 2 == 1 else k_size + 1
                c_minval = cv2.getTrackbarPos("c_minval", "img")
                c_maxval = cv2.getTrackbarPos("c_maxval", "img")

                result = detect(p.copy(), (base_size + k_size, base_size + k_size), base_minval + c_minval,base_maxval + c_maxval)  # 保存结果
                if result is not None:
                    cv2.imshow("img", cv2.resize(result, (1024, 768)))
                    cv2.waitKey(1)
            except Exception as e:
                traceback.print_exc()
        except Exception as e:
            print(e)
            traceback.print_exc()
单图片处理(带参调节)
python
import cv2
import traceback

def callback(value):
    print(value)


def detect(img, k_size, min_val, max_val):
    return img


if __name__ == '__main__':
    img_path = "../data/result/img/1712817408432.jpg"

    # 读取输入图片data/resource/img/led/1711702476703.jpg
    img = cv2.imread(img_path)
    img = cv2.resize(img, (1024, 768))
    cv2.namedWindow("img")
    cv2.resizeWindow("img", (1024, 768))
    cv2.createTrackbar("k_size", "img", 10, 90, callback)
    cv2.createTrackbar("c_minval", "img", 10, 90, callback)
    cv2.createTrackbar("c_maxval", "img", 10, 90, callback)
    base_size = 10
    base_minval = 10
    base_maxval = 10
    while True:
        try:
            k_size = cv2.getTrackbarPos("k_size", "img")
            k_size = k_size if k_size % 2 == 1 else k_size + 1
            c_minval = cv2.getTrackbarPos("c_minval", "img")
            c_maxval = cv2.getTrackbarPos("c_maxval", "img")

            result = detect(img.copy(), (base_size + k_size, base_size + k_size), base_minval + c_minval,
                            base_maxval + c_maxval)
            # 保存结果
            # file_name = img_path.split("/")[-1]
            # print(file_name)
            # cv2.imwrite(f"../data/result/img/r_{file_name}", result)
            if result is not None:
                cv2.imshow("img", result)
                cv2.waitKey(1)
        except Exception as e:
            print(e)
            traceback.print_exc()