目录
Unlua的使用
前言
整理一下Unlua的整个学习流程
下载Unlua插件
我们此处使用的是腾讯的Unlua插件,打开官方的Github链接,下载对应的版本
官方链接GitHub
Wiki文档
插件安装
把下载好的插件放在自己新建项目的Plugins文件夹下,编译启动
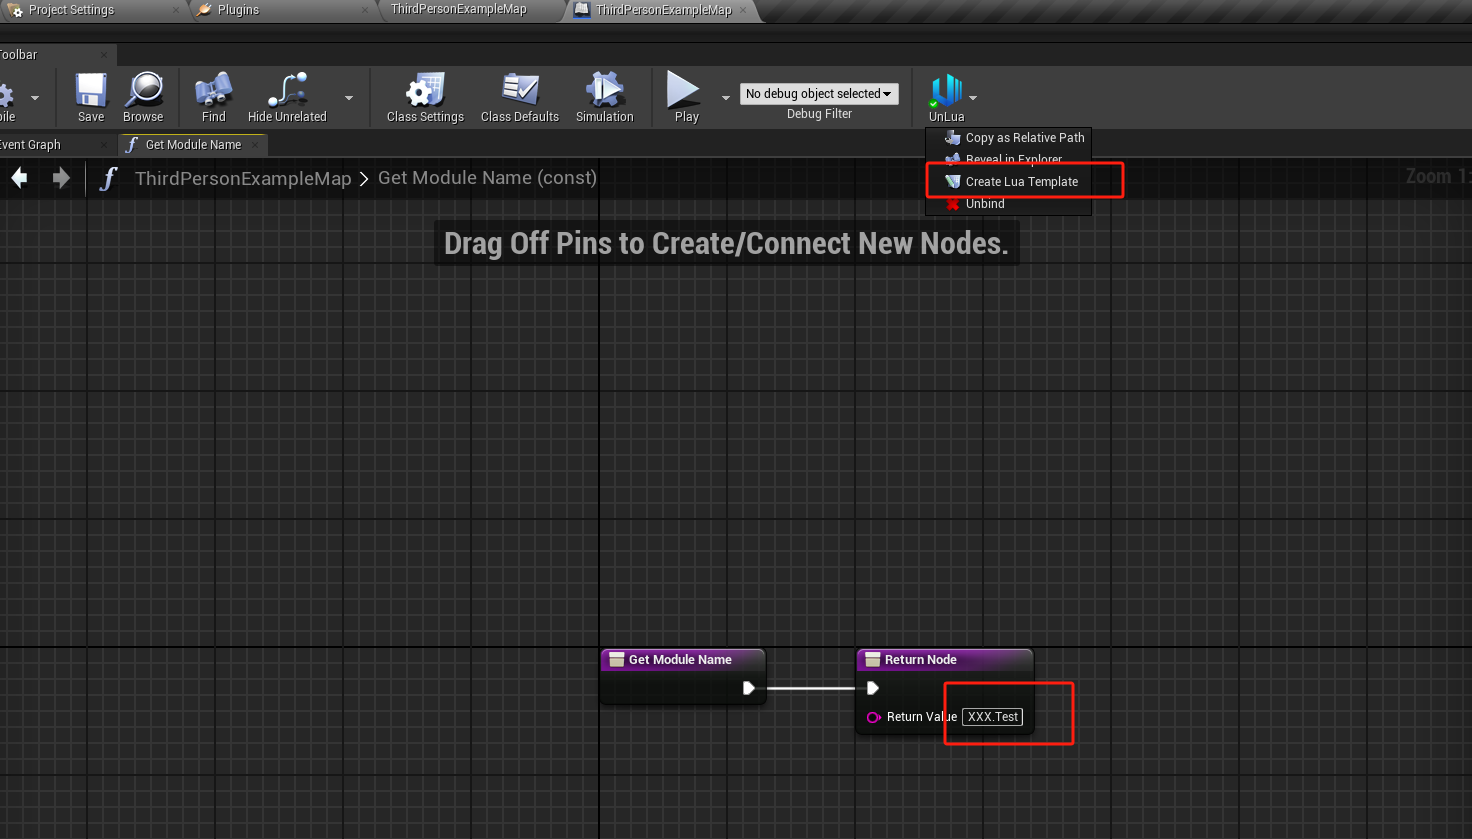
快速入门
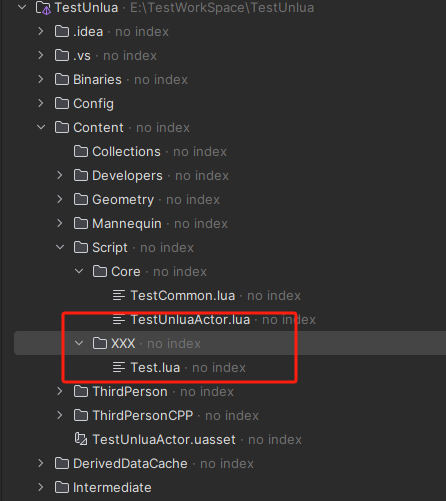
点击Create的时候,会根据填写的模块名字生成路径
语法汇总
模块导入
与路径对应即可
bash
local Common = require "Core.Common"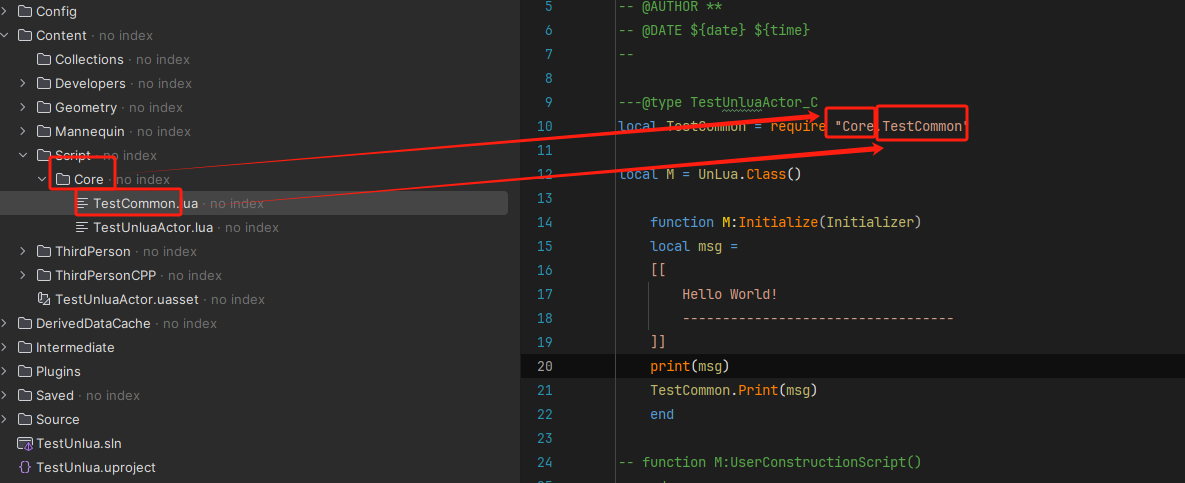
多行字符串

官方静态方法调用
c++
UE.类名.静态方法名字nil代表无效值空值未定义的值

蓝图方法调用
bash
self:XXXFunction() 
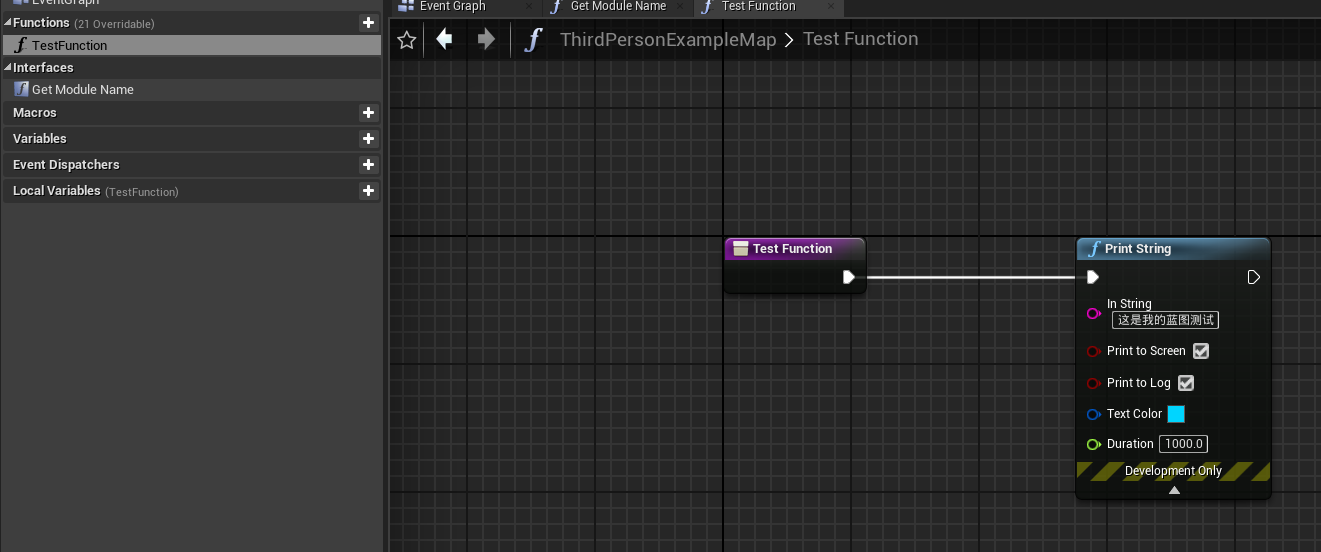
输出结果:这是我的蓝图测试
重载蓝图中的方法
bash
function M:XXXFunction())
end
c++
输出结果:M:TestFunction主动调用被重载的蓝图方法
cpp
self.Overridden.XXXFunction()
c++
输出结果:
这是我的蓝图测试
M:TestFunction
输入绑定
cpp
function M:LeftMouseButton_Pressed()
end
实例:绑定按键并打印它的名字
cpp
local M = UnLua.Class()

local PrintString = UE.UKismetSystemLibrary.PrintString

local function Print(text)
    PrintString(nil, text, true, false, UE.FLinearColor(1, 1, 1, 1), 100)
end

function M:ReceiveBeginPlay()
    local msg =
        [[
    来试试以下输入吧:
    字母、数字、小键盘、方向键、鼠标
    ]]
    Print(msg)
end

local function SetupKeyBindings()
    local key_names =
    {
        -- 字母
        "A", "B", --[["C",]] "D", "E","F", "G", "H", "I", "J", "K", "L", "M", "N", "O", "P", "Q", "R", "S", "T", "U", --[["V", ]] "W", "X", "Y", "Z",
        -- 数字
        "One", "Two", "Three", "Four", "Five", "Six", "Seven", "Eight", "Nine",
        -- 小键盘
        "NumPadOne", "NumPadTwo", "NumPadThree", "NumPadFour", "NumPadFive", "NumPadSix", "NumPadSeven", "NumPadEight", "NumPadNine",
        -- 方向键
        "Up", "Down", "Left", "Right",
        -- ProjectSettings -> Engine - Input -> Action Mappings
        "Fire", "Aim",
    }

    for _, key_name in ipairs(key_names) do
        M[key_name .. "_Pressed"] = function(self, key)
            Print(string.format("按下了%s", key.KeyName))
        end
    end
end

local function SetupAxisBindings()
    local axis_names = {
        "MoveForward", "MoveRight", "Turn", "LookUp", "LookUpRate", "TurnRate"
    }
    for _, axis_name in ipairs(axis_names) do
        M[axis_name] = function(self, value)
            if value ~= 0 then
                Print(string.format("%s(%f)", axis_name, value))
            end
        end
    end
end

SetupKeyBindings() -- 在require的时候会执行
SetupAxisBindings()

local BindKey = UnLua.Input.BindKey

BindKey(M, "C", "Pressed", function(self, Key)
    Print("按下了C")
end)

BindKey(M, "C", "Pressed", function(self, Key)
    Print("复制")
end, { Ctrl = true })

BindKey(M, "V", "Pressed", function(self, Key)
    Print("按下了V")
end)

BindKey(M, "V", "Pressed", function(self, Key)
    Print("粘贴")
end, { Ctrl = true })

return M
动态绑定Lua脚本
Actor:
cpp
    local World = self:GetWorld()
    local SpawnClass = self.SpawnClass
    local Transform = self.SpawnPointActor:GetTransform()
    local AlwaysSpawn = UE.ESpawnActorCollisionHandlingMethod.AlwaysSpawn
    World:SpawnActor(SpawnClass, Transform, AlwaysSpawn, self, self, "XXX.XXX")
Object:
cpp
local WidgetClass = self.WidgetClass
local img = NewObject(WidgetClass, self, nil, "XXX.XXX")
img:AddToViewport()
img:RandomPosition()
委托
cpp
local FLinearColor = UE.FLinearColor

local M = UnLua.Class()

function M:Construct()
	-- Bind
    self.ClickMeButton.OnClicked:Add(self, self.OnButtonClicked)
    self.ClickMeCheckBox.OnCheckStateChanged:Add(self, self.OnCheckBoxToggled)
    -- SetTimerByEvent
    self.TimerHandle = UE.UKismetSystemLibrary.K2_SetTimerDelegate({ self, self.OnTimer }, 1, true)
end

function M:OnButtonClicked()
    local r = math.random()
    local g = math.random()
    local b = math.random()

    self.ClickMeButton:SetBackgroundColor(FLinearColor(r, g, b, 1))
end

function M:OnCheckBoxToggled(on)
    if on then
        self.CheckBoxText:SetText("已选中")
    else
        self.CheckBoxText:SetText("未选中")
    end
end

function M:OnTimer())
end

function M:Destruct()
    -- Unbind
    self.ClickMeButton.OnClicked:Remove(self, self.OnButtonClicked)
    self.ClickMeCheckBox.OnCheckStateChanged:Remove(self, self.OnCheckBoxToggled)
    -- ClearTimer
    UE.UKismetSystemLibrary.K2_ClearAndInvalidateTimerHandle(self, self.TimerHandle)
end

return M
容器使用
创建原生容器时通常需要指定参数类型,来确定容器内存放的数据类型
| 参数类型 | 示例 | 实际类型 |
|---|---|---|
| boolean | true | Boolean |
| number | 0 | Interge |
| string | "" | String |
| table | FVector | Vector |
| userdata | FVector(1,1,1) | Vector |
例:
cpp
local array = TArray({ElementType})
local set = TSet({ElementType})
local map = TMap({KeyType}, {ValueType})
cpp
local array = UE.TArray(0)
local set = UE.TSet(0)
local map = UE.TMap(0, true)
延迟与协程的使用
local M = UnLua.Class()
cpp
local Latent = UE.UKismetSystemLibrary.XXXLatentFunction

-- 定义一个协程函数
function M:StartCoroutine()
    local co = coroutine.create(function()
        print("开始等待...")
        Latent.Wait(2.0)
        print("等待结束")
    end)
    coroutine.resume(co)
end

function M:ReceiveBeginPlay()
    self:StartCoroutine()
end

return M
cpp
local M = UnLua.Class()

local PrintString = UE.UKismetSystemLibrary.PrintString

local function Print(text)
    PrintString(nil, text, true, false, UE.FLinearColor(1, 1, 1, 1), 100)
end

local function run(self, name)
   Print(string.format("协程%s:启动", name))
    for i = 1, 5 do
        UE.UKismetSystemLibrary.Delay(self, 1)
       Print(string.format("协程%s:%d", name, i))
    end
   Print(string.format("协程%s:结束", name))
end

function M:ReceiveBeginPlay()
    local msg = [[
    ------ ReceiveBeginPlay"
    ]]
    Print(msg)

    coroutine.resume(coroutine.create(run), self, "A")
    coroutine.resume(coroutine.create(run), self, "B")
end

return M
C++ 调用Lua
C++部分
cpp
void UTutorialBlueprintFunctionLibrary::CallLuaByFLuaTable()
{
    PrintScreen(TEXT("[C++]CallLuaByFLuaTable 开始"));
    UnLua::FLuaEnv Env;

    const auto Require = UnLua::FLuaFunction(&Env, "_G", "require");
    const auto RetValues1 = Require.Call("Tutorials.08_CppCallLua");
    check(RetValues1.Num() == 2);

    const auto RetValue = RetValues1[0];
    const auto LuaTable = UnLua::FLuaTable(&Env, RetValue);
    const auto RetValues2 = LuaTable.Call("CallMe", 3.3f, 4.4f);
    check(RetValues2.Num() == 1);

    const auto Msg = FString::Printf(TEXT("[C++]收到来自Lua的返回,结果=%f"), RetValues2[0].Value<float>());
    PrintScreen(Msg);
    PrintScreen(TEXT("[C++]CallLuaByFLuaTable 结束"));
}

void UTutorialBlueprintFunctionLibrary::CallLuaByGlobalTable()
{
    PrintScreen(TEXT("[C++]CallLuaByGlobalTable 开始"));

    UnLua::FLuaEnv Env;
    const auto bSuccess = Env.DoString("G_08_CppCallLua = require 'Tutorials.08_CppCallLua'");
    check(bSuccess);

    const auto RetValues = UnLua::CallTableFunc(Env.GetMainState(), "G_08_CppCallLua", "CallMe", 1.1f, 2.2f);
    check(RetValues.Num() == 1);

    const auto Msg = FString::Printf(TEXT("[C++]收到来自Lua的返回,结果=%f"), RetValues[0].Value<float>());
    PrintScreen(Msg);
    PrintScreen(TEXT("[C++]CallLuaByGlobalTable 结束"));
}

static void PrintScreen(const FString& Msg)
{
    UKismetSystemLibrary::PrintString(nullptr, Msg, true, false, FLinearColor(0, 0.66, 1), 100);
}
lua 部分
cpp
local M = UnLua.Class()

local PrintString = UE.UKismetSystemLibrary.PrintString

local function Print(text)
    PrintString(nil, text, true, false, UE.FLinearColor(1, 1, 1, 1), 100)
end

function M:ReceiveBeginPlay()
    local msg =
        [[
    ------ ReceiveBeginPlay
    ]]
    Print(msg)
    UE.UTutorialBlueprintFunctionLibrary.CallLuaByGlobalTable()
    Print("=================")
    UE.UTutorialBlueprintFunctionLibrary.CallLuaByFLuaTable()
end

function M.CallMe(a, b)
    local ret = a + b
    local msg = string.format("[Lua]收到来自C++的调用,a=%f b=%f,返回%f", a, b, ret)
    Print(msg)
    return ret
end

return M
静态导出自定义类型到Lua使用
C++.h
cpp
#pragma once

#include "CoreMinimal.h"

struct FTutorialObject
{
protected:
	FString Name;

public:
	FTutorialObject();

	explicit FTutorialObject(const FString& Name)
		:Name(Name)
	{
	}

	FString GetTitle() const
	{
		return FString::Printf(TEXT("《%s》"), *Name);
	}

	FString ToString() const
	{
		return GetTitle();
	}
};
c++ cpp
cpp
#include "TutorialObject.h"

#include "LuaCore.h"
#include "UnLua.h"
#include "UnLuaEx.h"

FTutorialObject::FTutorialObject()
{
}

static int32 FTutorialObject_New(lua_State* L)
{
	const auto NumParams = lua_gettop(L);
    if (NumParams != 2)
    {
        UNLUA_LOGERROR(L, LogUnLua, Log, TEXT("%s: Invalid parameters!"), ANSI_TO_TCHAR(__FUNCTION__));
        return 0;
    }

    const char* NameChars = lua_tostring(L, 2);
    if (!NameChars)
    {
        UE_LOG(LogUnLua, Log, TEXT("%s: Invalid tutorial name!"), ANSI_TO_TCHAR(__FUNCTION__));
        return 0;
    }

    const auto UserData = NewUserdataWithPadding(L, sizeof(FTutorialObject), "FTutorialObject");
	new(UserData) FTutorialObject(UTF8_TO_TCHAR(NameChars));
    return 1;
}

static const luaL_Reg FTutorialObjectLib[] =
{
    { "__call", FTutorialObject_New },
    { nullptr, nullptr }
};

BEGIN_EXPORT_CLASS(FTutorialObject)
ADD_FUNCTION(GetTitle)
ADD_LIB(FTutorialObjectLib)
END_EXPORT_CLASS()
IMPLEMENT_EXPORTED_CLASS(FTutorialObject)
lua部分
c
local M = UnLua.Class()
local PrintString = UE.UKismetSystemLibrary.PrintString

local function Print(text)
    PrintString(nil, text, true, false, UE.FLinearColor(1, 1, 1, 1), 100)
end

function M:ReceiveBeginPlay()
    local msg =
        [[
    -- ReceiveBeginPlay
    ]]
    Print(msg)

    local tutorial = UE.FTutorialObject("教程")
    msg = string.format("tutorial -> %s\n\ntutorial:GetTitle() -> %s", tostring(tutorial), tutorial:GetTitle())
   Print(msg)
end
网络
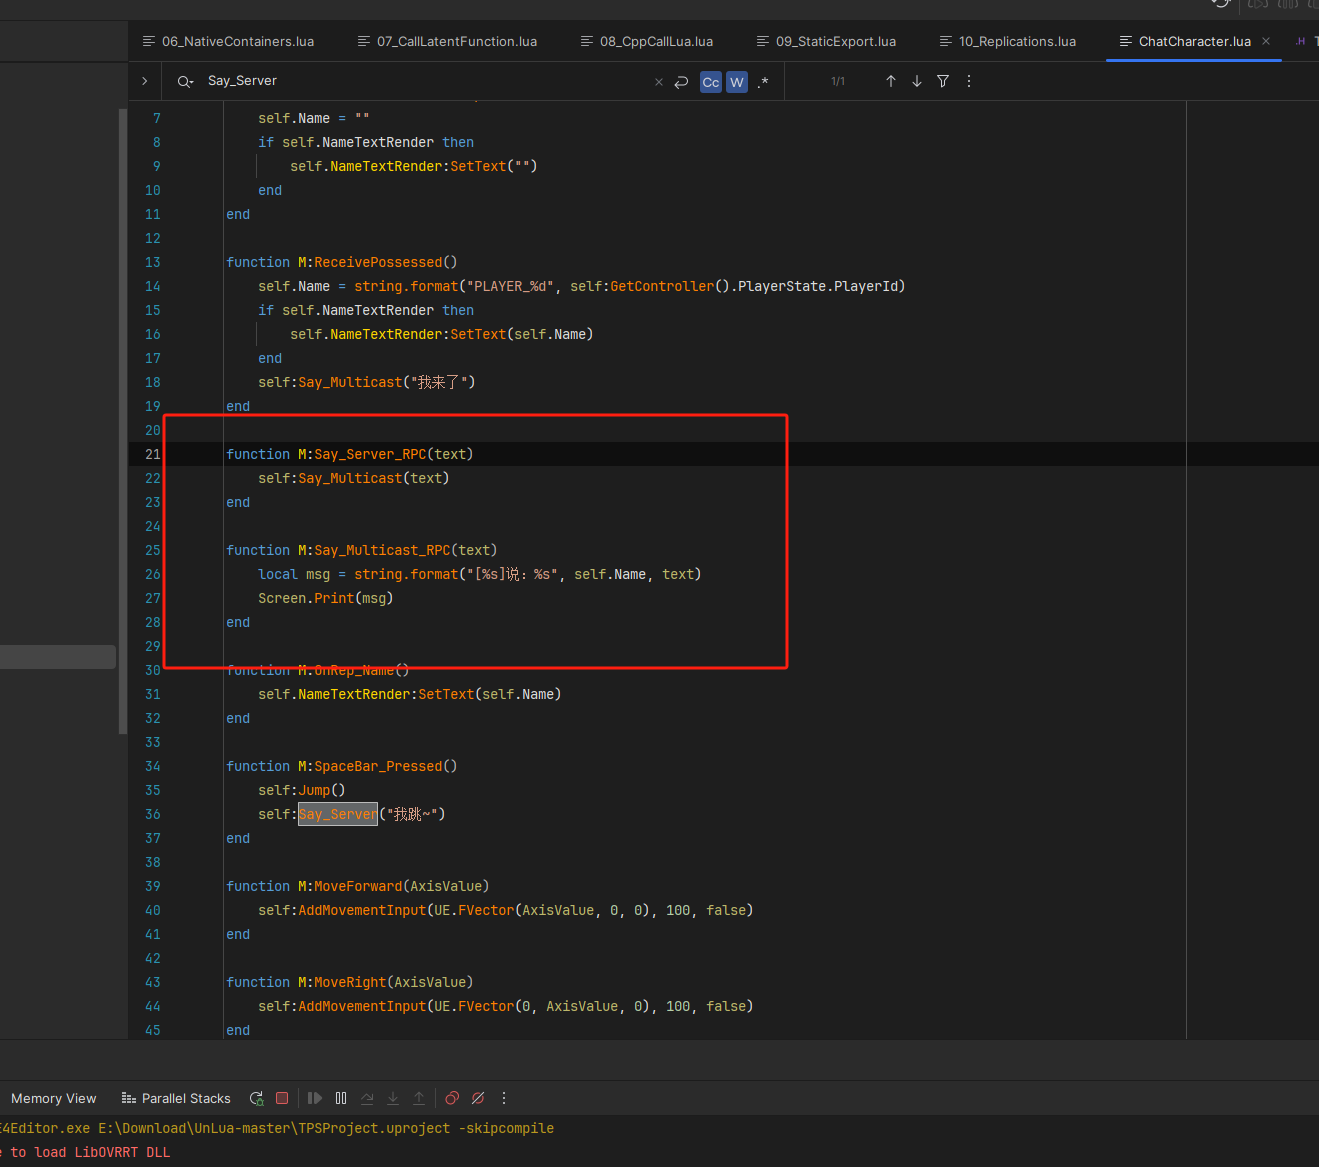
使用 {函数名}RPC 可以覆盖蓝图中RPC函数的实现
使用 OnRep{变量名} 可以覆盖蓝图中变量同步消息的处理
蓝图里面添加多人联机复制广播之类的
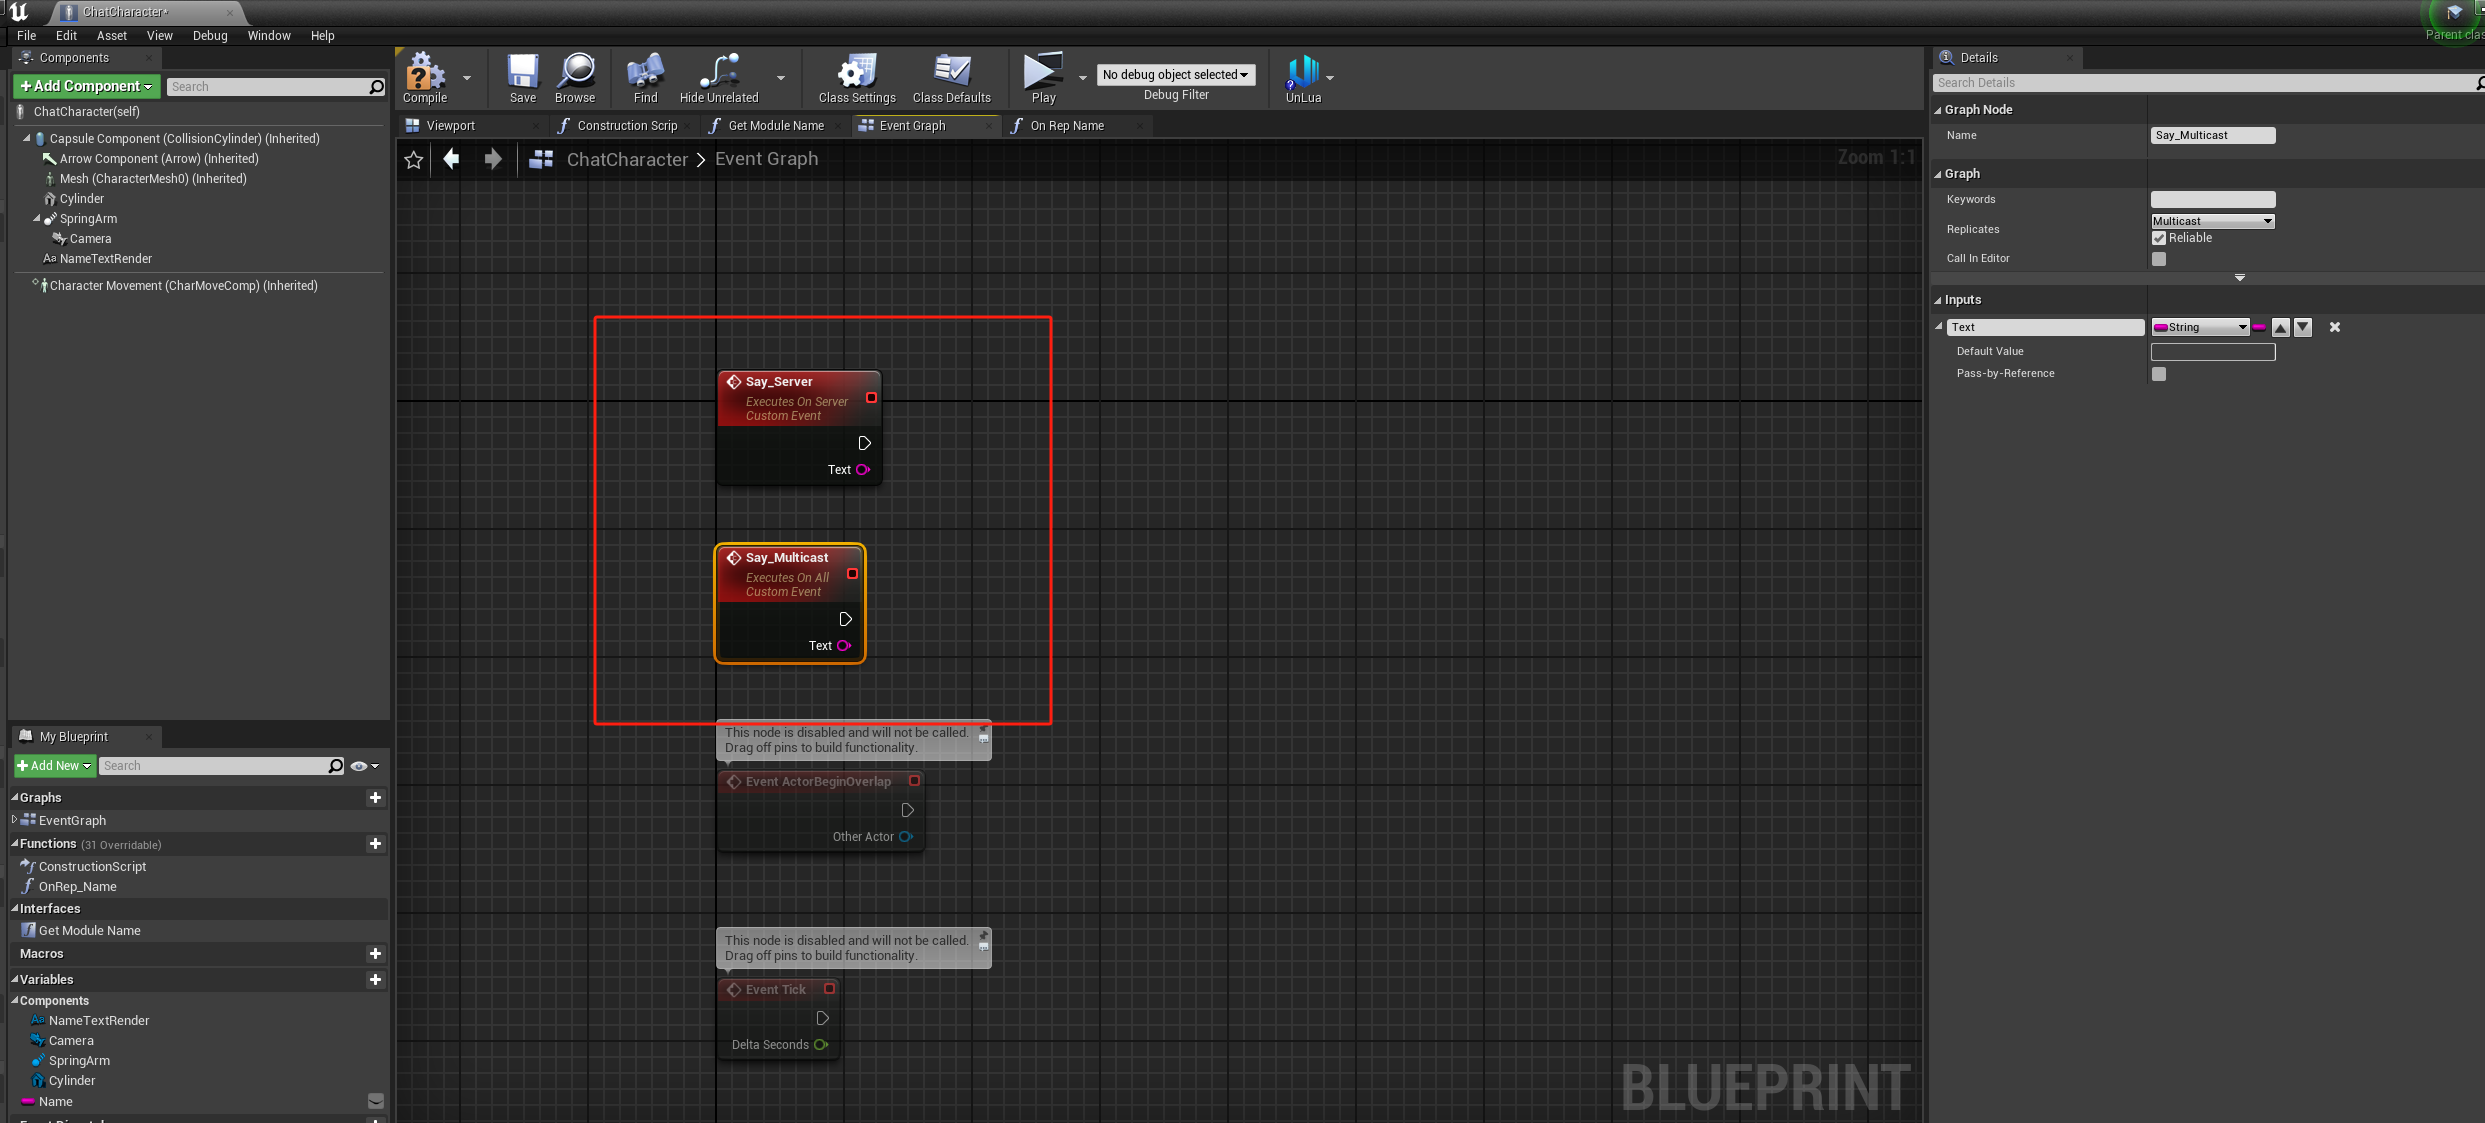
lua里写真正调用的方法
UMG资源释放
这部分直接附着官方内容
UMG:
cpp
---@type ReleaseUMG_Root_C
local M = UnLua.Class()

function M:Construct()
    print("Root Construct")
    self.Button_AddNew.OnClicked:Add(self, self.OnAddNew)
    self.Button_ReleaseAll.OnClicked:Add(self, self.OnReleaseAll)
end

function M:OnAddNew()
    print("Root Add New")
    local widget_class = UE.UClass.Load("/Game/Tutorials/11_ReleaseUMG/ReleaseUMG_ItemParent.ReleaseUMG_ItemParent_C")
    local widget = NewObject(widget_class, self)
    self.VerticalBox_Panel:AddChildToVerticalBox(widget)
end

function M:OnReleaseAll()
    self:RemoveFromViewport()
end

function M:Destruct()
    print("Root Destruct")
    self:Release()
end

return M
测试部分:
cpp
--[[
    说明:

    UMG对象的释放流程:
    1、调用self:Release(),解除LuaTable在C++侧的引用
    2、确保LuaTable在Lua侧没有其他引用,触发LuaGC
    3、C++侧收到UObject_Delete回调,解除UMG在C++侧的引用
    4、确保UMG在C++侧没有其他引用,触发UEGC

    小提示:

    使用控制台命令查看对象和类的引用情况:

    查看指定类的引用列表:Obj List Class=ReleaseUMG_Root_C
    查看指定对象的引用链:Obj Refs Name=ReleaseUMG_Root_C_0
]] --

local Screen = require "Tutorials.Screen"

local M = UnLua.Class()

local function print_intro()
    local msg =
        [[
使用以下按键进行一次强制垃圾回收:

C:强制 C++ GC
L:强制 Lua GC

------ 本示例来自 "Content/Script/Tutorials.11_ReleaseUMG.lua"
]]
    Screen.Print(msg)
end

function M:ReceiveBeginPlay()
    local widget_class = UE.UClass.Load("/Game/Tutorials/11_ReleaseUMG/ReleaseUMG_Root.ReleaseUMG_Root_C")
    local widget_root = NewObject(widget_class, self)
    widget_root:AddToViewport()

    print_intro()
end

function M:L_Pressed()
    collectgarbage("collect")
    Screen.Print('collectgarbage("collect")')
end

function M:C_Pressed()
    UE.UKismetSystemLibrary.CollectGarbage()
    Screen.Print("UKismetSystemLibrary.CollectGarbage()")
end

return M
自定义加载器
说明:通过绑定 FUnLuaDelegates::CustomLoadLuaFile 可以实现自定义Lua加载器
方式1:查找路径固定,性能更好
方式2:通过package.path查找,更加灵活
lua部分:
cpp
UE.UTutorialBlueprintFunctionLibrary.SetupCustomLoader(1)
Screen.Print(string.format("FromCustomLoader1:%s", require("Tutorials")))

package.loaded["Tutorials"] = nil

package.path = package.path .. ";./?/Index.lua"
UE.UTutorialBlueprintFunctionLibrary.SetupCustomLoader(2)
Screen.Print(string.format("FromCustomLoader2:%s", require("Tutorials")))

UE.UTutorialBlueprintFunctionLibrary.SetupCustomLoader(0)
C++部分
cpp
bool CustomLoader1(UnLua::FLuaEnv& Env, const FString& RelativePath, TArray<uint8>& Data, FString& FullPath)
{
    const auto SlashedRelativePath = RelativePath.Replace(TEXT("."), TEXT("/"));
    FullPath = FString::Printf(TEXT("%s%s.lua"), *GLuaSrcFullPath, *SlashedRelativePath);

    if (FFileHelper::LoadFileToArray(Data, *FullPath, FILEREAD_Silent))
        return true;

    FullPath.ReplaceInline(TEXT(".lua"), TEXT("/Index.lua"));
    if (FFileHelper::LoadFileToArray(Data, *FullPath, FILEREAD_Silent))
        return true;

    return false;
}
cpp
bool CustomLoader2(UnLua::FLuaEnv& Env, const FString& RelativePath, TArray<uint8>& Data, FString& FullPath)
{
    const auto SlashedRelativePath = RelativePath.Replace(TEXT("."), TEXT("/"));
    const auto L = Env.GetMainState();
    lua_getglobal(L, "package");
    lua_getfield(L, -1, "path");
    const char* Path = lua_tostring(L, -1);
    lua_pop(L, 2);
    if (!Path)
        return false;

    TArray<FString> Parts;
    FString(Path).ParseIntoArray(Parts, TEXT(";"), false);
    for (auto& Part : Parts)
    {
        Part.ReplaceInline(TEXT("?"), *SlashedRelativePath);
        FPaths::CollapseRelativeDirectories(Part);

        if (FPaths::IsRelative(Part))
            FullPath = FPaths::ConvertRelativePathToFull(GLuaSrcFullPath, Part);
        else
            FullPath = Part;

        if (FFileHelper::LoadFileToArray(Data, *FullPath, FILEREAD_Silent))
            return true;
    }

    return false;
}
动画通知
cpp
local M = UnLua.Class()

function M:Received_Notify(MeshComp, Animation)
    return true
end

return M