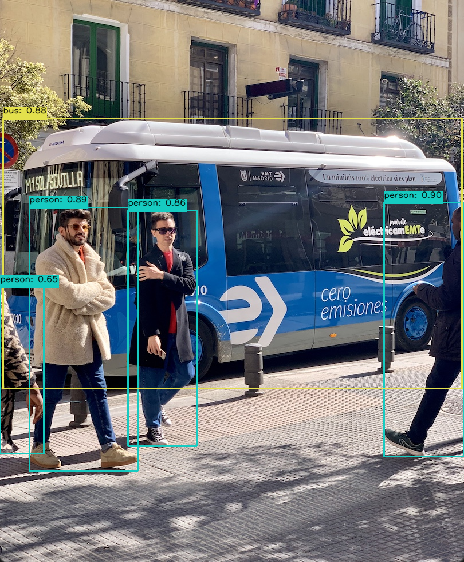
YOLOv8 目标检测程序,依赖的库最少,使用onnxruntime推理
flyfish
为了方便理解,加入了注释
py
"""
YOLOv8 目标检测程序
Author: flyfish
Date:
Description: 该程序使用ONNX运行时进行YOLOv8模型的目标检测。
      它对输入图像进行预处理,运行推理,并对输出进行后处理,在图像上绘制边界框和标签。
"""
import argparse
import cv2
import numpy as np
import onnxruntime as ort

# 定义类别字典,将类别ID映射到类别名称
classes = {
    0: 'person', 1: 'bicycle', 2: 'car', 3: 'motorcycle', 4: 'airplane', 5: 'bus', 6: 'train', 7: 'truck', 8: 'boat',
    9: 'traffic light', 10: 'fire hydrant', 11: 'stop sign', 12: 'parking meter', 13: 'bench', 14: 'bird', 15: 'cat',
    16: 'dog', 17: 'horse', 18: 'sheep', 19: 'cow', 20: 'elephant', 21: 'bear', 22: 'zebra', 23: 'giraffe',
    24: 'backpack', 25: 'umbrella', 26: 'handbag', 27: 'tie', 28: 'suitcase', 29: 'frisbee', 30: 'skis',
    31: 'snowboard', 32: 'sports ball', 33: 'kite', 34: 'baseball bat', 35: 'baseball glove', 36: 'skateboard',
    37: 'surfboard', 38: 'tennis racket', 39: 'bottle', 40: 'wine glass', 41: 'cup', 42: 'fork', 43: 'knife',
    44: 'spoon', 45: 'bowl', 46: 'banana', 47: 'apple', 48: 'sandwich', 49: 'orange', 50: 'broccoli', 51: 'carrot',
    52: 'hot dog', 53: 'pizza', 54: 'donut', 55: 'cake', 56: 'chair', 57: 'couch', 58: 'potted plant', 59: 'bed',
    60: 'dining table', 61: 'toilet', 62: 'tv', 63: 'laptop', 64: 'mouse', 65: 'remote', 66: 'keyboard',
    67: 'cell phone', 68: 'microwave', 69: 'oven', 70: 'toaster', 71: 'sink', 72: 'refrigerator', 73: 'book',
    74: 'clock', 75: 'vase', 76: 'scissors', 77: 'teddy bear', 78: 'hair drier', 79: 'toothbrush'
}

class YOLOv8:
    """YOLOv8目标检测模型类,用于处理推理和可视化。"""

    def __init__(self, onnx_model, input_image, confidence_thres, iou_thres):
        """
        初始化YOLOv8类的实例。

        参数:
            onnx_model: ONNX模型的路径。
            input_image: 输入图像的路径。
            confidence_thres: 用于过滤检测结果的置信度阈值。
            iou_thres: 非极大值抑制的IoU(交并比)阈值。
        """
        self.onnx_model = onnx_model
        self.input_image = input_image
        self.confidence_thres = confidence_thres
        self.iou_thres = iou_thres

        # 加载类别名称
        self.classes = classes

        # 为每个类别生成一个颜色调色板
        self.color_palette = np.random.uniform(0, 255, size=(len(self.classes), 3))

    def draw_detections(self, img, box, score, class_id):
        """
        在输入图像上绘制检测到的边界框和标签。

        参数:
            img: 要在其上绘制检测结果的输入图像。
            box: 检测到的边界框。
            score: 对应的检测置信度分数。
            class_id: 检测到的对象的类别ID。

        返回值:
            无
        """
        # 提取边界框的坐标
        x1, y1, w, h = box

        # 获取类别ID对应的颜色
        color = self.color_palette[class_id]

        # 在图像上绘制边界框
        cv2.rectangle(img, (int(x1), int(y1)), (int(x1 + w), int(y1 + h)), color, 2)

        # 创建包含类别名称和置信度分数的标签文本
        label = f"{self.classes[class_id]}: {score:.2f}"

        # 计算标签文本的尺寸
        (label_width, label_height), _ = cv2.getTextSize(label, cv2.FONT_HERSHEY_SIMPLEX, 0.5, 1)

        # 计算标签文本的位置
        label_x = x1
        label_y = y1 - 10 if y1 - 10 > label_height else y1 + 10

        # 绘制填充矩形作为标签文本的背景
        cv2.rectangle(
            img, (label_x, label_y - label_height), (label_x + label_width, label_y + label_height), color, cv2.FILLED
        )

        # 在图像上绘制标签文本
        cv2.putText(img, label, (label_x, label_y), cv2.FONT_HERSHEY_SIMPLEX, 0.5, (0, 0, 0), 1, cv2.LINE_AA)

    def preprocess(self):
        """
        在执行推理之前预处理输入图像。

        返回值:
            image_data: 预处理后的图像数据,准备进行推理。
        """
        # 使用OpenCV读取输入图像
        self.img = cv2.imread(self.input_image)

        # 获取输入图像的高度和宽度
        self.img_height, self.img_width = self.img.shape[:2]

        # 将图像的颜色空间从BGR转换为RGB
        img = cv2.cvtColor(self.img, cv2.COLOR_BGR2RGB)

        # 调整图像大小以匹配输入形状
        img = cv2.resize(img, (self.input_width, self.input_height))

        # 通过除以255.0来规范化图像数据
        image_data = np.array(img) / 255.0

        # 转置图像,使通道维度为第一个维度
        image_data = np.transpose(image_data, (2, 0, 1))  # 通道优先

        # 扩展图像数据的维度以匹配预期的输入形状
        image_data = np.expand_dims(image_data, axis=0).astype(np.float32)

        # 返回预处理后的图像数据
        return image_data

    def postprocess(self, input_image, output):
        """
        对模型的输出进行后处理,以提取边界框、置信度分数和类别ID。

        参数:
            input_image (numpy.ndarray): 输入图像。
            output (numpy.ndarray): 模型的输出。

        返回值:
            numpy.ndarray: 带有绘制检测结果的输入图像。
        """
        # 转置并压缩输出以匹配预期的形状
        outputs = np.transpose(np.squeeze(output[0]))

        # 获取输出数组中的行数
        rows = outputs.shape[0]

        # 用于存储检测到的边界框、置信度分数和类别ID的列表
        boxes = []
        scores = []
        class_ids = []

        # 计算边界框坐标的缩放因子
        x_factor = self.img_width / self.input_width
        y_factor = self.img_height / self.input_height

        # 遍历输出数组中的每一行
        for i in range(rows):
            # 从当前行中提取类别分数
            classes_scores = outputs[i][4:]

            # 找到类别分数中的最大值
            max_score = np.amax(classes_scores)

            # 如果最大值大于置信度阈值
            if max_score >= self.confidence_thres:
                # 获取具有最高分数的类别ID
                class_id = np.argmax(classes_scores)

                # 从当前行中提取边界框坐标
                x, y, w, h = outputs[i][0], outputs[i][1], outputs[i][2], outputs[i][3]

                # 计算缩放后的边界框坐标
                left = int((x - w / 2) * x_factor)
                top = int((y - h / 2) * y_factor)
                width = int(w * x_factor)
                height = int(h * y_factor)

                # 将类别ID、置信度分数和边界框坐标添加到各自的列表中
                class_ids.append(class_id)
                scores.append(max_score)
                boxes.append([left, top, width, height])

        # 应用非极大值抑制以过滤重叠的边界框
        indices = cv2.dnn.NMSBoxes(boxes, scores, self.confidence_thres, self.iou_thres)

        # 遍历非极大值抑制后选择的索引
        for i in indices:
            # 获取对应于索引的边界框、置信度分数和类别ID
            box = boxes[i]
            score = scores[i]
            class_id = class_ids[i]

            # 在输入图像上绘制检测结果
            self.draw_detections(input_image, box, score, class_id)

        # 返回修改后的输入图像
        return input_image

    def main(self):
        """
        使用ONNX模型执行推理并返回带有绘制检测结果的输出图像。

        返回值:
            output_img: 带有绘制检测结果的输出图像。
        """
        # 使用ONNX模型创建推理会话并指定执行提供程序
        session = ort.InferenceSession(self.onnx_model, providers=["CUDAExecutionProvider", "CPUExecutionProvider"])

        # 获取模型输入
        model_inputs = session.get_inputs()

        # 存储输入的形状以便稍后使用
        input_shape = model_inputs[0].shape
        self.input_width = input_shape[2]
        self.input_height = input_shape[3]

        # 预处理图像数据
        img_data = self.preprocess()

        # 使用预处理后的图像数据进行推理
        outputs = session.run(None, {model_inputs[0].name: img_data})

        # 对输出进行后处理以获得输出图像
        return self.postprocess(self.img, outputs)  # 输出图像


if __name__ == "__main__":
    # 创建一个参数解析器以处理命令行参数
    parser = argparse.ArgumentParser()
    parser.add_argument("--model", type=str, default="yolov8n.onnx", help="输入您的ONNX模型。")
    parser.add_argument("--img", type=str, default="bus.jpg", help="输入图像的路径。")
    parser.add_argument("--conf-thres", type=float, default=0.5, help="置信度阈值")
    parser.add_argument("--iou-thres", type=float, default=0.5, help="非极大值抑制的IoU阈值")
    args = parser.parse_args()

    # 使用指定的参数创建YOLOv8类的实例
    detection = YOLOv8(args.model, args.img, args.conf_thres, args.iou_thres)

    # 执行目标检测并获取输出图像
    output_image = detection.main()

    # 在窗口中显示输出图像
    cv2.namedWindow("Output", cv2.WINDOW_NORMAL)
    cv2.imshow("Output", output_image)

    # 等待按键以退出
    cv2.waitKey(0)