一、引言
随着微服务架构的广泛应用,系统的复杂性也随之增加。在这种复杂的系统中,应用通常由多个相互独立的服务组成,每个服务可能分布在不同的主机上。微服务架构虽然提高了系统的灵活性和可扩展性,但也带来了新的挑战,尤其是在故障排查和性能优化方面。这时,链路追踪(Tracing)成为了一个非常重要的工具。
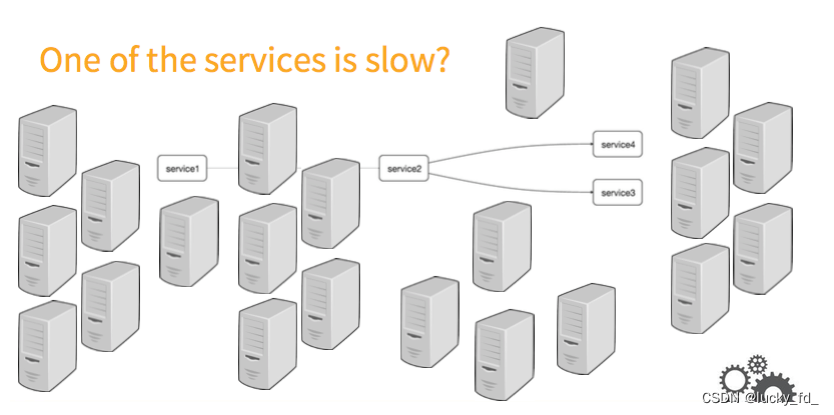
注:图片来自网络
如图,在复杂的调用链路中假设存在一条调用链路响应缓慢,如何定位其中延迟高的服务呢?
- 日志: 通过分析调用链路上的每个服务日志得到结果,这种方式耗时高效率低
- zipkin:Zipkin是Twitter开源的分布式跟踪系统,是开箱即用的产品,主要用来收集系统的时许数据,从而追踪系统的调用问题,使用zipkin的web UI可以一眼看出延迟高的服务。
- Skywalking,中国人吴晟(华为)开源的一款分布式追踪,分析,告警的工具,现在是Apache旗下开源项目,专为微服务、云原生架构和基于容器(Docker、K8s、Mesos)架构而设计。
Zipkin使用方式请参考:SpringCloud分布式微服务链路追踪方案:Zipkin
本文只介绍Skywalking的使用方式。
二、skywalking介绍
skywalking官网:SkyWalking
考虑到部分读者的英语水平可能和博主差不多😂,这里推荐一个中文文档:https://github.com/SkyAPM/document-cn-translation-of-skywalking/blob/master/docs/README.md
架构设计
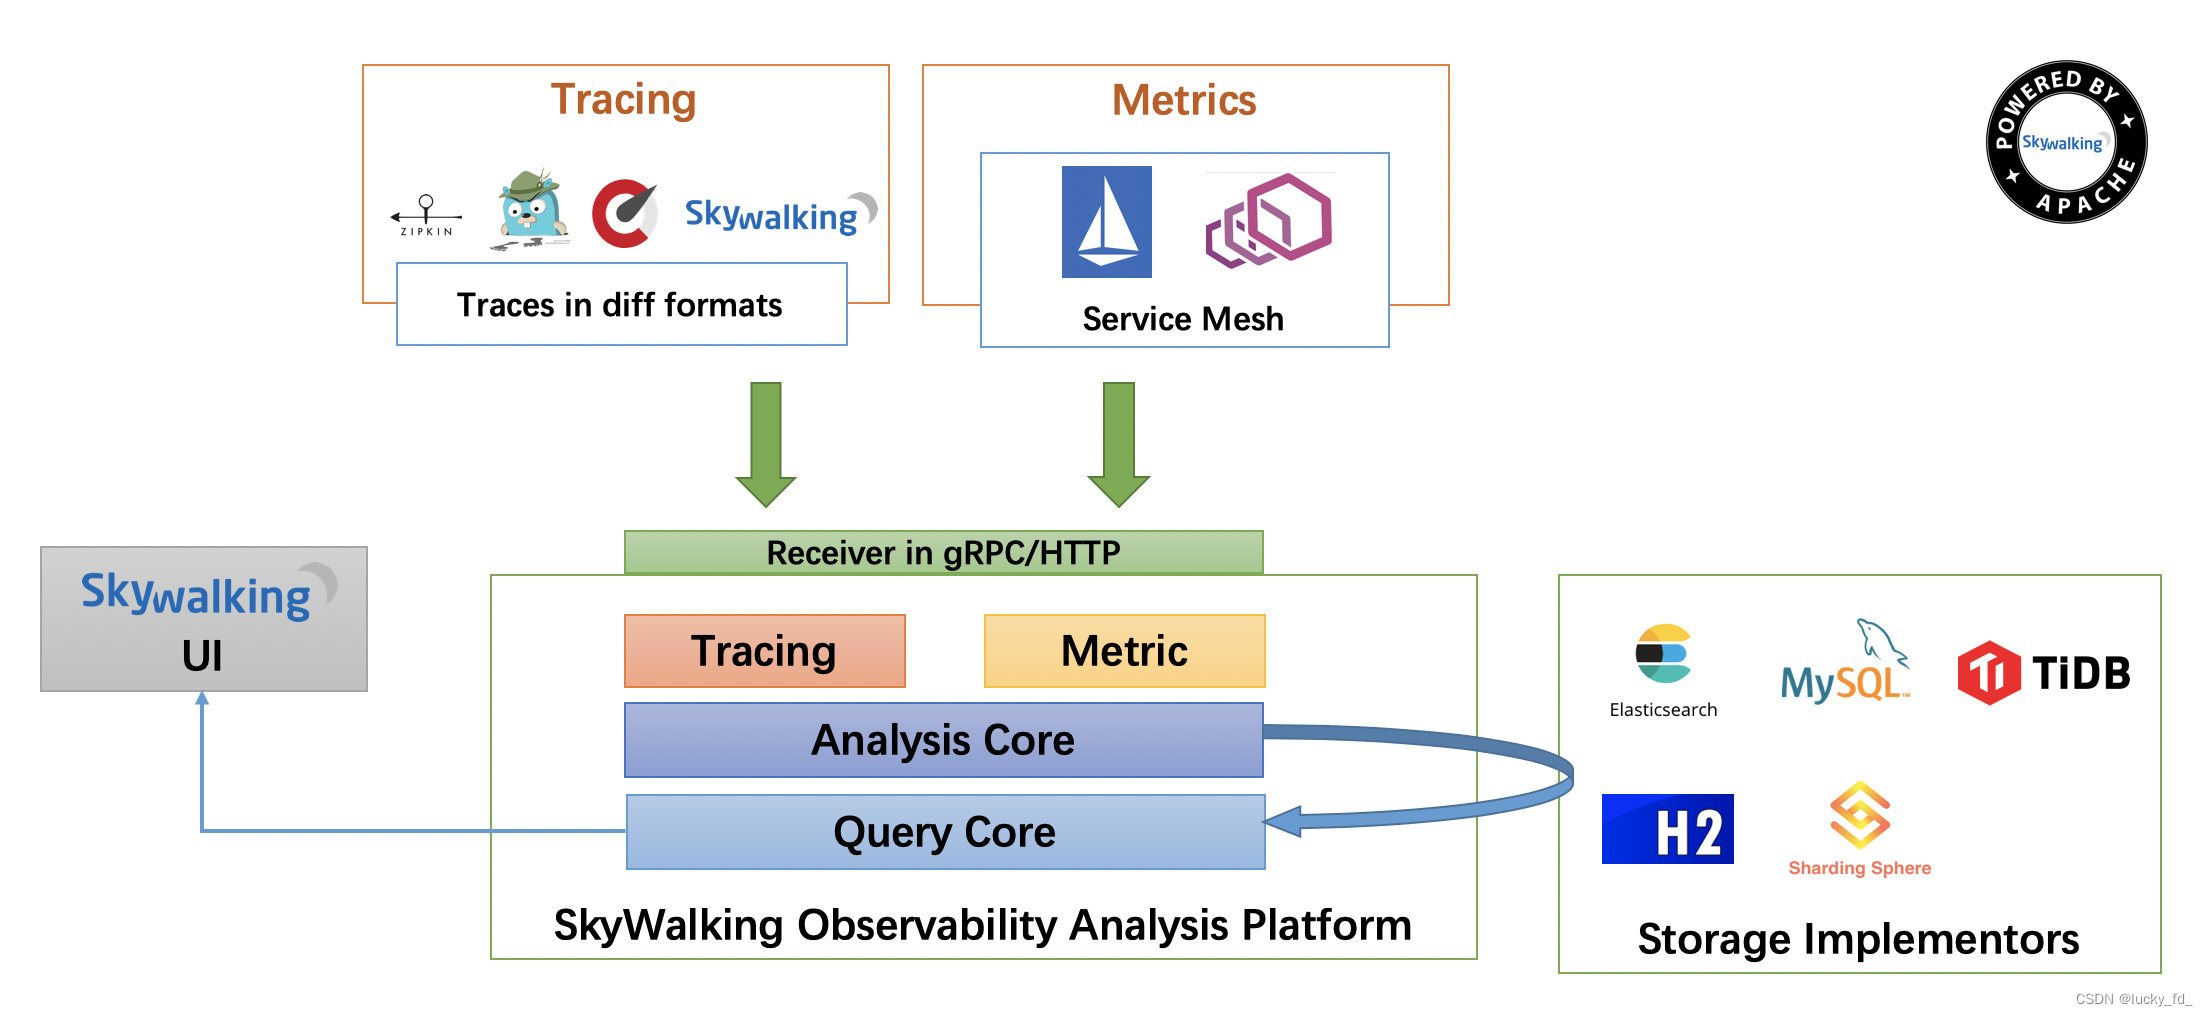
整个架构,分成上、下、左、右四部分:
考虑到让描述更简单,我们舍弃掉 Metric 指标相关,而着重在 Tracing 链路相关功能。
- 上部分 Agent :负责从应用中,收集链路信息,发送给 SkyWalking OAP 服务器。目前支持 SkyWalking、Zikpin、Jaeger 等提供的 Tracing 数据信息。而我们目前采用的是,SkyWalking Agent 收集 SkyWalking Tracing 数据,传递给服务器。
- 下部分 SkyWalking OAP :负责接收 Agent 发送的 Tracing 数据信息,然后进行分析(Analysis Core) ,存储到外部存储器( Storage ),最终提供查询( Query )功能。
- 右部分 Storage :Tracing 数据存储。目前支持 ES、MySQL、Sharding Sphere、TiDB、H2 多种存储器。而我们目前采用的是 ES ,主要考虑是 SkyWalking 开发团队自己的生产环境采用 ES 为主。
- 左部分 SkyWalking UI :负责提供控台,查看链路等等。

三、安装skywalking
1. 环境要求
在安装和使用 Skywalking 之前,需要确保以下环境要求:
- JDK 8 或以上版本
- 支持 Docker(可选)
- 操作系统:Windows、Mac OS 或 Linux
- 数据库(如 Elasticsearch、MySQL,用于存储数据)
2. 安装skywalking
下载 SkyWalking
从 Apache SkyWalking 官方网站 下载最新版本的 SkyWalking。下载完成后,解压文件。
下载地址:skywalking安装包
我们这里下载apache-skywalking-apm-es7-8.0.0.tar.gz版本,使用es7作为数据存储。
bash
wget https://archive.apache.org/dist/skywalking/8.0.0/apache-skywalking-apm-es7-8.0.0.tar.gz
tar -xzf apache-skywalking-apm-es7-8.0.0.tar.gz
cd apache-skywalking-apm-bin-es7
配置 SkyWalking
配置文件位于 config 目录下,你可以根据需要修改 application.yml 文件。例如,配置存储为 Elasticsearch7:
vi application.yml
sh
storage:
  # 配置使用的存储器,默认使用h2
  selector: ${SW_STORAGE:h2}
  elasticsearch:
    nameSpace: ${SW_NAMESPACE:""}
    clusterNodes: ${SW_STORAGE_ES_CLUSTER_NODES:localhost:9200}
    protocol: ${SW_STORAGE_ES_HTTP_PROTOCOL:"http"}
    trustStorePath: ${SW_STORAGE_ES_SSL_JKS_PATH:""}
    trustStorePass: ${SW_STORAGE_ES_SSL_JKS_PASS:""}
    user: ${SW_ES_USER:""}
    password: ${SW_ES_PASSWORD:""}
    secretsManagementFile: ${SW_ES_SECRETS_MANAGEMENT_FILE:""} # Secrets management file in the properties format includes the username, password, which are managed by 3rd party tool.
    dayStep: ${SW_STORAGE_DAY_STEP:1} # Represent the number of days in the one minute/hour/day index.
    indexShardsNumber: ${SW_STORAGE_ES_INDEX_SHARDS_NUMBER:1} # The index shards number is for store metrics data rather than basic segment record
    superDatasetIndexShardsFactor: ${SW_STORAGE_ES_SUPER_DATASET_INDEX_SHARDS_FACTOR:5} # Super data set has been defined in the codes, such as trace segments. This factor provides more shards for the super data set, shards number = indexShardsNumber * superDatasetIndexShardsFactor. Also, this factor effects Zipkin and Jaeger traces.
    indexReplicasNumber: ${SW_STORAGE_ES_INDEX_REPLICAS_NUMBER:0}
    # Batch process setting, refer to https://www.elastic.co/guide/en/elasticsearch/client/java-api/5.5/java-docs-bulk-processor.html
    bulkActions: ${SW_STORAGE_ES_BULK_ACTIONS:1000} # Execute the bulk every 1000 requests
    flushInterval: ${SW_STORAGE_ES_FLUSH_INTERVAL:10} # flush the bulk every 10 seconds whatever the number of requests
    concurrentRequests: ${SW_STORAGE_ES_CONCURRENT_REQUESTS:2} # the number of concurrent requests
    resultWindowMaxSize: ${SW_STORAGE_ES_QUERY_MAX_WINDOW_SIZE:10000}
    metadataQueryMaxSize: ${SW_STORAGE_ES_QUERY_MAX_SIZE:5000}
    segmentQueryMaxSize: ${SW_STORAGE_ES_QUERY_SEGMENT_SIZE:200}
    profileTaskQueryMaxSize: ${SW_STORAGE_ES_QUERY_PROFILE_TASK_SIZE:200}
    advanced: ${SW_STORAGE_ES_ADVANCED:""}
  elasticsearch7:
    nameSpace: ${SW_NAMESPACE:""}
    clusterNodes: ${SW_STORAGE_ES_CLUSTER_NODES:localhost:9200}
    protocol: ${SW_STORAGE_ES_HTTP_PROTOCOL:"http"}
    trustStorePath: ${SW_STORAGE_ES_SSL_JKS_PATH:""}
    trustStorePass: ${SW_STORAGE_ES_SSL_JKS_PASS:""}
    dayStep: ${SW_STORAGE_DAY_STEP:1} # Represent the number of days in the one minute/hour/day index.
    user: ${SW_ES_USER:""}
    password: ${SW_ES_PASSWORD:""}
    secretsManagementFile: ${SW_ES_SECRETS_MANAGEMENT_FILE:""} # Secrets management file in the properties format includes the username, password, which are managed by 3rd party tool.
    indexShardsNumber: ${SW_STORAGE_ES_INDEX_SHARDS_NUMBER:1} # The index shards number is for store metrics data rather than basic segment record
    superDatasetIndexShardsFactor: ${SW_STORAGE_ES_SUPER_DATASET_INDEX_SHARDS_FACTOR:5} # Super data set has been defined in the codes, such as trace segments. This factor provides more shards for the super data set, shards number = indexShardsNumber * superDatasetIndexShardsFactor. Also, this factor effects Zipkin and Jaeger traces.
indexReplicasNumber: ${SW_STORAGE_ES_INDEX_REPLICAS_NUMBER:0}- storage.elasticsearch 配置项,设置使用 Elasticsearch 6.X 版本作为存储器。
- storage.elasticsearch7 配置项,设置使用 Elasticsearch 7.X 版本作为存储器。
- storage.h2 配置项,设置使用 H2 作为存储器。
skywalking默认使用h2存储,这里我们修改为elasticsearch7,并正确配置elasticsearch7的配置信息。
storage:
selector: ${SW_STORAGE:elasticsearch7}
elasticsearch7配置:
- nameSpace: es命名空间
- clusterNodes:es集群节点
- user:es用户
- password: es用户密码
Elasticsearch安装参考:Elasticsearch安装文档
启动Skywalking OAP
bash
$ cd bin/
$ ls
oapService.bat      oapServiceInit.sh     oapServiceNoInit.sh  startup.bat  webappService.bat
oapServiceInit.bat  oapServiceNoInit.bat  oapService.sh        startup.sh   webappService.sh
$ sh oapService.sh
SkyWalking OAP started successfully!
启动成功,我们可以打开 logs/skywalking-oap-server.log 日志文件,查看是否有错误日志。首次启动时,因为 SkyWalking OAP 会创建 Elasticsearch 的索引,所以会"疯狂"的打印日志。最终,我们看到如下日志,基本可以代表 SkyWalking OAP 服务启动成功
2024-06-27 16:18:42,515 - org.apache.skywalking.oap.server.library.server.jetty.JettyServer - 94 main INFO \[\] - start server, host: 0.0.0.0, port: 12800
2024-06-27 16:18:42,517 - org.eclipse.jetty.server.Server - 359 main INFO \[\] - jetty-9.4.28.v20200408; built: 2020-04-08T17:49:39.557Z; git: ab228fde9e55e9164c738d7fa121f8ac5acd51c9; jvm 1.8.0_144-b01
2024-06-27 16:18:42,546 - org.eclipse.jetty.server.handler.ContextHandler - 843 main INFO \[\] - Started o.e.j.s.ServletContextHandler@1c90029b{/,null,AVAILABLE}
2024-06-27 16:18:42,555 - org.eclipse.jetty.server.AbstractConnector - 331 main INFO \[\] - Started ServerConnector@7e8a46b7{HTTP/1.1, (http/1.1)}{0.0.0.0:12800}
2024-06-27 16:18:42,556 - org.eclipse.jetty.server.Server - 399 main INFO \[\] - Started @14557ms
2024-06-27 16:18:42,557 - org.apache.skywalking.oap.server.core.storage.PersistenceTimer - 56 main INFO \[\] - persistence timer start
2024-06-27 16:18:42,560 - org.apache.skywalking.oap.server.core.cache.CacheUpdateTimer - 46 main INFO \[\] - Cache updateServiceInventory timer start
启动Skywalking UI
bash
$ ./bin/webappService.sh
SkyWalking Web Application started successfully!
启动完成,我们到logs/logs/webapp.log查看是否有错误日志。启动成功,会显示以下日志
2024-06-27 15:27:03.937 INFO 180490 --- main o.s.c.support.DefaultLifecycleProcessor : Starting beans in phase 0
2024-06-27 15:27:03.997 INFO 180490 --- main o.s.c.support.DefaultLifecycleProcessor : Starting beans in phase 2147483647
2024-06-27 15:27:04.002 INFO 180490 --- main ration$HystrixMetricsPollerConfiguration : Starting poller
2024-06-27 15:27:04.163 INFO 180490 --- main s.b.c.e.t.TomcatEmbeddedServletContainer : Tomcat started on port(s): 8080 (http)
2024-06-27 15:27:04.168 INFO 180490 --- main o.a.s.apm.webapp.ApplicationStartUp : Started ApplicationStartUp in 14.596 seconds (JVM running for 15.68)
如果想要修改 SkyWalking UI 服务的参数,可以编辑 webapp/webapp.yml 配置文件。
yml
server:
  # skywalking UI访问端口
  port: 8080

collector:
  path: /graphql
  ribbon:
    ReadTimeout: 10000
    # Point to all backend's restHost:restPort, split by ,
    # SkyWalking OAP 服务地址数组,SkyWalking UI 界面的数据是通过SkyWalking OAP服务获取
    listOfServers: 127.0.0.1:12800
默认8080端口容易和其他中间件冲突,建议修改。
skywalking UI访问:
浏览器打开127.0.0.1:8080,界面如下

四、项目集成skywalking
1. Java应用接入
对于 Java 应用程序,需要添加 SkyWalking Agent。SkyWalking Agent实现数据传输到skywalking OAP服务。
下载并解压 Agent 包,通过-javaagent参数指定SkyWalking Java Agent的路径和配置参数,例如:在启动应用程序时添加以下 JVM 参数:
bash
-javaagent:/path/to/skywalking-agent/skywalking-agent.jar -Dskywalking.agent.service_name=your-service-name -Dskywalking.collector.backend_service=127.0.0.1:11800- -javaagent:配置agent路径
- -Dskywalking.agent.service_name:设置应用服务名称
- -Dskywalking.collector.backend_service:设置skywalking oap地址
我们需要将apache-skywalking-apm-bin/agent 目录,拷贝到 Java 应用所在的服务器上。这样,Java 应用才可以配置使用该 SkyWalking Agent。
bash
[apache-skywalking-apm-bin-es7]$ ls
agent  bin  config  LICENSE  licenses  logs  NOTICE  oap-libs  README.txt  tools  webapp
[apache-skywalking-apm-bin-es7]$ ls ./agent/
activations  bootstrap-plugins  config  logs  optional-plugins  plugins  skywalking-agent.jar
首先将apache-skywalking-apm-bin/agent 目录拷贝到java应用服务器,然后在Java启动命令添加JVM参数,例如:
java -jar serviceDemo.jar -javaagent:D:\my_programs\skywalking\agent\skywalking-agent.jar -Dskywalking.collector.backend_service=192.168.253.10:11800IDEA启动
编辑启动配置,添加JVM参数
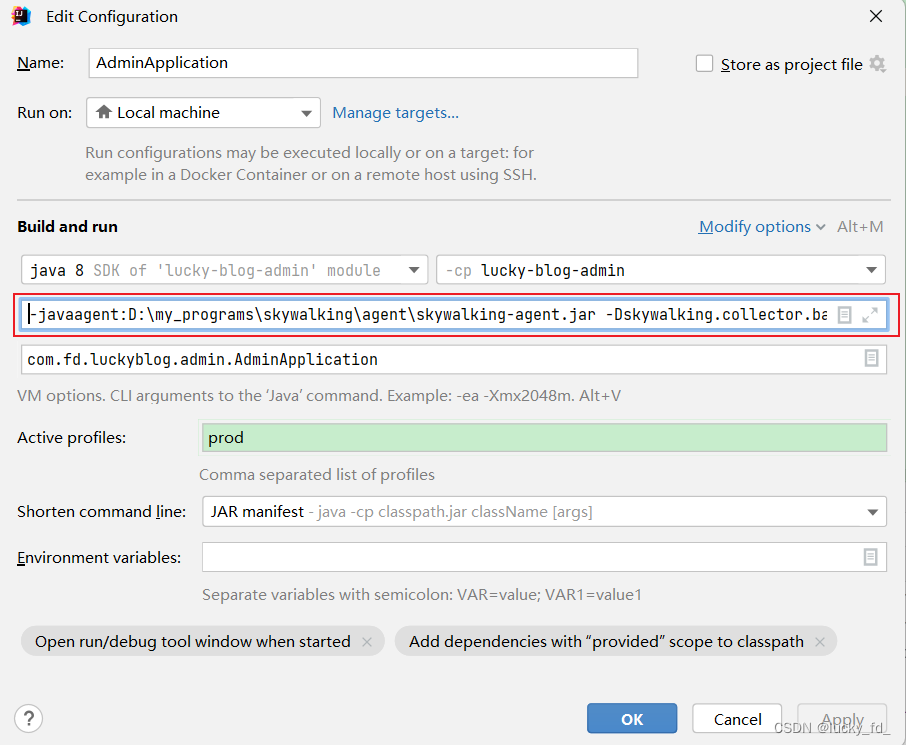
启动 Java 项目。在启动日志中,我们可以看到 SkyWalking Agent 被加载的日志。日志示例如下:
AgentPackagePath : The beacon class location is jar:file:/D:/my_programs/skywalking/agent/skywalking-agent.jar!/org/apache/skywalking/apm/agent/core/boot/AgentPackagePath.class.
SnifferConfigInitializer : Config file found in D:\my_programs\skywalking\agent\config\agent.config.
2. Java Agent配置
可以根据需要编辑agent配置,打开agent/config/agent.config
# The agent namespace 命名空间
# agent.namespace=${SW_AGENT_NAMESPACE:default-namespace}

# The service name in UI 当前agent服务名称
agent.service_name=${SW_AGENT_NAME:Your_ApplicationName}

# The number of sampled traces per 3 seconds 每3秒采样的记录数
# Negative or zero means off, by default 默认或负数表示关闭,即默认全部采样。
# agent.sample_n_per_3_secs=${SW_AGENT_SAMPLE:-1}

# Authentication active is based on backend setting, see application.yml for more details.
# agent.authentication = ${SW_AGENT_AUTHENTICATION:xxxx}

# The max amount of spans in a single segment.
# Through this config item, SkyWalking keep your application memory cost estimated.
# agent.span_limit_per_segment=${SW_AGENT_SPAN_LIMIT:150}

# Ignore the segments if their operation names end with these suffix.
# agent.ignore_suffix=${SW_AGENT_IGNORE_SUFFIX:.jpg,.jpeg,.js,.css,.png,.bmp,.gif,.ico,.mp3,.mp4,.html,.svg}

# If true, SkyWalking agent will save all instrumented classes files in `/debugging` folder.
# SkyWalking team may ask for these files in order to resolve compatible problem.
# agent.is_open_debugging_class = ${SW_AGENT_OPEN_DEBUG:true}

# The operationName max length
# Notice, in the current practice, we don't recommend the length over 190.
# agent.operation_name_threshold=${SW_AGENT_OPERATION_NAME_THRESHOLD:150}

# If true, skywalking agent will enable profile when user create a new profile task. Otherwise disable profile.
# profile.active=${SW_AGENT_PROFILE_ACTIVE:true}

# Parallel monitor segment count
# profile.max_parallel=${SW_AGENT_PROFILE_MAX_PARALLEL:5}

# Max monitor segment time(minutes), if current segment monitor time out of limit, then stop it.
# profile.duration=${SW_AGENT_PROFILE_DURATION:10}

# Max dump thread stack depth
# profile.dump_max_stack_depth=${SW_AGENT_PROFILE_DUMP_MAX_STACK_DEPTH:500}

# Snapshot transport to backend buffer size
# profile.snapshot_transport_buffer_size=${SW_AGENT_PROFILE_SNAPSHOT_TRANSPORT_BUFFER_SIZE:50}

# Backend service addresses.
collector.backend_service=${SW_AGENT_COLLECTOR_BACKEND_SERVICES:127.0.0.1:11800}

# Logging file_name
logging.file_name=${SW_LOGGING_FILE_NAME:skywalking-api.log}

# Logging level
logging.level=${SW_LOGGING_LEVEL:INFO}

# Logging dir
# logging.dir=${SW_LOGGING_DIR:""}

# Logging max_file_size, default: 300 * 1024 * 1024 = 314572800
# logging.max_file_size=${SW_LOGGING_MAX_FILE_SIZE:314572800}

# The max history log files. When rollover happened, if log files exceed this number,
# then the oldest file will be delete. Negative or zero means off, by default.
# logging.max_history_files=${SW_LOGGING_MAX_HISTORY_FILES:-1}

# mysql plugin configuration
# plugin.mysql.trace_sql_parameters=${SW_MYSQL_TRACE_SQL_PARAMETERS:false}| 属性名 | 描述 | 默认值 |
|---|---|---|
| agent.namespace | 命名空间,用于隔离跨进程传播的header。如果进行了配置,header将为HeaderName:Namespace. | 未设置 |
| agent.service_name | 在SkyWalking UI中展示的服务名。5.x版本对应Application,6.x版本对应Service。 建议:为每个服务设置个唯一的名字,服务的多个服务实例为同样的服务名 | Your_ApplicationName |
| agent.sample_n_per_3_secs | 负数或0表示关闭,即默认全部采样。生产环境会带来较大开销。SAMPLE_N_PER_3_SECS表示每3秒采样N条。如果设置为100,则每3秒将采样100个链路数据。 | 未设置,建议设置 |
| agent.authentication | 鉴权是否开启取决于后端的配置,可查看application.yml的详细描述。对于大多数的场景,需要后端对鉴权进行扩展。目前仅实现了基本的鉴权功能。 | 未设置 |
| agent.span_limit_per_segment | 单个segment中的span的最大个数。通过这个配置项,Skywalking可评估应用程序内存使用量。 | 300 |
| agent.ignore_suffix | 如果这个集合中包含了第一个span的操作名,这个segment将会被忽略掉。 | 未设置 |
这里列举部分agent环境参数,详细官方文档见:https://github.com/apache/skywalking/blob/v8.0.0/docs/en/setup/service-agent/java-agent/README.md
agent配置有多种姿势,上面修改 agent.config 文件中的值,只是其中一种。还支持以下方式:
系统属性(-D)
使用 -Dskywalking. + agent.config配置文件中的key 即可。例如:
agent.config 文件中有一个属性名为 agent.service_name ,那么如果使用系统属性的方式,则可以写成
java -javaagent:/opt/agent/skywalking-agent.jar -Dskywalking.agent.service_name=你想设置的值 -jar spring-boot.jar代理选项
在JVM参数中的代理路径之后添加属性即可。格式:
bash
-javaagent:/path/to/skywalking-agent.jar=[option1]=[value1],[option2]=[value2]例如:
bash
java -javaagent:/opt/agent/skywalking-agent.jar=agent.service_name=你想设置的值 -jar spring-boot.jar系统环境变量
agent.config 文件中默认的大写值,都可以作为环境变量引用。例如,agent.config 中有如下内容
shell
agent.service_name=${SW_AGENT_NAME:Your_ApplicationName}这说明Skywalking会读取名为 SW_AGENT_NAME 的环境变量。
优先级:
代理选项 > 系统属性(-D) > 系统环境变量 > 配置文件
3. 测试skywalking
先访问自己的服务,获取agent数据,然后查看skywalking UI显示

仪表盘:可以查看服务性能,接口总体耗时,数据库sql执行耗时排行等等,分为以下几个功能:
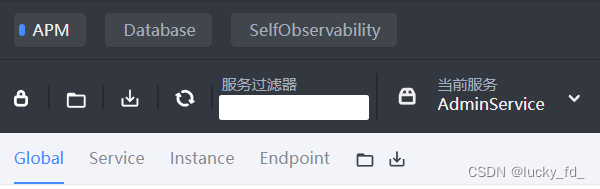
- APM:以全局(Global)、服务(Service)、服务实例(Instance)、端点(Endpoint)的维度展示各项指标。
- Database:展示数据库的各项指标。
- SelfObservability:展示OAP服务端的各项指标。
相关概念解释:
服务(Service):表示对请求提供相同行为的一组工作负载,比如:一个的 Web API系统。
服务实例(Instance):上述的一组工作负载中的每一个工作负载称为一个实例,比如:一个的 Web API 系统集群中的一个实例。
端点(Endpoint):对于特定服务所接收的请求路径,如 HTTP 的 URI 路径和 gRPC 服务的类名 + 方法签名。
更多SkyWalking的UI介绍,请参考:图解 Apache SkyWalking UI 的使用
SkyWalking告警请参考:基于 SkyWalking 的分布式跟踪系统 - 异常告警
常见问题
- Failed to read the config file, skywalking is going to run in default config. org.apache.skywalking.apm.agent.core.conf.ConfigNotFoundException: Failed to load agent.config.
问题原因:未将apache-skywalking-apm-bin/agent 目录,完全拷贝到 Java 应用所在的服务器上