目录
[Canny 边缘检测](#Canny 边缘检测)
答题卡识别主要步骤
(1)反二值化,选项处理为前景(白色),其它处理为背景(黑色)。
(2)每个选项提取出来,计算各选项白色像素点个数。
(3)筛选出白色像素点最多的选项作为考生答案。
(4)与标准答案比较,给出评阅结果。
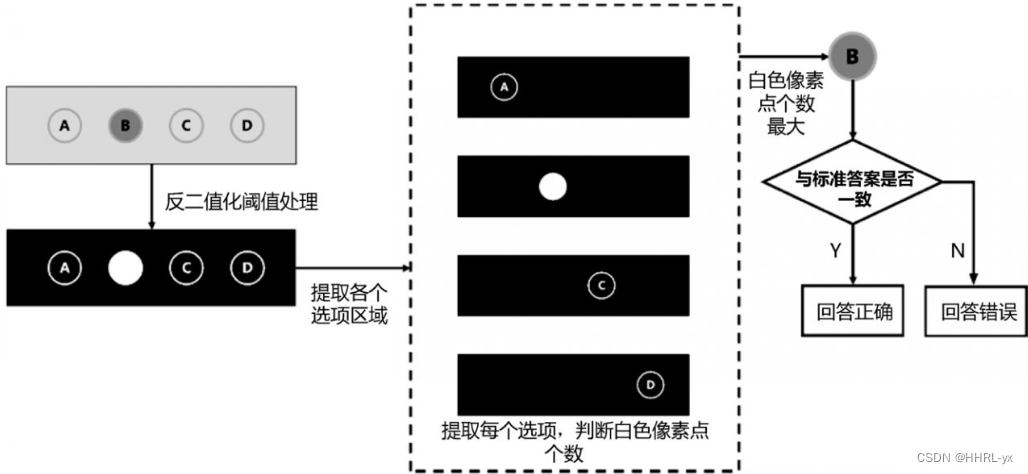
基本实现原理图
一.单道题目的识别
1.基本流程及原理
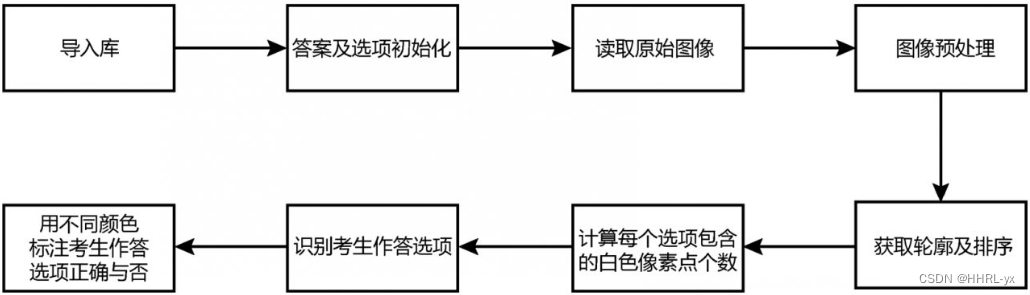
实现步骤流程图
(1)标准答案及选项初始化
为了方便处理,将各个选项放入map的键值对中,不同选项对应不同索引。
cpp
// 标准答案及选项初始化
std::map<int, std::string> ANSWER_KEY = { {0, "A"}, {1, "B"}, {2, "C"}, {3, "D"} };
std::string ANSWER = "C";
(2) 读取原始图像
cpp
    // 读取原始图像
    cv::Mat img = cv::imread("xiaogang.jpg");
    if (img.empty()) {
        std::cout << "图像读取失败!" << std::endl;
        return -1;
    }
    cv::imshow("original", img);
(3)图像预处理
首先进行灰度化和高斯滤波去噪处理,然后进行++阈值变换++ 。阈值变换使用的是反二值化 阈值处理,将图像内++较暗的部分(如铅笔填涂的答案、选项标记等)处理为白色,将图像内相对较亮的部分(如白色等)处理为黑色++。之所以这样处理是因为,通常用白色表示前景,前景是需要处理的对象;用黑色表示背景,背景是不需要额外处理的部分。
cpp
    // 图像预处理
    cv::Mat gray, gaussian_blur, thresh;
    cv::cvtColor(img, gray, cv::COLOR_BGR2GRAY);
    cv::GaussianBlur(gray, gaussian_blur, cv::Size(5, 5), 0);
    cv::threshold(gaussian_blur, thresh, 0, 255, cv::THRESH_BINARY_INV | cv::THRESH_OTSU);
    // cv::imshow("thresh", thresh);
(4)获取轮廓及排序
获取轮廓是图像处理的关键,借助轮廓能够确定每个选项的位置、选项是否被选中等。
需要注意的是,使用findcontours函数获取的轮廓的排列是没有规律的。因此需要将获取的各选项的轮廓按照从左到右出现的顺序排序,++即map中的索引顺序。++
cpp
    // 获取轮廓及排序
    std::vector<std::vector<cv::Point>> cnts;
    cv::findContours(thresh, cnts, cv::RETR_EXTERNAL, cv::CHAIN_APPROX_SIMPLE);
    std::vector<cv::Rect> boundingBoxes;
    for (const auto& c : cnts) {
        boundingBoxes.push_back(cv::boundingRect(c));
    }
    std::sort(boundingBoxes.begin(), boundingBoxes.end(), [](const cv::Rect& a, const
               cv::Rect& b) {
        return a.x < b.x;
        });
(5)计算每个选项非零值(白色像素点)个数及序号
本步骤主要完成任务如下,
任务1:提取每一个选项。
任务2:计算每一个选项内的自色像素点个数。
对于任务1,使用按位与运算的掩模方式完成,示意图如图所示,根据"任意数值与自身进行按位与运算,结果仍旧是自身值"及掩模指定计算区域的特点:
如左图所示,将图像与自身进行按位与运算时,得到的仍旧是图像自身
如右图所示,在指定了掩模后,图像与自身相与所得的结果图像中与掩模对应部分保留原值;其余部分均为黑色。

掩膜示意图
cpp
    // 构建列表,用来存储每个选项非零值(白色像素点)个数及序号
    std::vector<std::pair<int, int>> options;
    for (size_t j = 0; j < cnts.size(); ++j) {
        // 构造一个与原始图像大小一致的灰度图像,用来保存每一个选项用
        cv::Mat mask = cv::Mat::zeros(gray.size(), CV_8UC1);
        cv::drawContours(mask, cnts, j, cv::Scalar(255), -1);

        // 获取thresh中mask指定部分
        cv::Mat result;
        cv::bitwise_and(thresh, mask, result);
        cv::imshow("mask" + std::to_string(j), mask);
        cv::imshow("result" + std::to_string(j), result);

        // 计算每一个选项的非零值(白色像素点)
        int total = cv::countNonZero(result);
        options.push_back(std::make_pair(total, j));
    }
(6)识别考生作答选项
白色像素点最多的即为考生选项,如图,考生选项为B

选项示意图
根据轮廓内白色像素点的个数将轮廓降序排列,最前面的即为考生选项。
cpp
    // 识别考生的选项
    std::sort(options.begin(), options.end(), std::greater<>());
    int choice_num = options[0].second;
    std::string choice = ANSWER_KEY[choice_num];
    std::cout << "该生的选项:" << choice << std::endl;
(7)输出结果
根据选项正确与否,用不同颜色标注考生选项,正确标注绿色轮廓,错误标注红色轮廓。
cpp
    // 根据选项正确与否,用不同颜色标注考生选项
    cv::Scalar color;
    std::string msg;
    if (choice == ANSWER) {
        color = cv::Scalar(0, 255, 0);  // 回答正确,用绿色表示
        msg = "回答正确";
    }
    else {
        color = cv::Scalar(0, 0, 255);  // 回答错误,用红色表示
        msg = "回答错误";
    }
    cv::drawContours(img, cnts, choice_num, color, 2);
    cv::imshow("result", img);
    std::cout << msg << std::endl;
2.实现程序
完整代码如下:
cpp
#include <opencv2/opencv.hpp>
#include <iostream>
#include <vector>
#include <algorithm>

// 标准答案及选项初始化
std::map<int, std::string> ANSWER_KEY = { {0, "A"}, {1, "B"}, {2, "C"}, {3, "D"} };
std::string ANSWER = "C";

int main() {
    // 读取原始图像
    cv::Mat img = cv::imread("xiaogang.jpg");
    if (img.empty()) {
        std::cout << "图像读取失败!" << std::endl;
        return -1;
    }
    cv::imshow("original", img);

    // 图像预处理
    cv::Mat gray, gaussian_blur, thresh;
    cv::cvtColor(img, gray, cv::COLOR_BGR2GRAY);
    cv::GaussianBlur(gray, gaussian_blur, cv::Size(5, 5), 0);
    cv::threshold(gaussian_blur, thresh, 0, 255, cv::THRESH_BINARY_INV | cv::THRESH_OTSU);
    // cv::imshow("thresh", thresh);

    // 获取轮廓及排序
    std::vector<std::vector<cv::Point>> cnts;
    cv::findContours(thresh, cnts, cv::RETR_EXTERNAL, cv::CHAIN_APPROX_SIMPLE);
    std::vector<cv::Rect> boundingBoxes;
    for (const auto& c : cnts) {
        boundingBoxes.push_back(cv::boundingRect(c));
    }
    std::sort(boundingBoxes.begin(), boundingBoxes.end(), [](const cv::Rect& a, const cv::Rect& b) {
        return a.x < b.x;
        });

    // 构建列表,用来存储每个选项非零值(白色像素点)个数及序号
    std::vector<std::pair<int, int>> options;
    for (size_t j = 0; j < cnts.size(); ++j) {
        // 构造一个与原始图像大小一致的灰度图像,用来保存每一个选项用
        cv::Mat mask = cv::Mat::zeros(gray.size(), CV_8UC1);
        cv::drawContours(mask, cnts, j, cv::Scalar(255), -1);

        // 获取thresh中mask指定部分
        cv::Mat result;
        cv::bitwise_and(thresh, mask, result);
        cv::imshow("mask" + std::to_string(j), mask);
        cv::imshow("result" + std::to_string(j), result);

        // 计算每一个选项的非零值(白色像素点)
        int total = cv::countNonZero(result);
        options.push_back(std::make_pair(total, j));
    }

    // 识别考生的选项
    std::sort(options.begin(), options.end(), std::greater<>());
    int choice_num = options[0].second;
    std::string choice = ANSWER_KEY[choice_num];
    std::cout << "该生的选项:" << choice << std::endl;

    // 根据选项正确与否,用不同颜色标注考生选项
    cv::Scalar color;
    std::string msg;
    if (choice == ANSWER) {
        color = cv::Scalar(0, 255, 0);  // 回答正确,用绿色表示
        msg = "回答正确";
    }
    else {
        color = cv::Scalar(0, 0, 255);  // 回答错误,用红色表示
        msg = "回答错误";
    }
    cv::drawContours(img, cnts, choice_num, color, 2);
    cv::imshow("result", img);
    std::cout << msg << std::endl;

    cv::waitKey(0);
    cv::destroyAllWindows();
    return 0;
}
二.整张答题卡原理
整张答题卡识别的核心就是单道题目的识别。
识别流程如下:

1.图像预处理
图像预处理主要完成读取图像、色彩空间转换、高斯滤波、Canny边缘检测、获取轮廓等。
色彩空间转换: 将图像从RGB色彩空间转换到灰度空间,以便后续处理。
高斯滤波: 主要用于对图像进行去噪处理。为了得到更好的去噪效果,可以根据需要加入形态学如腐蚀、膨胀等操作。
**Canny边缘检测:**是为了获取Canny边缘,以便更好地完成后续获取图像轮的操作。获取轮廓: 是指将图像内的所有轮廓提取出来。函数findcontours可以根据参数查找图像内特定的轮廓。例如,通过参数++cv2.RETR EXTERNAL可以实现仅查找所有外轮廓。++
其它的操作之前都用到过,下面介绍一下canny边缘检测。
Canny 边缘检测
是一种多步骤的图像处理算法,被认为是最优的边缘检测算法之一。Canny 边缘检测的目标是找出图像中显著的边缘,并去除可能由噪声引起的虚假边缘。
在OpenCV中,cv::Canny函数直接实现了Canny边缘检测算法的所有步骤,包括使用Sobel算子计算梯度、非极大值抑制和双阈值检测。
函数语法:
cpp
void cv::Canny(
    InputArray image,        // 输入图像
    OutputArray edges,       // 输出边缘图像
    double threshold1,       // 低阈值
    double threshold2,       // 高阈值
    int apertureSize = 3,    // Sobel 算子的孔径大小(默认为 3)
    bool L2gradient = false  // 是否使用更精确的 L2 范数计算梯度幅度(默认为 false)
);
|----------------|------------------------------------------------------|
| image | 输入图像,通常为灰度图像。 |
| edges | 输出边缘图像,与输入图像大小相同。 |
| threshold1 | 低阈值,用于边缘连接。 |
| threshold2 | 高阈值,用于检测强边缘。 |
| apertureSize | Sobel 算子的孔径大小,默认为 3 |
| L2gradient | 使用 L2 范数计算梯度幅度。 默认为 false,如果设为 true,则使用更精确但更耗时的计算方式。 |
[参数含义]
预处理代码:
cpp
#include <opencv2/opencv.hpp>
#include <iostream>

int main() {
    // 读取图像
    cv::Mat img = cv::imread("b.jpg");
    if (img.empty()) {
        std::cerr << "图像读取失败!" << std::endl;
        return -1;
    }
    cv::imshow("original", img);

    // 转换为灰度图像
    cv::Mat gray;
    cv::cvtColor(img, gray, cv::COLOR_BGR2GRAY);
    cv::imshow("gray", gray);

    // 高斯滤波
    cv::Mat gaussian;
    cv::GaussianBlur(gray, gaussian, cv::Size(5, 5), 0);
    cv::imshow("gaussian", gaussian);

    // Canny边缘检测
    cv::Mat edged;
    cv::Canny(gaussian, edged, 50, 200);
    cv::imshow("edged", edged);

    // 查找轮廓
    std::vector<std::vector<cv::Point>> cts;
    std::vector<cv::Vec4i> hierarchy;
    cv::findContours(edged.clone(), cts, hierarchy, cv::RETR_EXTERNAL, cv::CHAIN_APPROX_SIMPLE);

    // 在图像上绘制轮廓
    cv::drawContours(img, cts, -1, cv::Scalar(0, 0, 255), 3);
    cv::imshow("img", img);

    cv::waitKey(0);
    cv::destroyAllWindows();

    return 0;
}
2.答题卡处理
将答题卡铺满整个页面(倾斜校正、删除无效边缘),将选项处理为白色,背景处理为黑色。
答题卡的处理,需要解决如下几个核心问题。
问题1:如何从众多轮廓中找到答题卡的轮廓?
问题2:如何对答题卡进行倾斜校正、裁剪掉扫描的边缘?
问题3:如何实现前景、背景的有效处理?
问题4:如何找到答题卡内所有选项?
问题1: 如何从众多轮廓中找到答题卡的轮廓?
在将答题卡铺满整个页面前,最重要的步骤是判定哪个轮廓是答题卡的轮廓。也就是说,需要先找到答题卡,再对其处理。
方法1:通常情况下,将函数findContours的method参数值设定为cv2.CHAIN APPROX SIMPLE ,当它识别到矩形时,就会使用++4个顶点来保存其轮廓信息++。 因此,可以通过判定轮廓是否用4个顶点表示,来判定轮廓是不是矩形。这个方法简单易行,但是在扫描答题卡时,可能会发生失真,使得原本是矩形的答题卡变成梯形。此时,简单地通过轮廓的顶点个数判断对象是否是答题卡就无效了。不过,在采用逼近多边形拟合轮廓时,可以使用4个顶点拟合梯形。因此,通过逼近多边形的顶点个数可以判定一个轮廓是否是梯形:++若一个轮廓的逼近多边形是4个顶点,则该轮廓是梯形;否则,该轮廓不是梯形。++
方法2:除此之外,还有一个方法是在找到的众多轮廓中,面积最大的轮廓可能是答题卡。因此,可以将++面积最大的轮廓对应的对象判定为答题卡。++
问题2: 如何对答题卡进行倾斜校正、裁剪掉扫描的边缘?
通常情况下,通过扫描等方式得到的答题卡可能存在较大的黑边及较大程度的倾斜,需要对其进行校正。该操作通常通过透视变换实现。透视变换可以将矩形映射为任意四边形,在0pencv中可通过函数warpPerspective实现。
cv::warpPerspective
函数语法:
cpp
void cv::warpPerspective(
    InputArray src,           // 输入图像
    OutputArray dst,          // 输出图像
    InputArray M,             // 3x3 透视变换矩阵
    Size dsize,               // 输出图像的大小
                )
由此可知,函数warpPerspective通过变换矩阵将原始图像src转换为目标图像dst。因此,在通过透视变换对图像进行倾斜校正时,需要构造一个变换矩阵。0penCv提供的函数getPerspectiveTransform能够构造从原始图像到目标图像(矩阵)之间的变换矩阵M。
cv::getPerspectiveTransform
函数语法:
cpp
Mat cv::getPerspectiveTransform(
    InputArray src, // 输入图像中的四个点
    InputArray dst  // 输出图像中的四个点
);通过轮廓查找,确定轮廓的逼近多边形,找到答题卡(待校正的不规则四边形)的四个顶点。由于并不知道这四个顶点分别是左上、右上、左下、右下四个顶点中的哪个顶点,因此需要在函数内先确定好这四个顶点分别对应左上、右上、左下、右下四个顶点中的哪个顶点。然后将这四个顶点和目标图像的四个顶点按照++一致的排列方式++传递给函数getPerspectiveTransform获取变换矩阵。最后根据变换矩阵,使用函数warpPerspective完成倾斜校正。
示例应用:倾斜校正、裁边处理
cpp
#include <opencv2/opencv.hpp>
#include <iostream>
#include <vector>
#include <cmath>

// 自定义透视函数
cv::Mat myWarpPerspective(const cv::Mat& image, const std::vector<cv::Point2f>& pts) {
    // step1:参数pts是要做倾斜校正的轮廓的逼近多边形(本题中的答题纸)的四个顶点,
    // 首先,确定四个顶点分别对应(左上、右上、右下、左下)的哪一个位置
    // step1.1:根据x轴值排序对4个点进行排序
    std::vector<cv::Point2f> xSorted = pts;
    std::sort(xSorted.begin(), xSorted.end(), [](const cv::Point2f& a, const cv::Point2f& b) { return a.x < b.x; });

    //step1.2:四个点划分为:左侧2个、右侧2个
    std::vector<cv::Point2f> left(xSorted.begin(), xSorted.begin() + 2);
    std::vector<cv::Point2f> right(xSorted.begin() + 2, xSorted.end());

    // step1.3:在左半边寻找左上角、左下角
    // 根据y轴的值排序
    std::sort(left.begin(), left.end(), [](const cv::Point2f& a, const cv::Point2f& b) { return a.y < b.y; });
    // 排在前面的是左上角(tl:top-left)、排在后面的是左下角(bl:bottom-left)
    cv::Point2f tl = left[0];
    cv::Point2f bl = left[1];

    // step1.4:根据右侧两个点与左上角点的距离判断右侧两个点的位置
    // 计算右侧两个点距离左上角点的距离
    std::vector<float> D;
    for (const auto& point : right) {
        D.push_back(cv::norm(tl - point));
    }

    // 右侧两个点,距离左上角远的点是右下角(br)的点,近的点是右上角的点(tr)
    cv::Point2f br = right[D[0] < D[1] ? 1 : 0];
    cv::Point2f tr = right[D[0] < D[1] ? 0 : 1];

    // step1.5:确定pts的四点分别属于(左上、左下、右上、右下)的哪一个
    std::vector<cv::Point2f> src = { tl, tr, br, bl };

    // step2:根据pts的四个顶点,计算出校正后图像的宽度和高度
    float widthA = std::sqrt(std::pow(br.x - bl.x, 2) + std::pow(br.y - bl.y, 2));
    float widthB = std::sqrt(std::pow(tr.x - tl.x, 2) + std::pow(tr.y - tl.y, 2));
    int maxWidth = static_cast<int>(std::max(widthA, widthB));

    float heightA = std::sqrt(std::pow(tr.x - br.x, 2) + std::pow(tr.y - br.y, 2));
    float heightB = std::sqrt(std::pow(tl.x - bl.x, 2) + std::pow(tl.y - bl.y, 2));
    int maxHeight = static_cast<int>(std::max(heightA, heightB));

    // 根据宽度、高度,构造新图像dst对应的的四个顶点
    std::vector<cv::Point2f> dst = {
        cv::Point2f(0, 0),
        cv::Point2f(maxWidth - 1, 0),
        cv::Point2f(maxWidth - 1, maxHeight - 1),
        cv::Point2f(0, maxHeight - 1)
    };

    // 构造从src到dst的透视变换矩阵
    cv::Mat M = cv::getPerspectiveTransform(src, dst);

    // 完成从src到dst的透视变换
    cv::Mat warped;
    cv::warpPerspective(image, warped, M, cv::Size(maxWidth, maxHeight));

    // 返回透视变换的结果
    return warped;
}

int main() {
    // 读取输入图像
    cv::Mat img = cv::imread("b.jpg");
    if (img.empty()) {
        std::cerr << "Could not open or find the image" << std::endl;
        return -1;
    }

    // 转换为灰度图像
    cv::Mat gray;
    cv::cvtColor(img, gray, cv::COLOR_BGR2GRAY);

    // 高斯模糊
    cv::Mat gaussian_blur;
    cv::GaussianBlur(gray, gaussian_blur, cv::Size(5, 5), 0);

    // 边缘检测
    cv::Mat edged;
    cv::Canny(gaussian_blur, edged, 50, 200);

    // 查找轮廓
    std::vector<std::vector<cv::Point>> contours;
    std::vector<cv::Vec4i> hierarchy;
    cv::findContours(edged, contours, hierarchy, cv::RETR_EXTERNAL, cv::CHAIN_APPROX_SIMPLE);

    cv::Mat paper;
    // 遍历每一个轮廓,找到答题纸的轮廓
    for (const auto& c : contours) {
        double peri = 0.01 * cv::arcLength(c, true);
        std::vector<cv::Point> approx;
        cv::approxPolyDP(c, approx, peri, true);

        // 四个顶点的轮廓是矩形(或者是由于扫描等原因由矩形变成的梯形)
        if (approx.size() == 4) {
            std::vector<cv::Point2f> points;
            for (const auto& point : approx) {
                points.push_back(cv::Point2f(point.x, point.y));
            }
            // 将外轮廓进行倾斜校正,将其构成一个矩形
            paper = myWarpPerspective(img, points);
            break;
        }
    }

    // 显示结果
    if (!paper.empty()) {
        cv::imshow("Paper", paper);
        cv::waitKey(0);
    }

    cv::destroyAllWindows();
    return 0;
}
问题3:如何实现前景、背景的有效处理
为了取得更好的识别效果,将图像内色彩较暗的部分(如A、B、C、D选项,填涂的答案等)处理为白色(作为前景),将颜色较亮的部分(答题卡上没有任何文字标记的部分、普通背景等)处理为黑色(作为背景)。采用反二值化阈值处理可以实现上述功能。反二值化阈值处理将图像中大于阈值的像素点处理为黑色小于阈值的像素点处理为白色。++将函数threshold的参数设置为"Cv2.THRESH BINARY INV|cV2.THRESH OTSU"++,可以获取图像的反二值化阈值处理结果。
问题4:如何找到答题卡内所有选项
利用函数findcontours可以找到图像内的所有轮廓,因此可利用该函数找到答题卡内的所有选项。需要注意的是,上述处理不仅会找到答题卡内的所有选项轮廓,还会找到大量其他轮廓,如文字描述信息的轮廓、噪声轮廓等。因此后续需要进行噪声处理和进一步筛选。
3.筛选出所有选项
需要将各选项轮廓筛选出来,具体的筛选原则如下:
(1)轮廓要足够大,不能太小,具体量化为长度大于25像素、宽度大于25像素。
(2)轮廓要接近于圆形,不能太扁,具体量化为纵横比介于0.6,1.3。
将所有轮廓依次按照上述条件进行筛选,满足上述条件的轮判定为选项;否则,判定为噪声(说明文字等其他信息的轮廓)
筛选轮廓 :遍历所有轮廓,使用**cv::boundingRect 函数获取轮廓的矩形包围框**,计算纵横比并筛选符合条件的轮廓。
cv::boundingRect
功能:计算包围某个轮廓的最小矩形的函数。
函数语法:
cpp
Rect cv::boundingRect(InputArray points);points :输入的点集或轮廓,可以是一个二维点的数组或 std::vector<cv::Point>。
++返回类型为cv::Rect。++
应用示例:找到答题卡内所有选项轮廓
cpp
#include <opencv2/opencv.hpp>
#include <iostream>
#include <vector>

int main() {
    // 读取输入图像
    cv::Mat thresh = cv::imread("thresh.bmp", cv::IMREAD_UNCHANGED);
    if (thresh.empty()) {
        std::cerr << "Could not open or find the image" << std::endl;
        return -1;
    }

    cv::imshow("thresh_original", thresh);

    // 查找所有的轮廓
    std::vector<std::vector<cv::Point>> cnts;
    std::vector<cv::Vec4i> hierarchy;
    cv::findContours(thresh.clone(), cnts, hierarchy, cv::RETR_EXTERNAL, cv::CHAIN_APPROX_SIMPLE);
    std::cout << "共找到各种轮廓 " << cnts.size() << " 个" << std::endl;

    // 筛选出选项的轮廓
    std::vector<std::vector<cv::Point>> options;
    for (const auto& ci : cnts) {
        // 获取轮廓的矩形包围框
        cv::Rect boundingBox = cv::boundingRect(ci);
        int x = boundingBox.x;
        int y = boundingBox.y;
        int w = boundingBox.width;
        int h = boundingBox.height;

        // ar纵横比
        float ar = w / static_cast<float>(h);

        // 满足长度、宽度大于25像素,纵横比在[0.6, 1.3]之间,加入到options中
        if (w >= 25 && h >= 25 && ar >= 0.6 && ar <= 1.3) {
            options.push_back(ci);
        }
    }

    // 需要注意,此时得到了很多选项的轮廓,但是他们在options是无规则存放的
    std::cout << "共找到选项 " << options.size() << " 个" << std::endl;

    // 将所有找到的选项轮廓绘制出来
    cv::Scalar color = cv::Scalar(0, 0, 255);  // 红色

    // 为了以彩色显示,将原始图像转换为彩色空间
    cv::cvtColor(thresh, thresh, cv::COLOR_GRAY2BGR);

    // 绘制每个选项的轮廓
    cv::drawContours(thresh, options, -1, color, 5);

    // 显示结果
    cv::imshow("thresh_result", thresh);
    cv::waitKey();
    cv::destroyAllWindows();

    return 0;
}
结果如图:

4.将选项按题目分组
在默认情况下,所有轮廓是无序排列的,因此无法直接使用序号将其划分到不同的题目上。若将所有选项轮廓按照从上到下的顺序排列,则可以获得如图所示的排序规律。由于第1道题目的四个选项一定在第2道题目的四个选项的上方,所以第1道题目的四个选项的序号一定是{0、1、2、3}这四个值,但是具体哪个选项对应哪个值不确定。同理,第2道题目的四个选项一定在第3道题目的上方,所以第2道题目的四个选项的序号一定是{4、5、6、7} 这四个值,以此类推:

排序结果示意图
示例代码:确定选项大致序号,每道题选项序号再下一道题前面。
cpp
#include <opencv2/opencv.hpp>
#include <iostream>
#include <vector>
#include <algorithm>

int main() {
    // 读取输入图像
    cv::Mat thresh = cv::imread("thresh.bmp", cv::IMREAD_UNCHANGED);
    if (thresh.empty()) {
        std::cerr << "Could not open or find the image" << std::endl;
        return -1;
    }

    // 查找所有的轮廓
    std::vector<std::vector<cv::Point>> cnts;
    std::vector<cv::Vec4i> hierarchy;
    cv::findContours(thresh.clone(), cnts, hierarchy, cv::RETR_EXTERNAL, cv::CHAIN_APPROX_SIMPLE);
    std::cout << "共找到各种轮廓 " << cnts.size() << " 个" << std::endl;

    // 将thresh转换为彩色图像,用于显示无序的轮廓编号
    cv::cvtColor(thresh, thresh, cv::COLOR_GRAY2BGR);
    cv::Mat result = thresh.clone(); // 用于显示排序后的轮廓编号

    // 筛选出选项的轮廓
    std::vector<std::vector<cv::Point>> options;
    cv::Scalar color = cv::Scalar(0, 0, 255); // 红色
    int font = cv::FONT_HERSHEY_SIMPLEX;

    for (size_t i = 0; i < cnts.size(); i++) {
        // 获取轮廓的矩形包围框
        cv::Rect boundingBox = cv::boundingRect(cnts[i]);
        int x = boundingBox.x;
        int y = boundingBox.y;
        int w = boundingBox.width;
        int h = boundingBox.height;

        // 计算纵横比
        float ar = w / static_cast<float>(h);

        // 满足长度、宽度大于25像素,纵横比在[0.6, 1.3]之间,加入到options中
        if (w >= 25 && h >= 25 && ar >= 0.6 && ar <= 1.3) {
            options.push_back(cnts[i]);
            // 绘制序号
            cv::putText(thresh, std::to_string(i), cv::Point(x-1, y-5), font, 0.5, color, 2);
        }
    }

    // 显示无序的选项编号
    cv::imshow("thresh", thresh);

    // 将轮廓按照从上到下的顺序排序
    std::vector<cv::Rect> boundingBoxes;
    for (const auto& opt : options) {
        boundingBoxes.push_back(cv::boundingRect(opt));
    }

    std::vector<std::pair<std::vector<cv::Point>, cv::Rect>> sortedOptions;
    for (size_t i = 0; i < options.size(); ++i) {
        sortedOptions.push_back(std::make_pair(options[i], boundingBoxes[i]));
    }

    std::sort(sortedOptions.begin(), sortedOptions.end(),
              [](const std::pair<std::vector<cv::Point>, cv::Rect>& a,
                 const std::pair<std::vector<cv::Point>, cv::Rect>& b) {
                  return a.second.y < b.second.y;
              });

    // 提取排序后的轮廓
    options.clear();
    for (const auto& item : sortedOptions) {
        options.push_back(item.first);
    }

    // 按照序号,显示排序后的轮廓
    for (size_t i = 0; i < options.size(); i++) {
        cv::Rect boundingBox = cv::boundingRect(options[i]);
        int x = boundingBox.x;
        int y = boundingBox.y;
        cv::putText(result, std::to_string(i), cv::Point(x-1, y-5), font, 0.5, color, 2);
    }

    // 显示排序后的结果
    cv::imshow("result", result);
    cv::waitKey();
    cv::destroyAllWindows();

    return 0;
}
结果如图:

在此基础上,还需要将每道题目的4个选项按照从左到右的顺序排列,在具体实现中,根据各选项的坐标值,实现各选项按从左到右顺序排列。
示例代码:
cpp
    // 将每一题目的四个选项筛选出来并显示
    for (size_t tn = 0; tn < options.size(); tn += 4) {
        // 将轮廓按照坐标实现自左向右顺次存放
        std::vector<cv::Rect> boundingBoxes;
        for (size_t i = tn; i < tn + 4 && i < options.size(); ++i) {
            boundingBoxes.push_back(cv::boundingRect(options[i]));
        }

        std::vector<std::pair<std::vector<cv::Point>, cv::Rect>> sortedCnts;
        for (size_t i = 0; i < boundingBoxes.size(); ++i) {
            sortedCnts.push_back(std::make_pair(options[tn + i], boundingBoxes[i]));
        }

        std::sort(sortedCnts.begin(), sortedCnts.end(),
                  [](const std::pair<std::vector<cv::Point>, cv::Rect>& a,
                     const std::pair<std::vector<cv::Point>, cv::Rect>& b) {
                      return a.second.x < b.second.x;
                  });

        // 构造图像image用来显示每道题目的四个选项
        cv::Mat image = cv::Mat::zeros(thresh.size(), CV_8UC3);

        // 针对每个选项单独处理
        for (size_t n = 0; n < sortedCnts.size(); ++n) {
            const auto& ni = sortedCnts[n].first;
            cv::Rect boundingBox = sortedCnts[n].second;
            int x = boundingBox.x;
            int y = boundingBox.y;
            int w = boundingBox.width;
            int h = boundingBox.height;

            cv::drawContours(image, std::vector<std::vector<cv::Point>>{ni}, -1, cv::Scalar(255, 255, 255), -1);
            cv::putText(image, std::to_string(n), cv::Point(x-1, y-5), font, 1, cv::Scalar(0, 0, 255), 2);
        }

        // 显示每个题目的四个选项及对应的序号
        cv::imshow("result" + std::to_string(tn / 4), image);
    }
接下来按照 **(一)**中单道题目的识别逻辑进行。
三.完整实现程序
1.实现代码
cpp
#include <opencv2/opencv.hpp>
#include <iostream>
#include <vector>
#include <algorithm>
#include <cmath>
#include <map>

// 自定义函数,实现透视变换(倾斜校正)
cv::Mat myWarpPerspective(const cv::Mat& image, const std::vector<cv::Point2f>& pts) {
    // 根据x轴值排序对4个点进行排序
    std::vector<cv::Point2f> xSorted = pts;
    std::sort(xSorted.begin(), xSorted.end(), [](const cv::Point2f& a, const cv::Point2f& b) { return a.x < b.x; });

    // 四个点划分为:左侧2个、右侧2个
    std::vector<cv::Point2f> left(xSorted.begin(), xSorted.begin() + 2);
    std::vector<cv::Point2f> right(xSorted.begin() + 2, xSorted.end());

    // 在左半边寻找左上角、左下角,根据y轴的值排序
    std::sort(left.begin(), left.end(), [](const cv::Point2f& a, const cv::Point2f& b) { return a.y < b.y; });
    cv::Point2f tl = left[0];
    cv::Point2f bl = left[1];

    // 根据右侧两个点与左上角点的距离判断右侧两个点的位置
    std::vector<float> D;
    for (const auto& point : right) {
        D.push_back(cv::norm(tl - point));
    }

    cv::Point2f br = right[D[0] < D[1] ? 1 : 0];
    cv::Point2f tr = right[D[0] < D[1] ? 0 : 1];

    // 确定pts的四点分别属于(左上、左下、右上、右下)的哪一个
    std::vector<cv::Point2f> src = { tl, tr, br, bl };

    // 根据pts的四个顶点,计算出校正后图像的宽度和高度
    float widthA = std::sqrt(std::pow(br.x - bl.x, 2) + std::pow(br.y - bl.y, 2));
    float widthB = std::sqrt(std::pow(tr.x - tl.x, 2) + std::pow(tr.y - tl.y, 2));
    int maxWidth = static_cast<int>(std::max(widthA, widthB));

    float heightA = std::sqrt(std::pow(tr.x - br.x, 2) + std::pow(tr.y - br.y, 2));
    float heightB = std::sqrt(std::pow(tl.x - bl.x, 2) + std::pow(tl.y - bl.y, 2));
    int maxHeight = static_cast<int>(std::max(heightA, heightB));

    // 根据宽度、高度,构造新图像dst对应的四个顶点
    std::vector<cv::Point2f> dst = {
        cv::Point2f(0, 0),
        cv::Point2f(maxWidth - 1, 0),
        cv::Point2f(maxWidth - 1, maxHeight - 1),
        cv::Point2f(0, maxHeight - 1)
    };

    // 构造从src到dst的透视变换矩阵
    cv::Mat M = cv::getPerspectiveTransform(src, dst);

    // 完成从src到dst的透视变换
    cv::Mat warped;
    cv::warpPerspective(image, warped, M, cv::Size(maxWidth, maxHeight));

    // 返回透视变换的结果
    return warped;
}

// 标准答案
std::map<int, int> ANSWER = { {0, 1}, {1, 2}, {2, 0}, {3, 2}, {4, 3} };
// 答案用到的字典
std::map<int, std::string> answerDICT = { {0, "A"}, {1, "B"}, {2, "C"}, {3, "D"} };

int main() {
    // 读取原始图像(考卷)
    cv::Mat img = cv::imread("b.jpg");
    if (img.empty()) {
        std::cerr << "Could not open or find the image" << std::endl;
        return -1;
    }

    // 图像预处理:色彩空间变换
    cv::Mat gray;
    cv::cvtColor(img, gray, cv::COLOR_BGR2GRAY);

    // 图像预处理:高斯滤波
    cv::Mat gaussian_blur;
    cv::GaussianBlur(gray, gaussian_blur, cv::Size(5, 5), 0);

    // 图像预处理:边缘检测
    cv::Mat edged;
    cv::Canny(gaussian_blur, edged, 50, 200);

    // 查找轮廓
    std::vector<std::vector<cv::Point>> cts;
    std::vector<cv::Vec4i> hierarchy;
    cv::findContours(edged.clone(), cts, hierarchy, cv::RETR_EXTERNAL, cv::CHAIN_APPROX_SIMPLE);

    // 轮廓排序
    std::sort(cts.begin(), cts.end(), [](const std::vector<cv::Point>& a, const std::vector<cv::Point>& b) {
        return cv::contourArea(a) > cv::contourArea(b);
        });
    std::cout << "寻找轮廓的个数:" << cts.size() << std::endl;

    int rightSum = 0;

    // 遍历每一个轮廓,找到答题纸的轮廓,将答题纸处理进行倾斜校正
    for (const auto& c : cts) {
        double peri = 0.01 * cv::arcLength(c, true);
        std::vector<cv::Point> approx;
        cv::approxPolyDP(c, approx, peri, true);
        std::cout << "顶点个数:" << approx.size() << std::endl;

        // 四个顶点的轮廓是矩形(或者是由于扫描等原因由矩形变成的梯形)
        if (approx.size() == 4) {
            std::vector<cv::Point2f> pts;
            for (const auto& p : approx) {
                pts.push_back(cv::Point2f(p.x, p.y));
            }

            // 将外轮廓进行倾斜校正,将其构成一个矩形
            cv::Mat paper = myWarpPerspective(img, pts);
            cv::Mat paperGray = myWarpPerspective(gray, pts);

            // 反二值化阈值处理,选项处理为白色,答题卡整体背景处理黑色
            cv::Mat thresh;
            cv::threshold(paperGray, thresh, 0, 255, cv::THRESH_BINARY_INV | cv::THRESH_OTSU);

            // 在答题纸内寻找所有轮廓
            std::vector<std::vector<cv::Point>> cnts;
            cv::findContours(thresh.clone(), cnts, hierarchy, cv::RETR_EXTERNAL, cv::CHAIN_APPROX_SIMPLE);

            // 用options来保存每一个选项(选中,未选中都放进去)
            std::vector<std::vector<cv::Point>> options;

            // 遍历每一个轮廓,将选项放入到options中
            for (const auto& ci : cnts) {
                // 获取轮廓的矩形包围框
                cv::Rect boundingBox = cv::boundingRect(ci);
                int x = boundingBox.x;
                int y = boundingBox.y;
                int w = boundingBox.width;
                int h = boundingBox.height;

                // 计算纵横比
                float ar = w / static_cast<float>(h);

                // 满足条件,加入到options中
                if (w >= 25 && h >= 25 && ar >= 0.6 && ar <= 1.3) {
                    options.push_back(ci);
                }
            }

            // 将轮廓自上向下存放
            std::vector<cv::Rect> boundingBoxes;
            for (const auto& opt : options) {
                boundingBoxes.push_back(cv::boundingRect(opt));
            }

            std::vector<std::pair<std::vector<cv::Point>, cv::Rect>> sortedOptions;
            for (size_t i = 0; i < options.size(); ++i) {
                sortedOptions.push_back(std::make_pair(options[i], boundingBoxes[i]));
            }

            std::sort(sortedOptions.begin(), sortedOptions.end(),
                [](const std::pair<std::vector<cv::Point>, cv::Rect>& a,
                    const std::pair<std::vector<cv::Point>, cv::Rect>& b) {
                        return a.second.y < b.second.y;
                });

            // 提取排序后的轮廓
            options.clear();
            for (const auto& item : sortedOptions) {
                options.push_back(item.first);
            }

            // 处理每一道题的4个选项的轮廓
            for (size_t tn = 0; tn < options.size(); tn += 4) {
                // 将轮廓按照坐标实现自左向右顺次存放
                std::vector<cv::Rect> boundingBoxes;
                for (size_t i = tn; i < tn + 4 && i < options.size(); ++i) {
                    boundingBoxes.push_back(cv::boundingRect(options[i]));
                }

                std::vector<std::pair<std::vector<cv::Point>, cv::Rect>> sortedCnts;
                for (size_t i = 0; i < boundingBoxes.size(); ++i) {
                    sortedCnts.push_back(std::make_pair(options[tn + i], boundingBoxes[i]));
                }

                std::sort(sortedCnts.begin(), sortedCnts.end(),
                    [](const std::pair<std::vector<cv::Point>, cv::Rect>& a,
                        const std::pair<std::vector<cv::Point>, cv::Rect>& b) {
                            return a.second.x < b.second.x;
                    });

                // 构建列表ioptions,用来存储当前题目的每个选项(非零值个数,序号)
                std::vector<std::pair<int, int>> ioptions;

                // 提取出4个轮廓的每一个c,及序号ci
                for (size_t ci = 0; ci < sortedCnts.size(); ++ci) {
                    const auto& c = sortedCnts[ci].first;

                    // 构造一个核答题纸同尺寸的mask,灰度图像,黑色(值均为0)
                    cv::Mat mask = cv::Mat::zeros(paperGray.size(), CV_8UC1);

                    // 在mask内,绘制当前遍历到的选项轮廓
                    cv::drawContours(mask, std::vector<std::vector<cv::Point>>{c}, -1, 255, -1);

                    // 使用按位与运算的mask模式,提取出当前遍历到的选项
                    cv::Mat masked;
                    cv::bitwise_and(thresh, mask, masked);

                    // 计算当前遍历到选项内非零值个数
                    int total = cv::countNonZero(masked);

                    // 将选项非零值个数、选项序号放入列表ioptions内
                    ioptions.push_back(std::make_pair(total, ci));
                }

                // 将每道题的4个选项按照非零值个数降序排序
                std::sort(ioptions.begin(), ioptions.end(), [](const std::pair<int, int>& a, const std::pair<int, int>& b) {
                    return a.first > b.first;
                    });

                // 获取包含最多白色像素点的选项索引(序号)
                int choiceNum = ioptions[0].second;

                // 根据索引确定选项值:ABCD
                std::string choice = answerDICT[choiceNum];

                // 设定标注的颜色类型,绿对红错
                cv::Scalar color = (ANSWER[tn / 4] == choiceNum) ? cv::Scalar(0, 255, 0) : cv::Scalar(0, 0, 255);
                if (color == cv::Scalar(0, 255, 0)) {
                    rightSum++;
                }

                cv::drawContours(paper, std::vector<std::vector<cv::Point>>{sortedCnts[choiceNum].first}, -1, color, 2);
            }

            std::string s1 = "total: " + std::to_string(ANSWER.size());
            std::string s2 = "right: " + std::to_string(rightSum);
            std::string s3 = "score: " + std::to_string(static_cast<double>(rightSum) / ANSWER.size() * 100);
            int font = cv::FONT_HERSHEY_SIMPLEX;
            cv::putText(paper, s1 + "  " + s2 + "  " + s3, cv::Point(10, 30), font, 0.5, cv::Scalar(0, 0, 255), 2);
            cv::imshow("score", paper);

            // 找到第一个具有4个顶点轮廓,就是答题纸,直接break跳出循环
            break;
        }
    }

    cv::waitKey(0);
    cv::destroyAllWindows();

    return 0;
}
2.结果图
