LLM擅长文本生成应用程序,如聊天和代码完成模型,能够高度理解和流畅。但是它们的大尺寸也给推理带来了挑战。有很多个框架和包可以优化LLM推理和服务,所以在本文中我将整理一些常用的推理引擎并进行比较。
TensorRT-LLM
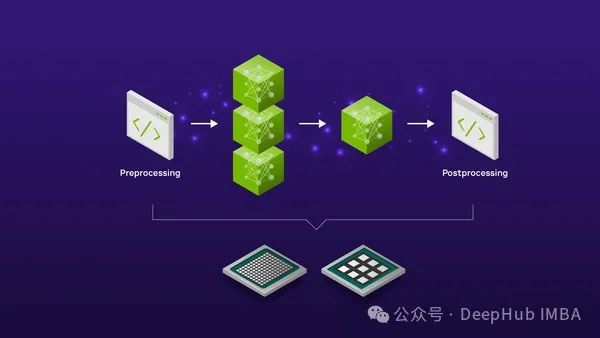
TensorRT-LLM是NV发布的一个推理引擎。llm被编译成TensorRT后与triton服务器一起部署并支持多GPU-多节点推理和FP8。
我们将比较HF模型、tensorrt模型和TensorRT-INT8模型(量化)的执行时间、ROUGE分数、延迟和吞吐量。
我这里在Linux上安装Nvidia-container-toolkit,初始化Git LFS(用于下载HF Models),并下载所需的软件包如下:
 !curl -fsSL https://nvidia.github.io/libnvidia-container/gpgkey | sudo gpg --dearmor -o /usr/share/keyrings/nvidia-container-toolkit-keyring.gpg \
   && curl -s -L https://nvidia.github.io/libnvidia-container/stable/deb/nvidia-container-toolkit.list | \
     sed 's#deb https://#deb [signed-by=/usr/share/keyrings/nvidia-container-toolkit-keyring.gpg] https://#g' | \
     sudo tee /etc/apt/sources.list.d/nvidia-container-toolkit.list
 !apt-get update
 !git clone https://github.com/NVIDIA/TensorRT-LLM/
 !apt-get update && apt-get -y install python3.10 python3-pip openmpi-bin libopenmpi-dev
 !pip3 install tensorrt_llm -U --pre --extra-index-url https://pypi.nvidia.com
 !pip install -r TensorRT-LLM/examples/phi/requirements.txt
 !pip install flash_attn pytest
 !curl -s https://packagecloud.io/install/repositories/github/git-lfs/script.deb.sh | bash
 !apt-get install git-lfs
然后下载模型权重
 PHI_PATH="TensorRT-LLM/examples/phi"
 !rm -rf $PHI_PATH/7B
 !mkdir -p $PHI_PATH/7B && git clone https://huggingface.co/microsoft/Phi-3-small-128k-instruct $PHI_PATH/7B
使用下面的命令将模型转换为TensorRT-LLM格式,并从检查点构建TensorRT-LLM。
 !python3 $PHI_PATH/convert_checkpoint.py --model_dir $PHI_PATH/7B/ \
                 --dtype bfloat16 \
                 --output_dir $PHI_PATH/7B/trt_ckpt/bf16/1-gpu/
 # Build TensorRT-LLM model from checkpoint
 !trtllm-build --checkpoint_dir $PHI_PATH/7B/trt_ckpt/bf16/1-gpu/ \
                 --gemm_plugin bfloat16 \
                 --output_dir $PHI_PATH/7B/trt_engines/bf16/1-gpu/
我们还测试INT8的量化应用
 !python3 $PHI_PATH/convert_checkpoint.py --model_dir $PHI_PATH/7B \
                 --dtype bfloat16 \
                 --use_weight_only \
                 --output_dir $PHI_PATH/7B/trt_ckpt/int8_weight_only/1-gpu/
 !trtllm-build --checkpoint_dir $PHI_PATH/7B/trt_ckpt/int8_weight_only/1-gpu/ \
                 --gemm_plugin bfloat16 \
                 --output_dir $PHI_PATH/7B/trt_engines/int8_weight_only/1-gpu/
然后就可以在摘要任务上测试phi3和两个TensorRT模型
 %%capture phi_hf_results
 # Huggingface
 !time python3 $PHI_PATH/../summarize.py --test_hf \
                        --hf_model_dir $PHI_PATH/7B/ \
                        --data_type bf16 \
                        --engine_dir $PHI_PATH/7B/trt_engines/bf16/1-gpu/
 %%capture phi_trt_results
 # TensorRT-LLM
 !time python3 $PHI_PATH/../summarize.py --test_trt_llm \
                        --hf_model_dir $PHI_PATH/7B/ \
                        --data_type bf16 \
                        --engine_dir $PHI_PATH/7B/trt_engines/bf16/1-gpu/
 %%capture phi_int8_results
 # TensorRT-LLM (INT8)
 !time python3 $PHI_PATH/../summarize.py --test_trt_llm \
                        --hf_model_dir $PHI_PATH/7B/ \
                        --data_type bf16 \
                        --engine_dir $PHI_PATH/7B/trt_engines/int8_weight_only/1-gpu/
得到结果后就可以解析输出并绘制图表,比较所有模型的执行时间、ROUGE分数、延迟和吞吐量。
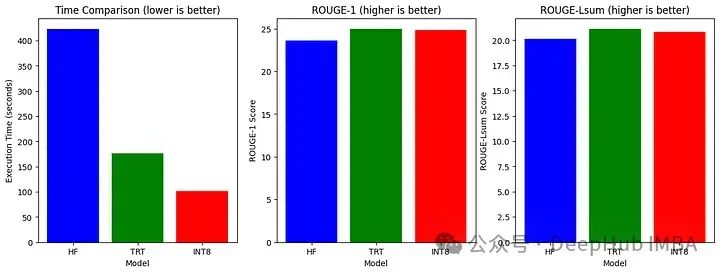
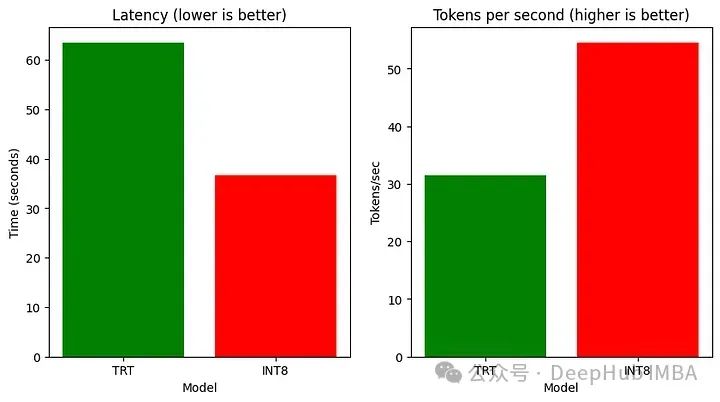
可以看到速度提高了不少,所有结果我们最后一起总结。
vLLM
vLLM提供LLM推理和服务,具有SOTA吞吐量,分页注意力,连续批处理,量化(GPTQ, AWQ, FP8)的支持和优化的CUDA内核。
我们首先安装相应的包
 !pip install -q vllm
 !git clone https://github.com/vllm-project/vllm.git
 !pip install -q datasets
 !pip install transformers scipy
 from vllm import LLM, SamplingParams
 from datasets import load_dataset
 import time
 from tqdm import tqdm
 from transformers import AutoTokenizer
然后加载模型并在数据集的一小部分上生成它的输出。
 dataset = load_dataset("akemiH/MedQA-Reason", split="train").select(range(10))
 prompts = []
 for sample in dataset:
     prompts.append(sample)
 sampling_params = SamplingParams(max_tokens=524)
 llm = LLM(model="microsoft/Phi-3-mini-4k-instruct", trust_remote_code=True)
 def generate_with_time(prompt):
     start = time.time()
     outputs = llm.generate(prompt, sampling_params)
     taken = time.time() - start
     generated_text = outputs[0].outputs[0].text
     return generated_text, taken
 generated_text = []
 time_taken = 0
 for sample in tqdm(prompts):
     text, taken = generate_with_time(sample)
     time_taken += taken
     generated_text.append(text)

 # Tokenize the outputs and calculate the throughput
 tokenizer = AutoTokenizer.from_pretrained("microsoft/Phi-3-mini-4k-instruct")
 token = 1
 for sample in generated_text:
     tokens = tokenizer(sample)
     tok = len(tokens.input_ids)
     token += tok
 print(token)
 print("tok/s", token // time_taken)
通过vLLM在ShareGPT数据集上对模型的性能进行基准测试
 !wget https://huggingface.co/datasets/anon8231489123/ShareGPT_Vicuna_unfiltered/resolve/main/ShareGPT_V3_unfiltered_cleaned_split.json
 %cd vllm
 !python benchmarks/benchmark_throughput.py --backend vllm --dataset ../ShareGPT_V3_unfiltered_cleaned_split.json --model microsoft/Phi-3-mini-4k-instruct --tokenizer microsoft/Phi-3-mini-4k-instruct --num-prompts=1000
LMDeploy
LMDeploy允许压缩、部署和服务llm,同时提供高效的推理(持久批处理、阻塞KV缓存、动态分裂和融合、张量并行、高性能CUDA内核)、有效的量化(4位推理性能比FP16高2.4倍)。跨多台机器和GPU部署多模型服务。此外,它还允许分析令牌延迟和吞吐量、请求吞吐量、API服务器和triton推理服务器性能。
!pip install -q lmdeploy
!pip install nest_asyncio
import nest_asyncio
nest_asyncio.apply()
!git clone --depth=1 https://github.com/InternLM/lmdeploy
%cd lmdeploy/benchmark
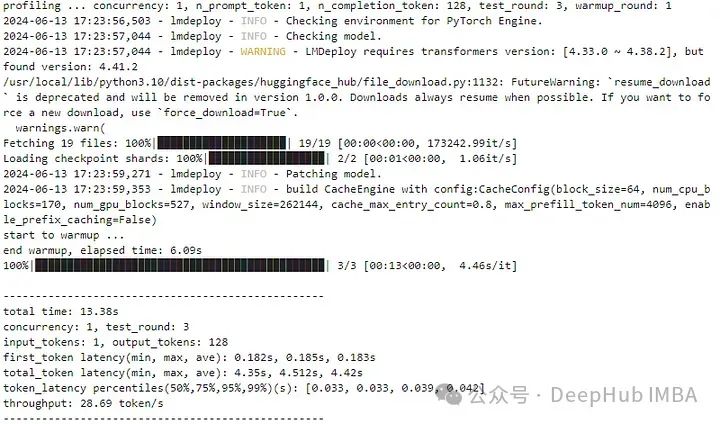
LMdeploy还开发了两个推理引擎TurboMind和PyTorch。我们来使用PyTorch引擎。
!python3 profile_generation.py microsoft/Phi-3-mini-128k-instruct --backend pytorch它在多个回合中对引擎进行配置,并报告每个回合的令牌延迟和吞吐量。
MLC-LLM
MLC-LLM提供了一个高性能的部署和推理引擎,称为MLCEngine。
conda activate your-environment
python -m pip install --pre -U -f https://mlc.ai/wheels mlc-llm-nightly-cu121 mlc-ai-nightly-cu121
conda env remove -n mlc-chat-venv
conda create -n mlc-chat-venv -c conda-forge \
    "cmake>=3.24" \
    rust \
    git \
    python=3.11
conda activate mlc-chat-venv
git clone --recursive https://github.com/mlc-ai/mlc-llm.git && cd mlc-llm/
mkdir -p build && cd build
python ../cmake/gen_cmake_config.py
cmake .. && cmake --build . --parallel $(nproc) && cd ..
set(USE_FLASHINFER ON)
conda activate your-own-env
cd mlc-llm/python
pip install -e .
我们需要将模型权重转换为MLC格式。通过Git LFS下载HF模型,然后转换权重。
mlc_llm convert_weight ./dist/models/Phi-3-small-128k-instruct/ \
    --quantization q0f16 \
    --model-type "phi3" \
    -o ./dist/Phi-3-small-128k-instruct-q0f16-MLC
现在将MLC格式模型加载到MLC引擎中
from mlc_llm import MLCEngine
# Create engine
model = "HF://mlc-ai/Phi-3-mini-128k-instruct-q0f16-MLC"
engine = MLCEngine(model)

# Now let's calculate throughput
import time
from transformers import AutoTokenizer
start = time.time()
response = engine.chat.completions.create(
    messages=[{"role": "user", "content": "What is the Machine Learning?"}],
    model=model,
    stream=False,
)
taken = time.time() - start
tokenizer = AutoTokenizer.from_pretrained("microsoft/Phi-3-mini-128k-instruct")
print("tok/s", 82 // taken)
总结
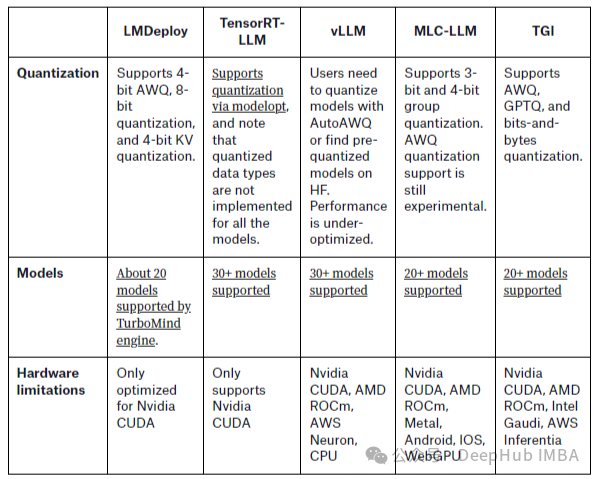
TensorRT INT8模型在推理速度上优于HF模型和TensorRT模型,而TensorRT模型在总结任务上表现更好,ROUGE得分最高。可以看到这几个推理引擎都要比使用HF模型的速度快2倍左右,这是因为HF使用的是Python和Pytorch,也没有进行任何的优化。而者4个引擎在推理速度上相差不大,差距在5%-10%左右,这是因为目前这几个引擎都是用了优化的技术,区别只是代码实现的方式不同会产生一些差距,所以在实际使用时,我们只要选择一个兼容性好(或者符合你正在使用的大语言模型)的框架就可以了。
最后这里有个列表 TGI我不熟,就没测,不过结果应该差不多
https://avoid.overfit.cn/post/33f6420c91e74c0eb8d6737cb9471e27
作者:Zain ul Abideen