Windows上可视化ubuntu程序图形界面
文章目录
- Windows上可视化ubuntu程序图形界面
- [1 vscode远程配置](#1 vscode远程配置)
- [2 界面导致程序无法运行问题](#2 界面导致程序无法运行问题)
-
- [2.1 Xvfb](#2.1 Xvfb)
- [2.2 X11转发](#2.2 X11转发)
-
- [2.2.1 Ubuntu设置](#2.2.1 Ubuntu设置)
- [2.2.2 Windows安装Xming](#2.2.2 Windows安装Xming)
- [2.2.3 其余配置](#2.2.3 其余配置)
- [2.2.4 测试验证](#2.2.4 测试验证)
1 vscode远程配置
1 点击左下角SSH进行远程连接,选择添加新的SSH主机
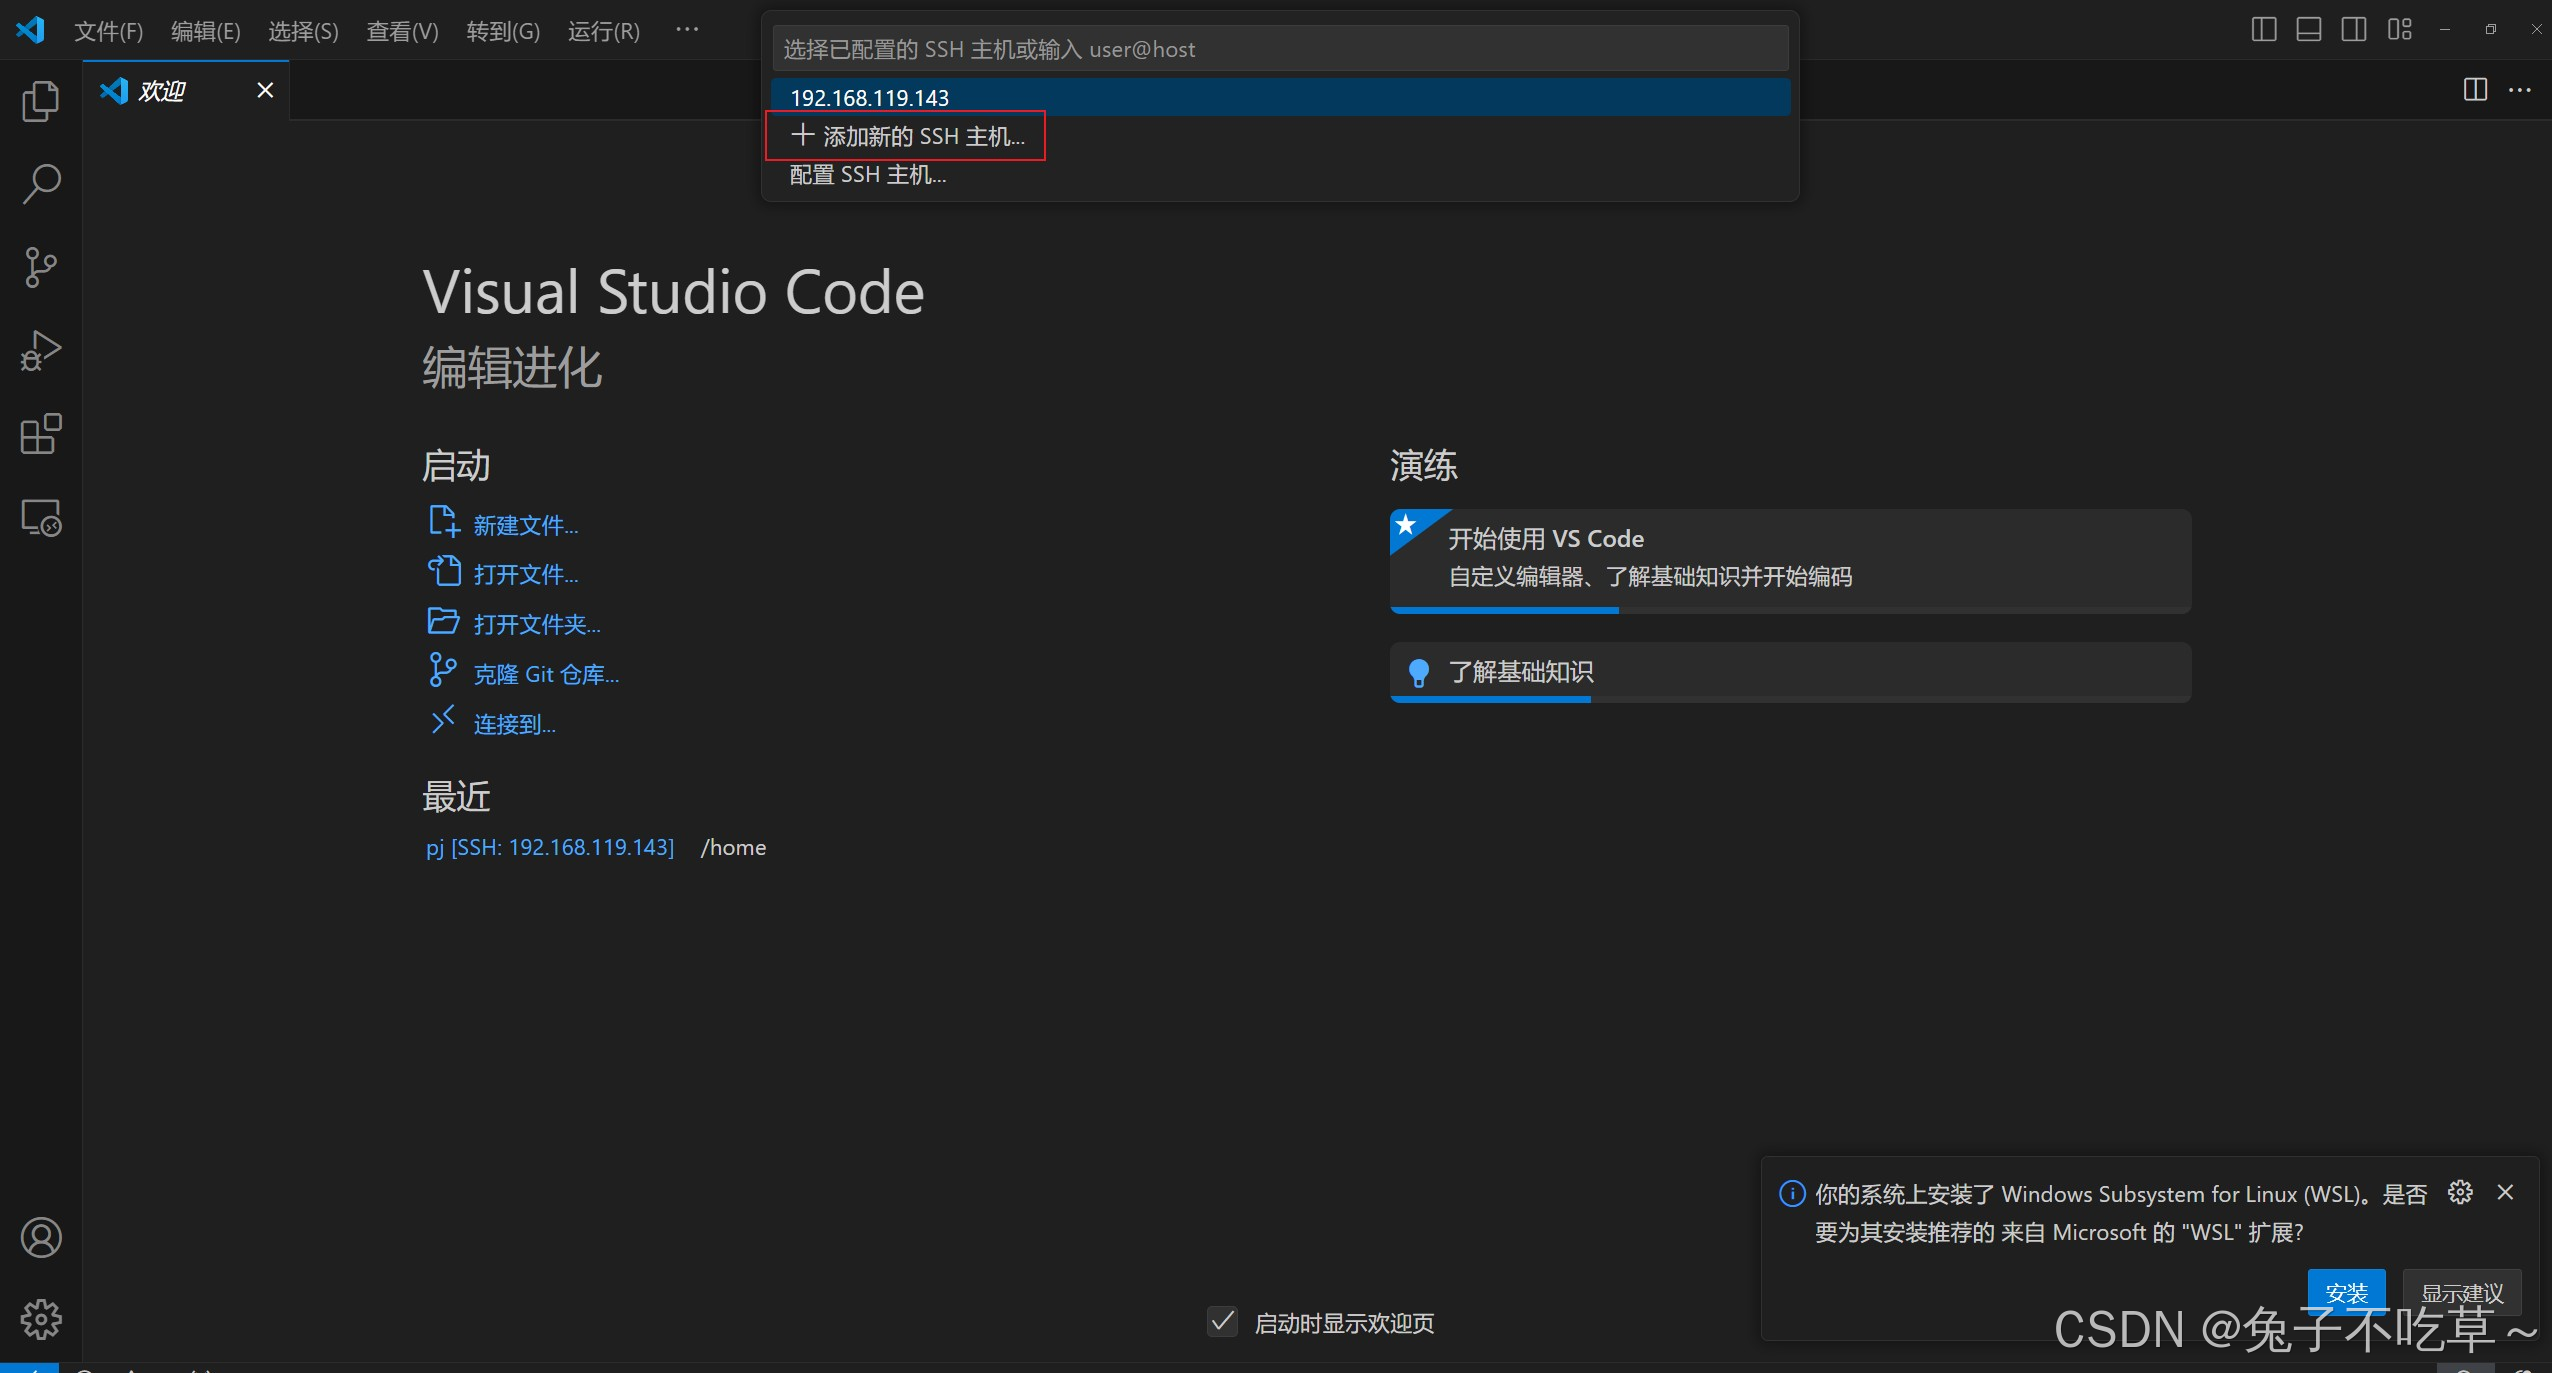
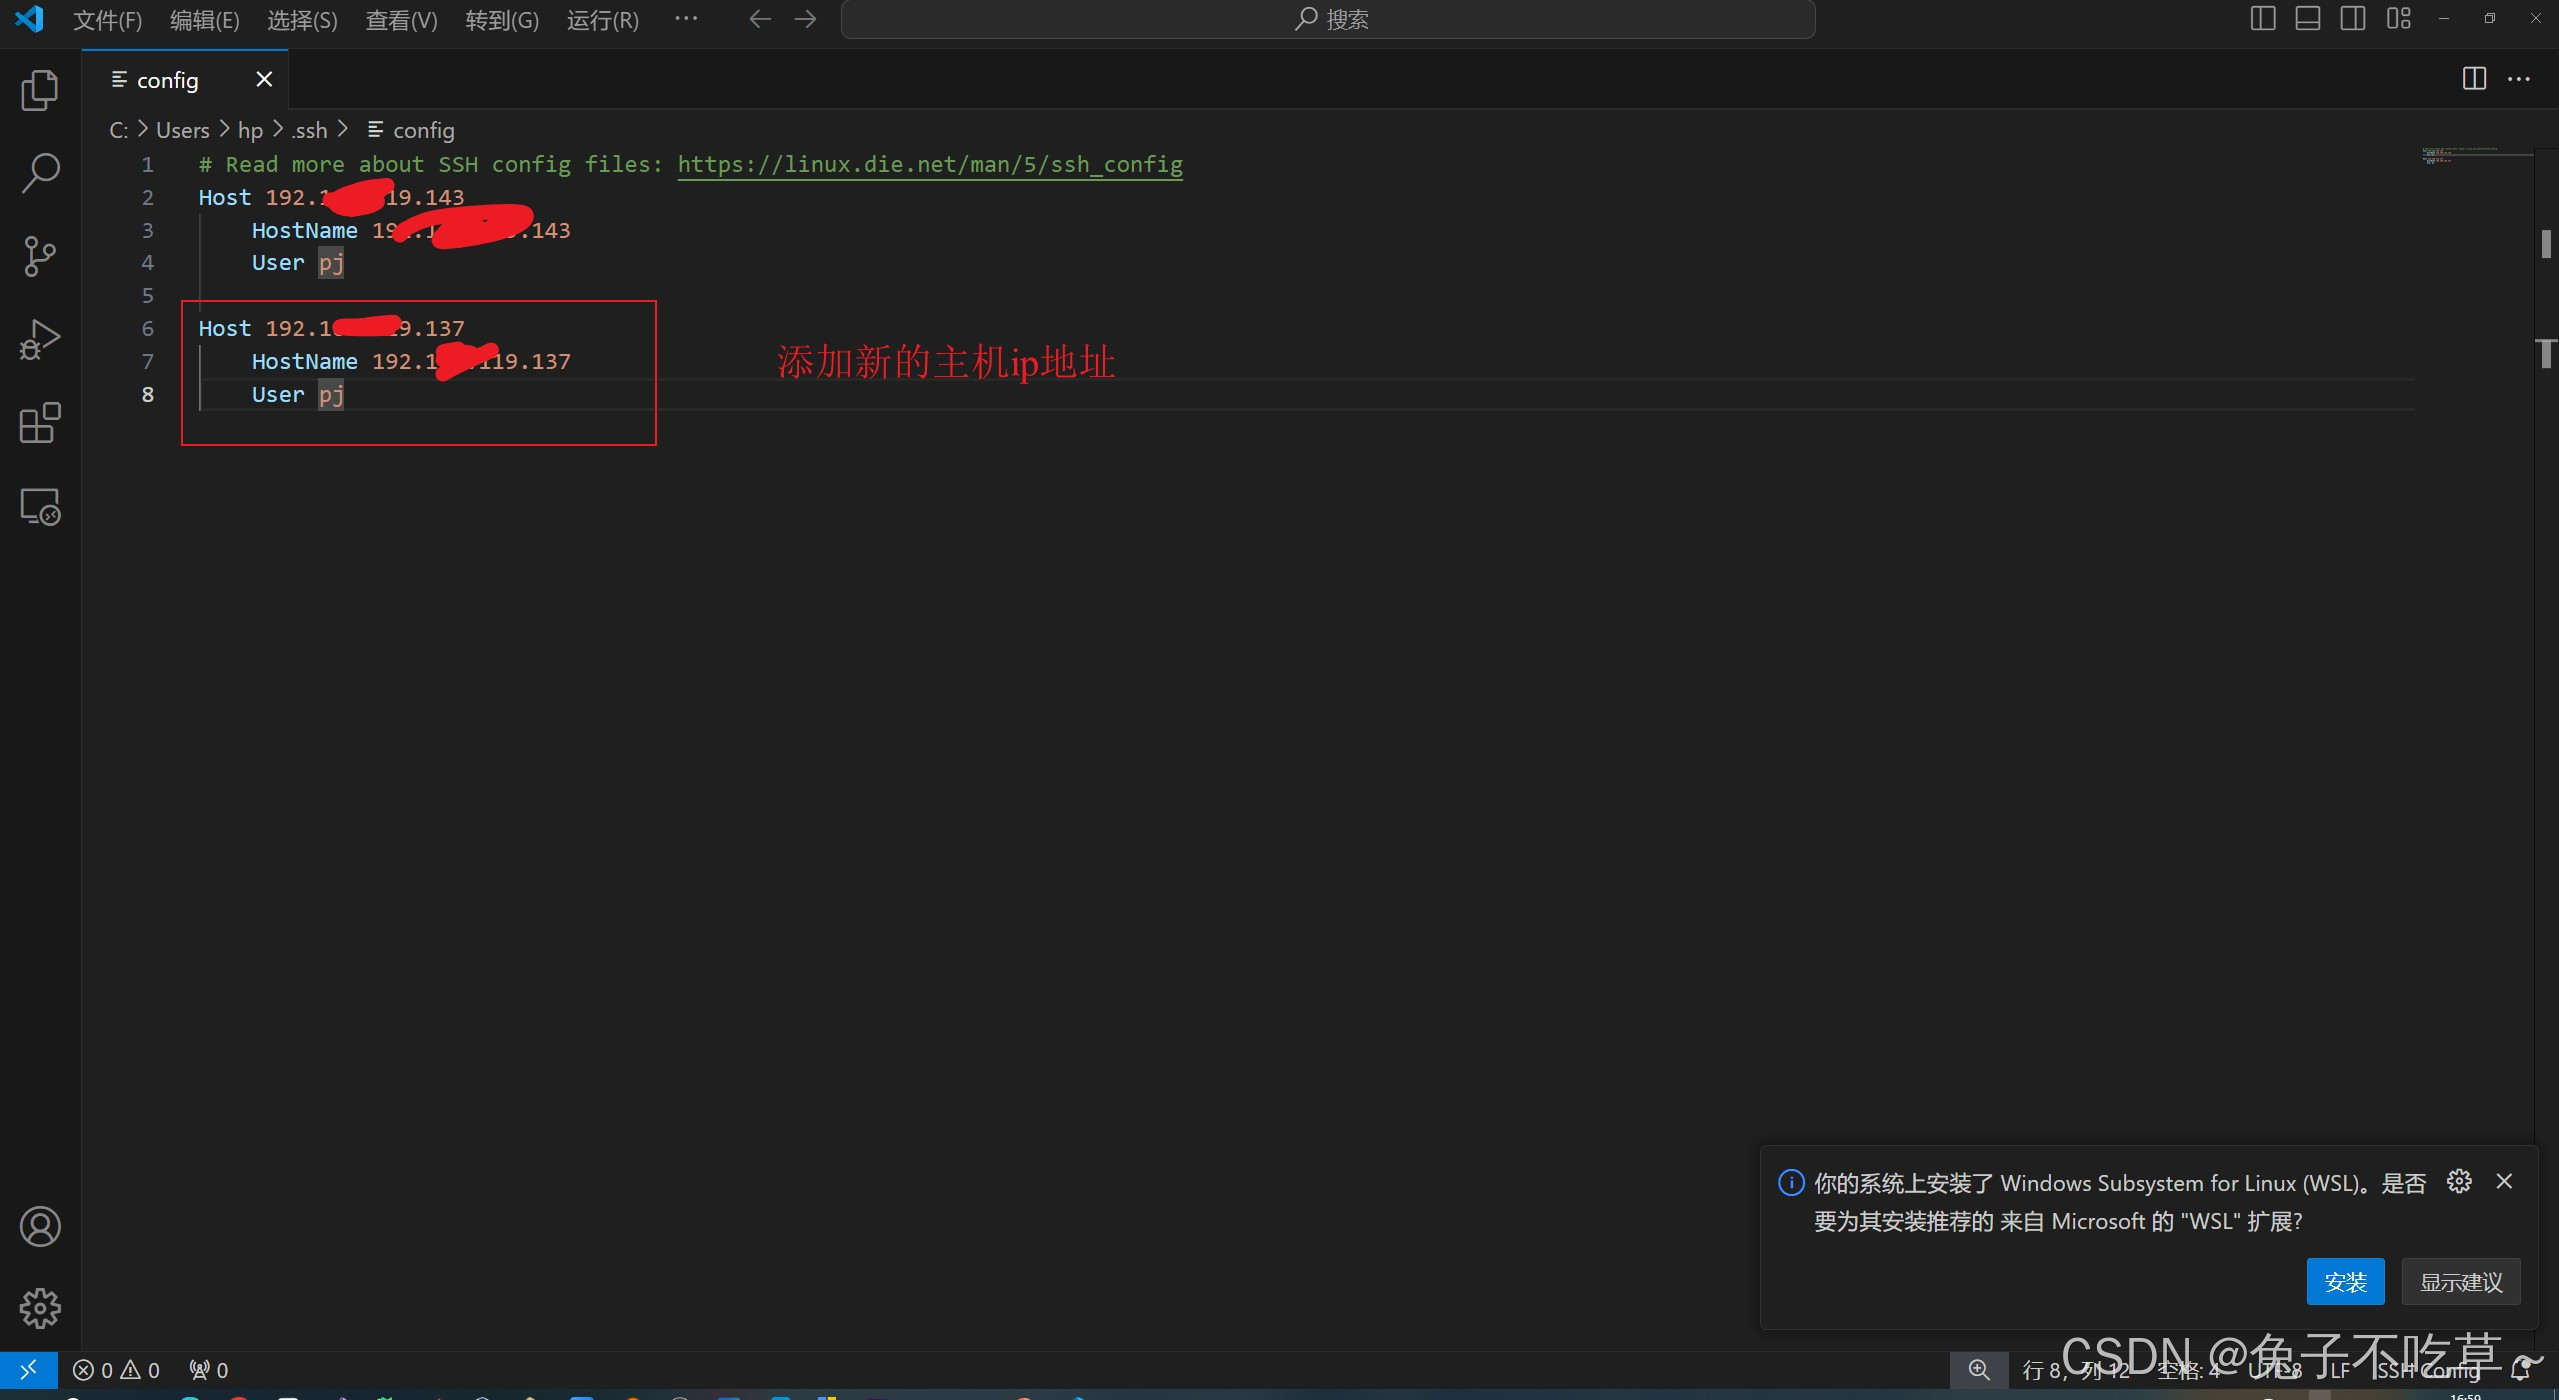
2 设置主机ip地址,用户名
或者用快捷键搜索打开!
shHost 192.xxx.xxx.1x7 HostName 192.xxx.xxx.1x7 User pj ForwardX11 yes # 为了后面可以把ubuntu的程序可视化界面显示到windows,这里添加 ForwardX11Trusted yes

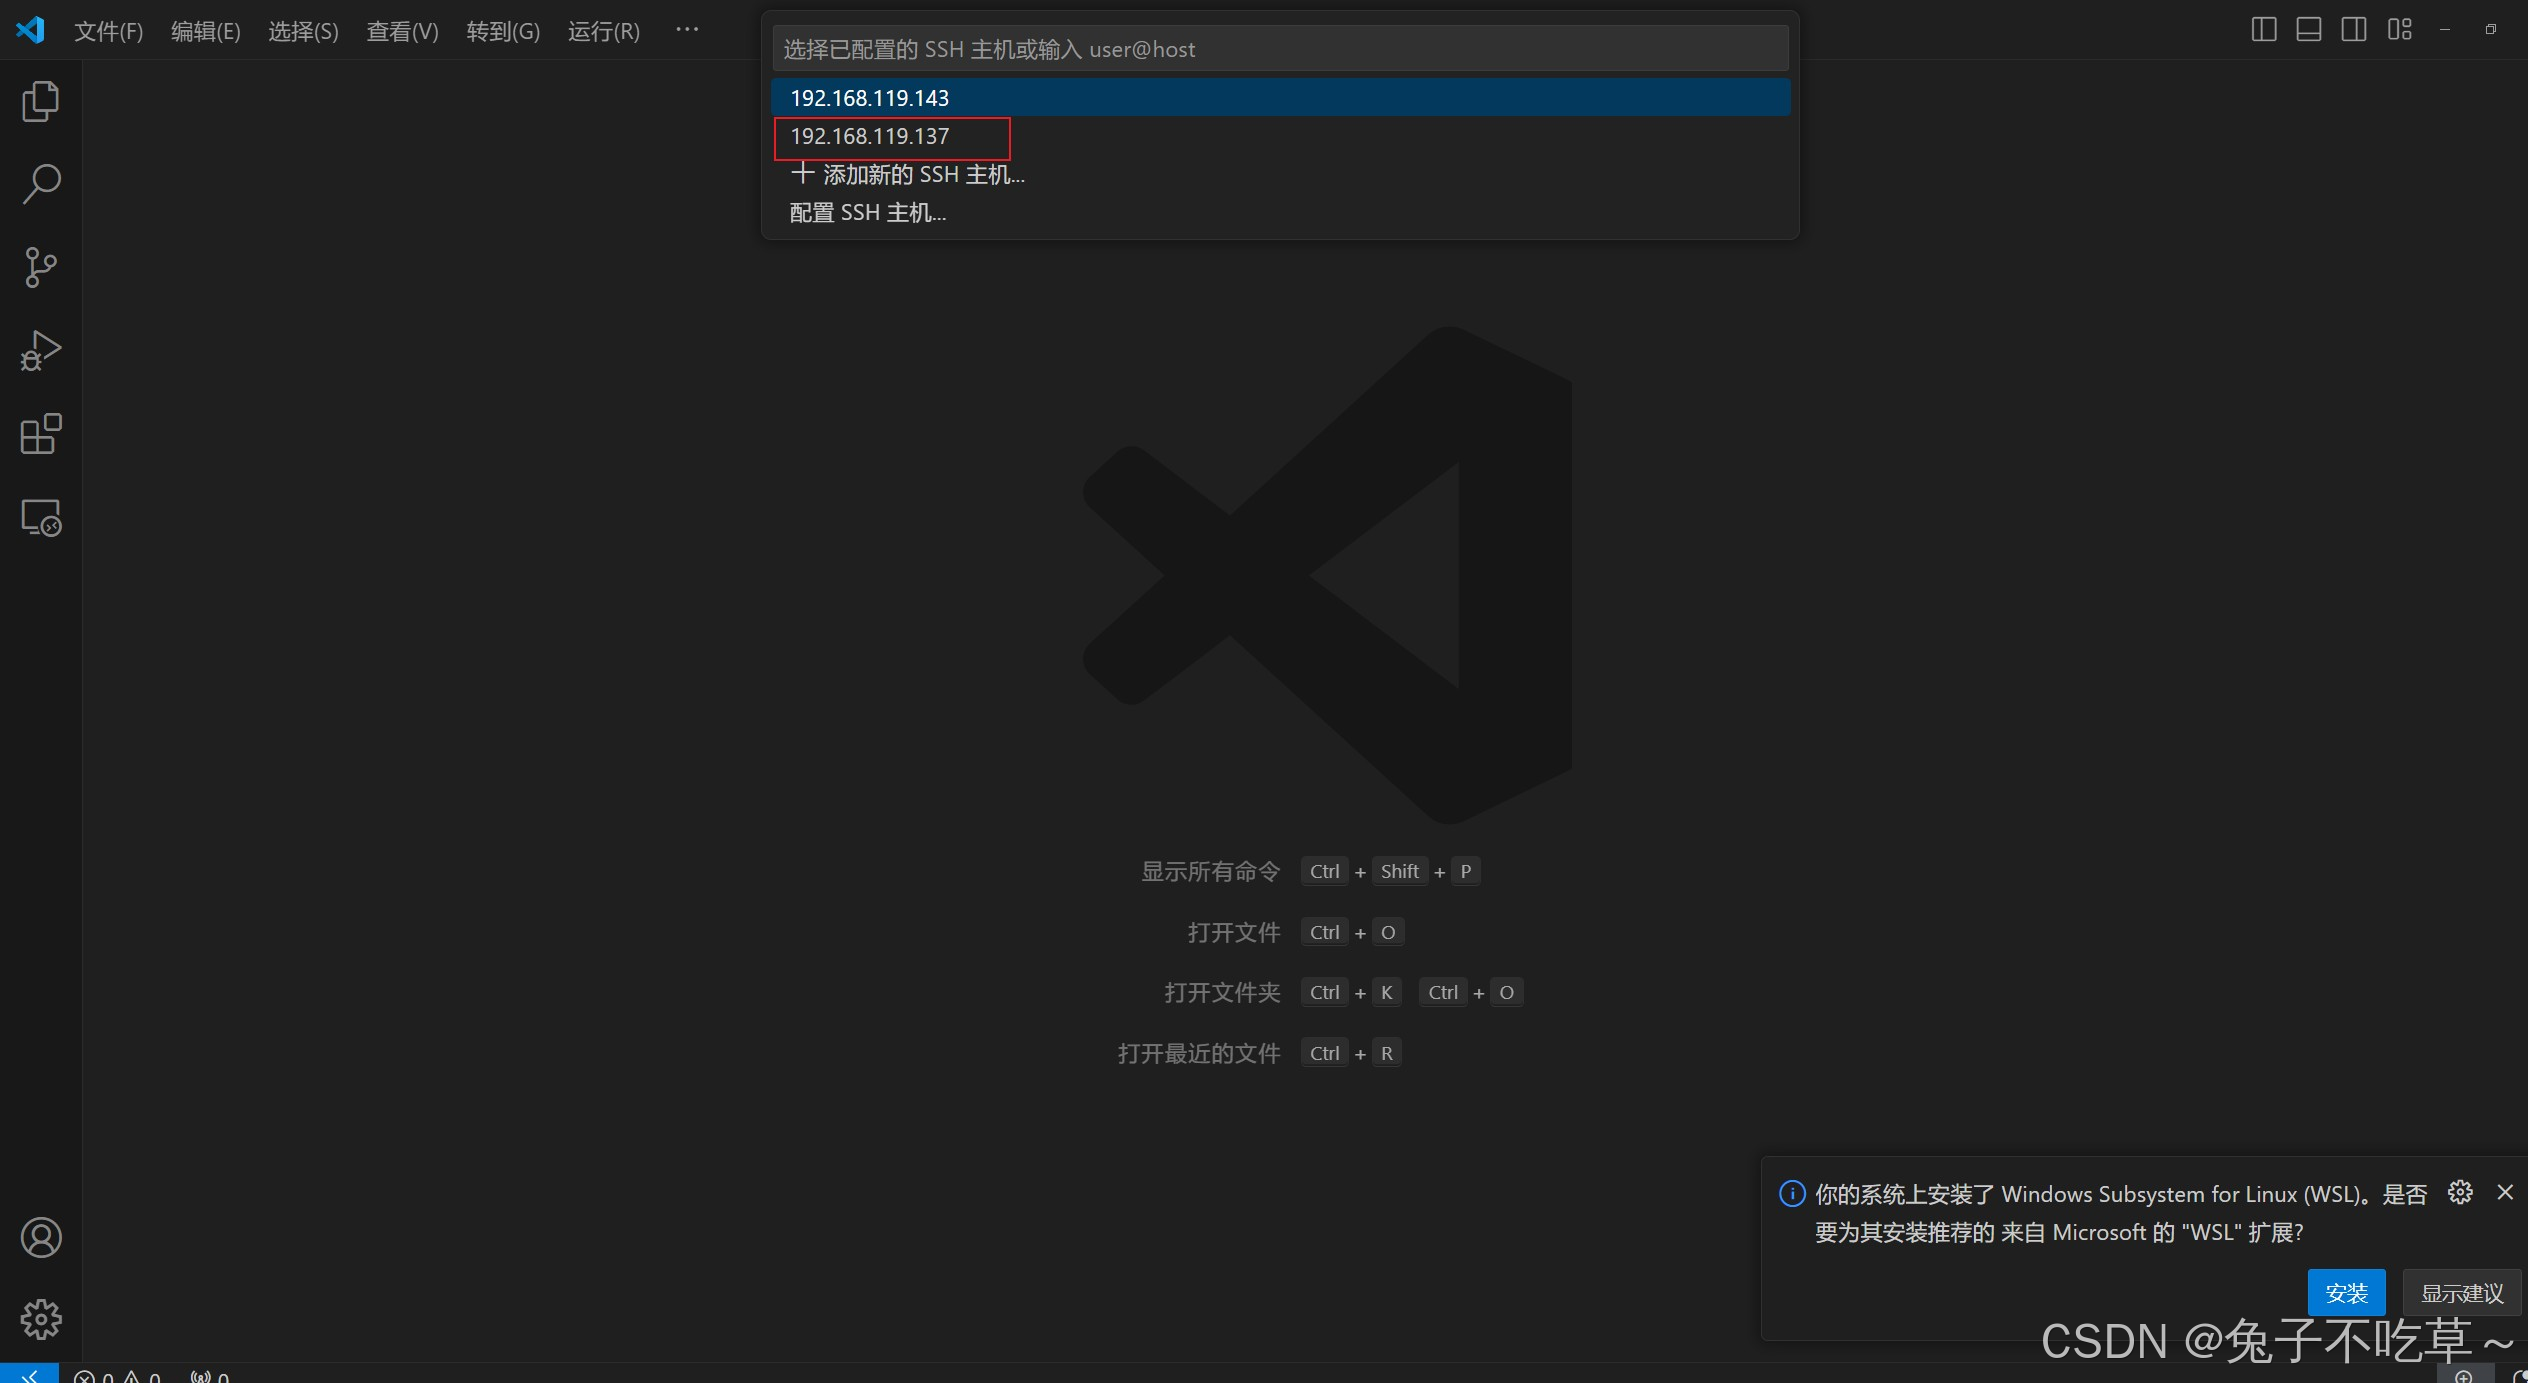
3 配置完成,选择主机,输入密码即可!
2 界面导致程序无法运行问题
因为要远程执行的程序有opencv可视化界面,直接在windows执行会报错如下!
sh
Unable to init server: Could not connect: Connection refused
terminate called after throwing an instance of 'cv::Exception'
  what():  OpenCV(3.4.16) /home/pj/opencv3.4.16/opencv-3.4.16/modules/highgui/src/window_gtk.cpp:624: error: (-2:Unspecified error) Can't initialize GTK backend in function 'cvInitSystem'

Aborted (core dumped)
有两种方法解决:
2.1 Xvfb
使用虚拟显示环境,如Xvfb(X virtual framebuffer)来模拟一个显示环境(实际上我们是看不到真实画面的,但是程序可以运行了)。
安装
Xvfb:
sh
sudo apt-get install xvfb然后在
Xvfb环境中运行你的程序:
sh
xvfb-run -a ./可执行文件2.2 X11转发
为了在本地机器上显示虚拟机程序的图形界面,可以使用X11转发
①
Linux:已经预装X11,检查SSH的相应配置②
Windows:安装Xming,配置并启动
2.2.1 Ubuntu设置
检查虚拟机上的SSH服务器配置文件(通常是 /etc/ssh/sshd_config)中,确保以X11Forwarding等未被注释,并设置为 yes。下面是我虚拟机设置
yaml
#	$OpenBSD: sshd_config,v 1.103 2018/04/09 20:41:22 tj Exp $

# This is the sshd server system-wide configuration file.  See
# sshd_config(5) for more information.

# This sshd was compiled with PATH=/usr/bin:/bin:/usr/sbin:/sbin

# The strategy used for options in the default sshd_config shipped with
# OpenSSH is to specify options with their default value where
# possible, but leave them commented.  Uncommented options override the
# default value.

Include /etc/ssh/sshd_config.d/*.conf

#Port 22
#AddressFamily any
#ListenAddress 0.0.0.0
#ListenAddress ::

#HostKey /etc/ssh/ssh_host_rsa_key
#HostKey /etc/ssh/ssh_host_ecdsa_key
#HostKey /etc/ssh/ssh_host_ed25519_key

# Ciphers and keying
#RekeyLimit default none

# Logging
#SyslogFacility AUTH
#LogLevel INFO

# Authentication:

#LoginGraceTime 2m
#PermitRootLogin prohibit-password
#StrictModes yes
#MaxAuthTries 6
#MaxSessions 10

#PubkeyAuthentication yes

# Expect .ssh/authorized_keys2 to be disregarded by default in future.
#AuthorizedKeysFile	.ssh/authorized_keys .ssh/authorized_keys2

#AuthorizedPrincipalsFile none

#AuthorizedKeysCommand none
#AuthorizedKeysCommandUser nobody

# For this to work you will also need host keys in /etc/ssh/ssh_known_hosts
#HostbasedAuthentication no
# Change to yes if you don't trust ~/.ssh/known_hosts for
# HostbasedAuthentication
#IgnoreUserKnownHosts no
# Don't read the user's ~/.rhosts and ~/.shosts files
#IgnoreRhosts yes

# To disable tunneled clear text passwords, change to no here!
#PasswordAuthentication yes
#PermitEmptyPasswords no

# Change to yes to enable challenge-response passwords (beware issues with
# some PAM modules and threads)
ChallengeResponseAuthentication no

# Kerberos options
#KerberosAuthentication no
#KerberosOrLocalPasswd yes
#KerberosTicketCleanup yes
#KerberosGetAFSToken no

# GSSAPI options
#GSSAPIAuthentication no
#GSSAPICleanupCredentials yes
#GSSAPIStrictAcceptorCheck yes
#GSSAPIKeyExchange no

# Set this to 'yes' to enable PAM authentication, account processing,
# and session processing. If this is enabled, PAM authentication will
# be allowed through the ChallengeResponseAuthentication and
# PasswordAuthentication.  Depending on your PAM configuration,
# PAM authentication via ChallengeResponseAuthentication may bypass
# the setting of "PermitRootLogin without-password".
# If you just want the PAM account and session checks to run without
# PAM authentication, then enable this but set PasswordAuthentication
# and ChallengeResponseAuthentication to 'no'.
UsePAM yes

#AllowAgentForwarding yes
#AllowTcpForwarding yes
#GatewayPorts no
X11Forwarding yes
X11DisplayOffset 10
X11UseLocalhost yes
#PermitTTY yes
PrintMotd no
#PrintLastLog yes
#TCPKeepAlive yes
#PermitUserEnvironment no
#Compression delayed
#ClientAliveInterval 0
#ClientAliveCountMax 3
#UseDNS no
#PidFile /var/run/sshd.pid
#MaxStartups 10:30:100
#PermitTunnel no
#ChrootDirectory none
#VersionAddendum none

# no default banner path
#Banner none

# Allow client to pass locale environment variables
AcceptEnv LANG LC_*

# override default of no subsystems
Subsystem	sftp	/usr/lib/openssh/sftp-server
然后重启SSH服务:
sh
sudo service ssh restart还需要再Windows上的vsocde上的SSH客户端配置文件(通常是
C:/Users/xx/.ssh/config)中,确保包含以下内容(上面远程配置已经提到过)
ForwardX11 yes如果不是利用vscode,可以直接下面命令进行配置,效果是等价的
X11转发设置 :连接时可以使用-X或-Y选项,
sh
ssh -Y pj@192.xxx.11x.xxx2.2.2 Windows安装Xming
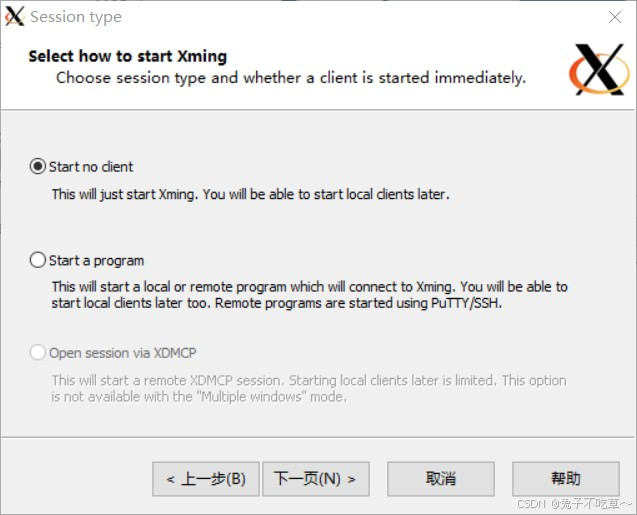
想在Windows可视化,还需要安装Xming,下载地址,安装过程直接next即可。主要说下软件的配置
第一步:点击
Xlaunch

第二步
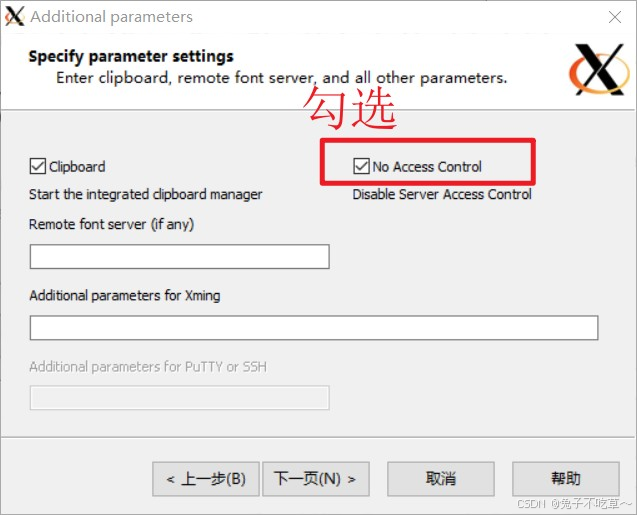
第三步,一定要勾选
No Access Control, 否则后面执行export到Windows主机上时会提示No protocol specified
第四步,点击完成即可
2.2.3 其余配置
假设这个时候已经通过远程连接成功
① 在SSH会话中,设置
DISPLAY环境变量,
sh
export DISPLAY=localhost:0.0 # 0.0是因为下面Xming后面是0.0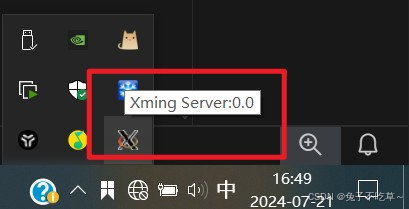
txt
localhost则是本机分配给虚拟机的地址,win+R,打卡cmd,输入ipifconfig,查看对应的ip即可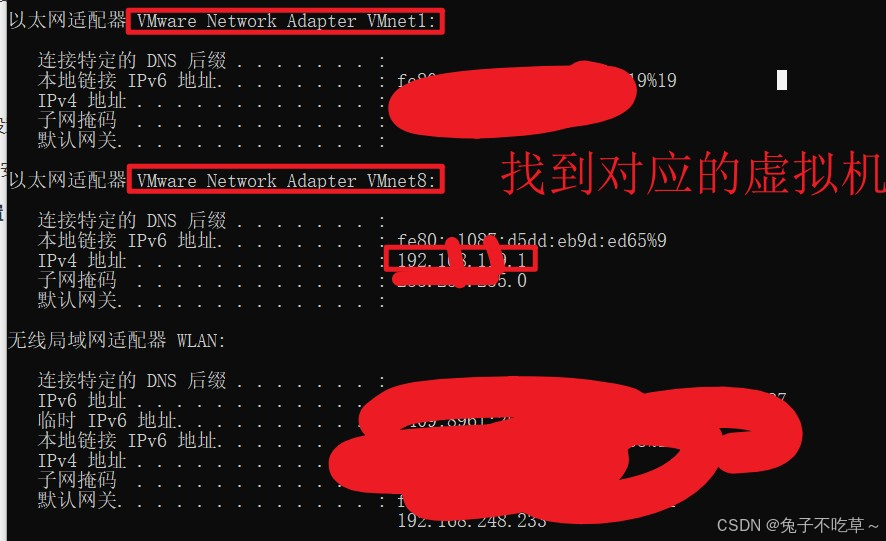
② 上面设置好
DISPLAY环境变量后,利用下面命令查看是否设置正确
shecho $DISPLAY
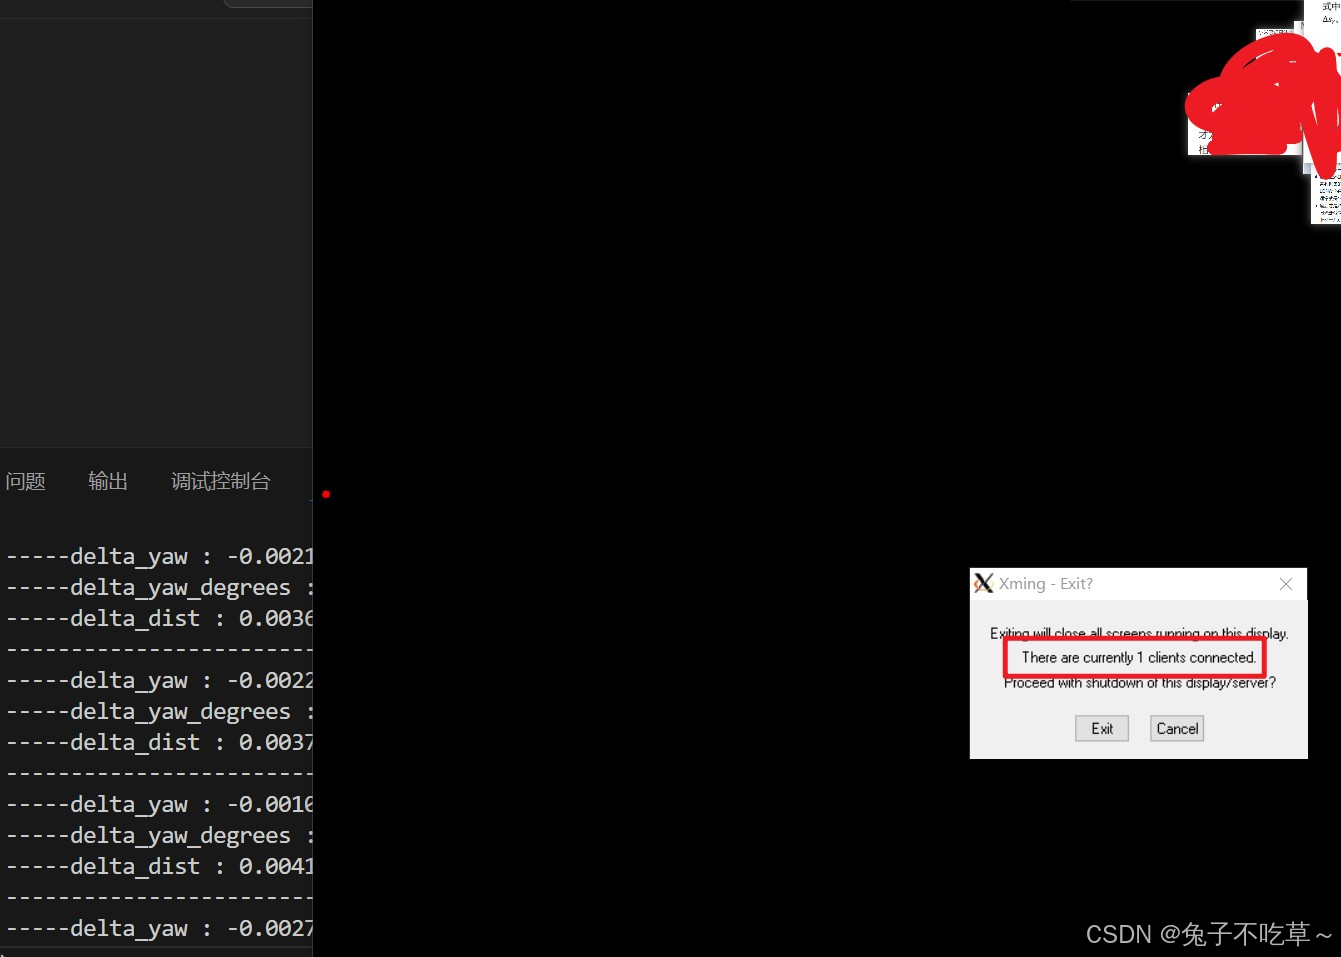
2.2.4 测试验证
到此,配置好之后,即可验证
① 测试X11转发是否工作,如果显示了时钟窗口,则说明X11转发配置正确,可以继续运行
sh
xclock # 如果没有显示,说明上面DISPLAY没有设置正确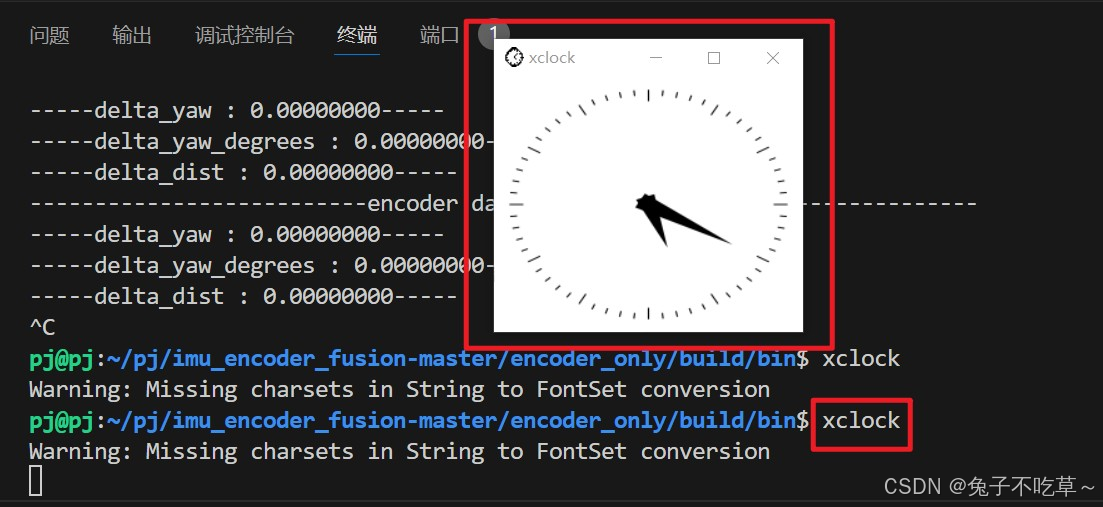
② 检查本地服务器,确保
Xming已经启动
sh
xhost + # 如果成功,则显示如下;如果不成功,那么一般是打开时没有勾选`No Access Control`,见上面2.2.2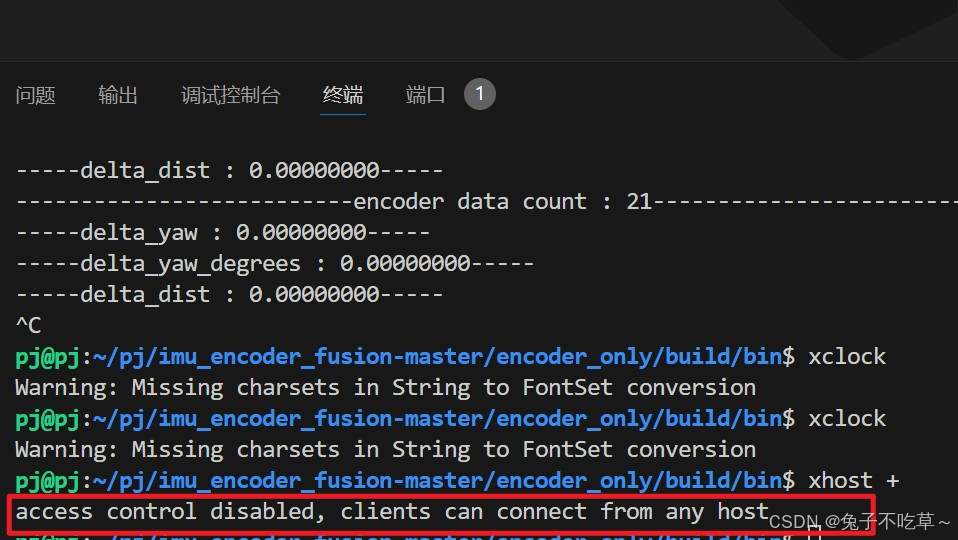
③ 执行一个程序验证,下图所示,已经构建一个连接,程序可视化也能在Windows显示