一、搭建web服务器
1.关闭firewall和selinux
关闭防火墙
systemctl stop firewalld
systemctl disable firewalld
停用selinux
setenforce 0
配置文件中让sellinux不再启动
vim /etc/selinux/config
SELINUX=permissive
2.编辑dns配置文件
vim /etc/resolv.conf
nameserver 114.114.114.114
3.下载安装阿里云镜像
安装wget
yum -y install wget
下载镜像
wget -O /etc/yum.repos.d/CentOS-Base.repo https://mirrors.aliyun.com/repo/Centos-7.repo
编辑yum配置文件
vim /etc/yum.repos.d/nginx.repo
[nginx-stable]
name=nginx stable repo
baseurl=http://nginx.org/packages/amzn2/$releasever/$basearch/
gpgcheck=1
enabled=1
gpgkey=https://nginx.org/keys/nginx_signing.key
module_hotfixes=true
priority=9
清除缓存
yum clean all
建立缓存
yum makecache
4.安装nginx
下载nginx
yum -y install nginx
找到nginx的资源文件,查看是否安装
rpm -qa|grep nginx
yum list installed |grep nginx
查看资源文件
rpm -ql nginx
直接启动
nginx
检查服务是否启动
netstat -lnput|grep nginx
ps -aux|grep nginx
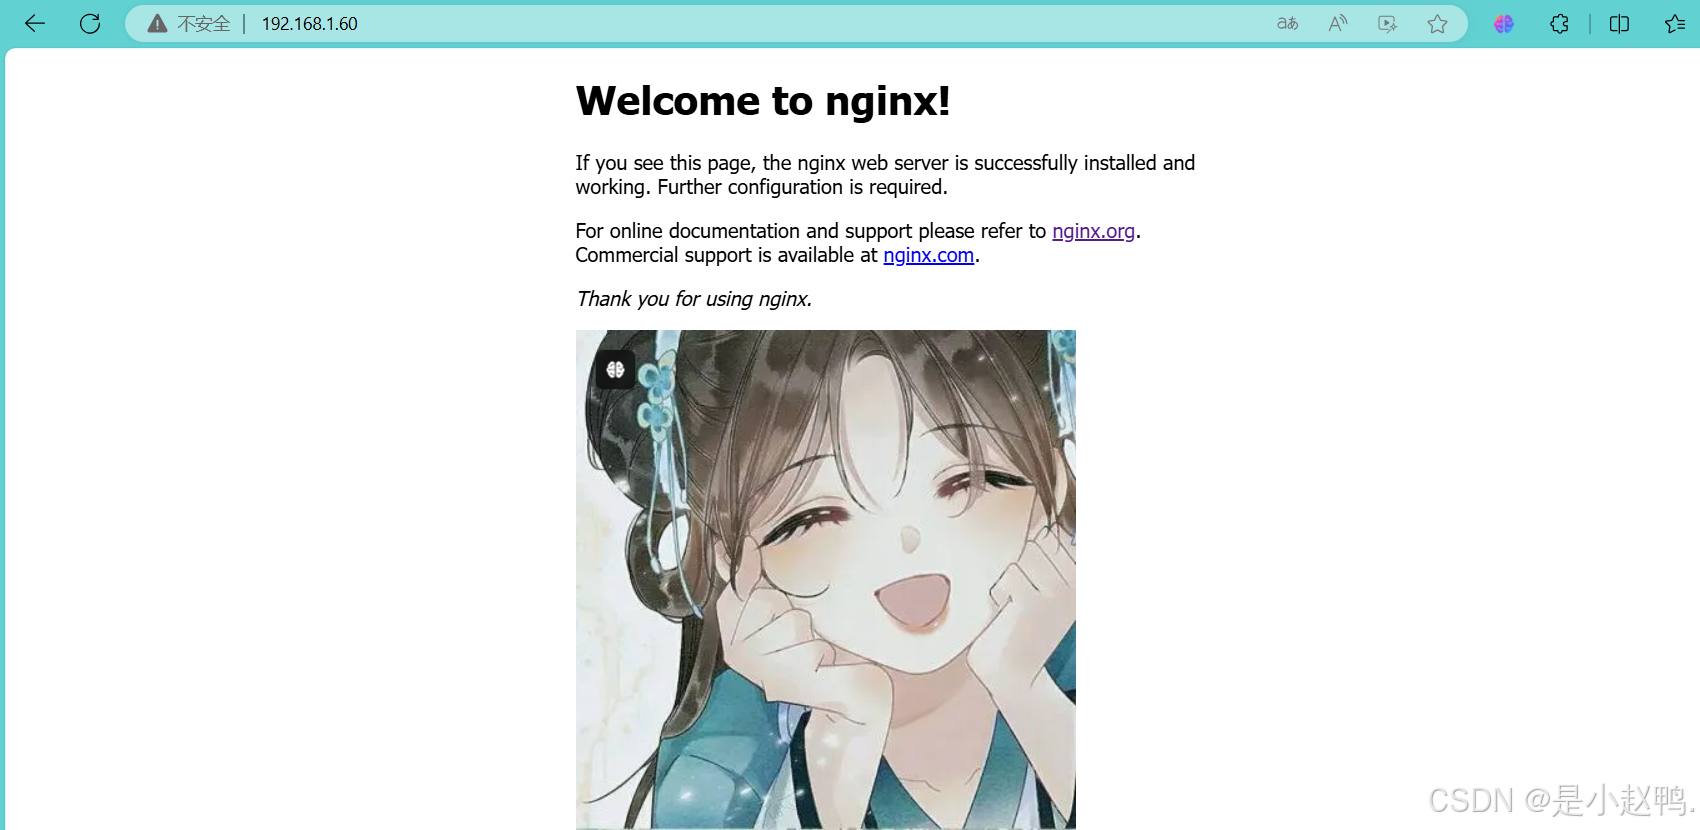
浏览器访问,出现下面页面
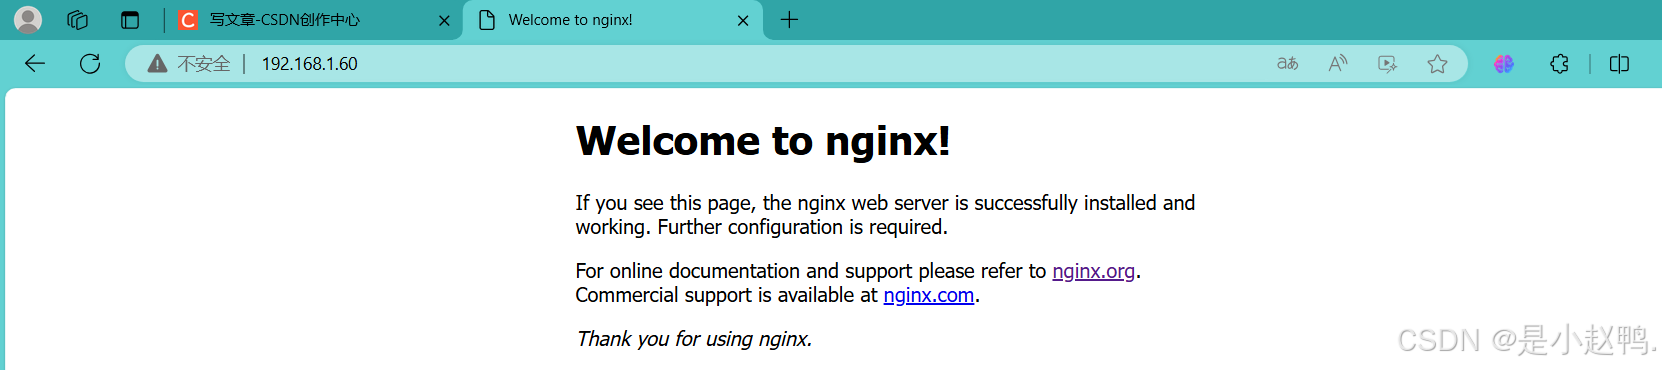
此时,我们的web服务器搭建完成!
5.远程访问
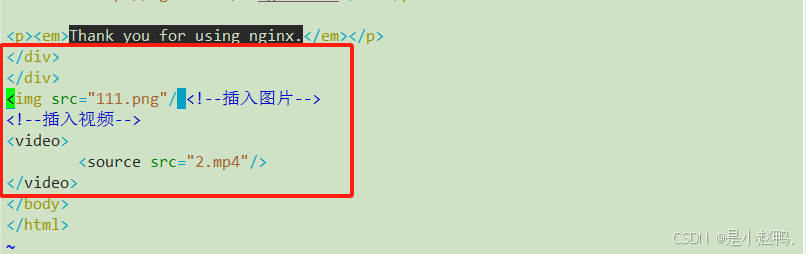
向web页面中添加图片和视频
上传图片和视频 到/usr/share/nginx/html/中
vim /usr/share/nginx/html/index.html
在本地物理主机上使用scp上传
scp -P22 111.png root@192.168.1.60
scp -P22 2.mp4 root@192.168.1.60
检查文件是否已经存在
root@web-server html# ls
111.png 2.mp4 50x.html index.html
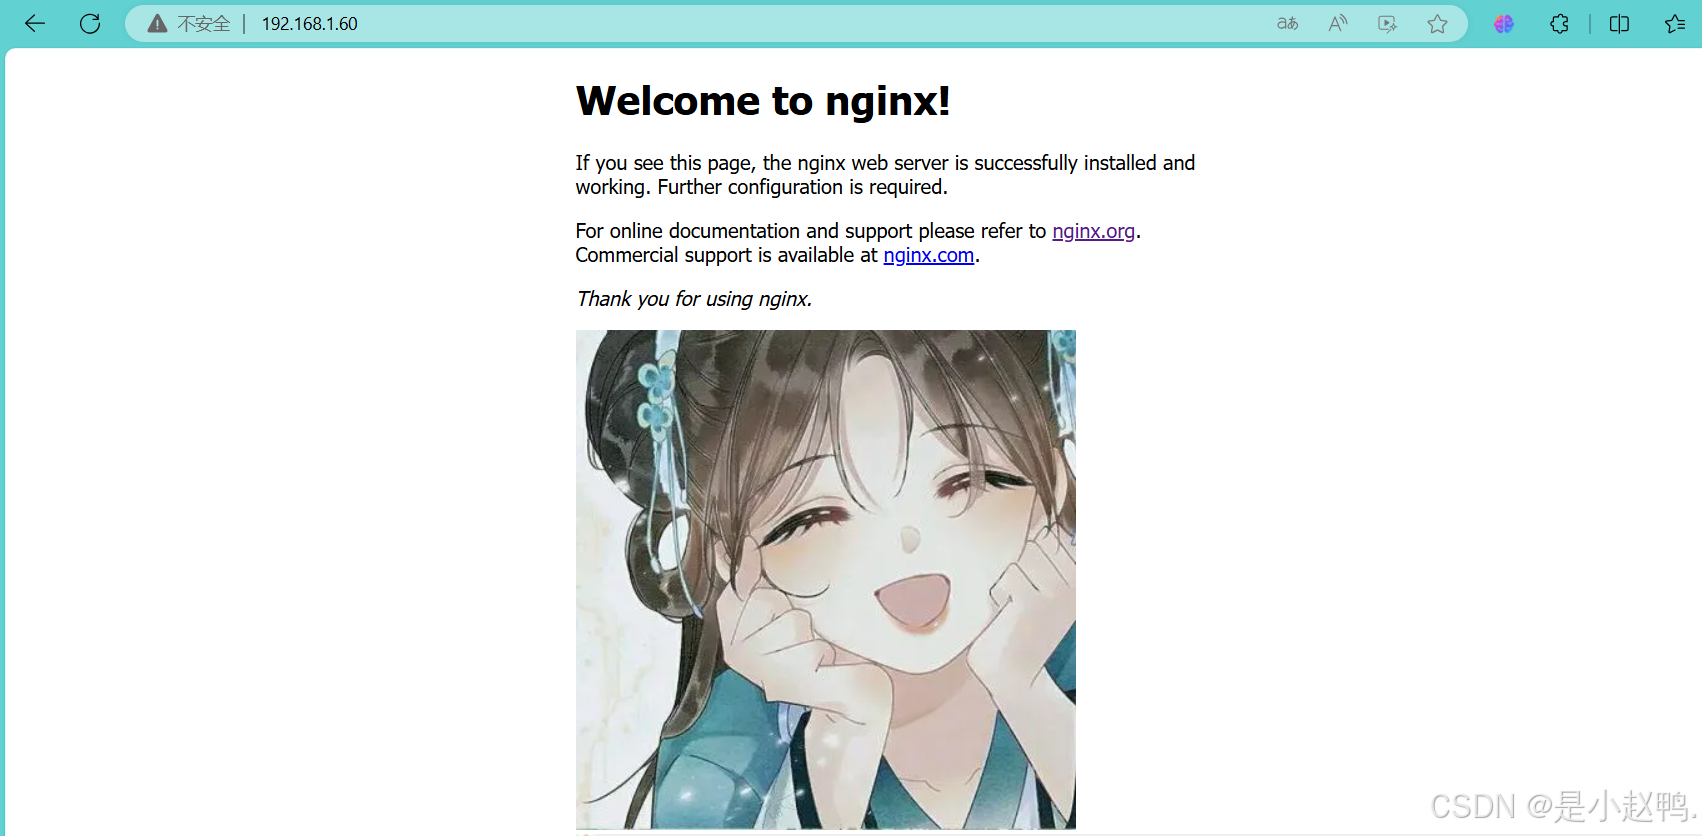
浏览器输入地址访问,可以看到我们上传的图片和视频
但是,视频却是播放不了的
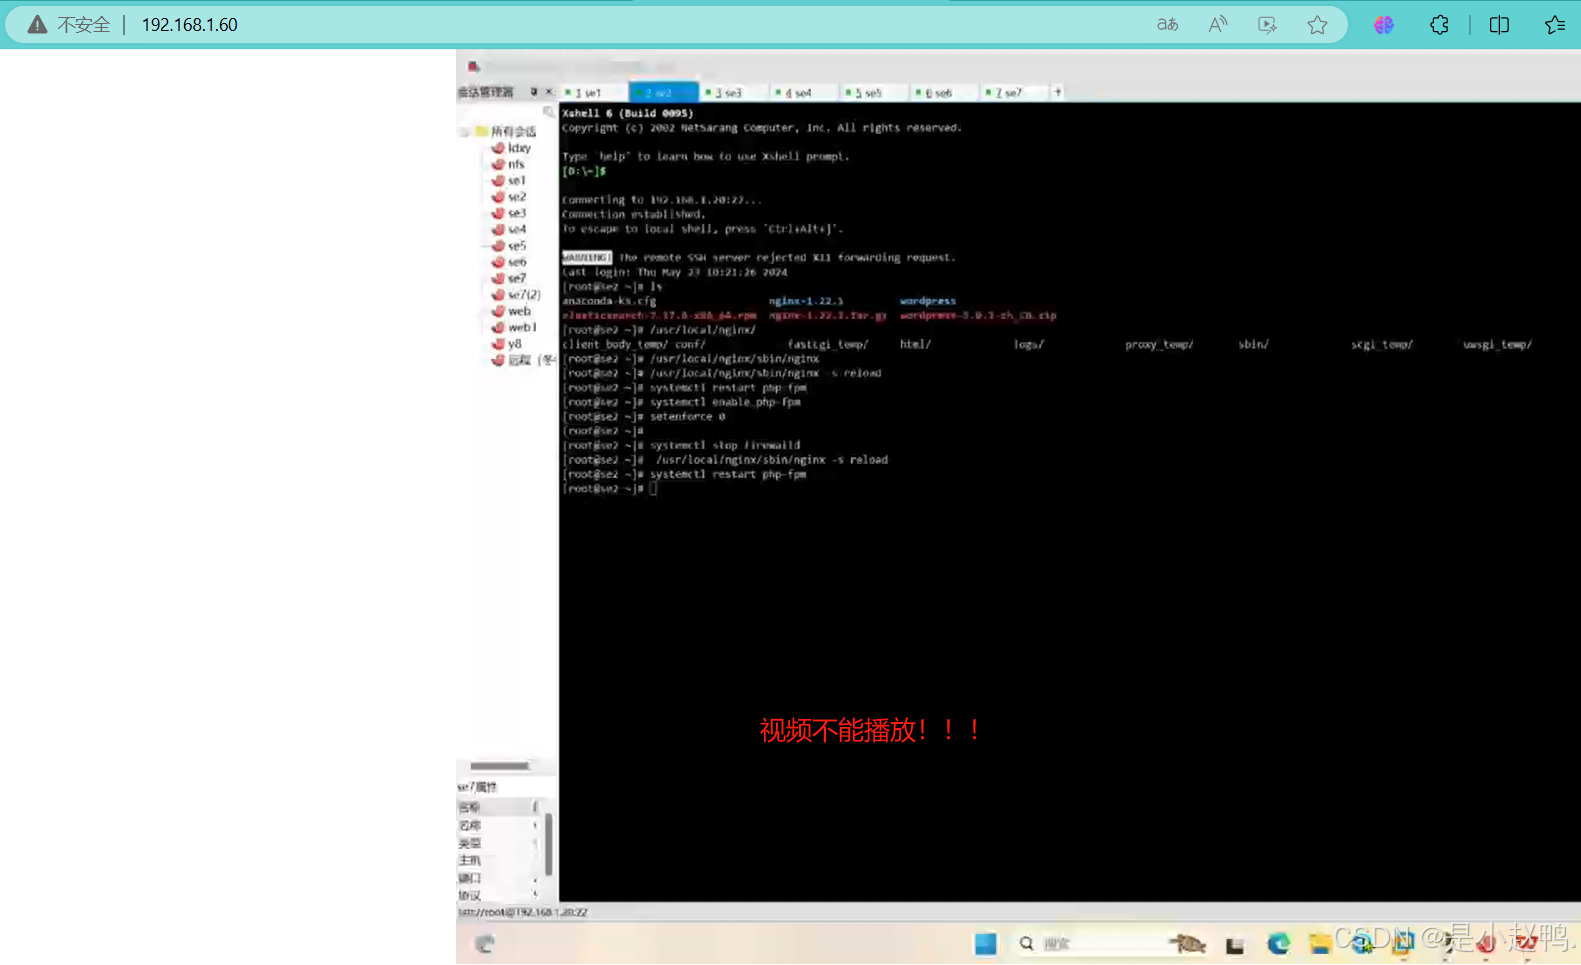
为此,我们只需要在访问时加上视频的名称,再去刷新,我们就能看到视频了!

二、搭建nfs服务器
1.首先做跟web服务器上相同的基本操作
下载阿里云镜像
root@nfs \~# yum -y install wget
wget -O /etc/yum.repos.d/CentOS-Base.repo https://mirrors.aliyun.com/repo/Centos-7.repo
root@nfs \~# yum clean all
root@nfs \~# yum makecache
关闭防火墙,关闭selinux
root@nfs \~# systemctl stop firewalld
root@nfs \~# setenforce 0
2.安装nfs和rpc
root@nfs \~# yum -y install nfs-utils.x86_64 rpcbind.x86_64
查看nfs和rpc是否安装
root@nfs \~# rpm -aq | grep nfs
root@nfs \~# rpm -aq | grep rpc
3.同步webf服务器的内容到nfs服务器上
创建目录及文件
创建一个share目录
root@nfs \~# mkdir /share
在share目录下创建一个名为paswd的文件
root@nfs \~# touch /share/paswd
下载tree
root@nfs \~# yum -y install tree
使用tree查看各级目录
root@nfs \~# tree /share/
/share/
└── paswd
0 directories, 1 file
将web机器上的图片111.png上传到nfs机器上

查看上传情况

同样的操作,再将web机器上的图片2.mp4上传到nfs机器上并查看
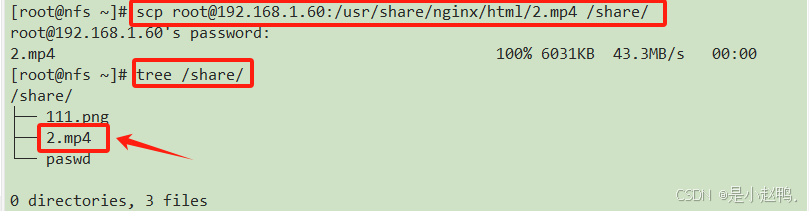
至此,成功实现了web服务器上的内容同步给nfs服务器
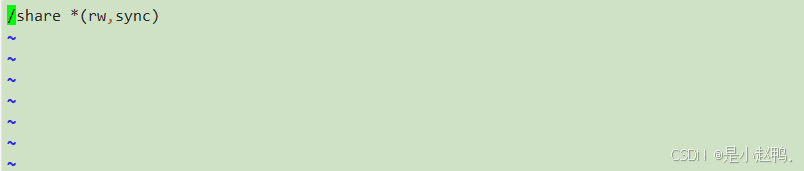
4.编辑配置文件
root@nfs \~# vim /etc/exports
5.启动rpcbind服务
root@nfs \~# systemctl start rpcbind.service
6.启动nfs服务
root@nfs \~# systemctl start nfs
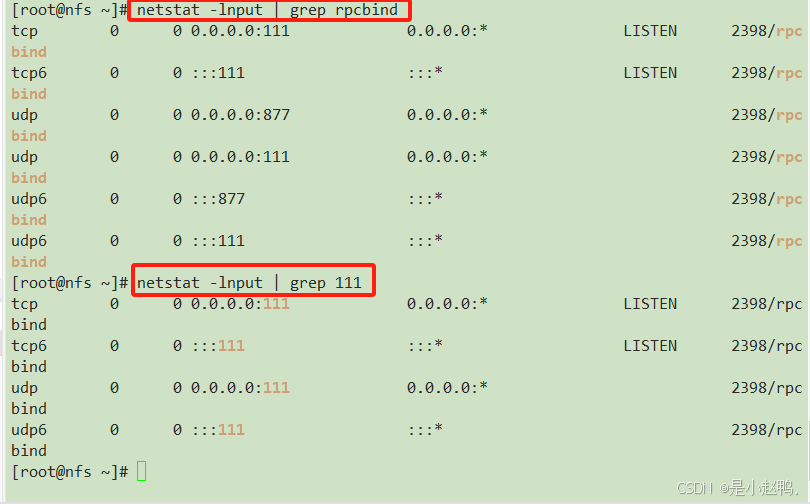
7.查看端口占用
8.文件的测试,读文件
web服务器操作:
创建一个挂载nfs服务器的数据的目录
root@web-server \~# mkdir /usr/share/nginx/html/static
root@web-server \~# ls /usr/share/nginx/html/
111.png 2.mp4 50x.html index.html static
下载nfs服务
root@web-server \~# yum -y install nfs-utils.x86_64 .pki/
挂载nfs服务器的文件
root@web-server \~# mount -t nfs 192.168.1.50:/share /usr/share/nginx/html/static/
查看挂载目录
root@web-server \~# ls /usr/share/nginx/html/static/
111.png 2.mp4 paswd
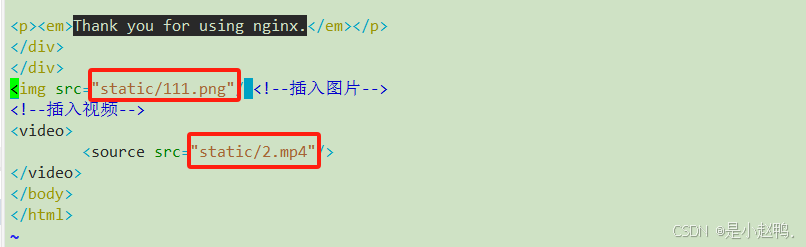
修改配置文件,将路径改为上面我们所创建的static目录
root@web-server \~# vim /usr/share/nginx/html/index.html
仍然能够访问到下面页面
查看static目录下的内容
root@web-server \~# ls /usr/share/nginx/html/static/
111.png 2.mp4 paswd
在nfs服务器上写入内容

再回到web服务器,查看更新情况

发现a.txt的文件已经同步到static的目录下了
查看就可以看到写入的内容了

在浏览器使用新的路径访问,得到以下页面

此时发现我们的文字是看不见的,这是因为字符集的原因,只需要,设置utf-8就OK了
三、备份静态文件
1.关闭防火墙和selinux
root@bak-server \~# systemctl stop firewalld
root@bak-server \~# setenforce 0
2..安装下载阿里云镜像
安装wget
root@bak-server \~# yum -y install wget
下载镜像
wget -O /etc/yum.repos.d/CentOS-Base.repo https://mirrors.aliyun.com/repo/Centos-7.repo
清除缓存
root@bak-server \~# yum clean all
建立缓存
root@bak-server \~# yum makecache
3.安装rsync
root@bak-server \~# yum -y install rsync
nfs主机也需要安装rsync
4.在nfs服务器上操作
安装epel
root@nfs \~# yum -y install epel-release.noarch
安装监听软件
root@nfs \~# yum -y install inotify-tools
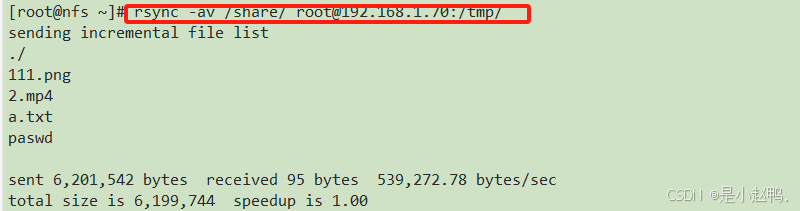
同步一份文件到bak-server上
root@nfs \~# rsync -av /share/ root@192.168.1.70:/tmp/
The authenticity of host '192.168.1.70 (192.168.1.70)' can't be established.
ECDSA key fingerprint is SHA256:f+o+Dk/cHGUOfJEUO6MRBUmq5O8YG9NEYM4qmoxGbvU.
ECDSA key fingerprint is MD5:43:42:63:7e:67:d1:ee:eb:2b:7c:92:4c:1f:69:d6:b4.
Are you sure you want to continue connecting (yes/no)? yes
Warning: Permanently added '192.168.1.70' (ECDSA) to the list of known hosts.
root@192.168.1.70's password:
rsync error: received SIGINT, SIGTERM, or SIGHUP (code 20) at rsync.c(638) sender=3.1.2
此时,需要我们输入密码进行验证
由于太过麻烦,我们对它做一个免密操作
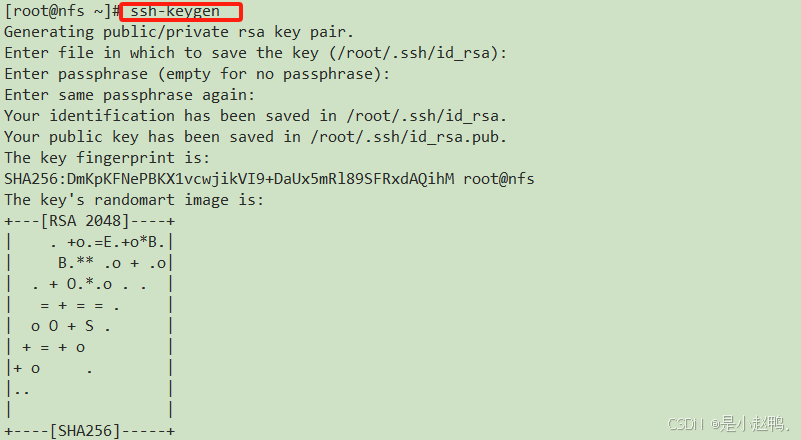
5.免密操作
生成密钥
将上面生成的密钥传递给bak-server
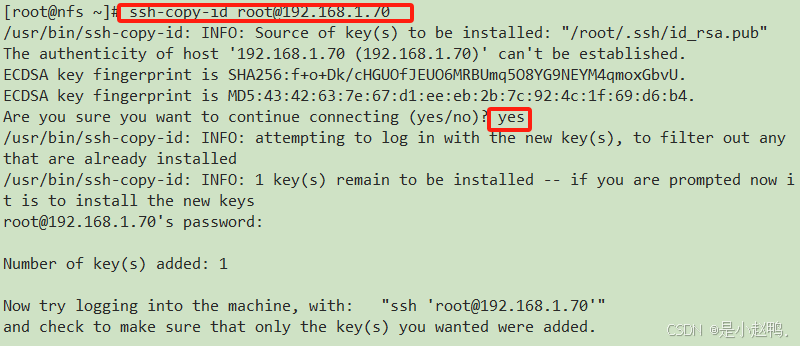
此时我们再去同步数据时就不需要输入密码了
6.创建备份目录
在备份主机上创建一个备份目录
root@bak-server \~# mkdir /bakup
7.回到nfs上编辑脚本
root@nfs \~# vim rn.sh
root@nfs \~# #添加x权限
root@nfs \~# chmod +x rn.sh
root@nfs \~# nohup ./rn.sh&
root@nfs \~# touch /share/aaa.aaa
root@nfs \~# touch /share/bbb.bbb
8.查看日志文件
root@nfs \~# cat nohup.out
到bak-server主机上查看,发现文件已经成功备份到bakup目录下了

四、基于linux和windows实现文件共享
在bak-server主机上安装samba
root@bak-server \~# yum -y install samba
编辑/etc/smb.conf配置文件,实现samba共享
root@bak-server \~# vim /etc/samba/smb.conf
设置用户user01 ,samba认证密码1
root@bak-server \~# useradd user01
window要访问bakup中的文件,使用uer01 1
启动名称管理
root@bak-server \~# systemctl start nmbroot@bak-server \~# systemctl start smb

(一)基于linux实现文件共享
1.为共享文件添加写权限
root@bak-server \~# setfacl -m u:user01:rwx /bakup/
2.回到web-server主机上操作
安装客户端
root@web-server \~# yum -y install samba-client
列出smb服务器上的共享资源
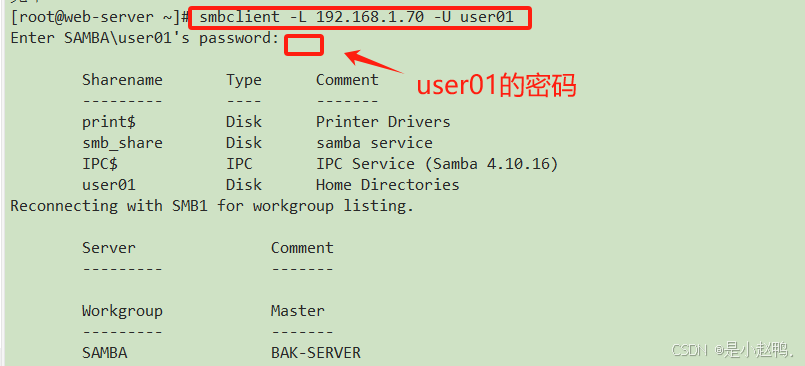
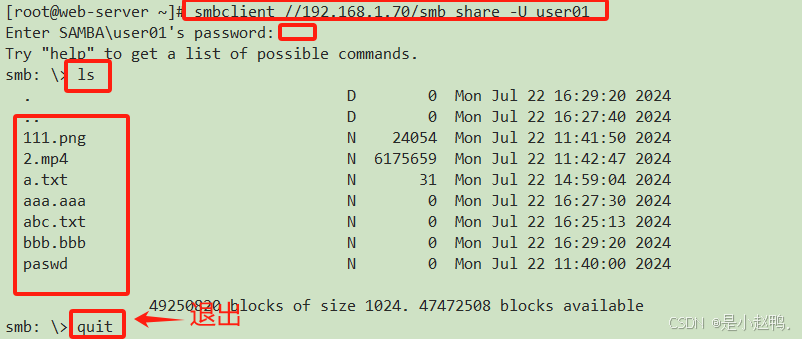
连接到bak-server 服务器上的名为 smb_share 的共享文件夹
3.安装cifs
root@web-server \~# yum -y install cifs-utils
4.创建aaa目录
root@web-server \~# mkdir aaa
5.共享挂载
共享挂载到本地文件系统的aaa目录上
root@web-server \~# mount.cifs -o user=user01,pass=1 //192.168.1.70/smb_share ~/aaa/
查看验证
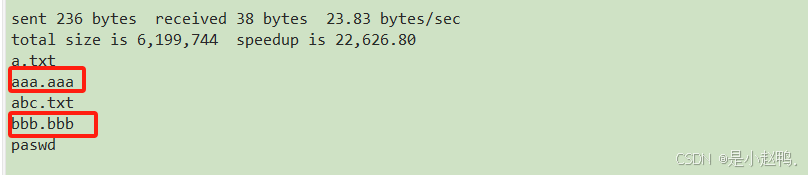
root@web-server \~# ls aaa
111.png 2.mp4 aaa.aaa abc.txt a.txt bbb.bbb paswd
可以看到文件已经被同步到aaa目录了
查看aaa目录下的详细信息
root@web-server \~# ls -l aaa
总用量 6060
-rw-r--r--. 1 root root 24054 7月 22 11:41 111.png
-rw-r--r--. 1 root root 6175659 7月 22 11:42 2.mp4
-rw-r--r--. 1 root root 0 7月 22 16:27 aaa.aaa
-rw-r--r--. 1 root root 0 7月 22 16:25 abc.txt
-rw-r--r--. 1 root root 31 7月 22 14:59 a.txt
-rw-r--r--. 1 root root 0 7月 22 16:29 bbb.bbb
-rw-r--r--. 1 root root 0 7月 22 11:40 paswd
至此基于linux的文件共享就完成了
(二)基于windows实现文件共享
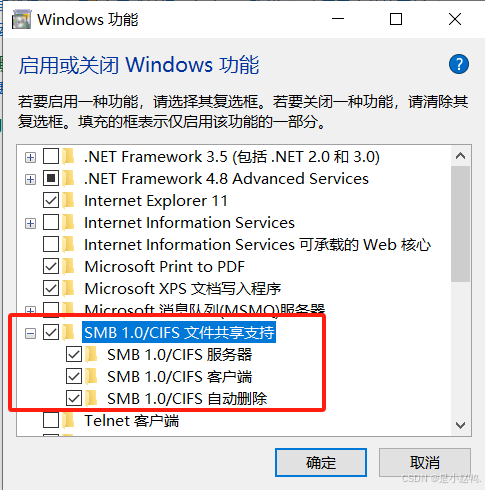
1.在控制面板打开下面的页面
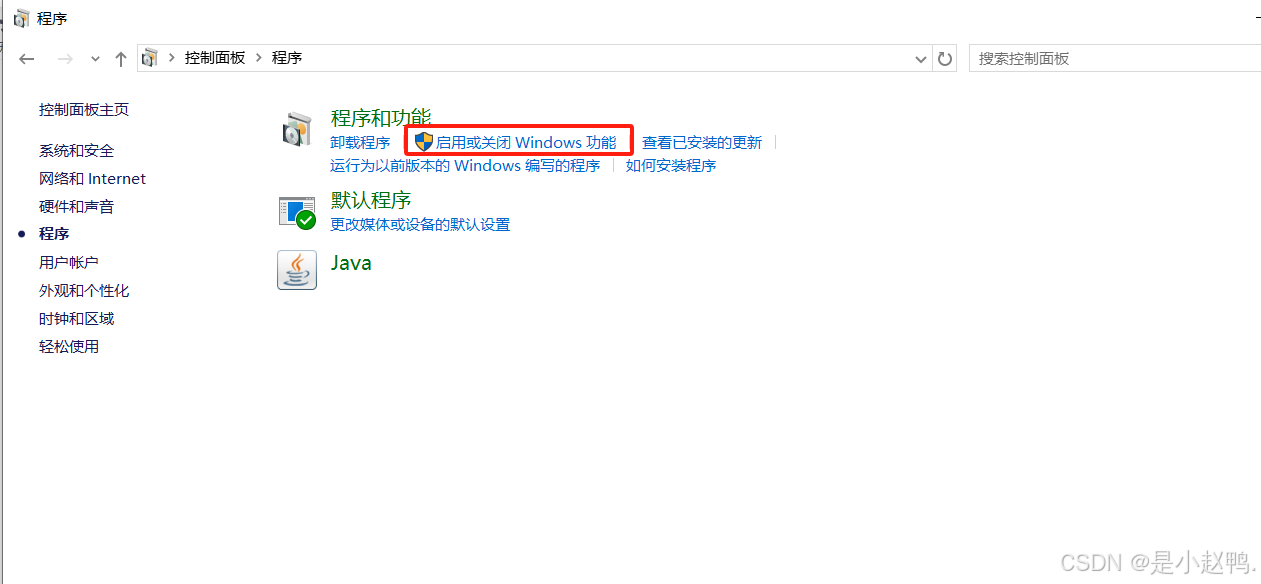
2.打开这里的功能
3.然后在windows的我的电脑里面添加一个新的映射网络驱动器
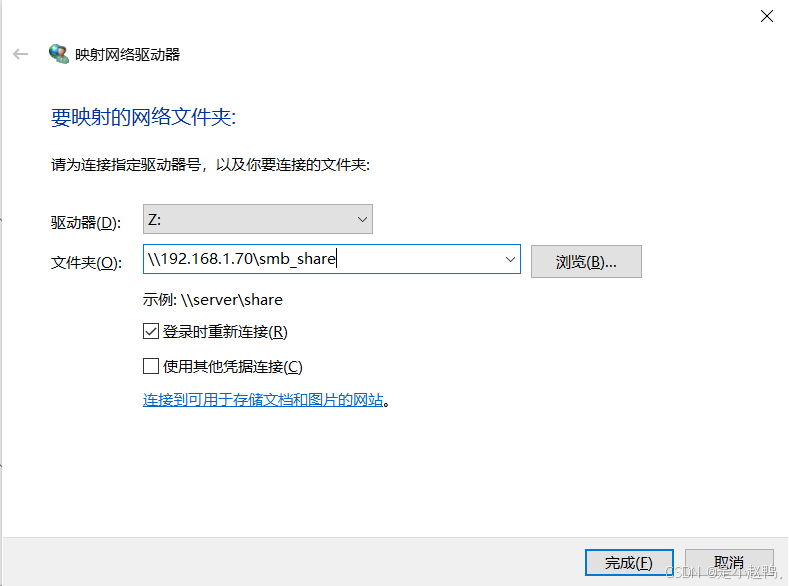
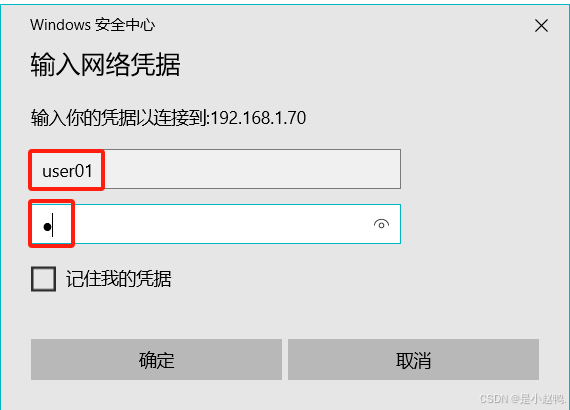
4.然后点击完成,此时需要输入前面设置的用户名和密码
5.然后点击确定,就能够看到共享的文件了
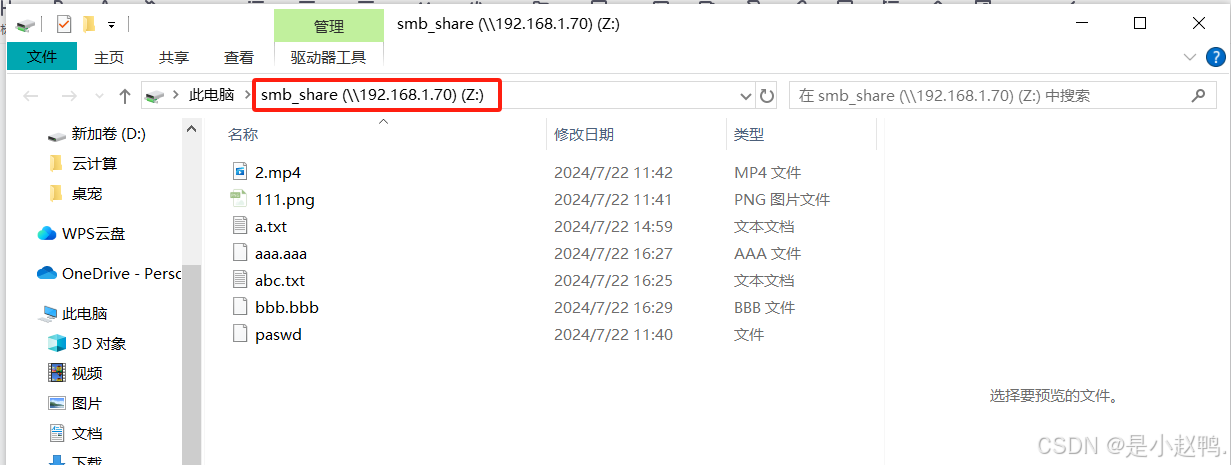
也可以在它的上一级目录看到我们创建的文件共享
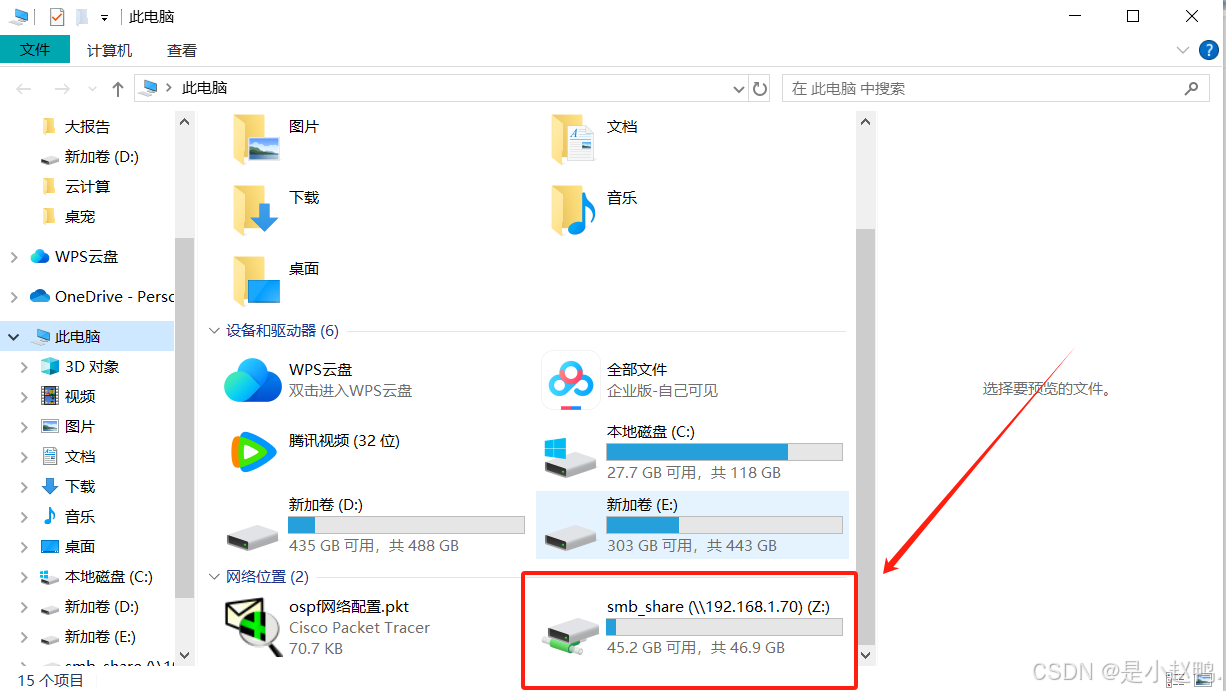
至此基于windows的文件共享就完成了