大语言模型(LLM)文本预处理实战
文章目录
- 大语言模型(LLM)文本预处理实战
-
- [2.1 理解词嵌入](#2.1 理解词嵌入)
- [2.2 文本分词](#2.2 文本分词)
- [2.3 将 token 转换为 token ID](#2.3 将 token 转换为 token ID)
- [2.4 添加特殊上下文 token](#2.4 添加特殊上下文 token)
- [2.5 字节对编码 (BytePair Encoding, BPE)](#2.5 字节对编码 (BytePair Encoding, BPE))
- [2.6 使用滑动窗口进行数据采样](#2.6 使用滑动窗口进行数据采样)
- [2.7 创建 token 嵌入 (Token Embeddings)](#2.7 创建 token 嵌入 (Token Embeddings))
- [2.8 编码词汇的位置信息 (Encoding Word Positions)](#2.8 编码词汇的位置信息 (Encoding Word Positions))

本文中使用的软件包:
python
from importlib.metadata import version

print("torch version:", version("torch"))
print("tiktoken version:", version("tiktoken"))
torch version: 2.4.0
tiktoken version: 0.7.0
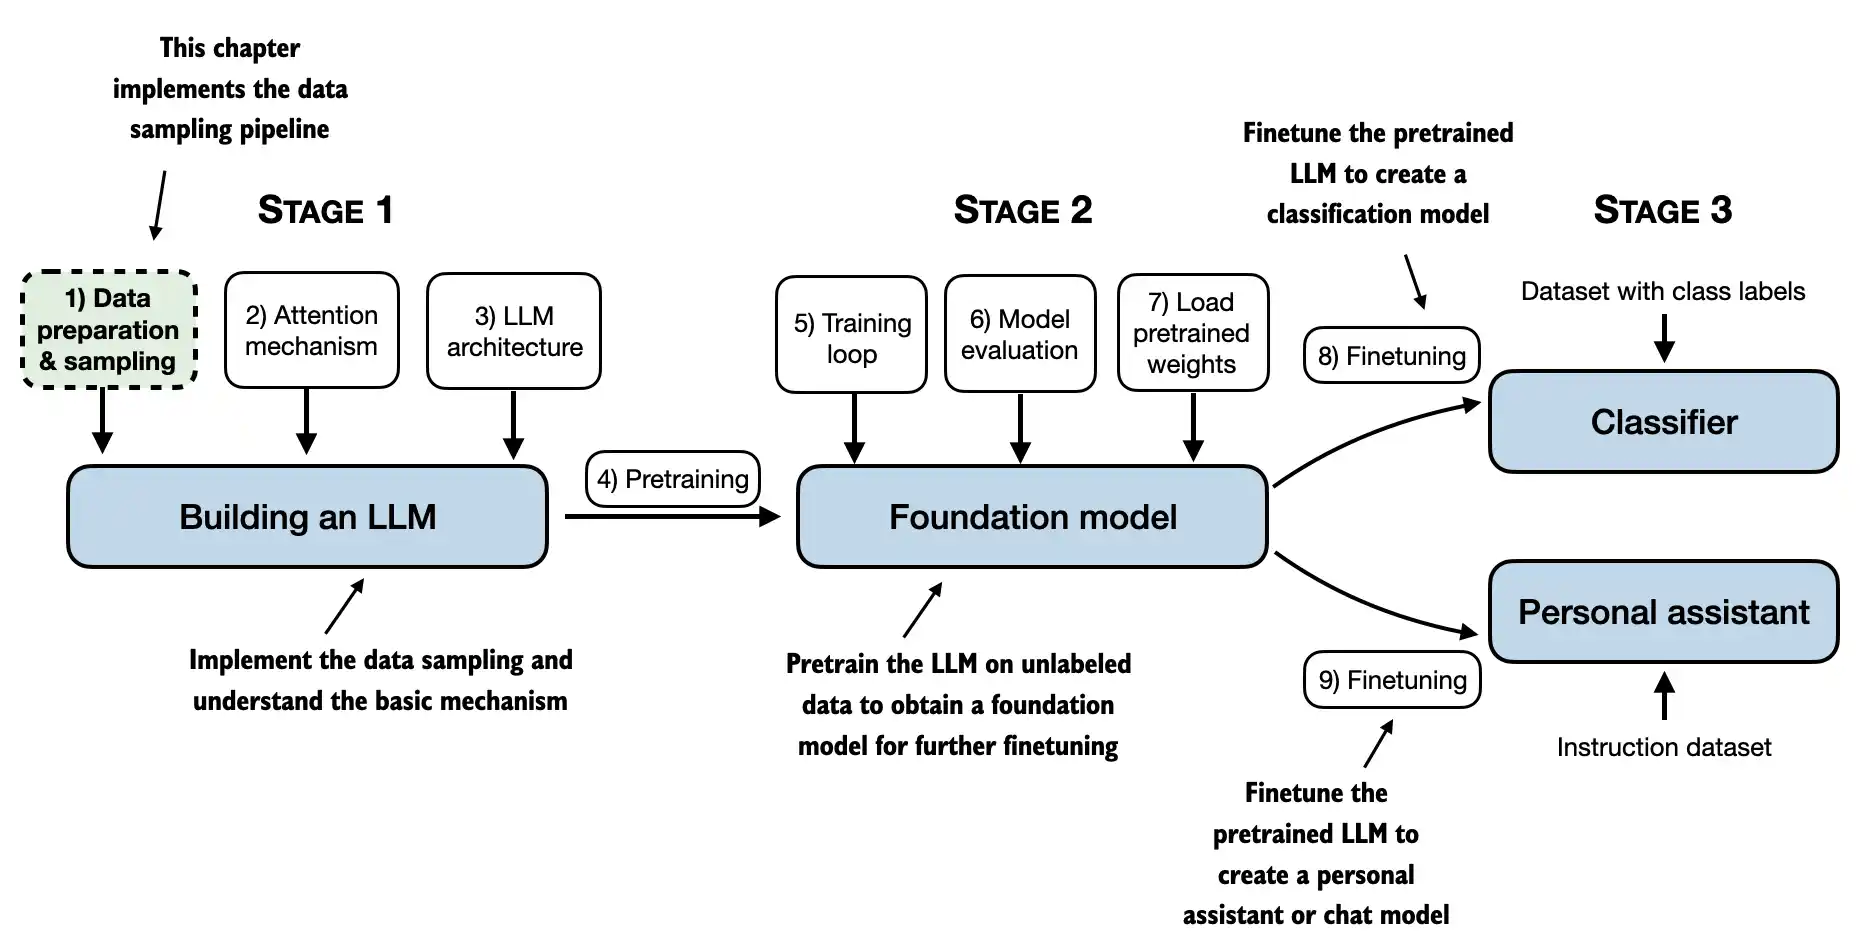
- 本章涵盖数据准备和采样,以便为 LLM 输入数据做好准备
2.1 理解词嵌入
- 嵌入有多种形式,本文重点介绍文本嵌入:
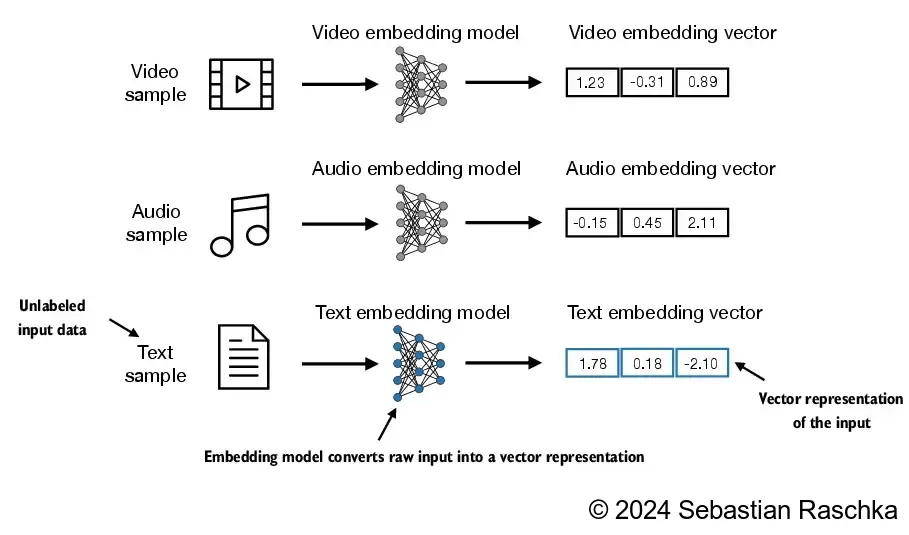
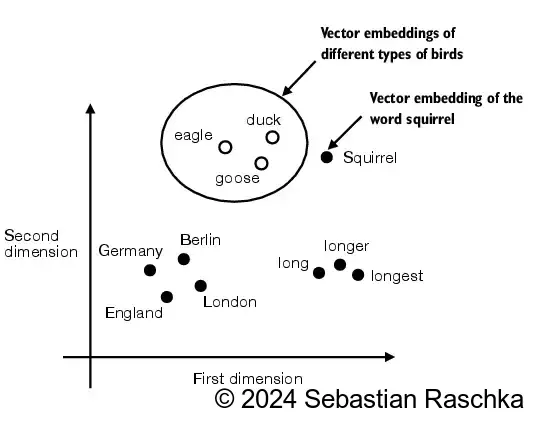
- LLMs(大型语言模型)在高维空间中处理嵌入(即,数千个维度)
- 由于我们无法可视化如此高的维度空间(人类通常在1、2或3个维度上思考),下图展示了一个二维的嵌入空间。
2.2 文本分词
- 在这一节中,我们将对文本进行分词,这意味着将文本分解为更小的单位,如单个单词和标点符号。
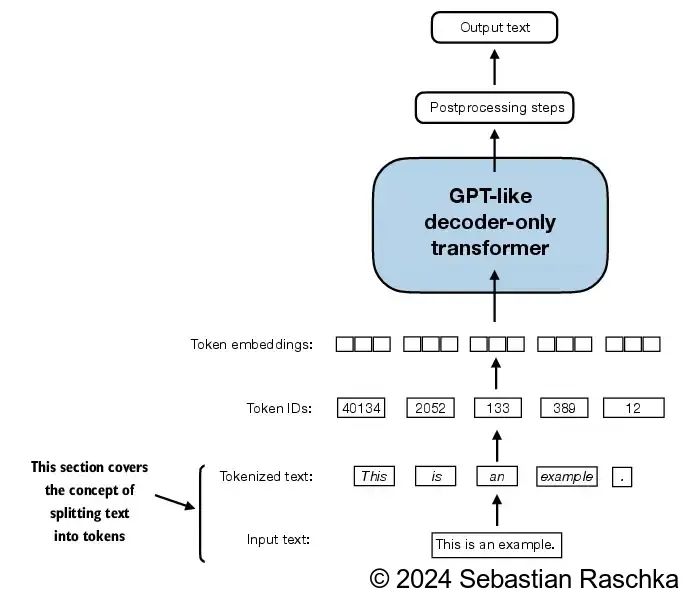
- 加载我们想要处理的原始文本。
- The Verdict by Edith Wharton 是一篇公有领域的短篇小说。
python
import os
import urllib.request

# 如果文件 "the-verdict.txt" 不存在,
if not os.path.exists("the-verdict.txt"):
    # 定义文件的 URL 地址
    url = ("https://raw.githubusercontent.com/rasbt/"
           "LLMs-from-scratch/main/ch02/01_main-chapter-code/"
           "the-verdict.txt")
    # 指定保存的本地文件路径
    file_path = "the-verdict.txt"
    # 使用 urllib 下载文件并保存到指定路径
    urllib.request.urlretrieve(url, file_path)
python
# 打开文件 "the-verdict.txt" 并读取其内容
with open("the-verdict.txt", "r", encoding="utf-8") as f:
    raw_text = f.read()  # 读取文件中的所有文本

# 输出文本的总字符数
print("Total number of characters:", len(raw_text))
# 输出文本的前99个字符
print(raw_text[:99])
Total number of character: 20479
I HAD always thought Jack Gisburn rather a cheap genius--though a good fellow enough--so it was no
- 目标是对这段文本进行分词和嵌入,以供大型语言模型使用。
- 我们先基于一些简单的示例文本开发一个简单的分词器,然后可以将其应用于上面的文本。
- 以下的正则表达式将会按空白符进行拆分。
python
import re  # 导入正则表达式模块

text = "Hello, world. This, is a test."  # 定义待分词的文本
result = re.split(r'(\s)', text)  # 使用正则表达式按空白符进行拆分,括号内的空白符会被保留

print(result)  # 输出分词结果
'Hello,', ' ', 'world.', ' ', 'This,', ' ', 'is', ' ', 'a', ' ', 'test.'
- 我们不仅希望按空白符进行拆分,还想按逗号和句点进行拆分,因此让我们修改正则表达式来实现这一点。
python
# 使用正则表达式按逗号、句点或空白符进行拆分
result = re.split(r'([,.]|\s)', text)

# 输出分词结果
print(result)
'Hello', ',', '', ' ', 'world', '.', '', ' ', 'This', ',', '', ' ', 'is', ' ', 'a', ' ', 'test', '.', ''
- 如我们所见,这样会创建空字符串,让我们把它们去掉。
python
# 从每个项中移除空白符,并过滤掉任何空字符串
result = [item for item in result if item.strip()]

# 输出处理后的分词结果
print(result)
'Hello', ',', 'world', '.', 'This', ',', 'is', 'a', 'test', '.'
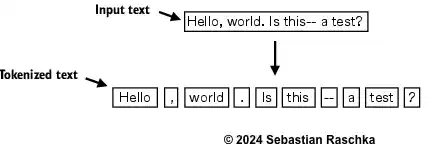
- 这看起来已经很不错了,但让我们也处理其他类型的标点符号,比如句点、问号等。
python
# 定义一段包含多种标点符号的文本
text = "Hello, world. Is this-- a test?"

# 使用正则表达式按逗号、句点、冒号、分号、问号、下划线、感叹号、圆括号、引号、破折号以及空白符进行拆分
result = re.split(r'([,.:;?_!"()\']|--|\s)', text)

# 从每个项中移除空白符,并过滤掉任何空字符串
result = [item.strip() for item in result if item.strip()]

# 输出处理后的分词结果
print(result)
'Hello', ',', 'world', '.', 'Is', 'this', '--', 'a', 'test', '?'
- 这样就很好了,现在我们可以将这个分词方法应用到原始文本上了。
python
# 使用正则表达式按逗号、句点、冒号、分号、问号、下划线、感叹号、圆括号、引号、破折号以及空白符对原始文本进行分词
preprocessed = re.split(r'([,.:;?_!"()\']|--|\s)', raw_text)

# 从每个项中移除空白符,并过滤掉任何空字符串
preprocessed = [item.strip() for item in preprocessed if item.strip()]

# 输出处理后的前30个分词结果
print(preprocessed[:30])
'I', 'HAD', 'always', 'thought', 'Jack', 'Gisburn', 'rather', 'a', 'cheap', 'genius', '--', 'though', 'a', 'good', 'fellow', 'enough', '--', 'so', 'it', 'was', 'no', 'great', 'surprise', 'to', 'me', 'to', 'hear', 'that', ',', 'in'
- 让我们计算总共有多少个tokens。
python
print(len(preprocessed))4690
2.3 将 token 转换为 token ID
- 接下来,我们将文本 token 转换为 token ID,以便后续可以通过嵌入层进行处理。
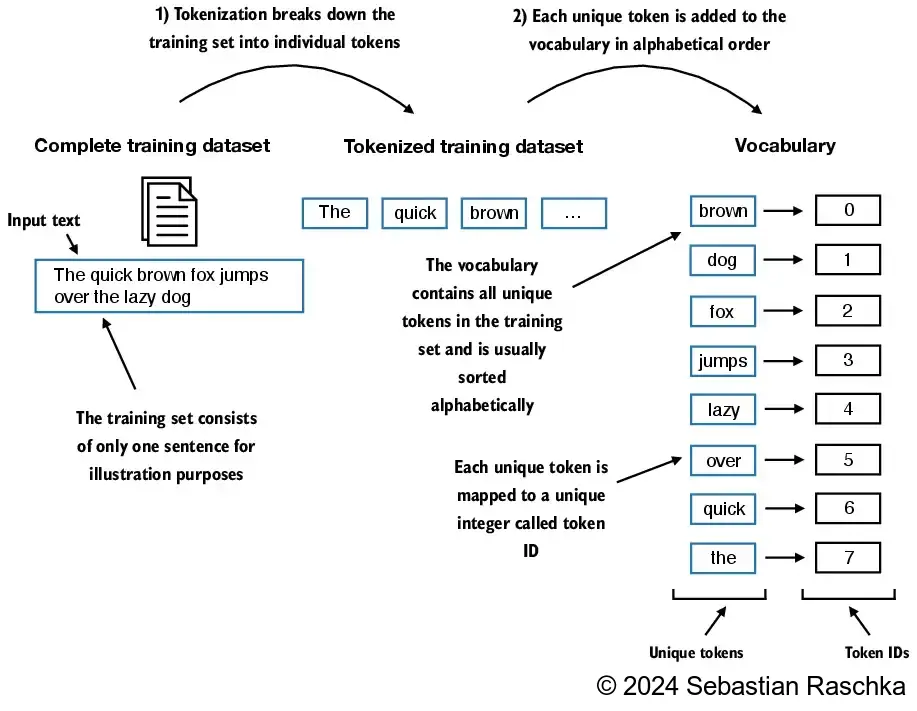
- 从这些 token 中,我们现在可以构建一个词汇表,该词汇表包含所有唯一的 token。
python
# 创建一个去重并排序后的词汇表
all_words = sorted(set(preprocessed))

# 计算词汇表的大小
vocab_size = len(all_words)

# 输出词汇表的大小
print(vocab_size)
1130
python
# 创建一个字典,将每个唯一的 token 映射到一个整数ID
vocab = {token: integer for integer, token in enumerate(all_words)}- 以下是词汇表中的前50个条目:
python
# 遍历词汇表中的项,并打印前50个条目
for i, item in enumerate(vocab.items()):
    print(item)
    # 如果已经打印了50个条目,则停止循环
    if i >= 49:  # 因为索引是从0开始的,所以这里应该是49
        break
('!', 0)
('"', 1)
("'", 2)
('(', 3)
(')', 4)
(',', 5)
('--', 6)
('.', 7)
(':', 8)
(';', 9)
('?', 10)
('A', 11)
('Ah', 12)
('Among', 13)
('And', 14)
('Are', 15)
('Arrt', 16)
('As', 17)
('At', 18)
('Be', 19)
('Begin', 20)
('Burlington', 21)
('But', 22)
('By', 23)
('Carlo', 24)
('Chicago', 25)
('Claude', 26)
('Come', 27)
('Croft', 28)
('Destroyed', 29)
('Devonshire', 30)
('Don', 31)
('Dubarry', 32)
('Emperors', 33)
('Florence', 34)
('For', 35)
('Gallery', 36)
('Gideon', 37)
('Gisburn', 38)
('Gisburns', 39)
('Grafton', 40)
('Greek', 41)
('Grindle', 42)
('Grindles', 43)
('HAD', 44)
('Had', 45)
('Hang', 46)
('Has', 47)
('He', 48)
('Her', 49)
('Hermia', 50)
- 下面,我们用一个小词汇表来说明对一段简短样本文本的分词过程:
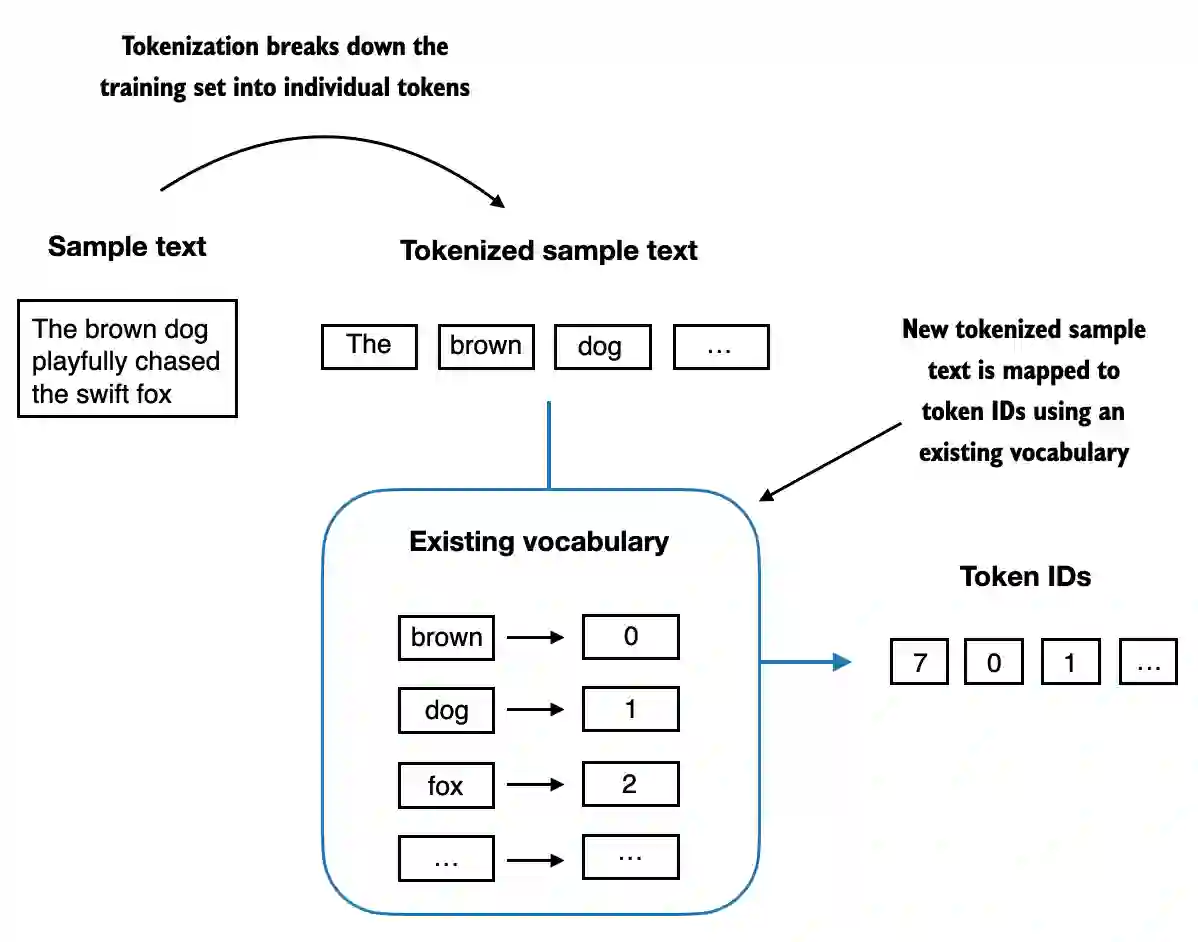
- 现在,我们将所有内容整合到一个分词器类中。
python
class SimpleTokenizerV1:
    def __init__(self, vocab):
        # 构造函数初始化分词器的词汇表
        self.str_to_int = vocab  # 字符串到整数的映射
        self.int_to_str = {i: s for s, i in vocab.items()}  # 整数到字符串的映射

    def encode(self, text):
        # 对输入文本进行预处理和分词
        preprocessed = re.split(r'([,.:;?_!"()\']|--|\s)', text)

        # 从每个项中移除空白符,并过滤掉任何空字符串
        preprocessed = [
            item.strip() for item in preprocessed if item.strip()
        ]
        # 将每个分词映射到相应的整数ID
        ids = [self.str_to_int[s] for s in preprocessed]
        return ids

    def decode(self, ids):
        # 将整数ID列表转换回文本
        text = " ".join([self.int_to_str[i] for i in ids])
        # 替换特定标点符号前的多余空格
        text = re.sub(r'\s+([,.?!"()\'])', r'\1', text)
return textencode函数将文本转换为 token ID。decode函数将 token ID转换回文本。
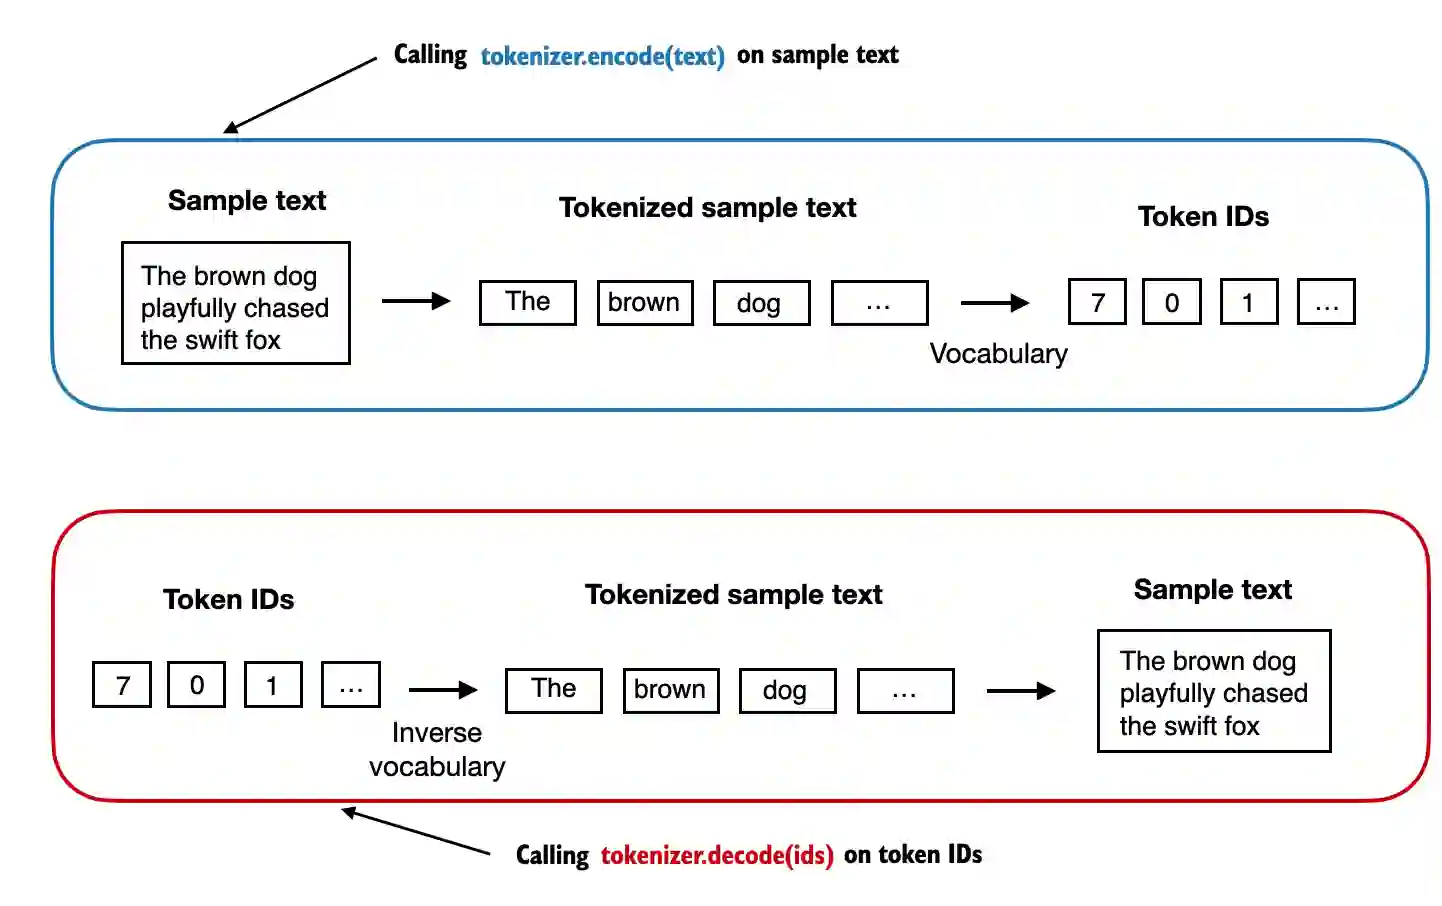
- 我们可以使用分词器将文本编码(即,进行分词)成整数。
- 这些整数随后可以被嵌入(稍后)作为大型语言模型的输入。
python
# 实例化分词器对象
tokenizer = SimpleTokenizerV1(vocab)

# 定义一段文本
text = """"It's the last he painted, you know,"
           Mrs. Gisburn said with pardonable pride."""

# 使用分词器将文本编码为整数ID列表
ids = tokenizer.encode(text)

# 输出整数ID列表
print(ids)
1, 56, 2, 850, 988, 602, 533, 746, 5, 1126, 596, 5, 1, 67, 7, 38, 851, 1108, 754, 793, 7
- 我们可以将这些整数再解码回文本。
python
tokenizer.decode(ids)'" It' s the last he painted, you know," Mrs. Gisburn said with pardonable pride.'
python
tokenizer.decode(tokenizer.encode(text))'" It' s the last he painted, you know," Mrs. Gisburn said with pardonable pride.'
2.4 添加特殊上下文 token
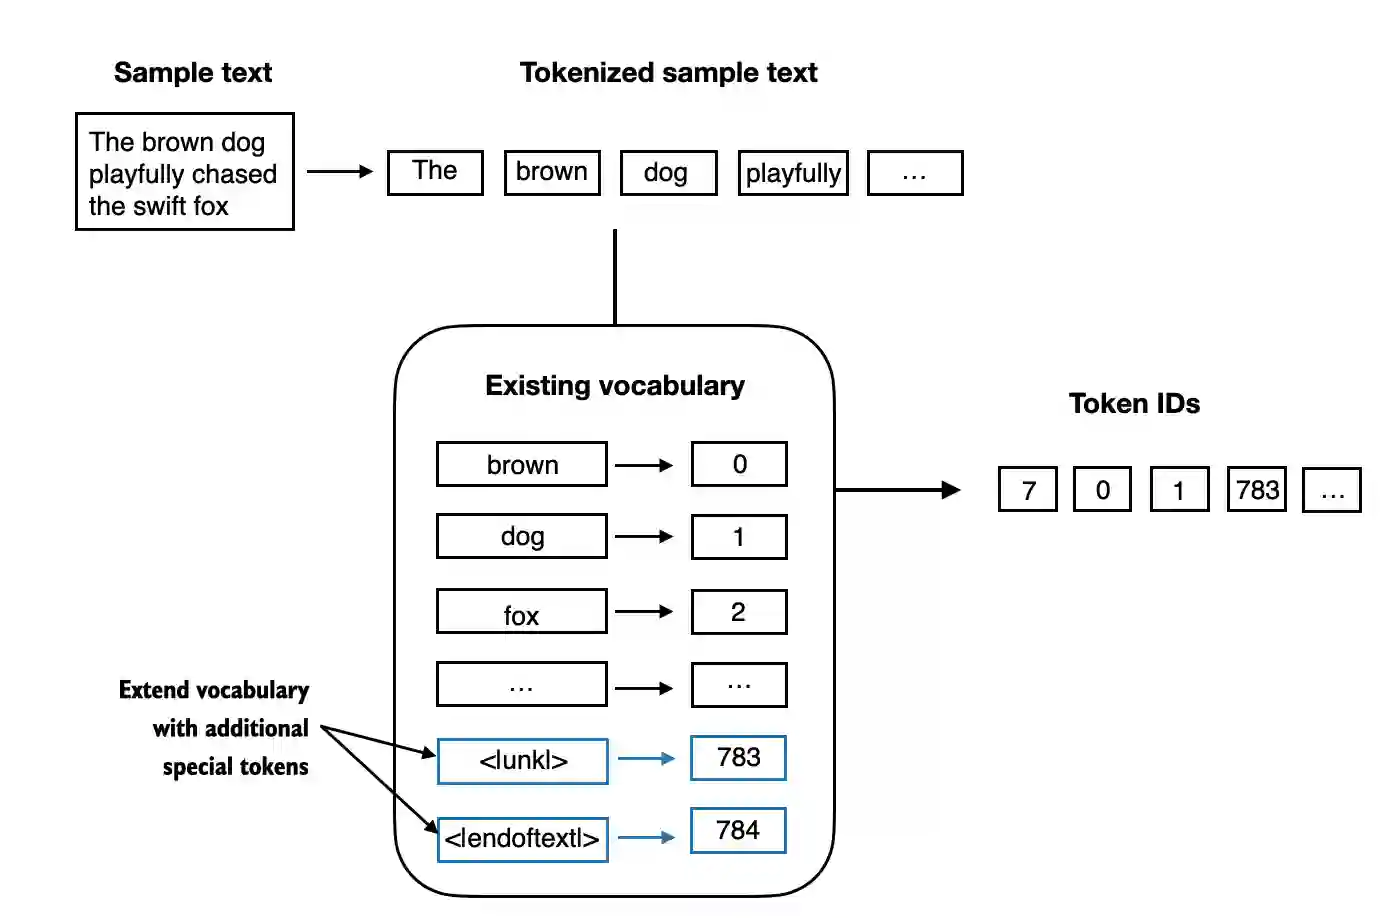
- 添加一些"特殊" token 对于未知词汇以及标记文本的结束是非常有用的。
-
一些分词器使用特殊 token 来为大型语言模型提供额外的上下文信息。
-
其中一些特殊 token 包括:
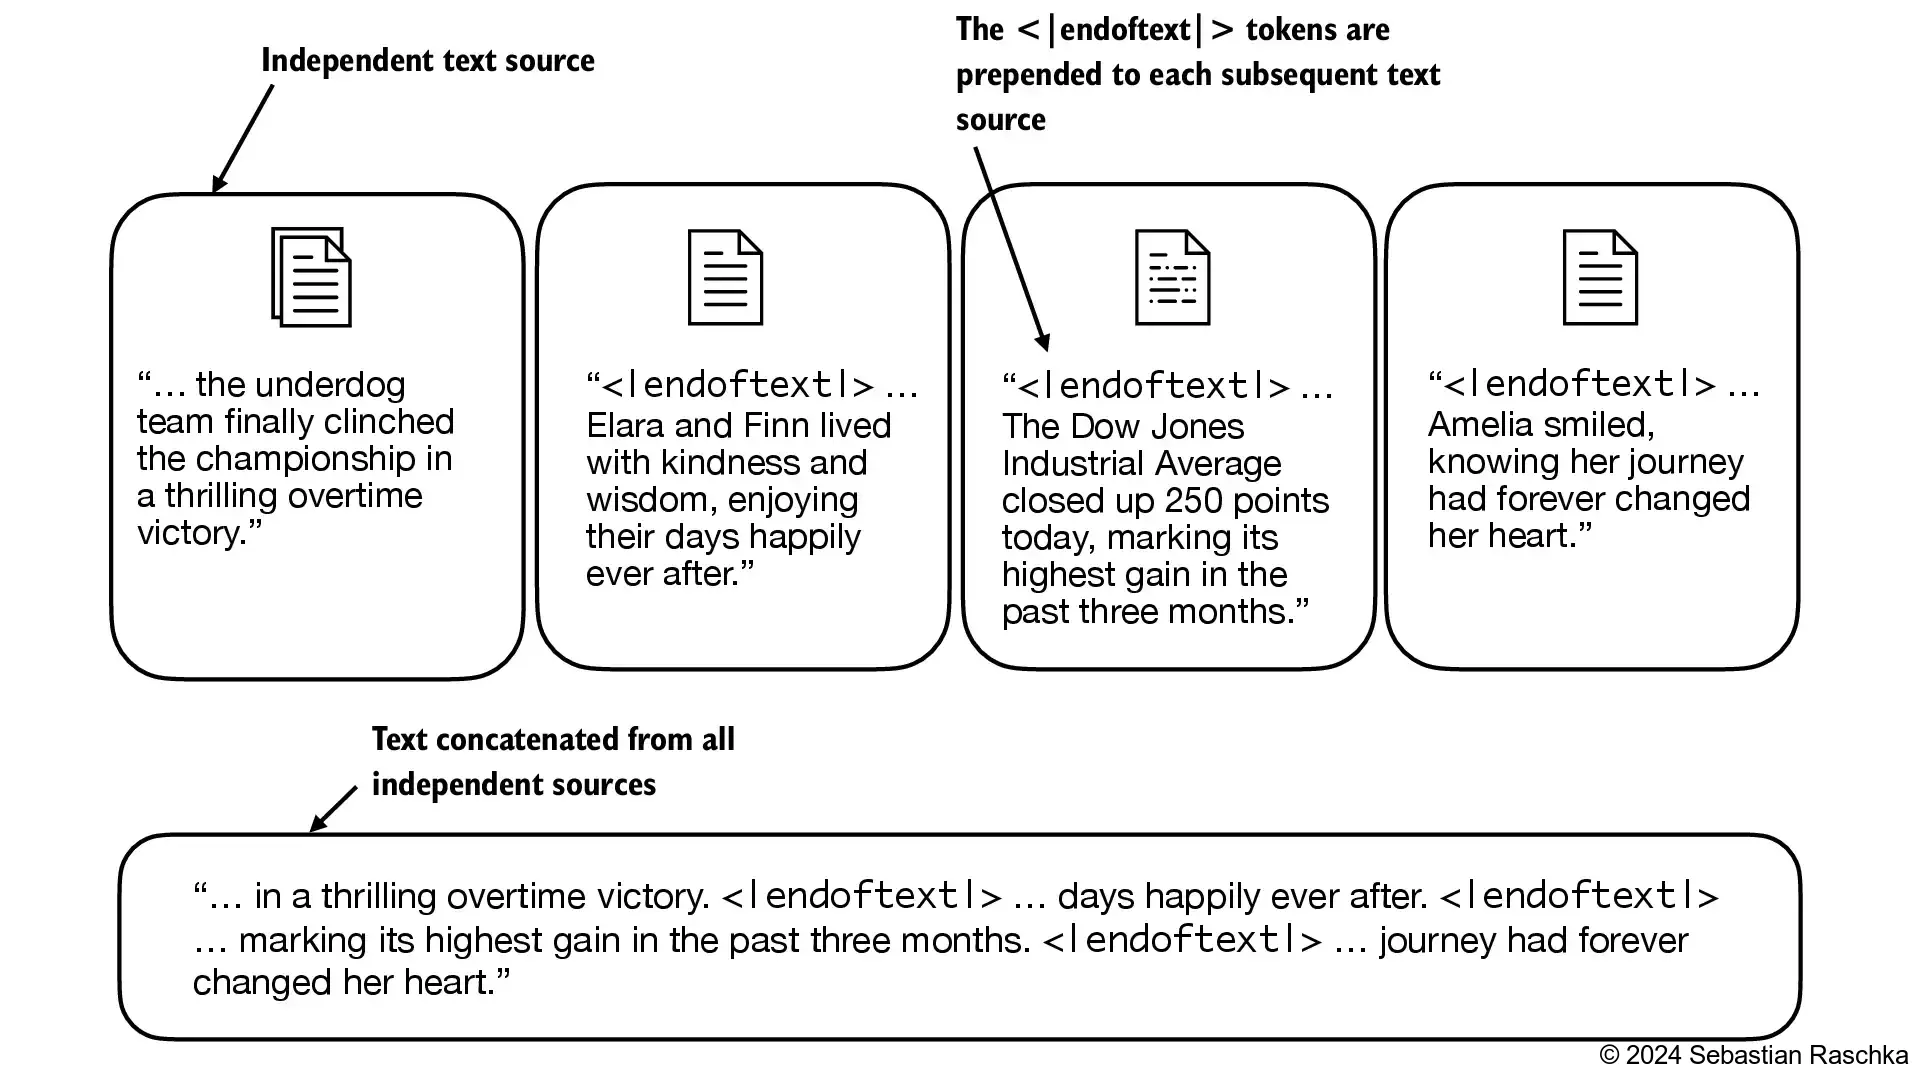
[BOS](序列开始)标记文本的起始位置。[EOS](序列结束)标记文本的结束位置(这通常用于连接多个不相关的文本,例如两篇不同的维基百科文章或两本不同的书等)。[PAD](填充)如果我们用大于1的批次大小训练大型语言模型(我们可能会包含长度不同的多个文本;通过填充 token,我们将较短的文本填充到最长文本的长度,从而使所有文本具有相同的长度)。
-
[UNK]代表不在词汇表中的词汇。 -
注意,GPT-2并不需要上述提及的任何特殊 token,而是仅使用
<|endoftext|>token 来简化复杂度。 -
<|endoftext|>类似于上述提到的[EOS]token。 -
GPT 同样使用
<|endoftext|>进行填充(因为在批量输入训练时通常使用掩码,我们无论如何都不会关注填充的 token,所以这些 token 具体是什么并不重要)。 -
GPT-2 不使用
<UNK>token 来表示词汇表外的词汇;相反,GPT-2 使用字节对编码(BPE)分词器,它将词汇分解为子词单元,我们将在后面的章节中讨论这一点。 -
我们在两个独立的文本来源之间使用
<|endoftext|>token:
- 让我们看看对以下文本进行分词会发生什么:
python
tokenizer = SimpleTokenizerV1(vocab)

text = "Hello, do you like tea. Is this-- a test?"

tokenizer.encode(text)
Traceback (most recent call last):
File "c:\Users\Tang.conda\envs\llm\lib\site-packages\IPython\core\interactiveshell.py", line 3577, in run_code
exec(code_obj, self.user_global_ns, self.user_ns)
File "C:\Users\Tang\AppData\Local\Temp\ipykernel_27700\2162118319.py", line 5, in
tokenizer.encode(text)
File "C:\Users\Tang\AppData\Local\Temp\ipykernel_27700\2118097954.py", line 12, in encode
ids = [self.str_to_int[s] for s in preprocessed]
File "C:\Users\Tang\AppData\Local\Temp\ipykernel_27700\2118097954.py", line 12, in
ids = [self.str_to_int[s] for s in preprocessed]
KeyError: 'Hello'
During handling of the above exception, another exception occurred:
Traceback (most recent call last):
File "c:\Users\Tang.conda\envs\llm\lib\site-packages\IPython\core\interactiveshell.py", line 2168, in showtraceback
stb = self.InteractiveTB.structured_traceback(
File "c:\Users\Tang.conda\envs\llm\lib\site-packages\IPython\core\ultratb.py", line 1454, in structured_traceback
return FormattedTB.structured_traceback(
File "c:\Users\Tang.conda\envs\llm\lib\site-packages\IPython\core\ultratb.py", line 1345, in structured_traceback
return VerboseTB.structured_traceback(
File "c:\Users\Tang.conda\envs\llm\lib\site-packages\IPython\core\ultratb.py", line 1192, in structured_traceback
formatted_exception = self.format_exception_as_a_whole(etype, evalue, etb, number_of_lines_of_context,
File "c:\Users\Tang.conda\envs\llm\lib\site-packages\IPython\core\ultratb.py", line 1107, in format_exception_as_a_whole
frames.append(self.format_record(record))
File "c:\Users\Tang.conda\envs\llm\lib\site-packages\IPython\core\ultratb.py", line 989, in format_record
frame_info.lines, Colors, self.has_colors, lvals
File "c:\Users\Tang.conda\envs\llm\lib\site-packages\IPython\core\ultratb.py", line 801, in lines
return self._sd.lines
File "c:\Users\Tang.conda\envs\llm\lib\site-packages\stack_data\utils.py", line 145, in cached_property_wrapper
value = obj.dict [self.func.name ] = self.func(obj)
File "c:\Users\Tang.conda\envs\llm\lib\site-packages\stack_data\core.py", line 734, in lines
pieces = self.included_pieces
File "c:\Users\Tang.conda\envs\llm\lib\site-packages\stack_data\utils.py", line 145, in cached_property_wrapper
value = obj.dict [self.func.name ] = self.func(obj)
File "c:\Users\Tang.conda\envs\llm\lib\site-packages\stack_data\core.py", line 677, in included_pieces
scope_pieces = self.scope_pieces
File "c:\Users\Tang.conda\envs\llm\lib\site-packages\stack_data\utils.py", line 145, in cached_property_wrapper
value = obj.dict [self.func.name ] = self.func(obj)
File "c:\Users\Tang.conda\envs\llm\lib\site-packages\stack_data\core.py", line 614, in scope_pieces
scope_start, scope_end = self.source.line_range(self.scope)
File "c:\Users\Tang.conda\envs\llm\lib\site-packages\stack_data\core.py", line 178, in line_range
return line_range(self.asttext(), node)
AttributeError: 'Source' object has no attribute 'asttext'
- 上述情况产生了错误,因为词汇表中不包含单词 "Hello"。
- 为了处理这种情况,我们可以在词汇表中添加特殊的 token,如
"<|unk|>",来代表未知词汇。 - 既然我们已经在扩展词汇表,让我们再添加一个叫做
"<|endoftext|>"的 token,这个 token 在 GPT-2 的训练中用于标记文本的结束(同时它也被用于连接的文本之间,比如我们的训练数据集由多篇文章、书籍等组成时)。
python
# 创建一个去重并排序后的所有唯一 token 列表
all_tokens = sorted(list(set(preprocessed)))

# 扩展词汇表,添加特殊 token <|endoftext|>
all_tokens.extend(["<|endoftext|>", "<|unk|>"])

# 创建一个字典,将每个唯一的 token 映射到一个整数ID
vocab = {token: integer for integer, token in enumerate(all_tokens)}
python
print(len(vocab.items()))1132
python
for i, item in enumerate(list(vocab.items())[-5:]):
    print(item)
('younger', 1127)
('your', 1128)
('yourself', 1129)
('<|endoftext|>', 1130)
('<|unk|>', 1131)
- 我们还需要相应地调整分词器,以便它知道何时以及如何使用新的
<unk>token。
python
class SimpleTokenizerV2:
    def __init__(self, vocab):
        # 初始化分词器,包括词汇表的字符串到整数的映射和整数到字符串的映射
        self.str_to_int = vocab
        self.int_to_str = {i: s for s, i in vocab.items()}

    def encode(self, text):
        # 对文本进行预处理,包括分词
        preprocessed = re.split(r'([,.:;?_!"()\']|--|\s)', text)
        # 移除空白符,并过滤掉任何空字符串
        preprocessed = [item.strip() for item in preprocessed if item.strip()]
        # 将不在词汇表中的 token 替换为 `<|unk|>` token
        preprocessed = [
            item if item in self.str_to_int
            else "<|unk|>" for item in preprocessed
        ]

        # 将每个分词映射到相应的整数ID
        ids = [self.str_to_int[s] for s in preprocessed]
        return ids

    def decode(self, ids):
        # 将整数ID列表转换回文本
        text = " ".join([self.int_to_str[i] for i in ids])
        # 替换特定标点符号前的多余空格
        text = re.sub(r'\s+([,.:;?!"()\'])', r'\1', text)
return text- 让我们尝试使用修改后的分词器来对文本进行分词:
python
# 实例化分词器对象
tokenizer = SimpleTokenizerV2(vocab)

# 定义两段文本
text1 = "Hello, do you like tea?"
text2 = "In the sunlit terraces of the palace."

# 使用特殊 token " <|endoftext|> " 连接两段文本
text = " <|endoftext|> ".join((text1, text2))

# 输出连接后的文本
print(text)
Hello, do you like tea? <|endoftext|> In the sunlit terraces of the palace.
pythonb
tokenizer.encode(text)1131, 5, 355, 1126, 628, 975, 10, 1130, 55, 988, 956, 984, 722, 988, 1131, 7
python
tokenizer.decode(tokenizer.encode(text))'<|unk|>, do you like tea? <|endoftext|> In the sunlit terraces of the <|unk|>.'
2.5 字节对编码 (BytePair Encoding, BPE)
- GPT-2 使用了字节对编码 (BytePair Encoding, BPE) 作为其分词器。
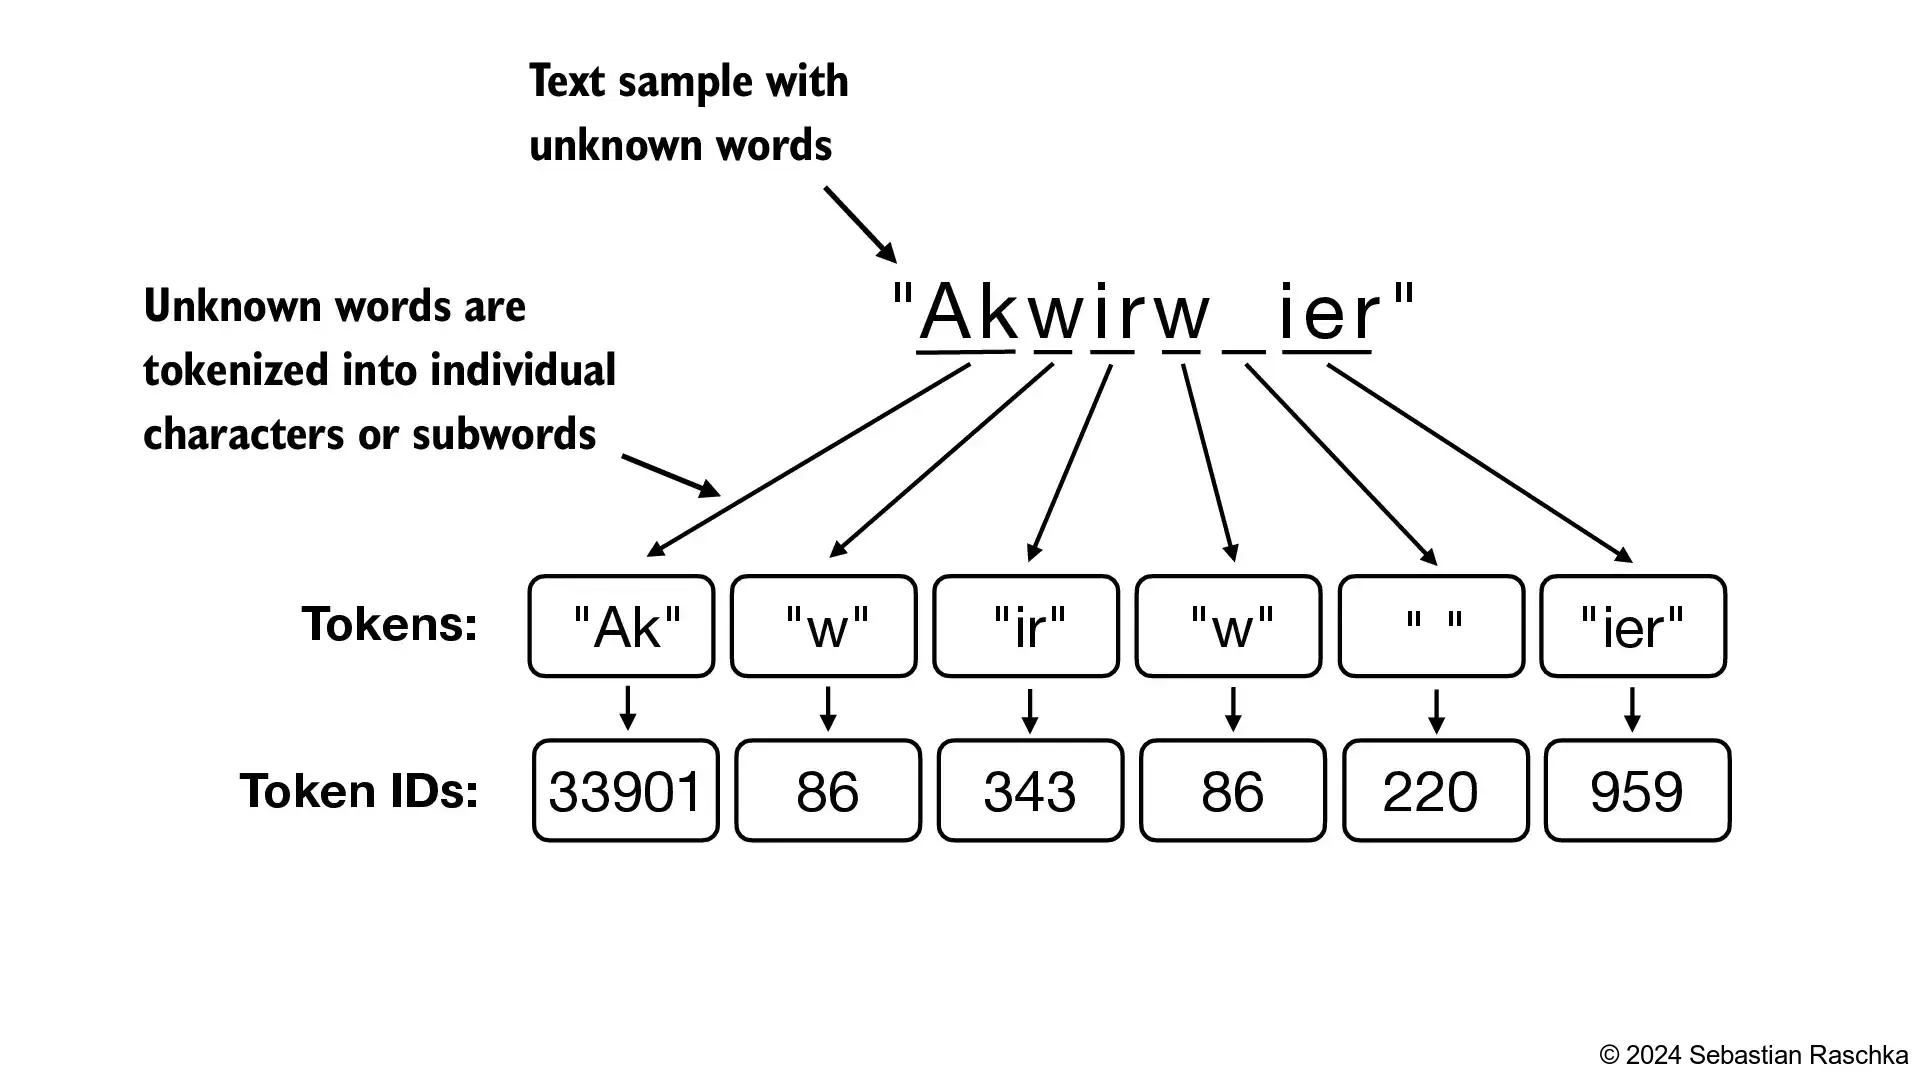
- 这种方法允许模型将不在预定义词汇表中的词汇分解为更小的子词单位甚至是单个字符,从而能够处理词汇表外的词汇。
- 例如,如果 GPT-2 的词汇表中没有单词 "unfamiliarword",它可能会将其分词为 ["unfam", "iliar", "word"] 或其他一些子词分解,这取决于其训练得到的 BPE 合并规则。
- 原始的 BPE 分词器可以在以下地址找到:https://github.com/openai/gpt-2/blob/master/src/encoder.py
- 在这本文中,我们使用了来自 OpenAI 开源库 tiktoken 的 BPE 分词器,该库使用 Rust 实现了其核心算法以提高计算性能。
- 我比较了这两种实现,结果显示 tiktoken 在样本文本上的运行速度大约快 5 倍。
python
# pip install tiktoken
python
import importlib
import tiktoken

print("tiktoken version:", importlib.metadata.version("tiktoken"))
tiktoken version: 0.7.0
python
tokenizer = tiktoken.get_encoding("gpt2")
python
# 定义一段包含特殊 token "<|endoftext|>" 的文本
text = (
    "Hello, do you like tea?  In the sunlit terraces"
    "of someunknownPlace."
)

# 使用分词器将文本编码为整数ID列表,允许使用特殊 token "<|endoftext|>"
integers = tokenizer.encode(text, allowed_special={"<|endoftext|>"})

# 输出整数ID列表
print(integers)
15496, 11, 466, 345, 588, 8887, 30, 220, 50256, 554, 262, 4252, 18250, 8812, 2114, 1659, 617, 34680, 27271, 13
python
strings = tokenizer.decode(integers)

print(strings)
Hello, do you like tea? <|endoftext|> In the sunlit terracesof someunknownPlace.
- BPE 分词器将未知词汇分解为子词和单个字符:
2.6 使用滑动窗口进行数据采样
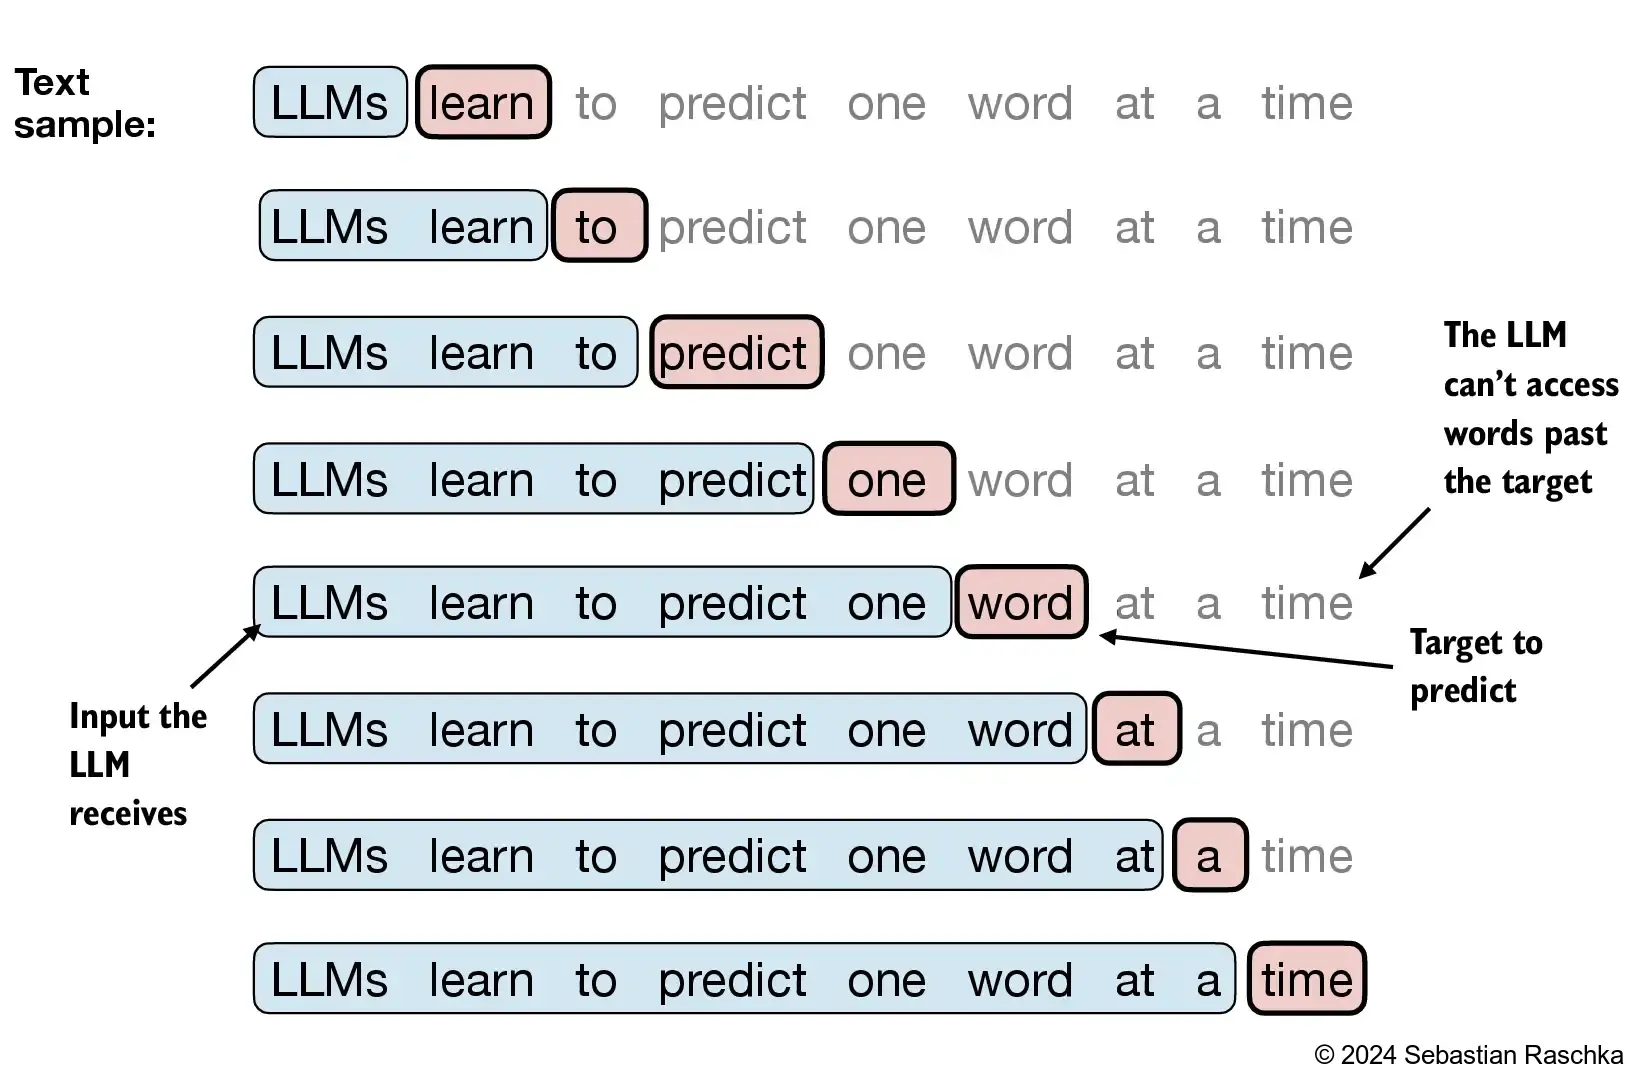
- 我们训练大型语言模型逐个生成词汇,因此我们需要相应地准备训练数据,其中序列中的下一个词汇代表要预测的目标:
python
# 打开文件 "the-verdict.txt" 并读取其内容
with open("the-verdict.txt", "r", encoding="utf-8") as f:
    raw_text = f.read()

# 使用分词器对原始文本进行编码
enc_text = tokenizer.encode(raw_text)

# 输出编码后的文本长度
print(len(enc_text))
5145
- 对于每个文本块,我们需要确定输入和目标。
- 由于我们希望模型预测下一个词汇,因此目标是输入向右移动一个位置的结果。
python
# 从编码后的文本中选取从第 51 个元素开始的子序列作为样本
enc_sample = enc_text[50:]
python
# 设置上下文大小为 4
context_size = 4

# 获取输入序列 x,即样本的前 context_size 个元素
x = enc_sample[:context_size]

# 获取目标序列 y,即样本的第 1 个元素到最后一个元素的前 context_size 个元素
y = enc_sample[1:context_size+1]

# 输出输入序列 x
print(f"x: {x}")

# 输出目标序列 y
print(f"y:      {y}")
x: [290, 4920, 2241, 287]
y: -------[4920, 2241, 287, 257]
- 逐个预测的话,看起来会像这样:
python
# 遍历从 1 到 context_size+1 的范围
for i in range(1, context_size+1):
    # 获取当前上下文,即从样本的起始位置到当前索引 i 的元素
    context = enc_sample[:i]

    # 获取期望的输出,即当前索引 i 处的元素
    desired = enc_sample[i]

    # 输出当前上下文及其对应的期望输出
    print(context, "---->", desired)
290\] ----\> 4920 \[290, 4920\] ----\> 2241 \[290, 4920, 2241\] ----\> 287 \[290, 4920, 2241, 287\] ----\> 257
python
# 遍历从 1 到 context_size+1 的范围
for i in range(1, context_size+1):
    # 获取当前上下文,即从样本的起始位置到当前索引 i 的元素
    context = enc_sample[:i]

    # 获取期望的输出,即当前索引 i 处的元素
    desired = enc_sample[i]

    # 将上下文和期望的输出解码回文本形式,并打印
    print(tokenizer.decode(context), "---->", tokenizer.decode([desired]))
and ----> established
and established ----> himself
and established himself ----> in
and established himself in ----> a
- 我们将在后续文章中会讨论下一个词汇的预测问题,在那之前我们会先介绍注意力机制。
- 目前,我们实现一个简单的数据加载器,它遍历输入数据集,并返回向右移动一个位置的输入和目标。
python
import torch
print("PyTorch version:", torch.__version__)
PyTorch version: 2.4.0+cpu
- 我们采用滑动窗口的方法,每次移动位置 +1:
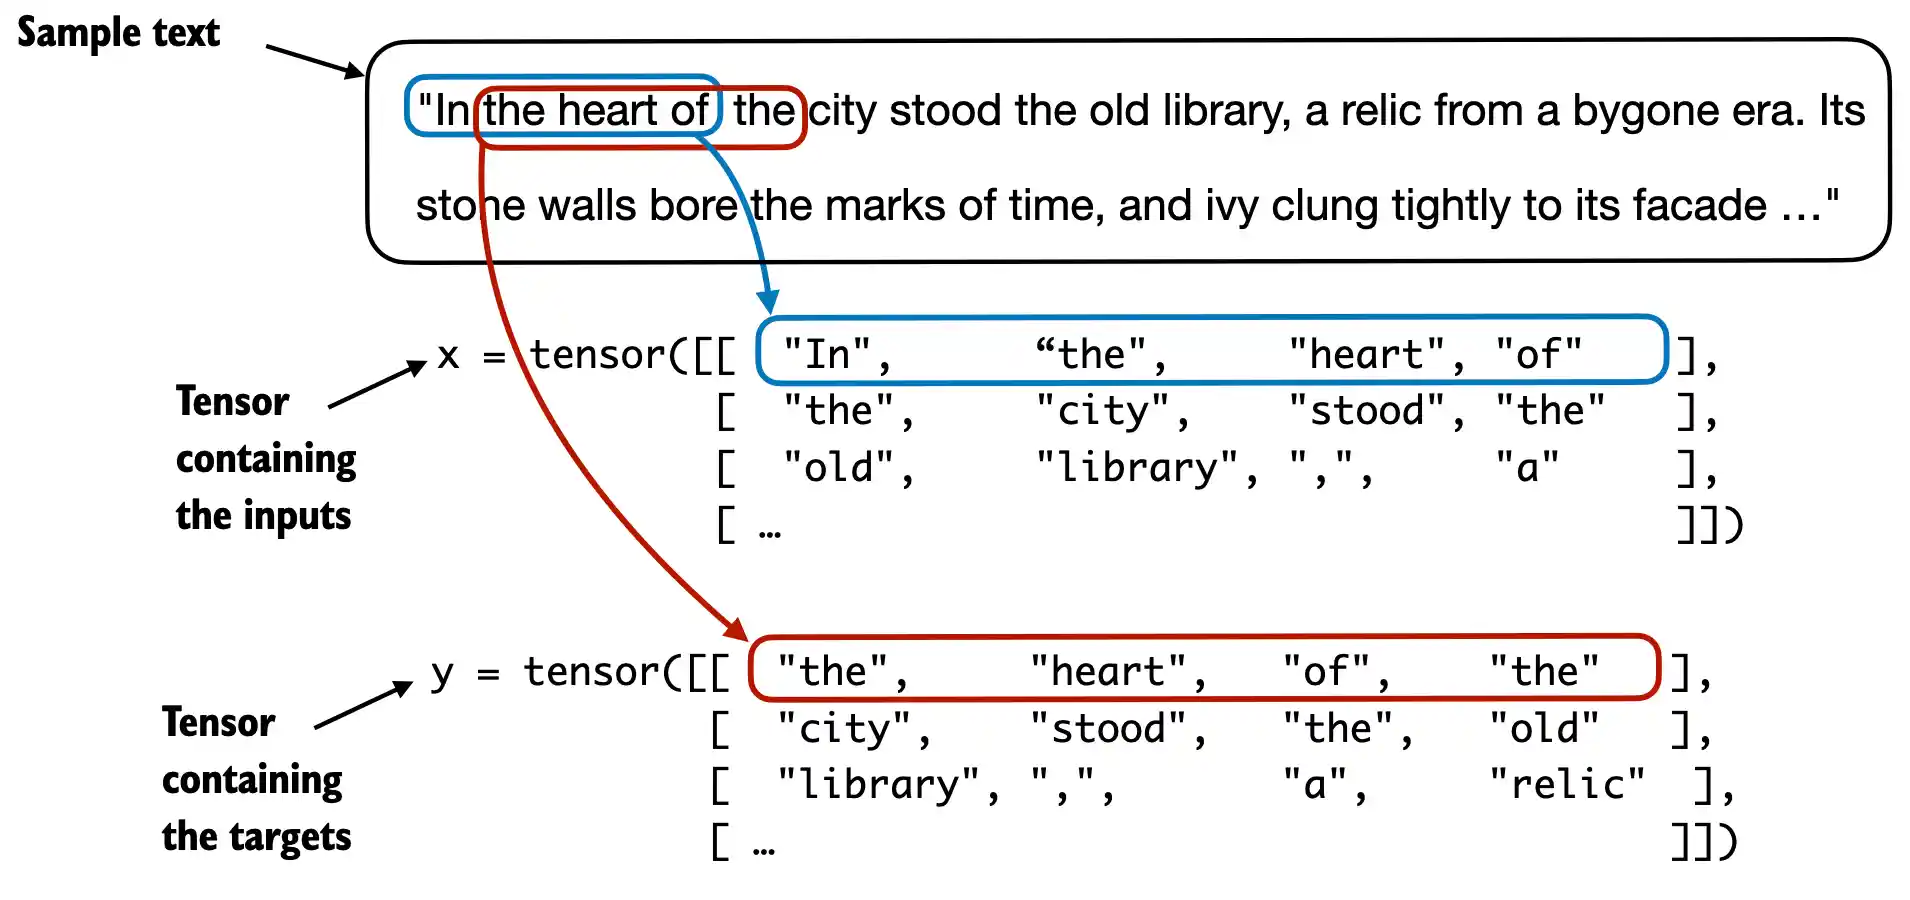
- 创建数据集 dataset 和数据加载器 dataloader,从输入文本数据集中提取文本块。
python
from torch.utils.data import Dataset, DataLoader

class GPTDatasetV1(Dataset):
    def __init__(self, txt, tokenizer, max_length, stride):
        # 初始化输入和目标 ID 列表
        self.input_ids = []
        self.target_ids = []

        # 对整个文本进行分词
        token_ids = tokenizer.encode(txt, allowed_special={"<|endoftext|>"})

        # 使用滑动窗口将文本分割成重叠的序列,每个序列的长度为 max_length
        for i in range(0, len(token_ids) - max_length, stride):
            # 获取输入序列
            input_chunk = token_ids[i:i + max_length]

            # 获取目标序列
            target_chunk = token_ids[i + 1: i + max_length + 1]

            # 将输入和目标序列转换为 PyTorch 张量,并添加到列表中
            self.input_ids.append(torch.tensor(input_chunk))
            self.target_ids.append(torch.tensor(target_chunk))

    def __len__(self):
        # 返回数据集中的样本数量
        return len(self.input_ids)

    def __getitem__(self, idx):
        # 根据索引返回输入和目标张量
        return self.input_ids[idx], self.target_ids[idx]
python
def create_dataloader_v1(txt, batch_size=4, max_length=256,
                         stride=128, shuffle=True, drop_last=True,
                         num_workers=0):
    # 初始化分词器
    tokenizer = tiktoken.get_encoding("gpt2")

    # 创建数据集
    dataset = GPTDatasetV1(txt, tokenizer, max_length, stride)

    # 创建数据加载器
    dataloader = DataLoader(
        dataset,
        batch_size=batch_size,
        shuffle=shuffle,
        drop_last=drop_last,
        num_workers=num_workers
    )

    # 返回数据加载器
return dataloader- 让我们使用批大小为 1 来测试数据加载器,对于具有上下文大小为 4 的大型语言模型来说:
python
with open("the-verdict.txt", "r", encoding="utf-8") as f:
    raw_text = f.read()
python
# 创建数据加载器,设置批大小为 1,最大序列长度为 4,步长为 1,不打乱顺序
dataloader = create_dataloader_v1(
    raw_text, batch_size=1, max_length=4, stride=1, shuffle=False
)

# 创建数据加载器迭代器
data_iter = iter(dataloader)

# 获取第一个批次的数据
first_batch = next(data_iter)

# 输出第一个批次的数据
print(first_batch)
tensor(\[\[ 40, 367, 2885, 1464\]\]), tensor(\[\[ 367, 2885, 1464, 1807\]\])
python
second_batch = next(data_iter)
print(second_batch)
tensor(\[\[ 367, 2885, 1464, 1807\]\]), tensor(\[\[2885, 1464, 1807, 3619\]\])
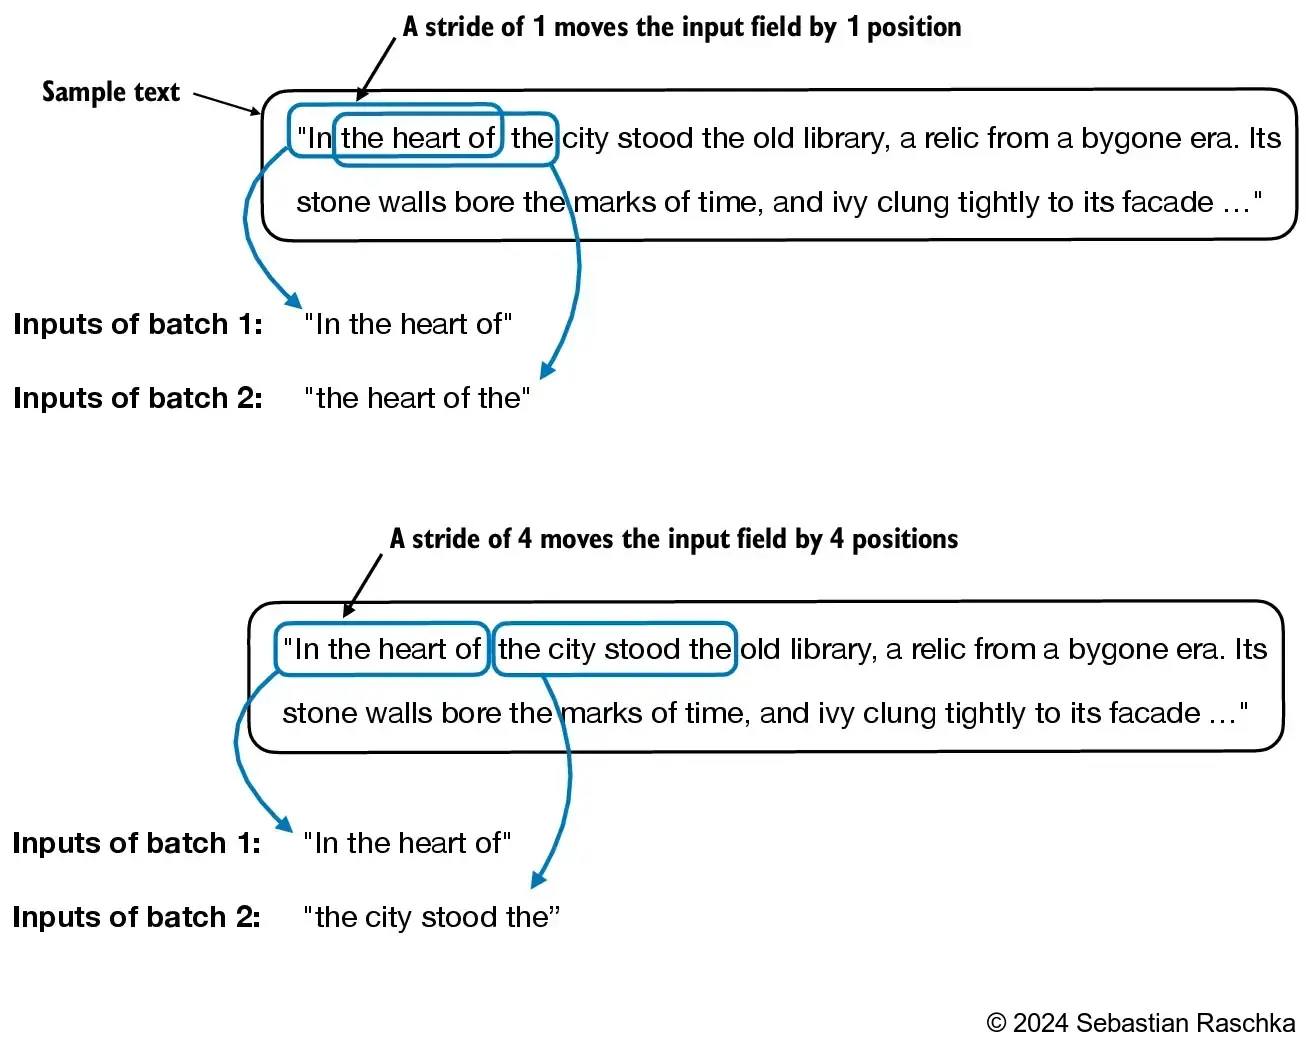
- 以下是一个使用步长等于上下文长度(这里为 4)的例子:
- 我们还可以创建批处理输出。
- 注意我们在这里增加了步长,以便在各批次之间没有重叠,因为过多的重叠可能导致过拟合加剧。
python
# 创建数据加载器,设置批大小为 8,最大序列长度为 4,步长为 4,不打乱顺序
dataloader = create_dataloader_v1(raw_text, batch_size=8, max_length=4, stride=4, shuffle=False)

# 创建数据加载器迭代器
data_iter = iter(dataloader)

# 获取第一个批次的数据
inputs, targets = next(data_iter)

# 输出输入数据
print("Inputs:\n", inputs)

# 输出目标数据
print("\nTargets:\n", targets)
Inputs:
tensor([[40, 367, 2885, 1464],
1807, 3619, 402, 271\], \[10899, 2138, 257, 7026\], \[15632, 438, 2016, 257\], \[922, 5891, 1576, 438\], \[568, 340, 373, 645\], \[1049, 5975, 284, 502\], \[284, 3285, 326, 11\]\]) Targets: tensor(\[\[367, 2885, 1464, 1807\], \[3619, 402, 271, 10899\], \[2138, 257, 7026, 15632\], \[438, 2016, 257, 922\], \[5891, 1576, 438, 568\], \[340, 373, 645, 1049\], \[5975, 284, 502, 284\], \[3285, 326, 11, 287\]\])
2.7 创建 token 嵌入 (Token Embeddings)
- 数据已经几乎准备好供大型语言模型使用了。
- 但最后,让我们使用嵌入层将 token 嵌入到连续的向量表示中。
- 通常,这些嵌入层是大型语言模型的一部分,并在模型训练过程中进行更新(训练)。
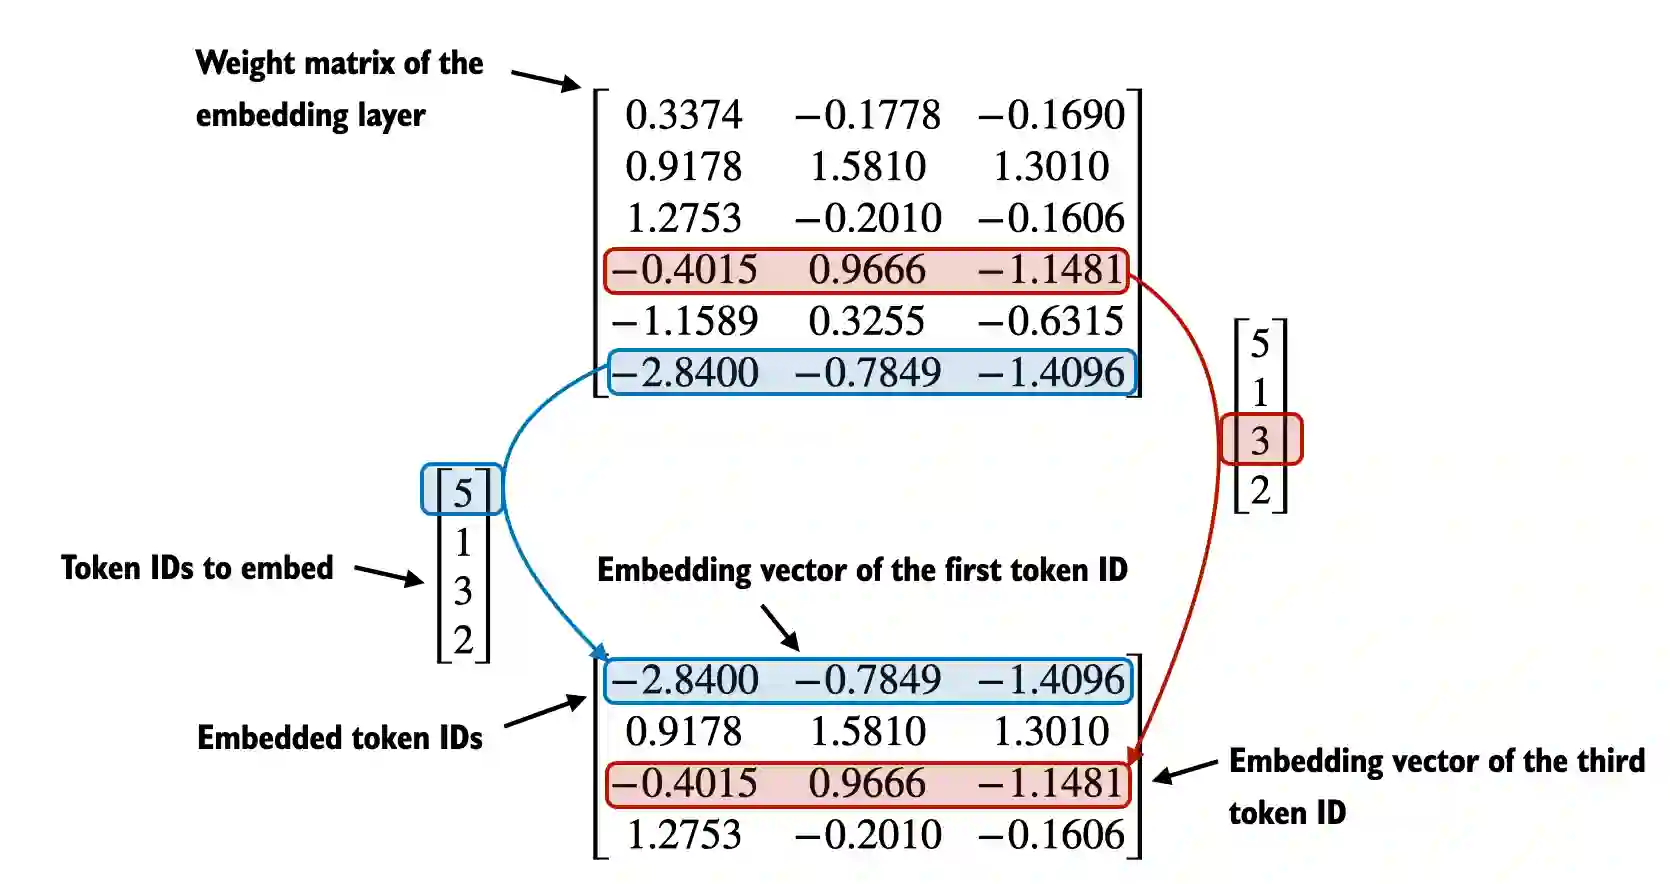
- 假设我们有以下四个输入示例,它们的输入ID分别为2、3、5和1(经过分词后):
python
input_ids = torch.tensor([2, 3, 5, 1])- 为了简化起见,假设我们有一个只包含6个词汇的小型词汇表,并且我们想要创建大小为3的嵌入:
python
# 设定词汇表大小为 6
vocab_size = 6

# 设定嵌入向量的维度为 3
output_dim = 3

# 设置随机种子以保证结果的可复现性
torch.manual_seed(123)

# 创建一个嵌入层,参数为词汇表大小和嵌入向量的维度
embedding_layer = torch.nn.Embedding(vocab_size, output_dim)- 这将得到一个 6x3 的权重矩阵:
python
print(embedding_layer.weight)Parameter containing:
tensor([[ 0.3374, -0.1778, -0.1690],
0.9178, 1.5810, 1.3010\], \[ 1.2753, -0.2010, -0.1606\], \[-0.4015, 0.9666, -1.1481\], \[-1.1589, 0.3255, -0.6315\], \[-2.8400, -0.7849, -1.4096\]\], requires_grad=True)
-
对于熟悉 one-hot 编码的人来说,上面的嵌入层方法本质上是一种更高效的方式,它实现了 one-hot 编码后跟全连接层中的矩阵乘法。
-
由于嵌入层仅仅是一种更高效的实现方式,它等同于 one-hot 编码和矩阵乘法的方法,因此它可以被视为一个可以通过反向传播进行优化的神经网络层。
-
要将具有ID 3的 token 转换为3维向量,我们执行以下操作:
python
print(embedding_layer(torch.tensor([3])))tensor([[-0.4015, 0.9666, -1.1481]], grad_fn=<EmbeddingBackward0>)
- 注意上面的是
embedding_layer权重矩阵中的第4行。 - 要嵌入上面所有的四个
input_ids值,我们执行如下操作:
python
print(embedding_layer(input_ids))tensor([[ 1.2753, -0.2010, -0.1606],
-0.4015, 0.9666, -1.1481\], \[-2.8400, -0.7849, -1.4096\], \[ 0.9178, 1.5810, 1.3010\]\], grad_fn=)
- 嵌入层本质上是一个查找操作:
- 嵌入层与常规线性层的区别:torch.nn.Embedding 和 torch.nn.Linear 的区别
2.8 编码词汇的位置信息 (Encoding Word Positions)
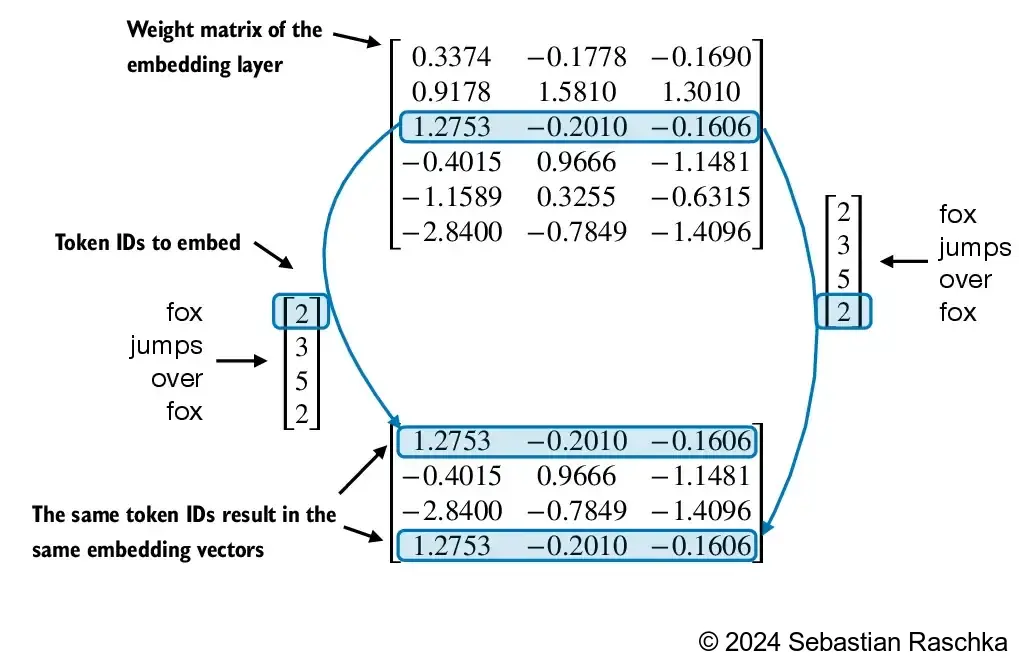
- 嵌入层将ID转换为相同的向量表示,无论它们位于输入序列中的哪个位置:
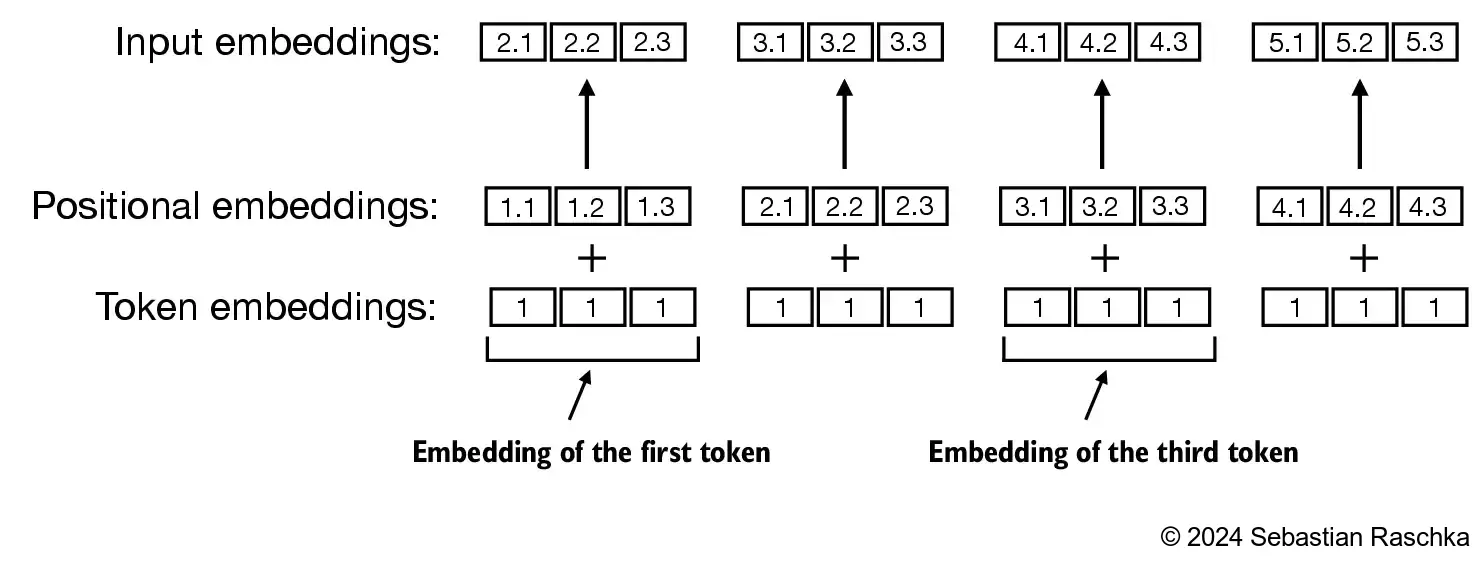
- 位置嵌入与 token 嵌入向量相结合,形成大型语言模型的输入嵌入:
- 字节对编码器的词汇表大小为 50,257:
- 假设我们想要将输入 token 编码为 256 维的向量表示:
python
# 设定词汇表大小为 50,257
vocab_size = 50257

# 设定嵌入向量的维度为 256
output_dim = 256

# 创建一个嵌入层,输入为词汇表大小,输出为嵌入向量的维度
token_embedding_layer = torch.nn.Embedding(vocab_size, output_dim)- 如果我们从数据加载器中采样数据,我们将每个批次中的 token 嵌入到 256 维的向量中。
- 如果我们的批大小为 8,每批中有 4 个 token,这将产生一个 8 x 4 x 256 的张量:
python
# 设定最大序列长度为 4
max_length = 4

# 创建数据加载器,设置批大小为 8,最大序列长度为 max_length,
# 步长为 max_length,不打乱顺序
dataloader = create_dataloader_v1(
    raw_text, batch_size=8, max_length=max_length,
    stride=max_length, shuffle=False
)

# 创建数据加载器迭代器
data_iter = iter(dataloader)

# 获取第一个批次的数据
inputs, targets = next(data_iter)
python
print("Token IDs:\n", inputs)
print("\nInputs shape:\n", inputs.shape)
Token IDs:
tensor([[ 40, 367, 2885, 1464],
1807, 3619, 402, 271\], \[10899, 2138, 257, 7026\], \[15632, 438, 2016, 257\], \[ 922, 5891, 1576, 438\], \[ 568, 340, 373, 645\], \[ 1049, 5975, 284, 502\], \[ 284, 3285, 326, 11\]\]) Inputs shape: torch.Size(\[8, 4\])
python
# 将 token 嵌入和位置嵌入相加,得到输入嵌入
input_embeddings = token_embeddings + pos_embeddings

# 输出输入嵌入的形状
print(input_embeddings.shape)
torch.Size([8, 4, 256])
- GPT-2 使用绝对位置嵌入,所以我们只需创建另一个嵌入层:
python
context_length = max_length

# 创建位置嵌入层,输入为上下文长度,输出为嵌入向量的维度
pos_embedding_layer = torch.nn.Embedding(context_length, output_dim)
python
# 创建位置嵌入,使用从 0 到 max_length-1 的整数序列作为输入
pos_embeddings = pos_embedding_layer(torch.arange(max_length))

# 输出位置嵌入的形状
print(pos_embeddings.shape)
torch.Size([4, 256])
- 为了创建大型语言模型中使用的输入嵌入,我们只需将 token 嵌入和位置嵌入相加:
python
# 将 token 嵌入和位置嵌入相加,得到输入嵌入
input_embeddings = token_embeddings + pos_embeddings

# 输出输入嵌入的形状
print(input_embeddings.shape)
torch.Size([8, 4, 256])
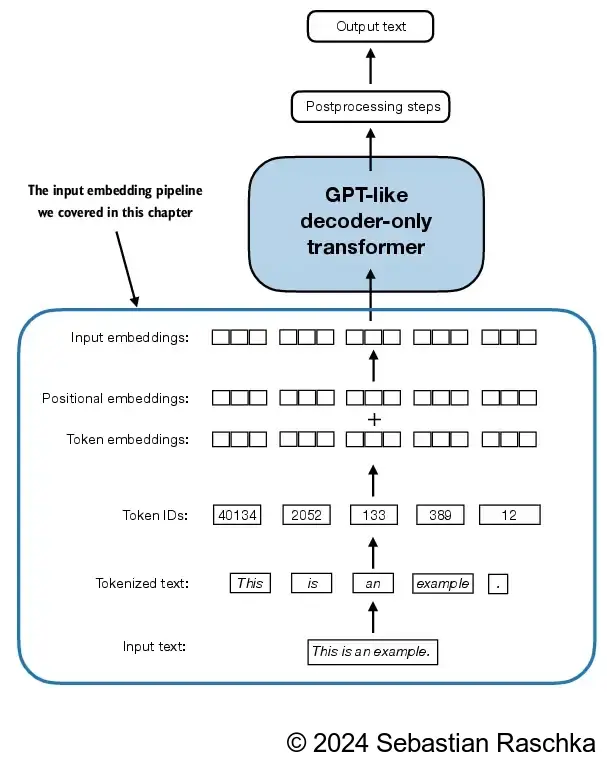
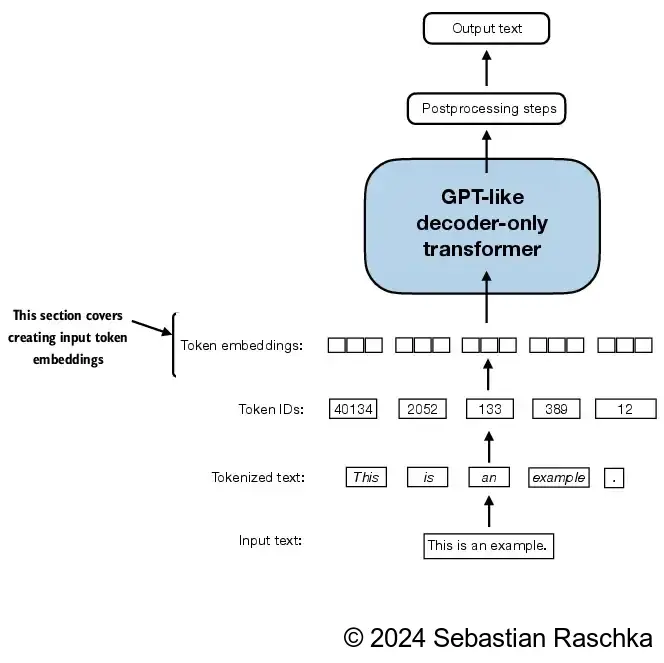
- 在输入处理工作流程的初始阶段,输入文本被分割成单独的 token。
- 在此分割之后,这些 token 根据预定义的词汇表被转换为 token ID:
