主要内容:
企业网络综合项目分析、大型企业网络搭建
项目案例1
一家网络公司,有若干服务器,通过NAT技术将业务服务器与Internet互联;已有技术:
- ① 默认路由:实现到互联网数以万计网络访问的简化配置;
- ② 静态路由:路由器与三层交换间配置静态路由;
- ③ NAT:将业务服务器与Internet互联;
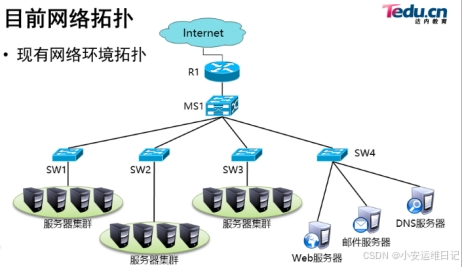
1)现有网络环境问题分析:
- 接入层交换机只与同一个ie三层交换机互联,存在单点故障而影响网络通信;
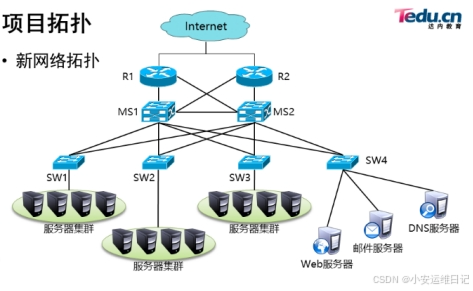
2)项目需求:
- 为提高主机对本公私网络服务访问的可靠性,需要使用很多的冗余技术;
- 为了保证局域网络高可靠使用了网状拓扑;
- 为了保证服务器不会因为使用单一网关而出现的单点失败影响网络通信需要网关冗余;
- 为了保证到互联网的高可用接入需要使用了冗余互联网连接;
3)解决方案:
- OSPF路由协议:实现网络路径的自动学习;
- VRRP虚拟路由冗余协议:实现冗余网关;
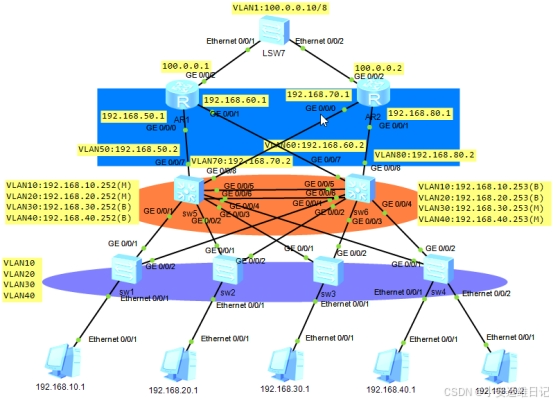
1、网络拓扑
2、整体思路
1.配置主机IP:
PC1:192.168.10.1 /24 192.168.10.254(VRRP)
PC2:192.168.20.1 /24 192.168.20.254(VRRP)
PC3:192.168.30.1 /24 192.168.30.254(VRRP)
PC4:192.168.40.1 /24 192.168.40.254(VRRP)
PC5:192.168.40.2 /24 192.168.40.254(VRRP)
2.配置二层交换机:
- ① 配置4个交换机的VLAN(10、20、30、40)
- ② 配置交换机下层,VLAN对应相应的接口,Type类型为Access;
- ③ 配置交换机上层,2个G接口类型加入Trunk;
3.配置三层交换机:
- ① 配置2个三层交换机的VLAN(10、20、30、40)
- ② 配置三层交换机连接二层交换机的接口为Trunk;
- ③ 配置2个三层交换机的VLAN虚拟接口;
- ④ 配置三层交换机之间的接口为ETH-TRUNK聚合链路;
- ⑤ 配置VRRP协议,设置虚拟网关;
4.配置路由器:
- ① 配置端口IP;
- ② 配置三层交换机VLAN虚拟接口并对应到相应接口上,VLAN(50、60、70、80)
- ③ 配置OSPF协议
5.模拟外网环境:
- ① 配置相关IP(SW7、路由器)
- ② 配置静态默认路由及宣告
- ③ 配置NAT-EasyIP模式实现NAT转换
3、配置步骤
步骤1:配置二层交换机,修改主机名并创建vlan10、20、30、40
bash
[Huawei]sysname sw1
[sw1]
[sw1] vlan batch 10 20 30 40
[sw1] displan vlan

[Huawei]sysname sw2
[sw2]
[sw2] vlan batch 10 20 30 40
[sw2] displan vlan

[Huawei]sysname sw3
[sw3]
[sw3] vlan batch 10 20 30 40
[sw3] displan vlan

[Huawei]sysname sw4
[sw4]
[sw4] vlan batch 10 20 30 40
[sw4] displan vlan
步骤2:配置二层交换机端口并加入对应VLAN
bash
[sw1]interface Ethernet 0/0/1
[sw1-Ethernet0/0/1]port link-type access
[sw1-Ethernet0/0/1]port default vlan 10

[sw2]interface Ethernet 0/0/1
[sw2-Ethernet0/0/1]port link-type access
[sw2-Ethernet0/0/1]port default vlan 20

[sw3]interface Ethernet 0/0/1
[sw3-Ethernet0/0/1]port link-type access
[sw3-Ethernet0/0/1]port default vlan 30

[sw4]interface Ethernet 0/0/1
[sw4-Ethernet0/0/1]port link-type access
[sw4-Ethernet0/0/1]port default vlan 40
[sw4]interface Ethernet 0/0/2
[sw4-Ethernet0/0/1]port link-type access
[sw4-Ethernet0/0/1]port default vlan 40
步骤3:配置二层交换机千兆口端口类型为Trunk
bash
[sw1] port-group 1
[sw1-port-group-1] group-member GigabitEthernet 0/0/1 GigabitEthernet 0/0/2
[sw1-port-group-1] port link-type trunk
[sw1-port-group-1] port trunk allow-pass vlan all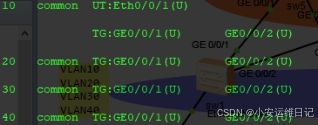
bash
[sw2] port-group 1
[sw2-port-group-1] group-member GigabitEthernet 0/0/1 GigabitEthernet 0/0/2
[sw2-port-group-1] port link-type trunk
[sw2-port-group-1] port trunk allow-pass vlan all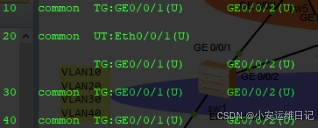
bash
[sw3] port-group 1
[sw3-port-group-1] group-member GigabitEthernet 0/0/1 GigabitEthernet 0/0/2
[sw3-port-group-1] port link-type trunk
[sw3-port-group-1] port trunk allow-pass vlan all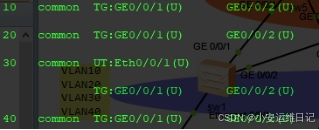
bash
[sw4] port-group 1
[sw4-port-group-1] group-member GigabitEthernet 0/0/1 GigabitEthernet 0/0/2
[sw4-port-group-1] port link-type trunk
[sw4-port-group-1] port trunk allow-pass vlan all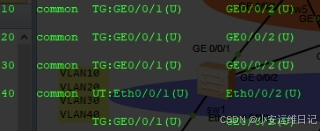
步骤4:配置三层交换机,修改主机名及创建VLAN及接口类型为Trunk
bash
[Huawei]sysname sw5
[sw5]vlan batch 10 20 30 40
[sw5]port-group 1
[sw5-port-group-1]group-member GigabitEthernet 0/0/1 to GigabitEthernet 0/0/4
[sw5-port-group-1]port link-type trunk
[sw5-port-group-1]port trunk allow-pass vlan all

[Huawei]sysname sw6
[sw6]vlan batch 10 20 30 40
[sw6]port-group 1
[sw6-port-group-1]group-member GigabitEthernet 0/0/1 to GigabitEthernet 0/0/4
[sw6-port-group-1]port link-type trunk
[sw6-port-group-1]port trunk allow-pass vlan all
步骤5:配置三层交换机聚合链路
bash
[sw5]interface Eth-Trunk 1
[sw5-Eth-Trunk1]trunkport GigabitEthernet 0/0/5 0/0/6
[sw5-Eth-Trunk1]port link-type trunk
[sw5-Eth-Trunk1]port trunk allow-pass vlan all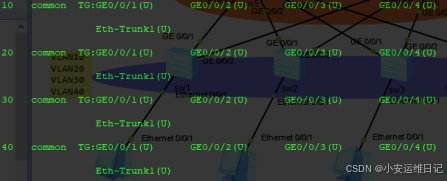
bash
[sw6]interface Eth-Trunk 1
[sw6-Eth-Trunk1]trunkport GigabitEthernet 0/0/5 0/0/6
[sw6-Eth-Trunk1]port link-type trunk
[sw6-Eth-Trunk1]port trunk allow-pass vlan all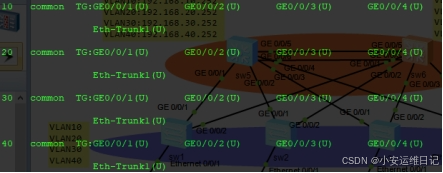
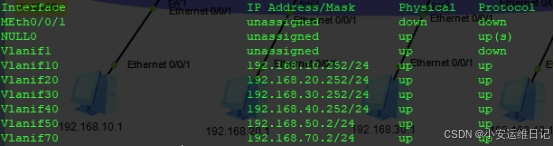
步骤6:配置三层交换机虚拟接口
bash
[sw5]inter vlan10
[sw5-Vlanif10]ip add 192.168.10.252 24
[sw5-Vlanif10]inter vlan20
[sw5-Vlanif20]ip add 192.168.20.252 24
[sw5-Vlanif20]inter vlan30
[sw5-Vlanif30]ip add 192.168.30.252 24
[sw5-Vlanif30]inter vlan40
[sw5-Vlanif40]ip add 192.168.40.252 24
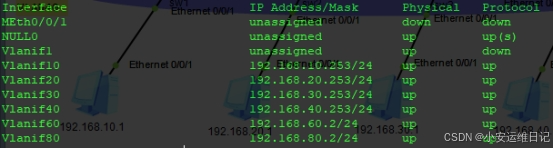
[sw5-Vlanif40]display ip interface brief
bash
[sw6]inter vlan10
[sw6-Vlanif10]ip add 192.168.10.253 24
[sw6-Vlanif10]inter vlan20
[sw6-Vlanif20]ip add 192.168.20.253 24
[sw6-Vlanif20]inter vlan30
[sw6-Vlanif30]ip add 192.168.30.253 24
[sw6-Vlanif30]inter vlan40
[sw6-Vlanif40]ip add 192.168.40.253 24
[sw6-Vlanif40]display ip interface brief
步骤7:配置VRRP虚拟冗余协议,添加虚拟网关
bash
[sw5]interface Vlanif 10
[sw5-Vlanif10]vrrp vrid 10 virtual-ip 192.168.10.254
[sw5-Vlanif10]vrrp vrid 10 priority 105
[sw5-Vlanif10]inter vlan 20
[sw5-Vlanif20]vrrp vrid 20 virtual-ip 192.168.20.254
[sw5-Vlanif20]vrrp vrid 20 priority 105
[sw5-Vlanif20]inter vlan 30
[sw5-Vlanif30]vrrp vrid 30 virtual-ip 192.168.30.254
[sw5-Vlanif30]inter vlan 40
[sw5-Vlanif40]vrrp vrid 40 virtual-ip 192.168.40.254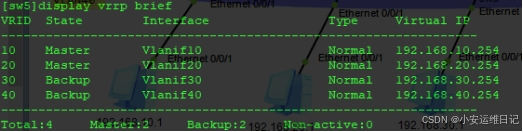
bash
[sw6]interface Vlanif 10
[sw6-Vlanif10]vrrp vrid 10 virtual-ip 192.168.10.254
[sw6-Vlanif10]inter vlan 20
[sw6-Vlanif20]vrrp vrid 20 virtual-ip 192.168.20.254
[sw6-Vlanif20]inter vlan 30
[sw6-Vlanif30]vrrp vrid 30 virtual-ip 192.168.30.254
[sw6-Vlanif30]vrrp vrid 30 priority 105
[sw6-Vlanif30]inter vlan 40
[sw6-Vlanif40]vrrp vrid 40 virtual-ip 192.168.40.254
[sw6-Vlanif40]vrrp vrid 40 priority 105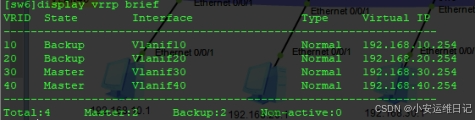
步骤8:配置路由器IP地址
AR1:
bash
[ar1]interface GigabitEthernet 0/0/0
[ar1-GigabitEthernet0/0/0]ip add 192.168.50.1 24
SW5:
bash
[sw5]vlan 50
[sw5]interface vlan 50
[sw5-Vlanif50]ip add 192.168.50.2 24
[sw5]interface GigabitEthernet 0/0/7
[sw5-GigabitEthernet0/0/7]port link-type access
[sw5-GigabitEthernet0/0/7]port default vlan 50
[sw5]ping 192.168.50.1    //测试
AR1:
bash
[ar1]interface GigabitEthernet 0/0/1
[ar1-GigabitEthernet0/0/0]ip add 192.168.60.1 24
SW6:
bash
[sw6]vlan 60
[sw6]interface vlan 60
[sw6-Vlanif60]ip add 192.168.60.2 24
[sw6]interface GigabitEthernet 0/0/7
[sw6-GigabitEthernet0/0/7]port link-type access
[sw6-GigabitEthernet0/0/7]port default vlan 60
[sw6]ping 192.168.60.1    //测试
AR2:
bash
[ar2]interface GigabitEthernet 0/0/0
[ar2-GigabitEthernet0/0/0]ip add 192.168.70.1 24
SW5:
bash
[sw5]vlan 70
[sw5]interface vlan 70
[sw5-Vlanif70]ip add 192.168.70.2 24
[sw5]interface GigabitEthernet 0/0/8
[sw5-GigabitEthernet0/0/8]port link-type access
[sw5-GigabitEthernet0/0/8]port default vlan 70
[sw5]ping 192.168.70.1    //测试
AR2:
bash
[ar2]interface GigabitEthernet 0/0/1
[ar2-GigabitEthernet0/0/0]ip add 192.168.80.1 24
SW6
bash
[sw6]vlan 80
[sw6]interface vlan 80
[sw6-Vlanif80]ip add 192.168.80.2 24
[sw6]interface GigabitEthernet 0/0/8
[sw6-GigabitEthernet0/0/8]port link-type access
[sw6-GigabitEthernet0/0/8]port default vlan 80
[sw6]ping 192.168.80.1    //测试
ar1 display ip interface brief

ar2 display ip interface brief

sw5 display ip interface brief
sw6 display ip interface brief
步骤9:配置OSPF动态路由协议
SW5:
bash
[sw5]ospf
[sw5-ospf-1]area 0
[sw5-ospf-1-area-0.0.0.0]network 192.168.10.0 0.0.0.255
[sw5-ospf-1-area-0.0.0.0]network 192.168.20.0 0.0.0.255
[sw5-ospf-1-area-0.0.0.0]network 192.168.30.0 0.0.0.255
[sw5-ospf-1-area-0.0.0.0]network 192.168.40.0 0.0.0.255
[sw5-ospf-1-area-0.0.0.0]network 192.168.50.0 0.0.0.255
[sw5-ospf-1-area-0.0.0.0]network 192.168.70.0 0.0.0.255
SW6:
bash
[sw6]ospf
[sw6-ospf-1]area 0
[sw6-ospf-1-area-0.0.0.0]network 192.168.10.0 0.0.0.255
[sw6-ospf-1-area-0.0.0.0]network 192.168.20.0 0.0.0.255
[sw6-ospf-1-area-0.0.0.0]network 192.168.30.0 0.0.0.255
[sw6-ospf-1-area-0.0.0.0]network 192.168.40.0 0.0.0.255
[sw6-ospf-1-area-0.0.0.0]network 192.168.60.0 0.0.0.255
[sw6-ospf-1-area-0.0.0.0]network 192.168.80.0 0.0.0.255
AR1:
bash
[ar1]ospf
[ar1-ospf-1]area 0
[ar1-ospf-1-area-0.0.0.0]network 192.168.50.0 0.0.0.255
[ar1-ospf-1-area-0.0.0.0]network 192.168.60.0 0.0.0.255
AR2:
bash
[ar2]ospf
[ar2-ospf-1]area 0
[ar2-ospf-1-area-0.0.0.0]network 192.168.70.0 0.0.0.255
[ar2-ospf-1-area-0.0.0.0]network 192.168.80.0 0.0.0.255
bash
[ar1] display ip routing-table | include /24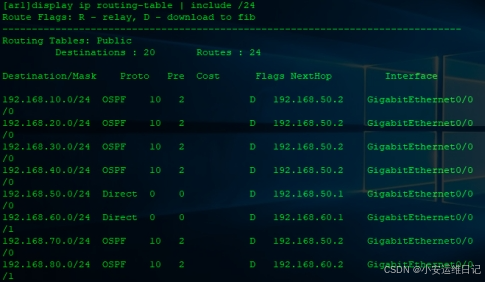
bash
[ar2] display ip routing-table | include /24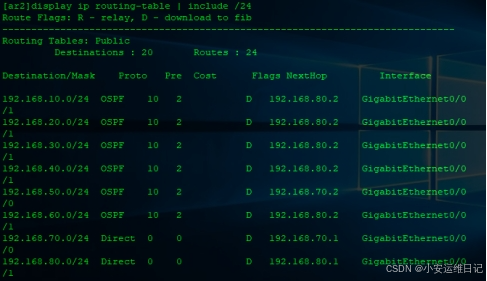
步骤10:模拟外网环境,配置相关IP
SW7:
bash
[Huawei]sysname sw7
[sw7]interface Vlanif 1
[sw7-Vlanif1]ip add 100.0.0.10 8
AR1:
bash
[ar1]interface GigabitEthernet 0/0/2
[ar1-GigabitEthernet0/0/2]ip add 100.0.0.1 8
AR2:
bash
[ar2]interface GigabitEthernet 0/0/2
[ar2-GigabitEthernet0/0/2]ip add 100.0.0.2 8
步骤11:配置静态默认路由及宣告默认路由
AR1:
bash
[ar1]ip route-static 0.0.0.0 0 100.0.0.10      //配置静态默认路由,指定下一跳
[ar1]ospf
[ar1-ospf-1]default-route-advertise       //宣告默认路由
bash
[ar1-ospf-1]display ip routing-table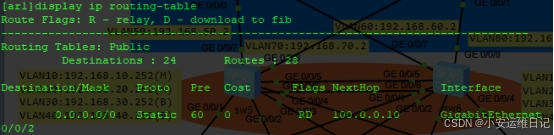
bash
[sw5]display ip routing-table //三层交换机通过宣告学习到默认路由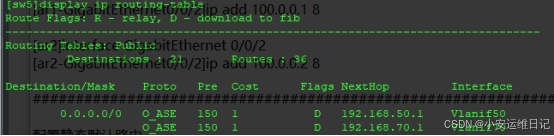
AR2:
bash
[ar2]ip route-static 0.0.0.0 0 100.0.0.10     //配置静态默认路由,指定下一跳
[ar2]ospf
[ar2-ospf-1]default-route-advertise       //宣告默认路由
bash
[ar2-ospf-1]display ip routing-table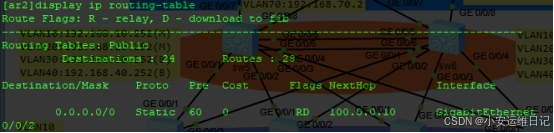
bash
[sw6]display ip routing-table //三层交换机通过宣告学习到默认路由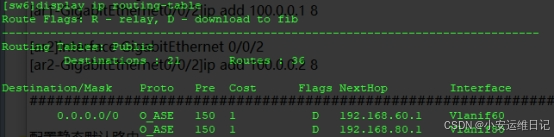
步骤12:配置NAT-Easy IP方式地址转换
bash
[ar1]acl 2000
[ar1-acl-basic-2000]rule permit source any
[ar1-acl-basic-2000]quit
[ar1]interface GigabitEthernet 0/0/2
[ar1-GigabitEthernet0/0/2]nat outbound 2000

[ar2]acl 2000
[ar2-acl-basic-2000]rule permit source any
[ar2-acl-basic-2000]quit
[ar2]interface GigabitEthernet 0/0/2
[ar2-GigabitEthernet0/0/2]nat outbound 2000
步骤13:PING测试结果
回顾:display
- display version //查询系统版本、硬件型号
- display current-configuration //查看大部分配置
- display vlan //查看VLAN信息
- display ip interface brief //查看IP接口配置( 管道过滤掩码为24:| include /24)
- display ip routing-table brief //查看完整路由表
- display acl all //查看所有ACL
- display vrrp brief //查看VRRP
小结:
本篇章节为**【第二阶段】NETWORK-DAY6** 的学习笔记,这篇笔记可以初步了解到 企业网络综合项目分析、大型企业网络搭建。
Tip:毕竟两个人的智慧大于一个人的智慧,如果你不理解本章节的内容或需要相关笔记、视频,可私信小安,请不要害羞和回避,可以向他人请教,花点时间直到你真正的理解