文章目录
-
- 1、位置编码的2种方案
- 2、位置编码
- [3、公式详解 : 绝对位置 、 相对位置](#3、公式详解 : 绝对位置 、 相对位置)
- 4、代码
-
- [4.1 代码1](#4.1 代码1)
- [4.2 代码2](#4.2 代码2)
1、位置编码的2种方案
transformer的作者刚开始说固定的位置编码和可学习的位置编码的效果是差不多的,后来证明可学习的位置编码没有太大的必要,还不如省事直接使用固定的位置编码,
代码中,token_num是句子中的单词数量,embed_dim表示每个单词的特征向量长度,
python
self.pe =nn.Parameter(torch.zeros(token_num, embed_dim))
2、位置编码
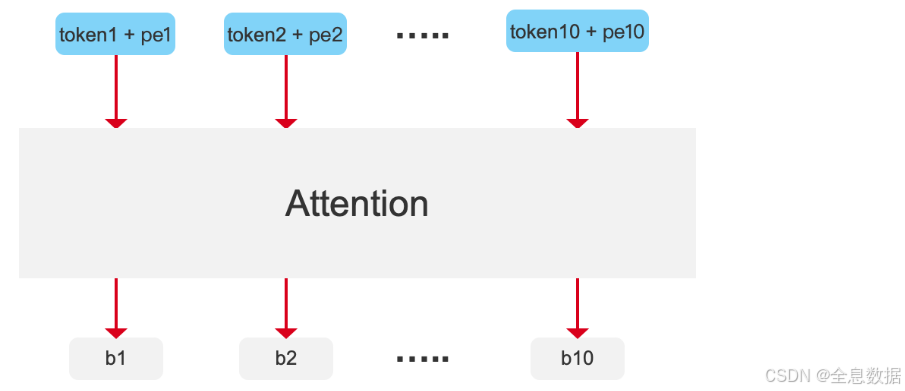
将对应位置的位置编码直接加在输入的单词上,如下图中的最后一行,
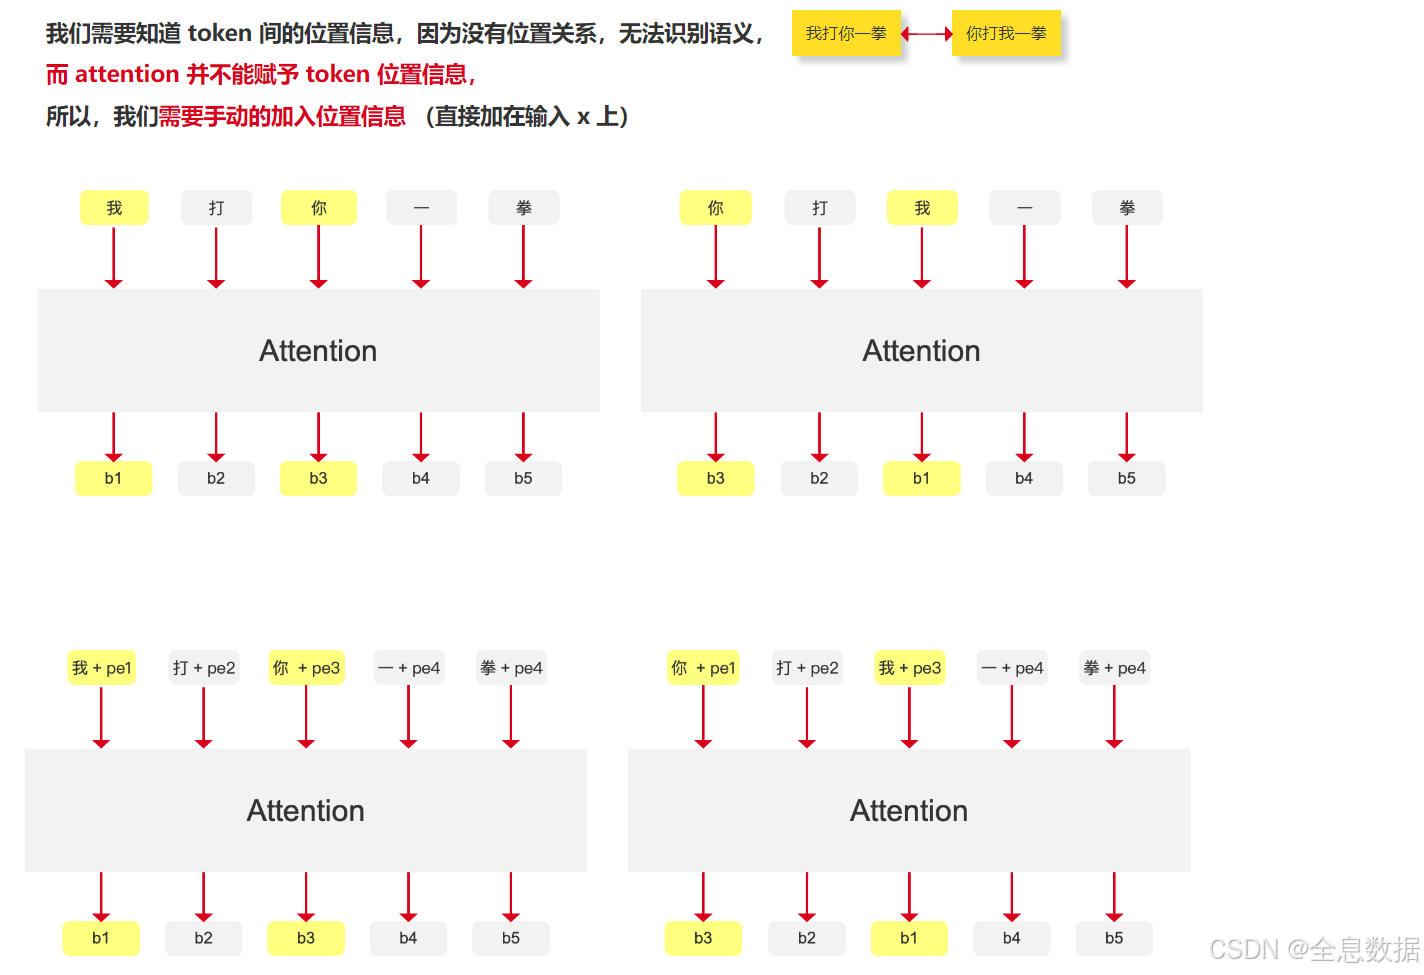
为什么 attention 并不能赋予 token 位置信息?
- 例如下图中的一句话里有5个token,先计算每个token(例如"我")和其他所有token的相似度,然后再乘以每个token(例如"我")的value,得到b1值,b1值只包含全局的内容信息,而不包括位置信息,
- 下图第1行的左图和右图中的"我"的值都是相同的,
- 所以相应的解决方案就是对每个token加入一个位置信息,如下图第2行中的pe,这样下图第2行中的b1和b3值就不一样了,
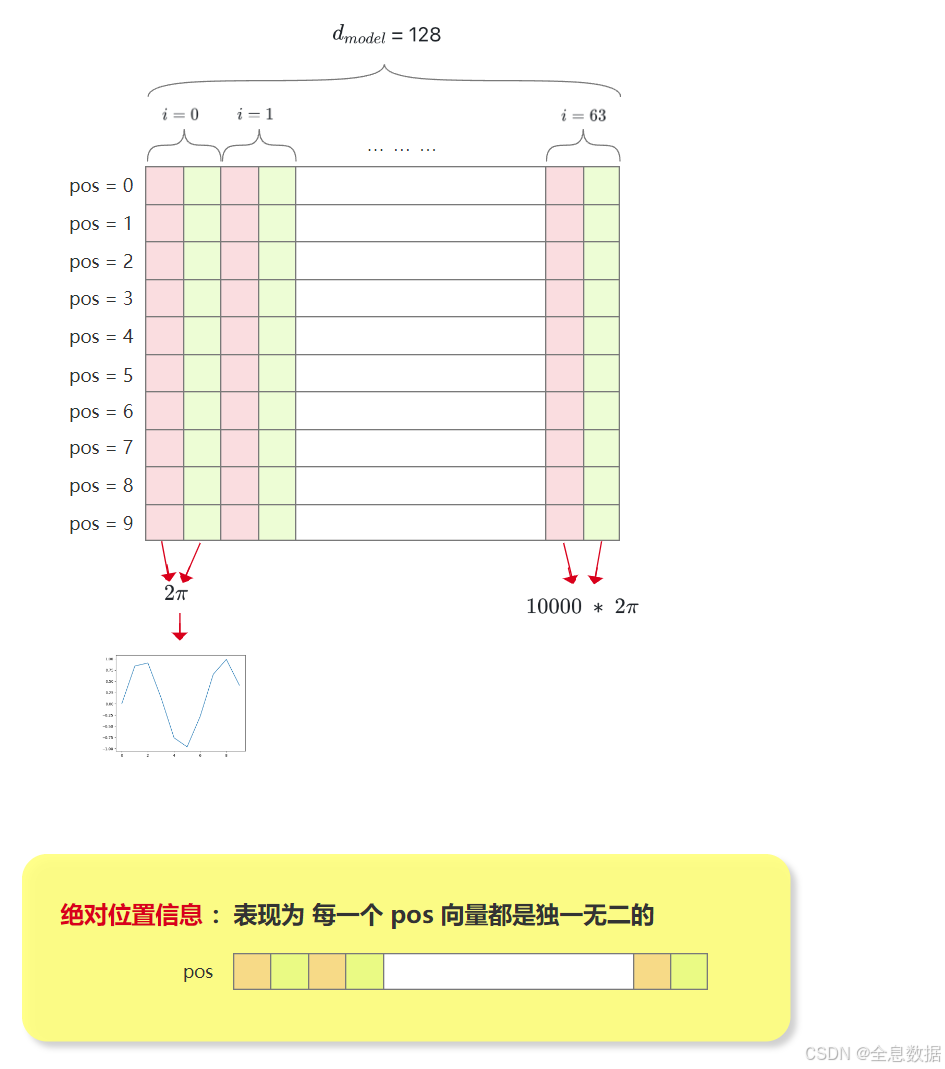
3、公式详解 : 绝对位置 、 相对位置
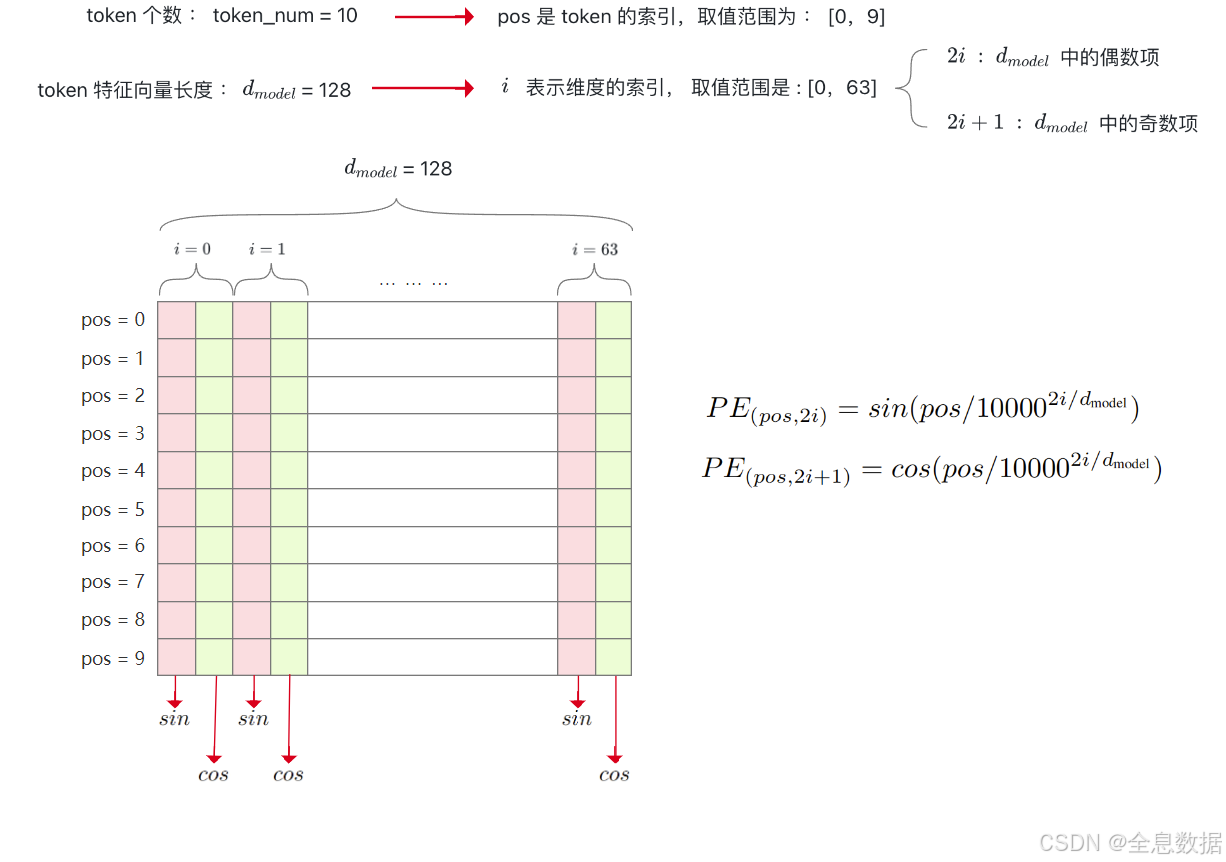
如下图,设置token的数量为10,token的特征向量长度为128,偶数项和奇数项的位置编码公式如下图所示,
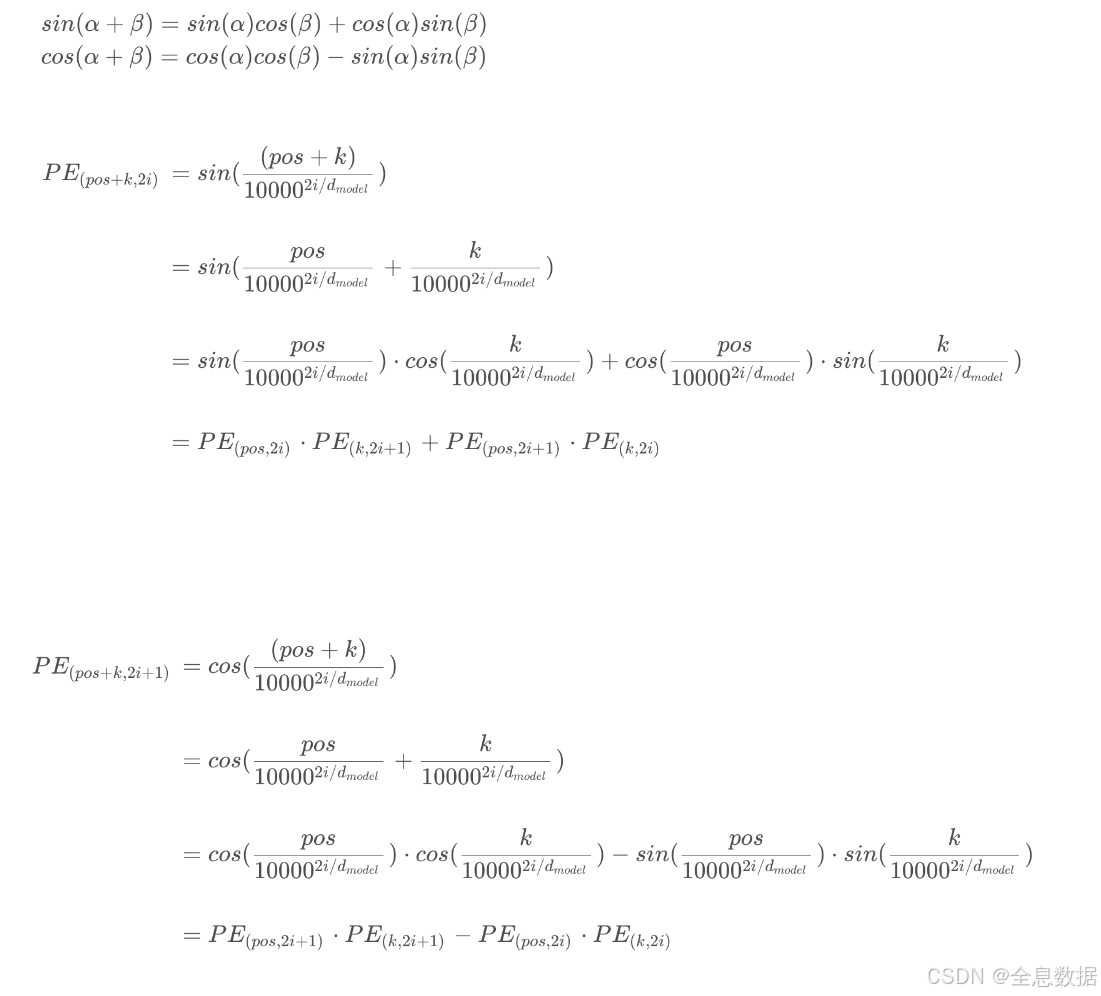
下面详细解释一下位置编码公式,下图中也解释了下面这句话:The wavelengths form a geometric progression from 2 π 2\pi 2π to 10000 ⋅ 2 π 10000 \cdot 2\pi 10000⋅2π,
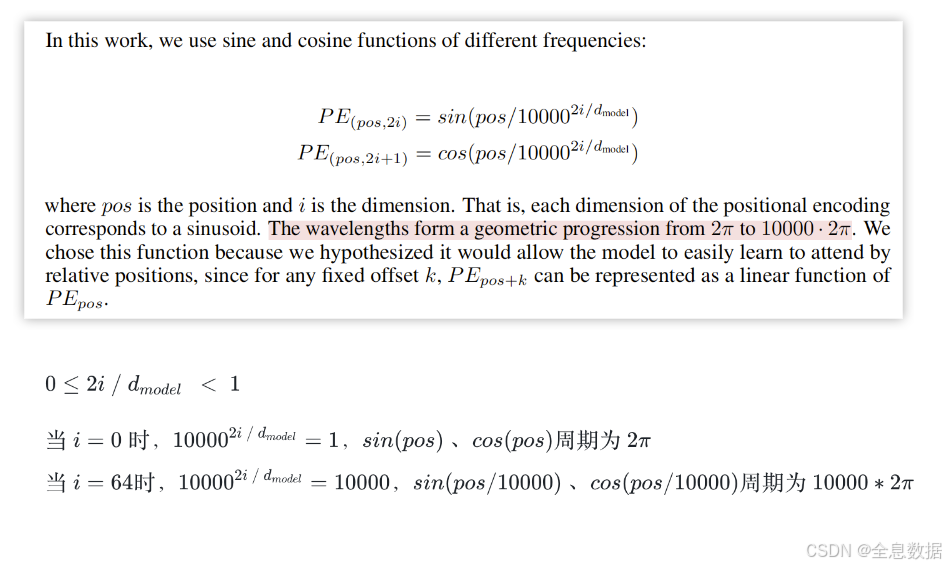
下面解释一下下面这段话:We chose this function because we hypothesized it would allow the model to easily learn to attend byrelative positions, since for any fixed offset k k k, P E p o s + k PE_{pos+k} PEpos+k can be represented as a linear function of P E p o s PE_{pos} PEpos

4、代码
4.1 代码1
python
import torch
import math
import matplotlib.pyplot as plt
def positional_encoding(d_model, length):
"""
:param d_model: dimension of the token
:param length: (maximum) token number
:return: length*d_model position matrix
"""
if d_model % 2 != 0:
raise ValueError("Cannot use sin/cos positional encoding with "
"odd dim (got dim={:d})".format(d_model))
pe = torch.zeros(length, d_model)
position = torch.arange(0, length).unsqueeze(1)
div_term = torch.exp((torch.arange(0, d_model, 2, dtype=torch.float) *
-(math.log(10000.0) / d_model)))
pe[:, 0::2] = torch.sin(position.float() * div_term)
pe[:, 1::2] = torch.cos(position.float() * div_term)
return pe
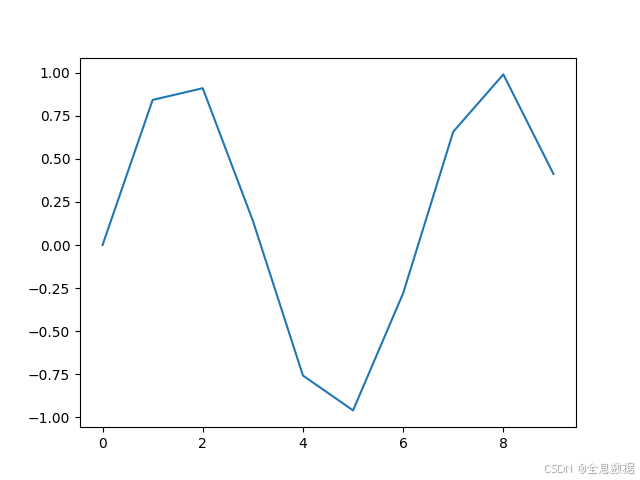
pe = positional_encoding(128, 10)
plt.plot(range(10), pe[:, 0])
plt.show()输出:
4.2 代码2
python
import torch
import torch.nn as nn
import numpy as np


class PositionalEncoding(nn.Module):

    def __init__(self, d_hid, n_position=200):
        super(PositionalEncoding, self).__init__()

        self.register_buffer('pos_table', self._get_sinusoid_encoding_table(n_position, d_hid))

    def _get_sinusoid_encoding_table(self, n_position, d_hid):
        def get_position_angle_vec(position):
            return [position / np.power(10000, 2 * (hid_j // 2) / d_hid) for hid_j in range(d_hid)]

        sinusoid_table = np.array([get_position_angle_vec(pos_i) for pos_i in range(n_position)])
        sinusoid_table[:, 0::2] = np.sin(sinusoid_table[:, 0::2])  # dim 2i
        sinusoid_table[:, 1::2] = np.cos(sinusoid_table[:, 1::2])  # dim 2i+1

        return torch.FloatTensor(sinusoid_table).unsqueeze(0)

    def forward(self, x):
        return x + self.pos_table[:, :x.size(1)].clone().detach()