1、首先创建一个桥接网络
docker network create auto
2、部署redis,提供celery的消息队列服务
bash
docker run --name redis --restart=always -d --network auto -v redis:/data redis:alpine3、部署数据库
注意数据库账号密码
bash
docker run --name mariadb --restart=always -d --network auto -v mariadb:/var/lib/mysql -e MARIADB_ROOT_PASSWORD=123456789 -e TZ=Asia/Shanghai -p 3309:3306 -e MARIADB_DATABASE=apiauto mariadb:latest查看网络的服务
bash
docker inspect auto3.1(可以忽略,手动部署,查看问题)
bash
docker run --name app -it --network auto -v /diyauto/djangoapp:/app -p 9191:8000 python:3.8-alpine /bin/sh3.2安装
进入app目录下
bash
pip3 install -i https://pypi.tuna.tsinghua.edu.cn/simple/ -r requirements.txt
提示更新
bash
python3 -m pip install --upgrade pip -i https://pypi.tuna.tsinghua.edu.cn/simple/ 再次安装pip3 install -i https://pypi.tuna.tsinghua.edu.cn/simple/ -r requirements.txt
提示报错

图片这个alpine内核装mysqlclient比较困难

3.3解决办法:
sed -i 's/dl-cdn.alpinelinux.org/mirrors.ustc.edu.cn/g' /etc/apk/repositories
apk update
apk upgrade
apk add tzdata mariadb-dev gcc libc-dev
python3 -m pip install --upgrade pip -i https://pypi.tuna.tsinghua.edu.cn/simple/
pip3 install -i https://pypi.tuna.tsinghua.edu.cn/simple/ -r reqirements.txt
pip3 install -i https://pypi.tuna.tsinghua.edu.cn/simple -r reqiremensts.txt

再次下载第一个命令行。即可成了
3.4准备文件gunicorn.conf.py,放在根目录下
python
bind = '0.0.0.0:8000'                               # 绑定地址和端口
reload = False
pidfile = '/app/logs/gunicorn.pid'                  # 进程id文件
accesslog = '/app/logs/gunicorn_acess.log'          # 通过日志
errorlog = '/app/logs/gunicorn_error.log'           # 启动,错误日志
执行文件命令
gunicron -c gunicorn.conf.py apiauto.wsgi

这是走到了开发环境,有错。
解决办法:查看环境变量,
export ENV=production
 gunicorn -c gunicorn.conf.py apiauto.wsgi

手动启动容器,只对当前的进程5有用,1234窗口需要重新配置环境变量ENV=pro

3.5,迁移数据库(代码写数据库ip地址)。写mariadb报错。
migrate 创建超管。
3.6执行supervisord.conf,配置celery和wsgi执行
unix_http_server
file=/tmp/supervisor.sock ; the path to the socket file
supervisord
logfile=/tmp/supervisord.log ; main log file; default $CWD/supervisord.log
logfile_maxbytes=50MB ; max main logfile bytes b4 rotation; default 50MB
logfile_backups=10 ; # of main logfile backups; 0 means none, default 10
loglevel=info ; log level; default info; others: debug,warn,trace
pidfile=/tmp/supervisord.pid ; supervisord pidfile; default supervisord.pid
nodaemon=true ; start in foreground if true; default false
silent=false ; no logs to stdout if true; default false
minfds=1024 ; min. avail startup file descriptors; default 1024
minprocs=200 ; min. avail process descriptors;default 200
rpcinterface:supervisor
supervisor.rpcinterface_factory = supervisor.rpcinterface:make_main_rpcinterface
supervisorctl
serverurl=unix:///tmp/supervisor.sock ; use a unix:// URL for a unix socket
program:gunicorn
command=gunicorn -c gunicorn.conf.py djangoapp.wsgi
program:celery_worker
command=celery -A djangoapp worker -l info
program:celery_beat
command=celery -A djangoapp beat -l info
bash
supervisord -c supervisord.conf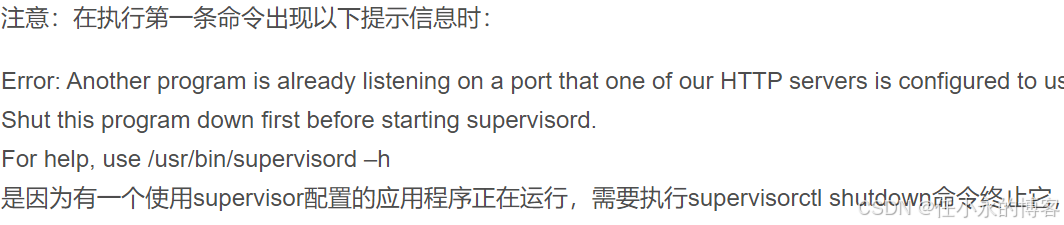
再次重新执行,

也可以进行ps 查看进程
4、编写DockerDfile文件
bash
FROM python:3.8-alpine
# 给镜像打上一些标签,信息
LABEL maintainer='xiaoyong'
LABEL description='Django project'
WORKDIR /app
# 拷贝代码到镜像中
# COPY使用相对路径
# 第一个路径是相对的是宿主机dockerfile所在的目录
# 第二个路径相对的是构建命令所在的目录
COPY . .
# 安装必要的库 shell命令
RUN sed -i 's/dl-cdn.alpinelinux.org/mirrors.ustc.edu.cn/g' /etc/apk/repositories && \
    apk update && \
    apk upgrade && \
    apk add --no-cache tzdata mariadb-dev gcc libc-dev && \
    cp /usr/share/zoneinfo/Asia/Shanghai /etc/localtime && \
    python -m pip install -i https://pypi.tuna.tsinghua.edu.cn/simple --upgrade pip && \
    pip install --no-cache-dir -i https://pypi.tuna.tsinghua.edu.cn/simple -r reqiremensts.txt &&\
    chmod 777 ./entrypoint.sh
VOLUME /app/logs
# 暴露监听端口,注意它不会自动映射,只是标注
EXPOSE 8000
# CMD 容器启动的时候要执行的命令
# CMD supervisord -c supervisord.conf
# 执行入口脚本
# 把容器要执行的复杂命令写到一个shell脚本中
ENTRYPOINT ["./entrypoint.sh"]
构建镜像,在DockerDfile所在目录
(就是把3的步骤写在一个文件内进行一步一步执行)
bash
docker build -t auto_app .docker images 查看镜像auto_app
5、通过镜像启动容器
bash
docker run --name app --network auto -p 9292:8000 -e TZ=Asia/Shanghai -e ENV="production" -d --restart=always -v auto_logs:/app/logs auto_app:latest