一、说明
在本博客的第 1 部分中,我介绍了使用 Albumentations Python 库进行图像增广的基础知识。本部分介绍高级详细信息。
二、使用 Albumentations 进行语义分割任务
我们将使用来自 TGS 盐鉴定挑战赛的图像和数据。TGS Salt Identification Challenge | Kaggle
import random
import cv2
from matplotlib import pyplot as plt
import albumentations as A


def visualize(image, mask, original_image=None, original_mask=None):
    fontsize = 18

    if original_image is None and original_mask is None:
        f, ax = plt.subplots(2, 1, figsize=(8, 8))

        ax[0].imshow(image)
        ax[1].imshow(mask)
    else:
        f, ax = plt.subplots(2, 2, figsize=(8, 8))

        ax[0, 0].imshow(original_image)
        ax[0, 0].set_title('Original image', fontsize=fontsize)

        ax[1, 0].imshow(original_mask)
        ax[1, 0].set_title('Original mask', fontsize=fontsize)

        ax[0, 1].imshow(image)
        ax[0, 1].set_title('Transformed image', fontsize=fontsize)

        ax[1, 1].imshow(mask)
        ax[1, 1].set_title('Transformed mask', fontsize=fontsize)


image = cv2.imread('0fea4b5049_image.png')
mask = cv2.imread('0fea4b5049.png', cv2.IMREAD_GRAYSCALE)
print(image.shape, mask.shape)
original_height, original_width = image.shape[:2]
visualize(image, mask)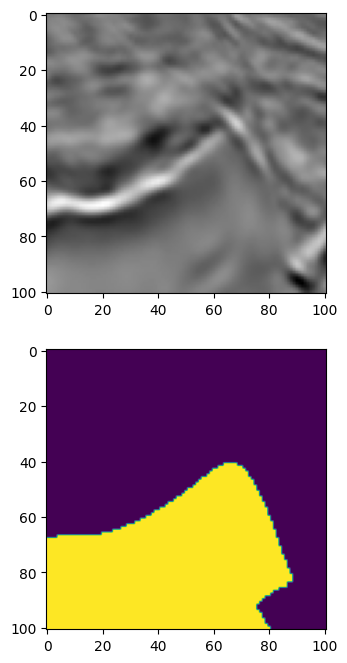
使用 Albumentations 的语义分割
三、填充
UNet 类型架构要求输入图像大小能被 2^N 整除,其中 N 是最大池化层数。在原版 UNet N=5 中,我们需要将输入图像填充到最接近的可被 2⁵ = 32 整除的数字,即 128。
可以使用 PadIfNeeded 变换执行此操作。它会在所有四个侧面填充图像和蒙版。可以指定填充类型 (零、常量、反射)。默认填充是反射填充。
aug = A.PadIfNeeded(min_height=128, min_width=128, p=1)

augmented = aug(image=image, mask=mask)

image_padded = augmented['image']
mask_padded = augmented['mask']

print(image_padded.shape, mask_padded.shape)

visualize(image_padded, mask_padded, original_image=image, original_mask=mask)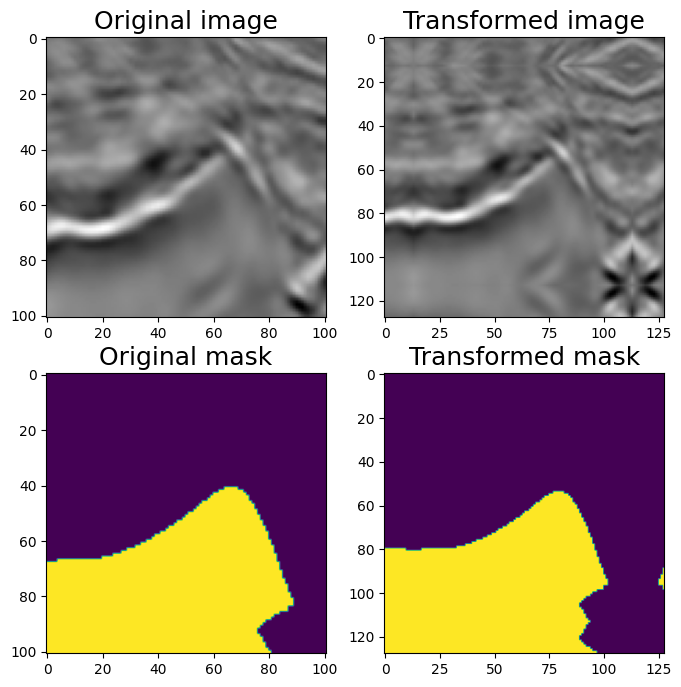
四、CenterCrop 和 Crop
要从填充版本获取原始图像和蒙版,我们可以使用 CenterCrop 或 Crop 转换
aug = A.CenterCrop(p=1, height=original_height, width=original_width)

augmented = aug(image=image_padded, mask=mask_padded)

image_center_cropped = augmented['image']
mask_center_cropped = augmented['mask']

print(image_center_cropped.shape, mask_center_cropped.shape)

assert (image - image_center_cropped).sum() == 0
assert (mask - mask_center_cropped).sum() == 0

visualize(image_padded, mask_padded, original_image=image_center_cropped,
          original_mask=mask_center_cropped)
五、非破坏性变换。
对于没有明确 top 概念的影像(如本图),卫星和航空影像或医学影像通常最好添加不会添加或丢失信息的变换。
有八种不同的方法可以表示平面上的同一方格。
转换 HorizontalFlip、VerticalFlip、Transpose、RandomRotate90 的组合将能够将原始图像转换为所有八种状态。
#HorizontalFlip
aug = A.HorizontalFlip(p=1)
augmented = aug(image=image, mask=mask)
image_h_flipped = augmented['image']
mask_h_flipped = augmented['mask']
visualize(image_h_flipped, mask_h_flipped, original_image=image, original_mask=mask)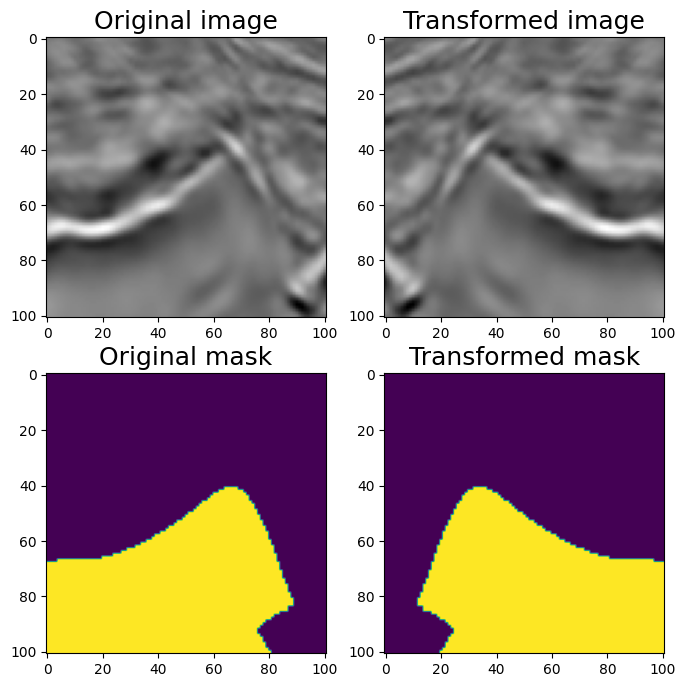
水平翻转
#VerticalFlip
aug = A.VerticalFlip(p=1)
augmented = aug(image=image, mask=mask)
image_v_flipped = augmented['image']
mask_v_flipped = augmented['mask']
visualize(image_v_flipped, mask_v_flipped, original_image=image, original_mask=mask)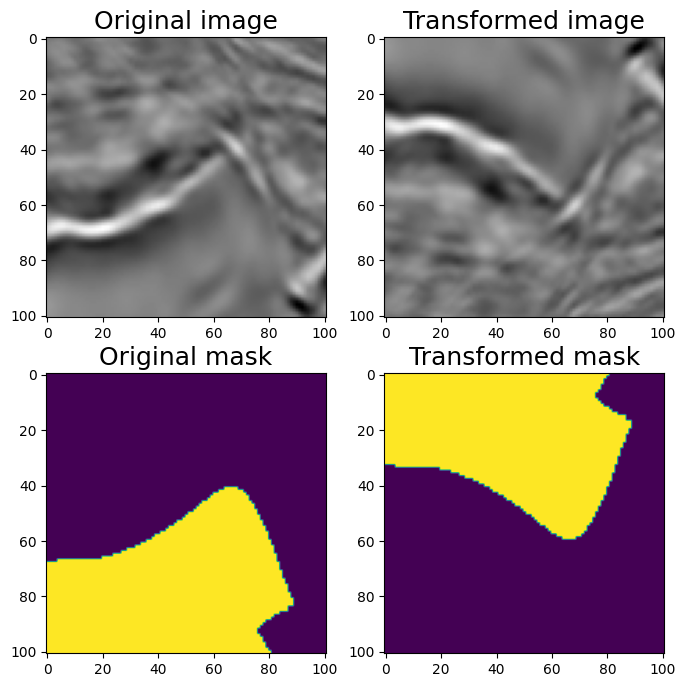
垂直翻转
#RandomRotate90 (Randomly rotates by 0, 90, 180, 270 degrees)

aug = A.RandomRotate90(p=1)
augmented = aug(image=image, mask=mask)
image_rot90 = augmented['image']
mask_rot90 = augmented['mask']
visualize(image_rot90, mask_rot90, original_image=image, original_mask=mask)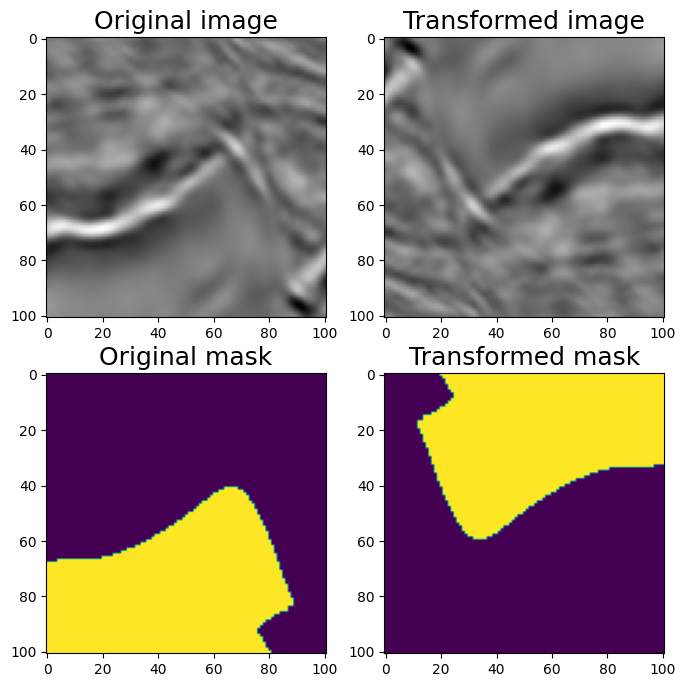
随机 90 度旋转
#Transpose (switch X and Y axis)

aug = A.Transpose(p=1)
augmented = aug(image=image, mask=mask)
image_transposed = augmented['image']
mask_transposed = augmented['mask']
visualize(image_transposed, mask_transposed, original_image=image, original_mask=mask)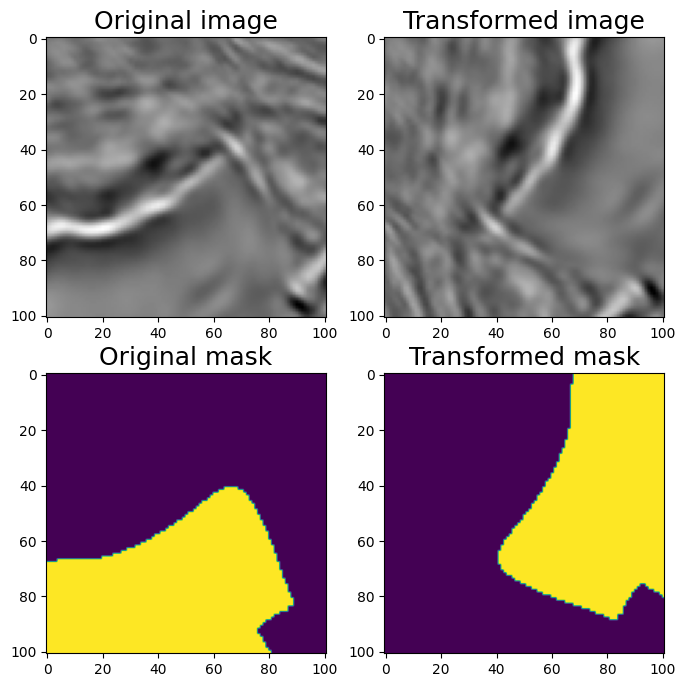
移调
六、非刚性变换:ElasticTransform、GridDistortion、OpticalDistortion
在医学成像问题中,非刚性转换有助于增强数据。目前尚不清楚他们是否会帮助解决这个问题,但让我们看看它们。我们将考虑 ElasticTransform、GridDistortion、OpticalDistortion。
我们修复随机种子以达到可视化目的,因此增强将始终产生相同的结果。在实际的计算机视觉管道中,在对图像应用转换之前,不应修复随机种子,因为在这种情况下,管道将始终输出相同的图像。图像增广的目的是每次使用不同的转换
6.1 弹性变换ElasticTransform
#ElasticTransform

aug = A.ElasticTransform(p=1, alpha=120, sigma=120 * 0.05, alpha_affine=None)
random.seed(7)
augmented = aug(image=image, mask=mask)
image_elastic = augmented['image']
mask_elastic = augmented['mask']
visualize(image_elastic, mask_elastic, original_image=image, original_mask=mask)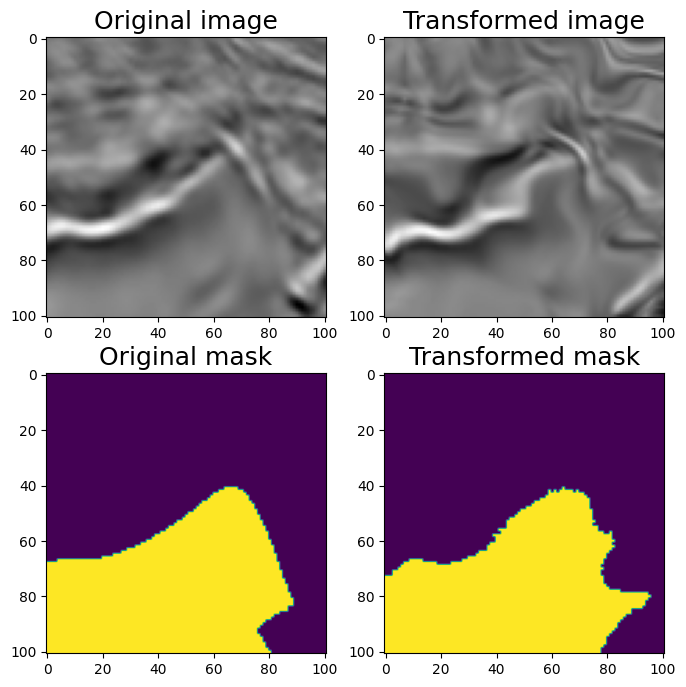
Elastic Transform
6.2 GridDistortion 刚体变换
#GridDistortion
aug = A.GridDistortion(p=1)
random.seed(7)
augmented = aug(image=image, mask=mask)
image_grid = augmented['image']
mask_grid = augmented['mask']
visualize(image_grid, mask_grid, original_image=image, original_mask=mask)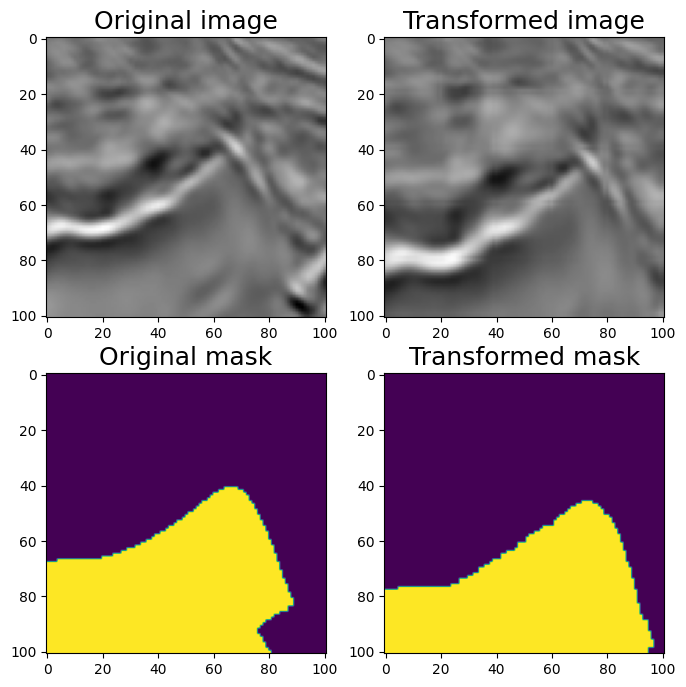
Grid Distortion
6.3 光学畸变OpticalDistortion
#OpticalDistortion

aug = A.OpticalDistortion(distort_limit=2, shift_limit=0.5, p=1)
random.seed(7)
augmented = aug(image=image, mask=mask)
image_optical = augmented['image']
mask_optical = augmented['mask']
visualize(image_optical, mask_optical, original_image=image, original_mask=mask)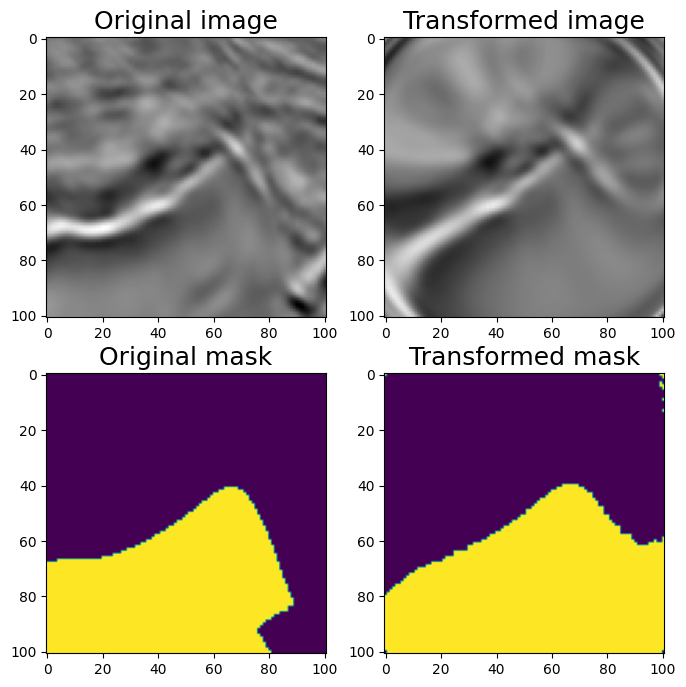
Optical Distortion
6.4 随机裁剪RandomSizedCrop
#RandomSizedCrop
#One may combine RandomCrop and RandomScale but there is a transformation RandomSizedCrop that allows to combine them into one transformation.
aug = A.RandomSizedCrop(min_max_height=(50, 101),
                        height=original_height, width=original_width, p=1)
random.seed(7)
augmented = aug(image=image, mask=mask)
image_scaled = augmented['image']
mask_scaled = augmented['mask']
visualize(image_scaled, mask_scaled,
          original_image=image, original_mask=mask)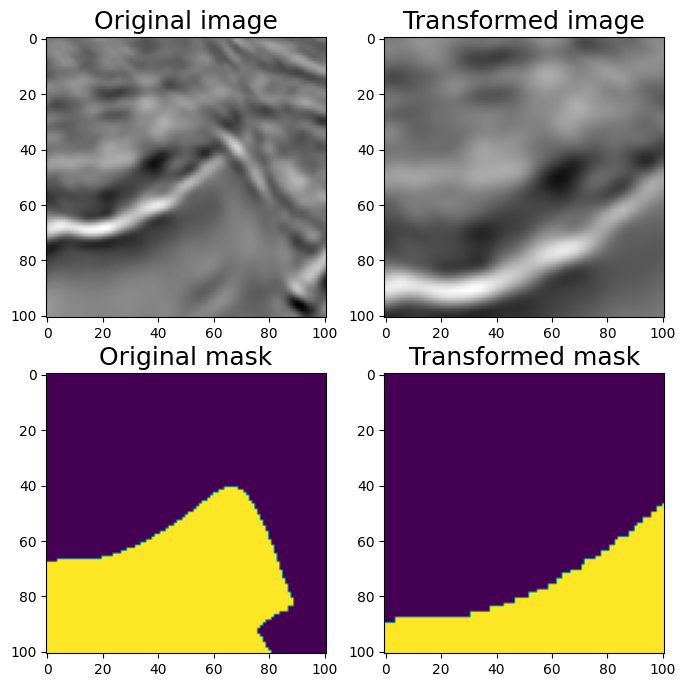
Randomized Size Crop
七、让我们尝试结合不同的转换
7.1 轻型非破坏性增强。
aug = A.Compose([
    A.VerticalFlip(p=0.5),
    A.RandomRotate90(p=0.5)]
)

random.seed(7)
augmented = aug(image=image, mask=mask)
image_light = augmented['image']
mask_light = augmented['mask']
visualize(image_light, mask_light, original_image=image, original_mask=mask)垂直翻转和随机旋转 90 度相结合7.2 让我们添加非刚性变换和 RandomSizedCrop Medium 增强
aug = A.Compose([
    A.OneOf([
        A.RandomSizedCrop(min_max_height=(50, 101), height=original_height,
                          width=original_width, p=0.5),
        A.PadIfNeeded(min_height=original_height, min_width=original_width, p=0.5)
    ],p=1),
    A.VerticalFlip(p=0.5),
    A.RandomRotate90(p=0.5),
    A.OneOf([
        A.ElasticTransform(p=0.5, alpha=120, sigma=120 * 0.05, alpha_affine=None),
        A.GridDistortion(p=0.5),
        A.OpticalDistortion(distort_limit=1, shift_limit=0.5, p=1),
    ], p=0.8)])

random.seed(11)
augmented = aug(image=image, mask=mask)

image_medium = augmented['image']
mask_medium = augmented['mask']

visualize(image_medium, mask_medium, original_image=image, original_mask=mask)
7.3 让我们添加非空间变换。
还可以添加许多非空间变换,如 CLAHE、RandomBrightness、RandomContrast、RandomGamma。它们将仅应用于图像而不是蒙版。
aug = A.Compose([
    A.OneOf([
        A.RandomSizedCrop(min_max_height=(50, 101), height=original_height,
                          width=original_width, p=0.5),
        A.PadIfNeeded(min_height=original_height, min_width=original_width, p=0.5)
    ], p=1),
    A.VerticalFlip(p=0.5),
    A.RandomRotate90(p=0.5),
    A.OneOf([
        A.ElasticTransform(alpha=120, sigma=120 * 0.05, alpha_affine=None, p=0.5),
        A.GridDistortion(p=0.5),
        A.OpticalDistortion(distort_limit=2, shift_limit=0.5, p=1)
        ], p=0.8),
    A.CLAHE(p=0.8),
    A.RandomBrightnessContrast(p=0.8),
    A.RandomGamma(p=0.8)])

random.seed(11)
augmented = aug(image=image, mask=mask)

image_heavy = augmented['image']
mask_heavy = augmented['mask']

visualize(image_heavy, mask_heavy, original_image=image, original_mask=mask)
7.4 使用专辑来增强关键点
在本笔记本中,我们将展示如何将专辑应用到关键点增强问题。请参阅变换及其支持的目标列表,以了解哪些空间级别增强支持关键点。您可以对具有关键点的图像使用任何像素级增强,因为像素级增强不会影响关键点。
注意:默认情况下,使用关键点的增强在转换后不会更改关键点的标签。如果关键点的标签是特定于侧面的,则可能会造成问题。例如,如果您有一个名为左臂的关键点并应用 HorizontalFlip 增强,您将获得具有相同左臂标签的关键点,但它现在看起来像右臂关键点。有关视觉示例,请参阅本文末尾的图片。
如果您使用此类类型的关键点,请考虑使用来自 albumentations-experimental 的 SymmetricKeypoints 增强,这些增强是为处理这种情况而精确创建的。
import random
import cv2
from matplotlib import pyplot as plt
import albumentations as A


KEYPOINT_COLOR = (0, 255, 0) # Green

def vis_keypoints(image, keypoints, color=KEYPOINT_COLOR, diameter=15):
    image = image.copy()

    for (x, y) in keypoints:
        cv2.circle(image, (int(x), int(y)), diameter, (0, 255, 0), -1)

    plt.figure(figsize=(8, 8))
    plt.axis('off')
    plt.imshow(image)


image = cv2.imread('keypoints_image.jpg')
image = cv2.cvtColor(image, cv2.COLOR_BGR2RGB)
7.5 定义关键点
我们将使用 xy 格式作为关键点的坐标。每个关键点都用两个坐标定义,x是x轴上的位置,y是y轴上的位置。关键点坐标格式的详细说明请参考这篇文章------
Keypoints augmentation - Albumentations Documentation
keypoints = [
    (100, 100),
    (720, 410),
    (1100, 400),
    (1700, 30),
    (300, 650),
    (1570, 590),
    (560, 800),
    (1300, 750),
    (900, 1000),
    (910, 780),
    (670, 670),
    (830, 670),
    (1000, 670),
    (1150, 670),
    (820, 900),
    (1000, 900),
]#Visualize the original image with keypoints
vis_keypoints(image, keypoints)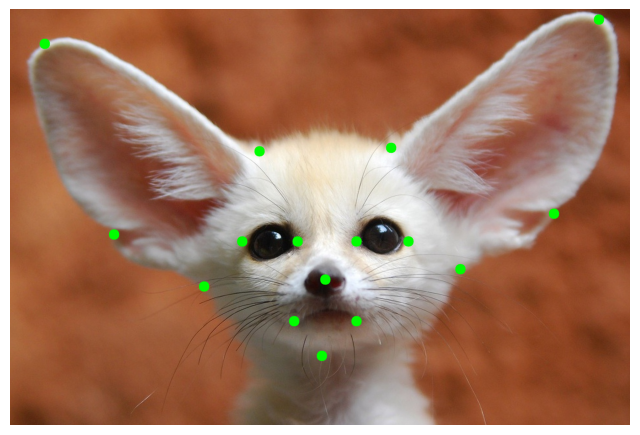
原始关键点(Original Key Points)
transform = A.Compose(
    [A.HorizontalFlip(p=1)],
    keypoint_params=A.KeypointParams(format='xy')
)
transformed = transform(image=image, keypoints=keypoints)
vis_keypoints(transformed['image'], transformed['keypoints'])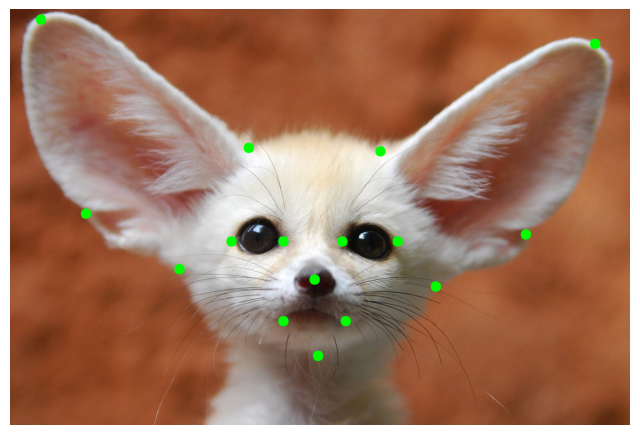
转换的图像和关键点
#A few more examples of augmentation pipelines

transform = A.Compose(
    [A.VerticalFlip(p=1)],
    keypoint_params=A.KeypointParams(format='xy')
)
transformed = transform(image=image, keypoints=keypoints)
vis_keypoints(transformed['image'], transformed['keypoints'])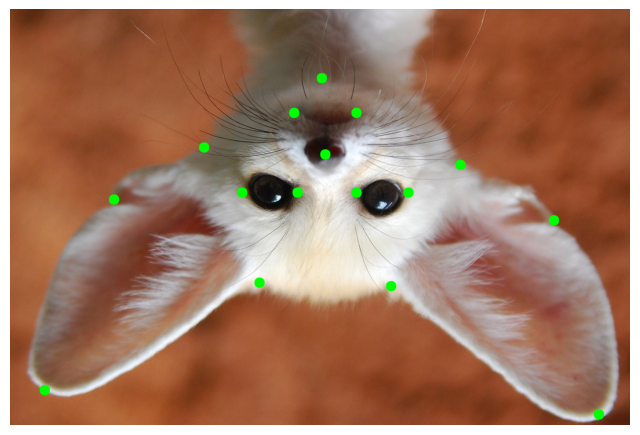
random.seed(7)
transform = A.Compose(
    [A.RandomCrop(width=768, height=768, p=1)],
    keypoint_params=A.KeypointParams(format='xy')
)
transformed = transform(image=image, keypoints=keypoints)
vis_keypoints(transformed['image'], transformed['keypoints'])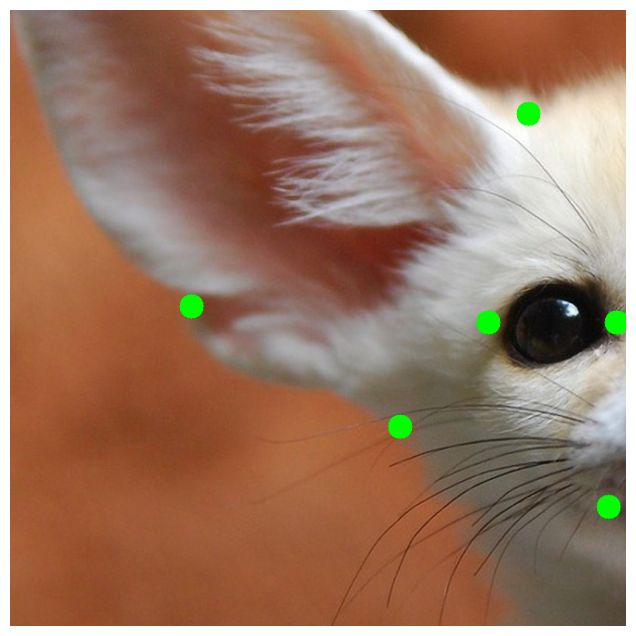
random.seed(7)
transform = A.Compose(
    [A.Rotate(p=0.5)],
    keypoint_params=A.KeypointParams(format='xy')
)
transformed = transform(image=image, keypoints=keypoints)
vis_keypoints(transformed['image'], transformed['keypoints'])
transform = A.Compose(
    [A.CenterCrop(height=512, width=512, p=1)],
    keypoint_params=A.KeypointParams(format='xy')
)
transformed = transform(image=image, keypoints=keypoints)
vis_keypoints(transformed['image'], transformed['keypoints'])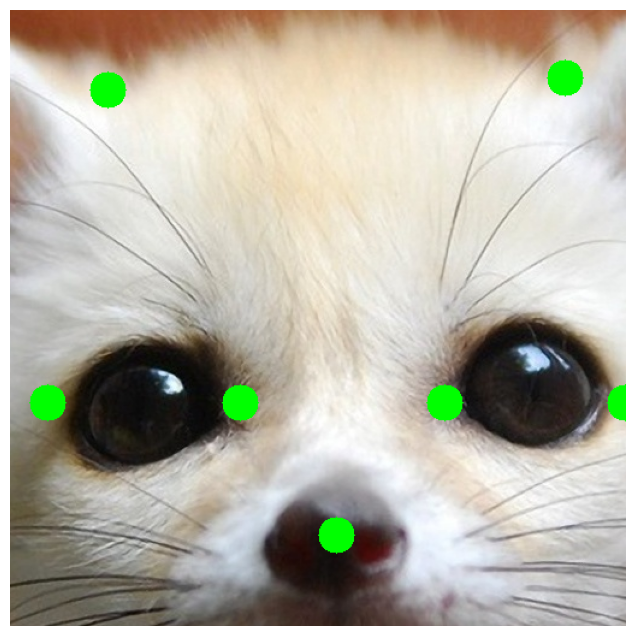
random.seed(7)
transform = A.Compose(
    [A.ShiftScaleRotate(p=0.5)],
    keypoint_params=A.KeypointParams(format='xy')
)
transformed = transform(image=image, keypoints=keypoints)
vis_keypoints(transformed['image'], transformed['keypoints'])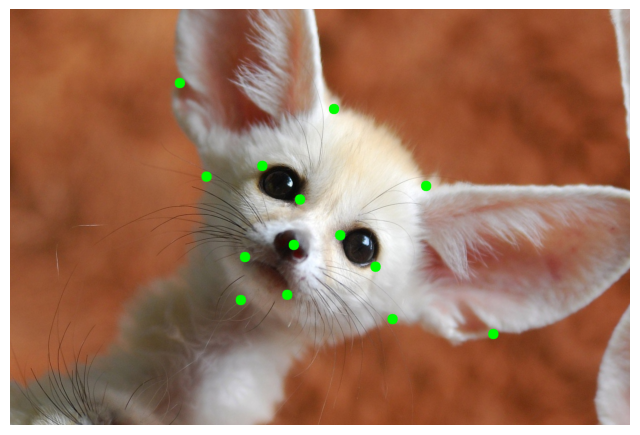
#An example of complex augmentation pipeline

random.seed(7)
transform = A.Compose([
        A.RandomSizedCrop(min_max_height=(256, 1025), height=512, width=512, p=0.5),
        A.HorizontalFlip(p=0.5),
        A.OneOf([
            A.HueSaturationValue(p=0.5),
            A.RGBShift(p=0.7)
        ], p=1),
        A.RandomBrightnessContrast(p=0.5)
    ],
    keypoint_params=A.KeypointParams(format='xy'),
)
transformed = transform(image=image, keypoints=keypoints)
vis_keypoints(transformed['image'], transformed['keypoints'])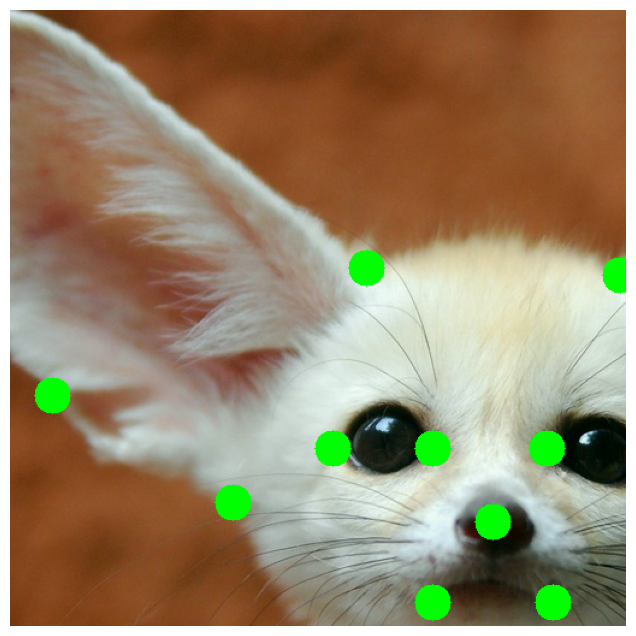
八、Albumentations 中的 MixUp 变换
在此转换中,我们创建原始图像和参考图像的加权平均值。变换还支持global_labels和蒙版
import random
import cv2
from matplotlib import pyplot as plt
from pathlib import Path
import numpy as np
import cv2
import albumentations as A


def visualize(image):
    plt.figure(figsize=(10, 5))
    plt.axis('off')
    plt.imshow(image)

def load_rgb(image_path):
    image = cv2.imread(image_path)
    return cv2.cvtColor(image, cv2.COLOR_BGR2RGB)


img_path = "woman.jpeg"
img = load_rgb(img_path)

class_id = 0
visualize(img)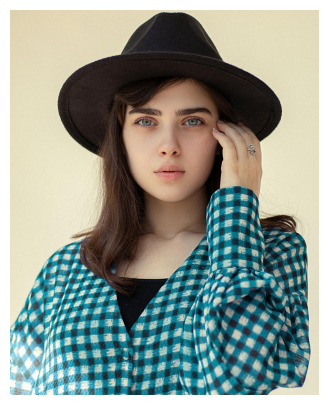
8.1 Mixup 变换
要使用 transform,我们需要定义可以是任何 sequence 或 generator 的参考数据。
我们还需要定义read_fn,将项目从 reference_data 转换为带有键 image 和可选global_label mask 的字典。
reference_data = [{
    "image_path": "cat1.jpeg",
    "class_id": 1},
                  {"image_path": "tiger.jpeg",
    "class_id": 2}]


def int_to_onehot(value, num_classes):
    """Convert an array of integers to one-hot representation.

    Args:
        values (np.ndarray): Array of integers to be converted.
        num_classes (int): Total number of classes, determines the length of one-hot vectors.

    Returns:
        np.ndarray: One-hot encoded representation of `values`.
    """
    # Initialize the one-hot encoded array of shape (num_classes,)
    one_hot = np.zeros(num_classes, dtype=int)

    # Set the appropriate index to one
    one_hot[value] = 1

    return one_hot

NUM_CLASSES = 5

target_height = 2500
target_width = 1800

# We can process data as we want, including application of augmentations transform.

reference_aug = A.Compose([A.RandomCrop(width=target_width,
                                        height=target_height, p=1)], p=1)

def read_fn(item):
    image = load_rgb(item["image_path"])

    transformed_image = reference_aug(image=image)["image"]

    global_label = int_to_onehot(item["class_id"], NUM_CLASSES)
    return {
        "image": transformed_image,
        "global_label": global_label
    }


visualize(read_fn(reference_data[0])["image"])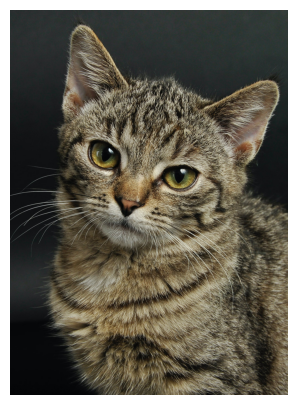
visualize(read_fn(reference_data[1])["image"])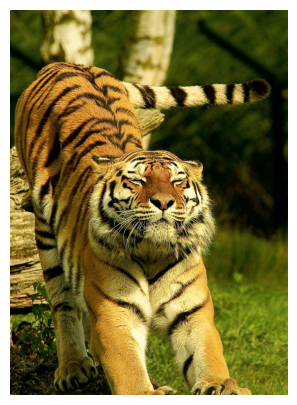
transform = A.Compose([A.RandomCrop(width=target_width, height=target_height, p=1),
                                       A.MixUp(reference_data=reference_data,
                                              read_fn=read_fn, p=1),
                                      A.HorizontalFlip(p=1)], p=1)

original_global_label = int_to_onehot(class_id, NUM_CLASSES)

transformed = transform(image=img, global_label=original_global_label)
print("Global label = ", transformed["global_label"])
print("Mixing coefficient = ", transformed["mix_coef"])

visualize(transformed["image"])


Output:
Global label =  [0.76996663 0.23003337 0.         0.         0.        ]
Mixing coefficient =  0.7699666256848163

The output image is a mix of above 3 images. See the image below -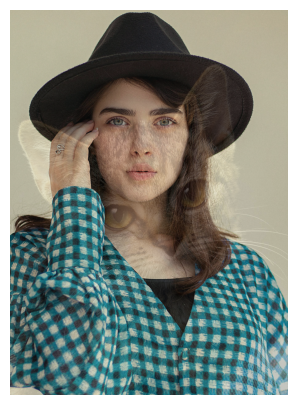
transformed = transform(image=img, global_label=original_global_label)
print("Global label = ", transformed["global_label"])
print("Mixing coefficient = ", transformed["mix_coef"])

visualize(transformed["image"])


Output:
Global label =  [0.34351105 0.         0.65648895 0.         0.        ]
Mixing coefficient =  0.34351104934091414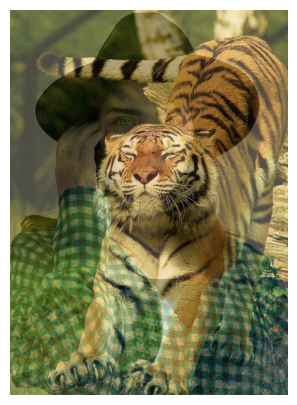
#What if you need to know image that was used for mixing?
mix_data = transformed["mix_data"]
mixing_image = mix_data["image"]
global_label_of_mixing_image = mix_data["global_label"]
8.2 将具有相同参数的相同增强应用于多个图像、蒙版、定界框或关键点
有时,您希望将同一组增强应用于相同类型的多个 input 对象。例如,您可能有一组来自视频的帧,并且您希望以相同的方式增强它们。或者,您可能为同一图像提供了多个蒙版,并且您希望对所有蒙版应用相同的增强。
在 Albumentations 中,您可以使用 Compose 的 additional_targets 参数声明其他目标及其类型。
对于其他目标的名称,您可以使用在 Python 中也是有效参数名称的任何字符串值。稍后,您将使用这些名称将其他目标传递给转换管道。因此,您不能使用以数字开头的字符串,例如 '0image',因为它不是有效的 Python 参数名称。
类型可以是 image、mask、bboxes 或 keypoints。
还有另一种方法可以将相同的增强应用于多个输入,例如图像、蒙版等。
ReplayCompose 是一种工具,可以记录应用于一组输入(例如,图像和关联的掩码)的增强参数,然后使用记录的值以相同的方式增强另一组输入。
支持相同类型的多个输入的 Compose 示例定义可能如下:
import random

import cv2
from matplotlib import pyplot as plt

import albumentations as A

def visualize(image):
    plt.figure(figsize=(10, 10))
    plt.axis('off')
    plt.imshow(image)


image = cv2.imread('multi_target_1.jpg')
image = cv2.cvtColor(image, cv2.COLOR_BGR2RGB)
image0 = cv2.imread('multi_target_2.jpg')
image0 = cv2.cvtColor(image0, cv2.COLOR_BGR2RGB)
image1 = cv2.imread('multi_target_3.jpg')
image1 = cv2.cvtColor(image1, cv2.COLOR_BGR2RGB)

visualize(image)
visualize(image0)
visualize(image1)
8.3 定义增强管道
管道需要三个图像作为输入,名为 image、image0 和 image1。然后,管道将以相同的方式增强这三个映像。因此,它将应用具有相同参数的同一组转换。
transform = A.Compose(
    [A.VerticalFlip(p=1)],
    additional_targets={'image0': 'image', 'image1': 'image'}
)

# original object and additional targets of the same type should have the same shape
image = image[:503, :723]
image1 = image[:503, :723]

transformed = transform(image=image, image0=image0, image1=image1)
visualize(transformed['image']) 
visualize(transformed['image0'])
visualize(transformed['image1'])#An example of more complex pipeline
transform = A.Compose(
[
A.HorizontalFlip(p=0.5),
A.ShiftScaleRotate(p=0.5),
A.RandomBrightnessContrast(p=0.2),
A.RGBShift(p=0.2),
],
additional_targets={'image0': 'image', 'image1': 'image'}
)
random.seed(42)
transformed = transform(image=image, image0=image0, image1=image1)
visualize(transformed['image'])
visualize(transformed['image0'])
8.4 使用 Albumentations 向图像添加文本
转换的代码基于 Dana Aubakirova https://github.com/danaaubakirova/doc-augmentation 中的代码。猫咪的图片属于 Sarah Bieszczad Mooze(小的)和 Meeko(大的)。
此转换的输入是 Albumentations 格式的边界框。即 bbox = x_min / 宽度, y_min / 高度, x_max / 宽度, y_max, 高度
为此,我们需要 pillow 库。
from __future__ import annotations
import albumentations as A
import cv2
from matplotlib import pyplot as plt


def visualize(image):
    plt.figure(figsize=(10, 5))
    plt.axis('off')
    plt.imshow(image)

bgr_image = cv2.imread("cats.jpg")
image = cv2.cvtColor(bgr_image, cv2.COLOR_BGR2RGB)
font_path = "LiberationSerif-Regular.ttf"
visualize(image)
#Write text
transform = A.Compose([A.TextImage(font_path=font_path, p=1, font_color="yellow")])
metadata = {
    "bbox": [0.15, 0.9, 0.9, 0.98],
    "text": "Mooze and Meeko",
}

transformed = transform(image=image, textimage_metadata=metadata)
visualize(transformed["image"])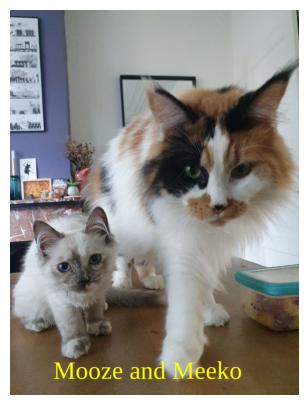
添加了文本的图像
#Inpaint background
#We black out parts of the image where insert text and inpaint them. Could be useful when replacing old text with a new one.

transform = A.Compose([A.TextImage(font_path=font_path, p=1, font_color=(255, 0, 0), clear_bg=True)])
metadata = {
    "bbox": [0.1, 0.3, 0.9, 0.38],
    "text": "Dangerous Tigers",
}

transformed = transform(image=image, textimage_metadata=metadata)
visualize(transformed["image"])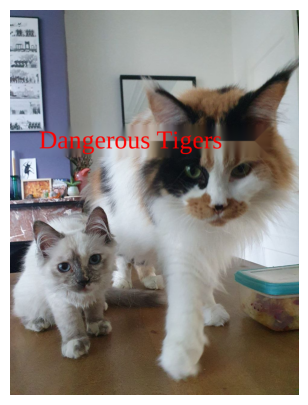
#Write several lines

transform = A.Compose([A.TextImage(font_path=font_path, p=1, font_color="black", clear_bg=True)])

metadata = [{
    "bbox": [0.02, 0.1, 0.95, 0.17],
    "text": "Big dreams in small packages...",
},
            {
    "bbox": [0.02, 0.85, 0.95, 0.91],
    "text": "...and even bigger in bigger ones."}
           ]

transformed = transform(image=image, textimage_metadata=metadata)
visualize(transformed["image"])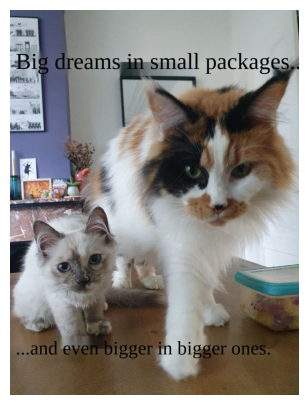
#Augment text
#We can insert text as is, or augment it on the fly.

#Swap words

transform = A.Compose([A.TextImage(font_path=font_path, p=1, font_color="white", augmentations=["swap"])])

metadata = [{
    "bbox": [0.02, 0.1, 0.95, 0.16],
    "text": "Big dreams in small packages...",
},
            {
    "bbox": [0.02, 0.85, 0.95, 0.91],
    "text": "...and even bigger in bigger ones."}
           ]

transformed = transform(image=image, textimage_metadata=metadata)

visualize(transformed["image"])
图像中的增强文本
#Random Deletion

transform = A.Compose([A.TextImage(font_path=font_path, p=1, font_color="red", augmentations=["deletion"])])

metadata = [{
    "bbox": [0.02, 0.1, 0.95, 0.16],
    "text": "Growing up with a giant...",
},
            {
    "bbox": [0.02, 0.85, 0.95, 0.91],
    "text": "...is always an adventure.."}
           ]

transformed = transform(image=image, textimage_metadata=metadata)

visualize(transformed["image"])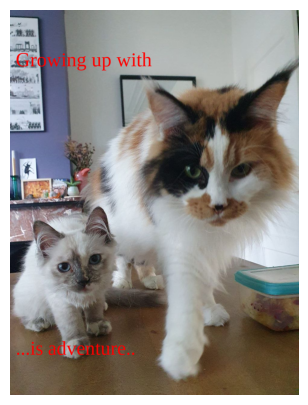
让我们使用 NLTK 库插入随机停用词。您应该已安装 NLTK 库。
!pip install nltk

#Insert random stopwords
import nltk

nltk.download('stopwords')
from nltk.corpus import stopwords
stops = stopwords.words('english')

transform = A.Compose([A.TextImage(font_path=font_path, p=1, font_color="white",
                                   augmentations=["insertion"], stopwords=stops)])

metadata = {
    "bbox": [0.15, 0.9, 0.9, 0.95],
    "text": "Mooze and Meeko",
}

transformed = transform(image=image, textimage_metadata=metadata)

visualize(transformed["image"])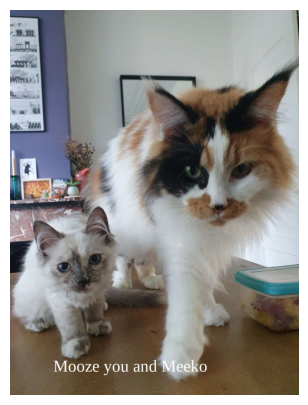
随机插入的停用词
#Returning augmented text
#If you need text that was added to the image after "swap", "insertion" or "deletion" you may get it with:


transform = A.Compose([A.TextImage(font_path=font_path, p=1,
                                   font_color="white", augmentations=["insertion", "swap"],
                                   stopwords=stops)])

metadata = [{
    "bbox": [0.02, 0.1, 0.95, 0.16],
    "text": "Big dreams in small packages...",
},
            {
    "bbox": [0.02, 0.85, 0.95, 0.91],
    "text": "...and even bigger in bigger ones."}
           ]

transformed = transform(image=image, textimage_metadata=metadata)

transformed["overlay_data"]

[{'bbox_coords': (19, 1088, 912, 1164),
  'text': 'for ...and even bigger in as bigger didn ones.',
  'original_text': '...and even bigger in bigger ones.',
  'bbox_index': 1,
  'font_color': 'white'},
 {'bbox_coords': (19, 128, 912, 204),
  'text': 'dreams in Big small packages...',
  'original_text': 'Big dreams in small packages...',
  'bbox_index': 0,
  'font_color': 'white'}]


Output:
[{'bbox_coords': (19, 1088, 912, 1164),
  'text': 'for ...and even bigger in as bigger didn ones.',
  'original_text': '...and even bigger in bigger ones.',
  'bbox_index': 1,
  'font_color': 'white'},
 {'bbox_coords': (19, 128, 912, 204),
  'text': 'dreams in Big small packages...',
  'original_text': 'Big dreams in small packages...',
  'bbox_index': 0,
  'font_color': 'white'}]