基于Python 3.9版本演示
一、写在前面
最近看了一篇在Lancet子刊《eClinicalMedicine》上发表的机器学习分类的文章:《Development of a novel dementia risk prediction model in the general population: A large, longitudinal, population-based machine-learning study》。
学到一种叫做"概率校准"的骚操作,顺手利用GPT系统学习学习。
文章中用的技术是:保序回归(Isotonic regression)。
为了体现举一反三,顺便问了GPT还有哪些方法也可以实现概率校准。它给我列举了很多,那么就一个一个学习吧。
这一期,介绍一个叫做 Sigmoid Calibration 的方法。
二、Sigmoid Calibration
Sigmoid Calibration是一种后处理技术,用于改进机器学习分类器的概率估计。它通常应用于二元分类器的输出,将原始得分转换为校准后的概率。该技术使用逻辑(Sigmoid)函数将分类器的得分映射到概率上,旨在确保预测的概率更准确地反映真实结果的可能性。
(1)Sigmoid Calibration 的基本步骤
1)训练分类器:在训练数据上训练你的二元分类器。
2)获取原始得分:收集分类器在验证数据集上的原始得分或 logits。
3)拟合逻辑回归模型:使用验证数据集拟合一个逻辑回归模型,将原始得分映射为概率。
4)预测校准后的概率:使用拟合的逻辑回归模型,将分类器的原始得分转换为校准后的概率。
(2)Sigmoid Calibration 的使用
对于逻辑回归模型,通常不需要进行Sigmoid校准,因为逻辑回归本身就是基于Sigmoid函数来计算概率的。然而,在一些情况下,即使是逻辑回归模型,校准仍然可能有帮助。以下是一些可能需要校准的情况:
1)类不平衡问题:如果训练数据集中存在严重的类别不平衡问题,即某个类别的数据明显多于其他类别,逻辑回归模型的概率估计可能会偏向于较多的类别。在这种情况下,校准可以帮助调整概率估计,使其更准确地反映实际的类别分布。
2)模型训练不充分:如果逻辑回归模型没有充分训练,可能会导致概率估计不准确。校准可以在一定程度上纠正这种情况。
3)训练和测试数据分布不同:如果训练数据和测试数据的分布存在差异,逻辑回归模型的概率估计可能不适用于测试数据。在这种情况下,可以使用校准技术对模型的输出进行调整。
4)多模型集成:在多模型集成(例如集成学习)中,不同模型的输出需要组合在一起。校准可以确保不同模型的输出概率具有一致性,从而提高集成模型的性能。
三、Sigmoid Calibration代码实现
下面,我编一个1比3的不太平衡的数据进行测试,对照组使用不进行校准的SVM模型,实验组就是加入校准的SVM模型,看看性能能够提高多少?
(1)不进行校准的SVM模型(默认参数)
python
import numpy as np
import matplotlib.pyplot as plt
import pandas as pd
from sklearn.model_selection import train_test_split
from sklearn.preprocessing import StandardScaler
from sklearn.svm import SVC
from sklearn.metrics import confusion_matrix, roc_auc_score, roc_curve

# 加载数据
dataset = pd.read_csv('8PSMjianmo.csv')
X = dataset.iloc[:, 1:20].values
Y = dataset.iloc[:, 0].values

# 分割数据集
X_train, X_test, y_train, y_test = train_test_split(X, Y, test_size=0.30, random_state=666)

# 标准化数据
sc = StandardScaler()
X_train = sc.fit_transform(X_train)
X_test = sc.transform(X_test)

# 使用SVM分类器
classifier = SVC(kernel='linear', probability=True)
classifier.fit(X_train, y_train)

# 预测结果
y_pred = classifier.predict(X_test)
y_testprba = classifier.decision_function(X_test)

y_trainpred = classifier.predict(X_train)
y_trainprba = classifier.decision_function(X_train)

# 混淆矩阵
cm_test = confusion_matrix(y_test, y_pred)
cm_train = confusion_matrix(y_train, y_trainpred)
print(cm_train)
print(cm_test)

# 绘制测试集混淆矩阵
classes = list(set(y_test))
classes.sort()
plt.imshow(cm_test, cmap=plt.cm.Blues)
indices = range(len(cm_test))
plt.xticks(indices, classes)
plt.yticks(indices, classes)
plt.colorbar()
plt.xlabel('Predicted')
plt.ylabel('Actual')
for first_index in range(len(cm_test)):
    for second_index in range(len(cm_test[first_index])):
        plt.text(first_index, second_index, cm_test[first_index][second_index])

plt.show()

# 绘制训练集混淆矩阵
classes = list(set(y_train))
classes.sort()
plt.imshow(cm_train, cmap=plt.cm.Blues)
indices = range(len(cm_train))
plt.xticks(indices, classes)
plt.yticks(indices, classes)
plt.colorbar()
plt.xlabel('Predicted')
plt.ylabel('Actual')
for first_index in range(len(cm_train)):
    for second_index in range(len(cm_train[first_index])):
        plt.text(first_index, second_index, cm_train[first_index][second_index])

plt.show()

# 计算并打印性能参数
def calculate_metrics(cm, y_true, y_pred_prob):
    a = cm[0, 0]
    b = cm[0, 1]
    c = cm[1, 0]
    d = cm[1, 1]
    acc = (a + d) / (a + b + c + d)
    error_rate = 1 - acc
    sen = d / (d + c)
    sep = a / (a + b)
    precision = d / (b + d)
    F1 = (2 * precision * sen) / (precision + sen)
    MCC = (d * a - b * c) / (np.sqrt((d + b) * (d + c) * (a + b) * (a + c)))
    auc_score = roc_auc_score(y_true, y_pred_prob)

    metrics = {
        "Accuracy": acc,
        "Error Rate": error_rate,
        "Sensitivity": sen,
        "Specificity": sep,
        "Precision": precision,
        "F1 Score": F1,
        "MCC": MCC,
        "AUC": auc_score
    }
    return metrics

metrics_test = calculate_metrics(cm_test, y_test, y_testprba)
metrics_train = calculate_metrics(cm_train, y_train, y_trainprba)

print("Performance Metrics (Test):")
for key, value in metrics_test.items():
    print(f"{key}: {value:.4f}")

print("\nPerformance Metrics (Train):")
for key, value in metrics_train.items():
print(f"{key}: {value:.4f}")
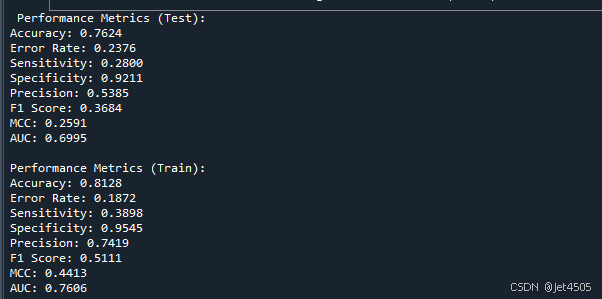
结果输出:

记住这些个数字。
这个参数的SVM还没有LR好。
(2)进行校准的SVM模型(默认参数)
python
import numpy as np
import matplotlib.pyplot as plt
import pandas as pd
from sklearn.model_selection import train_test_split
from sklearn.preprocessing import StandardScaler
from sklearn.svm import SVC
from sklearn.metrics import confusion_matrix, roc_auc_score, roc_curve
from sklearn.calibration import CalibratedClassifierCV

# 加载数据
dataset = pd.read_csv('8PSMjianmo.csv')
X = dataset.iloc[:, 1:20].values
Y = dataset.iloc[:, 0].values

# 分割数据集
X_train, X_test, y_train, y_test = train_test_split(X, Y, test_size=0.30, random_state=666)

# 标准化数据
sc = StandardScaler()
X_train = sc.fit_transform(X_train)
X_test = sc.transform(X_test)

# 使用SVM分类器
classifier = SVC(kernel='rbf', C= 0.1, probability=True)
classifier.fit(X_train, y_train)

# 进行Sigmoid校准
calibrated_classifier = CalibratedClassifierCV(base_estimator=classifier, method='sigmoid', cv='prefit')
calibrated_classifier.fit(X_test, y_test)

# 预测结果
y_pred = calibrated_classifier.predict(X_test)
y_testprba = calibrated_classifier.predict_proba(X_test)[:, 1]

y_trainpred = calibrated_classifier.predict(X_train)
y_trainprba = calibrated_classifier.predict_proba(X_train)[:, 1]

# 混淆矩阵
cm_test = confusion_matrix(y_test, y_pred)
cm_train = confusion_matrix(y_train, y_trainpred)
print(cm_train)
print(cm_test)

# 绘制测试集混淆矩阵
classes = list(set(y_test))
classes.sort()
plt.imshow(cm_test, cmap=plt.cm.Blues)
indices = range(len(cm_test))
plt.xticks(indices, classes)
plt.yticks(indices, classes)
plt.colorbar()
plt.xlabel('Predicted')
plt.ylabel('Actual')
for first_index in range(len(cm_test)):
    for second_index in range(len(cm_test[first_index])):
        plt.text(first_index, second_index, cm_test[first_index][second_index])

plt.show()

# 绘制训练集混淆矩阵
classes = list(set(y_train))
classes.sort()
plt.imshow(cm_train, cmap=plt.cm.Blues)
indices = range(len(cm_train))
plt.xticks(indices, classes)
plt.yticks(indices, classes)
plt.colorbar()
plt.xlabel('Predicted')
plt.ylabel('Actual')
for first_index in range(len(cm_train)):
    for second_index in range(len(cm_train[first_index])):
        plt.text(first_index, second_index, cm_train[first_index][second_index])

plt.show()

# 计算并打印性能参数
def calculate_metrics(cm, y_true, y_pred_prob):
    a = cm[0, 0]
    b = cm[0, 1]
    c = cm[1, 0]
    d = cm[1, 1]
    acc = (a + d) / (a + b + c + d)
    error_rate = 1 - acc
    sen = d / (d + c)
    sep = a / (a + b)
    precision = d / (b + d)
    F1 = (2 * precision * sen) / (precision + sen)
    MCC = (d * a - b * c) / (np.sqrt((d + b) * (d + c) * (a + b) * (a + c)))
    auc_score = roc_auc_score(y_true, y_pred_prob)

    metrics = {
        "Accuracy": acc,
        "Error Rate": error_rate,
        "Sensitivity": sen,
        "Specificity": sep,
        "Precision": precision,
        "F1 Score": F1,
        "MCC": MCC,
        "AUC": auc_score
    }
    return metrics

metrics_test = calculate_metrics(cm_test, y_test, y_testprba)
metrics_train = calculate_metrics(cm_train, y_train, y_trainprba)

print("Performance Metrics (Test):")
for key, value in metrics_test.items():
    print(f"{key}: {value:.4f}")

print("\nPerformance Metrics (Train):")
for key, value in metrics_train.items():
    print(f"{key}: {value:.4f}")
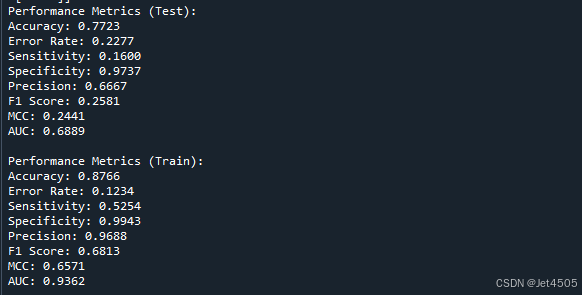
看看结果:

总体来看,仅仅训练集起作用了,验证集差强人意。
四、 换个策略
参考那篇文章的策略:采用五折交叉验证来建立和评估模型,其中四折用于训练,一折用于评估,在训练集中,其中三折用于建立SVM模型,另一折采用Sigmoid Calibration概率校正,在训练集内部采用交叉验证对超参数进行调参。
代码:
python
import numpy as np
import matplotlib.pyplot as plt
import pandas as pd
from sklearn.model_selection import train_test_split, KFold, GridSearchCV
from sklearn.preprocessing import StandardScaler
from sklearn.svm import SVC
from sklearn.calibration import CalibratedClassifierCV
from sklearn.metrics import confusion_matrix, roc_auc_score, make_scorer

# 加载数据
dataset = pd.read_csv('8PSMjianmo.csv')
X = dataset.iloc[:, 1:20].values
Y = dataset.iloc[:, 0].values

# 标准化数据
sc = StandardScaler()
X = sc.fit_transform(X)

# 五折交叉验证
kf = KFold(n_splits=5, shuffle=True, random_state=666)

# 超参数调优参数网格
param_grid = {
    'C': [0.1, 1, 10, 100],
    'kernel': ['linear', 'rbf']
}

# 计算并打印性能参数
def calculate_metrics(cm, y_true, y_pred_prob):
    a = cm[0, 0]
    b = cm[0, 1]
    c = cm[1, 0]
    d = cm[1, 1]
    acc = (a + d) / (a + b + c + d)
    error_rate = 1 - acc
    sen = d / (d + c)
    sep = a / (a + b)
    precision = d / (b + d)
    F1 = (2 * precision * sen) / (precision + sen)
    MCC = (d * a - b * c) / (np.sqrt((d + b) * (d + c) * (a + b) * (a + c)))
    auc_score = roc_auc_score(y_true, y_pred_prob)

    metrics = {
        "Accuracy": acc,
        "Error Rate": error_rate,
        "Sensitivity": sen,
        "Specificity": sep,
        "Precision": precision,
        "F1 Score": F1,
        "MCC": MCC,
        "AUC": auc_score
    }
    return metrics

# 初始化结果列表
results_train = []
results_test = []

# 初始化变量以跟踪最优模型
best_auc = 0
best_model = None
best_X_train = None
best_X_test = None
best_y_train = None
best_y_test = None

# 交叉验证过程
for train_index, test_index in kf.split(X):
    X_train, X_test = X[train_index], X[test_index]
    y_train, y_test = Y[train_index], Y[test_index]

    # 内部交叉验证进行超参数调优和模型训练
    inner_kf = KFold(n_splits=4, shuffle=True, random_state=666)
    grid_search = GridSearchCV(SVC(probability=True), param_grid, cv=inner_kf, scoring='roc_auc')
    grid_search.fit(X_train, y_train)
    model = grid_search.best_estimator_

    # Sigmoid Calibration 概率校准
    calibrated_svm = CalibratedClassifierCV(model, method='sigmoid', cv='prefit')
    calibrated_svm.fit(X_train, y_train)

    # 评估模型
    y_trainpred = calibrated_svm.predict(X_train)
    y_trainprba = calibrated_svm.predict_proba(X_train)[:, 1]
    cm_train = confusion_matrix(y_train, y_trainpred)
    metrics_train = calculate_metrics(cm_train, y_train, y_trainprba)
    results_train.append(metrics_train)

    y_pred = calibrated_svm.predict(X_test)
    y_testprba = calibrated_svm.predict_proba(X_test)[:, 1]
    cm_test = confusion_matrix(y_test, y_pred)
    metrics_test = calculate_metrics(cm_test, y_test, y_testprba)
    results_test.append(metrics_test)

    # 更新最优模型
    if metrics_test['AUC'] > best_auc:
        best_auc = metrics_test['AUC']
        best_model = calibrated_svm
        best_X_train = X_train
        best_X_test = X_test
        best_y_train = y_train
        best_y_test = y_test
        best_params = grid_search.best_params_

    print("Performance Metrics (Train):")
    for key, value in metrics_train.items():
        print(f"{key}: {value:.4f}")

    print("\nPerformance Metrics (Test):")
    for key, value in metrics_test.items():
        print(f"{key}: {value:.4f}")
    print("\n" + "="*40 + "\n")

# 使用最优模型评估性能
y_trainpred = best_model.predict(best_X_train)
y_trainprba = best_model.predict_proba(best_X_train)[:, 1]
cm_train = confusion_matrix(best_y_train, y_trainpred)
metrics_train = calculate_metrics(cm_train, best_y_train, y_trainprba)

y_pred = best_model.predict(best_X_test)
y_testprba = best_model.predict_proba(best_X_test)[:, 1]
cm_test = confusion_matrix(best_y_test, y_pred)
metrics_test = calculate_metrics(cm_test, best_y_test, y_testprba)

print("Performance Metrics of the Best Model (Train):")
for key, value in metrics_train.items():
    print(f"{key}: {value:.4f}")

print("\nPerformance Metrics of the Best Model (Test):")
for key, value in metrics_test.items():
    print(f"{key}: {value:.4f}")

# 打印最优模型的参数
print("\nBest Model Parameters:")
for key, value in best_params.items():
    print(f"{key}: {value}")
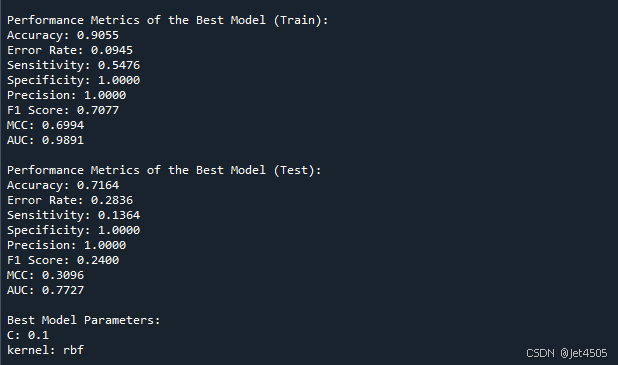
输出:

还是有提升的,不过并没有Platt Scaling的结果好。
五、最后
各位可以去试一试在其他数据或者在其他机器学习分类模型中使用的效果。
数据不分享啦。