神经网络 - 卷积层
pytorch官网网站卷积层(Convolution Layers):Convolution Layers
| nn.Conv1d 一维卷积 | Applies a 1D convolution over an input signal composed of several input planes. |
|---|---|
| nn.Conv2d 二维卷积 | Applies a 2D convolution over an input signal composed of several input planes. |
| nn.Conv3d 三维卷积 | Applies a 3D convolution over an input signal composed of several input planes. |
图像为二维矩阵,所以讲解 nn.Conv2d:
Conv2d --- PyTorch 1.10 documentation

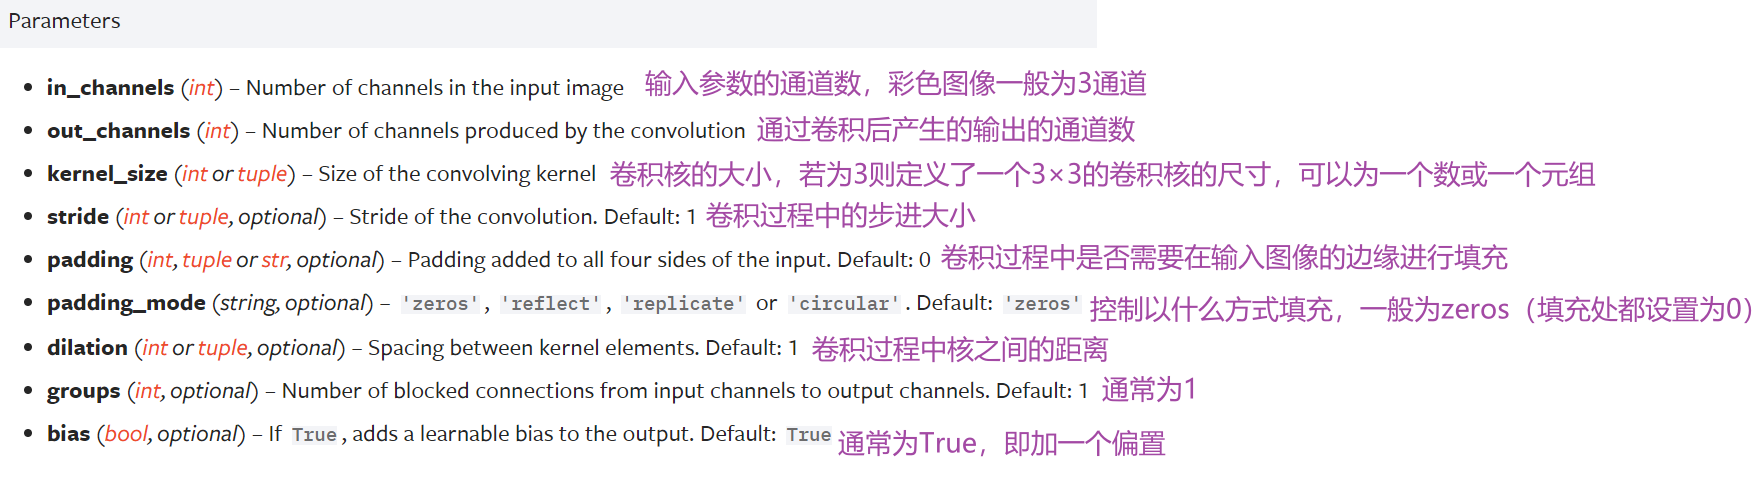
CLASS torch.nn.Conv2d(in_channels, out_channels, kernel_size, stride=1, padding=0, dilation=1, groups=1, bias=True, padding_mode='zeros', device=None, dtype=None)

# in_channels 输入通道数
# out_channels 输出通道数
# kernel_size 卷积核大小
#以上参数需要设置

#以下参数提供了默认值
# stride=1 卷积过程中的步进大小
# padding=0 卷积过程中对原始图像进行padding的选项
# dilation=1 每一个卷积核对应位的距离
# groups=1 一般设置为1,很少改动,改动的话为分组卷积
# bias=True 通常为True,对卷积后的结果是否加减一个常数的偏置
# padding_mode='zeros' 选择padding填充的模式
参数含义:
动图(演示地址): conv_arithmetic/README.md at master · vdumoulin/conv_arithmetic · GitHub(conv_arithmetic/README.md at master · vdumoulin/conv_arithmetic · GitHub)
kernel_size
定义了一个卷积核的大小,若为3则生成一个3×3的卷积核
卷积核的参数是从一些分布中进行采样得到的
实际训练过程中,卷积核中的值会不断进行调整
in_channels & out_channels
in_channels:输入图片的channel数(彩色图像 in_channels 值为3)
out_channels:输出图片的channel数
in_channels 和 out_channels 都为 1 时,拿一个卷积核在输入图像中进行卷积
out_channels 为 2 时,卷积层会生成两个卷积核(不一定一样),得到两个输出,叠加后作为最后输出
CIFAR10数据集实例
# CIFAR10数据集
import torch
import torchvision
from torch import nn
from torch.nn import Conv2d
from torch.utils.data import DataLoader
from torch.utils.tensorboard import SummaryWriter

dataset = torchvision.datasets.CIFAR10("../data",train=False,transform=torchvision.transforms.ToTensor(),download=True)  # 这里用测试数据集,因为训练数据集太大了
dataloader = DataLoader(dataset,batch_size=64)

# 搭建神经网络Tudui
class Tudui(nn.Module):
    def __init__(self):
        super(Tudui, self).__init__()
        # 因为是彩色图片,所以in_channels=3
        self.conv1 = Conv2d(in_channels=3,out_channels=6,kernel_size=3,stride=1,padding=0)   #卷积层conv1
    def forward(self,x):  #输出为x
        x = self.conv1(x)
        return x

tudui = Tudui()  # 初始化网络
# 打印一下网络结构
print(tudui)   #Tudui((conv1): Conv2d(3, 6, kernel_size=(3, 3), stride=(1, 1)))

writer = SummaryWriter("logs")
step = 0
for data in dataloader:
    imgs,targets = data  #经过ToTensor转换,成为tensor数据类型,可以直接送到网络中
    output = tudui(imgs)
    print(imgs.shape)     #输入大小 torch.Size([64, 3, 32, 32])  batch_size=64,in_channels=3(彩色图像),每张图片是32×32的
    print(output.shape)   #经过卷积后的输出大小 torch.Size([64, 6, 30, 30])  卷积后变成6个channels,但原始图像减小,所以是30×30的
    writer.add_images("input",imgs,step)

    # 6个channel无法显示。torch.Size([64, 6, 30, 30]) ------> [xxx,3,30,30] 第一个值不知道为多少时写-1,会根据后面值的大小进行计算
    output = torch.reshape(output,(-1,3,30,30))
    writer.add_images("output",output,step)
    step = step + 1
运行后(如果没启用环境),在 Terminal 里启动 pytorch 环境:
conda activate pytorch打开 tensorboard:
tensorboard --logdir=logs打开网址(卷积后得到的输出)

卷积层 vgg16
卷积前后维度计算公式
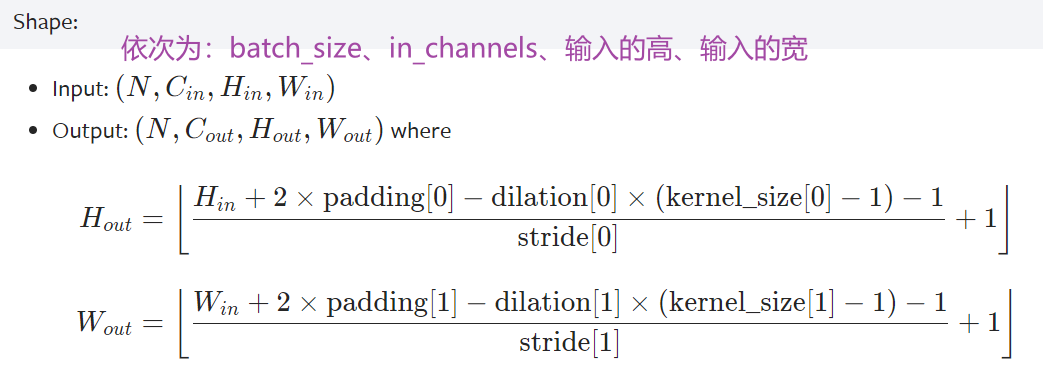
4861571558)]
卷积前后维度计算公式