场景
把本地项目推送到Github仓库后,如果想部署到服务器上,可以尝试此方案
-
我的博客是hugo搭建的,每次更新文章会手动推送到Github仓库,
-
然后利用Actions 脚本自动推送到cf或者vercel
-
之前我写过一篇 将 hugo 博客搬迁到服务器 步骤有些繁琐,
-
本次方案快速高效(推荐)
方案
使用rsync,配置Actions 脚本
小站demo: https://blog.taoshuge.eu.org/
安装 rsync
登录远程服务器,键入以下命令来完成 rsync 的安装:
bash
sudo apt install rsync安装成功会显示git的版本号
bash
rsync --version显示
rsync version 3.2.3 protocol version 31
新建 rsync 用户
出于安全的原因考虑,我们一般不会使用root来运行同步功能,因此,需要创建一个 rsync 用户来执行同步。
登录远程服务器,键入以下命令:
bash
sudo adduser rsyncer创建用户的途中会要求输入用户密码,这个密码请务必记住,切换到这个用户时需要,其它配置使用默认值直接回车就行。
本地生成 SSH key
在你的电脑上生成一个 Key 对,其中一个扩展名是.pub,是公钥。假设分别命名为:id_rsa 和 id_rsa.pub
bash
ssh-keygen -q -t rsa -b 4096 -C "阿弥托福" -N "" -f ~/.ssh/id_rsa查看并复制公钥内容
bash
cat ~/.ssh/id_rsa.pub把 SSH 公钥添加到远程服务器
登录你的服务器,逐个输入以下代码
bash
su rsyncer  # 要输入密码
cd ~
mkdir -p www .ssh
chmod 700 .ssh
touch .ssh/authorized_keys
chmod 600 .ssh/authorized_keys
vim .ssh/authorized_keys # 用文本编辑器打开 `id_rsa.pub`,复制所有内容到这个文件里注意:.ssh的权限必须是700,authorized_keys的权限必须是600
修改 SSH 默认配置
以下内容一般不用修改,如果同步有问题再来修改。
bash
vim /etc/ssh/sshd_config移除前面的注释,若没有则在最后添加
bash
RSAAuthentication yes
PubkeyAuthentication yes
AuthorizedKeysFile  .ssh/authorized_keys
修改保存后重启sshd服务
bash
systemctl restart sshd.service设置Git仓库(重点)
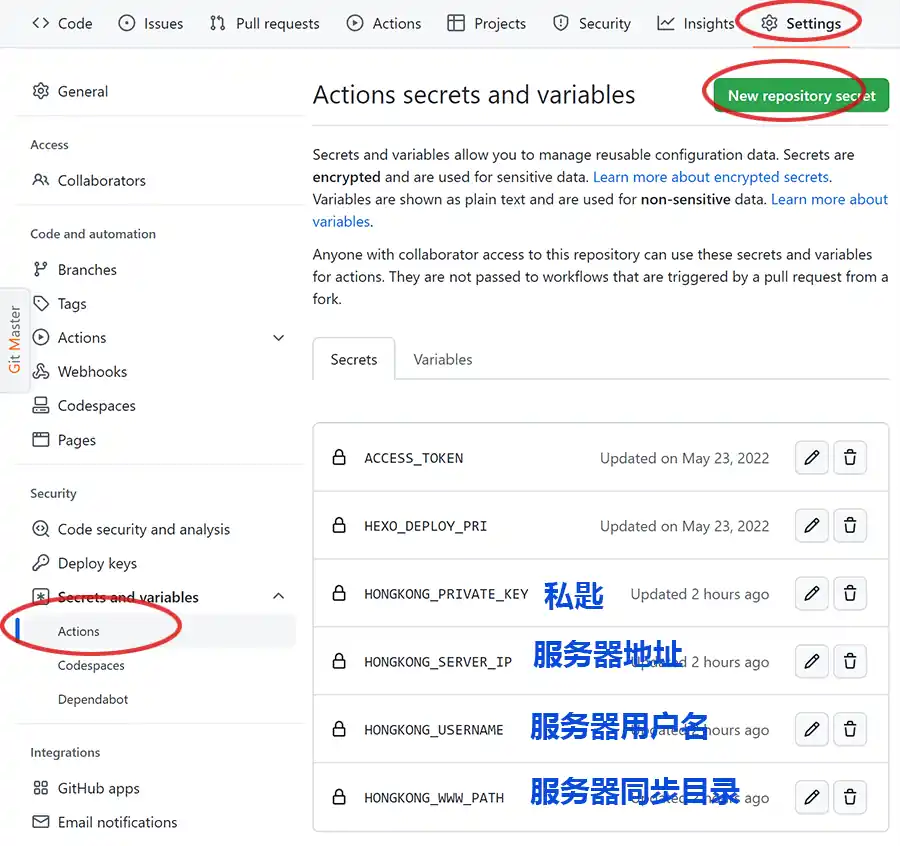
打开仓库设置,按下图把相关设置加入 secrets,
地址:https://github.com/用户名/仓库名/settings/secrets/actions

解读:
HONGKONG_PRIVATE_KEY  :你电脑上的id_rsa私钥内容

HONGKONG_SERVER_IP : 你的服务器IP地址

HONGKONG_USERNAME  :rsyncer  #用户名就是前面新建的rsyncer用户

HONGKONG_WWW_PATH  :www   #就是服务器同步的目录为www
修改自动化 Actions 脚本
-
rsync命令实现增量同步, --delete参数表示会删除远程文件夹中本地不存在的文件
-
-a是复合参数, 可复制本地文件的全部属性至远程, -v会显示具体同步的文件信息
-
exclude中的文件夹路径是相对于本地同步文件夹而言, 即
"public/.git" -
注意:
-p 5522是服务器的ssh端口,如果不是22,记得修改
把以下内容加入脚本,脚本目录:.github\workflows\main.yml
bash
      - name: webfactory/ssh-agent
        uses: webfactory/ssh-agent@v0.7.0
        with:
          ssh-private-key: ${{ secrets.HONGKONG_PRIVATE_KEY }}

      - name: Publish blog to remote vps
        run: |
          rsync -av -e "ssh -o StrictHostKeyChecking=no -p 5522" --delete --exclude={'.git/','.github/','.user.ini'} public/ ${{ secrets.HONGKONG_USERNAME }}@${{ secrets.HONGKONG_SERVER_IP }}:${{ secrets.HONGKONG_WWW_PATH }}
完整hugo脚本:
name: Auto Deploy hugo
on:
  push:
    branches:
      - main # 更新触发的分支
jobs:
  build-deploy:
    runs-on: ubuntu-20.04
    env:
      FORCE_JAVASCRIPT_ACTIONS_TO_NODE20: true # ACTIONS_ALLOW_USE_UNSECURE_NODE_VERSION: true
    steps:
      - name: Check out repository code
        uses: actions/checkout@v4
        with:
           submodules: recursive # Fetch Hugo themes (true OR recursive)
           fetch-depth: 0 # Fetch all history for .GitInfo and .Lastmod

      - name: Setup hugo
        uses: peaceiris/actions-hugo@v3.0.0
        with:
          hugo-version: "0.127.0"
          extended: true # 设置是否需要 extended 版本

      - name: Cache resources # 缓存 resource 文件加快生成速度
        uses: actions/cache@v3
        with:
         path: resources
         key: ${{ runner.os }}-hugocache-${{ hashFiles('content/**/*') }}
         restore-keys: ${{ runner.os }}-hugocache-

      - name: Build Hugo static files # 部署静态资源
        run: hugo --gc --minify

      - name: Deploy to Github Pages  # 部署到Github Pages页面
        uses: peaceiris/actions-gh-pages@v3
        with:
          personal_token: ${{ secrets.PERSONAL_TOKEN }} # 两个仓库请使用 deploy_key
          external_repository: woniu336/woniu336.github.io  # 如果在同一个仓库请注释
          publish_dir: ./public # hugo 生成到 public 作为跟目录
          publish_branch: main # Github Pages 所在分支
          commit_message: ${{ github.event.head_commit.message }}

      - name: webfactory/ssh-agent
        uses: webfactory/ssh-agent@v0.7.0
        with:
          ssh-private-key: ${{ secrets.HONGKONG_PRIVATE_KEY }}

      - name: Publish blog to remote vps
        run: |
          rsync -av -e "ssh -o StrictHostKeyChecking=no -p 5522" --delete --exclude={'.git/','.github/','.user.ini'} public/ ${{ secrets.HONGKONG_USERNAME }}@${{ secrets.HONGKONG_SERVER_IP }}:${{ secrets.HONGKONG_WWW_PATH }}
完结~