建议点赞收藏关注!持续更新至pytorch大部分内容更完。
本文已达到10w字,故按模块拆开,详见目录导航。
本节目录
模型
模型训练基本步骤:数据->模型->损失函数->优化器->迭代训练
线性回归
1.确定模型:y=wx+b 关系是线性的,需要求解w,b
2.选择损失函数 MSE均方差

3.求解梯度并更新w,b
w=w-LRw.grad 加上梯度的负方向 即减梯度正方向
b=b-LRw.grad
python
# -*- coding:utf-8 -*-
"""
@brief      : 一元线性回归模型
"""
import torch
import matplotlib.pyplot as plt
torch.manual_seed(10)

lr = 0.05  # 学习率

# 创建训练数据
x = torch.rand(20, 1) * 10  # x data (tensor), shape=(20, 1)
y = 2*x + (5 + torch.randn(20, 1))  # y data (tensor), shape=(20, 1)
#torch.randn(20, 1)是一些噪声

# 构建初始化线性回归参数
w = torch.randn((1), requires_grad=True)
b = torch.zeros((1), requires_grad=True)

for iteration in range(1000):

    # 前向传播
    wx = torch.mul(w, x)#w*x
    y_pred = torch.add(wx, b)#y_pred是预测值=w*x+b

    # 计算 MSE loss
    loss = (0.5 * (y - y_pred) ** 2).mean()
    #0.5这里是为了消掉求导中的系数2

    # 反向传播 得到梯度
    loss.backward()

    # 更新参数 即减掉lr * grad梯度
    b.data.sub_(lr * b.grad)
    w.data.sub_(lr * w.grad)

    # 清零张量的梯度   20191015增加
    w.grad.zero_()
    b.grad.zero_()

    # 绘图
    if iteration % 20 == 0:
        plt.cla()   # 防止社区版可视化时模型重叠
        plt.scatter(x.data.numpy(), y.data.numpy())
        plt.plot(x.data.numpy(), y_pred.data.numpy(), 'r-', lw=5)
        plt.text(2, 20, 'Loss=%.4f' % loss.data.numpy(), fontdict={'size': 20, 'color':  'red'})
        plt.xlim(1.5, 10)
        plt.ylim(8, 28)
        plt.title("Iteration: {}\nw: {} b: {}".format(iteration, w.data.numpy(), b.data.numpy()))
        plt.pause(0.5)

        if loss.data.numpy() < 1:#loss小于1时停止迭代
            break
    plt.show()
逻辑回归
注意:是线性的二分类 模型
模型表达式:y=f(wx+b), f(x)=1/(1+e^-x),f(x)成为sigmoid函数 又叫logistic函数,它会将输入的数据映射到0~1之间(概率)

如何二分类?通常将阈值设置为0.5,超过0.5为1,不足0.5为0

逻辑回归又名 对数几率回归,这里的几率对应y/(1-y)
ln[y/(1-y)]=wx+b 公式与逻辑回归表达式可以互相得到
对数回归:表达式lny=wx+b
python
import torch
import torch.nn as nn
import matplotlib.pyplot as plt
import numpy as np
torch.manual_seed(10)


# ============================ step 1/5 生成数据 ============================
sample_nums = 100
mean_value = 1.7
bias = 1
n_data = torch.ones(sample_nums, 2)
x0 = torch.normal(mean_value * n_data, 1) + bias      # 类别0 数据 shape=(100, 2)
#normal(mean,std)
y0 = torch.zeros(sample_nums)                         # 类别0 标签 shape=(100)
x1 = torch.normal(-mean_value * n_data, 1) + bias     # 类别1 数据 shape=(100, 2)
y1 = torch.ones(sample_nums)                          # 类别1 标签 shape=(100)
train_x = torch.cat((x0, x1), 0)
train_y = torch.cat((y0, y1), 0)


# ============================ step 2/5 选择模型 ============================
class LR(nn.Module):
    def __init__(self):
        super(LR, self).__init__()
        self.features = nn.Linear(2, 1)
        self.sigmoid = nn.Sigmoid()

    def forward(self, x):#前向传播
        x = self.features(x)
        x = self.sigmoid(x)
        return x


lr_net = LR()   # 实例化逻辑回归模型


# ============================ step 3/5 选择损失函数 ============================
loss_fn = nn.BCELoss()#二分类交叉熵

# ============================ step 4/5 选择优化器   ============================
lr = 0.01  # 学习率
optimizer = torch.optim.SGD(lr_net.parameters(), lr=lr, momentum=0.9)
#SGD随机梯度下降法
'''
关于momentum
SGD(Stochastic Gradient Descent,随机梯度下降)是一种常用的优化算法,用于训练机器学习模型。 Momentum 是SGD的一种变体,它引入了一个动量项(momentum term),目的是为了加速收敛并减少震荡。简单来说,Momentum会在每一次更新方向上考虑历史的梯度信息,而不是仅仅基于当前的梯度。
这个动量项会让模型偏向于沿之前梯度的方向移动,如果之前的方向是有利的,那么在后续迭代中会保持这种趋势,有助于避免陷入局部最优。
'''
# ============================ step 5/5 模型训练 ============================
for iteration in range(1000):

    # 前向传播:将数据输入给模型
    y_pred = lr_net(train_x)

    # 计算 loss
    loss = loss_fn(y_pred.squeeze(), train_y)

    # 反向传播
    loss.backward()

    # 更新参数
    optimizer.step()

    # 清空梯度
    optimizer.zero_grad()

    # 绘图
    if iteration % 20 == 0:

        mask = y_pred.ge(0.5).float().squeeze()  # 以0.5为阈值进行分类
        correct = (mask == train_y).sum()  # 计算正确预测的样本个数
        acc = correct.item() / train_y.size(0)  # 计算分类准确率

        plt.scatter(x0.data.numpy()[:, 0], x0.data.numpy()[:, 1], c='r', label='class 0')
        plt.scatter(x1.data.numpy()[:, 0], x1.data.numpy()[:, 1], c='b', label='class 1')

        w0, w1 = lr_net.features.weight[0]
        w0, w1 = float(w0.item()), float(w1.item())
        plot_b = float(lr_net.features.bias[0].item())
        plot_x = np.arange(-6, 6, 0.1)
        plot_y = (-w0 * plot_x - plot_b) / w1

        plt.xlim(-5, 7)
        plt.ylim(-7, 7)
        plt.plot(plot_x, plot_y)

        plt.text(-5, 5, 'Loss=%.4f' % loss.data.numpy(), fontdict={'size': 20, 'color': 'red'})
        plt.title("Iteration: {}\nw0:{:.2f} w1:{:.2f} b: {:.2f} accuracy:{:.2%}".format(iteration, w0, w1, plot_b, acc))
        plt.legend()

        plt.show()
        plt.pause(0.5)

        if acc > 0.99:
            break
LeNet
conv1->pool1->conv2->pool2->fc1->fc2->fc3

forward:从左往右的顺序,前向传播;反之为backward
AlexNet


features部分是卷积池化
classfier部分是全联接
Alexnet是分组卷积,原因是受制于硬件,因为它用了两个GPU进行训练。如上图结构所示,一张图片分成上下两组卷积进行,直到最后全连接时上下两组才连接起来。
python
class AlexNet(nn.Module):
    def __init__(self, num_classes: int = 1000, dropout: float = 0.5) -> None:
        super().__init__()
        _log_api_usage_once(self)
        self.features = nn.Sequential(
            nn.Conv2d(3, 64, kernel_size=11, stride=4, padding=2),
            nn.ReLU(inplace=True),
            nn.MaxPool2d(kernel_size=3, stride=2),
            nn.Conv2d(64, 192, kernel_size=5, padding=2),
            nn.ReLU(inplace=True),
            nn.MaxPool2d(kernel_size=3, stride=2),
            nn.Conv2d(192, 384, kernel_size=3, padding=1),
            nn.ReLU(inplace=True),
            nn.Conv2d(384, 256, kernel_size=3, padding=1),
            nn.ReLU(inplace=True),
            nn.Conv2d(256, 256, kernel_size=3, padding=1),
            nn.ReLU(inplace=True),
            nn.MaxPool2d(kernel_size=3, stride=2),
        )
        self.avgpool = nn.AdaptiveAvgPool2d((6, 6))
        self.classifier = nn.Sequential(
            nn.Dropout(p=dropout),
            nn.Linear(256 * 6 * 6, 4096),#全连接
            nn.ReLU(inplace=True),
            nn.Dropout(p=dropout),
            nn.Linear(4096, 4096),
            nn.ReLU(inplace=True),
            nn.Linear(4096, num_classes),
        )

    def forward(self, x: torch.Tensor) -> torch.Tensor:
        x = self.features(x)
        x = self.avgpool(x)
        x = torch.flatten(x, 1)
        x = self.classifier(x)
        return x

# 4 AlexNet
alexnet = torchvision.models.AlexNet()
构建模块
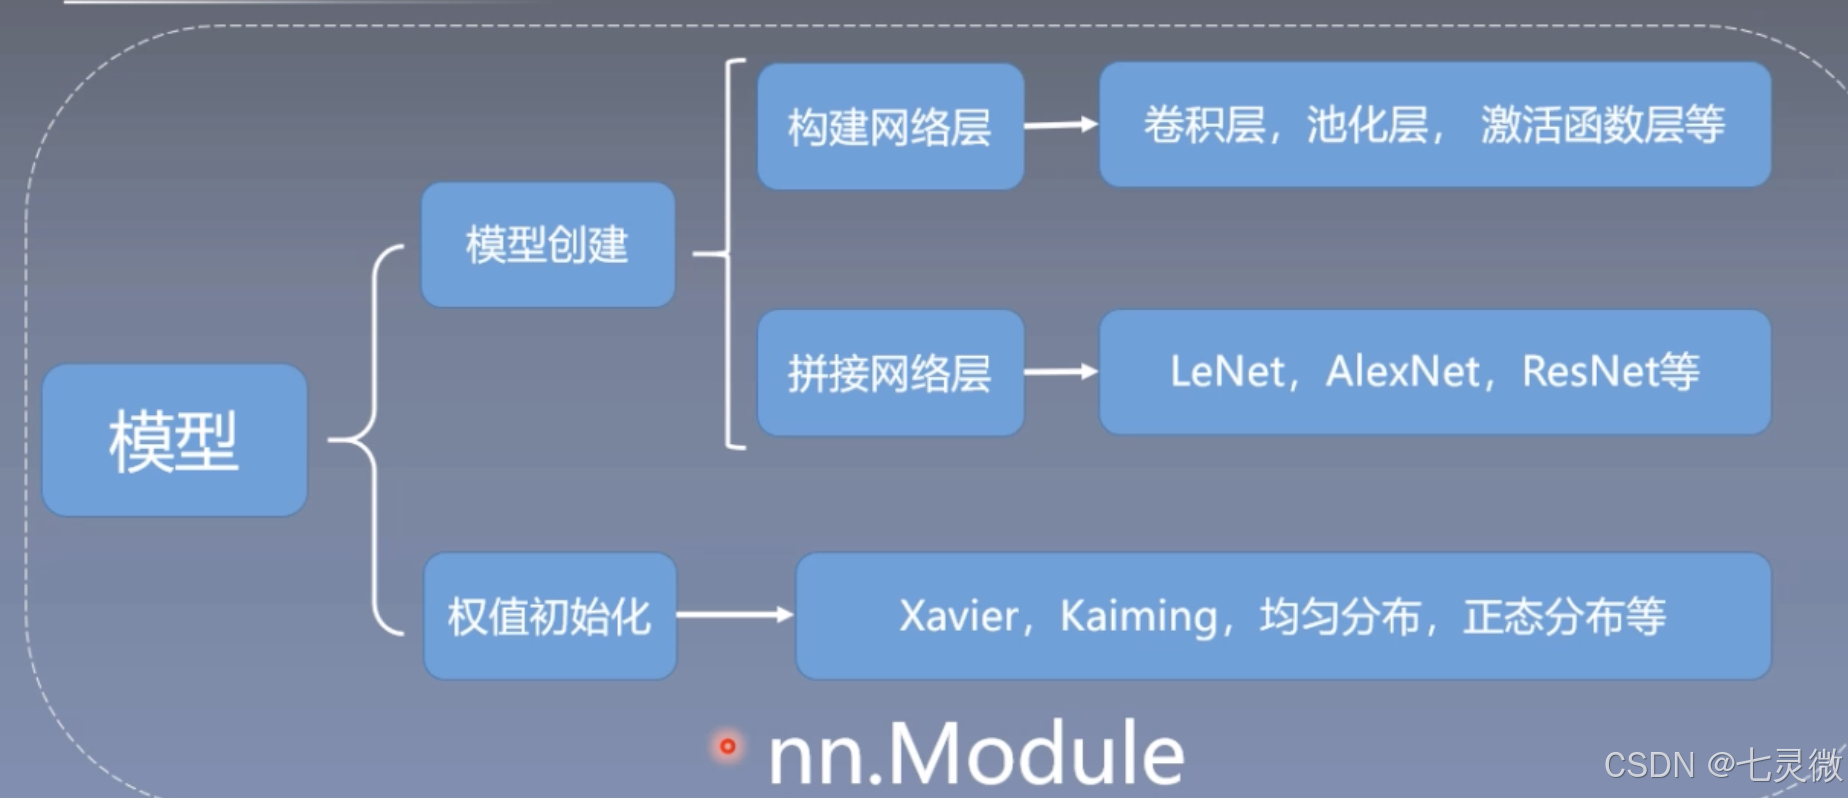
构建模块需要构建子模块(在__init__()),拼接子模块(在forward())。
所有的模型、网络层都是继承nn.Module

nn.Module总结:
- 一个module可以包含多个子module,比如说convNd,pool都是一个module,区别在于这种子module的module属性为空,即它们没有子模块了
- 一个module相当于一个运算,必须实现forward()
- 每个module都有8个字典管理它的属性;例如,执行module的init创建self.conv2时就会进入__setattr__判断传参类型,如果是parameter则加入到parameters字典中,其key==[该参数],如果是module则加入到modules字典中,其key==[conv2];(细节可以通过源码debug来查看)
nn.Module的属性有

以下是与hooks有关的字典:

python
class LeNet(nn.Module):
    def __init__(self, classes):
        super(LeNet, self).__init__()#这里实现了调用父类的init()
        self.conv1 = nn.Conv2d(3, 6, 5)
        #这些都可以debug之后step in 看一下它继续往哪个代码底层执行,了解代码原理
        self.conv2 = nn.Conv2d(6, 16, 5)
        self.fc1 = nn.Linear(16*5*5, 120)
        self.fc2 = nn.Linear(120, 84)
        self.fc3 = nn.Linear(84, classes)

    def forward(self, x):
        out = F.relu(self.conv1(x))
        out = F.max_pool2d(out, 2)
        out = F.relu(self.conv2(out))
        out = F.max_pool2d(out, 2)
        out = out.view(out.size(0), -1)
        out = F.relu(self.fc1(out))
        out = F.relu(self.fc2(out))
        out = self.fc3(out)
        return out

    def initialize_weights(self):
        for m in self.modules():
            if isinstance(m, nn.Conv2d):
                nn.init.xavier_normal_(m.weight.data)
                if m.bias is not None:
                    m.bias.data.zero_()
            elif isinstance(m, nn.BatchNorm2d):
                m.weight.data.fill_(1)
                m.bias.data.zero_()
            elif isinstance(m, nn.Linear):
                nn.init.normal_(m.weight.data, 0, 0.1)
                m.bias.data.zero_()
python
# -*- coding: utf-8 -*-
"""
# @file name  : create_module.py
# @brief      : 学习模型创建学习
"""
import os
BASE_DIR = os.path.dirname(os.path.abspath(__file__))
import numpy as np
import torch
import torch.nn as nn
from torch.utils.data import DataLoader
import torchvision.transforms as transforms
import torch.optim as optim
from matplotlib import pyplot as plt
path_lenet = os.path.abspath(os.path.join(BASE_DIR, "..", "..", "model", "lenet.py"))
path_tools = os.path.abspath(os.path.join(BASE_DIR, "..", "..", "tools", "common_tools.py"))
assert os.path.exists(path_lenet), "{}不存在,请将lenet.py文件放到 {}".format(path_lenet, os.path.dirname(path_lenet))
assert os.path.exists(path_tools), "{}不存在,请将common_tools.py文件放到 {}".format(path_tools, os.path.dirname(path_tools))

import sys
hello_pytorch_DIR = os.path.abspath(os.path.dirname(__file__)+os.path.sep+".."+os.path.sep+"..")
sys.path.append(hello_pytorch_DIR)

from model.lenet import LeNet
from tools.my_dataset import RMBDataset
from tools.common_tools import set_seed

set_seed()  # 设置随机种子
rmb_label = {"1": 0, "100": 1}

# 参数设置
MAX_EPOCH = 10
BATCH_SIZE = 16
LR = 0.01
log_interval = 10
val_interval = 1

# ============================ step 1/5 数据 ============================
split_dir = os.path.abspath(os.path.join(BASE_DIR, "..", "..", "data", "rmb_split"))
if not os.path.exists(split_dir):
    raise Exception(r"数据 {} 不存在, 回到lesson-06\1_split_dataset.py生成数据".format(split_dir))
train_dir = os.path.join(split_dir, "train")
valid_dir = os.path.join(split_dir, "valid")

norm_mean = [0.485, 0.456, 0.406]
norm_std = [0.229, 0.224, 0.225]

train_transform = transforms.Compose([
    transforms.Resize((32, 32)),
    transforms.RandomCrop(32, padding=4),
    transforms.ToTensor(),
    transforms.Normalize(norm_mean, norm_std),
])

valid_transform = transforms.Compose([
    transforms.Resize((32, 32)),
    transforms.ToTensor(),
    transforms.Normalize(norm_mean, norm_std),
])

# 构建MyDataset实例
train_data = RMBDataset(data_dir=train_dir, transform=train_transform)
valid_data = RMBDataset(data_dir=valid_dir, transform=valid_transform)

# 构建DataLoder
train_loader = DataLoader(dataset=train_data, batch_size=BATCH_SIZE, shuffle=True)
valid_loader = DataLoader(dataset=valid_data, batch_size=BATCH_SIZE)

# ============================ step 2/5 模型 ============================
net = LeNet(classes=2)
net.initialize_weights()

# ============================ step 3/5 损失函数 ============================
criterion = nn.CrossEntropyLoss()                                                   # 选择损失函数

# ============================ step 4/5 优化器 ============================
optimizer = optim.SGD(net.parameters(), lr=LR, momentum=0.9)                        # 选择优化器
scheduler = torch.optim.lr_scheduler.StepLR(optimizer, step_size=10, gamma=0.1)     # 设置学习率下降策略

# ============================ step 5/5 训练 ============================
train_curve = list()
valid_curve = list()

for epoch in range(MAX_EPOCH):

    loss_mean = 0.
    correct = 0.
    total = 0.

    net.train()
    for i, data in enumerate(train_loader):

        # forward
        inputs, labels = data
        outputs = net(inputs)

        # backward
        optimizer.zero_grad()
        loss = criterion(outputs, labels)
        loss.backward()

        # update weights
        optimizer.step()

        # 统计分类情况
        _, predicted = torch.max(outputs.data, 1)
        total += labels.size(0)
        correct += (predicted == labels).squeeze().sum().numpy()

        # 打印训练信息
        loss_mean += loss.item()
        train_curve.append(loss.item())
        if (i+1) % log_interval == 0:
            loss_mean = loss_mean / log_interval
            print("Training:Epoch[{:0>3}/{:0>3}] Iteration[{:0>3}/{:0>3}] Loss: {:.4f} Acc:{:.2%}".format(
                epoch, MAX_EPOCH, i+1, len(train_loader), loss_mean, correct / total))
            loss_mean = 0.

    scheduler.step()  # 更新学习率

    # validate the model
    if (epoch+1) % val_interval == 0:

        correct_val = 0.
        total_val = 0.
        loss_val = 0.
        net.eval()
        with torch.no_grad():
            for j, data in enumerate(valid_loader):
                inputs, labels = data
                outputs = net(inputs)
                loss = criterion(outputs, labels)

                _, predicted = torch.max(outputs.data, 1)
                total_val += labels.size(0)
                correct_val += (predicted == labels).squeeze().sum().numpy()

                loss_val += loss.item()

            valid_curve.append(loss_val)
            print("Valid:\t Epoch[{:0>3}/{:0>3}] Iteration[{:0>3}/{:0>3}] Loss: {:.4f} Acc:{:.2%}".format(
                epoch, MAX_EPOCH, j+1, len(valid_loader), loss_val, correct / total))


train_x = range(len(train_curve))
train_y = train_curve

train_iters = len(train_loader)
valid_x = np.arange(1, len(valid_curve)+1) * train_iters*val_interval # 由于valid中记录的是epochloss,需要对记录点进行转换到iterations
valid_y = valid_curve

plt.plot(train_x, train_y, label='Train')
plt.plot(valid_x, valid_y, label='Valid')

plt.legend(loc='upper right')
plt.ylabel('loss value')
plt.xlabel('Iteration')
plt.show()

# ============================ inference ============================

BASE_DIR = os.path.dirname(os.path.abspath(__file__))
test_dir = os.path.join(BASE_DIR, "test_data")

test_data = RMBDataset(data_dir=test_dir, transform=valid_transform)
valid_loader = DataLoader(dataset=test_data, batch_size=1)

for i, data in enumerate(valid_loader):
    # forward
    inputs, labels = data
    outputs = net(inputs)
    _, predicted = torch.max(outputs.data, 1)

    rmb = 1 if predicted.numpy()[0] == 0 else 100
    print("模型获得{}元".format(rmb))
组织复杂网络
介绍容器containers,包装起来作为一个整体

可以利用sequential将LeNet划分成features,classifier两部分

可以发现sequential定义后的打印出来模型结构,里面不再是有name的,而是拿序号区分不同层的。所以要用字典形式构建,见下面代码中class LeNetSequential 和class LeNetSequentialOrderDict的区别。


python
# -*- coding: utf-8 -*-
"""
# @file name  : module_containers.py
# @brief      : 模型容器------Sequential, ModuleList, ModuleDict
"""
import torch
import torchvision
import torch.nn as nn
from collections import OrderedDict


# ============================ Sequential
class LeNetSequential(nn.Module):
    def __init__(self, classes):
        super(LeNetSequential, self).__init__()
        self.features = nn.Sequential(
            nn.Conv2d(3, 6, 5),
            nn.ReLU(),
            nn.MaxPool2d(kernel_size=2, stride=2),
            nn.Conv2d(6, 16, 5),
            nn.ReLU(),
            nn.MaxPool2d(kernel_size=2, stride=2),)

        self.classifier = nn.Sequential(
            nn.Linear(16*5*5, 120),
            nn.ReLU(),
            nn.Linear(120, 84),
            nn.ReLU(),
            nn.Linear(84, classes),)

    def forward(self, x):
        x = self.features(x)#自己定义的sequential
        x = x.view(x.size()[0], -1)
        x = self.classifier(x)#自己定义的sequential
        return x


class LeNetSequentialOrderDict(nn.Module):
    def __init__(self, classes):
        super(LeNetSequentialOrderDict, self).__init__()

        self.features = nn.Sequential(OrderedDict({
            'conv1': nn.Conv2d(3, 6, 5),
            'relu1': nn.ReLU(inplace=True),
            'pool1': nn.MaxPool2d(kernel_size=2, stride=2),

            'conv2': nn.Conv2d(6, 16, 5),
            'relu2': nn.ReLU(inplace=True),
            'pool2': nn.MaxPool2d(kernel_size=2, stride=2),
        }))

        self.classifier = nn.Sequential(OrderedDict({
            'fc1': nn.Linear(16*5*5, 120),
            'relu3': nn.ReLU(),

            'fc2': nn.Linear(120, 84),
            'relu4': nn.ReLU(inplace=True),

            'fc3': nn.Linear(84, classes),
        }))

    def forward(self, x):
        x = self.features(x)
        x = x.view(x.size()[0], -1)
        x = self.classifier(x)
        return x


# net = LeNetSequential(classes=2)
# net = LeNetSequentialOrderDict(classes=2)
#
# fake_img = torch.randn((4, 3, 32, 32), dtype=torch.float32)
#
# output = net(fake_img)
#
# print(net)
# print(output)


# ============================ ModuleList

class ModuleList(nn.Module):
    def __init__(self):
        super(ModuleList, self).__init__()
        self.linears = nn.ModuleList([nn.Linear(10, 10) for i in range(20)])# # 输入特征数为10,输出特征数为10

    def forward(self, x):
        for i, linear in enumerate(self.linears):
            x = linear(x)
        return x


# net = ModuleList()
#
# print(net)
#
# fake_data = torch.ones((10, 10))
#
# output = net(fake_data)
#
# print(output)


# ============================ ModuleDict

class ModuleDict(nn.Module):
    def __init__(self):
        super(ModuleDict, self).__init__()
        self.choices = nn.ModuleDict({
            'conv': nn.Conv2d(10, 10, 3),
            'pool': nn.MaxPool2d(3)
        })

        self.activations = nn.ModuleDict({
            'relu': nn.ReLU(),
            'prelu': nn.PReLU()
        })

    def forward(self, x, choice, act):
        x = self.choices[choice](x)
        x = self.activations[act](x)
        return x


net = ModuleDict()

fake_img = torch.randn((4, 10, 32, 32))

output = net(fake_img, 'conv', 'relu')

print(output)

# 4 AlexNet
alexnet = torchvision.models.AlexNet()
初始化网络参数
梯度消失 or 梯度爆炸
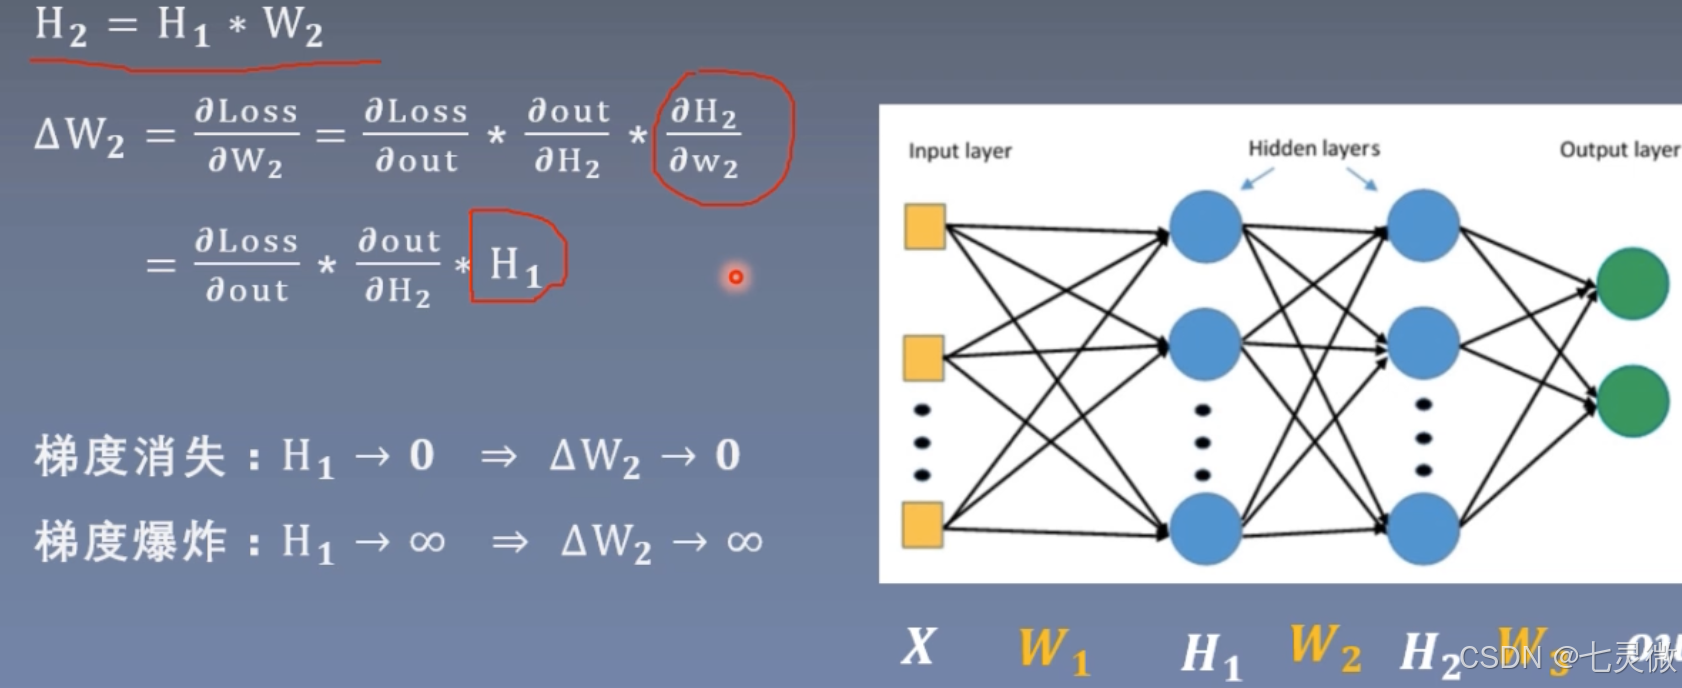
也就是说要控制网络层每一层输出不能太大,也不能太小。也就是说数据的方差不能过大过小,维持在1即可。

证明如下


红色圈起来的部分就是 想要让每次标准差std都稳定在1(左右),已知初始化D(xi)=1,则需要D(w)=1/n即可
通常Xavier 泽威尔采用均匀分布,如下图右边所示。

n_i是输入层的神经元个数,n_(i+1)是输出层的神经元个数。
当需要保持方差一致性(始终在1左右),则有上图公式推导。
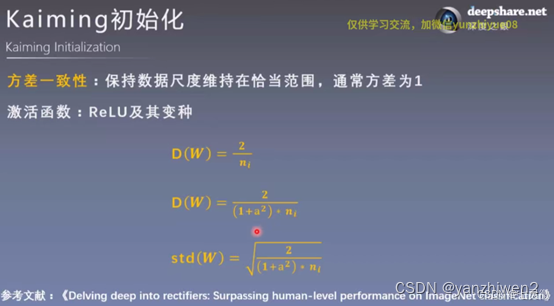
这里的a是负半轴的斜率,第二行是变种relu
python
"""
总结 这里首先初始化标准差为1,后面在31层就会变成nan
# @file name  : grad_vanish_explod.py
# @brief      : 梯度消失与爆炸实验
"""
import os
import torch
import random
import numpy as np
import torch.nn as nn
from tools.common_tools import set_seed

set_seed(1)  # 设置随机种子


class MLP(nn.Module):
    def __init__(self, neural_num, layers):
        super(MLP, self).__init__()
        #构建100层线性层,每层有256个神经元
        self.linears = nn.ModuleList([nn.Linear(neural_num, neural_num, bias=False) for i in range(layers)])
        self.neural_num = neural_num

    def forward(self, x):
        for (i, linear) in enumerate(self.linears):
            x = linear(x)
            #xavier x=torch.tanh(x)
            #后面relu非饱和激活函数替换掉了饱和函数tanh等,用kaiming初始化替换掉对应的xavier初始化
            x = torch.relu(x)

            print("layer:{}, std:{}".format(i, x.std()))
            #判断是否为nan
            if torch.isnan(x.std()):
                print("output is nan in {} layers".format(i))
                break

        return x

    def initialize(self):
        #遍历每一个模块modules
        for m in self.modules():

            if isinstance(m, nn.Linear):#判断模块是否为线性层
                ##初始值为标准正态分布,均值为0,标准差为1,但是每层的标准差会越来越大,发生std爆炸
                nn.init.normal_(m.weight.data) #标准正态分布进行初始化
                #均值为0,标准差为1,标准差会发生爆炸

                #此时的初始化权值可以使每层的均值为0,std为1.
                nn.init.normal_(m.weight.data, std=np.sqrt(1/self.neural_num))

                #手动计算
                # a = np.sqrt(6 / (self.neural_num + self.neural_num))
                #计算激活函数的增益,即数据输入到激活函数后标准差的变化的上下限的绝对值
                # tanh_gain = nn.init.calculate_gain('tanh')
                # a *= tanh_gain
                #设置均匀分布来初始化权值
                # nn.init.uniform_(m.weight.data, -a, a)

                #自动计算
                nn.init.xavier_uniform_(m.weight.data, gain=nn.init.calculate_gain('tanh'))

                #手动计算
                # nn.init.normal_(m.weight.data, std=np.sqrt(2 / self.neural_num))

                #自动计算
                nn.init.kaiming_normal_(m.weight.data)

flag = 0
# flag = 1

if flag:
    layer_nums = 100 #100层神经网络
    neural_nums = 256 #每一层神经元个数为256
    batch_size = 16

    net = MLP(neural_nums, layer_nums)
    net.initialize()

    inputs = torch.randn((batch_size, neural_nums))  # 标准正态分布normal: mean=0, std=1

    output = net(inputs)
    print(output)

# ======================================= calculate gain =======================================

# flag = 0
flag = 1

if flag:

    x = torch.randn(10000) #标准正态分布创建10000个数据点
    out = torch.tanh(x)

    gain = x.std() / out.std()
    print('gain:{}'.format(gain))

    tanh_gain = nn.init.calculate_gain('tanh')
    print('tanh_gain in PyTorch:', tanh_gain)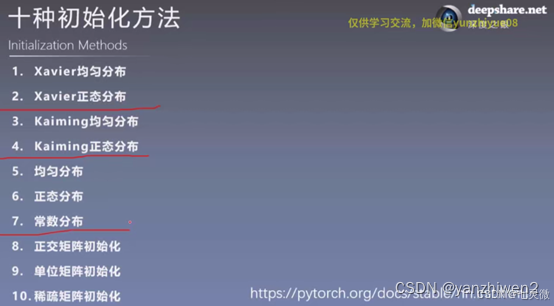
python
nn.init.calculate_gain(nonlinearity,param=None)
'''
计算激活函数方差变化尺度 =输入数据的方差/经过激活函数后输出数据的方差
nonlinearity:激活函数名称
param:激活函数参数 如Leaky ReLU的Negative_slop
'''
定义网络层
卷积层


下图是一个三维卷积:利用二维卷积在一张图片的3个通道上进行,最后叠加起来。

padding:可以利用它保持特征图shape不变
dilation:空洞卷积
尺寸计算:


python
torch.nn.Conv2d(in_channels, out_channels, kernel_size, stride=1, padding=0, dilation=1, groups=1, bias=True, padding_mode='zeros', device=None, dtype=None)
'''
(1)功能:对多个二维信号进行二维卷积;
(2)参数:
in_channels: 输入通道数;
out_channels: 输出通道数,等于卷积核的个数;
kernel_size: 卷积核的尺寸;
stride: 步长,stride步长是滑动时两个维度都一同滑动几个像素;
padding: 填充个数,保证输入和输出图像在尺寸上是匹配的;
dilation: 空洞卷积的大小;
groups: 分组卷积设置;
bias: 偏置;
'''

set_seed(3)  # 设置随机种子 随机种子不一样,之后nn.init.xavier_normal_初始化也不一样,导致图片卷积后的效果不同。

# ================================= load img ==================================
path_img = os.path.join(os.path.dirname(os.path.abspath(__file__)), "lena.png")
img = Image.open(path_img).convert('RGB')  # 0~255 RGB

# convert to tensor 张量
img_transform = transforms.Compose([transforms.ToTensor()])
img_tensor = img_transform(img)
# C*H*W to B*C*H*W 扩展成四维,增加batchsize维度
img_tensor.unsqueeze_(dim=0)

# ================================= create convolution layer ==================================

# ================ 2d
flag = 1
# flag = 0
if flag:
    #图像是RGB具有三个通道,因此in_channels=3,设置一个卷积核来观察out_channels=1,卷积核为3*3
    conv_layer = nn.Conv2d(3, 1, 3)   # (in_channels, out_channels, 卷积核size)
    #打印可以发现conv2d的_parameters字典中的weight.shape为[1,3,3,3]
    #=(out_channels, in_channels , h, w) h,w是二维卷积核的尺寸

    nn.init.xavier_normal_(conv_layer.weight.data)#初始化

    # calculation
    img_conv = conv_layer(img_tensor)

# ================================= visualization ==================================
print("卷积前尺寸:{}\n卷积后尺寸:{}".format(img_tensor.shape, img_conv.shape))
img_conv = transform_invert(img_conv[0, 0:1, ...], img_transform)
img_raw = transform_invert(img_tensor.squeeze(), img_transform)
plt.subplot(122).imshow(img_conv, cmap='gray')
plt.subplot(121).imshow(img_raw)
plt.show()
转置卷积(常用于图像分割)
但最好不要称其为反卷积,因为卷积与其是不可逆的运算,虽然前后图像相转置的,但是权值不可逆。

假设图像shape 44, kernel 33, padding=0,stride=1
正常卷积:首先,将输入图像44拉成16 1的向量,其中16是44所有的像素;1是1张图片。
然后,卷积核3 3会变成416的矩阵,其中16是3 3=9个权值通过补0得到16个数;,4是根据图像尺寸、padding、stride、dilation等计算得到的输出图像中像素的总个数。
最后,卷积核矩阵乘以图像矩阵得到41,然后再reshape为22的输出特征图。
转置卷积:就是在正常卷积之后22 再转置回去4 4
首先,将输入图像22拉成4 1的向量,其中4是22=4得到的输入图像中所有像素的个数,1是1张图片。
然后,卷积核3 3会变成164的矩阵,其中4是3 3=9中剔除多余的剩下的4个,16是根据图像尺寸、padding、stride、dilation等计算得到的输出图像中像素的总个数。
最后,卷积核矩阵乘以图像矩阵得到161,然后再reshape为4 4的输出特征图。


尺寸计算公式刚好和卷积是相逆的。
反卷积过后会有棋盘效应,可以看到处理后图像像棋盘一样。

python
nn.ConvTranspose2d(in_channels, out_channels, kernel_size, stride=1, padding=0, output_padding=0, groups=1, bias=True, dilation=1, padding_mode='zeros', device=None, dtype=None)

'''
参数同卷积参数
'''

# -*- coding: utf-8 -*-
"""
# @file name  : nn_layers_convolution.py
# @brief      : 学习卷积层
"""
import os
import torch.nn as nn
from PIL import Image
from torchvision import transforms
from matplotlib import pyplot as plt
from tools.common_tools import transform_invert, set_seed

set_seed(3)  # 设置随机种子

# ================================= load img ==================================
path_img = os.path.join(os.path.dirname(os.path.abspath(__file__)), "lena.png")
img = Image.open(path_img).convert('RGB')  # 0~255 RGB

# convert to tensor 张量
img_transform = transforms.Compose([transforms.ToTensor()])
img_tensor = img_transform(img)
# C*H*W to B*C*H*W 扩展成四维,增加batchsize维度
img_tensor.unsqueeze_(dim=0)

# ================================= create convolution layer ==================================

# ================ 2d
flag = 1
# flag = 0
if flag:
    #图像是RGB具有三个通道,因此in_channels=3,设置一个卷积核来观察out_channels=1,卷积核为3*3
    conv_layer = nn.Conv2d(3, 1, 3)   # (in_channels, out_channels, 卷积核size)
    #初始化
    #weights:[1,3,3,3]=(out_channels, in_channels , h, w) h,w是二维卷积核的尺寸
    nn.init.xavier_normal_(conv_layer.weight.data)

    # calculation
    img_conv = conv_layer(img_tensor)

# ================ transposed
# flag = 1
flag = 0
if flag:
    conv_layer = nn.ConvTranspose2d(3, 1, 3, stride=2)   #(in_channels, out_channels, 卷积核size)
    nn.init.xavier_normal_(conv_layer.weight.data)

    # calculation
    img_conv = conv_layer(img_tensor)


# ================================= visualization ==================================
print("卷积前尺寸:{}\n卷积后尺寸:{}".format(img_tensor.shape, img_conv.shape))
img_conv = transform_invert(img_conv[0, 0:1, ...], img_transform)
img_raw = transform_invert(img_tensor.squeeze(), img_transform)
plt.subplot(122).imshow(img_conv, cmap='gray')
plt.subplot(121).imshow(img_raw)
plt.show()
2d卷积一般用于图片,3d卷积一般用于视频,当做3d卷积时,需要在原先shape中间插入一个D-deep,作为图片帧数
python
img_tensor.unsqueeze_(dim=2)    # B*C*H*W to B*C*D*H*W

conv_layer = nn.Conv3d(3, 1, (3, 3, 3), padding=(1, 0, 0), bias=False)#(3,3,3)分别表示deep方向的kernel大小,shape
'''
如果padding[0]不为1的话,
则deep方向上只有原图片,但是原图片的shape转变成
1*3*1*512*512,batchsize*channel*deep*height*width
显然 图片shape的deep方向1<kernel deep方向的3 程序会报错
当padding[0]为1的话,相当于在原图像前后各添加一层0,这样就3 >=kernel的deep方向3,就不会报错了
'''
3d卷积是在三个方向上卷积

池化层
对信号收集总结,使数量多到少,有maxpool/avgpool
python
nn.MaxPool2d(kernel_size, stride=None, padding=0, dilation=1, return_indices=False, ceil_mode=False)
'''
kernel_size: 池化核的尺寸;
stride: 步长,stride步长是滑动时滑动几个像素;通常与kernel_size一致,不会去重叠。
padding: 填充个数,保证输入和输出图像在尺寸上是匹配的;
dilation: 空洞卷积的大小;
ceil_mode:尺寸取整,ceil_mode设置为True则为尺寸向上取整,默认为False即尺寸向下取整;
return_indices:记录最大值像素所在的位置的索引,通常用于最大值反池化上采样时使用;
'''

set_seed(1)  # 设置随机种子

# ================================= load img ==================================
path_img = os.path.join(os.path.dirname(os.path.abspath(__file__)), "lena.png")
img = Image.open(path_img).convert('RGB')  # 0~255

# convert to tensor
#c:通道,h:高,w:宽
img_transform = transforms.Compose([transforms.ToTensor()])
img_tensor = img_transform(img)
img_tensor.unsqueeze_(dim=0)    # C*H*W to B*C*H*W

# ================================= create convolution layer ==================================

# ================ maxpool
flag = 1
if flag:
    #stride步长通常与池化窗口大小2*2一致,保证池化时不会发生重叠
    maxpool_layer = nn.MaxPool2d((2, 2), stride=(2, 2))
    img_pool = maxpool_layer(img_tensor)

# ================================= visualization ==================================
print("池化前尺寸:{}\n池化后尺寸:{}".format(img_tensor.shape, img_pool.shape))
img_pool = transform_invert(img_pool[0, 0:3, ...], img_transform)
img_raw = transform_invert(img_tensor.squeeze(), img_transform)
plt.subplot(122).imshow(img_pool)
plt.subplot(121).imshow(img_raw)
plt.show()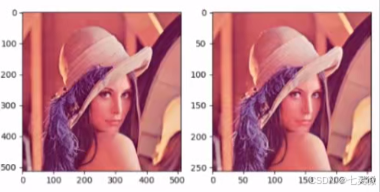
池化后照片没有啥区别,所以 池化常用于冗余信息的剔除并减少计算量。
最大值反池化就是利用return_indices将原先池化后的元素放到新区域的对应索引上,其他区域为0

python
nn.MaxUnpool2d(kernel_size, stride=None, padding=0)

nn.AvgPool2d(kernel_size, stride=None, padding=0, ceil_mode=False, count_include_pad=True, divisor_override=None)
'''
ceil_mode:尺寸取整,ceil_mode设置为True则为尺寸向上取整,默认为False即尺寸向下取整;
count_include_pad:填充值是否用于计算;
divisor_override:除法因子,此时计算平均值时分母为divisor_override,本来是像素值的个数。

平均值池化的图像相较于最大值池化的图像较暗淡,
(像素越大越亮 偏白)
因为像素值较小,最大值池化图像取得是最大值,
平均值池化图像取得是平均值。
'''

set_seed(1)  # 设置随机种子

# ================================= load img ==================================
path_img = os.path.join(os.path.dirname(os.path.abspath(__file__)), "lena.png")
img = Image.open(path_img).convert('RGB')  # 0~255

# convert to tensor
#c:通道,h:高,w:宽
img_transform = transforms.Compose([transforms.ToTensor()])
img_tensor = img_transform(img)
img_tensor.unsqueeze_(dim=0)    # C*H*W to B*C*H*W

# ================================= create convolution layer ==================================

# ================ max unpool
flag = 1
if flag:
    # pooling
    img_tensor = torch.randint(high=5, size=(1, 1, 4, 4), dtype=torch.float) #生成尺寸为1*1*4*4的整数[0, 5)均匀分布
    maxpool_layer = nn.MaxPool2d((2, 2), stride=(2, 2), return_indices=True)
    img_pool, indices = maxpool_layer(img_tensor) #记录最大像素值的索引

    # unpooling
    #创建反池化层的输入,输入的尺寸与图片池化后的尺寸一致。
    img_reconstruct = torch.randn_like(img_pool, dtype=torch.float) #标准正态分布
    #构建反池化层(窗口、步长参数与池化层参数一一对应相等)
    maxunpool_layer = nn.MaxUnpool2d((2, 2), stride=(2, 2))
    #生成反池化后的图像
    img_unpool = maxunpool_layer(img_reconstruct, indices)

    print("raw_img:\n{}\nimg_pool:\n{}".format(img_tensor, img_pool))
    print("img_reconstruct:\n{}\nimg_unpool:\n{}".format(img_reconstruct, img_unpool))
AdaptiveMaxPool2d和maxpooling层有什么区别呢?
Maxpool.
已知:input size, kernel, stride.
未知:Output size
AdaptiveMaxpool
已知 :input size, Output size
未知:kernel, stride
线性层(全连接层)
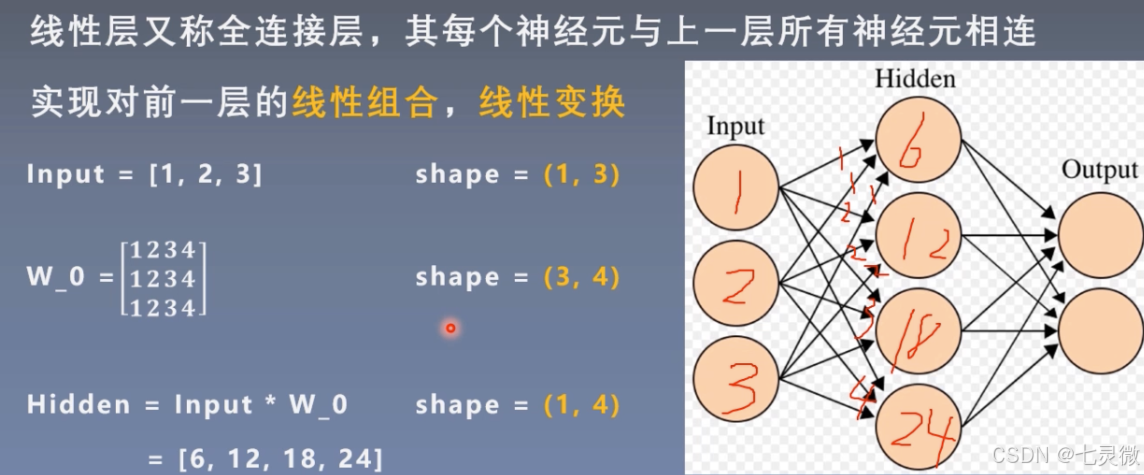
w_0第一行是input层第一个神经元传递给hidden层每个神经元的权值weight,同理...
如果有bias 还要加上bias。 y=wx+b
如果没有非线性激活函数,那么n层线性层==1层线性层
python
nn.Linear(in_features, out_features, bias=True, device=None, dtype=None)
'''
对一维信号(向量)进行线性组合;
参数:
in_features: 输入节点数;
in_features: 输出节点数;
bias: 是否需要偏置,默认为True;
'''

# ================ linear
flag = 1
if flag:
    inputs = torch.tensor([[1., 2, 3]]) #1*3
    linear_layer = nn.Linear(3, 4) #输入节点3个,输出节点4个
    #w权值矩阵为4*3,每一行代表一个神经元与上一层神经元连接的权值。
    linear_layer.weight.data = torch.tensor([[1., 1., 1.],
                                             [2., 2., 2.],
                                             [3., 3., 3.],
                                             [4., 4., 4.]])

    linear_layer.bias.data.fill_(0.5)
    output = linear_layer(inputs)
    print(inputs, inputs.shape)
    print(linear_layer.weight.data, linear_layer.weight.data.shape)
    #output=inputs*w^T+bias
    print(output, output.shape) #输出的尺寸为1*4
激活函数层
- nn.Sigmoid
这个在逻辑回归里见过。

橙色曲线是其导数图像。
(1)多个网络层叠加后,导数范围会变得更小,甚至消失。
(2)输出不是0均值分布,破坏了数据分布。 - nn.Tanh

这个公式是怎么推导的?

导数<0时,网络非常深时,同样会梯度消失。 - nn.ReLu()修正线性单元

当多层网络不断使梯度叠加,会导致梯度爆炸;当累乘时可以缓解梯度消失。

nn.LeakyReLU(negative_slope=0.01, inplace=False)
LeakyReLU的slope参数0.01表示:负半轴0.01的斜率.

nn.PReLU(num_parameters=1, init=0.25, device=None, dtype=None)

python
num_parameters(整数):可学习参数 a 的数量,只有两种选择,要么定义成1,表示在所有通道上应用相同的 a进行激活,要么定义成输入数据的通道数,表示在所有通道上应用不同的 a进行激活,默认1。

init(float):a的初始值

输入数据的第二维度表示为通道维度,当输入维度小于2时,不存在通道维度,此时默认通道数为1

通过调用.weight方法来取出参数a
即使有多个 a,init也还是只能输入一个float类型的数
nn.RReLU(lower=0.125, upper=0.3333333333333333, inplace=False)
RReLU:斜率是随机的,符合均匀分布.