CI/CD 是指持续集成(Continuous Integration)和持续部署(Continuous Deployment)或持续交付(Continuous Delivery)
持续集成(Continuous Integration)
持续集成是一种软件开发实践,团队成员频繁地将他们的工作集成到共享的代码仓库中。其主要特点包括:
- 频繁提交代码:开发人员可以每天多次提交代码,确保代码库始终保持最新状态。
- 自动化构建:每次提交后,自动触发构建过程,包括编译、测试、静态分析等。
- 快速反馈:如果构建失败或测试不通过,能够快速地向开发人员提供反馈,以便及时修复问题。
持续部署(Continuous Deployment)
持续部署是在持续集成的基础上,将通过所有测试的代码自动部署到生产环境中。其特点如下:
- 自动化流程:从代码提交到生产环境的部署完全自动化,无需人工干预。
- 高频率部署:可以实现频繁的部署,使得新功能能够快速地提供给用户。
- 风险控制:需要有强大的测试和监控体系来确保部署的稳定性和可靠性。
持续交付(Continuous Delivery)
持续交付与持续部署类似,但不一定自动部署到生产环境,而是随时可以部署。其重点在于确保软件随时处于可发布状态。
CI/CD 的好处包括:
- 提高开发效率:减少手动操作和等待时间,加快开发周期。
- 尽早发现问题:通过频繁的集成和测试,问题能够在早期被发现和解决。
- 降低风险:减少了大规模部署时可能出现的问题,提高了软件的质量和稳定性。
- 增强团队协作:促进团队成员之间的沟通和协作,提高团队的整体效率。
bash
#下载
[root@gitlab ~]# dnf install git -y
# 初始化
[root@gitlab luo]# git init
# 查看
[root@gitlab luo]# ls -a
.  ..  .git
建立用户信息
bash
[root@gitlab luo]# git config --global user.name "luo"
[root@gitlab luo]# git config --global user.email "luo@timingluo.org"
未提交状态
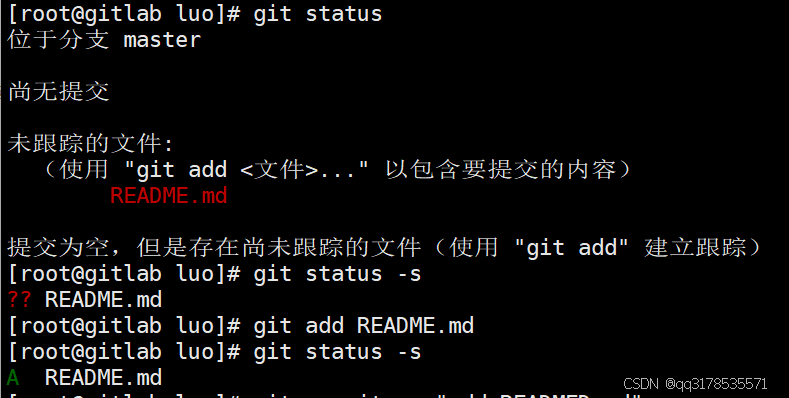
提交后状态

追加内容,右M,在工作区被修改,但没提交
bash
[root@gitlab luo]# echo >> README.md
提交后左绿,提交到暂存区
bash
[root@gitlab luo]# git add README.md 
提交到工作区
bash
[root@gitlab luo]# git commit -m "README.md v2"
git status -s 无任何显示,标识已经提交到版本库
当再次修改
bash
[root@gitlab luo]# vim README.md
右红M表示文件在工作区被修改

撤销修改
bash
[root@gitlab luo]# git checkout -- README.md
[root@gitlab luo]# cat README.md
luo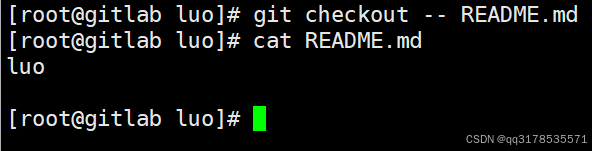
重新修改
bash
[root@gitlab luo]# echo luoluo > README.md
[root@gitlab luo]# git add README.md
[root@gitlab luo]# git status -s
M  README.md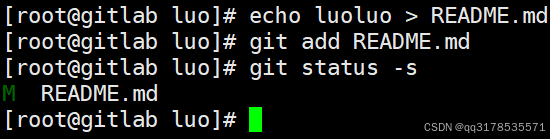
从暂存区撤销
bash
[root@gitlab luo]# git restore --staged README.md
[root@gitlab luo]# git status -s
 M README.md
重新提交
bash
[root@gitlab luo]#  git add README.md
[root@gitlab luo]# git status -s
M  README.md
更新
bash
[root@gitlab luo]# git commit -m "update v1"
[master f126628] update v1
 1 file changed, 1 insertion(+), 2 deletions(-)
[root@gitlab luo]# git status -s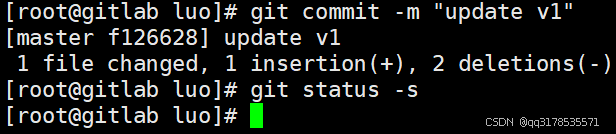
更新文件
bash
[root@gitlab luo]# echo luo1 >> README.md
[root@gitlab luo]# git add README.md
[root@gitlab luo]# echo luo1 >> README.md
[root@gitlab luo]# git status -s
MM README.md
MM表示有一部分在暂存区,还有一部分没有提交
如果现在提交只能提交在暂存区中的部分
bash
[root@gitlab luo]# git commit -m "update v2"
[master c155d30] update v2
 1 file changed, 1 insertion(+)
[root@gitlab luo]# git status -s
 M README.md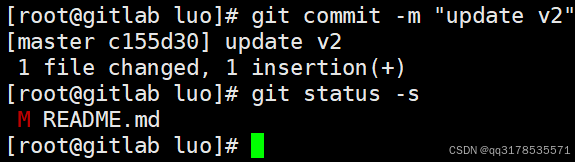
查看已暂存和未暂存的修改变化
bash
[root@gitlab luo]# echo luo >> README.md
[root@gitlab luo]# git diff
diff --git a/README.md b/README.md
index a700f83..6240833 100644
--- a/README.md
+++ b/README.md
@@ -1,2 +1,4 @@
 luoluo
 luo1
+luo1
+luo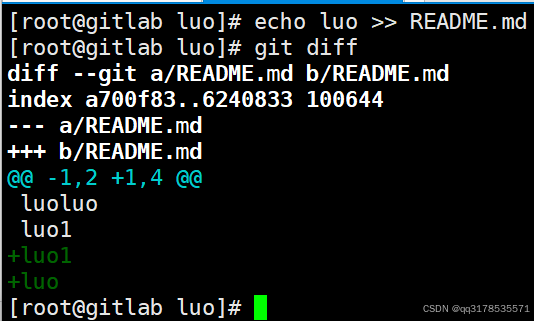
跳过使用暂存区,只能在提交过的在版本库中存在的文件使用如果文件状态是"??"不能用此方法
撤销工作区中删除动作
bash
[root@gitlab luo]# touch luo.txt
[root@gitlab luo]# git add luo.txt
[root@gitlab luo]# git commit  -m "add luo.txt"
[master aa037c1] add luo.txt
 1 file changed, 0 insertions(+), 0 deletions(-)
 create mode 100644 luo.txt
 [root@gitlab luo]# rm -rf luo.txt
 [root@gitlab luo]# git status -s
 D luo.txt
右D 表示文件在工作区被删除

git 对文件忽略
bash
[root@gitlab luo]# mkdir dir1
[root@gitlab luo]# touch dir1/.file2
[root@gitlab luo]# git status -s
?? dir1/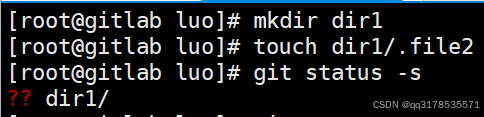
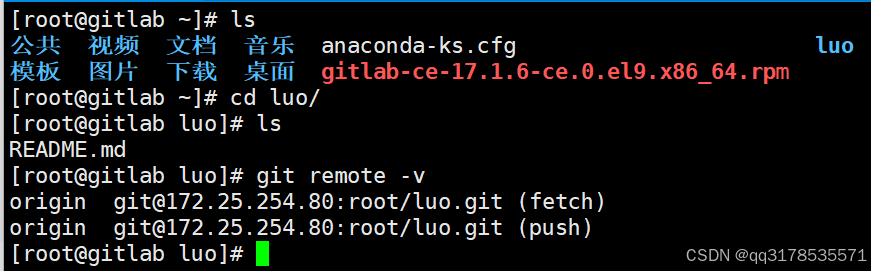
gitlab代码仓库
部署gitlab
bash
# 在安装包之前需配置好软件仓库来解决依赖性
[root@gitlab luo]# yum install -y curl policycoreutils-python-utils openssh-server perl
修改配置文件
bash
[root@gitlab luo]# cd /etc/gitlab/
[root@gitlab gitlab]# vim gitlab.rb
[root@gitlab gitlab]# gitlab-ctl reconfigure
使用gitlab-crt生效配置
root@gitlab gitlab# gitlab-ctl reconfigure
查看原始密码
root@gitlab gitlab# cat /etc/gitlab/initial_root_password
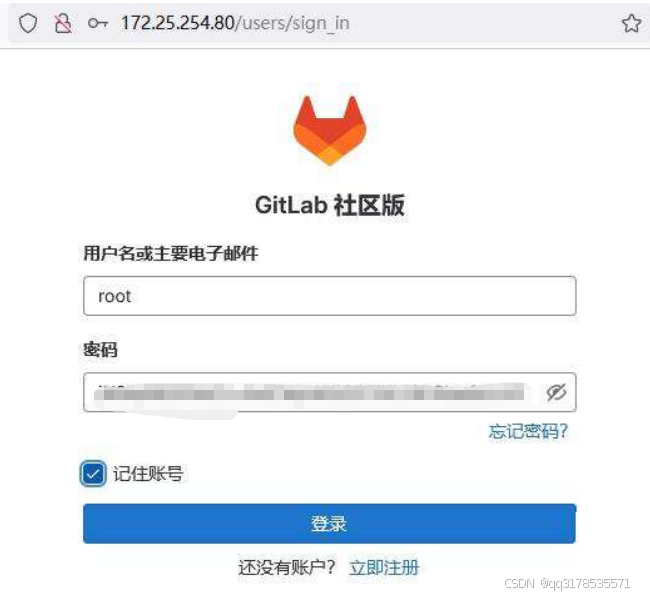
登录
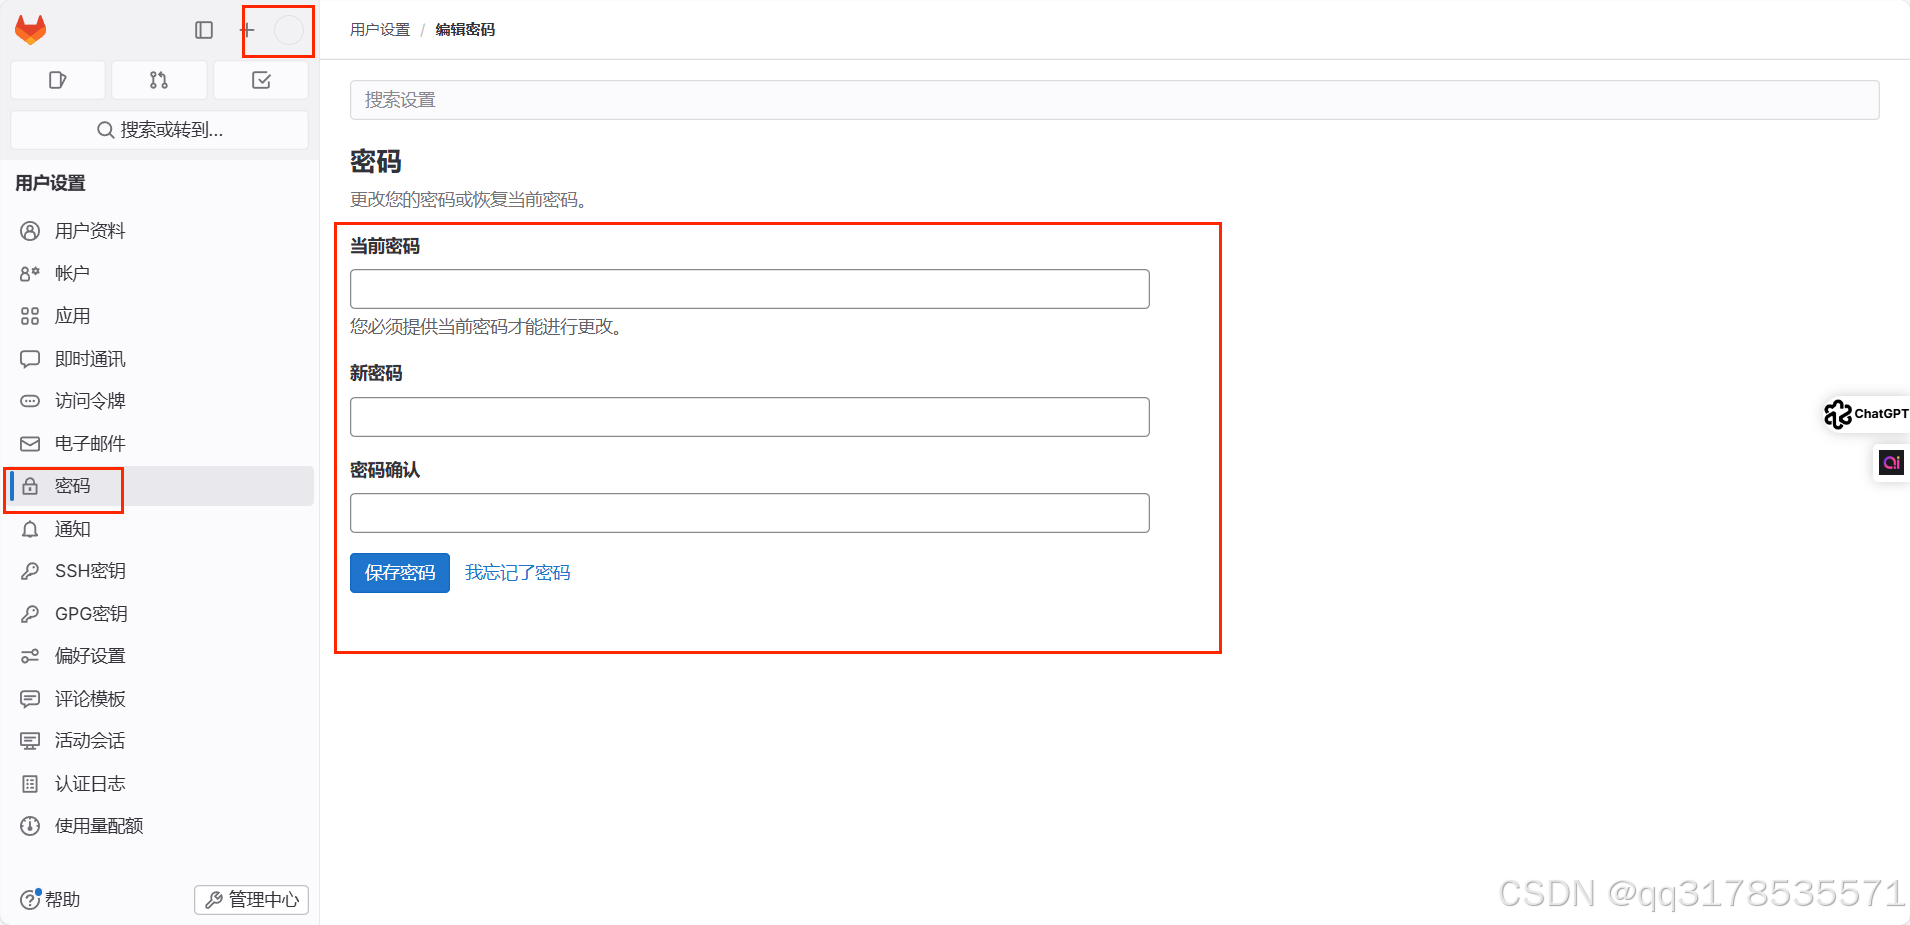
更改密码
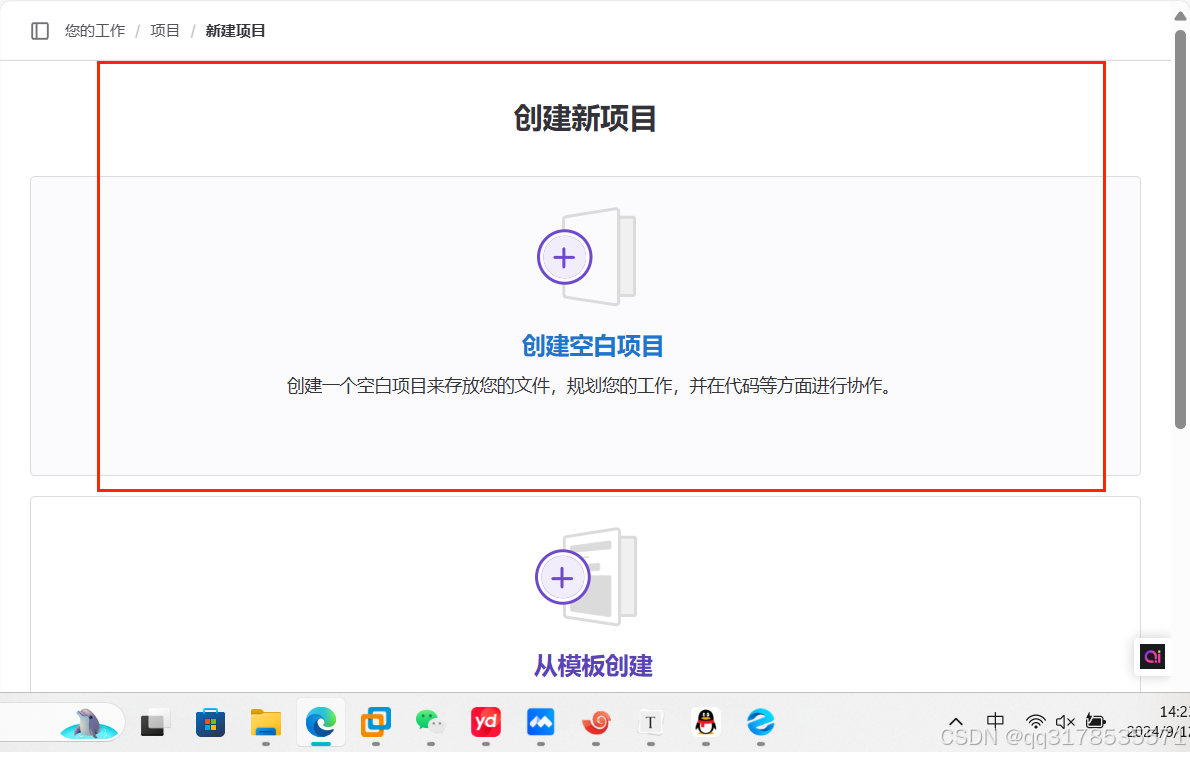
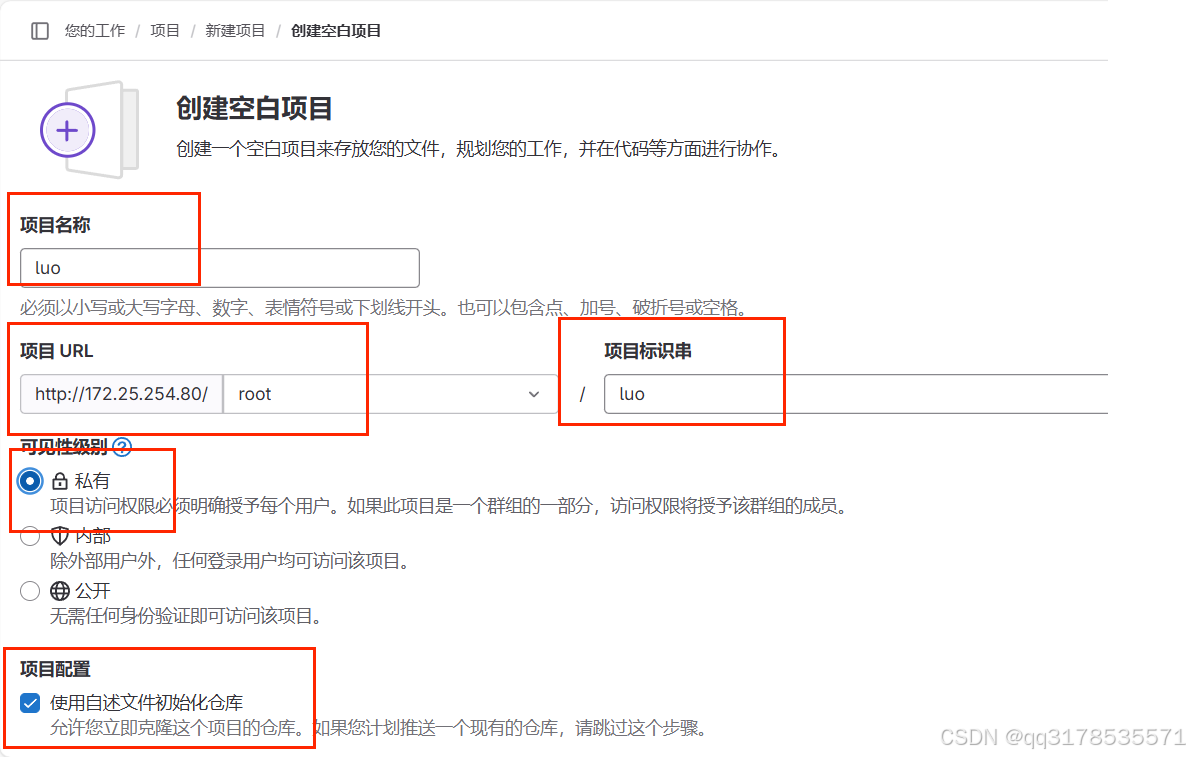
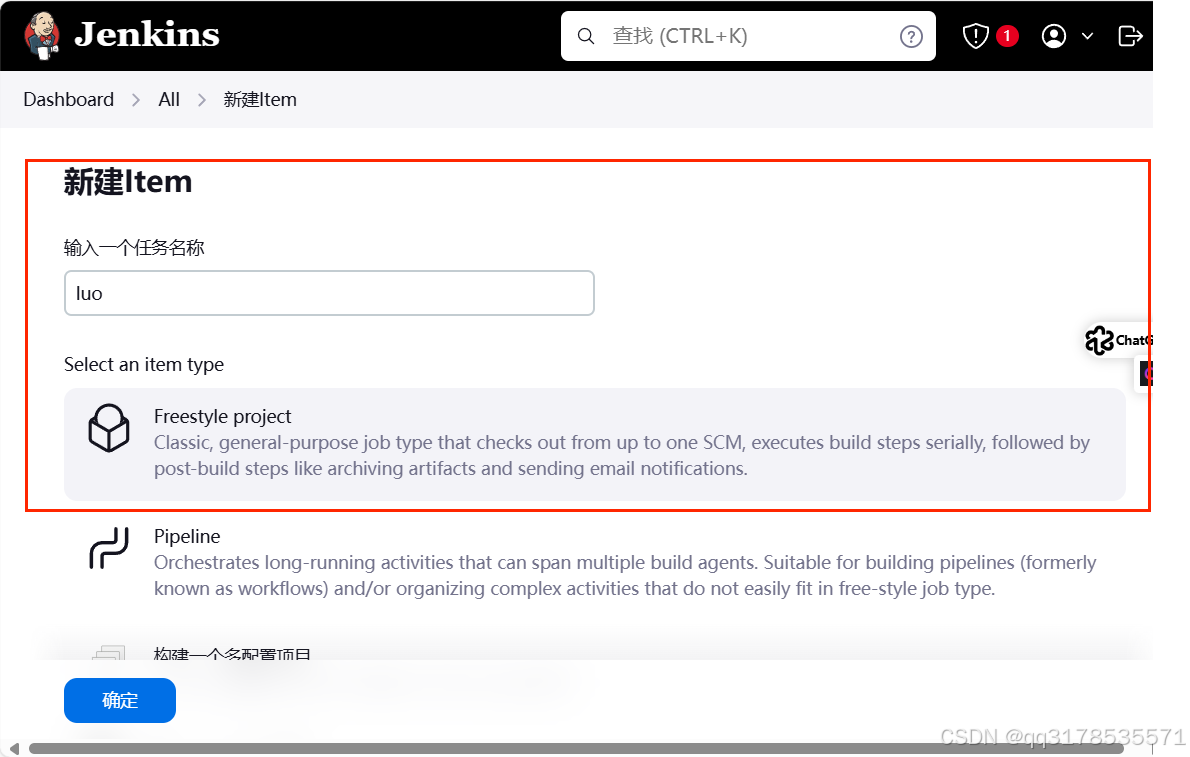
在gitlab中新建项目

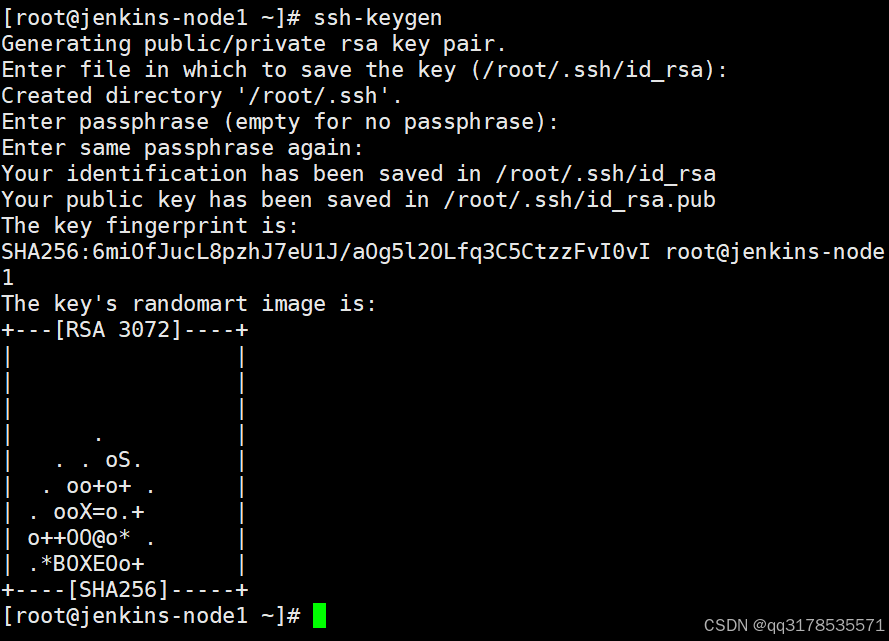
生成sshd密钥
bash
[root@gitlab gitlab]# ssh-keygen
[root@gitlab ~]# cat .ssh/id_rsa.pub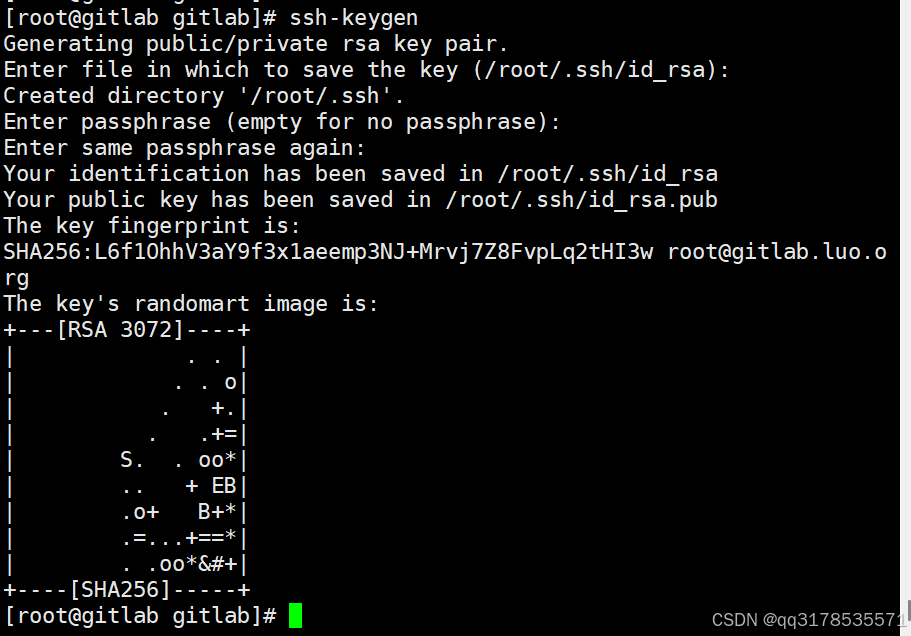
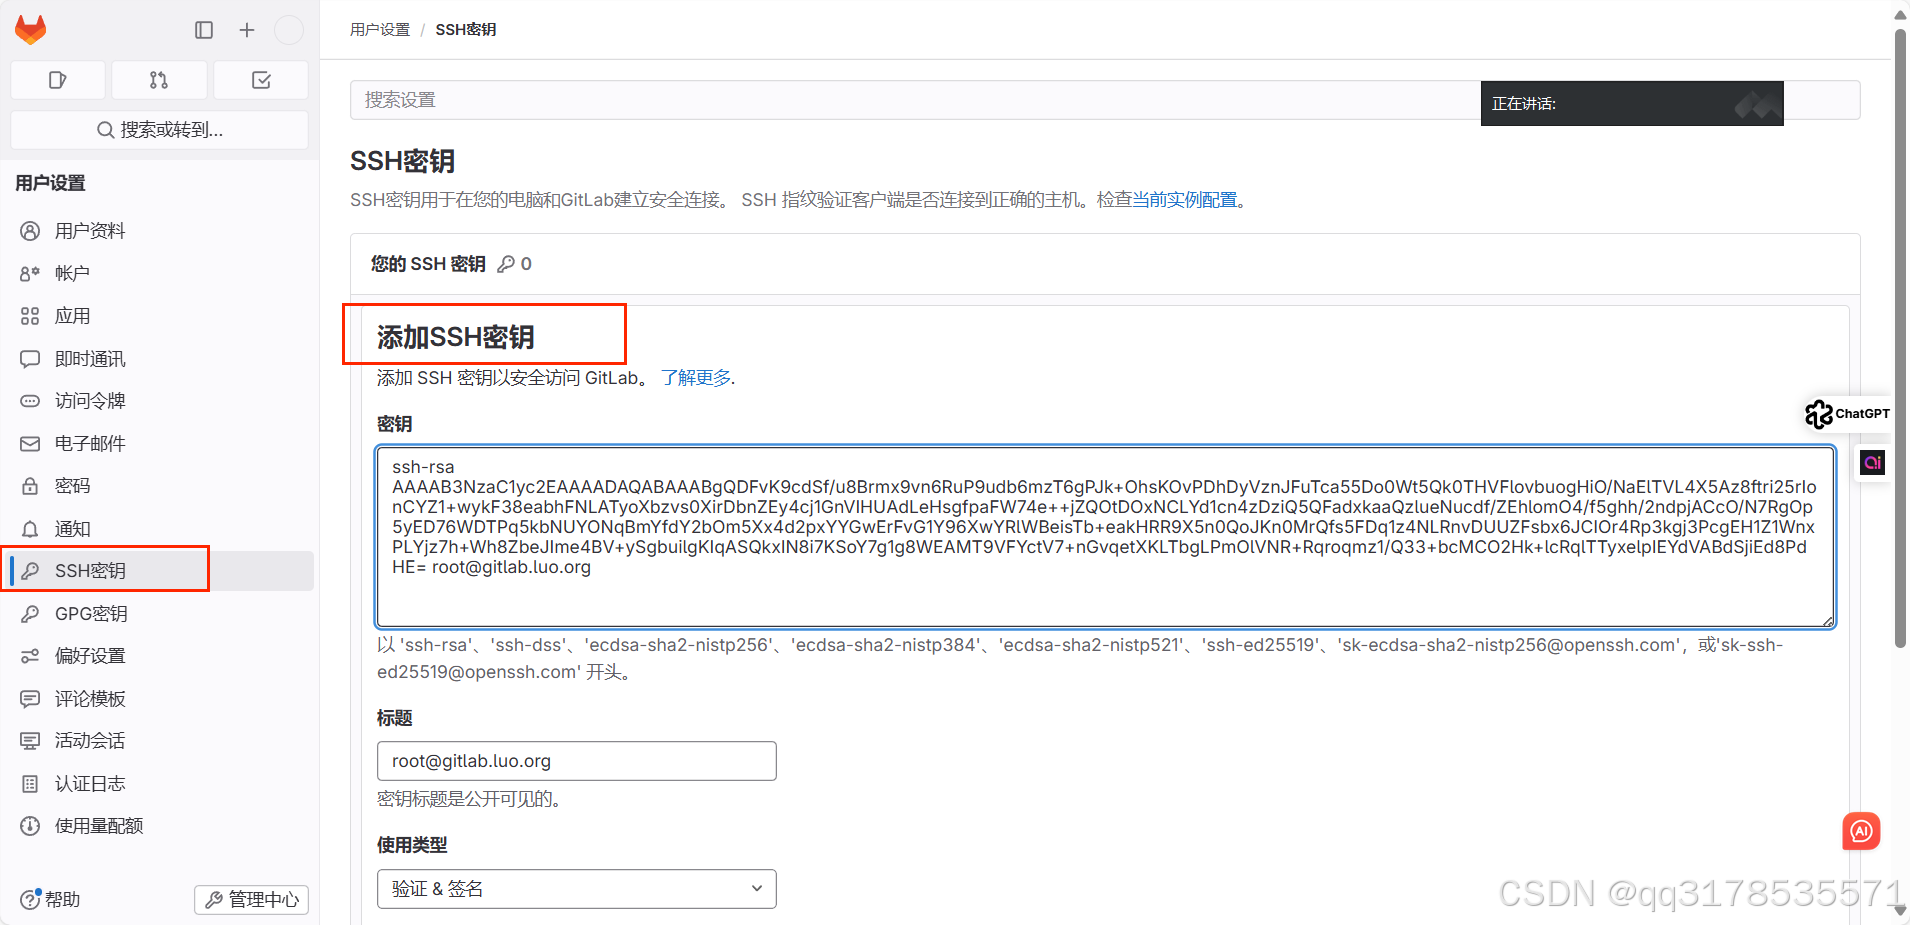
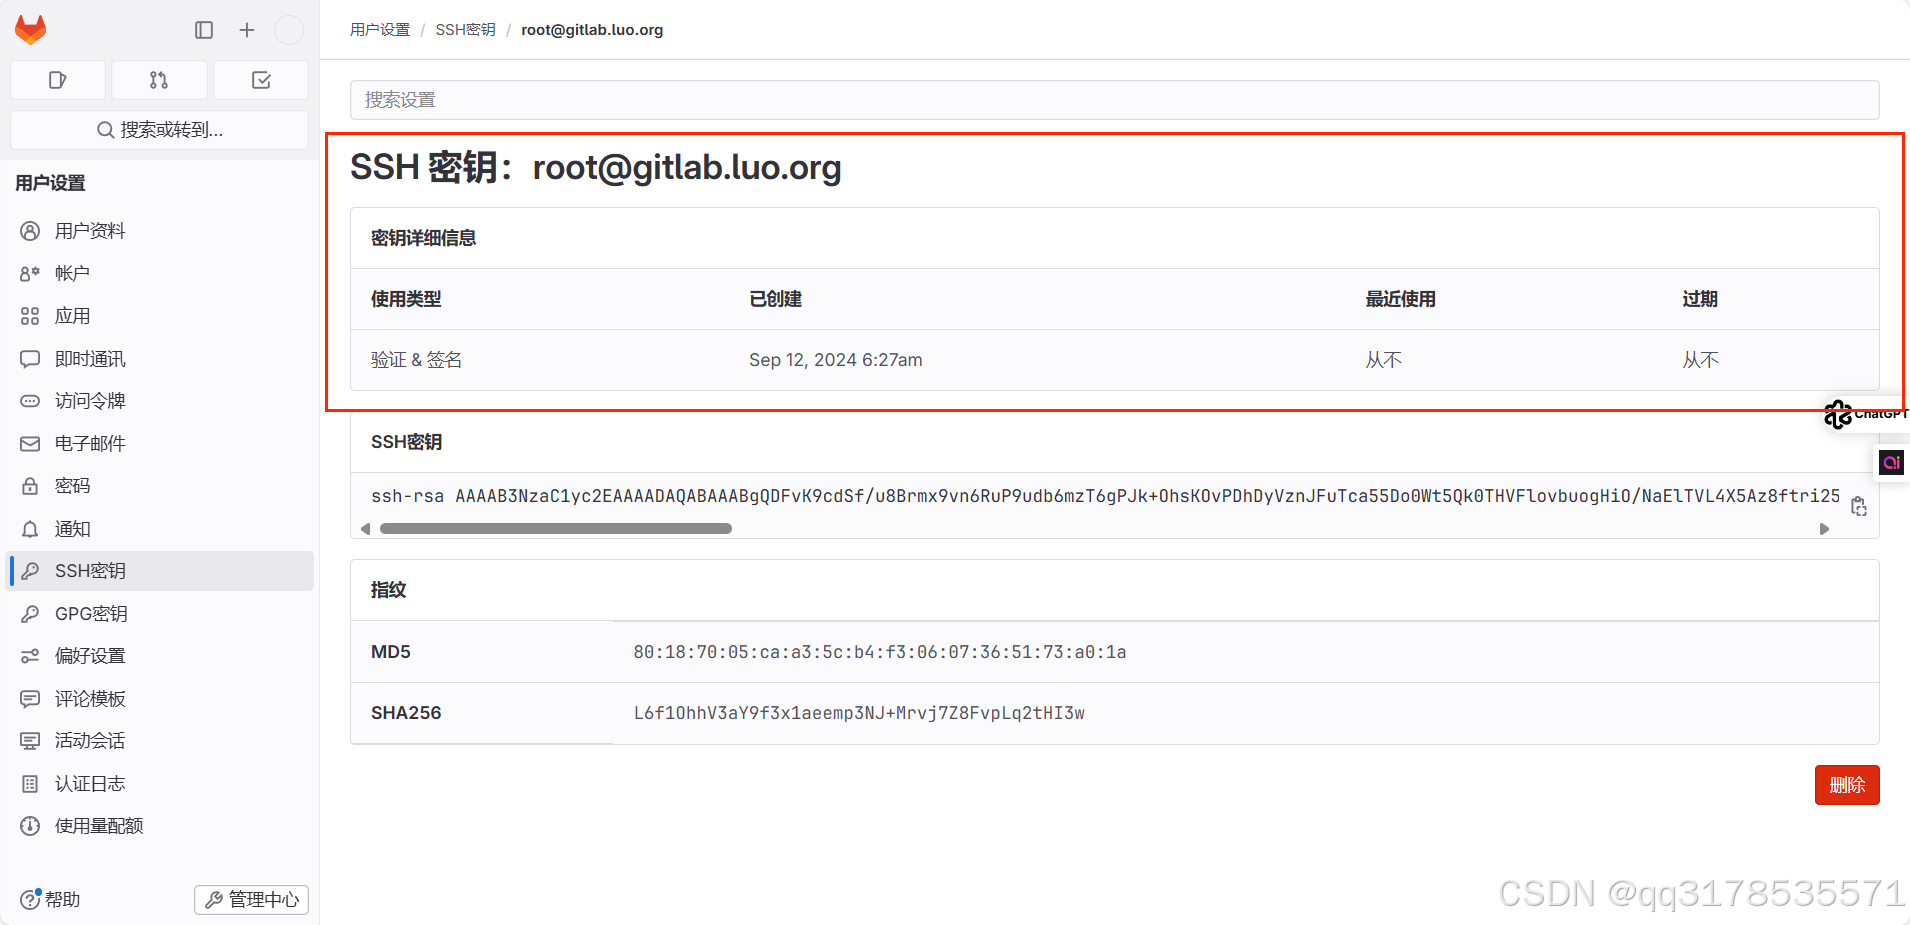
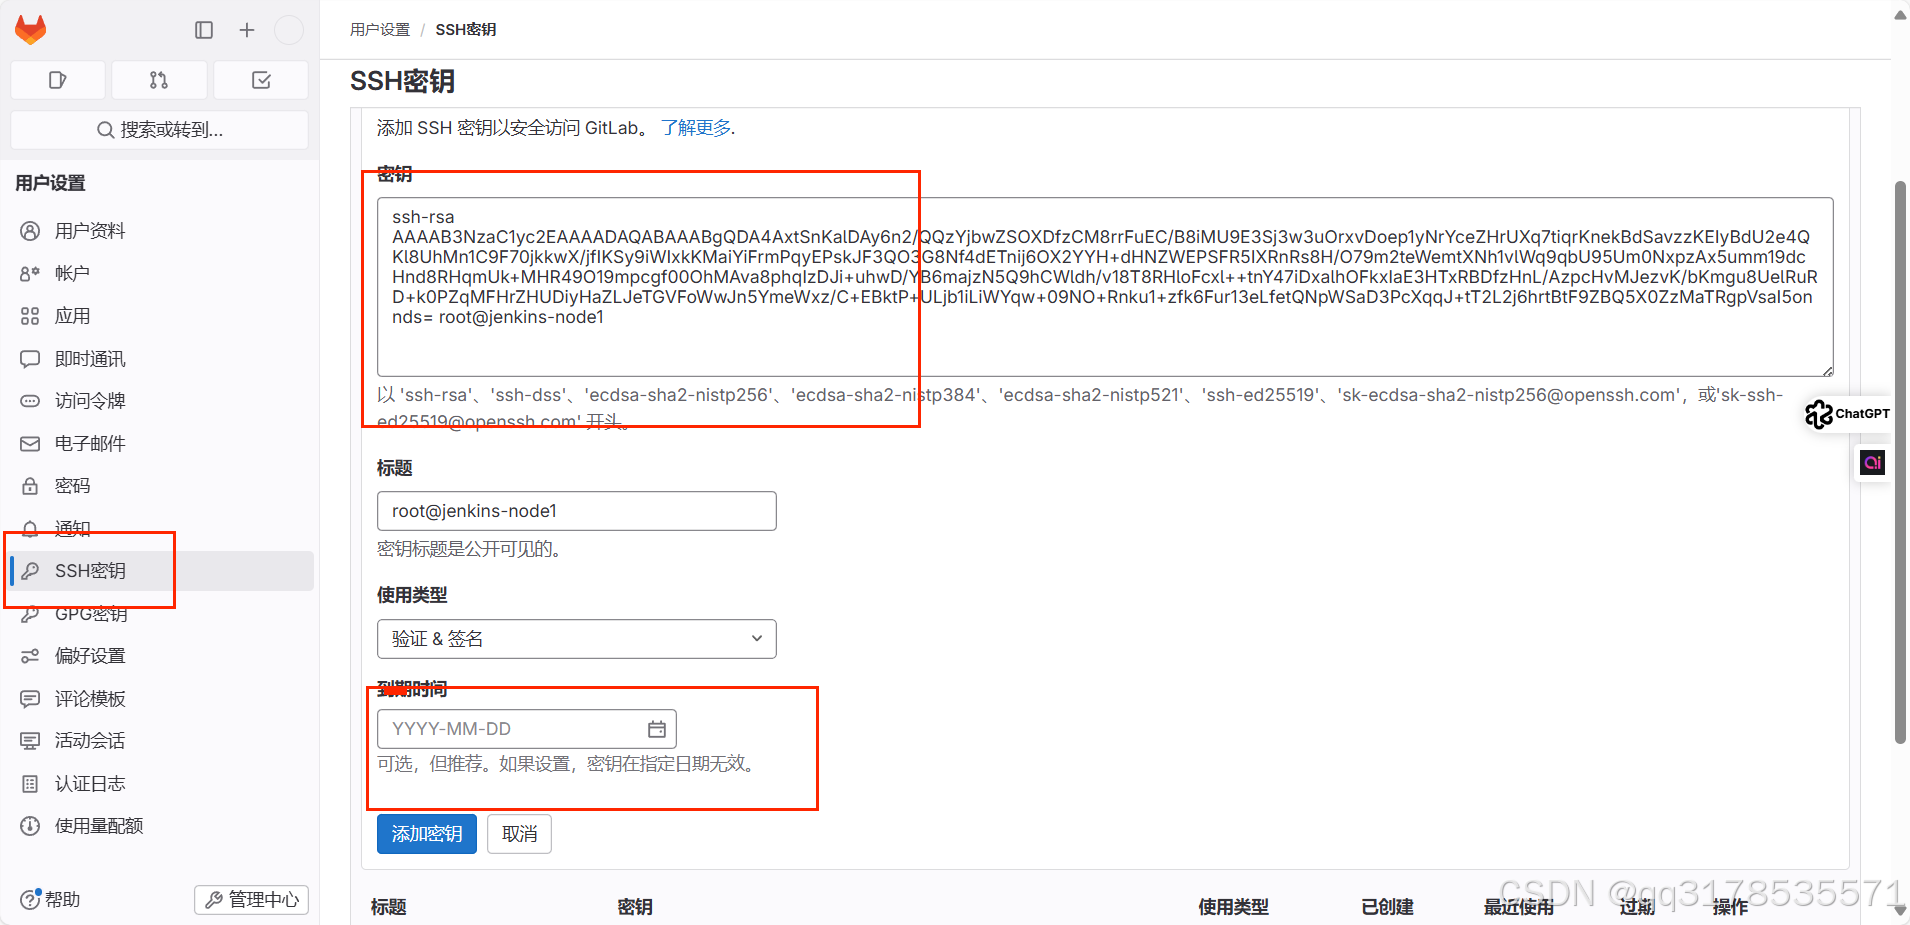
上传公钥到gitlab中
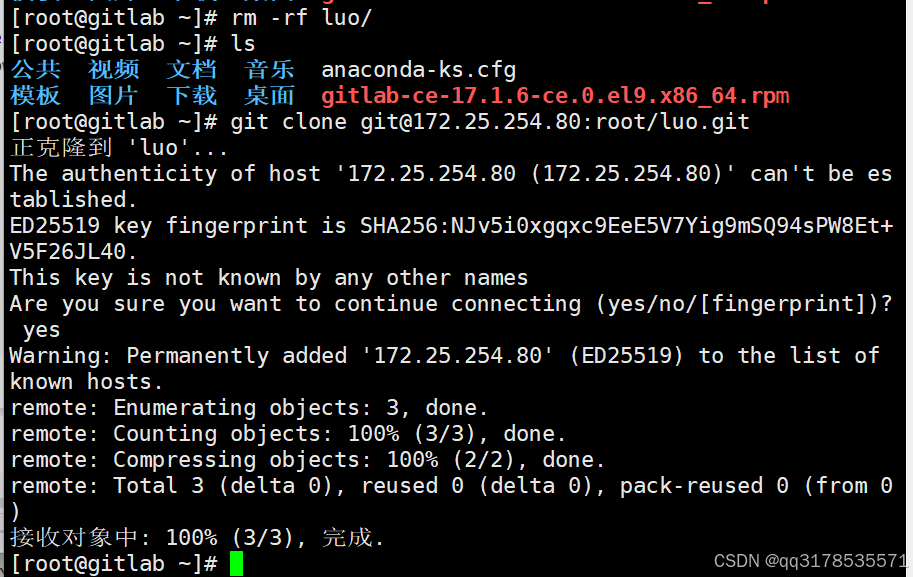
下载项目
部署jenkins
bash
[root@jenkins-node1 ~]# ls
公共 图片 音乐 jenkins-2.462.2-1.1.noarch.rpm
模板 文档 桌面 plugins.tar.gz
视频 下载 anaconda-ks.cfg
[root@jenkins-node1 ~]# dnf install jenkins-2.476-1.1.noarch.rpm
[root@jenkins-node1 ~]# systemctl enable --now jenkins.service
Created symlink /etc/systemd/system/multi-user.target.wants/jenkins.service → /usr/lib/systemd/system/jenkins.service.
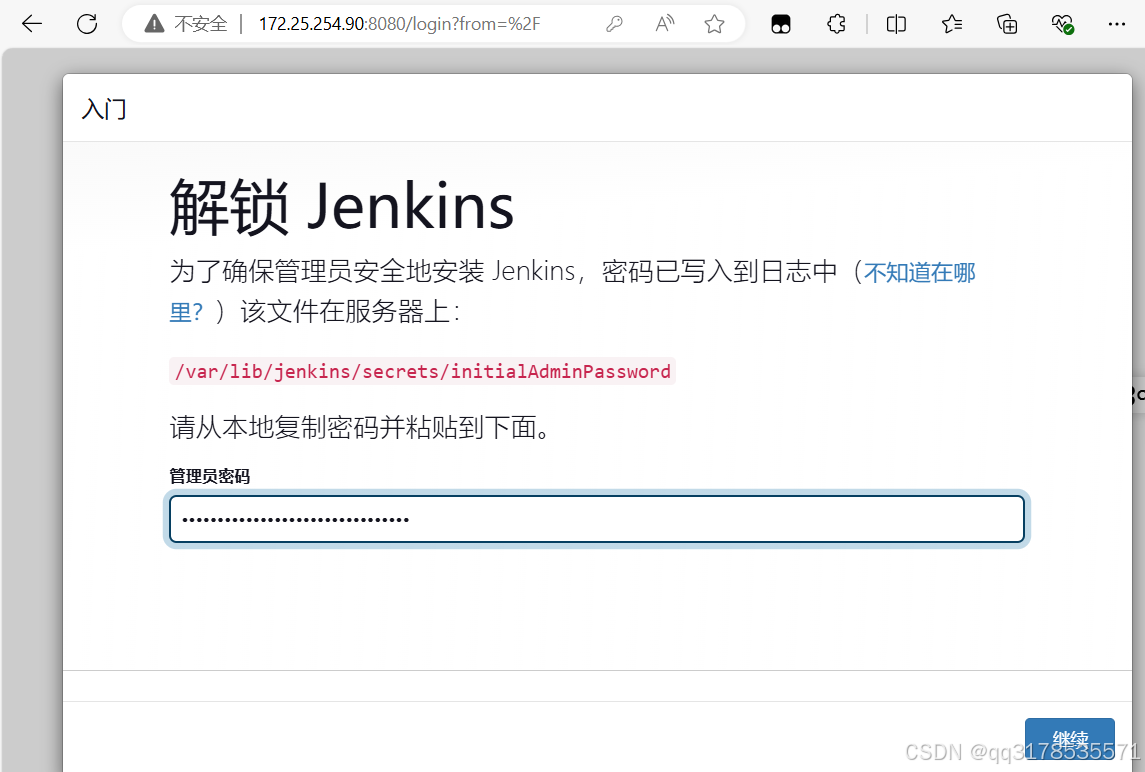
[root@jenkins-node1 ~]# cat /var/lib/jenkins/secrets/initialAdminPas
使用下载好的插件
bash
[root@jenkins-node1 jenkins]# rm -rf /var/lib/jenkins/*
[root@jenkins-node1 jenkins]# cd
[root@jenkins-node1 ~]# tar zxf plugins.tar.gz -C /var/lib/jenkins/
[root@jenkins-node1 ~]# cd /var/lib/jenkins/
[root@jenkins-node1 jenkins]# ls
plugins
[root@jenkins-node1 jenkins]# systemctl restart jenkins.service 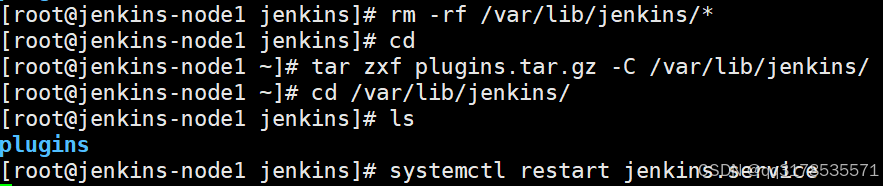

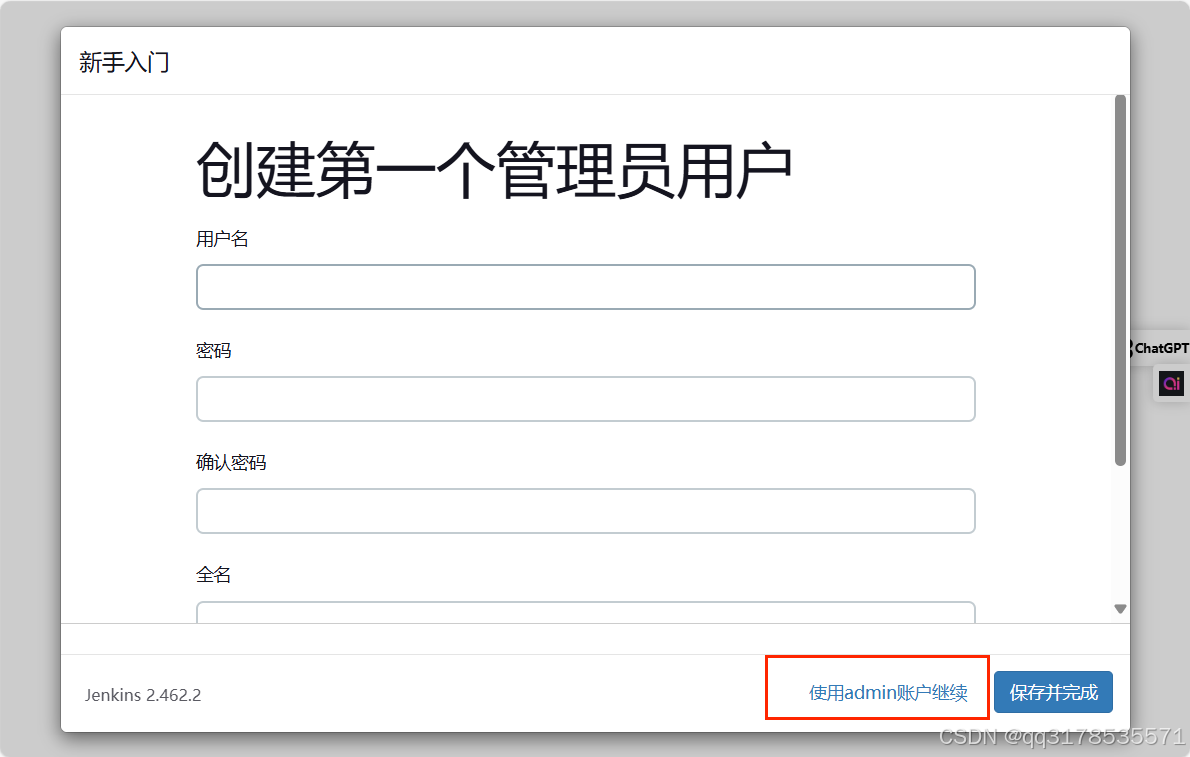
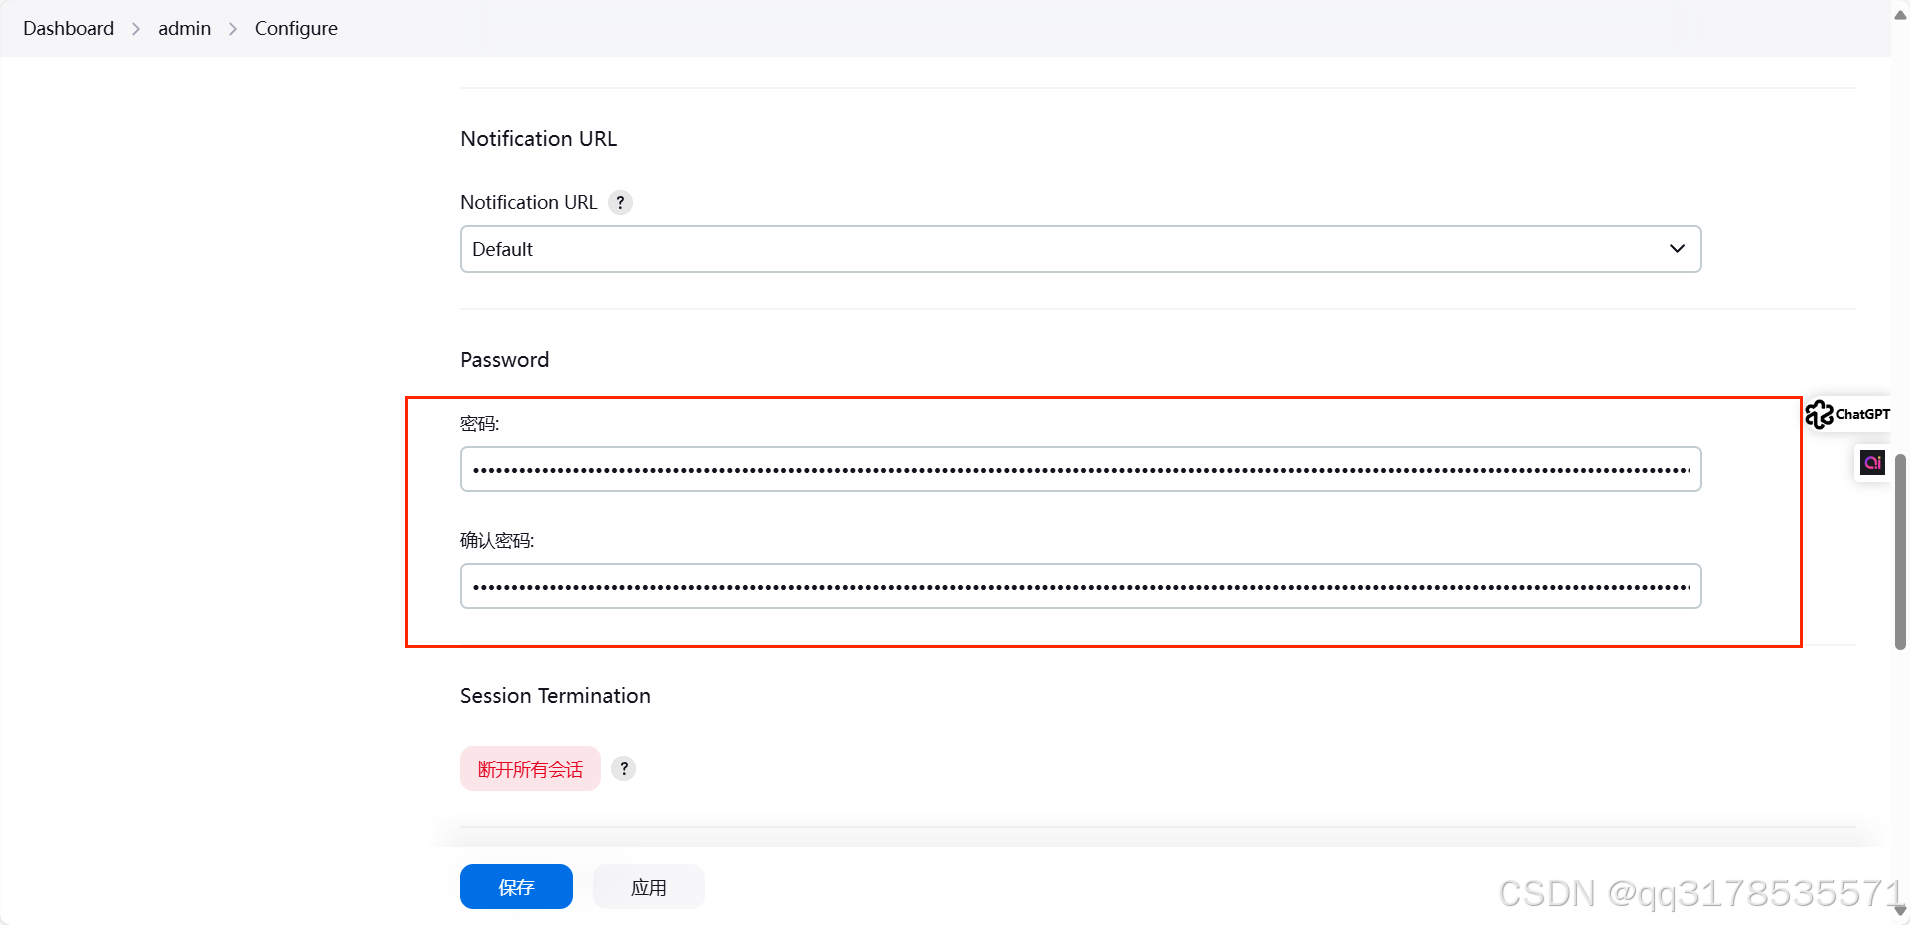
设置密码
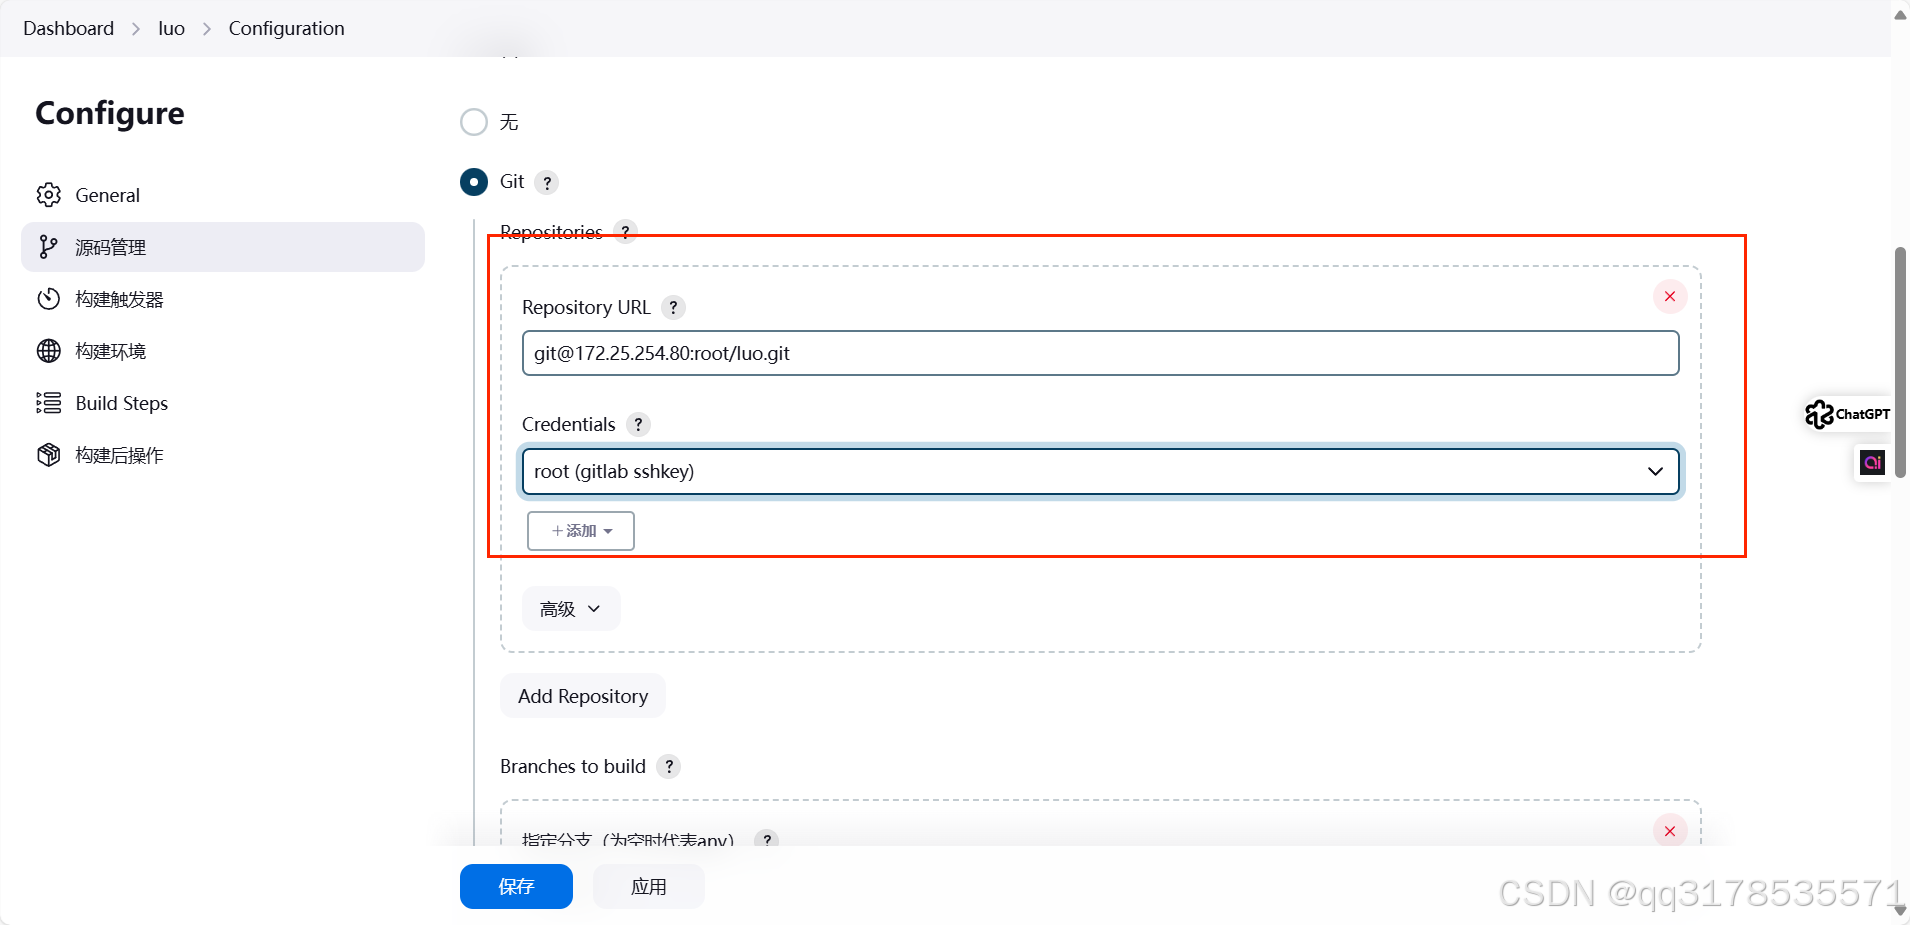
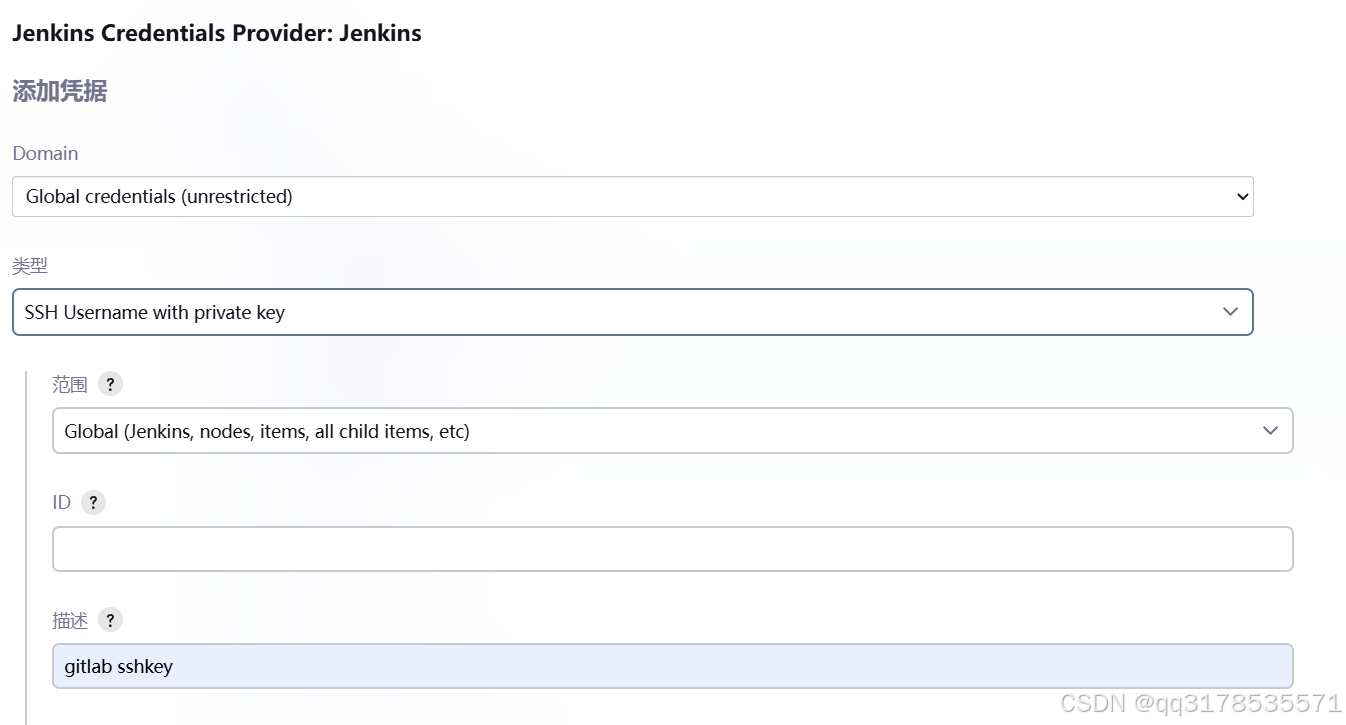
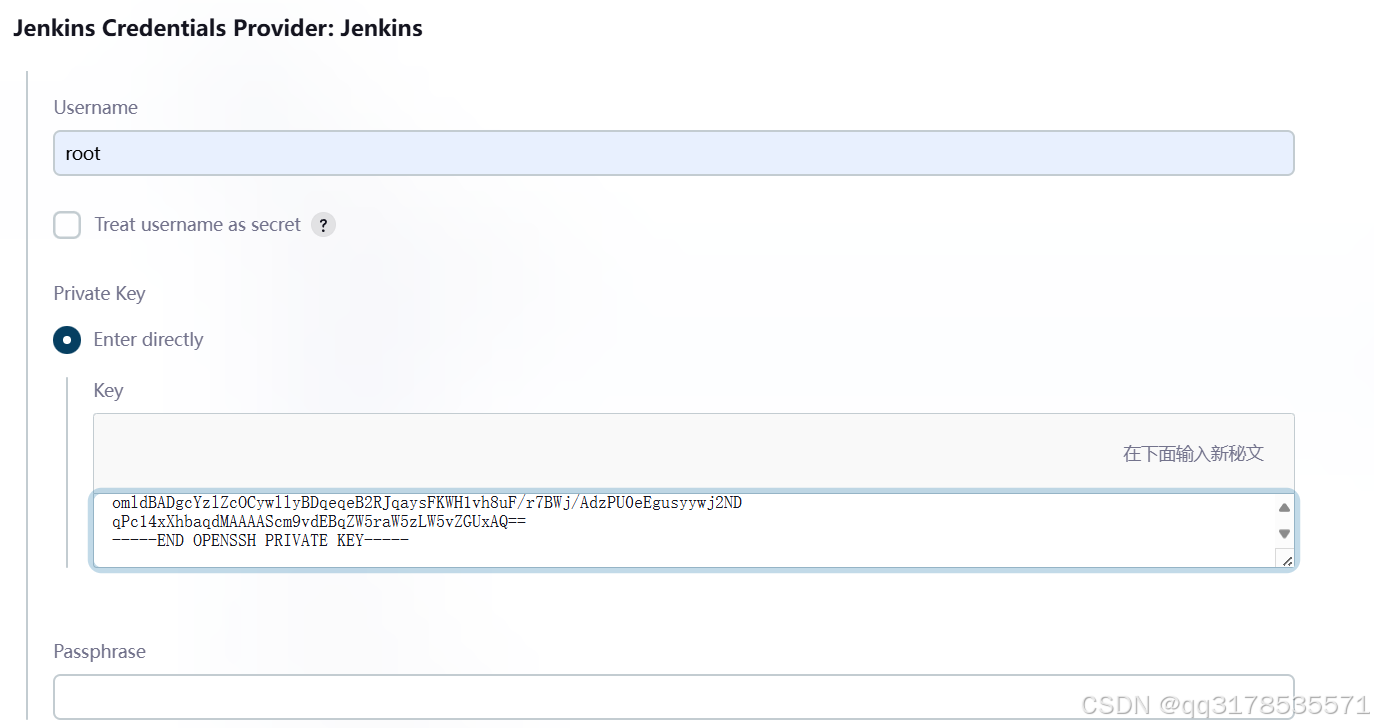
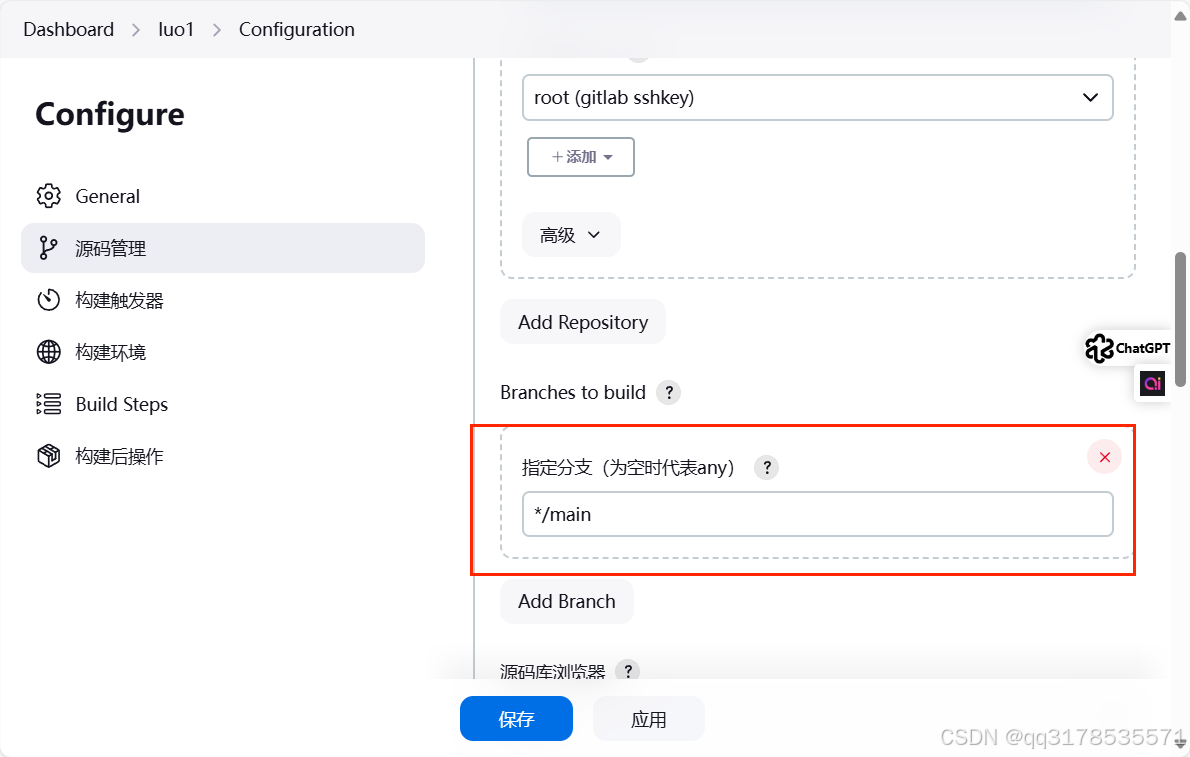
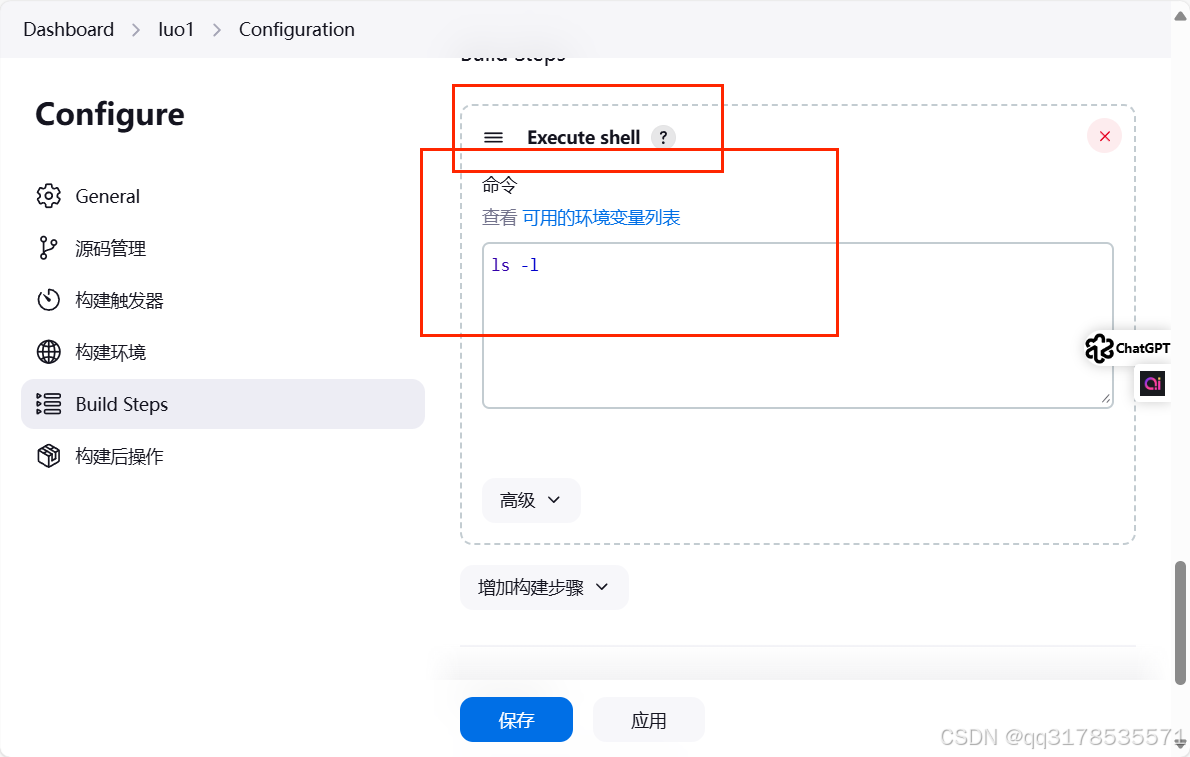
jenkins 与gitlab的整合
添加密钥
关闭远程登录需要的yes/no
bash
[root@jenkins-node1 ~]# vim /etc/ssh/ssh_config
更该类型
设置计划任务

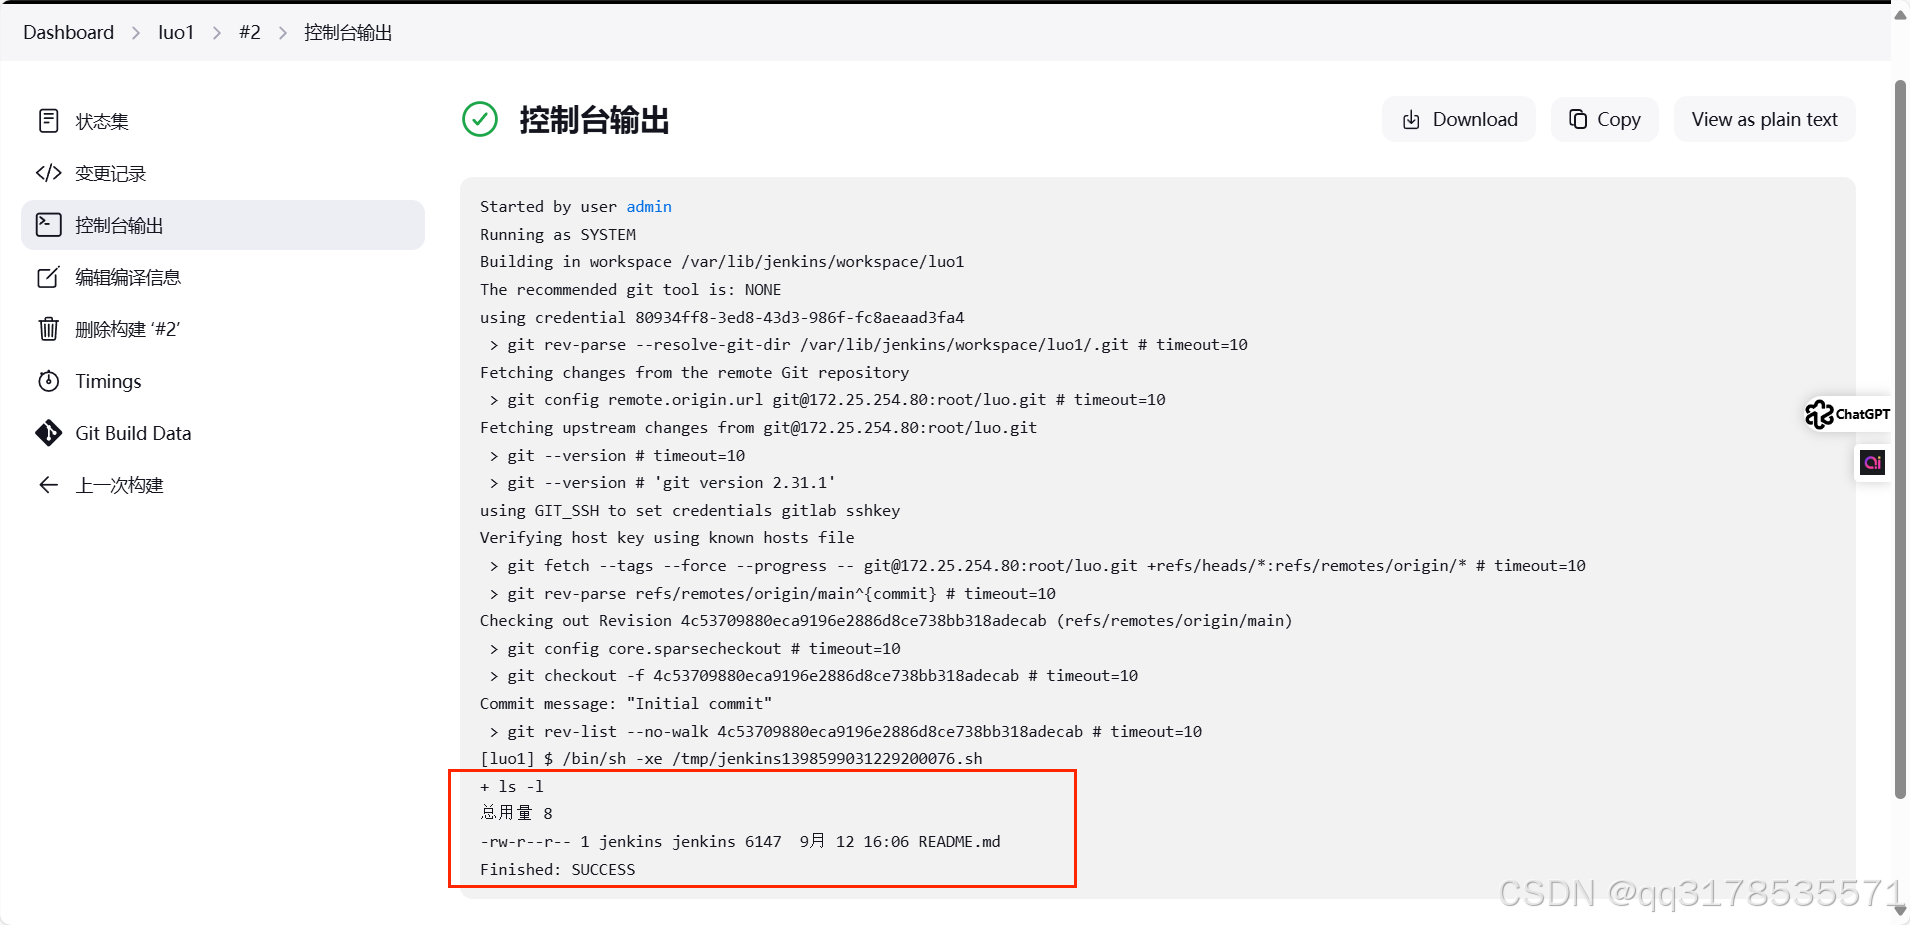
设置查看有没有建立成功
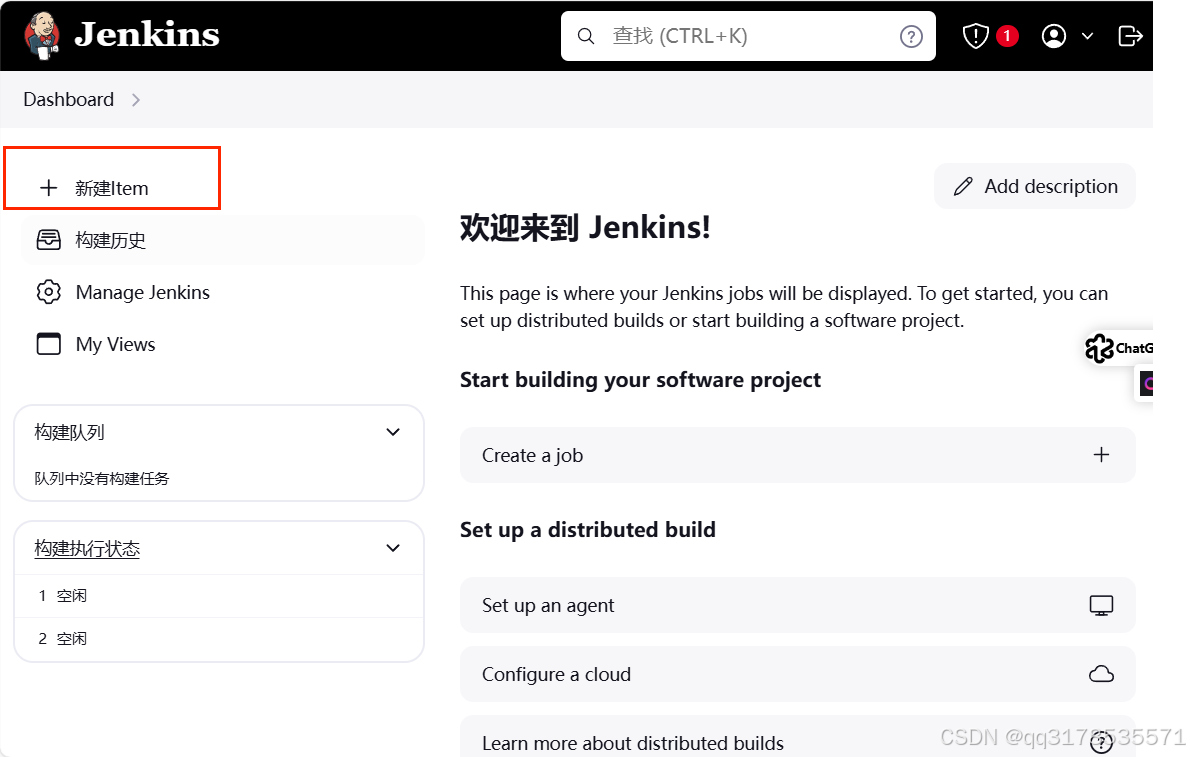
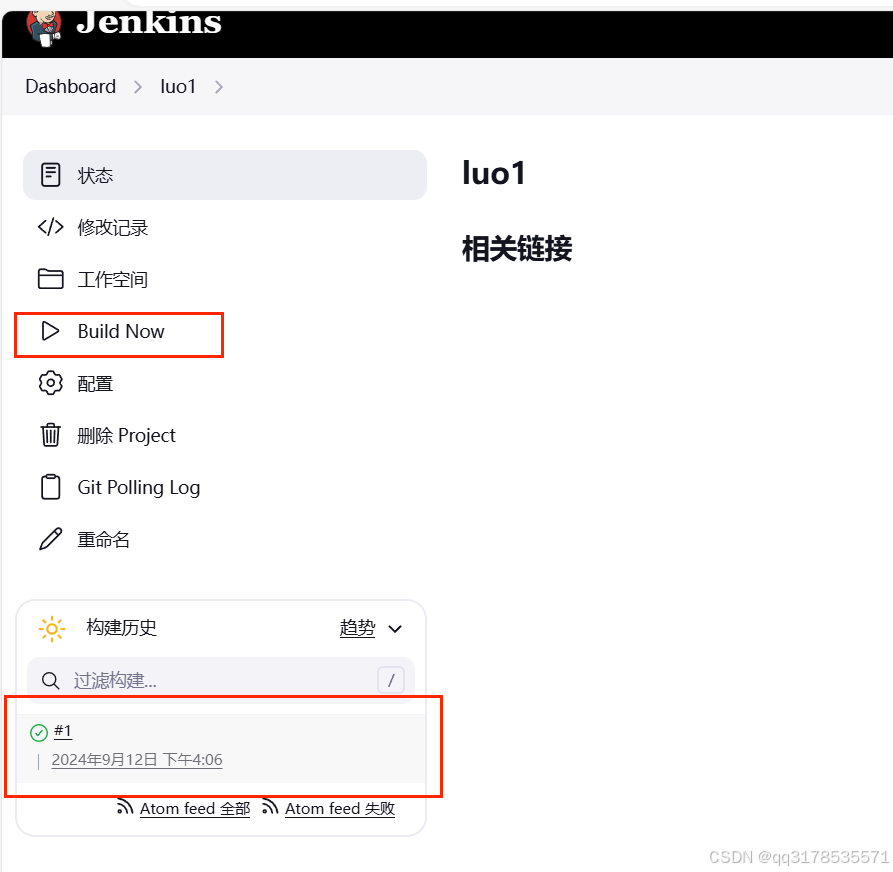
点击立刻创建
查看