【写在前面】
在现代应用程序中,星级评分是一个常见的用户界面元素,它允许用户对产品、服务或内容进行评价。
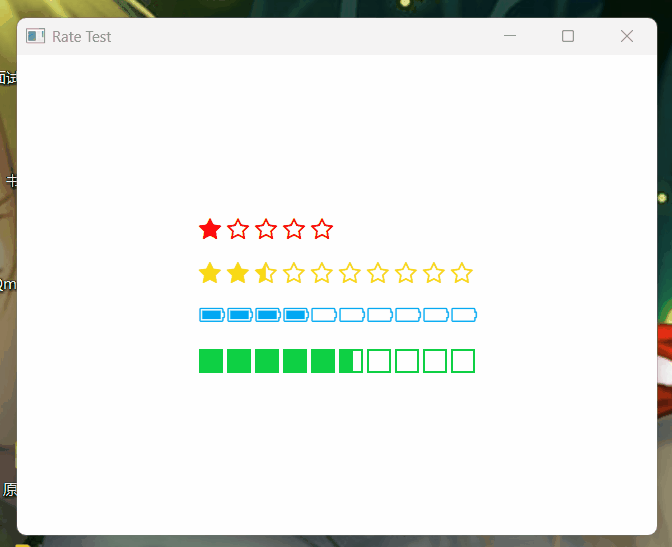
想必大家在用各种带有评分的软件中看到过这个组件:

本文将指导你如何使用 Qml 创建一个简单而美观的星级评分组件,并且支持高度自定义。
【正文开始】
先来看看效果图:
现在开始讲解思路:
首先,我们需要考虑半星的情况,因此可以分为三个部分:

1、红色部分:满填充星星【fillDelegate】。
2、绿色部分:半填充星星【halfDelegate】。
3、蓝色部分:无填充星星【emptyDelegate】。
这三部分都是通过代理实现的,因此如果需要自定义,则必须提供这三个组件:
qml
    property Component fillDelegate: Component {
        Text {
            text: fillIcon
            color: root.iconColor
            font.family: fontAwesome.name
            font.pixelSize: iconFontSize
        }
    }
    property Component emptyDelegate: Component {
        Text {
            text: emptyIcon
            color: root.iconColor
            font.family: fontAwesome.name
            font.pixelSize: iconFontSize
        }
    }
    property Component halfDelegate: Component {
        Text {
            text: halfIcon
            color: root.iconColor
            font.family: fontAwesome.name
            font.pixelSize: iconFontSize
        }
    }
接下来,我们需要计算每个部分的数量,其中半星必然只有一颗( 如果有 ):
qml
    property int fillCount: Math.floor(root.value)
    property int emptyStartIndex: Math.round(root.value)
    property bool hasHalf: root.value - fillCount > 0
然后用 Repeater + Loader 载入即可:
qml
    Repeater {
        id: repeater
        model: root.count
        delegate: MouseArea {
            id: rootItem
            width: root.iconSize
            height: root.iconSize
            hoverEnabled: true
            onEntered: hovered = true;
            onExited: hovered = false;
            onClicked: {
                root.isDone = !root.isDone;
                if (root.isDone) {
                    __private.doneValue = root.value;
                    root.done(__private.doneValue);
                }
            }
            onPositionChanged: function(mouse) {
                if (root.allowHalf) {
                    if (mouse.x > (width * 0.5)) {
                        root.value = index + 1;
                    } else {
                        root.value = index + 0.5;
                    }

                } else {
                    root.value = index + 1;
                }
            }
            property bool hovered: false

            Loader {
                active: index < repeater.fillCount
                sourceComponent: fillDelegate
                property bool hovered: rootItem.hovered
            }

            Loader {
                active: repeater.hasHalf && index === (repeater.emptyStartIndex - 1)
                sourceComponent: halfDelegate
                property bool hovered: rootItem.hovered
            }

            Loader {
                active: index >= repeater.emptyStartIndex
                sourceComponent: emptyDelegate
                property bool hovered: rootItem.hovered
            }
        }

        property int fillCount: Math.floor(root.value)
        property int emptyStartIndex: Math.round(root.value)
        property bool hasHalf: root.value - fillCount > 0
    }
至此,核心部分讲解完了,其他部分直接看源码即可。
【结语】
最后:项目链接(多多star呀..⭐_⭐):
Github 地址:https://github.com/mengps/QmlControls/tree/master/Rate