1.准备一台机子,准备源,下载docker-ce
bash
vi /etc/yum.repo.d/Centos-7.repo  加入以下内容


[base]
name=CentOS-$releasever - Base - mirrors.aliyun.com
failovermethod=priority
baseurl=http://mirrors.aliyun.com/centos/$releasever/os/$basearch/
        http://mirrors.aliyuncs.com/centos/$releasever/os/$basearch/
        http://mirrors.cloud.aliyuncs.com/centos/$releasever/os/$basearch/
gpgcheck=1
gpgkey=http://mirrors.aliyun.com/centos/RPM-GPG-KEY-CentOS-7

#released updates
[updates]
name=CentOS-$releasever - Updates - mirrors.aliyun.com
failovermethod=priority
baseurl=http://mirrors.aliyun.com/centos/$releasever/updates/$basearch/
        http://mirrors.aliyuncs.com/centos/$releasever/updates/$basearch/
        http://mirrors.cloud.aliyuncs.com/centos/$releasever/updates/$basearch/
gpgcheck=1
gpgkey=http://mirrors.aliyun.com/centos/RPM-GPG-KEY-CentOS-7

#additional packages that may be useful
[extras]
name=CentOS-$releasever - Extras - mirrors.aliyun.com
failovermethod=priority
baseurl=http://mirrors.aliyun.com/centos/$releasever/extras/$basearch/
        http://mirrors.aliyuncs.com/centos/$releasever/extras/$basearch/
        http://mirrors.cloud.aliyuncs.com/centos/$releasever/extras/$basearch/
gpgcheck=1
gpgkey=http://mirrors.aliyun.com/centos/RPM-GPG-KEY-CentOS-7

#additional packages that extend functionality of existing packages
[centosplus]
name=CentOS-$releasever - Plus - mirrors.aliyun.com
failovermethod=priority
baseurl=http://mirrors.aliyun.com/centos/$releasever/centosplus/$basearch/
        http://mirrors.aliyuncs.com/centos/$releasever/centosplus/$basearch/
        http://mirrors.cloud.aliyuncs.com/centos/$releasever/centosplus/$basearch/
gpgcheck=1
enabled=0
gpgkey=http://mirrors.aliyun.com/centos/RPM-GPG-KEY-CentOS-7

#contrib - packages by Centos Users
[contrib]
name=CentOS-$releasever - Contrib - mirrors.aliyun.com
failovermethod=priority
baseurl=http://mirrors.aliyun.com/centos/$releasever/contrib/$basearch/
        http://mirrors.aliyuncs.com/centos/$releasever/contrib/$basearch/
        http://mirrors.cloud.aliyuncs.com/centos/$releasever/contrib/$basearch/
gpgcheck=1
enabled=0
gpgkey=http://mirrors.aliyun.com/centos/RPM-GPG-KEY-CentOS-7


配置docker
vi /etc/yum.repos.d/docker.repo

[docker-ce-stable]
name=Docker CE Stable - $basearch
baseurl=https://mirrors.aliyun.com/docker-ce/linux/centos/$releasever/$basearch/stable
enabled=1
gpgcheck=1
gpgkey=https://mirrors.aliyun.com/docker-ce/linux/centos/gpg

[docker-ce-stable-debuginfo]
name=Docker CE Stable - Debuginfo $basearch
baseurl=https://mirrors.aliyun.com/docker-ce/linux/centos/$releasever/debug-$basearch/stable
enabled=0
gpgcheck=1
gpgkey=https://mirrors.aliyun.com/docker-ce/linux/centos/gpg

[docker-ce-stable-source]
name=Docker CE Stable - Sources
baseurl=https://mirrors.aliyun.com/docker-ce/linux/centos/$releasever/source/stable
enabled=0
gpgcheck=1
gpgkey=https://mirrors.aliyun.com/docker-ce/linux/centos/gpg

[docker-ce-test]
name=Docker CE Test - $basearch
baseurl=https://mirrors.aliyun.com/docker-ce/linux/centos/$releasever/$basearch/test
enabled=0
gpgcheck=1
gpgkey=https://mirrors.aliyun.com/docker-ce/linux/centos/gpg

[docker-ce-test-debuginfo]
name=Docker CE Test - Debuginfo $basearch
baseurl=https://mirrors.aliyun.com/docker-ce/linux/centos/$releasever/debug-$basearch/test
enabled=0
gpgcheck=1
gpgkey=https://mirrors.aliyun.com/docker-ce/linux/centos/gpg

[docker-ce-test-source]
name=Docker CE Test - Sources
baseurl=https://mirrors.aliyun.com/docker-ce/linux/centos/$releasever/source/test
enabled=0
gpgcheck=1
gpgkey=https://mirrors.aliyun.com/docker-ce/linux/centos/gpg

[docker-ce-nightly]
name=Docker CE Nightly - $basearch
baseurl=https://mirrors.aliyun.com/docker-ce/linux/centos/$releasever/$basearch/nightly
enabled=0
gpgcheck=1
gpgkey=https://mirrors.aliyun.com/docker-ce/linux/centos/gpg

[docker-ce-nightly-debuginfo]
name=Docker CE Nightly - Debuginfo $basearch
baseurl=https://mirrors.aliyun.com/docker-ce/linux/centos/$releasever/debug-$basearch/nightly
enabled=0
gpgcheck=1
gpgkey=https://mirrors.aliyun.com/docker-ce/linux/centos/gpg

[docker-ce-nightly-source]
name=Docker CE Nightly - Sources
baseurl=https://mirrors.aliyun.com/docker-ce/linux/centos/$releasever/source/nightly
enabled=0
gpgcheck=1
gpgkey=https://mirrors.aliyun.com/docker-ce/linux/centos/gpg


安装docker
yum -y install docker-ce
2.创建一个dockerfile执行目录,使用dockerfile编写apache镜像。
bash
#进入dockerfile 编写
FROM centos:7    #要看你现在docker images 里面有没有centos7镜像,
RUN yum -y install httpd -y
VOLUME ["/var/www/html"]  #卷
EXPOSE 80  #端口暴露
CMD ["/usr/sbin/httpd","-DFOREGROUND"]  #启动httpd
3.构建镜像,并运行容器(使用端口)。
bash
#执行dockerfile编写的命令
docker build -t httpd:v1 .

#运行httpd端口暴露
docker run -d -p 8888:80 --name httpd httpd:v1

#使用macvlan指定ip,先创建macvlan
docker network create -d macvlan --subnet 192.168.10.0/24 --gateway 192.168.10.2 -o parent=ens33 macvlan2

#使用macvlan运行,并指定ip
docker run -d --net macvlan --ip 192.168.10.86 --name httpd2 httpd:v1
构建镜像成功。

启动镜像成功。

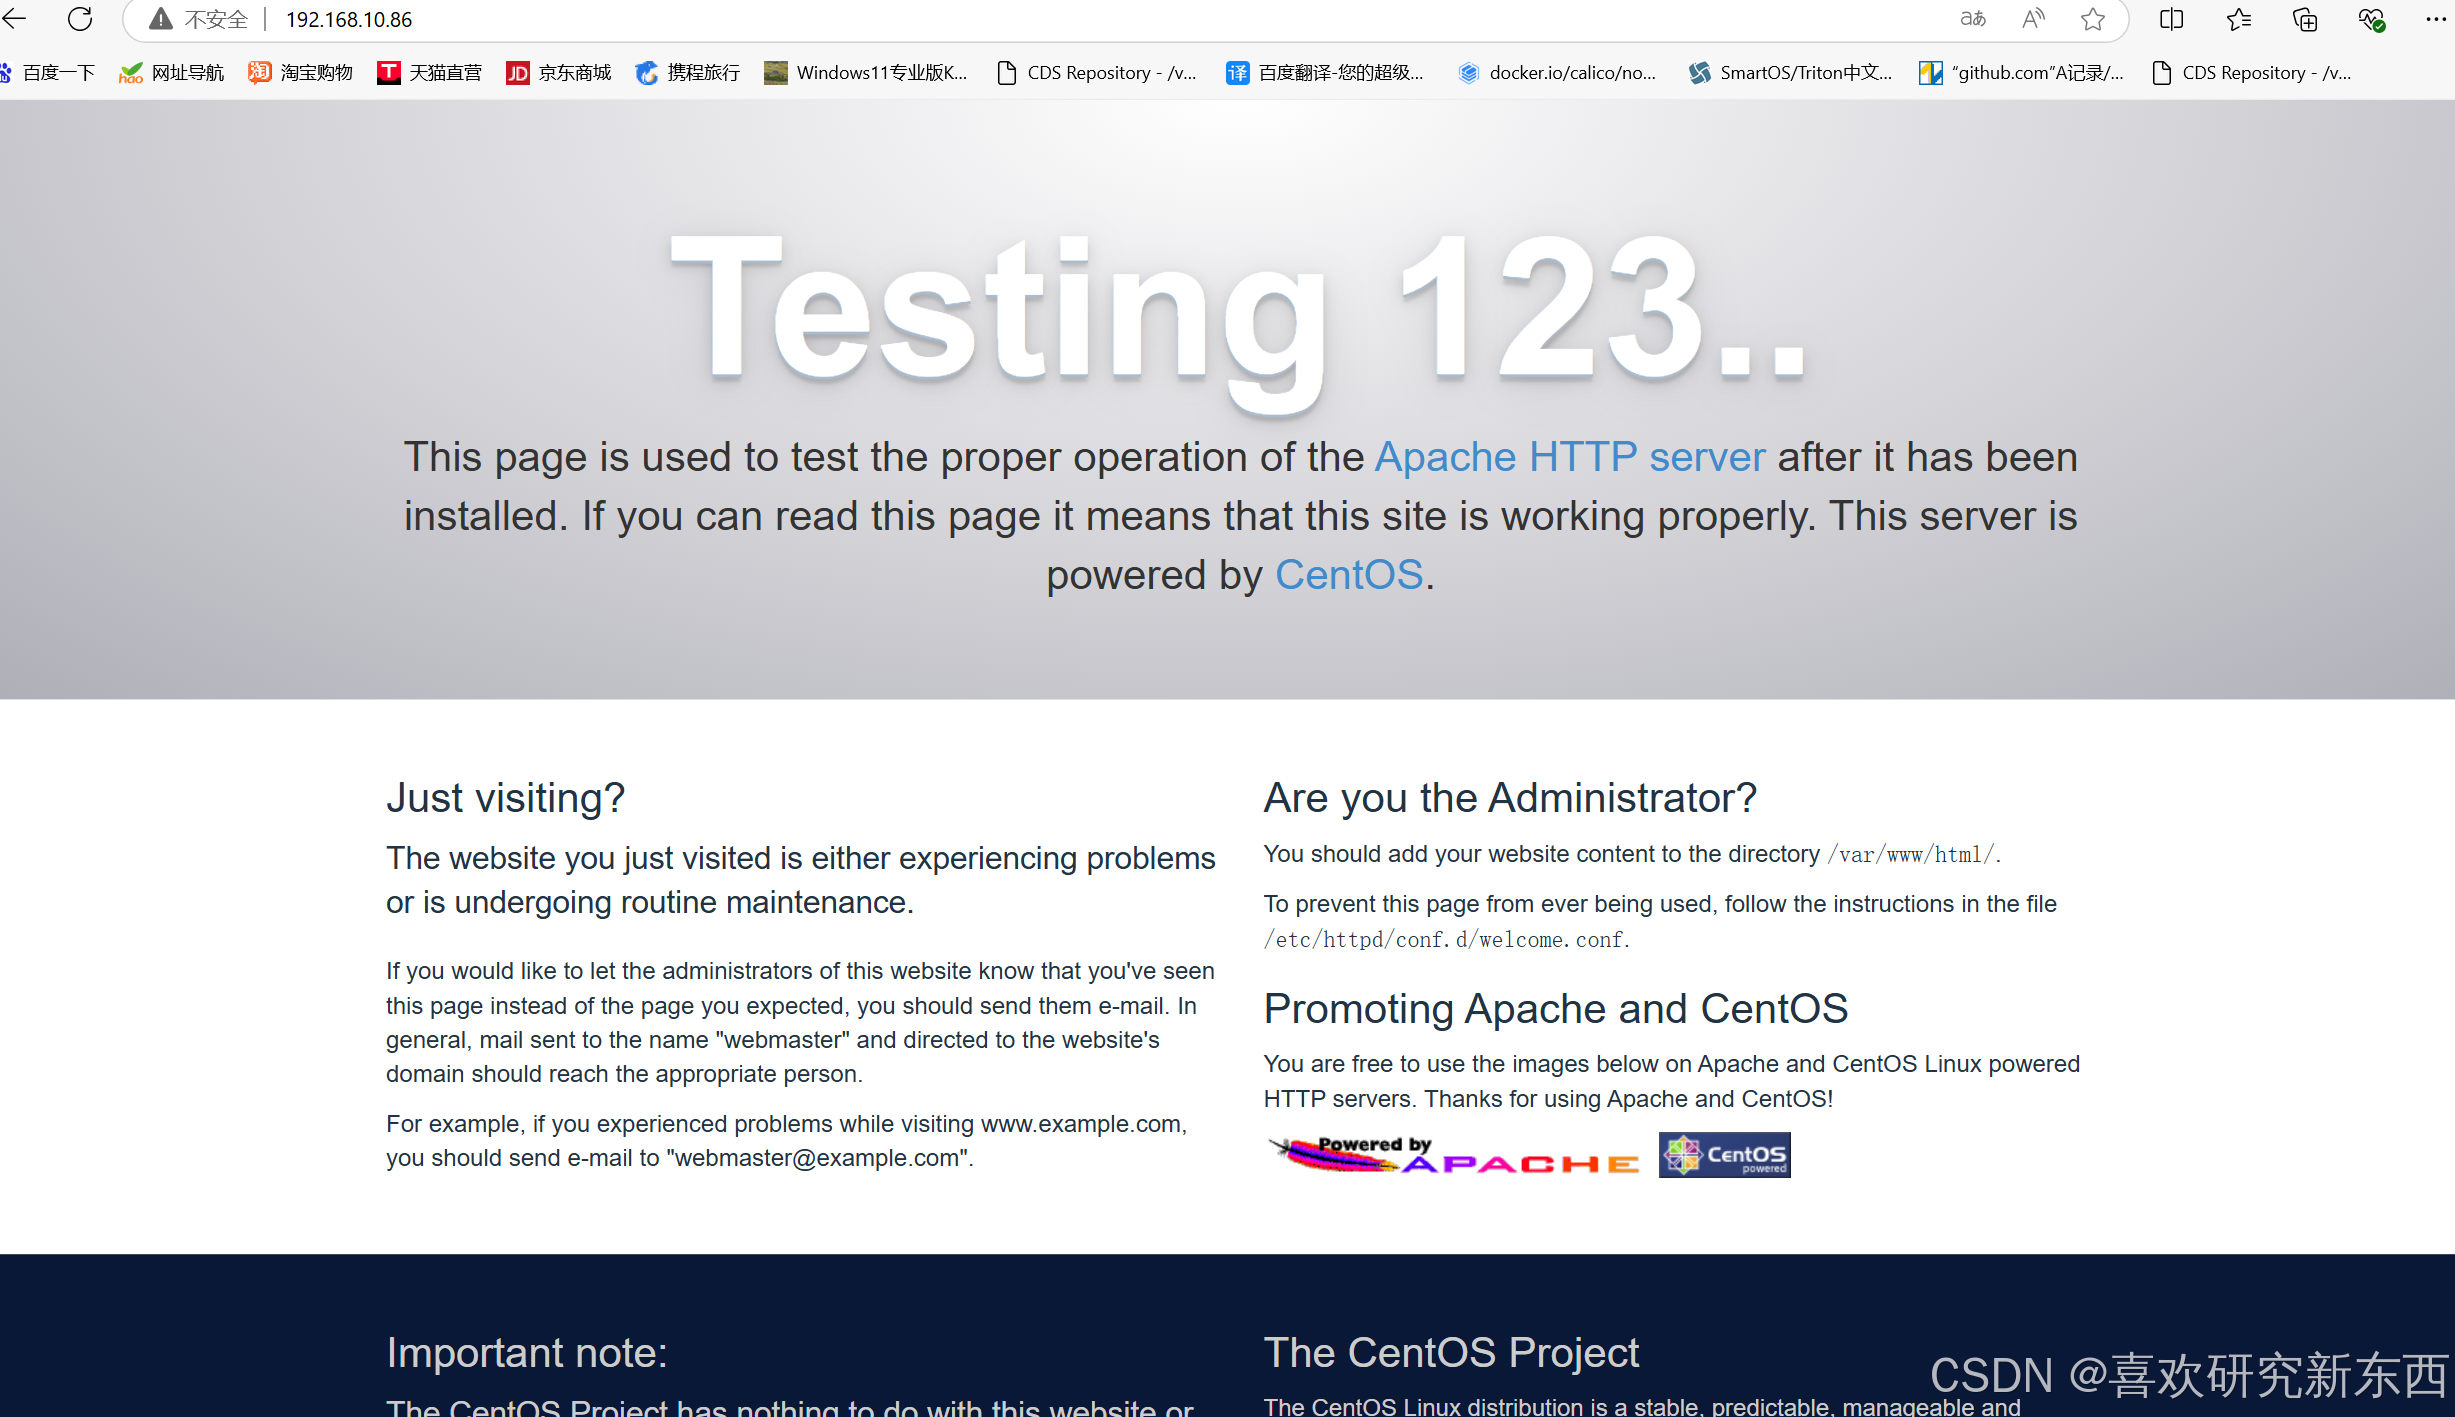
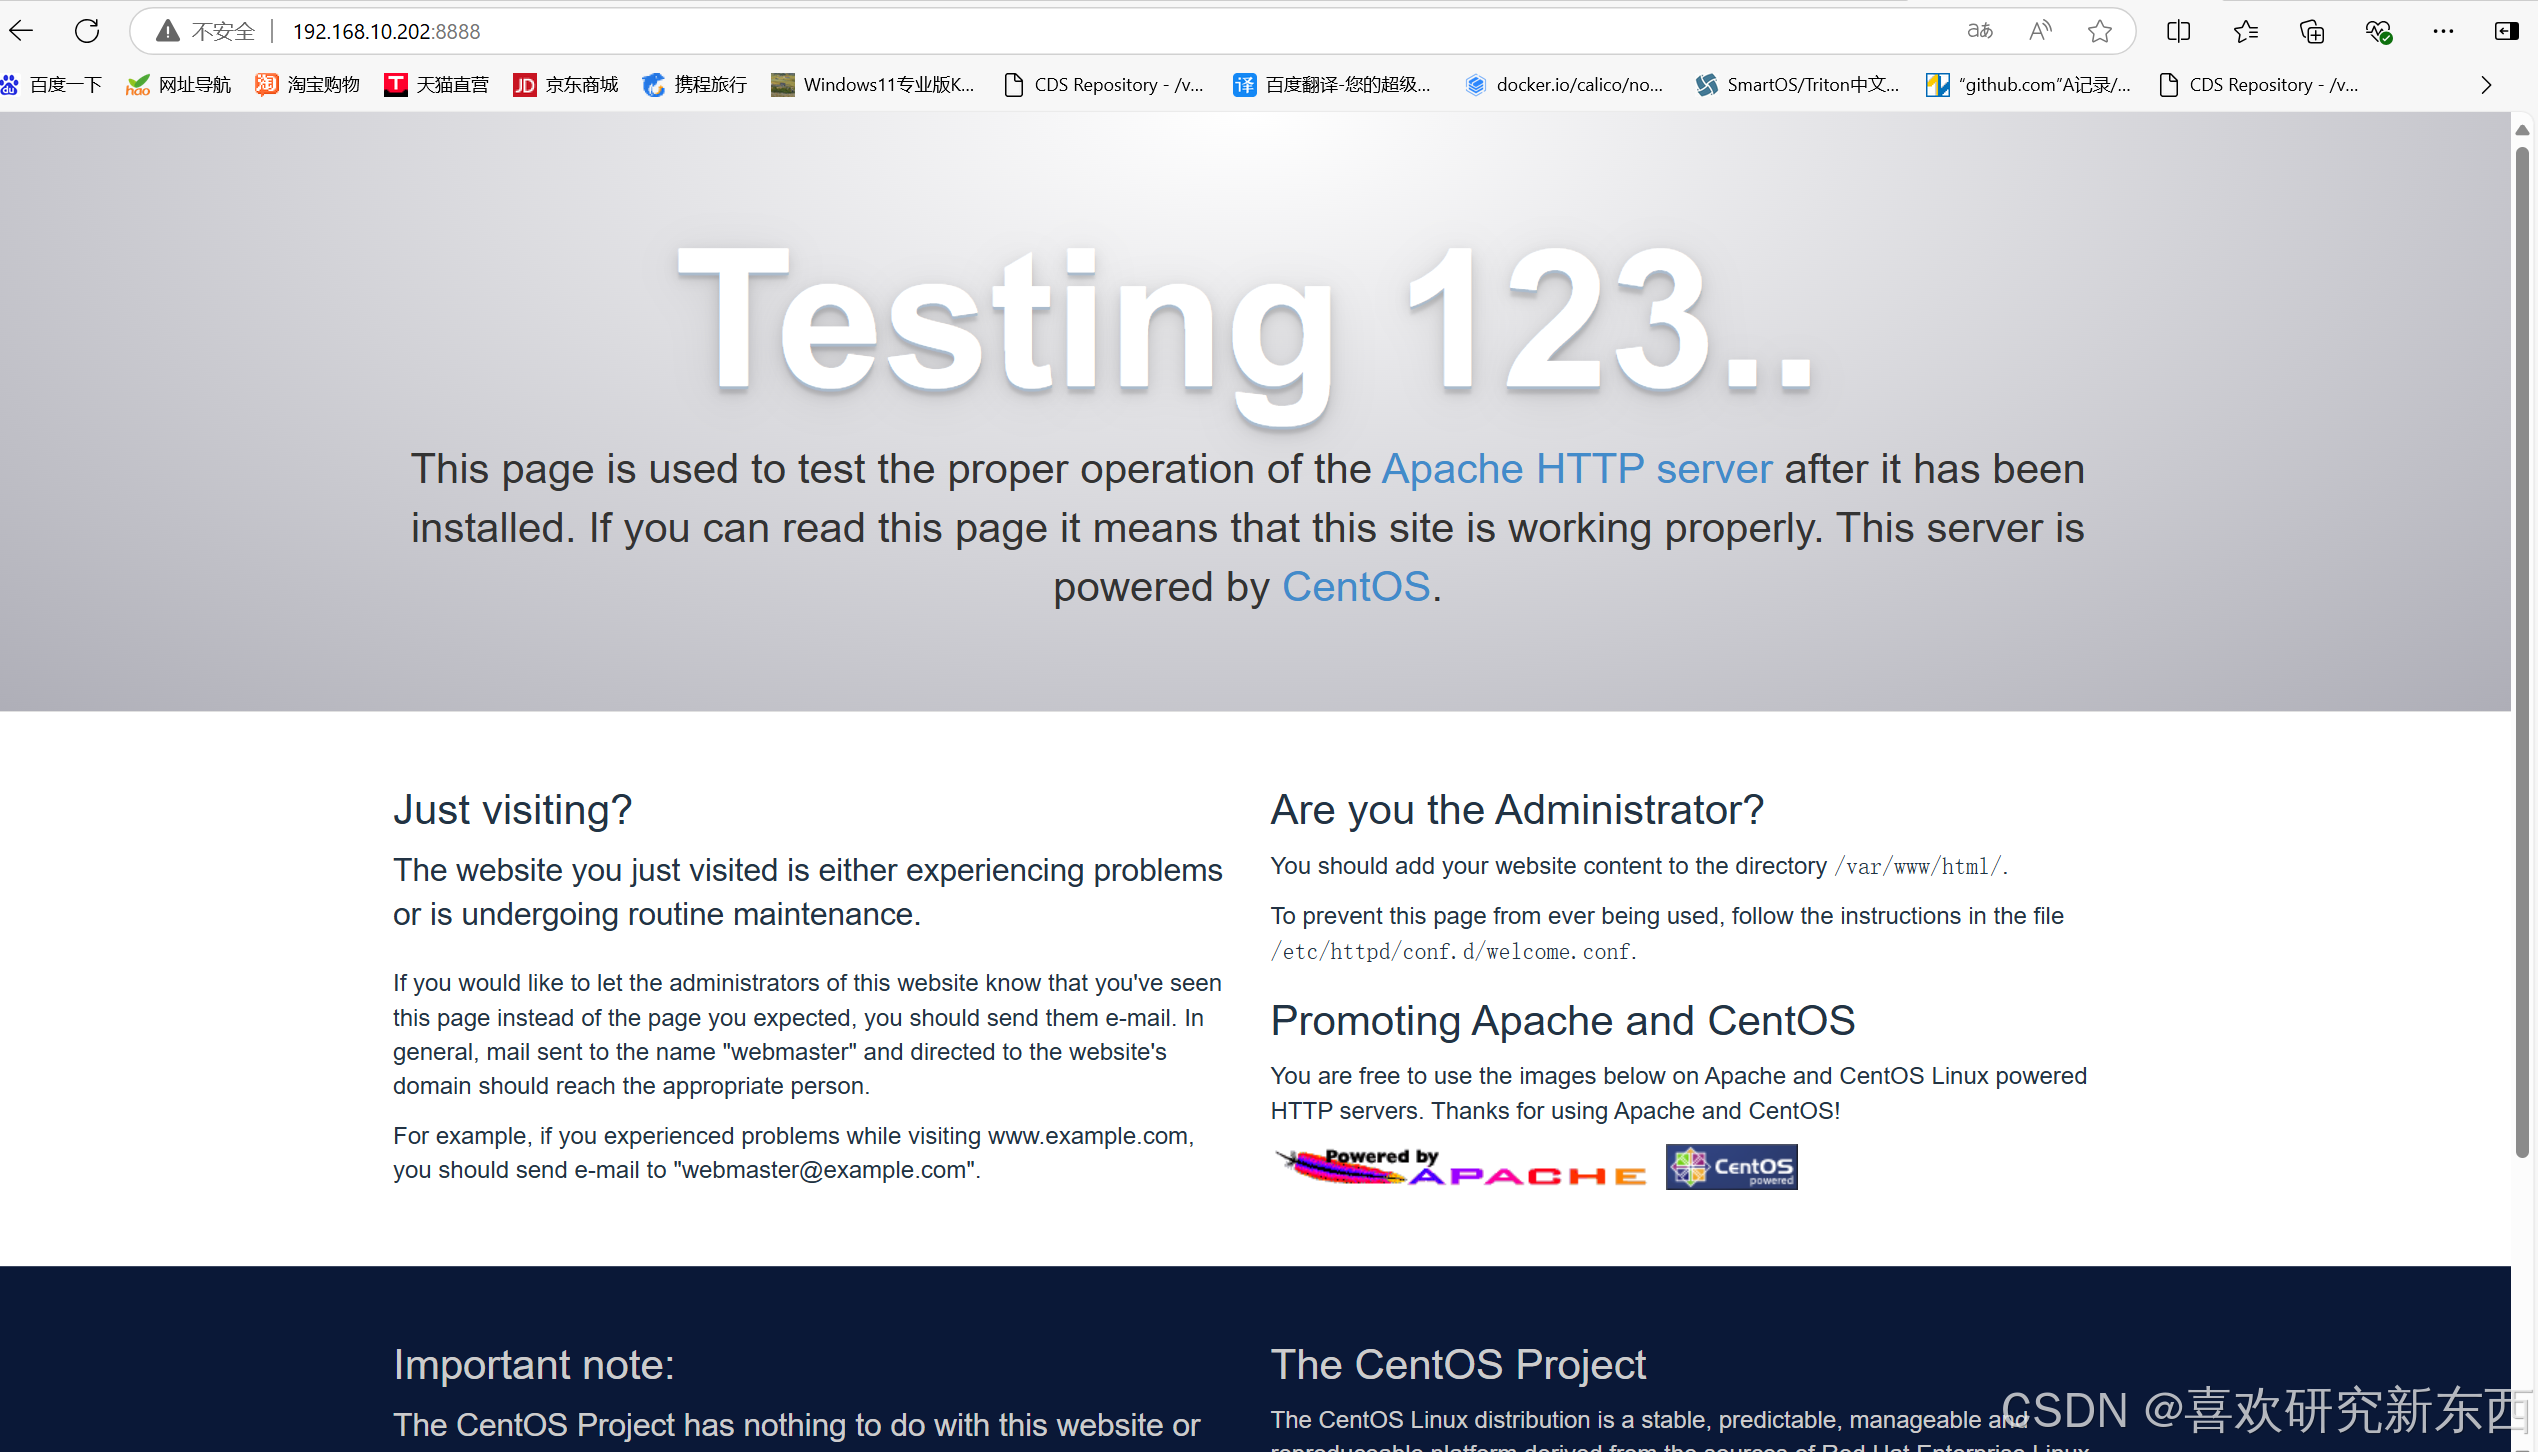
4.浏览器访问:
端口暴露访问:192.168.10.202:8888
ip访问:192.168.10.86(macvlan)
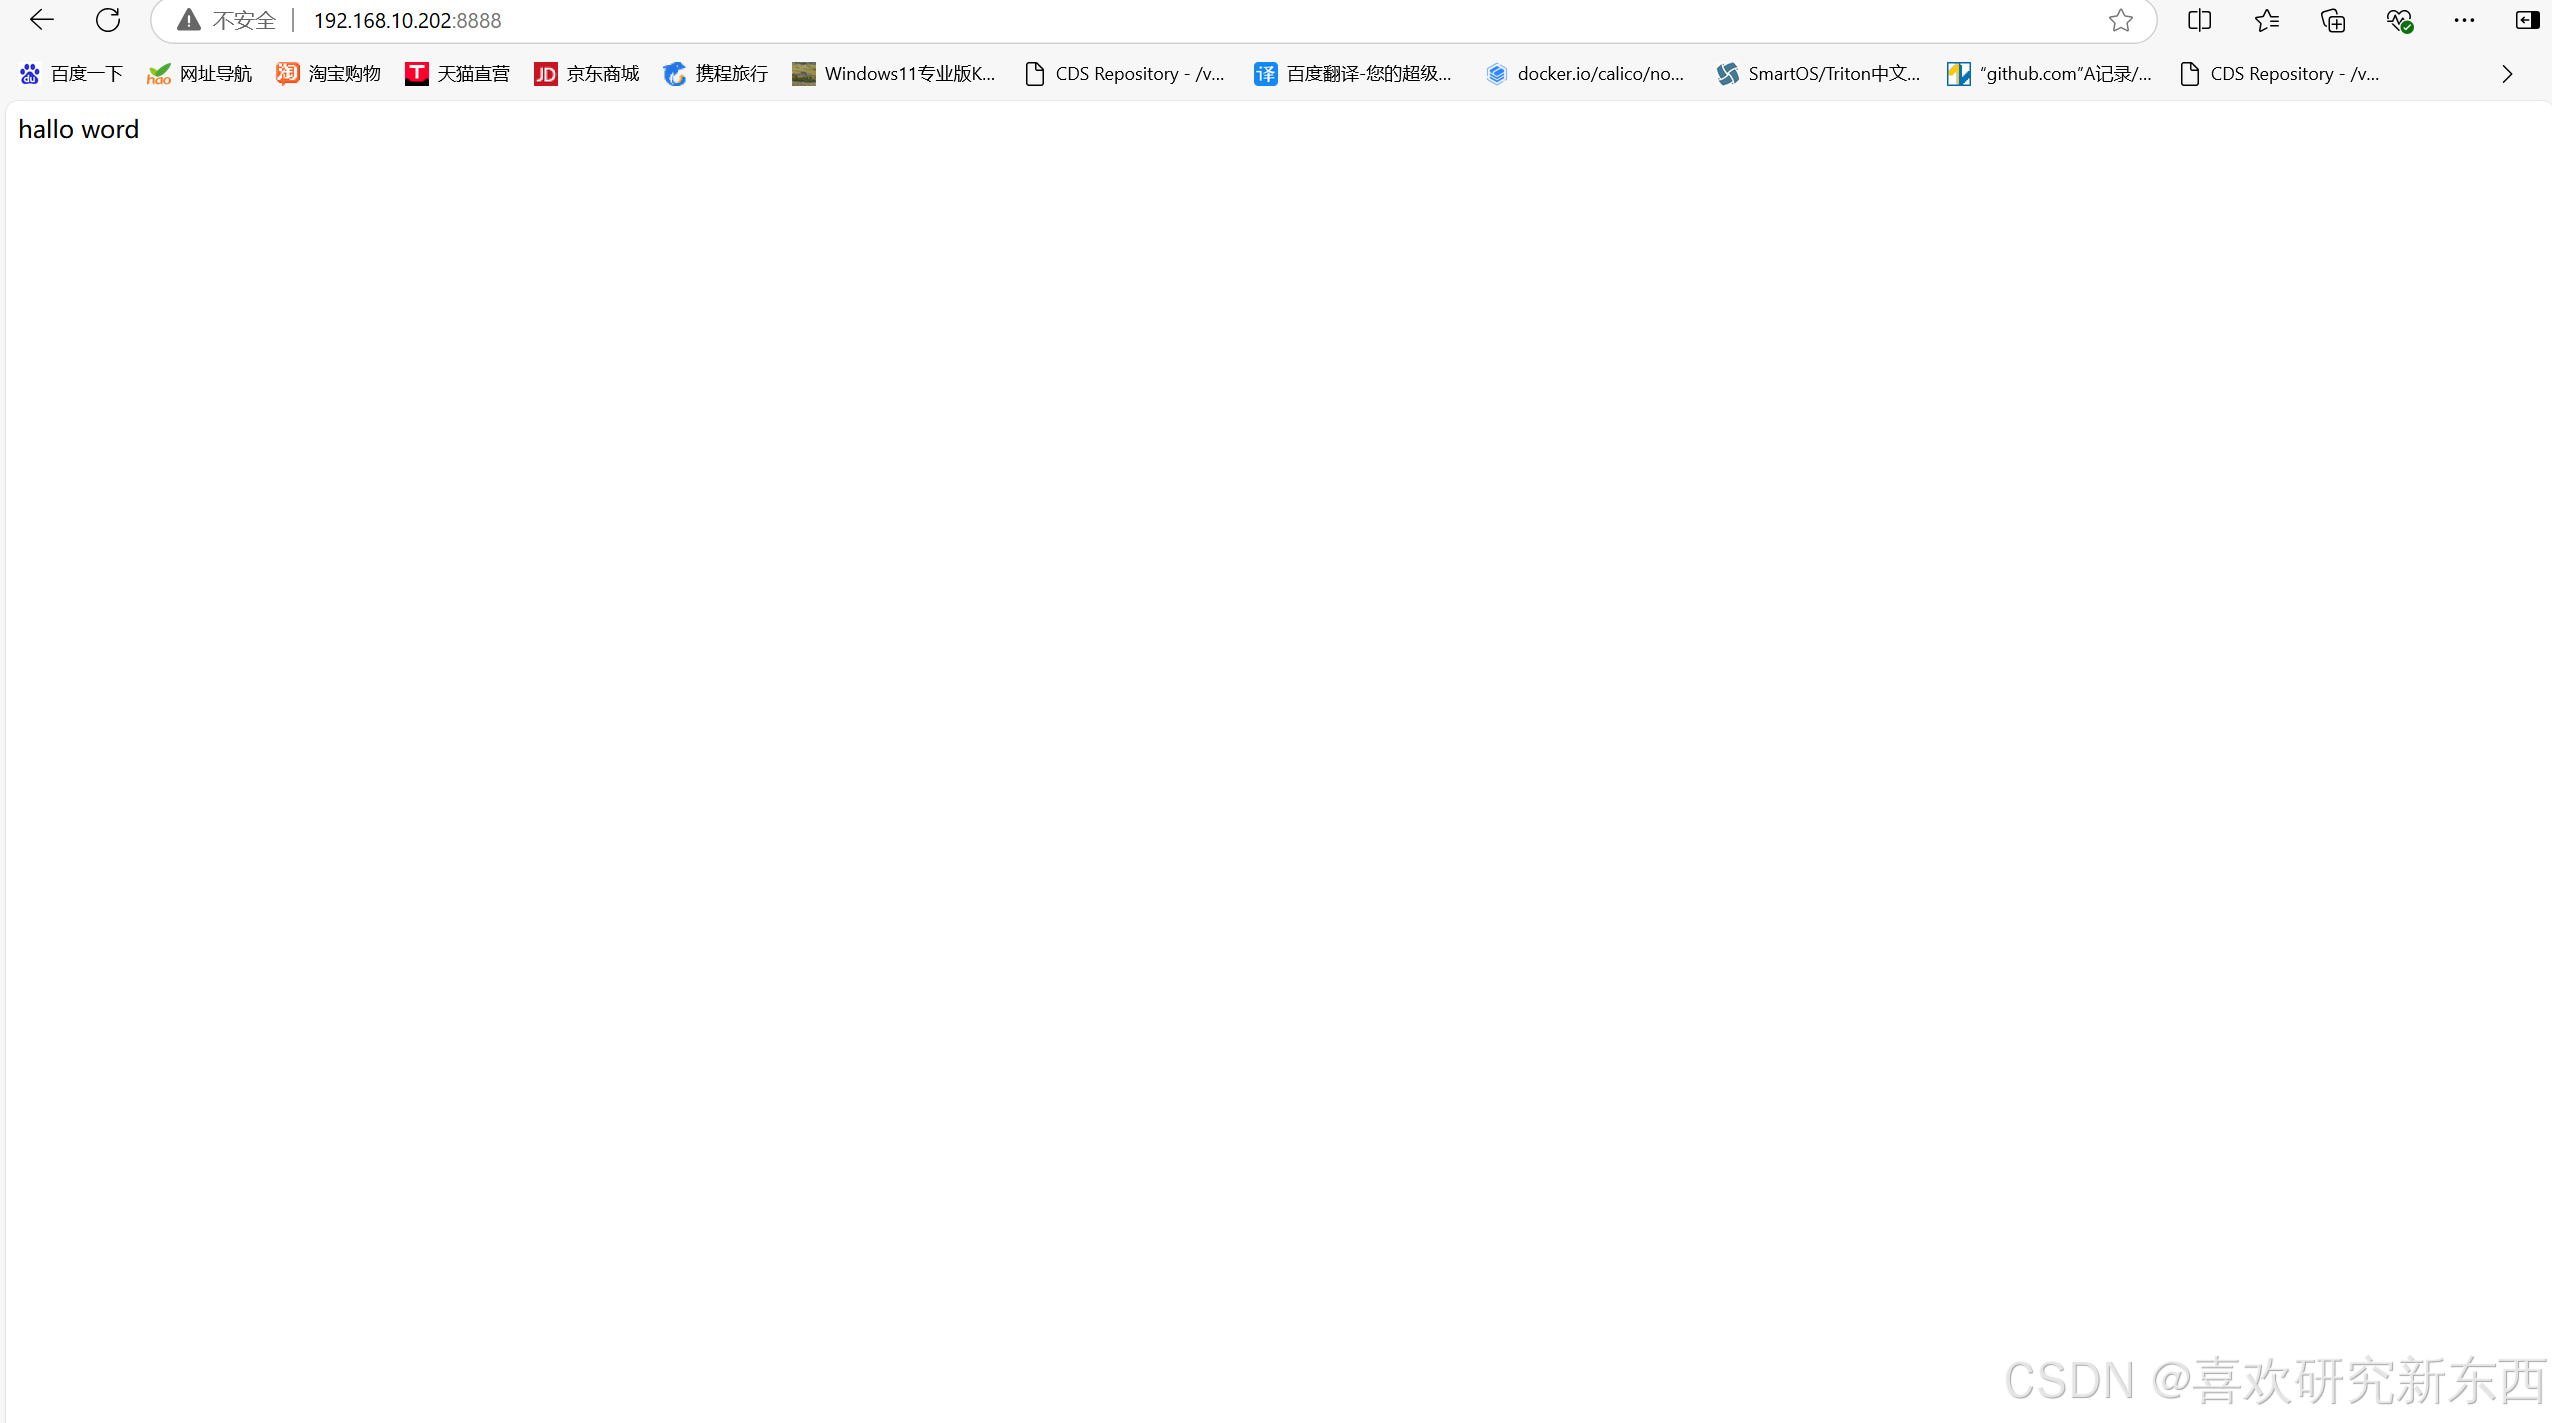
- 创建主页和分页,先找到数据卷的位置
bash
#找查数据卷位置 (中间的89是容器的id简写)
docker inspect 89 | grep Sou
#进入数据卷位置
cd
/var/lib/docker/volumes/b5275e14935d153586686436df235d85a1cb87f7926392f5d1028906648c5c04/_data
#创建一个主页文件
vi index.html 写入
hallo word
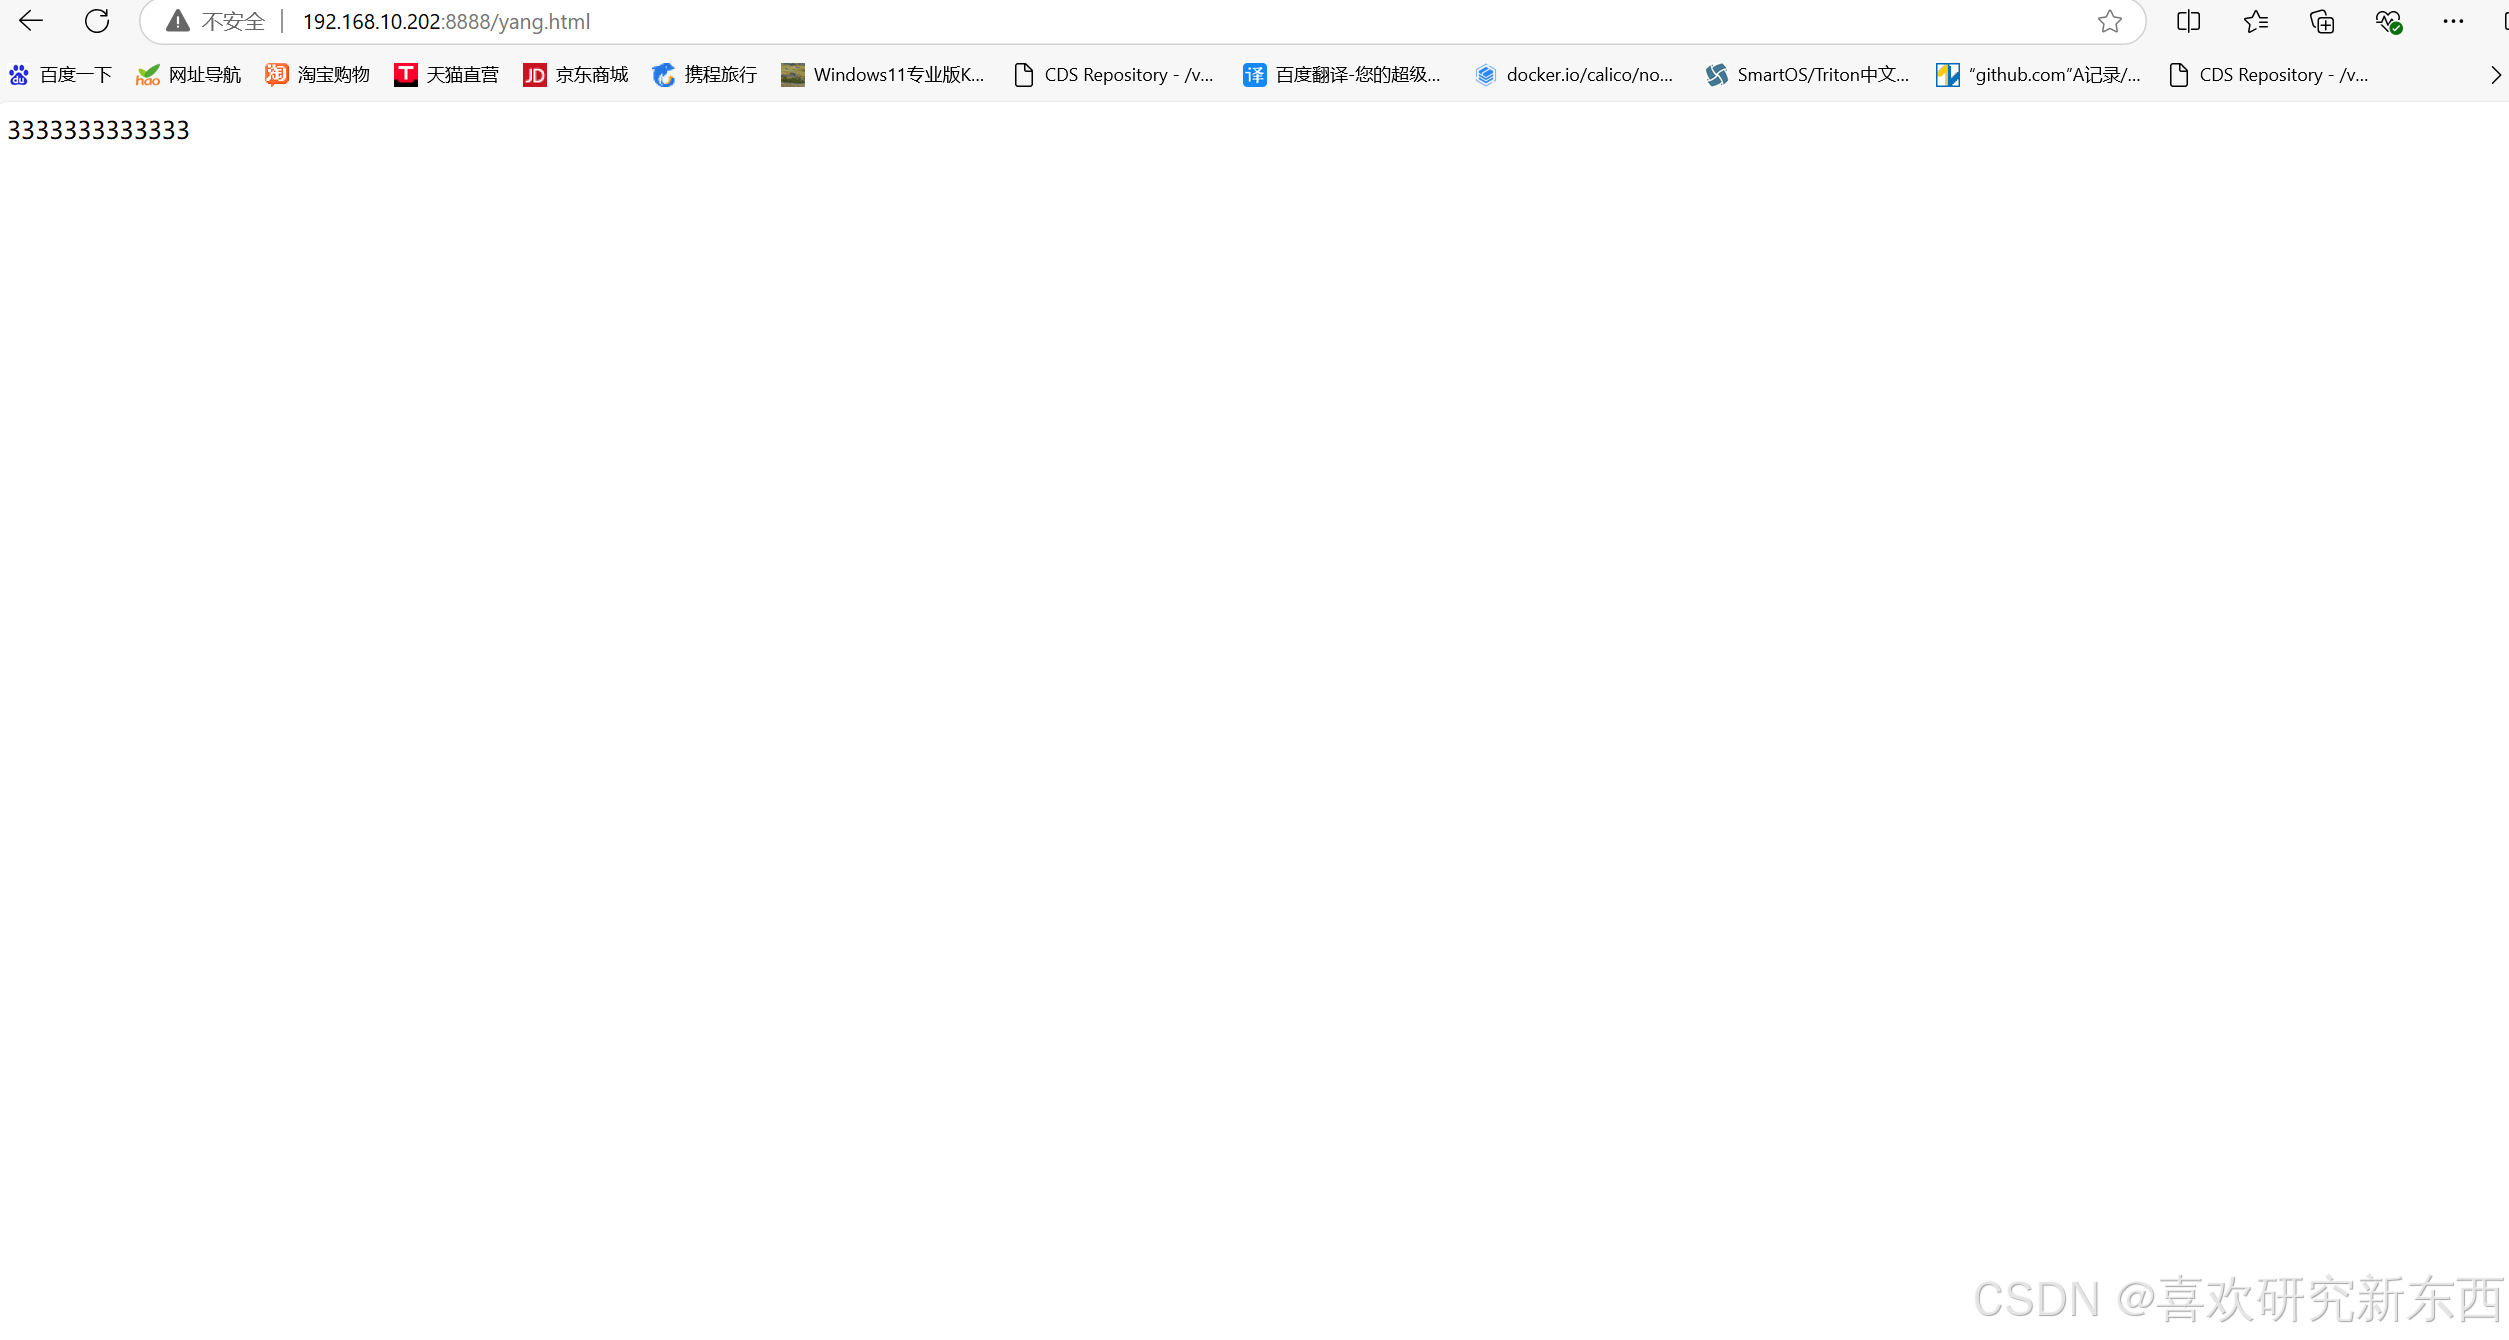
#在创建一个 yang.html 写入
333333333333浏览器访问:192.168.10.202:8888 出现hallo word
192.168.10.202:8888/yang.html 出现33333333333
6.总结:以上就是一个使用dockerfile编写的httpd镜像,并构建镜像,使用端口暴露和macvlan启动镜像,创建httpd主页和分页。