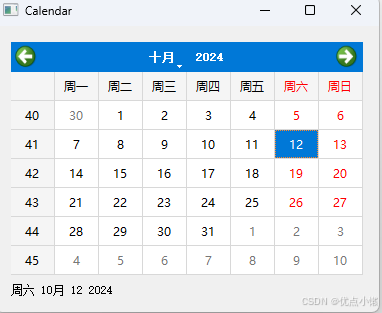
日历
QCalendarWidget 提供了基于⽉份的⽇历插件,⼗分简易⽽且直观
python
from PyQt5.QtWidgets import (QWidget, QCalendarWidget,
 QLabel, QApplication, QVBoxLayout)
from PyQt5.QtCore import QDate
import sys

class Example(QWidget):
    def __init__(self):
        super().__init__()
        self.initUI()

    def initUI(self):
        vbox = QVBoxLayout(self)
        cal = QCalendarWidget(self)
        cal.setGridVisible(True)
        cal.clicked[QDate].connect(self.showDate)
        vbox.addWidget(cal)
        self.lbl = QLabel(self)
        # 使⽤ selectedDate() ⽅法获取选中的⽇期,然后把⽇期对象转成字符串,在标签⾥⾯显⽰出来
        date = cal.selectedDate()  # 默认选中当前⽇期
        self.lbl.setText(date.toString())
        vbox.addWidget(self.lbl)
        self.setLayout(vbox)
        self.setGeometry(300, 300, 350, 300)
        self.setWindowTitle('Calendar')
        self.show()

    def showDate(self, date):
        self.lbl.setText(date.toString())

if __name__ == '__main__':
    app = QApplication(sys.argv)
    ex = Example()
    sys.exit(app.exec_())
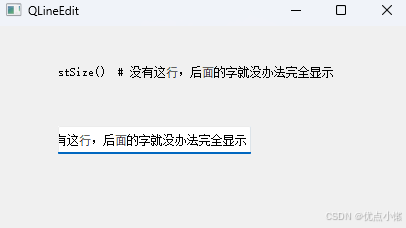
⾏编辑
QLineEdit 组件提供了编辑⽂本的功能,⾃带了撤销、重做、剪切、粘贴、拖拽等功能
python
import sys
from PyQt5.QtWidgets import (QWidget, QLabel,
 QLineEdit, QApplication)

class Example(QWidget):
    def __init__(self):
        super().__init__()
        self.initUI()

    def initUI(self):
        self.lbl = QLabel(self)
        qle = QLineEdit(self)
        qle.move(60, 100)  # 原来第⼀个数是列,第⼆个数是⾏
        self.lbl.move(60, 40)
        # 如果输⼊框的值有变化,就调⽤ onChanged() ⽅法
        qle.textChanged[str].connect(self.onChanged)
        self.setGeometry(300, 300, 280, 170)
        self.setWindowTitle('QLineEdit')
        self.show()

    def onChanged(self, text):
    	# 把⽂本框⾥的值赋值给了标签组件
        self.lbl.setText(text)
        # 让标签⾃适应⽂本内容
        self.lbl.adjustSize()  # 没有这⾏,后⾯的字就没办法完全显示

if __name__ == '__main__':
    app = QApplication(sys.argv)
    ex = Example()
    sys.exit(app.exec_())
QSplitter
QSplitter 组件能让⽤户通过拖拽分割线的⽅式改变⼦窗⼜⼤⼩的组件
python
from PyQt5.QtWidgets import (QWidget, QHBoxLayout, QFrame,
 QSplitter, QStyleFactory, QApplication)
from PyQt5.QtCore import Qt
import sys

class Example(QWidget):
    def __init__(self):
        super().__init__()
        self.initUI()

    def initUI(self):
        hbox = QHBoxLayout(self)
        topleft = QFrame(self)
        topleft.setFrameShape(QFrame.StyledPanel)
        topright = QFrame(self)
        topright.setFrameShape(QFrame.StyledPanel)
        bottom = QFrame(self)
        bottom.setFrameShape(QFrame.StyledPanel)
        splitter1 = QSplitter(Qt.Horizontal)
        splitter1.addWidget(topleft)
        splitter1.addWidget(topright)
        splitter2 = QSplitter(Qt.Vertical)
        splitter2.addWidget(splitter1)
        splitter2.addWidget(bottom)
        hbox.addWidget(splitter2)
        self.setLayout(hbox)
        self.setGeometry(300, 300, 300, 200)
        self.setWindowTitle('QSplitter')
        self.show()

if __name__ == '__main__':
    app = QApplication(sys.argv)
    ex = Example()
    sys.exit(app.exec_())
缩放窗口内部小窗口会随之改变,上下拉伸时,只有最下方的窗口会改变

下拉选框
QComboBox 组件能让⽤户在多个选择项中选择⼀个
python
from PyQt5.QtWidgets import (QWidget, QLabel,
 QComboBox, QApplication)
import sys

class Example(QWidget):
    def __init__(self):
        super().__init__()
        self.initUI()

    def initUI(self):
        self.lbl = QLabel("Ubuntu", self)
        # 创建⼀个 QComboBox 组件和五个选项
        combo = QComboBox(self)
        combo.addItem("Ubuntu")
        combo.addItem("Mandriva")
        combo.addItem("Fedora")
        combo.addItem("Arch")
        combo.addItem("Gentoo")
        combo.move(50, 50)
        self.lbl.move(50, 150)
        combo.activated[str].connect(self.onActivated)
        self.setGeometry(300, 300, 300, 200)
        self.setWindowTitle('QComboBox')
        self.show()

    def onActivated(self, text):
	    # 设置标签内容为选定的字符串,然后设置⾃适应⽂本⼤⼩
        self.lbl.setText(text)
        self.lbl.adjustSize()

if __name__ == '__main__':
    app = QApplication(sys.argv)
    ex = Example()
    sys.exit(app.exec_())
本例包含了⼀个 QComboBox 和⼀个 QLabel ,下拉选择框有五个选项

拖拽
在GUI⾥,拖放是指⽤户点击⼀个虚拟的对象,拖动,然后放置到另外⼀个对象上⾯的动作。⼀般
情况下,需要调⽤很多动作和⽅法,创建很多变量。
⼀般情况下,我们可以拖放两种东西:数据和图形界⾯。把⼀个图像从⼀个应⽤拖放到另外⼀个应
⽤上的实质是操作⼆进制数据。把⼀个表格从Firefox上拖放到另外⼀个位置 的实质是操作⼀个图形
组。
简单的拖放
本例使⽤了 QLineEdit 和 QPushButton 。把⼀个⽂本从编辑框⾥拖到按钮上,更新按钮上的标签
python
from PyQt5.QtWidgets import (QPushButton, QWidget, QLineEdit, QApplication)
import sys

class Button(QPushButton):
    def __init__(self, title, parent):
        super().__init__(title, parent)
        # 激活组件的拖拽事件
        self.setAcceptDrops(True)

	# 重构dragEnterEvent() ⽅法
    def dragEnterEvent(self, e):
		# 设定接受拖拽的数据类型(plain text)
        if e.mimeData().hasFormat('text/plain'):
            e.accept()
        else:
            e.ignore()
	# 重构 dropEvent() ⽅法
    def dropEvent(self, e):
    	# 更改按钮接受⿏标的释放事件的默认⾏为
        self.setText(e.mimeData().text())


class Example(QWidget):
    def __init__(self):
        super().__init__()
        self.initUI()

    def initUI(self):
        edit = QLineEdit('', self)
        edit.setDragEnabled(True)
        edit.move(30, 65)
        button = Button("Button", self)
        button.move(190, 65)
        self.setWindowTitle('Simple drag and drop')
        self.setGeometry(300, 300, 300, 150)

if __name__ == '__main__':
    app = QApplication(sys.argv)
    ex = Example()
    ex.show()
    app.exec_()
QLineEdit 默认⽀持拖拽操作,所以我们只要调⽤ setDragEnabled() ⽅法使⽤就⾏了
初始窗口:

在输入框输入文字,选中并拖到按钮上:

拖放按钮组件
python
from PyQt5.QtWidgets import QPushButton, QWidget, QApplication
from PyQt5.QtCore import Qt, QMimeData
from PyQt5.QtGui import QDrag
import sys

class Button(QPushButton):
    def __init__(self, title, parent):

        super().__init__(title, parent)

    def mouseMoveEvent(self, e):  # 原⽅法是计算⿏标移动的距离,防⽌⽆意的拖动

        if e.buttons() != Qt.RightButton:
            return
        mimeData = QMimeData()
        drag = QDrag(self)
        drag.setMimeData(mimeData)
        drag.setHotSpot(e.pos() - self.rect().topLeft())
        drag.exec_(Qt.MoveAction)

    def mousePressEvent(self, e):
        super().mousePressEvent(e)
        # 只修改按钮的右键事件,左键的操作还是默认⾏为
        if e.button() == Qt.LeftButton:
            print('press')

class Example(QWidget):
    def __init__(self):
        super().__init__()
        self.initUI()

    def initUI(self):
        self.setAcceptDrops(True)  # 这个应该是允许拖动的意思
        self.button = Button('Button', self)
        self.button.move(100, 65)
        self.setWindowTitle('Click or Move')
        self.setGeometry(300, 300, 280, 150)

    def dragEnterEvent(self, e):
        e.accept()

    def dropEvent(self, e):
        position = e.pos()
        self.button.move(position)
        e.setDropAction(Qt.MoveAction)
        e.accept()

if __name__ == '__main__':
    app = QApplication(sys.argv)
    ex = Example()
    ex.show()
    app.exec_()
右键点击按钮可以实现拖拽
