前提条件
- 拥有docker环境,可参考:Docker的安装
- 掌握容器的使用,可参考:Docker容器的使用
- 掌握镜像的使用,可参考:Docker镜像的使用
Docker存储的问题
容器是隔离环境,容器内程序的文件、配置、运行时产生的数据都存储在容器内部,思考如下问题:
-
如果要升级MySQL版本,需要销毁旧容器,那么数据岂不是跟着被销毁了?
-
MySQL、Nginx容器运行后,如果要修改其中的某些配置该怎么办?需要先进入容器内部才能再修改,不方便。
Docker存储概述
默认情况下,在容器内部创建的所有文件都存储在可写的容器层上。这意味着:
-
当容器不再存在时,数据不会持久化,并且如果其他进程需要这些数据,可能很难从容器中取出数据。
-
容器的可写层与容器正在运行的主机紧密耦合,无法轻易地将数据移动到其他地方。
-
写入容器的可写层需要一个存储驱动程序来管理文件系统。该存储驱动程序使用 Linux 内核提供联合文件系统。与直接写入主机文件系统的数据卷相比,这种额外的抽象会降低性能。
Docker解决存储问题的方式:
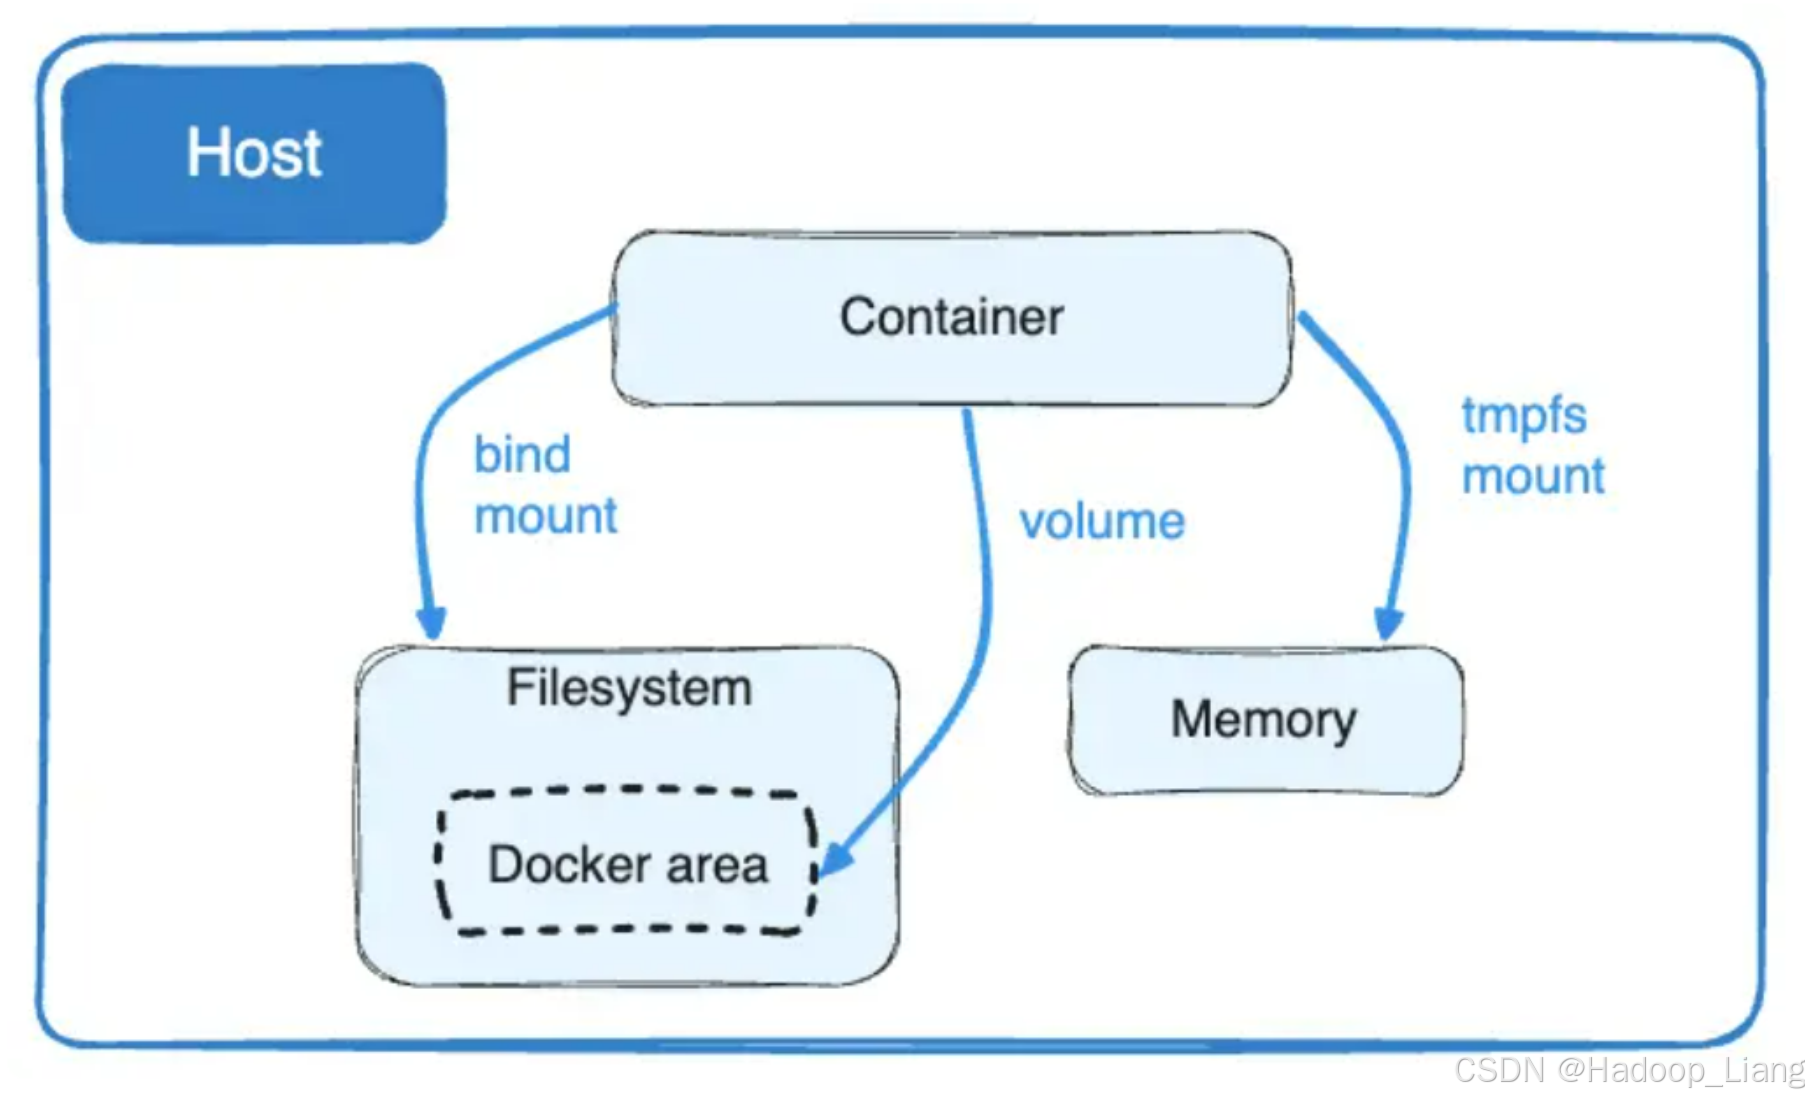
Docker 为容器在主机上存储文件提供了两种选择,以便在容器停止后文件仍然持久化:卷(volume )和绑定挂载(bind mount)。
对于敏感数据不希望被持久化的情况下,Docker 还支持容器在主机的内存中存储文件,这样的文件不会被持久化,**tmpfs 挂载(tmpfs mount)**用于将文件存储在主机的系统内存中。
一种直观理解卷、绑定挂载和 tmpfs 挂载之间差异的简单方法是数据在 Docker 主机上的存储位置。挂载类型及其在 Docker 主机上的存储位置,如下图所示:

-
绑定挂载可以存储在主机系统的任何位置,甚至可能是重要的系统文件或目录。Docker 主机上的非 Docker 进程或 Docker 容器可以随时修改它们。
-
卷存储在主机文件系统中由 Docker 管理的一部分(在 Linux 上为 /var/lib/docker/volumes/)。非 Docker 进程不应修改文件系统的这一部分。卷是在 Docker 中持久化数据的最佳方式。
-
tmpfs 挂载仅存储在主机系统的内存中,并且永远不会写入主机系统的文件系统。
绑定挂载和卷都可以使用 -v 或 --volume 标志挂载到容器中,但每种的语法略有不同。对于 tmpfs 挂载,可以使用 --tmpfs 标志。对于容器和服务,建议使用 --mount 标志来进行绑定挂载、卷或 tmpfs 挂载,因为其语法更清晰。
绑定挂载
绑定挂载就是将容器内部的目录/文件与宿主机的任意目录进行映射,主机目录由用户决定,目录不存在将系统自动创建。
案例:实现nginx的html目录绑定挂载
#运行容器
[root@localhost ~]# docker run -d --name my-nginx -p 90:80 -v /root/html:/usr/share/nginx/html nginx
#挂载目录会自动创建
[root@localhost ~]# ls html
#访问页面,403错误,因为挂载目录/root/html下没有任何内容,所以403
[root@localhost ~]# curl localhost:90
<html>
<head><title>403 Forbidden</title></head>
<body>
<center><h1>403 Forbidden</h1></center>
<hr><center>nginx/1.21.5</center>
</body>
</html>
#添加index.html
[root@localhost ~]# echo "hello docker" > html/index.html
#再次访问
[root@localhost ~]# curl localhost:90
hello docker
从案例中看到,使用-v实现绑定挂载,将主机的/root/html与容器中的/usr/share/nginx/html做映射。当主机/root/html目录没有内容时,容器内部的/usr/share/nginx/html也没有内容。当主机目录内容改变,容器内部目录内容也跟着改变。
卷
什么是数据卷
卷由 Docker 创建和管理。你可以使用 docker volume create 命令显式地创建一个卷,或者在容器或服务创建期间,Docker 可以创建一个卷。
当创建一个卷时,它存储在 Docker 主机上的一个目录中,目录由Docker决定。当你将卷挂载到容器中时,这个目录会被挂载到容器中。这与绑定挂载的工作方式类似,不同之处在于卷由 Docker 管理并且与主机的核心功能隔离。
一个给定的卷可以同时挂载到多个容器中。当没有正在运行的容器使用卷时,该卷仍然可供 Docker 使用,并且不会自动删除。你可以使用 docker volume prune 来删除未使用的卷。
当你挂载一个卷时,它可以是命名的或匿名的。匿名卷会被赋予一个随机名称,在给定的 Docker 主机中保证是唯一的。就像命名卷一样,即使你删除了使用它们的容器,匿名卷也会持久化,除非你在创建容器时使用 --rm 标志,在这种情况下,匿名卷将被销毁。如果你依次创建多个使用匿名卷的容器,每个容器都会创建自己的卷。匿名卷不会在容器之间自动重用或共享。要在两个或多个容器之间共享一个匿名卷,必须使用随机卷 ID 挂载匿名卷。卷还支持使用卷驱动程序,这使你可以将数据存储在远程主机或云提供商等地方。
数据卷命令
数据卷的相关命令有:
| 命令 | 说明 |
|---|---|
| docker volume create | 创建数据卷 |
| docker volume ls | 查看所有数据卷 |
| docker volume rm | 删除指定数据卷 |
| docker volume inspect | 查看某个数据卷的详情 |
| docker volume prune | 清除数据卷 |
注意:容器的卷挂载要在创建容器时配置,对于创建好的容器,是不能设置数据卷的。而且 创建容器的过程中,数据卷会自动创建 。
案例1:nginx html目录的卷挂载
# 1.首先创建容器并指定数据卷,注意通过 -v 参数来指定数据卷
[root@localhost ~]# docker run -d --name nginx -p 80:80 -v html:/usr/share/nginx/html nginx
# 2.然后查看数据卷
[root@localhost ~]# docker volume ls
DRIVER VOLUME NAME
local html
# 3.查看数据卷详情
[root@localhost ~]# docker volume inspect html
[
{
"CreatedAt": "2024-09-28T00:07:39+08:00",
"Driver": "local",
"Labels": null,
"Mountpoint": "/var/lib/docker/volumes/html/_data",
"Name": "html",
"Options": null,
"Scope": "local"
}
]
# 4.查看/var/lib/docker/volumes/html/_data目录
[root@localhost ~]# ll /var/lib/docker/volumes/html/_data
total 8
-rw-r--r-- 1 root root 497 Dec 28 2021 50x.html
-rw-r--r-- 1 root root 615 Dec 28 2021 index.html
# 5.访问页面
[root@localhost ~]# curl localhost
有默认内容
...
<title>Welcome to nginx!</title>
...
# 6.进入该目录,并随意修改index.html内容
[root@localhost ~]# cd /var/lib/docker/volumes/html/_data/
[root@localhost _data]# ls
50x.html index.html
直接查看index.html
[root@localhost _data]# cat index.html
...
<title>Welcome to nginx!</title>
...
修改index.html内容
[root@localhost _data]# echo "hello world" > index.html
# 7.打开页面,查看效果
[root@localhost _data]# curl localhost
hello world
# 8.进入容器内部,查看/usr/share/nginx/html目录内的文件是否变化
[root@localhost _data]# docker exec -it nginx bash
root@6a5ddf625373:/# cat /usr/share/nginx/html/index.html
hello world
看到绑定挂载和卷挂载的区别在于:
-
绑定挂载:目录是绝对路径或相对路径(以
/或./开头),目录挂载的目录不存在会自动创建,不会把容器里面的文件映射到挂载目录,以主机目录为准。 -
卷挂载:直接以卷名(目录)名字开头,卷和目录不存在也会自动创建,通过
docker volume ls查看卷,通过docker volume inspect查看目录,会把容器里面的文件复制到映射的目录。
案例2:nginx配置的卷挂载
显然启动ngin需要用到nginx.conf内容,所以不能使用绑定挂载(除非主机目录已经准备好相关配置文件),而是使用卷挂载方式。
查看nginx容器内部的配置,如下
进入nginx容器内部
[root@localhost _data]# docker exec -it nginx bash
查看配置目录
root@6a5ddf625373:/# ls /etc/nginx/
conf.d fastcgi_params mime.types modules nginx.conf scgi_params uwsgi_params
查看nginx.conf配置内容
root@6a5ddf625373:/# cat /etc/nginx/nginx.conf
user nginx;
worker_processes auto;
error_log /var/log/nginx/error.log notice;
pid /var/run/nginx.pid;
events {
worker_connections 1024;
}
http {
include /etc/nginx/mime.types;
default_type application/octet-stream;
log_format main '$remote_addr - $remote_user [$time_local] "$request" '
'$status $body_bytes_sent "$http_referer" '
'"$http_user_agent" "$http_x_forwarded_for"';
access_log /var/log/nginx/access.log main;
sendfile on;
#tcp_nopush on;
keepalive_timeout 65;
#gzip on;
include /etc/nginx/conf.d/*.conf;
}
再启动一个容器进行卷映射
# 启动容器,进行html和ngconf卷映射
[root@localhost ~]# docker run -d --name nginx1 -p 81:80 -v html:/usr/share/nginx/html -v ngconf:/etc/nginx nginx
# 访问页面,因为此前进行卷映射修改了html内容index.html,所以看到此前html卷映射的内容
[root@localhost ~]# curl localhost:81
hello world
# 查看卷
[root@localhost ~]# docker volume ls
DRIVER VOLUME NAME
local html
local ngconf
# 查看卷信息
[root@localhost ~]# docker volume inspect ngconf
[
{
"CreatedAt": "2024-09-28T00:51:26+08:00",
"Driver": "local",
"Labels": null,
"Mountpoint": "/var/lib/docker/volumes/ngconf/_data",
"Name": "ngconf",
"Options": null,
"Scope": "local"
}
]
# 进入ngconf卷,发现存在相关配置文件,说明卷挂载可以将容器内部的配置映射出来。
[root@localhost ~]# cd /var/lib/docker/volumes/ngconf/_data
[root@localhost _data]# ls
conf.d fastcgi_params mime.types modules nginx.conf scgi_params uwsgi_params
# 在宿主机修改配置内容,在第一行添加注释内容 # hhh
[root@localhost _data]# vi nginx.conf
# hhh
...
# 查看容器内部的nginx.conf,配置内容也改变了
[root@localhost _data]# docker exec -it nginx1 bash
root@88c3de4ddc3e:/# cat /etc/nginx/nginx.conf
# hhh
...
tmpfs
tmpfs 挂载,将数据放在内存中,不会在磁盘上持久化(无论是在 Docker 主机上还是在容器内都不会持久化),它可以在容器的生命周期内被容器使用。用于存储非持久化状态或敏感信息。例如,在内部,Swarm 服务使用 tmpfs 挂载将机密信息挂载到服务的容器中。
# 使用tmpfs挂载:将容器内部的/tmp/container_tmp_data目录挂载到主机内存中
[root@localhost ~]# docker run -it --tmpfs /tmp/container_tmp_data busybox sh
/ # echo "This is a test" > /tmp/container_tmp_data/test.txt
/ # cat /tmp/container_tmp_data/test.txt
This is a test
/ # exit
[root@localhost ~]#
# 查看运行的容器,说明容器的不再运行,容器的本次生命周期已经结束,tmpfs挂载的内容在内存中应该被释放,挂载的内容不会持久化存储在容器中。
[root@localhost ~]# docker ps
CONTAINER ID IMAGE COMMAND CREATED STATUS PORTS NAMES
# 查看所有容器
[root@localhost ~]# docker ps -a
CONTAINER ID IMAGE COMMAND CREATED STATUS PORTS NAMES
8229d76fc9fd busybox "sh" 47 seconds ago Exited (0) 13 seconds ago relaxed_gould
# 再次进入到容器
[root@localhost ~]# docker exec -it 822 sh
# 查看容器内部的数据,发现容器内部的container_tmp_data目录是空的,说明数据不持久化到容器内部
/ # ls /tmp/
container_tmp_data
/ # ls /tmp/container_tmp_data/
/ # cat /tmp/container_tmp_data/test.txt
cat: can't open '/tmp/container_tmp_data/test.txt': No such file or directory
/ # exit
[root@localhost ~]#
# 查看宿主机也没有数据,说明数据也不持久化到主机
[root@localhost ~]# ls /tmp/ | grep con
[root@localhost ~]#完成!enjoy it!