一、ElementUI概述
官网: https: //element.eleme.cn/#/zh-CN
(一)定义
Element ,一套为开发者、设计师和产品经理准备的基于 Vue 2.0 的桌面端组件库。
是基于 Vue 的一个 UI 框架,该框架基于 Vue 开发了很多相关组件,方便我们快速开发页面。
(二)由来
饿了么前端团队 基于 Vue 进行开发并开源,提供了封装好的组件。
二、安装ElementUI
(一)方式1:CDN
目前可以通过 unpkg.com/element-ui 获取到最新版本的资源,在页面上引入 js 和 css 文件即可开始使用。
<!-- 引入样式 -->
<linkrel=**"stylesheet"href="https://unpkg.com/element-ui/lib/theme-chalk/index.css">
<!-- 引入组件库 -->
<scriptsrc=**"https://unpkg.com/element-ui/lib/index.js"></script>
建议使用 CDN 引入 Element 的用户在链接地址上锁定版本,以免将来 Element 升级时受到非兼容性更新的影响 . 参考: unpkg.com
<!-- 引入 elementUI 样式 -->
<linkrel=**"stylesheet"href="https://unpkg.com/element-ui@2.13.0/lib/theme- chalk/index.css">
<!-- 引入elementUI 组件库 -->
<scriptsrc=**"https://unpkg.com/element-ui@2.13.0/lib/index.js"></script>
(二)方式2:npm
① 通过脚手架创建项目
vue init webpack 项目名
② 下载 ElementUI 的依赖
npm i element-ui -S
③ 在 main*.* js**中写入以下内容
// 引入ElementUI 依赖
import ElementUI from 'element-ui'**;
// 引入ElementUI依赖样式
import 'element-ui/lib/theme-chalk/index.css'**;
// 在vue中使用ElementUI
Vue*.* use*(ElementUI)* ;
(三)方式3:本地资源
<!-- 引入 elementUI 样式 -->
<linkrel=**"stylesheet"href="./element-ui-2.13.0/lib/theme-chalk/index.css"> <!-- 引入 vue 的js文件: elementUI基于Vue开发,必须在elementUI的js文件之前引入 --> <scriptsrc=**"./vue-v2.6.10.js"></script>
<!-- 引入elementUI 组件库 -->
<scriptsrc=**"./element-ui-2.13.0/lib/index.js"></script>
三、简单使用
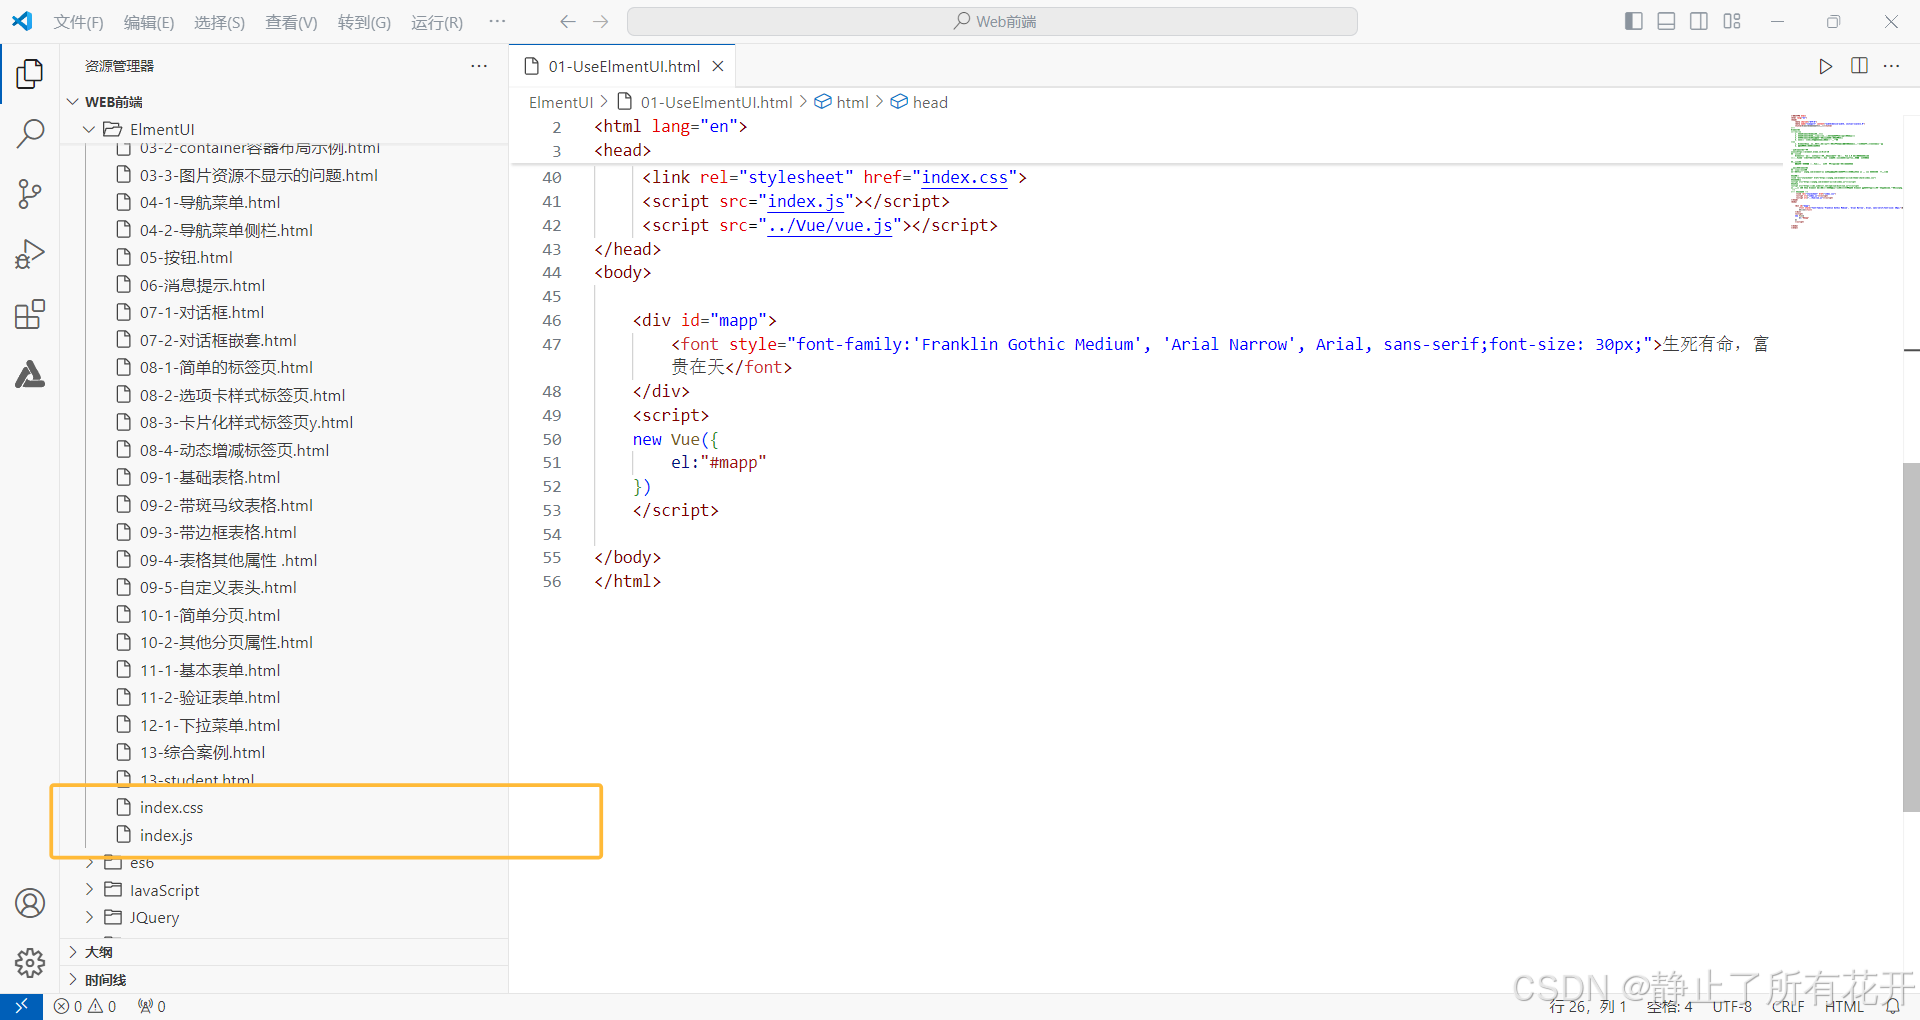
在进行使用之前,我们先加入本地的两个依赖使用
html
<!DOCTYPE html>
<html lang="en">
<head>
    <meta charset="UTF-8">
    <meta name="viewport" content="width=device-width, initial-scale=1.0">
    <title>ElmentUI的介绍以及使用</title>

<!-- 引入组件 -->
     <link rel="stylesheet" href="index.css">
     <script src="index.js"></script>
     <script src="../Vue/vue.js"></script>
</head>
<body>

    <div id="mapp">
        <font style="font-family:'Franklin Gothic Medium', 'Arial Narrow', Arial, sans-serif;font-size: 30px;">生死有命,富贵在天</font>
    </div>
    <script>
    new Vue({
        el:"#mapp"
    })
    </script>

</body>
</html>
四、Layout 布局
通过基础的 24 分栏,迅速过渡地创造布局。
(一)单一分栏基础的布局
html
<!DOCTYPE html>
<html lang="en">
<head>
    <meta charset="UTF-8">
    <meta name="viewport" content="width=device-width, initial-scale=1.0">
    <title>layout布局</title>


    <link rel="stylesheet" href="index.css">
     <script src="index.js"></script>
     <script src="../Vue/vue.js"></script>
     <style>
    .el-row {
       margin-bottom: 20px;
     }
     .el-col {
       border-radius: 4px;
     }
     .bg-purple-dark {
       background: #99a9bf;
     }
     .bg-purple {
       background: #d3dce6;
     }
     .bg-purple-light {
       background: #e5e9f2;
     }
     .grid-content {
       border-radius: 4px;
       min-height: 36px;
     }
     .row-bg {
       padding: 10px 0;
       background-color: #f9fafc;
     }

     </style>
</head>
<body>
    <div id="mapp">
        <el-row>
            <el-col :span="24"><div class="grid-content bg-purple-dark"></div></el-col>
        </el-row>
        <el-row>
            <el-col :span="12"><div class="grid-content bg-purple"></div></el-col>
            <el-col :span="12"><div class="grid-content bg-purple-light"></div></el-col>
        </el-row>
        <el-row>
            <el-col :span="8"><div class="grid-content bg-purple"></div></el-col>
            <el-col :span="8"><div class="grid-content bg-purple-light"></div></el-col>
            <el-col :span="8"><div class="grid-content bg-purple"></div></el-col>
        </el-row>
        <el-row>
            <el-col :span="6"><div class="grid-content bg-purple"></div></el-col>
            <el-col :span="6"><div class="grid-content bg-purple-light"></div></el-col>
            <el-col :span="6"><div class="grid-content bg-purple"></div></el-col>
            <el-col :span="6"><div class="grid-content bg-purple-light"></div></el-col>
        </el-row>
        <el-row>
            <el-col :span="4"><div class="grid-content bg-purple"></div></el-col>
            <el-col :span="4"><div class="grid-content bg-purple-light"></div></el-col>
            <el-col :span="4"><div class="grid-content bg-purple"></div></el-col>
            <el-col :span="4"><div class="grid-content bg-purple-light"></div></el-col>
            <el-col :span="4"><div class="grid-content bg-purple"></div></el-col>
            <el-col :span="4"><div class="grid-content bg-purple-light"></div></el-col>
        </el-row>
    </div>
    <script>
    new Vue({
        el:"#mapp"
    })
    </script>

</body>
</html>
(二)分栏间隔
分栏之间存在间隔。 Row 组件提供 gutter 属性来指定每个栏之间的间隔,交替间隔为 0 。
html
<!DOCTYPE html>
<html lang="en">
    <head>
        <meta charset="UTF-8">
        <meta name="viewport" content="width=device-width, initial-scale=1.0">
        <title>LayOut 分栏间隔</title>
        <link rel="stylesheet" href="index.css">
        <script src="../Vue/vue.js"></script>
        <script src="index.js"></script>

    <style>
        .el-row {
          margin-bottom: 20px;
          &:last-child {
            margin-bottom: 0;
          }
        }
        .el-col {
          border-radius: 4px;
        }
        .bg-purple-dark {
          background: #99a9bf;
        }
        .bg-purple {
          background: #d3dce6;
        }
        .bg-purple-light {
          background: #e5e9f2;
        }
        .grid-content {
          border-radius: 4px;
          min-height: 36px;
        }
        .row-bg {
          padding: 10px 0;
          background-color: #f9fafc;
        }
      </style>
</head>
<body>
    <div id="mapp">
        <!-- 分栏间隔,可以设置 -->
        <el-row :gutter="20">
            <el-col :span="6"><div class="grid-content bg-purple"></div></el-col>
            <el-col :span="6"><div class="grid-content bg-purple"></div></el-col>
            <el-col :span="6"><div class="grid-content bg-purple"></div></el-col>
            <el-col :span="6"><div class="grid-content bg-purple"></div></el-col>
          </el-row>
    </div>
    <script>
        new Vue({
            el:"#mapp"
        })
    </script>
</body>
</html>
混合分栏间隔
html
<!DOCTYPE html>
<html lang="en">
<head>
    <meta charset="UTF-8">
    <meta name="viewport" content="width=device-width, initial-scale=1.0">
    <title>混合分栏间隔</title>

    <link rel="stylesheet" href="index.css">
    <script src="../Vue/vue.js"></script>
    <script src="index.js"></script>

    <style>
        .el-row {
          margin-bottom: 20px;
          &:last-child {
            margin-bottom: 0;
          }
        }
        .el-col {
          border-radius: 4px;
        }
        .bg-purple-dark {
          background: #99a9bf;
        }
        .bg-purple {
          background: #d3dce6;
        }
        .bg-purple-light {
          background: #e5e9f2;
        }
        .grid-content {
          border-radius: 4px;
          min-height: 36px;
        }
        .row-bg {
          padding: 10px 0;
          background-color: #f9fafc;
        }
      </style>
</head>
<body>
    <div id="mapp">
        <el-row :gutter="20">
            <el-col :span="16"><div class="grid-content bg-purple"></div></el-col>
            <el-col :span="8"><div class="grid-content bg-purple"></div></el-col>
          </el-row>
          <el-row :gutter="20">
            <el-col :span="8"><div class="grid-content bg-purple"></div></el-col>
            <el-col :span="8"><div class="grid-content bg-purple"></div></el-col>
            <el-col :span="4"><div class="grid-content bg-purple"></div></el-col>
            <el-col :span="4"><div class="grid-content bg-purple"></div></el-col>
          </el-row>
          <el-row :gutter="20">
            <el-col :span="4"><div class="grid-content bg-purple"></div></el-col>
            <el-col :span="16"><div class="grid-content bg-purple"></div></el-col>
            <el-col :span="4"><div class="grid-content bg-purple"></div></el-col>
          </el-row>
    </div>
    <script>
    new Vue({
        el:"#mapp"
    })
    </script>

</body>
</html>
(三)响应式布局
参照了 Bootstrap 的 响应式设计,预设了五个响应尺寸: xs 、 sm 、 md 、 lg 和 xl 。
html
<!DOCTYPE html>
<html lang="en">
<head>
    <meta charset="UTF-8">
    <meta name="viewport" content="width=device-width, initial-scale=1.0">
    <title>响应式布局</title>

    <link rel="stylesheet" href="index.css">
    <script src="../Vue/vue.js"></script>
    <script src="index.js"></script>
<!--
参数	                    说明	                类型	                          可选值	默认值
xs	    <768px 响应式栅格数或者栅格属性对象	number/object (例如: {span: 4, offset: 4})	    ---	    ---
sm	    ≥768px 响应式栅格数或者栅格属性对象	number/object (例如: {span: 4, offset: 4})	    ---	    ---
md	    ≥992px 响应式栅格数或者栅格属性对象	number/object (例如: {span: 4, offset: 4})	    ---	    ---
lg	    ≥1200px响应式栅格数或者栅格属性对象	number/object (例如: {span: 4, offset: 4})	    ---	    ---
xl	    ≥1920px响应式栅格数或者栅格属性对象	number/object (例如: {span: 4, offset: 4})	    ---	    ---
-->
    <style>
        .el-col {
          border-radius: 4px;
        }
        .bg-purple-dark {
          background: #99a9bf;
        }
        .bg-purple {
          background: #d3dce6;
        }
        .bg-purple-light {
          background: #e5e9f2;
        }
        .grid-content {
          border-radius: 4px;
          min-height: 36px;
        }
      </style>
</head>
<body>

    <div id="mapp">
        <el-row :gutter="10">
            <el-col :xs="8" :sm="6" :md="4" :lg="3" :xl="1"><div class="grid-content bg-purple"></div></el-col>
            <el-col :xs="4" :sm="6" :md="8" :lg="9" :xl="11"><div class="grid-content bg-purple-light"></div></el-col>
            <el-col :xs="4" :sm="6" :md="8" :lg="9" :xl="11"><div class="grid-content bg-purple"></div></el-col>
            <el-col :xs="8" :sm="6" :md="4" :lg="3" :xl="1"><div class="grid-content bg-purple-light"></div></el-col>
          </el-row>
    </div>
    <script>
        new Vue({
            el:"#mapp"
        })
    </script>

</body>
</html>
五、Container 布局容器
用于布局的容器组件,方便快速搭建页面的基本结构。
常见标签:
<el-container>:外层容器。当子元素中包含 <el-header> 或 <el-footer> 时,全部子元素会垂直上下排列,否则会水平左右排列。
<el-header>:顶栏容器。
<el-aside>:侧边栏容器。
<el-main>:主要区域容器。
<el-footer>:底栏容器。
注意:
以上组件采用了 flex 布局,使用前请确定目标浏览器是否兼容。此外, <el-container> 的子元素只能是后四者,后四者的父元素也只能是 <el-container>。
(一)常见页面布局
html
<!DOCTYPE html>
<html lang="en">
<head>
    <meta charset="UTF-8">
    <meta name="viewport" content="width=device-width, initial-scale=1.0">
    <title>响应式布局</title>

    <link rel="stylesheet" href="index.css">
    <script src="../Vue/vue.js"></script>
    <script src="index.js"></script>
<!--
五、Container 布局容器
    用于布局的容器组件,方便快速搭建页面的基本结构。
常见标签:
<el-container>:外层容器。当子元素中包含 <el-header> 或 <el-footer> 时,全部子元素会垂直上下排列,否则会水平左右排列。

<el-header>:顶栏容器。

<el-aside>:侧边栏容器。

<el-main>:主要区域容器。

<el-footer>:底栏容器。

注意:
以上组件采用了 flex 布局,使用前请确定目标浏览器是否兼容。此外,<el-container> 的子元素只能是后四者,后四者的父元素也只能是 <el-container>。
 -->
    <style>
         .el-header, .el-footer {
    background-color: #B3C0D1;
    color: #333;
    text-align: center;
    line-height: 60px;
  }

  .el-aside {
    background-color: #D3DCE6;
    color: #333;
    text-align: center;
    /* 设置此行高来调整侧边栏以及主空间的大小 */
    line-height: 600px;
  }

  .el-main {
    background-color: #E9EEF3;
    color: #333;
    text-align: center;
    line-height: 160px;
  }

  body > .el-container {
    margin-bottom: 40px;
  }

  .el-container:nth-child(5) .el-aside,
  .el-container:nth-child(6) .el-aside {
    line-height: 260px;
  }

  .el-container:nth-child(7) .el-aside {
    line-height: 320px;
  }
    </style>
</head>
<body>

    <div id="mapp">
        <el-container>
            <el-header>Header</el-header>
            <el-container >
                <el-aside>Aside</el-aside>
                <el-main>Mian</el-main>
            </el-container>
            <el-footer>Footer</el-footer>
        </el-container>
    </div>
    <script>
        new Vue({
            el:"#mapp"
        })
    </script>

</body>
</html>
(二)实例
html
<!DOCTYPE html>
<html lang="en">
<head>
    <meta charset="UTF-8">
    <meta name="viewport" content="width=device-width, initial-scale=1.0">
    <title>响应式布局</title>

    <link rel="stylesheet" href="index.css">
    <script src="../Vue/vue.js"></script>
    <script src="index.js"></script>
<!--
五、Container 布局容器
    用于布局的容器组件,方便快速搭建页面的基本结构。
常见标签:
<el-container>:外层容器。当子元素中包含 <el-header> 或 <el-footer> 时,全部子元素会垂直上下排列,否则会水平左右排列。

<el-header>:顶栏容器。

<el-aside>:侧边栏容器。

<el-main>:主要区域容器。

<el-footer>:底栏容器。

注意:
以上组件采用了 flex 布局,使用前请确定目标浏览器是否兼容。此外,<el-container> 的子元素只能是后四者,后四者的父元素也只能是 <el-container>。
 -->
    <style>
         .el-header, .el-footer {
    background-color: #B3C0D1;
    color: #333;
    text-align: center;
    line-height: 60px;
  }

  .el-aside {
    background-color: #D3DCE6;
    color: #333;
    text-align: center;
    /* 设置此行高来调整侧边栏以及主空间的大小 */
    line-height: 600px;
  }

  .el-main {
    background-color: #E9EEF3;
    color: #333;
    text-align: center;
    line-height: 160px;
  }

  body > .el-container {
    margin-bottom: 40px;
  }

  .el-container:nth-child(5) .el-aside,
  .el-container:nth-child(6) .el-aside {
    line-height: 260px;
  }

  .el-container:nth-child(7) .el-aside {
    line-height: 320px;
  }
    </style>
</head>
<body>

    <div id="mapp">
        <el-container>
            <el-header>Header</el-header>
            <el-container >
                <el-aside>Aside</el-aside>
                <el-main>Mian</el-main>
            </el-container>
            <el-footer>Footer</el-footer>
        </el-container>
    </div>
    <script>
        new Vue({
            el:"#mapp"
        })
    </script>

</body>
</html>
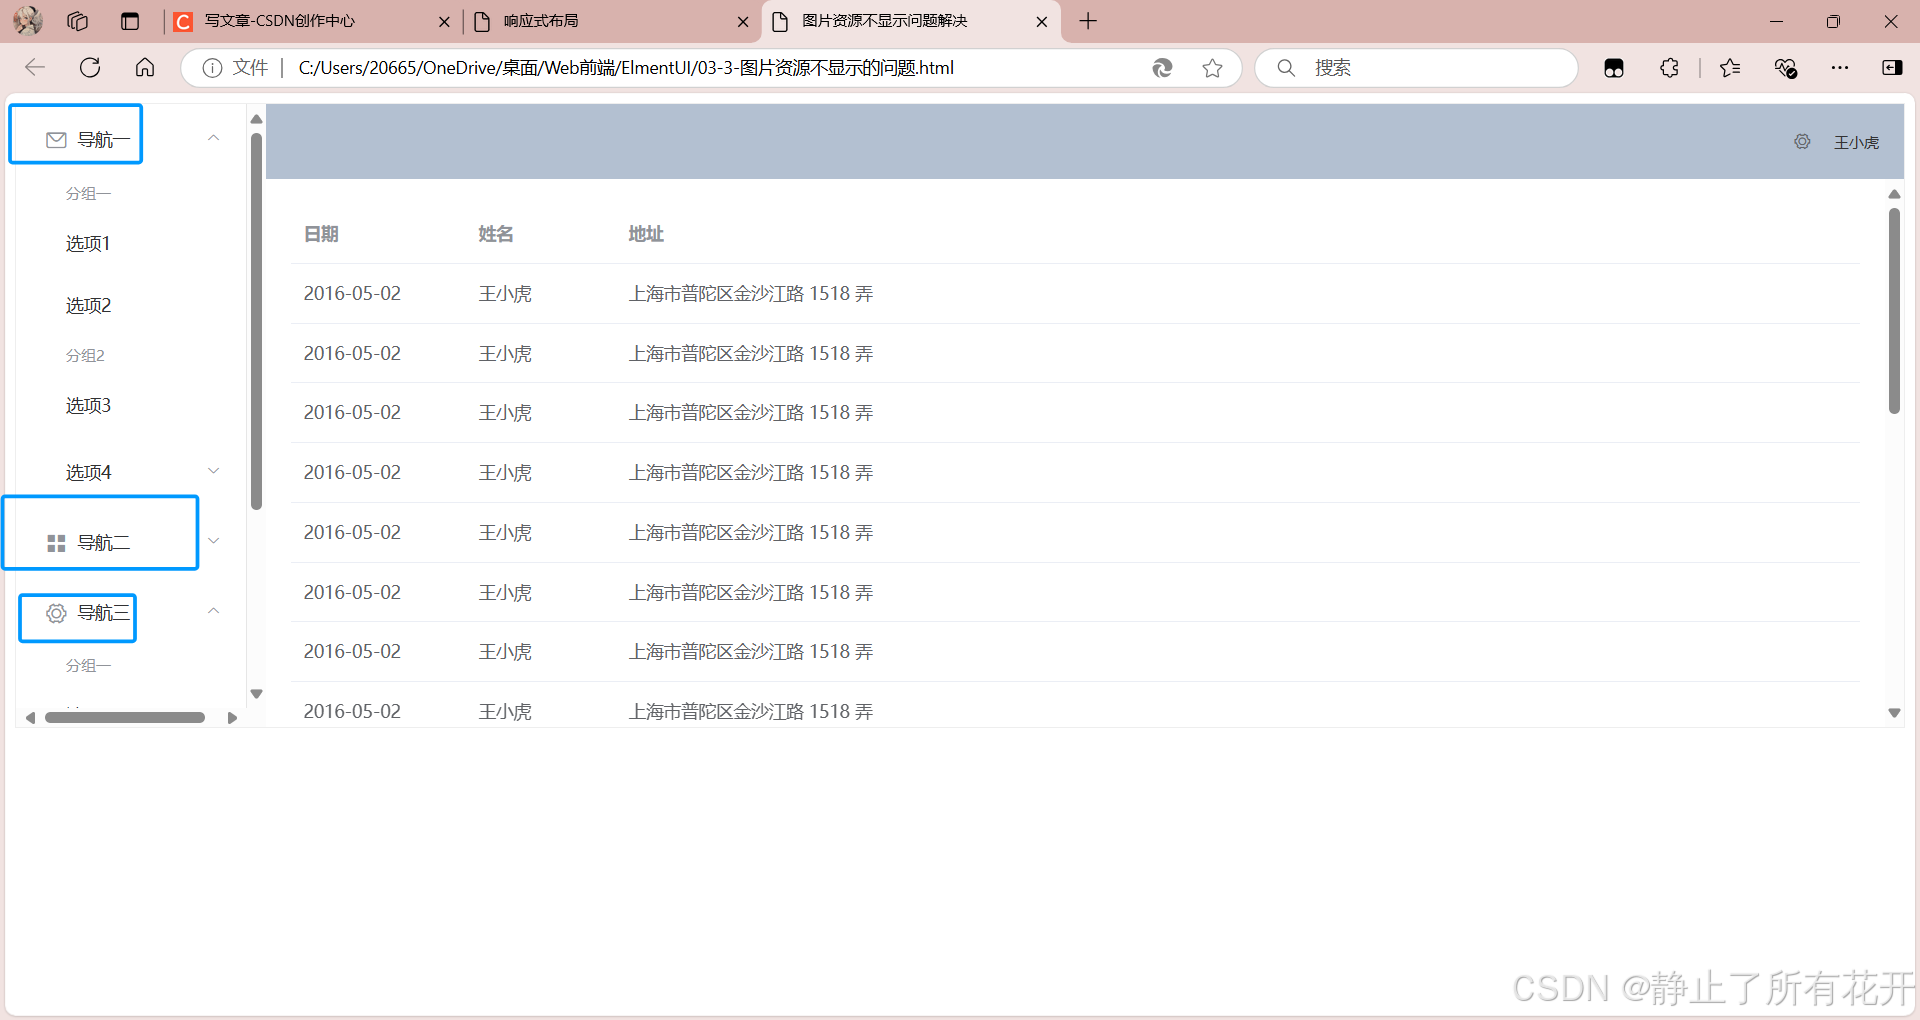
在上述代码演示过程中,没有正常加载图片信息
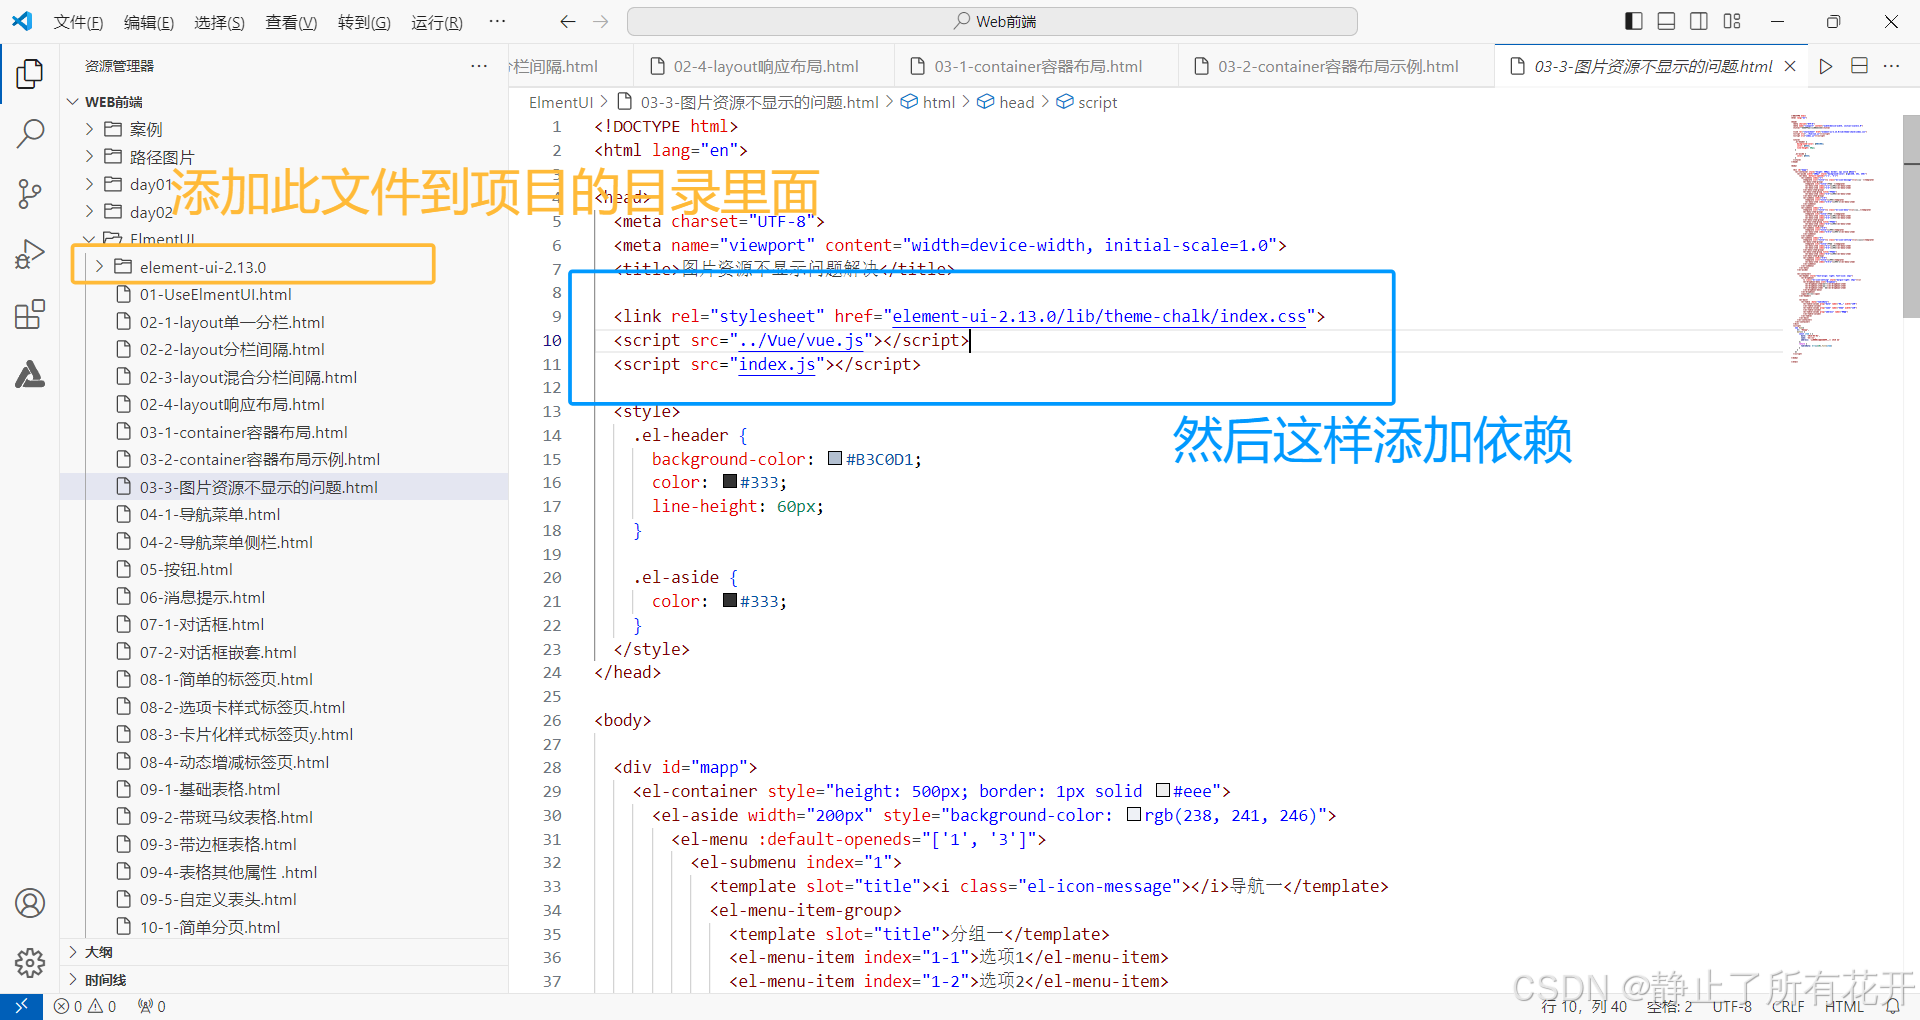
 (二)解决图片资源问题
先下载依赖包到资源目录里面,然后添加依赖,如图:
html
<!DOCTYPE html>
<html lang="en">

<head>
  <meta charset="UTF-8">
  <meta name="viewport" content="width=device-width, initial-scale=1.0">
  <title>图片资源不显示问题解决</title>

  <link rel="stylesheet" href="element-ui-2.13.0/lib/theme-chalk/index.css">
  <script src="../Vue/vue.js"></script>
  <script src="index.js"></script>

  <style>
    .el-header {
      background-color: #B3C0D1;
      color: #333;
      line-height: 60px;
    }

    .el-aside {
      color: #333;
    }
  </style>
</head>

<body>

  <div id="mapp">
    <el-container style="height: 500px; border: 1px solid #eee">
      <el-aside width="200px" style="background-color: rgb(238, 241, 246)">
        <el-menu :default-openeds="['1', '3']">
          <el-submenu index="1">
            <template slot="title"><i class="el-icon-message"></i>导航一</template>
            <el-menu-item-group>
              <template slot="title">分组一</template>
              <el-menu-item index="1-1">选项1</el-menu-item>
              <el-menu-item index="1-2">选项2</el-menu-item>
            </el-menu-item-group>
            <el-menu-item-group title="分组2">
              <el-menu-item index="1-3">选项3</el-menu-item>
            </el-menu-item-group>
            <el-submenu index="1-4">
              <template slot="title">选项4</template>
              <el-menu-item index="1-4-1">选项4-1</el-menu-item>
            </el-submenu>
          </el-submenu>
          <el-submenu index="2">
            <template slot="title"><i class="el-icon-menu"></i>导航二</template>
            <el-menu-item-group>
              <template slot="title">分组一</template>
              <el-menu-item index="2-1">选项1</el-menu-item>
              <el-menu-item index="2-2">选项2</el-menu-item>
            </el-menu-item-group>
            <el-menu-item-group title="分组2">
              <el-menu-item index="2-3">选项3</el-menu-item>
            </el-menu-item-group>
            <el-submenu index="2-4">
              <template slot="title">选项4</template>
              <el-menu-item index="2-4-1">选项4-1</el-menu-item>
            </el-submenu>
          </el-submenu>
          <el-submenu index="3">
            <template slot="title"><i class="el-icon-setting"></i>导航三</template>
            <el-menu-item-group>
              <template slot="title">分组一</template>
              <el-menu-item index="3-1">选项1</el-menu-item>
              <el-menu-item index="3-2">选项2</el-menu-item>
            </el-menu-item-group>
            <el-menu-item-group title="分组2">
              <el-menu-item index="3-3">选项3</el-menu-item>
            </el-menu-item-group>
            <el-submenu index="3-4">
              <template slot="title">选项4</template>
              <el-menu-item index="3-4-1">选项4-1</el-menu-item>
            </el-submenu>
          </el-submenu>
        </el-menu>
      </el-aside>

      <el-container>
        <el-header style="text-align: right; font-size: 12px">
          <el-dropdown>
            <i class="el-icon-setting" style="margin-right: 15px"></i>
            <el-dropdown-menu slot="dropdown">
              <el-dropdown-item>查看</el-dropdown-item>
              <el-dropdown-item>新增</el-dropdown-item>
              <el-dropdown-item>删除</el-dropdown-item>
            </el-dropdown-menu>
          </el-dropdown>
          <span>王小虎</span>
        </el-header>

        <el-main>
          <el-table :data="tableData">
            <el-table-column prop="date" label="日期" width="140">
            </el-table-column>
            <el-table-column prop="name" label="姓名" width="120">
            </el-table-column>
            <el-table-column prop="address" label="地址">
            </el-table-column>
          </el-table>
        </el-main>
      </el-container>
    </el-container>
  </div>
  <script>
    new Vue({
      el: "#mapp",
      data() {
        const item = {
          date: '2016-05-02',
          name: '王小虎',
          address: '上海市普陀区金沙江路 1518 弄'
        };
        return {
          tableData: Array(20).fill(item)
        }
      }
    })
  </script>

</body>

</html>
效果展示
六、导航菜单
根据官网组件演示导航菜单的效果以及如何修改
html
<!DOCTYPE html>
<html lang="en">

<head>
    <meta charset="UTF-8">
    <meta name="viewport" content="width=device-width, initial-scale=1.0">
    <title>导航菜单顶栏</title>
    <link rel="stylesheet" href="element-ui-2.13.0/lib/theme-chalk/index.css">
    <script src="../Vue/vue.js"></script>
    <script src="element-ui-2.13.0/lib/index.js"></script>


    <!--
  导航菜单默认为垂直模式,通过mode属性可以使导航菜单变更为水平模式。另外,在菜单中通过submenu组件可以生成二级菜单。Menu 还提供了background-color、text-color和active-text-color,分别用于设置菜单的背景色、菜单的文字颜色和当前激活菜单的文字颜色。 -->
</head>

<body>

    <div id="mapp">
        <el-menu :default-active="activeIndex" class="el-menu-demo" mode="horizontal" @select="handleSelect" background-color="pink">
            <el-menu-item index="1">处理中心</el-menu-item>
            <el-submenu index="2">
                <template slot="title">我的工作台</template>
                <el-menu-item index="2-1">选项1</el-menu-item>
                <el-menu-item index="2-2">选项2</el-menu-item>
                <el-menu-item index="2-3">选项3</el-menu-item>
                <el-submenu index="2-4">
                    <template slot="title">选项4</template>
                    <el-menu-item index="2-4-1">选项1</el-menu-item>
                    <el-menu-item index="2-4-2">选项2</el-menu-item>
                    <el-menu-item index="2-4-3">选项3</el-menu-item>
                </el-submenu>
            </el-submenu>
            <el-menu-item index="3" disabled>消息中心</el-menu-item>
            <el-menu-item index="4"><a href="https://www.ele.me" target="_blank">订单管理</a></el-menu-item>
        </el-menu>
    </div>
</div>
    <script>
        new Vue({
            el: "#mapp",
            data() {
                return {
                    activeIndex: '1',
                    activeIndex2: '1'
                };
            },
            methods: {
                handleSelect(key, keyPath) {
                    console.log(key, keyPath);
                }
            }
        })
    </script>

</body>

</html>
导航菜单侧栏代码
html
<!DOCTYPE html>
<html lang="en">

<head>
    <meta charset="UTF-8">
    <meta name="viewport" content="width=device-width, initial-scale=1.0">
    <title>导航菜单侧栏</title>
    <link rel="stylesheet" href="element-ui-2.13.0/lib/theme-chalk/index.css">
    <script src="../Vue/vue.js"></script>
    <script src="element-ui-2.13.0/lib/index.js"></script>

</head>

<body>
    <div id="mapp">
        <el-row class="tac">
            <el-col :span="12">
                <el-menu default-active="2" class="el-menu-vertical-demo" @open="handleOpen" @close="handleClose" background-color="pink">
                    <el-submenu index="1" >
                        <template slot="title">
                            <i class="el-icon-location"></i>
                            <span>导航一</span>
                        </template>
                        <el-menu-item-group>
                            <template slot="title">分组一</template>
                            <el-menu-item index="1-1">选项1</el-menu-item>
                            <el-menu-item index="1-2">选项2</el-menu-item>
                        </el-menu-item-group>
                        <el-menu-item-group title="分组2">
                            <el-menu-item index="1-3">选项3</el-menu-item>
                        </el-menu-item-group>
                        <el-submenu index="1-4">
                            <template slot="title">选项4</template>
                            <el-menu-item index="1-4-1">选项1</el-menu-item>
                        </el-submenu>
                    </el-submenu>
                    <el-menu-item index="2">
                        <i class="el-icon-menu"></i>
                        <span slot="title">导航二</span>
                    </el-menu-item>
                    <el-menu-item index="3" disabled>
                        <i class="el-icon-document"></i>
                        <span slot="title">导航三</span>
                    </el-menu-item>
                    <el-menu-item index="4">
                        <i class="el-icon-setting"></i>
                        <span slot="title">导航四</span>
                    </el-menu-item>
                </el-menu>
            </el-col>
        </el-row>
    </div>
    </div>
    <script>
        new Vue({
            el: "#mapp",
            methods: {
                handleOpen(key, keyPath) {
                    console.log(key, keyPath);
                },
                handleClose(key, keyPath) {
                    console.log(key, keyPath);
                }
            }
        })
    </script>

</body>

</html>
七、按钮
首先,介绍几种常见的按钮
其次,如何引入按钮以及修改
最后,介绍下什么情况下使用哪个按钮
常见的几种按钮
***<el-button>***默认按钮 </el-button>
<el-buttontype=**"primary"***>***主要按钮 </el-button>
<el-buttontype=**"success"***>***成功按钮 </el-button>
<el-buttontype=**"info"***>***信息按钮 </el-button>
<el-buttontype=**"warning"***>***警告按钮 </el-button>
<el-buttontype=**"danger"***>***危险按钮 </el-button>
html
<!DOCTYPE html>
<html lang="en">

<head>
    <meta charset="UTF-8">
    <meta name="viewport" content="width=device-width, initial-scale=1.0">
    <title>按钮</title>
    <link rel="stylesheet" href="element-ui-2.13.0/lib/theme-chalk/index.css">
    <script src="../Vue/vue.js"></script>
    <script src="element-ui-2.13.0/lib/index.js"></script>

    <!--
    使用type、plain、round和circle属性来定义 Button 的样式。
    你可以使用disabled属性来定义按钮是否可用,它接受一个Boolean值。
    设置icon属性即可,icon 的列表可以参考 Element 的 icon 组件,也可以设置在文字右边的 icon ,只要使用i标签即可,可以使用自定义图标。
    使用<el-button-group>标签来嵌套你的按钮。 -->
</head>

<body>
    <div id="mapp">
        <el-row>
            <el-button>默认按钮</el-button>
            <el-button type="primary">主要按钮</el-button>
            <el-button type="success">成功按钮</el-button>
            <el-button type="info">信息按钮</el-button>
            <el-button type="warning">警告按钮</el-button>
            <el-button type="danger">危险按钮</el-button>
          </el-row>

          <br>

          <el-row>
            <el-button plain>朴素按钮</el-button>
            <el-button type="primary" plain>主要按钮</el-button>
            <el-button type="success" plain>成功按钮</el-button>
            <el-button type="info" plain>信息按钮</el-button>
            <el-button type="warning" plain>警告按钮</el-button>
            <el-button type="danger" plain>危险按钮</el-button>
          </el-row>

          <br>

          <el-row>
            <el-button round>圆角按钮</el-button>
            <el-button type="primary" round>主要按钮</el-button>
            <el-button type="success" round>成功按钮</el-button>
            <el-button type="info" round>信息按钮</el-button>
            <el-button type="warning" round>警告按钮</el-button>
            <el-button type="danger" round>危险按钮</el-button>
          </el-row>

          <br>

          <el-row>
            <el-button icon="el-icon-search" circle></el-button>
            <el-button type="primary" icon="el-icon-edit" circle></el-button>
            <el-button type="success" icon="el-icon-check" circle></el-button>
            <el-button type="info" icon="el-icon-message" circle></el-button>
            <el-button type="warning" icon="el-icon-star-off" circle></el-button>
            <el-button type="danger" icon="el-icon-delete" circle></el-button>
          </el-row>

          <br>

          <el-button-group>
            <el-button type="primary" icon="el-icon-arrow-left">上一页</el-button>
            <el-button type="primary">下一页<i class="el-icon-arrow-right el-icon--right"></i></el-button>
          </el-button-group>

          <br>
          <br>
          <el-button-group>
            <el-button type="primary" icon="el-icon-edit"></el-button>
            <el-button type="primary" icon="el-icon-share"></el-button>
            <el-button type="primary" icon="el-icon-delete"></el-button>
          </el-button-group>
    </div>
    <script>
        new Vue({
            el: "#mapp",
            methods: {
                handleOpen(key, keyPath) {
                    console.log(key, keyPath);
                },
                handleClose(key, keyPath) {
                    console.log(key, keyPath);
                }
            }
        })
    </script>

</body>

</html>
八、消息提示
几种常见的消息提示:
<el-button*:plain="true"* @click*="open2"****>***成功 </el-button>
<el-button*:plain="true"* @click*="open3"****>***警告 </el-button>
<el-button*:plain="true"* @click*="open1"****>***消息 </el-button>
<el-button*:plain="true"* @click*="open4"****>***错误 </el-button>
html
<!DOCTYPE html>
<html lang="en">

<head>
  <meta charset="UTF-8">
  <meta name="viewport" content="width=device-width, initial-scale=1.0">
  <title>消息提示</title>
  <link rel="stylesheet" href="element-ui-2.13.0/lib/theme-chalk/index.css">
  <script src="../Vue/vue.js"></script>
  <script src="element-ui-2.13.0/lib/index.js"></script>

  <!--
Message 消息提示
  常用于主动操作后的反馈提示。与 Notification 的区别是后者更多用于系统级通知的被动提醒。

基础用法
从顶部出现,3 秒后自动消失。

Message 在配置上与 Notification 非常类似,所以部分 options 在此不做详尽解释,文末有 options 列表,可以结合 Notification 的文档理解它们。Element 注册了一个$message方法用于调用,Message 可以接收一个字符串或一个 VNode 作为参数,它会被显示为正文内容。

不同状态
用来显示「成功、警告、消息、错误」类的操作反馈。
当需要自定义更多属性时,Message 也可以接收一个对象为参数。比如,设置type字段可以定义不同的状态,默认为info。此时正文内容以message的值传入。同时,我们也为 Message 的各种 type 注册了方法,可以在不传入type字段的情况下像open4那样直接调用。

默认的 Message 是不可以被人工关闭的,如果需要可手动关闭的 Message,可以使用showClose字段。此外,和 Notification 一样,Message 拥有可控的duration,设置0为不会被自动关闭,默认为 3000 毫秒。-->


</head>

<body>
  <div id="mapp">
    <template>
      <el-button :plain="true" @click="open">打开消息提示</el-button>
      <el-button :plain="true" @click="openVn">VNode</el-button>
    </template>
    <template>
      <el-button :plain="true" @click="open2">成功</el-button>
      <el-button :plain="true" @click="open3">警告</el-button>
      <el-button :plain="true" @click="open1">消息</el-button>
      <el-button :plain="true" @click="open4">错误</el-button>
    </template>

    <template>
      <el-button :plain="true" @click="open5">可关闭</el-button>
    </template>
  </div>
  <script>
    new Vue({
      el: "#mapp",
      methods: {
        open() {
          this.$message('这是一条消息提示');
        },

        openVn() {
          const h = this.$createElement;
          this.$message({
            message: h('p', null, [
              h('span', null, '内容可以是 '),
              h('i', { style: 'color: teal' }, 'VNode')
            ])
          });
        },
        open1() {
          this.$message('这是一条消息提示');
        },
        open2() {
          this.$message({
            message: '恭喜你,这是一条成功消息',
            type: 'success'
          });
        },

        open3() {
          this.$message({
            message: '警告哦,这是一条警告消息',
            type: 'warning'
          });
        },

        open4() {
          this.$message.error('错了哦,这是一条错误消息');
        },
        open5() {
          this.$message({
            showClose:true,
            message:"可关闭消息提示的弹窗"
          })
        }
      }
    })
  </script>

</body>

</html>
九、对话框
(一)普通对话框
html
<!DOCTYPE html>
<html lang="en">

<head>
  <meta charset="UTF-8">
  <meta name="viewport" content="width=device-width, initial-scale=1.0">
  <title>对话框</title>
  <link rel="stylesheet" href="element-ui-2.13.0/lib/theme-chalk/index.css">
  <script src="../Vue/vue.js"></script>
  <script src="element-ui-2.13.0/lib/index.js"></script>

  <!--
Dialog 对话框
  在保留当前页面状态的情况下,告知用户并承载相关操作。

基本用法
Dialog 弹出一个对话框,适合需要定制性更大的场景。
需要设置visible属性,它接收Boolean,当为true时显示 Dialog。Dialog 分为两个部分:body和footer,footer需要具名为footer的slot。title属性用于定义标题,它是可选的,默认值为空。最后,本例还展示了before-close的用法。 -->


</head>

<body>
  <div id="mapp">
    <el-button type="text" @click="dialogVisible = true">点击打开 Dialog</el-button>

    <el-dialog title="提示" :visible.sync="dialogVisible" width="30%" :before-close="handleClose">
      <span>这是一段信息</span>
      <span slot="footer" class="dialog-footer">
        <el-button @click="dialogVisible = false">取 消</el-button>
        <el-button type="primary" @click="dialogVisible = false">确 定</el-button>
      </span>
    </el-dialog>

    <el-button type="text" @click="dialogTableVisible = true">打开嵌套表格的 Dialog</el-button>

    <el-dialog title="收货地址" :visible.sync="dialogTableVisible">
      <el-table :data="gridData">
        <el-table-column property="date" label="日期" width="150"></el-table-column>
        <el-table-column property="name" label="姓名" width="200"></el-table-column>
        <el-table-column property="address" label="地址"></el-table-column>
      </el-table>
    </el-dialog>

    <!-- Form -->
    <el-button type="text" @click="dialogFormVisible = true">打开嵌套表单的 Dialog</el-button>

    <el-dialog title="收货地址" :visible.sync="dialogFormVisible">
      <el-form :model="form">
        <el-form-item label="活动名称" :label-width="formLabelWidth">
          <el-input v-model="form.name" autocomplete="off"></el-input>
        </el-form-item>
        <el-form-item label="活动区域" :label-width="formLabelWidth">
          <el-select v-model="form.region" placeholder="请选择活动区域">
            <el-option label="区域一" value="shanghai"></el-option>
            <el-option label="区域二" value="beijing"></el-option>
          </el-select>
        </el-form-item>
      </el-form>
      <div slot="footer" class="dialog-footer">
        <el-button @click="dialogFormVisible = false">取 消</el-button>
        <el-button type="primary" @click="dialogFormVisible = false">确 定</el-button>
      </div>
    </el-dialog>
  </div>
  <script>
    new Vue({
      el: "#mapp",
      data() {
        return {
          dialogVisible: false,
          gridData: [{
            date: '2016-05-02',
            name: '王小虎',
            address: '上海市普陀区金沙江路 1518 弄'
          }, {
            date: '2016-05-04',
            name: '王小虎',
            address: '上海市普陀区金沙江路 1518 弄'
          }, {
            date: '2016-05-01',
            name: '王小虎',
            address: '上海市普陀区金沙江路 1518 弄'
          }, {
            date: '2016-05-03',
            name: '王小虎',
            address: '上海市普陀区金沙江路 1518 弄'
          }],
          dialogTableVisible: false,
          dialogFormVisible: false,
          form: {
            name: '',
            region: '',
            date1: '',
            date2: '',
            delivery: false,
            type: [],
            resource: '',
            desc: ''
          },
          formLabelWidth: '120px'
        };
      },
      methods: {
        handleClose(done) {
          this.$confirm('确认关闭?')
            .then(_ => {
              done();
            })
            .catch(_ => { });
        }
      }
    })
  </script>

</body>

</html>
(二)对话框嵌套
html
<!DOCTYPE html>
<html lang="en">

<head>
  <meta charset="UTF-8">
  <meta name="viewport" content="width=device-width, initial-scale=1.0">
  <title>对话框嵌套</title>
  <link rel="stylesheet" href="element-ui-2.13.0/lib/theme-chalk/index.css">
  <script src="../Vue/vue.js"></script>
  <script src="element-ui-2.13.0/lib/index.js"></script>

  <!--
嵌套的 Dialog
如果需要在一个 Dialog 内部嵌套另一个 Dialog,需要使用 append-to-body 属性。

正常情况下,我们不建议使用嵌套的 Dialog,如果需要在页面上同时显示多个 Dialog,可以将它们平级放置。对于确实需要嵌套 Dialog 的场景,我们提供了append-to-body属性。将内层 Dialog 的该属性设置为 true,它就会插入至 body 元素上,从而保证内外层 Dialog 和遮罩层级关系的正确。-->


</head>

<body>
  <div id="mapp">
    <el-button type="text" @click="outerVisible = true">点击打开外层 Dialog</el-button>

  <el-dialog title="外层 Dialog" :visible.sync="outerVisible">
    <el-dialog
      width="30%"
      title="内层 Dialog"
      :visible.sync="innerVisible"
      append-to-body>
    </el-dialog>
    <div slot="footer" class="dialog-footer">
      <el-button @click="outerVisible = false">取 消</el-button>
      <el-button type="primary" @click="innerVisible = true">打开内层 Dialog</el-button>
    </div>
  </el-dialog>
</template>
  </div>
  <script>
    new Vue({
      el: "#mapp",
      data() {
      return {
        outerVisible: false,
        innerVisible: false
      };
    }
    })
  </script>

</body>

</html>
十、标签页
(一)简单的标签页
html
<!DOCTYPE html>
<html lang="en">

<head>
  <meta charset="UTF-8">
  <meta name="viewport" content="width=device-width, initial-scale=1.0">
  <title>简单的标签页</title>
  <link rel="stylesheet" href="element-ui-2.13.0/lib/theme-chalk/index.css">
  <script src="../Vue/vue.js"></script>
  <script src="element-ui-2.13.0/lib/index.js"></script>

  <!--
Tabs 标签页
分隔内容上有关联但属于不同类别的数据集合。

基础用法
基础的、简洁的标签页。
Tabs 组件提供了选项卡功能,默认选中第一个标签页,你也可以通过 value 属性来指定当前选中的标签页。 -->
</head>

<body>
  <div id="mapp">
    <template>
      <el-tabs v-model="activeName" @tab-click="handleClick">
        <el-tab-pane label="用户管理" name="first">用户管理</el-tab-pane>
        <el-tab-pane label="配置管理" name="second">配置管理</el-tab-pane>
        <el-tab-pane label="角色管理" name="third">角色管理</el-tab-pane>
        <el-tab-pane label="定时任务补偿" name="fourth">定时任务补偿</el-tab-pane>
      </el-tabs>
    </template>
  </div>
  <script>
    new Vue({
      el: "#mapp",
      data() {
        return {
          activeName: 'second'
        };
      },
      methods: {
        handleClick(tab, event) {
          console.log(tab, event);
        }
      }

    })
  </script>

</body>

</html>
(二)选项卡样式标签页
html
<!DOCTYPE html>
<html lang="en">

<head>
  <meta charset="UTF-8">
  <meta name="viewport" content="width=device-width, initial-scale=1.0">
  <title>选项卡样式标签页</title>
  <link rel="stylesheet" href="element-ui-2.13.0/lib/theme-chalk/index.css">
  <script src="../Vue/vue.js"></script>
  <script src="element-ui-2.13.0/lib/index.js"></script>

  <!--
只需要设置 type 属性为 card 就可以使选项卡改变为标签风格。 -->
</head>

<body>
  <div id="mapp">
    <template>
      <el-tabs v-model="activeName" @tab-click="handleClick" type="card">
        <el-tab-pane label="用户管理" name="first">用户管理</el-tab-pane>
        <el-tab-pane label="配置管理" name="second">配置管理</el-tab-pane>
        <el-tab-pane label="角色管理" name="third">角色管理</el-tab-pane>
        <el-tab-pane label="定时任务补偿" name="fourth">定时任务补偿</el-tab-pane>
      </el-tabs>
    </template>
  </div>
  <script>
    new Vue({
      el: "#mapp",
      data() {
        return {
          activeName: 'second'
        };
      },
      methods: {
        handleClick(tab, event) {
          console.log(tab, event);
        }
      }

    })
  </script>

</body>

</html>
(三)卡片化样式标签页
html
<!DOCTYPE html>
<html lang="en">

<head>
  <meta charset="UTF-8">
  <meta name="viewport" content="width=device-width, initial-scale=1.0">
  <title>卡片化样式标签页</title>
  <link rel="stylesheet" href="element-ui-2.13.0/lib/theme-chalk/index.css">
  <script src="../Vue/vue.js"></script>
  <script src="element-ui-2.13.0/lib/index.js"></script>

  <!--
只需要设置 type 属性为 card 就可以使选项卡改变为标签风格。 -->
</head>

<body>
  <div id="mapp">
    <template>
      <el-tabs v-model="activeName" @tab-click="handleClick" type="border-card">
        <el-tab-pane label="用户管理" name="first">用户管理</el-tab-pane>
        <el-tab-pane label="配置管理" name="second">配置管理</el-tab-pane>
        <el-tab-pane label="角色管理" name="third">角色管理</el-tab-pane>
        <el-tab-pane label="定时任务补偿" name="fourth">定时任务补偿</el-tab-pane>
      </el-tabs>
    </template>
  </div>
  <script>
    new Vue({
      el: "#mapp",
      data() {
        return {
          activeName: 'second'
        };
      },
      methods: {
        handleClick(tab, event) {
          console.log(tab, event);
        }
      }

    })
  </script>

</body>

</html>
(四)动态增减标签页
html
<!DOCTYPE html>
<html lang="en">

<head>
  <meta charset="UTF-8">
  <meta name="viewport" content="width=device-width, initial-scale=1.0">
  <title>动态增减标签页</title>
  <link rel="stylesheet" href="element-ui-2.13.0/lib/theme-chalk/index.css">
  <script src="../Vue/vue.js"></script>
  <script src="element-ui-2.13.0/lib/index.js"></script>

  <!--
增减标签页按钮只能在选项卡样式的标签页下使用 -->
</head>

<body>
  <div id="mapp">
    <el-tabs v-model="editableTabsValue" type="card" editable @edit="handleTabsEdit">
      <el-tab-pane :key="item.name" v-for="(item, index) in editableTabs" :label="item.title" :name="item.name">
        {{item.content}}
      </el-tab-pane>
    </el-tabs>


    </script>
  </div>
  <script>
    new Vue({
      el: "#mapp",
      data() {
        return {
          editableTabsValue: '2',
          editableTabs: [{
            title: 'Tab 1',
            name: '1',
            content: 'Tab 1 content'
          }, {
            title: 'Tab 2',
            name: '2',
            content: 'Tab 2 content'
          }],
          tabIndex: 2
        }
      },
      methods: {
        handleTabsEdit(targetName, action) {
          if (action === 'add') {
            let newTabName = ++this.tabIndex + '';
            this.editableTabs.push({
              title: 'New Tab',
              name: newTabName,
              content: 'New Tab content'
            });
            this.editableTabsValue = newTabName;
          }
          if (action === 'remove') {
            let tabs = this.editableTabs;
            let activeName = this.editableTabsValue;
            if (activeName === targetName) {
              tabs.forEach((tab, index) => {
                if (tab.name === targetName) {
                  let nextTab = tabs[index + 1] || tabs[index - 1];
                  if (nextTab) {
                    activeName = nextTab.name;
                  }
                }
              });
            }

            this.editableTabsValue = activeName;
            this.editableTabs = tabs.filter(tab => tab.name !== targetName);
          }
        }
      }
    })
  </script>

</body>

</html>
十一、表格
(一)简单表格
html
<!DOCTYPE html>
<html lang="en">

<head>
  <meta charset="UTF-8">
  <meta name="viewport" content="width=device-width, initial-scale=1.0">
  <title>基础表格</title>
  <link rel="stylesheet" href="element-ui-2.13.0/lib/theme-chalk/index.css">
  <script src="../Vue/vue.js"></script>
  <script src="element-ui-2.13.0/lib/index.js"></script>

  <!--
Table 表格
  用于展示多条结构类似的数据,可对数据进行排序、筛选、对比或其他自定义操作。

基础表格
  基础的表格展示用法。

当el-table元素中注入data对象数组后,在el-table-column中用prop属性来对应对象中的键名即可填入数据,用label属性来定义表格的列名。可以使用width属性来定义列宽。 -->
</head>

<body>
  <div id="mapp">
    <template>
      <el-table :data="tableData" style="width: 100%">
        <el-table-column prop="date" label="日期" width="180">
        </el-table-column>
        <el-table-column prop="name" label="姓名" width="180">
        </el-table-column>
        <el-table-column prop="address" label="地址">
        </el-table-column>
      </el-table>
    </template>
  </div>
  <script>
    new Vue({
      el: "#mapp",
      data() {
        return {
          tableData: [{
            date: '2016-05-02',
            name: '王小虎',
            address: '上海市普陀区金沙江路 1518 弄'
          }, {
            date: '2016-05-04',
            name: '王小虎',
            address: '上海市普陀区金沙江路 1517 弄'
          }, {
            date: '2016-05-01',
            name: '王小虎',
            address: '上海市普陀区金沙江路 1519 弄'
          }, {
            date: '2016-05-03',
            name: '王小虎',
            address: '上海市普陀区金沙江路 1516 弄'
          }]
        }
      }

    })
  </script>

</body>

</html>
(二)带斑马纹表格
html
<!DOCTYPE html>
<html lang="en">

<head>
  <meta charset="UTF-8">
  <meta name="viewport" content="width=device-width, initial-scale=1.0">
  <title>带斑马纹表格</title>
  <link rel="stylesheet" href="element-ui-2.13.0/lib/theme-chalk/index.css">
  <script src="../Vue/vue.js"></script>
  <script src="element-ui-2.13.0/lib/index.js"></script>

  <!--stripe属性可以创建带斑马纹的表格。它接受一个Boolean,默认为false,设置为true即为启用。
。 -->
</head>

<body>
  <div id="mapp">
    <template>
      <el-table :data="tableData"  stripe style="width: 100%">
        <el-table-column prop="date" label="日期" width="180">
        </el-table-column>
        <el-table-column prop="name" label="姓名" width="180">
        </el-table-column>
        <el-table-column prop="address" label="地址">
        </el-table-column>
      </el-table>
    </template>
  </div>
  <script>
    new Vue({
      el: "#mapp",
      data() {
        return {
          tableData: [{
            date: '2016-05-02',
            name: '王小虎',
            address: '上海市普陀区金沙江路 1518 弄'
          }, {
            date: '2016-05-04',
            name: '王小虎',
            address: '上海市普陀区金沙江路 1517 弄'
          }, {
            date: '2016-05-01',
            name: '王小虎',
            address: '上海市普陀区金沙江路 1519 弄'
          }, {
            date: '2016-05-03',
            name: '王小虎',
            address: '上海市普陀区金沙江路 1516 弄'
          }]
        }
      }

    })
  </script>

</body>

</html>
(三)带边框表格
html
<!DOCTYPE html>
<html lang="en">

<head>
  <meta charset="UTF-8">
  <meta name="viewport" content="width=device-width, initial-scale=1.0">
  <title>带边框表格</title>
  <link rel="stylesheet" href="element-ui-2.13.0/lib/theme-chalk/index.css">
  <script src="../Vue/vue.js"></script>
  <script src="element-ui-2.13.0/lib/index.js"></script>

  <!--默认情况下,Table 组件是不具有竖直方向的边框的,如果需要,可以使用border属性,它接受一个Boolean,设置为true即可启用。
。 -->
</head>

<body>
  <div id="mapp">
    <template>
      <el-table :data="tableData"  stripe border style="width: 100%">
        <el-table-column prop="date" label="日期" width="180">
        </el-table-column>
        <el-table-column prop="name" label="姓名" width="180">
        </el-table-column>
        <el-table-column prop="address" label="地址">
        </el-table-column>
      </el-table>
    </template>
  </div>
  <script>
    new Vue({
      el: "#mapp",
      data() {
        return {
          tableData: [{
            date: '2016-05-02',
            name: '王小虎',
            address: '上海市普陀区金沙江路 1518 弄'
          }, {
            date: '2016-05-04',
            name: '王小虎',
            address: '上海市普陀区金沙江路 1517 弄'
          }, {
            date: '2016-05-01',
            name: '王小虎',
            address: '上海市普陀区金沙江路 1519 弄'
          }, {
            date: '2016-05-03',
            name: '王小虎',
            address: '上海市普陀区金沙江路 1516 弄'
          }]
        }
      }

    })
  </script>

</body>

</html>
(四)表格其他属性
html
<!DOCTYPE html>
<html lang="en">

<head>
  <meta charset="UTF-8">
  <meta name="viewport" content="width=device-width, initial-scale=1.0">
  <title>表格其他属性</title>
  <link rel="stylesheet" href="element-ui-2.13.0/lib/theme-chalk/index.css">
  <script src="../Vue/vue.js"></script>
  <script src="element-ui-2.13.0/lib/index.js"></script>

  <!--
带状态表格
    可将表格内容 highlight 显示,方便区分「成功、信息、警告、危险」等内容。
    可以通过指定 Table 组件的 row-class-name 属性来为 Table 中的某一行添加 class,表明该行处于某种状态。

固定表头
只要在el-table元素中定义了height属性,即可实现固定表头的表格,而不需要额外的代码。
。 -->

  <style>
    .el-table .warning-row {
      background: oldlace;
    }

    .el-table .success-row {
      background: #f0f9eb;
    }
  </style>
</head>

<body>
  <div id="mapp">
    <template>
      <el-table :data="tableData" style="width: 100%" :row-class-name="tableRowClassName" height="250">
        <el-table-column prop="date" label="日期" width="180">
        </el-table-column>
        <el-table-column prop="name" label="姓名" width="180">
        </el-table-column>
        <el-table-column prop="address" label="地址">
        </el-table-column>
      </el-table>
    </template>
  </div>
  <script>
    new Vue({
      el: "#mapp",
      methods: {
        tableRowClassName({ row, rowIndex }) {
          if (rowIndex === 1) {
            return 'warning-row';
          } else if (rowIndex === 3) {
            return 'success-row';
          }
          return '';
        }
      },
      data() {
        return {
          tableData: [{
            date: '2016-05-02',
            name: '王小虎',
            address: '上海市普陀区金沙江路 1518 弄',
          }, {
            date: '2016-05-04',
            name: '王小虎',
            address: '上海市普陀区金沙江路 1518 弄'
          }, {
            date: '2016-05-01',
            name: '王小虎',
            address: '上海市普陀区金沙江路 1518 弄',
          }, {
            date: '2016-05-03',
            name: '王小虎',
            address: '上海市普陀区金沙江路 1518 弄'
          }]
        }
      }

    })
  </script>

</body>

</html>
(五)自定义表头
html
<!DOCTYPE html>
<html lang="en">

<head>
  <meta charset="UTF-8">
  <meta name="viewport" content="width=device-width, initial-scale=1.0">
  <title>自定义表头</title>
  <link rel="stylesheet" href="element-ui-2.13.0/lib/theme-chalk/index.css">
  <script src="../Vue/vue.js"></script>
  <script src="element-ui-2.13.0/lib/index.js"></script>

  <!--
通过设置 Scoped slot 来自定义表头。 -->

  < </head>

<body>
  <div id="mapp">
    <template>
      <el-table :data="tableData.filter(data => !search || data.name.toLowerCase().includes(search.toLowerCase()))"
        style="width: 100%">
        <el-table-column label="Date" prop="date">
        </el-table-column>
        <el-table-column label="Name" prop="name">
        </el-table-column>
        <el-table-column align="right">
          <template slot="header" slot-scope="scope">
            <el-input v-model="search" size="mini" placeholder="输入关键字搜索" />
          </template>
          <template slot-scope="scope">
            <el-button size="mini" @click="handleEdit(scope.$index, scope.row)">Edit</el-button>
            <el-button size="mini" type="danger" @click="handleDelete(scope.$index, scope.row)">Delete</el-button>
          </template>
        </el-table-column>
      </el-table>
    </template>
  </div>
  <script>
    new Vue({
      el: "#mapp",
      data() {
        return {
          tableData: [{
            date: '2016-05-02',
            name: '王小虎',
            address: '上海市普陀区金沙江路 1518 弄'
          }, {
            date: '2016-05-04',
            name: '王小虎',
            address: '上海市普陀区金沙江路 1517 弄'
          }, {
            date: '2016-05-01',
            name: '王小虎',
            address: '上海市普陀区金沙江路 1519 弄'
          }, {
            date: '2016-05-03',
            name: '王小虎',
            address: '上海市普陀区金沙江路 1516 弄'
          }],
          search: ''
        }
      },
      methods: {
        handleEdit(index, row) {
          console.log(index, row);
        },
        handleDelete(index, row) {
          console.log(index, row);
        }
      }

    })
  </script>

</body>

</html>
十二、分页
简单分页
html
<!DOCTYPE html>
<html lang="en">

<head>
  <meta charset="UTF-8">
  <meta name="viewport" content="width=device-width, initial-scale=1.0">
  <title>简单分页</title>
  <link rel="stylesheet" href="element-ui-2.13.0/lib/theme-chalk/index.css">
  <script src="../Vue/vue.js"></script>
  <script src="element-ui-2.13.0/lib/index.js"></script>

  <!--
Pagination 分页
  当数据量过多时,使用分页分解数据。

基础用法
  设置layout,表示需要显示的内容,用逗号分隔,布局元素会依次显示。prev表示上一页,next为下一页,pager表示页码列表,除此以外还提供了jumper和total,sizes和特殊的布局符号->,->后的元素会靠右显示,jumper表示跳页元素,total表示总条目数,sizes用于设置每页显示的页码数量。

  设置background属性可以为分页按钮添加背景色。-->
</head>

<body>
  <div id="mapp">
    <div class="block">
      <span class="demonstration">页数较少时的效果</span>
      <el-pagination layout="prev, pager, next" :total="50" background>
      </el-pagination>
    </div>
    <div class="block">
      <span class="demonstration">大于 7 页时的效果</span>
      <el-pagination layout="prev, pager, next" :total="1000" background>
      </el-pagination>
    </div>
  </div>
  <script>
    new Vue({
      el: "#mapp"

    })
  </script>

</body>

</html>
其他分页属性
html
<!DOCTYPE html>
<html lang="en">

<head>
  <meta charset="UTF-8">
  <meta name="viewport" content="width=device-width, initial-scale=1.0">
  <title>其他分页属性</title>
  <link rel="stylesheet" href="element-ui-2.13.0/lib/theme-chalk/index.css">
  <script src="../Vue/vue.js"></script>
  <script src="element-ui-2.13.0/lib/index.js"></script>

  <!-- 此例是一个完整的用例,使用了size-change和current-change事件来处理页码大小和当前页变动时候触发的事件。page-sizes接受一个整型数组,数组元素为展示的选择每页显示个数的选项,[100, 200, 300, 400]表示四个选项,每页显示 100 个,200 个,300 个或者 400 个。 -->

</head>

<body>
  <div id="mapp">
    <template>
      <div class="block">
        <span class="demonstration">显示总数</span>
        <el-pagination @size-change="handleSizeChange" @current-change="handleCurrentChange"
          :current-page.sync="currentPage1" :page-size="100" layout="total, prev, pager, next" :total="1000">
        </el-pagination>
      </div>
      <div class="block">
        <span class="demonstration">调整每页显示条数</span>
        <el-pagination @size-change="handleSizeChange" @current-change="handleCurrentChange"
          :current-page.sync="currentPage2" :page-sizes="[100, 200, 300, 400]" :page-size="100"
          layout="sizes, prev, pager, next" :total="1000">
        </el-pagination>
      </div>
      <div class="block">
        <span class="demonstration">直接前往</span>
        <el-pagination @size-change="handleSizeChange" @current-change="handleCurrentChange"
          :current-page.sync="currentPage3" :page-size="100" layout="prev, pager, next, jumper" :total="1000">
        </el-pagination>
      </div>
      <div class="block">
        <span class="demonstration">完整功能</span>
        <el-pagination @size-change="handleSizeChange" @current-change="handleCurrentChange"
          :current-page="currentPage4" :page-sizes="[100, 200, 300, 400]" :page-size="100"
          layout="total, sizes, prev, pager, next, jumper" :total="400">
        </el-pagination>
      </div>
    </template>
  </div>
  <script>
    new Vue({
      el: "#mapp",

      methods: {
        handleSizeChange(val) {
          console.log(`每页 ${val} 条`);
        },
        handleCurrentChange(val) {
          console.log(`当前页: ${val}`);
        }
      },
      data() {
        return {
          currentPage1: 5,
          currentPage2: 5,
          currentPage3: 5,
          currentPage4: 4
        };
      }
    })
  </script>

</body>

</html>
十三、表单
基础表单
html
<!DOCTYPE html>
<html lang="en">

<head>
  <meta charset="UTF-8">
  <meta name="viewport" content="width=device-width, initial-scale=1.0">
  <title>基础表单</title>
  <link rel="stylesheet" href="element-ui-2.13.0/lib/theme-chalk/index.css">
  <script src="../Vue/vue.js"></script>
  <script src="element-ui-2.13.0/lib/index.js"></script>

  <!--
Form 表单
  由输入框、选择器、单选框、多选框等控件组成,用以收集、校验、提交数据

典型表单
  包括各种表单项,比如输入框、选择器、开关、单选框、多选框等。

在 Form 组件中,每一个表单域由一个 Form-Item 组件构成,表单域中可以放置各种类型的表单控件,包括 Input、Select、Checkbox、Radio、Switch、DatePicker、TimePicker

W3C 标准中有如下规定:
When there is only one single-line text input field in a form, the user agent should accept Enter in that field as a request to submit the form.
即:当一个 form 元素中只有一个输入框时,在该输入框中按下回车应提交该表单。如果希望阻止这一默认行为,可以在 <el-form> 标签上添加 @submit.native.prevent。-->

</head>

<body>
  <div id="mapp">
    <el-form ref="form" :model="form" label-width="80px">
      <el-form-item label="活动名称">
        <el-input v-model="form.name"></el-input>
      </el-form-item>
      <el-form-item label="活动区域">
        <el-select v-model="form.region" placeholder="请选择活动区域">
          <el-option label="区域一" value="shanghai"></el-option>
          <el-option label="区域二" value="beijing"></el-option>
        </el-select>
      </el-form-item>
      <el-form-item label="活动时间">
        <el-col :span="11">
          <el-date-picker type="date" placeholder="选择日期" v-model="form.date1" style="width: 100%;"></el-date-picker>
        </el-col>
        <el-col class="line" :span="2">-</el-col>
        <el-col :span="11">
          <el-time-picker placeholder="选择时间" v-model="form.date2" style="width: 100%;"></el-time-picker>
        </el-col>
      </el-form-item>
      <el-form-item label="即时配送">
        <el-switch v-model="form.delivery"></el-switch>
      </el-form-item>
      <el-form-item label="活动性质">
        <el-checkbox-group v-model="form.type">
          <el-checkbox label="美食/餐厅线上活动" name="type"></el-checkbox>
          <el-checkbox label="地推活动" name="type"></el-checkbox>
          <el-checkbox label="线下主题活动" name="type"></el-checkbox>
          <el-checkbox label="单纯品牌曝光" name="type"></el-checkbox>
        </el-checkbox-group>
      </el-form-item>
      <el-form-item label="特殊资源">
        <el-radio-group v-model="form.resource">
          <el-radio label="线上品牌商赞助"></el-radio>
          <el-radio label="线下场地免费"></el-radio>
        </el-radio-group>
      </el-form-item>
      <el-form-item label="活动形式">
        <el-input type="textarea" v-model="form.desc"></el-input>
      </el-form-item>
      <el-form-item>
        <el-button type="primary" @click="onSubmit">立即创建</el-button>
        <el-button>取消</el-button>
      </el-form-item>
    </el-form>
  </div>
  <script>
    new Vue({
      el: "#mapp",
      data() {
        return {
          form: {
            name: '',
            region: '',
            date1: '',
            date2: '',
            delivery: false,
            type: [],
            resource: '',
            desc: ''
          }
        }
      },
      methods: {
        onSubmit() {
          console.log('submit!');
        }
      }
    })
  </script>

</body>

</html>
验证表单
html
<!DOCTYPE html>
<html lang="en">

<head>
  <meta charset="UTF-8">
  <meta name="viewport" content="width=device-width, initial-scale=1.0">
  <title>验证表单</title>
  <link rel="stylesheet" href="element-ui-2.13.0/lib/theme-chalk/index.css">
  <script src="../Vue/vue.js"></script>
  <script src="element-ui-2.13.0/lib/index.js"></script>

  <!--本例还使用status-icon属性为输入框添加了表示校验结果的反馈图标。 -->

</head>

<body>
  <div id="mapp">
    <el-form :model="ruleForm" status-icon :rules="rules" ref="ruleForm" label-width="100px" class="demo-ruleForm">
      <el-form-item label="密码" prop="pass">
        <el-input type="password" v-model="ruleForm.pass" autocomplete="off"></el-input>
      </el-form-item>
      <el-form-item label="确认密码" prop="checkPass">
        <el-input type="password" v-model="ruleForm.checkPass" autocomplete="off"></el-input>
      </el-form-item>
      <el-form-item label="年龄" prop="age">
        <el-input v-model.number="ruleForm.age"></el-input>
      </el-form-item>
      <el-form-item>
        <el-button type="primary" @click="submitForm('ruleForm')">提交</el-button>
        <el-button @click="resetForm('ruleForm')">重置</el-button>
      </el-form-item>
    </el-form>
  </div>
  <script>
    new Vue({
      el: "#mapp",
      data() {
        var checkAge = (rule, value, callback) => {
          if (!value) {
            return callback(new Error('年龄不能为空'));
          }
          setTimeout(() => {
            if (!Number.isInteger(value)) {
              callback(new Error('请输入数字值'));
            } else {
              if (value < 18) {
                callback(new Error('必须年满18岁'));
              } else {
                callback();
              }
            }
          }, 1000);
        };
        var validatePass = (rule, value, callback) => {
          if (value === '') {
            callback(new Error('请输入密码'));
          } else {
            if (this.ruleForm.checkPass !== '') {
              this.$refs.ruleForm.validateField('checkPass');
            }
            callback();
          }
        };
        var validatePass2 = (rule, value, callback) => {
          if (value === '') {
            callback(new Error('请再次输入密码'));
          } else if (value !== this.ruleForm.pass) {
            callback(new Error('两次输入密码不一致!'));
          } else {
            callback();
          }
        };
        return {
          ruleForm: {
            pass: '',
            checkPass: '',
            age: ''
          },
          rules: {
            pass: [
              { validator: validatePass, trigger: 'blur' }
            ],
            checkPass: [
              { validator: validatePass2, trigger: 'blur' }
            ],
            age: [
              { validator: checkAge, trigger: 'blur' }
            ]
          }
        };
      },
      methods: {
        submitForm(formName) {
          this.$refs[formName].validate((valid) => {
            if (valid) {
              alert('submit!');
            } else {
              console.log('error submit!!');
              return false;
            }
          });
        },
        resetForm(formName) {
          this.$refs[formName].resetFields();
        }
      }
    })
  </script>

</body>

</html>
十四、下拉菜单
html
<!DOCTYPE html>
<html lang="en">

<head>
  <meta charset="UTF-8">
  <meta name="viewport" content="width=device-width, initial-scale=1.0">
  <title>下拉菜单</title>
  <link rel="stylesheet" href="element-ui-2.13.0/lib/theme-chalk/index.css">
  <script src="../Vue/vue.js"></script>
  <script src="element-ui-2.13.0/lib/index.js"></script>

  <!--
Dropdown 下拉菜单
  将动作或菜单折叠到下拉菜单中。

基础用法
  移动到下拉菜单上,展开更多操作。

通过组件slot来设置下拉触发的元素以及需要通过具名slot为dropdown 来设置下拉菜单。默认情况下,下拉按钮只要hover即可,无需点击也会显示下拉菜单。 -->


  <style>
    .el-dropdown-link {
      cursor: pointer;
      color: #409EFF;
    }

    .el-icon-arrow-down {
      font-size: 12px;
    }

    .el-dropdown {
      vertical-align: top;
    }

    .el-dropdown+.el-dropdown {
      margin-left: 15px;
    }

    .el-icon-arrow-down {
      font-size: 12px;
    }
  </style>
</head>

<body>
  <div id="mapp">
    <el-dropdown>
      <span class="el-dropdown-link">
        下拉菜单<i class="el-icon-arrow-down el-icon--right"></i>
      </span>
      <el-dropdown-menu slot="dropdown">
        <el-dropdown-item>黄金糕</el-dropdown-item>
        <el-dropdown-item>狮子头</el-dropdown-item>
        <el-dropdown-item>螺蛳粉</el-dropdown-item>
        <el-dropdown-item disabled>双皮奶</el-dropdown-item>
        <el-dropdown-item divided>蚵仔煎</el-dropdown-item>
      </el-dropdown-menu>

      <el-dropdown>
        <el-button type="primary">
          更多菜单<i class="el-icon-arrow-down el-icon--right"></i>
        </el-button>
        <el-dropdown-menu slot="dropdown">
          <el-dropdown-item>黄金糕</el-dropdown-item>
          <el-dropdown-item>狮子头</el-dropdown-item>
          <el-dropdown-item>螺蛳粉</el-dropdown-item>
          <el-dropdown-item>双皮奶</el-dropdown-item>
          <el-dropdown-item>蚵仔煎</el-dropdown-item>
        </el-dropdown-menu>
      </el-dropdown>
      <el-dropdown split-button type="primary" @click="handleClick">
        更多菜单
        <el-dropdown-menu slot="dropdown">
          <el-dropdown-item>黄金糕</el-dropdown-item>
          <el-dropdown-item>狮子头</el-dropdown-item>
          <el-dropdown-item>螺蛳粉</el-dropdown-item>
          <el-dropdown-item>双皮奶</el-dropdown-item>
          <el-dropdown-item>蚵仔煎</el-dropdown-item>
        </el-dropdown-menu>
      </el-dropdown>
    </el-dropdown>

  </div>
  <script>
    new Vue({
      el: "#mapp",
      methods: {
        handleClick() {
          alert('button click');
        }
      }

    })
  </script>

</body>

</html>
十五、综合案例
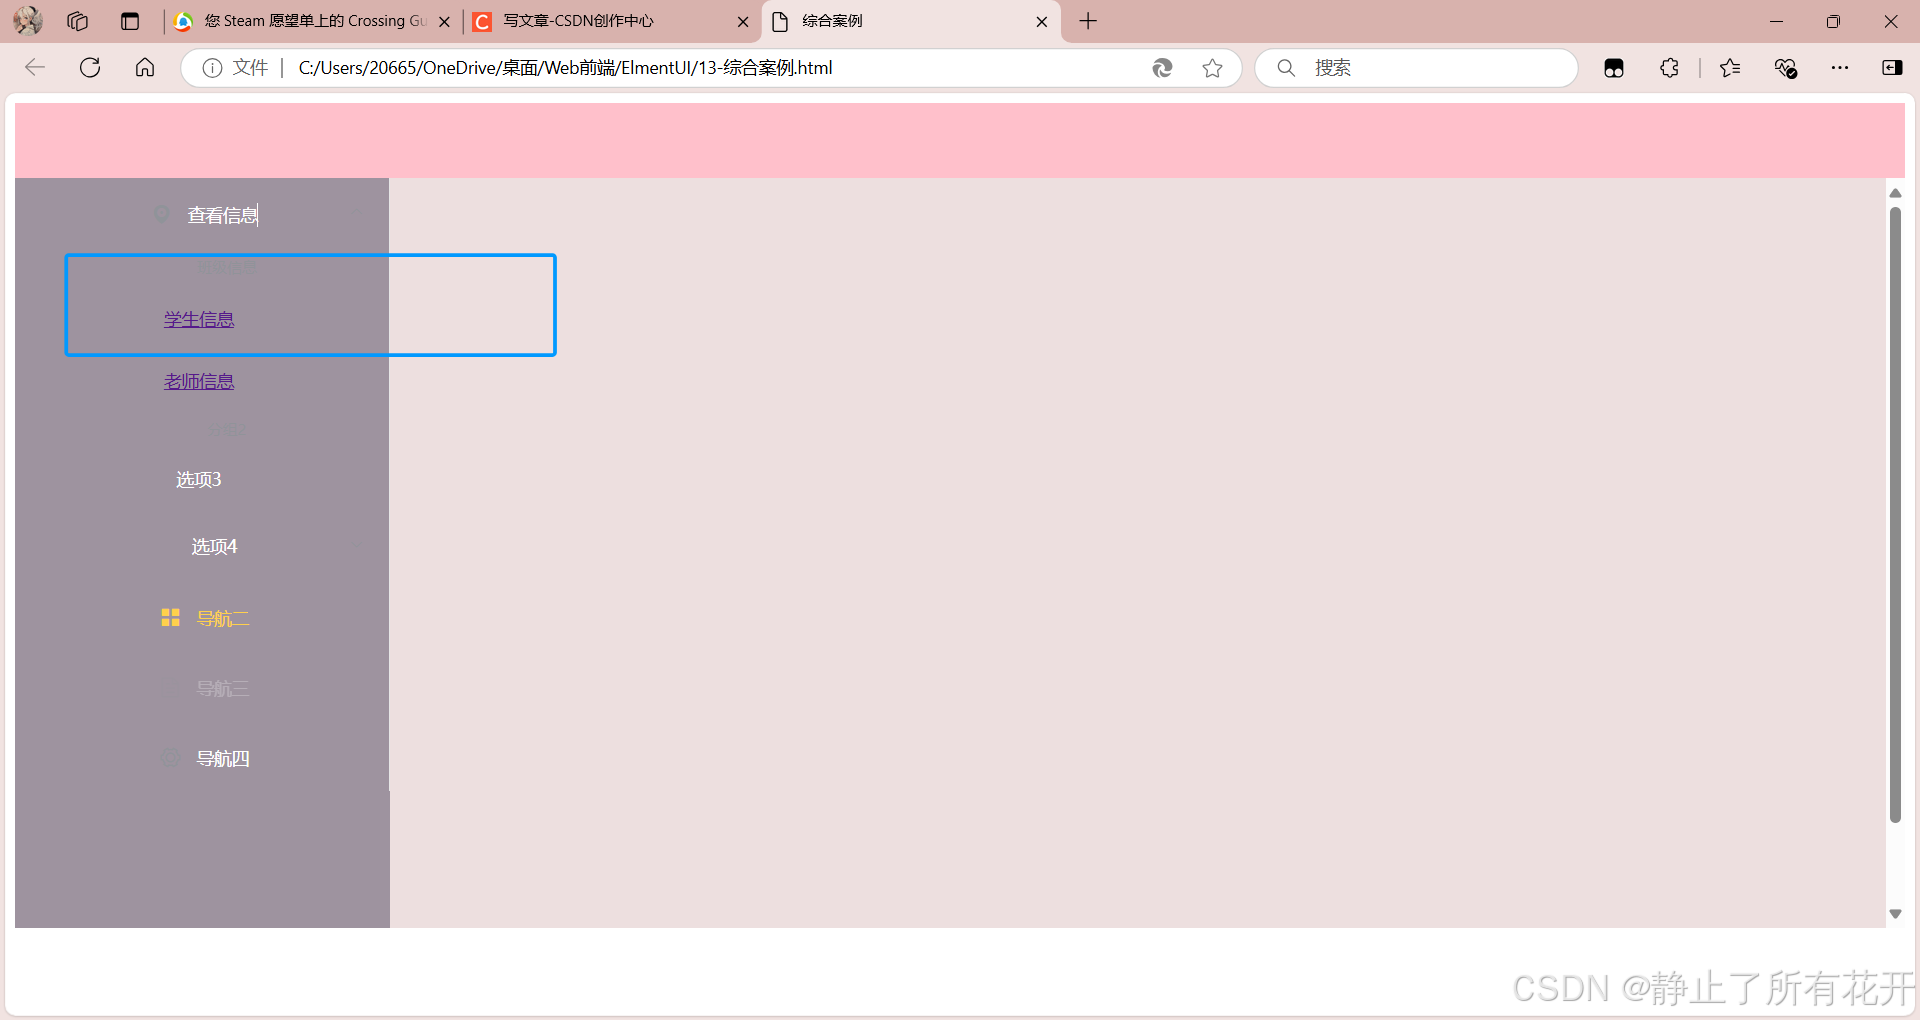
根据上述代码搭建一个主界面
html
<!DOCTYPE html>
<html lang="en">

<head>
  <meta charset="UTF-8">
  <meta name="viewport" content="width=device-width, initial-scale=1.0">
  <title>综合案例</title>
  <link rel="stylesheet" href="element-ui-2.13.0/lib/theme-chalk/index.css">
  <script src="../Vue/vue.js"></script>
  <script src="element-ui-2.13.0/lib/index.js"></script>

  <!-- -->
  <style>
    .el-header {
      background-color: pink;
      color: #333;
      text-align: center;
      line-height: 60px;
    }

    .el-aside {
      background-color: #9e939f;
      color: #333;
      text-align: center;
      /* 设置此行高来调整侧边栏以及主空间的大小 */
      line-height: 600px;
      height: 600px;
      width: 200px;
    }

    .el-main {
      background-color: #eddfdf;
      color: #333;
      text-align: center;
      line-height: 160px;
    }

    body>.el-container {
      margin-bottom: 40px;
    }

    .el-container:nth-child(5) .el-aside,
    .el-container:nth-child(6) .el-aside {
      line-height: 260px;
    }

    .el-container:nth-child(7) .el-aside {
      line-height: 320px;
    }
  </style>

</head>

<body>
  <div id="mapp" >
    <el-container>
      <el-header></el-header>
      <el-container>
        <el-aside>
          <el-menu default-active="2" class="el-menu-vertical-demo" @open="handleOpen" @close="handleClose"
            background-color="#9e939f" text-color="#fff" active-text-color="#ffd04b">
            <el-submenu index="1">
              <template slot="title">
                <i class="el-icon-location"></i>
                <span>查看信息</span>
              </template>
              <el-menu-item-group>
                <template slot="title">班级信息</template>
                <el-menu-item index="1-1">
                  <a href="13-student.html" target="right">学生信息</a>
                </el-menu-item>
                <el-menu-item index="1-2">
                  <a href="13-student.html" target="right">老师信息</a>
                </el-menu-item>
              </el-menu-item-group>
              <el-menu-item-group title="分组2">
                <el-menu-item index="1-3">选项3</el-menu-item>
              </el-menu-item-group>
              <el-submenu index="1-4">
                <template slot="title">选项4</template>
                <el-menu-item index="1-4-1">选项1</el-menu-item>
              </el-submenu>
            </el-submenu>
            <el-menu-item index="2">
              <i class="el-icon-menu"></i>
              <span slot="title">导航二</span>
            </el-menu-item>
            <el-menu-item index="3" disabled>
              <i class="el-icon-document"></i>
              <span slot="title">导航三</span>
            </el-menu-item>
            <el-menu-item index="4">
              <i class="el-icon-setting"></i>
              <span slot="title">导航四</span>
            </el-menu-item>
          </el-menu>
        </el-aside>
        <el-main>
          <iframe name="right" width="100%" height="100%" frameborder="0"></iframe>
        </el-main>
      </el-container>
    </el-container>
  </div>
  <script>
    new Vue({
      el: "#mapp",
      methods: {
        handleOpen(key, keyPath) {
          console.log(key, keyPath);
        },
        handleClose(key, keyPath) {
          console.log(key, keyPath);
        }
      }
    })
  </script>

</body>

</html>
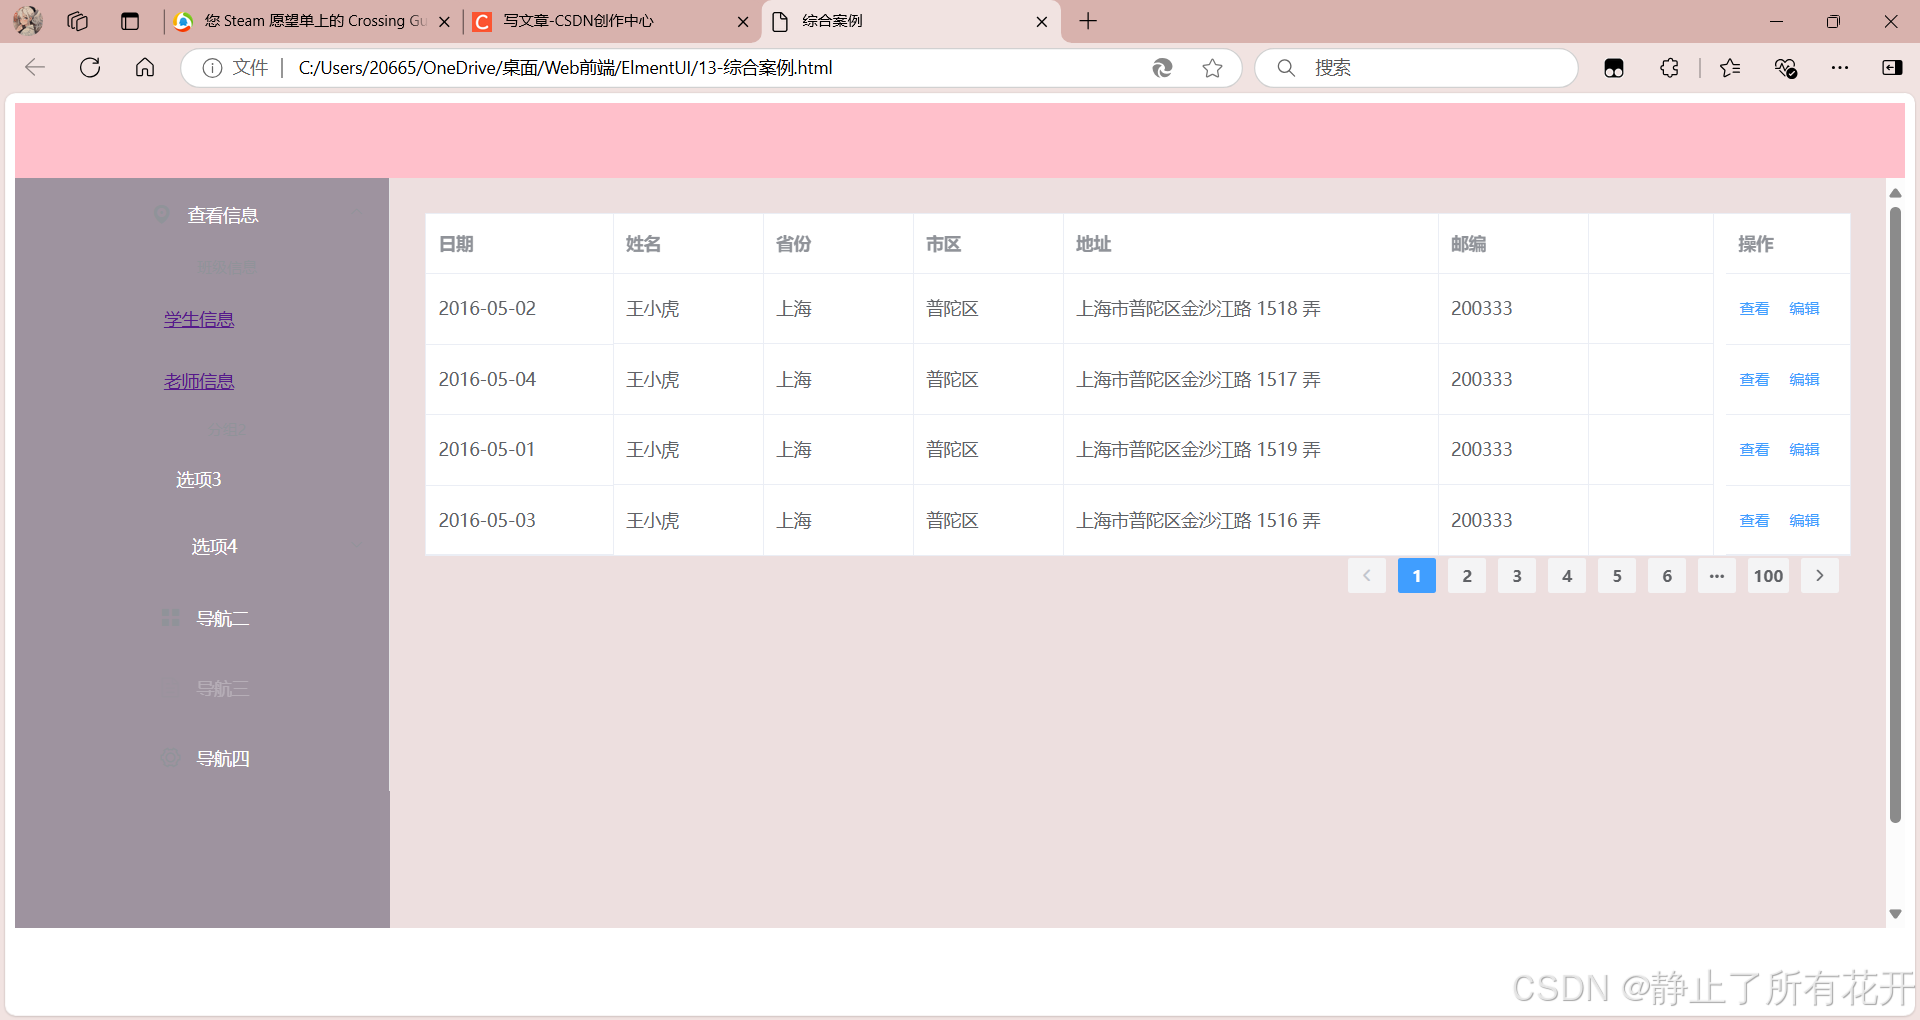
然后进行子界面的搭建
html
<!DOCTYPE html>
<html lang="en">

<head>
  <meta charset="UTF-8">
  <meta name="viewport" content="width=device-width, initial-scale=1.0">
  <title>student</title>
  <link rel="stylesheet" href="element-ui-2.13.0/lib/theme-chalk/index.css">
  <script src="../Vue/vue.js"></script>
  <script src="element-ui-2.13.0/lib/index.js"></script>

  <!-- -->
  <style>

  </style>

</head>

<body>
  <div id="mapp">
    <template>
      <el-table :data="tableData" border style="width: 100%">
        <el-table-column fixed prop="date" label="日期" width="150">
        </el-table-column>
        <el-table-column prop="name" label="姓名" width="120">
        </el-table-column>
        <el-table-column prop="province" label="省份" width="120">
        </el-table-column>
        <el-table-column prop="city" label="市区" width="120">
        </el-table-column>
        <el-table-column prop="address" label="地址" width="300">
        </el-table-column>
        <el-table-column prop="zip" label="邮编" width="120">
        </el-table-column>
        <el-table-column fixed="right" label="操作" width="100">
          <template slot-scope="scope">
            <el-button @click="handleClick(scope.row)" type="text" size="small">查看</el-button>
            <el-button type="text" size="small">编辑</el-button>
          </template>
        </el-table-column>
      </el-table>
    </template>
    <div style="text-align: right;">
       <el-pagination background layout="prev, pager, next" :total="1000">
    </el-pagination>
    </div>

  </div>
  <script>
    new Vue({
      el: "#mapp",
      methods: {
        handleClick(row) {
          console.log(row);
        }
      },

      data() {
        return {
          tableData: [{
            date: '2016-05-02',
            name: '王小虎',
            province: '上海',
            city: '普陀区',
            address: '上海市普陀区金沙江路 1518 弄',
            zip: 200333
          }, {
            date: '2016-05-04',
            name: '王小虎',
            province: '上海',
            city: '普陀区',
            address: '上海市普陀区金沙江路 1517 弄',
            zip: 200333
          }, {
            date: '2016-05-01',
            name: '王小虎',
            province: '上海',
            city: '普陀区',
            address: '上海市普陀区金沙江路 1519 弄',
            zip: 200333
          }, {
            date: '2016-05-03',
            name: '王小虎',
            province: '上海',
            city: '普陀区',
            address: '上海市普陀区金沙江路 1516 弄',
            zip: 200333
          }]
        }
      }
    })
  </script>

</body>

</html>
效果展示
