前言
目前已发布了3篇关于Flink RPC相关的文章,分别从底层通信系统akka/Pekko,RPC实现方式动态代理以及Flink RPC相关的组件做了介绍
深度了解flink rpc机制(一)-Akka/Pekko_flink pekko akka-CSDN博客
深度了解flink rpc机制(二)-动态代理-CSDN博客
深度了解flink rpc机制(三)-组件以及交互-CSDN博客
这篇文章通过分析源码,对以上知识进行验证并串联加深印象,更深入的了解Flink RPC的实现原理。本篇文章分享TaskManager启动和向ResouceManager注册的流程,TaskManager在flink 1.12之后被更名为TaskExecutor,可能文章中两个名称都会使用,大家理解成一个就行。
TaskManage启动源码分析
入口类
TaskManager的启动类入口,以Flink的Standalone模式为例,可以在flink目录下的bin目录的flink-daemon.sh找到入口类:
. "$bin"/config.sh

case $DAEMON in
    (taskexecutor)
        CLASS_TO_RUN=org.apache.flink.runtime.taskexecutor.TaskManagerRunner
    ;;

    (zookeeper)
        CLASS_TO_RUN=org.apache.flink.runtime.zookeeper.FlinkZooKeeperQuorumPeer
    ;;

    (historyserver)
        CLASS_TO_RUN=org.apache.flink.runtime.webmonitor.history.HistoryServer
    ;;

    (standalonesession)
        CLASS_TO_RUN=org.apache.flink.runtime.entrypoint.StandaloneSessionClusterEntrypoint
    ;;

    (standalonejob)
        CLASS_TO_RUN=org.apache.flink.container.entrypoint.StandaloneApplicationClusterEntryPoint
    ;;

    (*)
        echo "Unknown daemon '${DAEMON}'. $USAGE."
        exit 1
    ;;
esac
从这里可以看到Standalon模式下各个组件的启动类入口,TaskManager的入口类是TaskManageRunner,做为组件的入口类,肯定会有main方法:
    public static void main(String[] args) throws Exception {
        // startup checks and logging
        EnvironmentInformation.logEnvironmentInfo(LOG, "TaskManager", args);
        SignalHandler.register(LOG);
        JvmShutdownSafeguard.installAsShutdownHook(LOG);

        long maxOpenFileHandles = EnvironmentInformation.getOpenFileHandlesLimit();

        if (maxOpenFileHandles != -1L) {
            LOG.info("Maximum number of open file descriptors is {}.", maxOpenFileHandles);
        } else {
            LOG.info("Cannot determine the maximum number of open file descriptors");
        }
        //安装的方式启动taskmanager进程
        runTaskManagerProcessSecurely(args);
    }
之后就是在TaskManageRunner的方法调用了,最终会进入到runTaskManager这个静态方法
public static int runTaskManager(Configuration configuration, PluginManager pluginManager)
            throws Exception {
        final TaskManagerRunner taskManagerRunner;

        try {
            //之前方法都是静态方法调用,初始化taskManagerRunner对象
            taskManagerRunner =
                    new TaskManagerRunner(
                            configuration,
                            pluginManager,
                            TaskManagerRunner::createTaskExecutorService);
            //开始创建Taskmanager
            taskManagerRunner.start();
        } catch (Exception exception) {
            throw new FlinkException("Failed to start the TaskManagerRunner.", exception);
        }

        try {
            return taskManagerRunner.getTerminationFuture().get().getExitCode();
        } catch (Throwable t) {
            throw new FlinkException(
                    "Unexpected failure during runtime of TaskManagerRunner.",
                    ExceptionUtils.stripExecutionException(t));
        }
    }
之前一直是在调用TaskManageRunner的静态方法做一些日志加载,安全检查的前置校验,此时才真正的实例化TaskManageRunner对象,调用start方法进行TaskManager的创建
//taskManagerRunner.start()
 public void start() throws Exception {
        synchronized (lock) {
            startTaskManagerRunnerServices();
            taskExecutorService.start();
        }
}
创建RpcService和TaskExecutor
taskManagerRunner.start()方法内部有两个方法的调用
-
startTaskManagerRunnerServices()
private void startTaskManagerRunnerServices() throws Exception {
synchronized (lock) {
rpcSystem = RpcSystem.load(configuration);
//非RPC相关 代码省略
JMXService.startInstance(configuration.get(JMXServerOptions.JMX_SERVER_PORT));
//创建rpcService
rpcService = createRpcService(configuration, highAvailabilityServices, rpcSystem);
//非RPC相关 代码省略
//创建TaskExecutor
taskExecutorService =
taskExecutorServiceFactory.createTaskExecutor(
this.configuration,
this.resourceId.unwrap(),
rpcService,
highAvailabilityServices,
heartbeatServices,
metricRegistry,
blobCacheService,
false,
externalResourceInfoProvider,
workingDirectory.unwrap(),
this,
delegationTokenReceiverRepository);
}
}
可以看到这个方法首先调用createRpcService这个方法,这个方法内部内就是去创建ActorSystem,初始化RpcService
初始化RpcServer和PekkoInvocationHandler
然后就是创建TaskExecutor,TaskExecutor继承自EndPoint,EndPoint构造方法执行的时候会初始化RpcServer
/**
     * Initializes the RPC endpoint.
     *
     * @param rpcService The RPC server that dispatches calls to this RPC endpoint.
     * @param endpointId Unique identifier for this endpoint
     */
    protected RpcEndpoint(final RpcService rpcService, final String endpointId) {
        this.rpcService = checkNotNull(rpcService, "rpcService");
        this.endpointId = checkNotNull(endpointId, "endpointId");
        //创建RpcServer 方法内部
        //1.创建Acotr通信对象PekkoRpcActor
        //2.对象动态代理对象PekkoInvocationHandler赋值给rpcServer
        this.rpcServer = rpcService.startServer(this);
        this.resourceRegistry = new CloseableRegistry();

        this.mainThreadExecutor =
                new MainThreadExecutor(rpcServer, this::validateRunsInMainThread, endpointId);
        registerResource(this.mainThreadExecutor);
}- taskExecutorService.start()
这个方法会调用TaskExecutor对象的start方法,会调用父类EndPoint的start方法
    /**
     * Triggers start of the rpc endpoint. This tells the underlying rpc server that the rpc
     * endpoint is ready to process remote procedure calls.
     */
    public final void start() {
        rpcServer.start();
    }
rpcServer.start()方法如下
public void start() {
        //rpcEndpoint是Actor对象
        rpcEndpoint.tell(ControlMessages.START, ActorRef.noSender());
    }
这块儿代码就是taskmanger初始化后自己会给自己发送一个Akka START控制类的消息,准确来说是继承了EndPoint的类都会在初始化之后给自身发送一个这样的消息。
因为发的是Akka的消息,会进入到TaskExecutor的PekkoInvocationHandler#createReceive接收Akka消息的逻辑
    //构造方法
    PekkoRpcActor(
            final T rpcEndpoint,
            final CompletableFuture<Boolean> terminationFuture,
            final int version,
            final long maximumFramesize,
            final boolean forceSerialization,
            final ClassLoader flinkClassLoader) {
        //省略其他代码
        //PekkoPrcActor初始化 会将state枚举值设置为StoppedState.STOPPED
        this.state = StoppedState.STOPPED;
    }
    //接收消息
    @Override
    public Receive createReceive() {
        return ReceiveBuilder.create()
                //匹配到握手消息
                .match(RemoteHandshakeMessage.class, this::handleHandshakeMessage)
                //控制类消息
                .match(ControlMessages.class, this::handleControlMessage)
                //除以上两种之外的任意消息
                .matchAny(this::handleMessage)
                .build();
    //处理控制类消息的逻辑
    private void handleControlMessage(ControlMessages controlMessage) {
        try {
            switch (controlMessage) {
                case START:
                    state = state.start(this, flinkClassLoader);
                    break;
                case STOP:
                    state = state.stop();
                    break;
                case TERMINATE:
                    state = state.terminate(this, flinkClassLoader);
                    break;
                default:
                    handleUnknownControlMessage(controlMessage);
            }
        } catch (Exception e) {
            this.rpcEndpointTerminationResult = RpcEndpointTerminationResult.failure(e);
            throw e;
        }
    }
PekkoRpcActor在初始化的时候会 将自身state属性设置为StoppedState.STOPPED;
接收到ControlMessages.START消息,会走到handleControlMessage方法的case stop分支,因为state是StoppedState.STOPPED,所以代码会走到StoppedState这个静态枚举类的start方法
public State start(PekkoRpcActor<?> pekkoRpcActor, ClassLoader flinkClassLoader) {
            pekkoRpcActor.mainThreadValidator.enterMainThread();

            try {
                runWithContextClassLoader(
                        () -> pekkoRpcActor.rpcEndpoint.internalCallOnStart(), flinkClassLoader);
            } catch (Throwable throwable) {
                pekkoRpcActor.stop(
                        RpcEndpointTerminationResult.failure(
                                new RpcException(
                                        String.format(
                                                "Could not start RpcEndpoint %s.",
                                                pekkoRpcActor.rpcEndpoint.getEndpointId()),
                                        throwable)));
            } finally {
                pekkoRpcActor.mainThreadValidator.exitMainThread();
            }

            return StartedState.STARTED;
}pekkoRpcActor.rpcEndpoint.internalCallOnStart()这块儿代码是关键,又指定到了Endpoint定义的方法,
public final void internalCallOnStart() throws Exception {
        validateRunsInMainThread();
        isRunning = true;
        onStart();
    }

protected void onStart() throws Exception {}
这块儿代码饶了半天,其实用大白话来讲就是Flink任何需要进行通信的组件都要继承Endpoint类,组件初始化之前会先初始化RpcService对象作为Endpoint子类的成员变量,然后再由RpcService初始化ActorSystem,创建Actor和代理对象,之后再给自身发一个控制类的START方法,最后一定要进入到自身的onStart方法
TaskExecutor向ResourceManager注册流程
onStart方法开始进入到向ResourceManager注册的流程
    @Override
    public void onStart() throws Exception {
        try {
            //开始向ResourceManager注册
            startTaskExecutorServices();
        } catch (Throwable t) {
            final TaskManagerException exception =
                    new TaskManagerException(
                            String.format("Could not start the TaskExecutor %s", getAddress()), t);
            onFatalError(exception);
            throw exception;
        }

        startRegistrationTimeout();
    }

     private void startTaskExecutorServices() throws Exception {
        try {
            // start by connecting to the ResourceManager
            //new ResourceManagerLeaderListener()是真正注册的代码
            resourceManagerLeaderRetriever.start(new ResourceManagerLeaderListener());

            //省略其他代码
        } catch (Exception e) {
            handleStartTaskExecutorServicesException(e);
        }
    }
new ResourceManagerLeaderListener()是真正注册的方法
 private final class ResourceManagerLeaderListener implements LeaderRetrievalListener {

        @Override
        public void notifyLeaderAddress(final String leaderAddress, final UUID leaderSessionID) {
            runAsync(
                    () ->
                            notifyOfNewResourceManagerLeader(
                                    leaderAddress,
                                    ResourceManagerId.fromUuidOrNull(leaderSessionID)));
        }

        @Override
        public void handleError(Exception exception) {
            onFatalError(exception);
        }
    }
再进入到notifyOfNewResourceManagerLeader方法内部
private void notifyOfNewResourceManagerLeader(
        String newLeaderAddress, ResourceManagerId newResourceManagerId) {
        //获取ResouceManager的通信地址
    resourceManagerAddress =
            createResourceManagerAddress(newLeaderAddress, newResourceManagerId);
        //尝试连接ResouceMnanger
    reconnectToResourceManager(
            new FlinkException(
                    String.format(
                            "ResourceManager leader changed to new address %s",
                            resourceManagerAddress)));
}
reconnectToResourceManager方法内部
private void reconnectToResourceManager(Exception cause) {
        //如果已存在ResourceManger的连接  关闭连接
        closeResourceManagerConnection(cause);
        //设置注册超时时间
        startRegistrationTimeout();
        //继续尝试连接ResouceManager
        tryConnectToResourceManager();
    }
tryConnectToResourceManager();
    private void tryConnectToResourceManager() {
        if (resourceManagerAddress != null) {
            connectToResourceManager();
        }
    }

    private void connectToResourceManager() {
        assert (resourceManagerAddress != null);
        assert (establishedResourceManagerConnection == null);
        assert (resourceManagerConnection == null);

        log.info("Connecting to ResourceManager {}.", resourceManagerAddress);

        //封装taskExecutor的信息:地址 硬件资源 内存资源
        final TaskExecutorRegistration taskExecutorRegistration =
                new TaskExecutorRegistration(
                        getAddress(),
                        getResourceID(),
                        unresolvedTaskManagerLocation.getDataPort(),
                        JMXService.getPort().orElse(-1),
                        hardwareDescription,
                        memoryConfiguration,
                        taskManagerConfiguration.getDefaultSlotResourceProfile(),
                        taskManagerConfiguration.getTotalResourceProfile(),
                        unresolvedTaskManagerLocation.getNodeId());

        resourceManagerConnection =
                new TaskExecutorToResourceManagerConnection(
                        log,
                        getRpcService(),
                        taskManagerConfiguration.getRetryingRegistrationConfiguration(),
                        resourceManagerAddress.getAddress(),
                        resourceManagerAddress.getResourceManagerId(),
                        getMainThreadExecutor(),
                        new ResourceManagerRegistrationListener(),
                        taskExecutorRegistration);
        resourceManagerConnection.start();
    }
进入到connectToResourceManager方法,封装注册信息。进入start方法
public void start() {
        checkState(!closed, "The RPC connection is already closed");
        checkState(
                !isConnected() && pendingRegistration == null,
                "The RPC connection is already started");
        //创建注册成功、注册失败的回调方法
        final RetryingRegistration<F, G, S, R> newRegistration = createNewRegistration();

        if (REGISTRATION_UPDATER.compareAndSet(this, null, newRegistration)) {
            //开始主持
            newRegistration.startRegistration();
        } else {
            // concurrent start operation
            newRegistration.cancel();
        }
    }
首先创建注册成功和主持失败的回调方法,然后继续进入注册的流程
public void startRegistration() {
         //创建动态代理对象
        final CompletableFuture<G> rpcGatewayFuture;
        //ResourceManager可能有主从,所以走Fenced这块儿
        if (FencedRpcGateway.class.isAssignableFrom(targetType)) {
            rpcGatewayFuture =
                    (CompletableFuture<G>)
                            rpcService.connect(
                                    targetAddress,
                                    fencingToken,
                                    targetType.asSubclass(FencedRpcGateway.class));
        } else {
            rpcGatewayFuture = rpcService.connect(targetAddress, targetType);
        }

        //省略其他代码
}

private <C extends RpcGateway> CompletableFuture<C> connectInternal(
            final String address,
            final Class<C> clazz,
            Function<ActorRef, InvocationHandler> invocationHandlerFactory) {
        checkState(!stopped, "RpcService is stopped");
        //省略无关代码
        //握手确保连接正常
        final CompletableFuture<HandshakeSuccessMessage> handshakeFuture =


        final CompletableFuture<C> gatewayFuture =
                actorRefFuture.thenCombineAsync(
                        handshakeFuture,
                        (ActorRef actorRef, HandshakeSuccessMessage ignored) -> {
                            InvocationHandler invocationHandler =
                                    invocationHandlerFactory.apply(actorRef);
                            ClassLoader classLoader = getClass().getClassLoader();
                            //真正核心的代码 创建代理的实现
                            @SuppressWarnings("unchecked")
                            C proxy =
                                    (C)
                                            Proxy.newProxyInstance(
                                                    classLoader,
                                                    new Class<?>[] {clazz},
                                                    invocationHandler);

                            return proxy;
                        },
                        actorSystem.dispatcher());

        return guardCompletionWithContextClassLoader(gatewayFuture, flinkClassLoader);
    }
然后就会走到RpcService获取到ReouceManager的代理,然后将代理对象和主持方法通过akka消息发送到ResouceManager的RpcActor,然后进入消息处理,执行代理的对象的注册方法,也就是ResouceManager的注册方法,从而将TaskManager进行注册
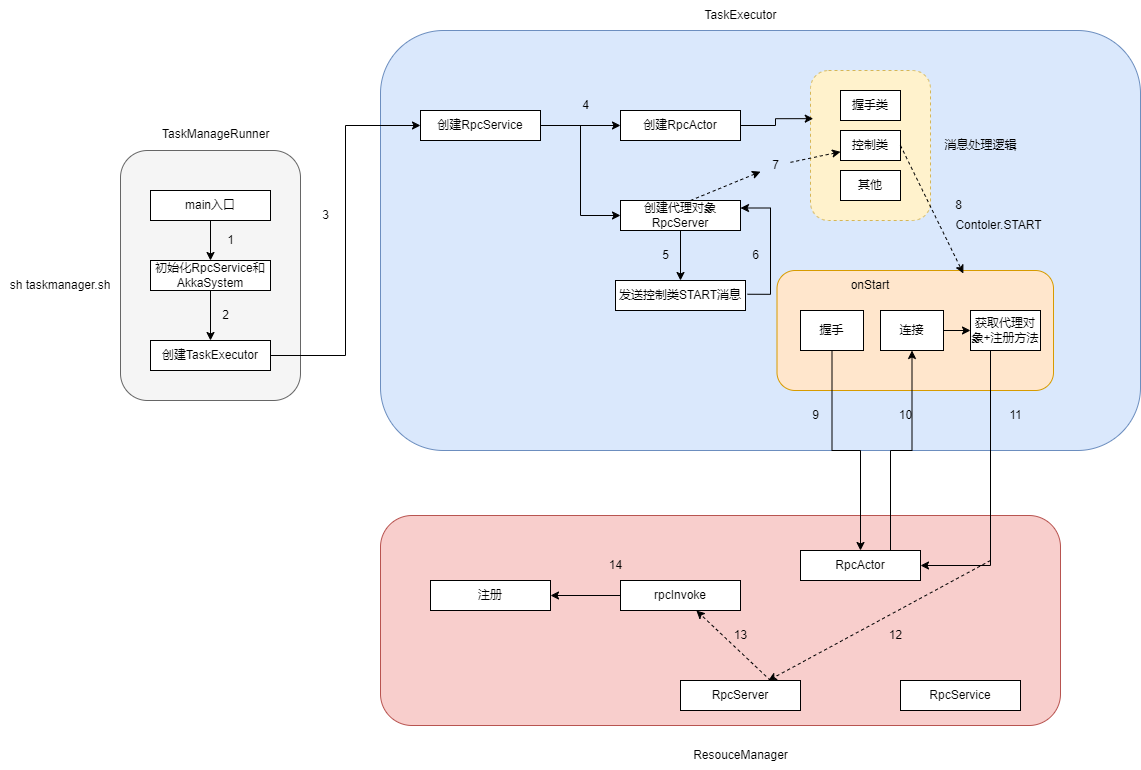
启动注册流程图