作者前言
🎂 ✨✨✨✨✨✨🍧🍧🍧🍧🍧🍧🍧🎂
🎂 作者介绍: 🎂🎂
🎂 🎉🎉🎉🎉🎉🎉🎉 🎂
🎂作者id:老秦包你会, 🎂
简单介绍:🎂🎂🎂🎂🎂🎂🎂🎂🎂🎂🎂🎂🎂🎂🎂
喜欢学习C语言、C++和python等编程语言,是一位爱分享的博主,有兴趣的小可爱可以来互讨 🎂🎂🎂🎂🎂🎂🎂🎂
🎂个人主页::小小页面🎂
🎂gitee页面:秦大大🎂
🎂🎂🎂🎂🎂🎂🎂🎂
🎂 一个爱分享的小博主 欢迎小可爱们前来借鉴🎂
输入类
- **作者前言**
- LineEdit
- QTextEdit
- [QCombo box](#QCombo box)
- [Spin Box和 QDoubleSpinBox](#Spin Box和 QDoubleSpinBox)
- [5 Date Edit & Time Edit](#5 Date Edit & Time Edit)
- Dial
- QSlider
LineEdit
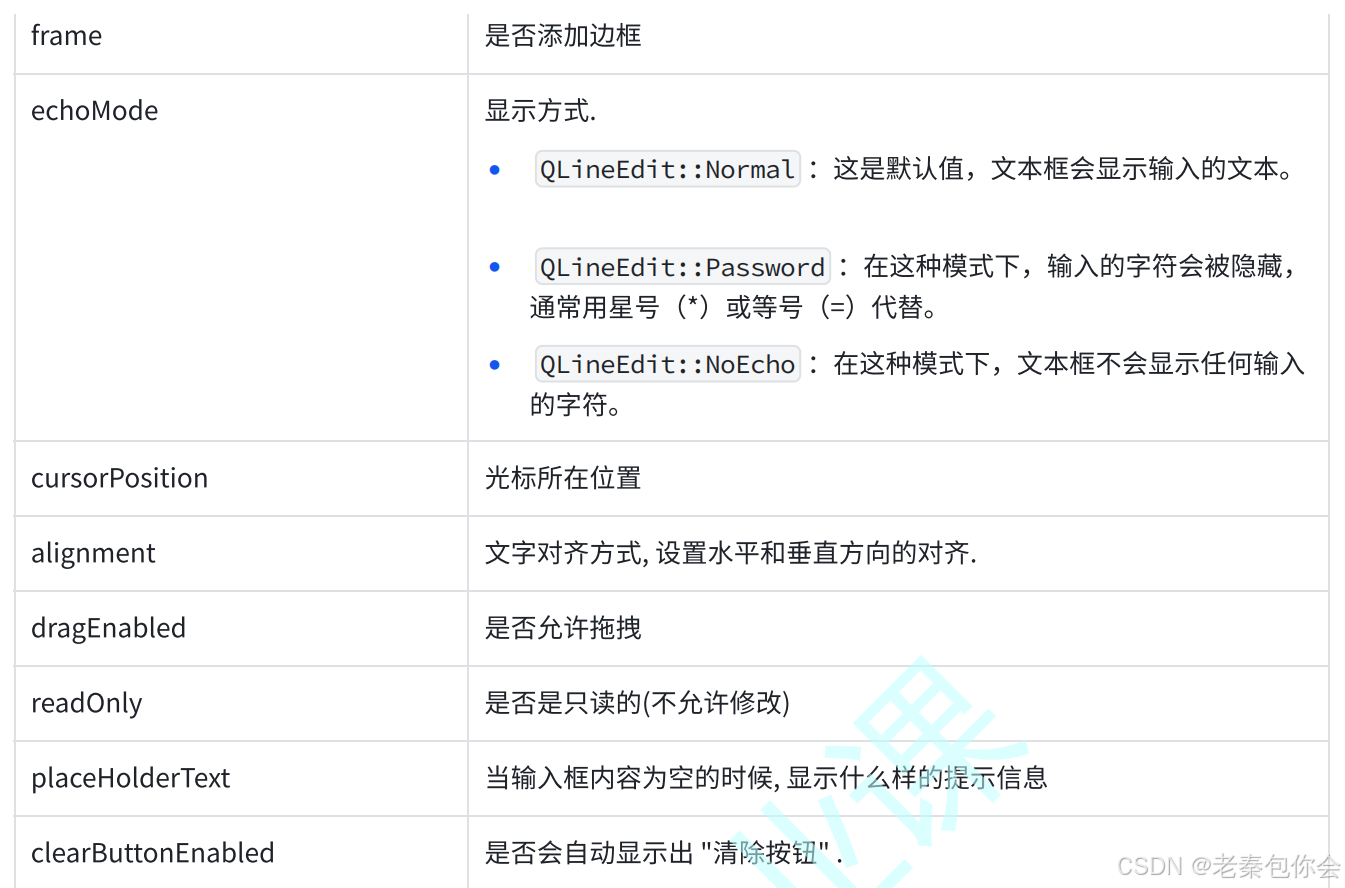
QLineEdit ⽤来表⽰单⾏输⼊框. 可以输⼊⼀段⽂本, 但是不能换⾏.
相关属性如下:

还有一些信号函数

下面使用一些代码简单的介绍
Widget::Widget(QWidget *parent)
    : QWidget(parent)
    , ui(new Ui::Widget)
{
    ui->setupUi(this);
    const QRect pointOne = Lineedtifuntion("账号:", "请输入账号",this->geometry().width()/2, this->geometry().height()/2);
    const QRect pointTwo =Lineedtifuntion("密码:", "请输入密码", pointOne.x(), pointOne.y());
    const QRect pointThree = Buttonfuntion("性别:","", pointTwo.x(), pointTwo.y());
    const QRect pointfour = Lineedtifuntion("电话:", "请输入电话号码", pointThree.x(), pointThree.y());
    //登入按钮
    QPushButton* button = new QPushButton("登入", this);
    button->move(QPoint(pointfour.x() , pointfour.y()+50));

}

const QRect Widget::Lineedtifuntion(QString name, QString inpt, int x, int y)
{
    QLabel* label = new QLabel(name,this);
    label->move(x,y+50);
    QLineEdit* lineeditOne = new QLineEdit(this);
    lineeditOne->move(QPoint(label->geometry().x()+50 , label->geometry().y()));
    lineeditOne->setMaxLength(15);
    lineeditOne->setFrame(true);
    lineeditOne->setPlaceholderText(inpt);
    //判断是否为密码
    if("密码:"==name)
        //更换显示模式
        lineeditOne->setEchoMode(QLineEdit::Password);
   lineeditOne->setClearButtonEnabled(true);//显示出自动清理按钮
   //进行电话号码的格式约束
    if("电话:"== name)
           lineeditOne->setInputMask("000-000-000");
    return label->geometry();

}

const QRect Widget::Buttonfuntion(QString name, QString inpt, int x, int y)
{
    QLabel* label = new QLabel(name,this);
    label->move(x,y+50);
    //性别
    QRadioButton* rediobuttonmale = new QRadioButton("男",this);
     rediobuttonmale->move(QPoint(label->geometry().x()+50 , label->geometry().y()));
    QRadioButton* rediobuttonfemale= new QRadioButton("女",this);
    rediobuttonfemale->move(QPoint(rediobuttonmale->geometry().x()+50 , rediobuttonmale->geometry().y()));

    return label->geometry();

}
效果如下:

这里的演示了setMaxLength(设置最大长度)、setFrame(设置边框),setPlaceholderText(为空时显示的内容),>setEchoMode(显示格式),
其中setClearButtonEnabled(设置清除)的效果如下:

剩下的就不过多介绍了。
QValidator
还需要注意的是inputMask。这个是一个简单格式约束,上面的代码000-000-000表示只能输入数字,光靠这个还是不行的,这就要使用到正则表达式了
这个正则表达式可以去网上查查
下面我们使用正则表达式来进行验证一下。
首先我们需要进行创建一个QRegExp对象,然后使用验证器进行验证,在Qt中有四种验证器
如图:

**注意:**QRegularExpressionValidator 在匹配性能上做出了⼀定优化. 但是从使⽤⻆度讲, 和
QRegExpValidator 差别不⼤. 我们使⽤ QRegExpValidator 即可
大致思路就是。 创建一个验证器, 然后验证字符串和正则表达式是否符合
下面就是使用到的QRegExpValidator::validate函数,

第⼀个参数填写的是要验证的字符串. 由于参数要求是 QString& ⽽不是 const
QString& , 需要把这个变量复制⼀下.
◦ 第⼆个参数是⼀个 int&, 是输出型参数. 当验证的字符串不匹配时, 返回这个字符串的⻓度. (没有
啥实质作⽤)

这个函数的返回值是一个枚举类型,
如图:

代码如下:
Widget::Widget(QWidget *parent)
    : QWidget(parent)
    , ui(new Ui::Widget)
{
    ui->setupUi(this);
    //
    QLineEdit * number = new QLineEdit(this);
    number->setGeometry(50,50,300,100);
    //创建验证按钮
    QPushButton *buttonvalidator =new  QPushButton("验证",this);
    //创建正则表达式对象
    QRegExp regexp("^1\\d{10}\\d$");
    //创建验证器
    QRegExpValidator * validator= new QRegExpValidator(regexp,this);


//    connect(buttonvalidator, &QPushButton::clicked, this, [=]()
//    {
//        number->setValidator(validator);//设置一个内置的验证器,需要返回一个validator对象
//        QString str = number->text();
//        int num = 0;
//        QValidator::State elemest =  number->validator()->validate(str,num);
//        if(elemest == QValidator::Acceptable)
//            qDebug() << "验证通过";
//        else
//            qDebug()<< "验证不通过"<< num << str << elemest;

//    });
    connect(number, &QLineEdit::textEdited, this, [=](const QString &str)
    {
        QString ch =  str;
        int point = 0;
        number->setValidator(validator);
        if(number->validator()->validate(ch, point) == QValidator::Acceptable)
            qDebug() << "验证通过";
        else
            qDebug()<< "验证不通过" << str;
    });

}
效果如下:

这里的代码主要演示的是判断字符是否符合要求,
下来我们还可以写一段注册页面的设置密码的情况, 就写一个输入的两个密码是否一致
// 输入两串字符是否一致
    //创建两个lineedit
    QLineEdit* passwordOne = new QLineEdit(this);
    QLineEdit* passwordTwo = new QLineEdit(this);
    passwordOne->setEchoMode(QLineEdit::Password);
    passwordTwo->setEchoMode(QLineEdit::Password);

    QRect pos = passwordOne->geometry();
    passwordTwo->move(pos.x(), pos.y()+50);
    connect(passwordOne, &QLineEdit::textEdited, this, [=](const QString &arg)
    {
        (void)arg;
        //获取这个文本
        QString textOne = passwordOne->text();
        //设置验证器
        QRegExp elemest(textOne);
        QRegExpValidator* validator = new QRegExpValidator(elemest, this);
        //给第二行设置内置验证器
        passwordTwo->setValidator(validator);
    });
    connect(passwordTwo, &QLineEdit::textEdited, this,[=](const QString & arg)
    {
        (void)arg;
        QString textTwo = passwordTwo->text();
        int strsize = 0;
        QValidator::State ret =  passwordTwo->validator()->validate(textTwo, strsize);
        if(ret == QValidator::Acceptable)
            qDebug()<< "验证成功";
        else
            qDebug()<< "验证失败";

    });
    //创建一个显示密码按钮
    QCheckBox* Onebutton = new QCheckBox("显示密码",this);
    //密码框
    QLineEdit * passwrodLine = new QLineEdit(this);
    passwrodLine->setEchoMode(QLineEdit::Password);
    passwrodLine->setGeometry(Onebutton->geometry().x(), Onebutton->geometry().y()+100, 200,100);
    connect(Onebutton, &QCheckBox::clicked, this, [=](bool checkedelement)
    {
        if(checkedelement != false)
            passwrodLine->setEchoMode(QLineEdit::Normal);
       else
           passwrodLine->setEchoMode(QLineEdit::Password);
    });
这里的代码是第二行输入框输入的字符数量会受到第一行输入框输入的字符限制的,不会跟我们见到的两行输入框可以随便输入,如果要实现这样的效果, 代码如下:
 connect(passwordOne, &QLineEdit::textEdited, this, [=](const QString &arg)
    {
        (void)arg;
        //获取这个文本
        QString textOne = passwordOne->text();
        QString textTwo = passwordTwo->text();
        if(textOne == textTwo)
            qDebug()<< "验证成功";
        else
             qDebug()<< "验证失败";

    });
    connect(passwordTwo, &QLineEdit::textEdited, this,[=](const QString & arg)
    {
        (void)arg;
        //获取这个文本
        QString textOne = passwordOne->text();
        QString textTwo = passwordTwo->text();
        if(textOne == textTwo)
            qDebug()<< "验证成功";
        else
             qDebug()<< "验证失败";

    });
我们还可以写一个显示密码的代码出来来进一步的演示
 QCheckBox* Onebutton = new QCheckBox("显示密码",this);
    //密码框
    QLineEdit * passwrodLine = new QLineEdit(this);
    passwrodLine->setEchoMode(QLineEdit::Password);
    passwrodLine->setGeometry(Onebutton->geometry().x(), Onebutton->geometry().y()+100, 200,100);
    connect(Onebutton, &QCheckBox::clicked, this, [=](bool checkedelement)
    {
        if(checkedelement != false)
            passwrodLine->setEchoMode(QLineEdit::Normal);
       else
           passwrodLine->setEchoMode(QLineEdit::Password);
    });
QTextEdit
表⽰多⾏输⼊框. 也是⼀个富⽂本 & markdown 编辑器,支持html、markdown和纯文本
如果只是想使用纯文本格式可以使用QPlainText,这两个类是差不多的
属性如下:
markdown :输⼊框内持有的内容. ⽀持 markdown 格式. 能够⾃动的对markdown ⽂本进⾏渲染成 html
html : 输⼊框内持有的内容. 可以⽀持⼤部分 html 标签. 包括 img 和 table 等.
placeHolderText : 输⼊框为空时提⽰的内容
readOnly :是否是只读的
undoRedoEnable :是否开启 undo / redo 功能.,按下 ctrl + z 触发 undo,按下 ctrl + y 触发 redo

信号函数

下面我们一一使用代码演示
html 和markdown
这两个属性主要是让文本按照html或者maekdown格式来渲染
QTextEdit* Multiple_Line = new QTextEdit(this);
    Multiple_Line->setHtml("<p>你好呀</p>");
效果如下:

这里只是演示了html的写法,markdown的写法可以自行探索
需要注意的是,如果我们想要获取到对于的文本,不能直接使用html或者markdown,例如获取html的文本:
qDebug()<< Multiple_Line->toHtml();效果如下

如果想要获取纯文本,可以使用toPlainText()
undoRedoEnable
这个就是可以设置是否可以剪切(undo)和剪切撤回(redo)
Multiple_Line->setUndoRedoEnabled(false);禁用
tabstopWidth
这个属性就是按下tap键缩进多少个字符,
Multiple_Line->setTabStopWidth(6);//缩进6个字符overwritemode
开启覆盖写模式
这个主要是覆盖输入目前的内容,某些编程环境或框架中,这个方法通常用于设置一个对象或组件在处理数据时是否允许覆盖现有的数据。
这里的话实现不了
acceptRichText
这个是用来设置是否可以富文本的
富文本:组件允许用户输入包含格式(如字体、颜色、粗体、斜体等)的文本。这意味着用户可以使用富文本编辑器的功能来格式化他们的文本。
verticalScrollBarPolicy和horizontalScrollBarPolicy
verticalScrollBarPolicy是设置垂直滚动条, horizontalScrollBarPolicy是设置水平滚动条
有三个分别是:
Qt::ScrollBarAsNeeded : 根据内容⾃动决定是否需要滚动条。这是默认值。
• Qt::ScrollBarAlwaysOff : 总是关闭滚动条。
• Qt::ScrollBarAlwaysOn : 总是显⽰滚动条。
Multiple_Line->setVerticalScrollBarPolicy(Qt::ScrollBarAlwaysOn);
    Multiple_Line->setHorizontalScrollBarPolicy(Qt::ScrollBarAlwaysOn);
如图:

信号函数textChanged()
当文本内容被改变就会触发
connect(Multiple_Line, &QTextEdit::textChanged, this, [=]()
    {
        qDebug()<< Multiple_Line->toPlainText();//获取纯文本
    });
效果如下:

信号函数selectionChanged()
当光标选中的内容触发
下面我们需要使用到一个类
QTextEdit 中包含了⼀个 QTextCursor 对象, 通过这个对象可以获取到当前光标位置和选中
的内容.
textCursor()返回一个 QTextCursor 对象,使用selectedText()可以查看光标选中的内容
 connect(Multiple_Line, &QTextEdit::selectionChanged,this,[=]()
    {
        qDebug()<< "选择的内容:" << Multiple_Line->textCursor().selectedText();
    });
效果如下:

当我们鼠标左键按住不放,就会不断的认为光标的选择范围不断发生改变,当我们松开,就不会输出
信号函数cursorPositionChanged
光标移动时触发
 connect(Multiple_Line, &QTextEdit::cursorPositionChanged,this,[=]()
    {
        qDebug()<< "选择的内容:" << Multiple_Line->textCursor().selectedText();
    });
如图:

光标移动就会触发
剩下的信号函数,可以根据自己去实现一下,
QCombo box
这个一个下拉框的类
属性和方法如下:


核心信号如下:

下面我们一一演示代码
Widget::Widget(QWidget *parent)
    : QWidget(parent)
    , ui(new Ui::Widget)
{
    ui->setupUi(this);
    //写一个下拉框,用户可以自己添加
    QComboBox* comboboxOne = new QComboBox(this);
    //
    QLineEdit * valueEdit = new QLineEdit(this);
    QPushButton *addButton = new QPushButton("添加", this);
    valueEdit->move(this->geometry().x()+100, this->geometry().y());
    addButton->move(valueEdit->geometry().x()+500, valueEdit->geometry().y());
    valueEdit->setPlaceholderText("输入要添加的内容");
    comboboxOne->setMaxCount(15);
    //设置用户可以修改
    comboboxOne->setEditable(true);
    connect(addButton, &QPushButton::clicked, this,[=]()
    {
        comboboxOne->addItem(valueEdit->text());
        valueEdit->setText("");
        if(comboboxOne->currentIndex()+1 >= 15)
            qDebug() << "添加失败,已经饱和";
        else
            qDebug()<< "你当前选择的序列号为:" << comboboxOne->currentIndex()+1<< "内容为:"
                    << comboboxOne->currentText();


    });


    comboboxOne->addItem("hello");

}
效果如下:

这里的代码使用到了curretext 、currentIndex、Editable等方法, 可以很直观的看到效果
下面我们写一些关于信号函数的代码出来看看效果
下面我们需要读取文件, 在C语言中可以使用fopen来打开文件,在C++中可以使用fstream来打开文件
下面是以cpu为中心, 来进行判断使用ifstream还是ofstream的

代码如下:
 QComboBox* comboboxOne = new QComboBox(this);
    //打开文件
    std::ifstream file("../ComboBox/one.txt");
    //判断文件是否打开成功
    if(!file.is_open())
        qDebug()<< "打开失败";
    else
    {
         qDebug()<< "打开成功";
         //开始读取
         std::string linech;
         while(std::getline(file, linech))//如果读取成功,流的状态将保持良好;如果到达文件末尾或发生错误,流的状态将变为不良
         {
             comboboxOne->addItem(QString::fromStdString(linech));
         }
         file.close();

    }
效果如下:

QString::fromStdString(linech)中这个函数是把string类型转换成Qstring, 如果想要把Qstring
转换成string, 可以使用toStdString()
Spin Box和 QDoubleSpinBox
这两种属于一种微调框,它是带有按钮的输⼊框. 可以⽤来输⼊整数/浮点数. 通过点击按钮来修改数值⼤⼩.
如图:

由于这两个是相似的下面就以讲解spinbox为主
属性如下:
QSpinBox 的关键属性包括:
value: 获取或设置当前的整数值。
minimum: 设置允许的最小值。
maximum: 设置允许的最大值。
singleStep: 设置每次增减的步长。
prefix: 设置显示在值前的字符串。
suffix: 设置显示在值后的字符串。
wrap: 设置是否允许循环输入(即超过最大值后回到最小值)。
readOnly: 设置为只读模式,防止用户直接输入。
displayIntegerBase: 设置显示的进制(如十进制或十六进制)。


信号函数如下:

图形化界面如下:

代码如下:
Widget::Widget(QWidget *parent)
    : QWidget(parent)
    , ui(new Ui::Widget)
{
    ui->setupUi(this);
    ui->label->setText("主食");
    ui->label_2->setText("饮料");
    ui->label_3->setText("菜品");
    fileRead("../spinbox/staplefood.txt", ui->comboBox);
    fileRead("../spinbox/drinck.txt", ui->comboBox_2);
    fileRead("../spinbox/dish.txt", ui->comboBox_3);
    ui->spinBox->setRange(1,5);//范围
    ui->spinBox_2->setRange(1,5);
    ui->spinBox_3->setRange(1,5);
    PreFixx(ui->spinBox, "数量:");
    SufFixx(ui->spinBox, "个");
    ui->spinBox->setFixedSize(100,20);


}

Widget::~Widget()
{
    delete ui;
}

void Widget::fileRead(QString fileName, QComboBox*  propre)
{
    if(fileName.isEmpty())
         return;
    //打开文件
    std::ifstream file(fileName.toStdString());
    //判断是否打开成功
    if(!file.is_open())
    {
        qDebug()<< "失败";
        return;
    }
    std::string line;
     //读取
    while(std::getline(file,line))
    {
        propre->addItem(QString::fromStdString(line));
    }


    file.close();


}

void Widget::PreFixx(QSpinBox *element, const QString fix)
{
    element->setPrefix(fix);
}

void Widget::SufFixx(QSpinBox *element, const QString fix)
{
    element->setSuffix(fix);
}
这里采用两者结合,更加清晰的观察,效果如下:

代码还有一些未使用的函数,可以自行探讨,
信号函数的使用
connect(ui->spinBox, &QSpinBox::textChanged,this, [=](const QString &ch)
    {
        qDebug()<< ch;
    });

    void Widget::on_spinBox_valueChanged(int arg1)//通过函数名链接
{
     qDebug()<< arg1;
}
效果如下:

5 Date Edit & Time Edit
这个是根据SpinBox来进行改造过来的,
注意:使⽤ QDateEdit 作为⽇期的微调框 以及 使⽤ QTimeEdit 作为时间的微调框
属性如下:
date: 获取或设置当前日期。
minimumDate: 获取或设置允许选择的最早日期。
maximumDate: 获取或设置允许选择的最晚日期。
displayFormat: 设置日期在控件中显示的格式,例如 "yyyy-MM-dd"。
calendarPopup: 指示是否在点击控件时显示日历弹出窗口。
timeSpec: 获取或设置时间的规格(如本地时间或 UTC)。
(Qt::LocalTime :显⽰本地时间。
• Qt::UTC :显⽰协调世界时(UTC)。
• Qt::OffsetFromUTC :显⽰相对于UTC的偏移量(时差))
readOnly: 设置控件是否为只读模式。
信号函数如下:

下面开始演示
代码如下:
Widget::Widget(QWidget *parent)
    : QWidget(parent)
    , ui(new Ui::Widget)
{
    ui->setupUi(this);
    //创建时间框
    QDateEdit * DateTime = new QDateEdit(this);
    DateTime->setDisplayFormat("yyyy年MM月dd日");
    DateTime->setTimeSpec(Qt::LocalTime);
}
效果如下:

需要注意的是,我们选中日期的年份可以进行修改,也可以选择月份进行修改
Dial
表⽰⼀个 旋钮
如同:

属性如下:
minimum: 获取或设置旋钮的最小值。
maximum: 获取或设置旋钮的最大值。
value: 获取或设置当前旋钮的值。
singleStep: 设置每次调整旋钮时的增量(通常用于按键调整)。
pageStep: 设置每次大步调整旋钮时的增量(通常用于鼠标滚轮)。
notchTarget: 设置旋钮的刻度间隔,决定刻度的分布。
notchesVisible 是否显⽰ 刻度线
wrapping: 设置是否允许旋钮值在达到最大值后回到最小值(布尔值)。
sliderPosition: 获取或设置滑块当前的位置。
信号函数如下:

下面我们写一个通过旋转按钮来设置窗口的透明度,
Widget::Widget(QWidget *parent)
    : QWidget(parent)
    , ui(new Ui::Widget)
{
    ui->setupUi(this);
    ui->dial->setWrapping(true);// 允许循环
    ui->dial->setSingleStep(1);// 步长
    ui->dial->setNotchesVisible(true);//显示刻度
    ui->dial->setNotchTarget(10);//刻度与刻度之前的格数
    ui->dial ->setMinimum(0);
    ui->dial->setMaximum(100);

    this->setWindowIcon(QIcon(QPixmap(":/img1.png")));
    //添加背景图片
    QPalette paletee;
    paletee.setBrush(QPalette::Background, QBrush(QPixmap(":/img1.png")));
    this->setPalette(paletee);
    this->setAutoFillBackground(true);
}

Widget::~Widget()
{
    delete ui;
}
void Widget::on_dial_valueChanged(int value)
{
    qDebug()<< value;
    //窗口透明度
    this->setWindowOpacity(value/100.0);
}
效果如下:

QSlider
表⽰⼀个滑动条.
这个和QDila是一样的,QSlider 和 QDial 都是继承⾃ QAbstractSlider , 因此⽤法上基本相同
下面列举出不同的属性
orientation 滑动条的⽅向是⽔平还是垂直
invertedAppearance 是否要翻转滑动条的⽅向
tickPosition 刻度的位置.
tickInterval 刻度的密集程度
下面我们写一段代码控制widget窗口的大小:
Widget::Widget(QWidget *parent)
    : QWidget(parent)
    , ui(new Ui::Widget)
{
    ui->setupUi(this);
    QRect coordinate = this->geometry();
    //创建水平滑动条
    QSlider* horizontalSlider = SliderCtreat(Qt::Horizontal);
    //创建垂直滑动条
    QSlider* verticalSlider = SliderCtreat(Qt::Vertical,true);
    horizontalSlider->setMaximum(coordinate.width());
    verticalSlider->setMaximum(coordinate.height());
    horizontalSlider->setSliderPosition(horizontalSlider->maximum());
    verticalSlider->setSliderPosition(horizontalSlider->maximum());
    verticalSlider->move(verticalSlider->x(), verticalSlider->y()+50);
    connect(horizontalSlider, &QSlider::valueChanged, this, [=](int value)
    {
        qDebug() <<"horizontal:"<< value;
        QRect coordinate = this->geometry();
        this->setGeometry(coordinate.x(), coordinate.y(), value, coordinate.height());
    });
    connect(verticalSlider, &QSlider::valueChanged, this, [=](int value)
    {
        qDebug() <<"vertical:"<< value;
        QRect coordinate = this->geometry();
        this->setGeometry(coordinate.x(), coordinate.y(),  coordinate.height(),(value));

    });

}
QSlider *Widget::SliderCtreat(Qt::Orientation a, bool change)
{

     QSlider * slider = new QSlider(this);
     slider->setOrientation(a);//设置滑动条水平或者垂直
     slider->setInvertedAppearance(change);//设置滑动条的滑动方向是否发生改变.
     slider->setSliderPosition(100);
     return slider;

}
如图:

我们还可以通过设置快捷键来进行控制滑动条的滑动
代码如下:
Widget::Widget(QWidget *parent)
    : QWidget(parent)
    , ui(new Ui::Widget)
{
    ui->setupUi(this);
    //创建两个快捷键
    QShortcut* subShorcurLeft = new QShortcut(this);
    QShortcut* addShorcurrigth = new QShortcut(this);
    subShorcurLeft->setKey(QKeySequence("-"));
    addShorcurrigth->setKey(QKeySequence("+"));
    ui->horizontalSlider->setSingleStep(1);
    ui->horizontalSlider->setMaximum(200);
    connect(subShorcurLeft, &QShortcut::activated, this, [=]()
    {

        ui->horizontalSlider->setSliderPosition(ui->horizontalSlider->value()-1);
        ui->label->setText(QString::number(ui->horizontalSlider->value()));

    });
    connect(addShorcurrigth, &QShortcut::activated, this, [=]()
    {

        ui->horizontalSlider->setSliderPosition(ui->horizontalSlider->value()+1);
        ui->label->setText(QString::number(ui->horizontalSlider->value()));

    });
}
效果如下:
