文章目录
-
- [一、VMClarity 介绍](#一、VMClarity 介绍)
- 二、VMClarity组件
- [三、部署 VMClarity 架构图](#三、部署 VMClarity 架构图)
- 四、实验先决条件
- 五、操作步骤
-
- [5.1 下载 VMClarity 部署模板](#5.1 下载 VMClarity 部署模板)
- [5.2 部署 VMClarity 堆栈](#5.2 部署 VMClarity 堆栈)
- [5.3 打开到 VMClarity 服务器的 SSH 隧道](#5.3 打开到 VMClarity 服务器的 SSH 隧道)
- [5.4 访问 VMClarity UI](#5.4 访问 VMClarity UI)
- [5.5 Assets资产自动发现](#5.5 Assets资产自动发现)
- [六、案例:使用 VMClarity 检测云安全漏洞](#六、案例:使用 VMClarity 检测云安全漏洞)
-
- [6.1 导航至扫描菜单栏](#6.1 导航至扫描菜单栏)
- [6.2 创建扫描配置名称和范围](#6.2 创建扫描配置名称和范围)
- [6.3 勾选扫描类型](#6.3 勾选扫描类型)
- [6.4 配置扫描时间](#6.4 配置扫描时间)
- [6.5 高级设置](#6.5 高级设置)
- [6.6 检查漏洞扫描结果](#6.6 检查漏洞扫描结果)
- 七、清除资源
- 八、参考链接
一、VMClarity 介绍
VMClarity是一个开源工具,用于无代理检测和管理虚拟机软件物料清单 (SBOM) 和云安全威胁,例如漏洞、漏洞利用、恶意软件、rootkit、错误配置和泄露的机密。
VMClarity具有针对主要云提供商(包括 AWS、Azure 和 GCP)的 VM 扫描功能。此外,VMClarity 还可用于扫描 Docker 资产。
由于 VMClarity 会拍摄虚拟机的快照并根据这些快照启动单独的虚拟机,因此无需在要扫描的资产虚拟机上安装软件。安全扫描器部署在新创建的虚拟机上,并将结果报告给 OpenClarity API。
如果您想开始扫描,可以通过 Web UI 或 VMClarity 进行CLI . 可以将扫描配置为仅运行一次,或者像 cron 作业一样重复运行。

二、VMClarity组件
API Server:用于管理 VMClarity 系统中所有对象的 VMClarity API。这是系统中唯一与数据库对话的组件。
Orchestrator :协调和管理 VMClarity 扫描配置、扫描和资产扫描的生命周期。Orchestrator 中有一个可插入的"提供程序",它将 Orchestrator 连接到要扫描的环境,并抽象资产发现、VM 快照以及扫描仪 VM 的创建。(注意:目前唯一受支持的提供程序是 AWS,其他超大规模提供商正在规划中)
UI Backend:一个单独的后端 API,它将一些处理从浏览器卸载到基础设施,以处理和过滤更靠近源的数据。
UI Webserver:提供UI静态文件的服务器。
DB:存储来自 API 的 VMClarity 对象。支持的选项是 SQLite 和 Postgres。
Scanner Helper services:这些服务为 VMClarity CLI 提供支持,以减轻每个扫描仪需要完成的工作,例如从各种数据库源下载最新的漏洞或恶意软件签名。今天包含的组件包括:
- grype-server:围绕 grype 漏洞扫描器的 rest API 包装器
- trivy-server:Trivy 漏洞扫描器服务器
- exploitDB 服务器:包装 Exploit DB CVE 以利用映射逻辑的测试 API
- freshclam-mirror:ClamAV 恶意软件签名的镜像
这些组件是容器化的,可以通过多种不同的方式部署。例如,我们的 cloudformation 安装程序使用专用 AWS 虚拟私有云 (VPC) 中的 docker 在 VM 上部署 VMClarity。
部署 VMClarity 服务器实例并创建扫描配置后,VMClarity 将在扫描配置定义的扫描范围内发现 VM 资源(例如按区域、实例标签和安全组)。创建资产列表后,将拍摄资产快照,并使用快照作为附加卷启动新的扫描仪 VM。在扫描仪 VM 中运行的 VMClarity CLI 将对已安装的快照执行配置的分析,并将结果报告给 VMClarity API。然后,VMClarity 后端将这些结果处理为发现结果。

三、部署 VMClarity 架构图
这个架构图展示了一个典型的AWS VPC设置,结合公有子网和私有子网来提高安全性和资源访问的灵活性。公有子网中的VmClarityServer可以直接与互联网通信,而私有子网中的资源需要通过NAT网关来访问外部网络,从而保护其不被外部直接访问。

四、实验先决条件
-
已拥有AWS账号;
-
已创建EC2密钥对;
五、操作步骤
5.1 下载 VMClarity 部署模板
模板下载链接:vmclarity/installation/aws/VmClarity.cfn at main · openclarity/vmclarity
5.2 部署 VMClarity 堆栈
依次点击
选择现有模板------上传模板文件------选择文件(vmclarity.cfn)------下一步
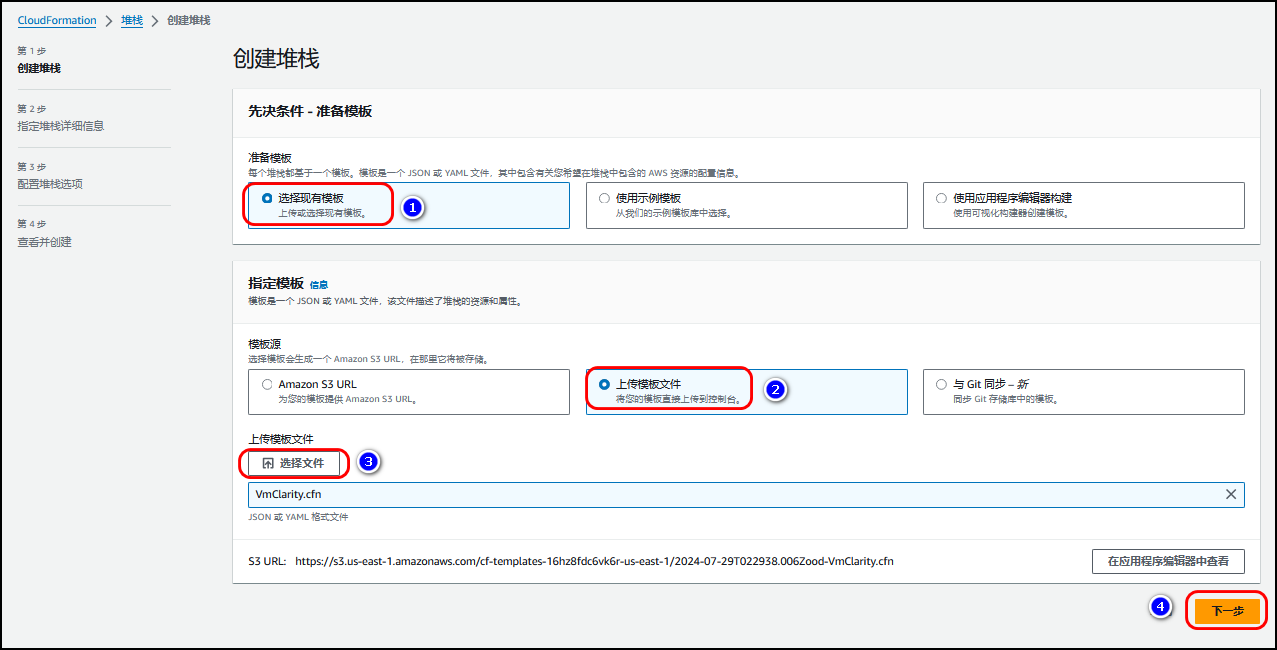
- 输入堆栈的名称。
- 选择InstanceType (默认
t2.large为 VMClarity 服务器和扫描仪虚拟机)。- 在KeyName字段中指定 EC2 实例的 SSH 密钥。将需要此密钥来连接到 VMClarity。
- 单击下一步 ,然后滚动到屏幕底部,并选中我确认...。
- 单击**"提交"**。

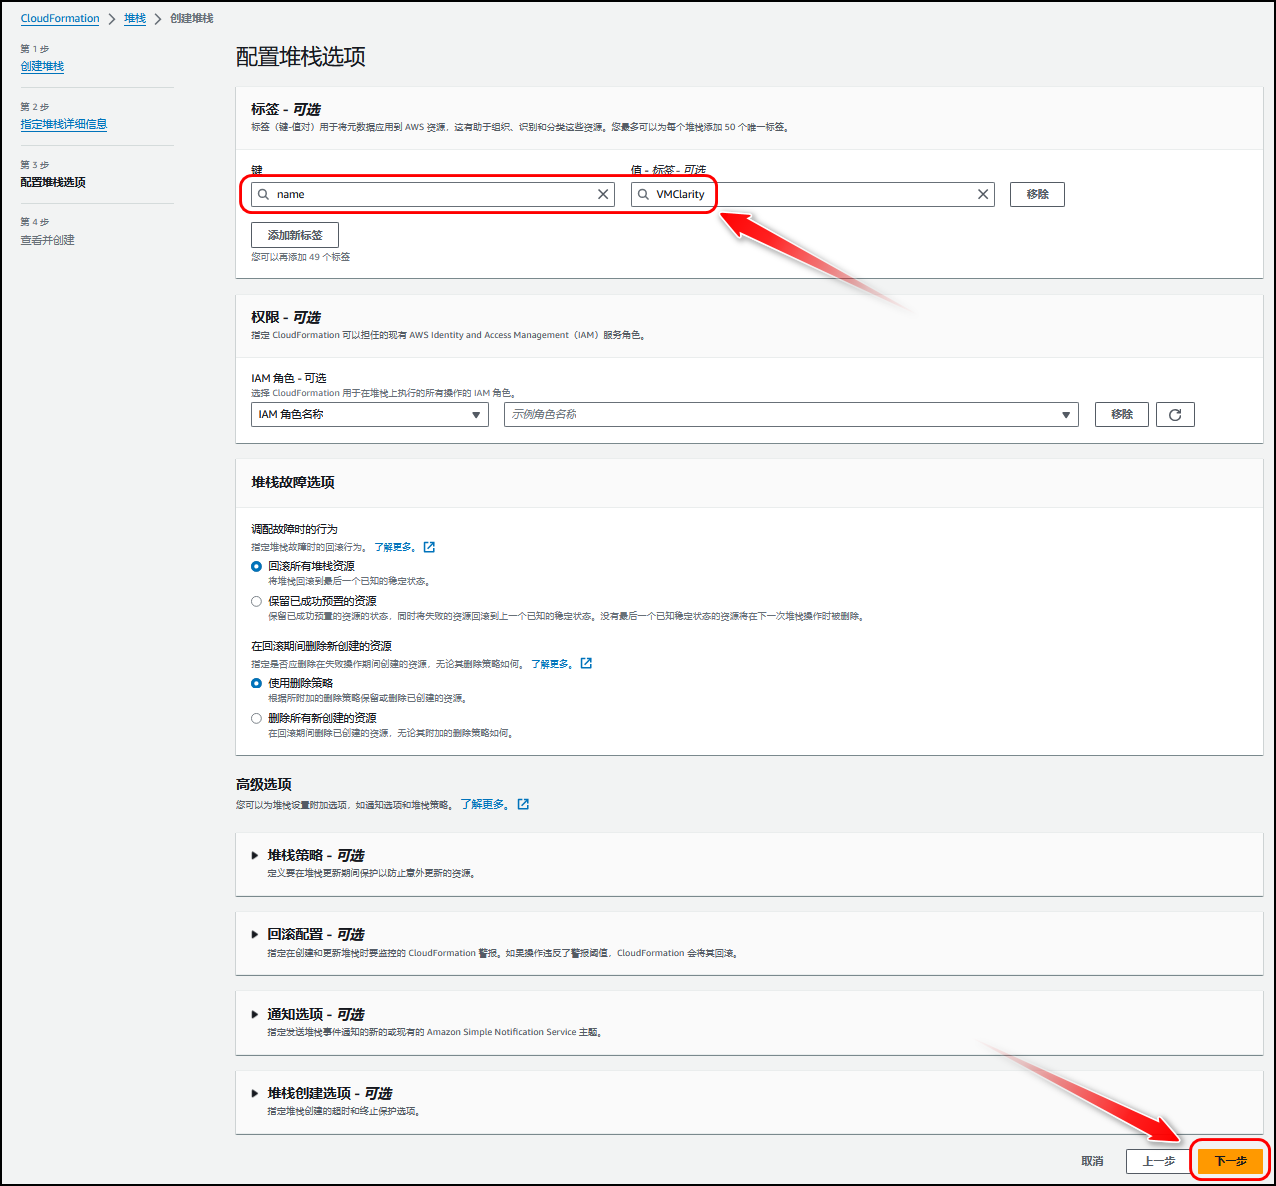
输入标签
name:VMClarity
查看并创建。
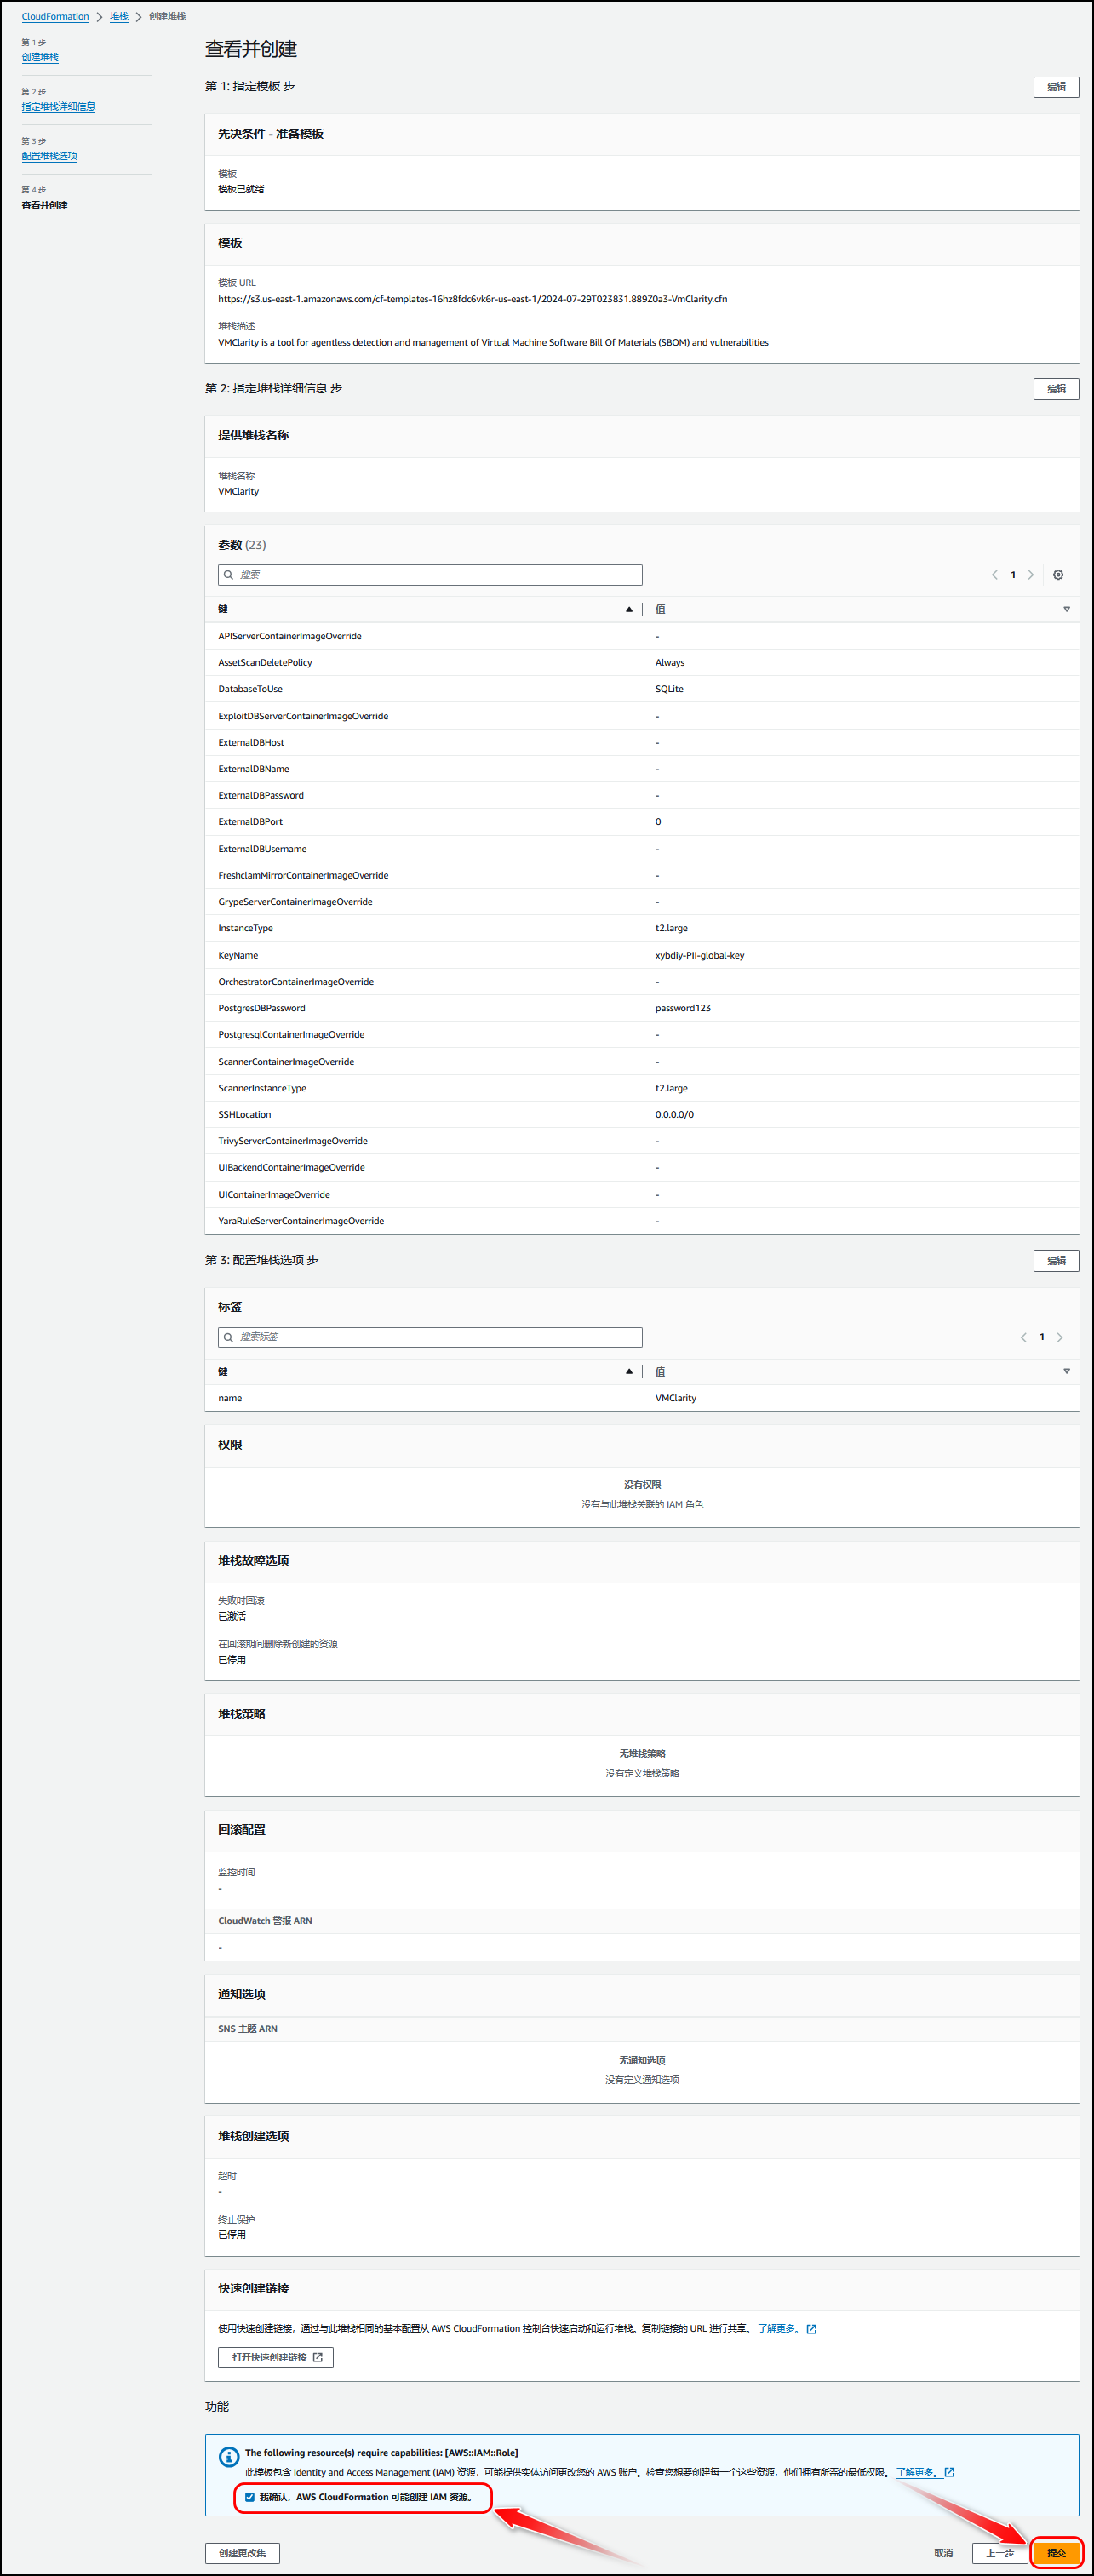
等待部署完成。

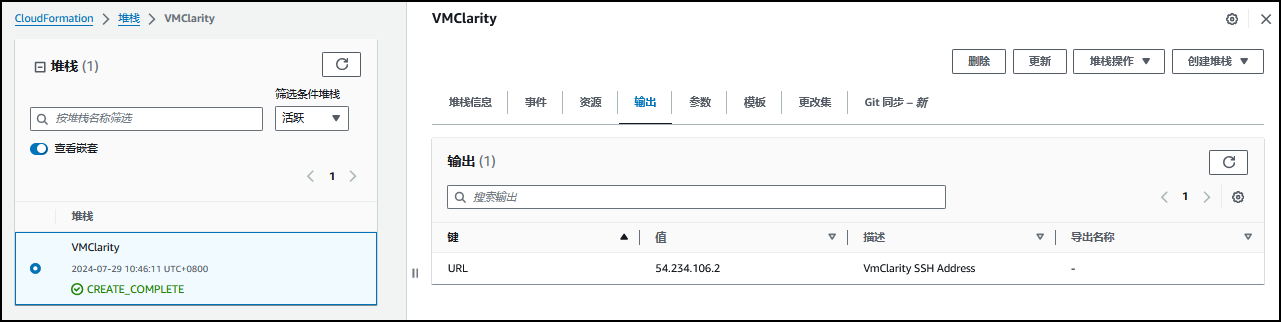
部署完成。

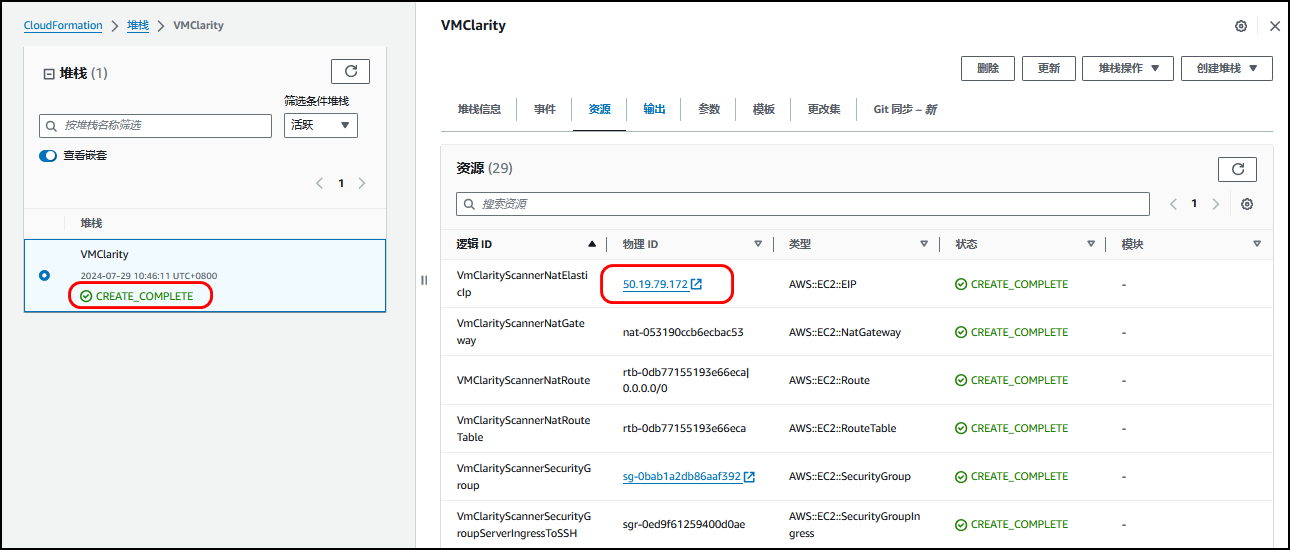
成功部署堆栈后,从 Outputs 选项卡复制 VMClarity SSH 地址。
5.3 打开到 VMClarity 服务器的 SSH 隧道
bash
ssh -N -L 8080:localhost:80 -i "<Path to the SSH key specified during install>" ubuntu@<VmClarity SSH Address copied during install>
5.4 访问 VMClarity UI
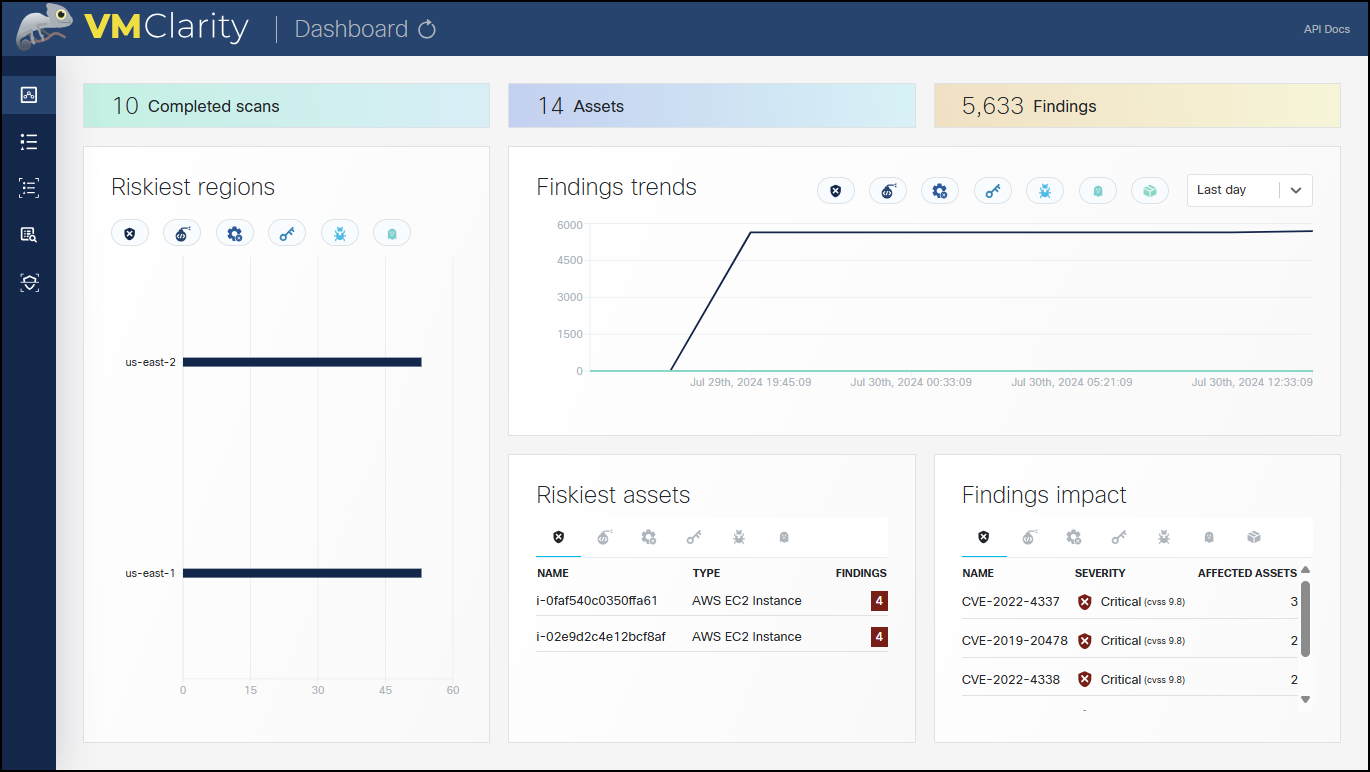
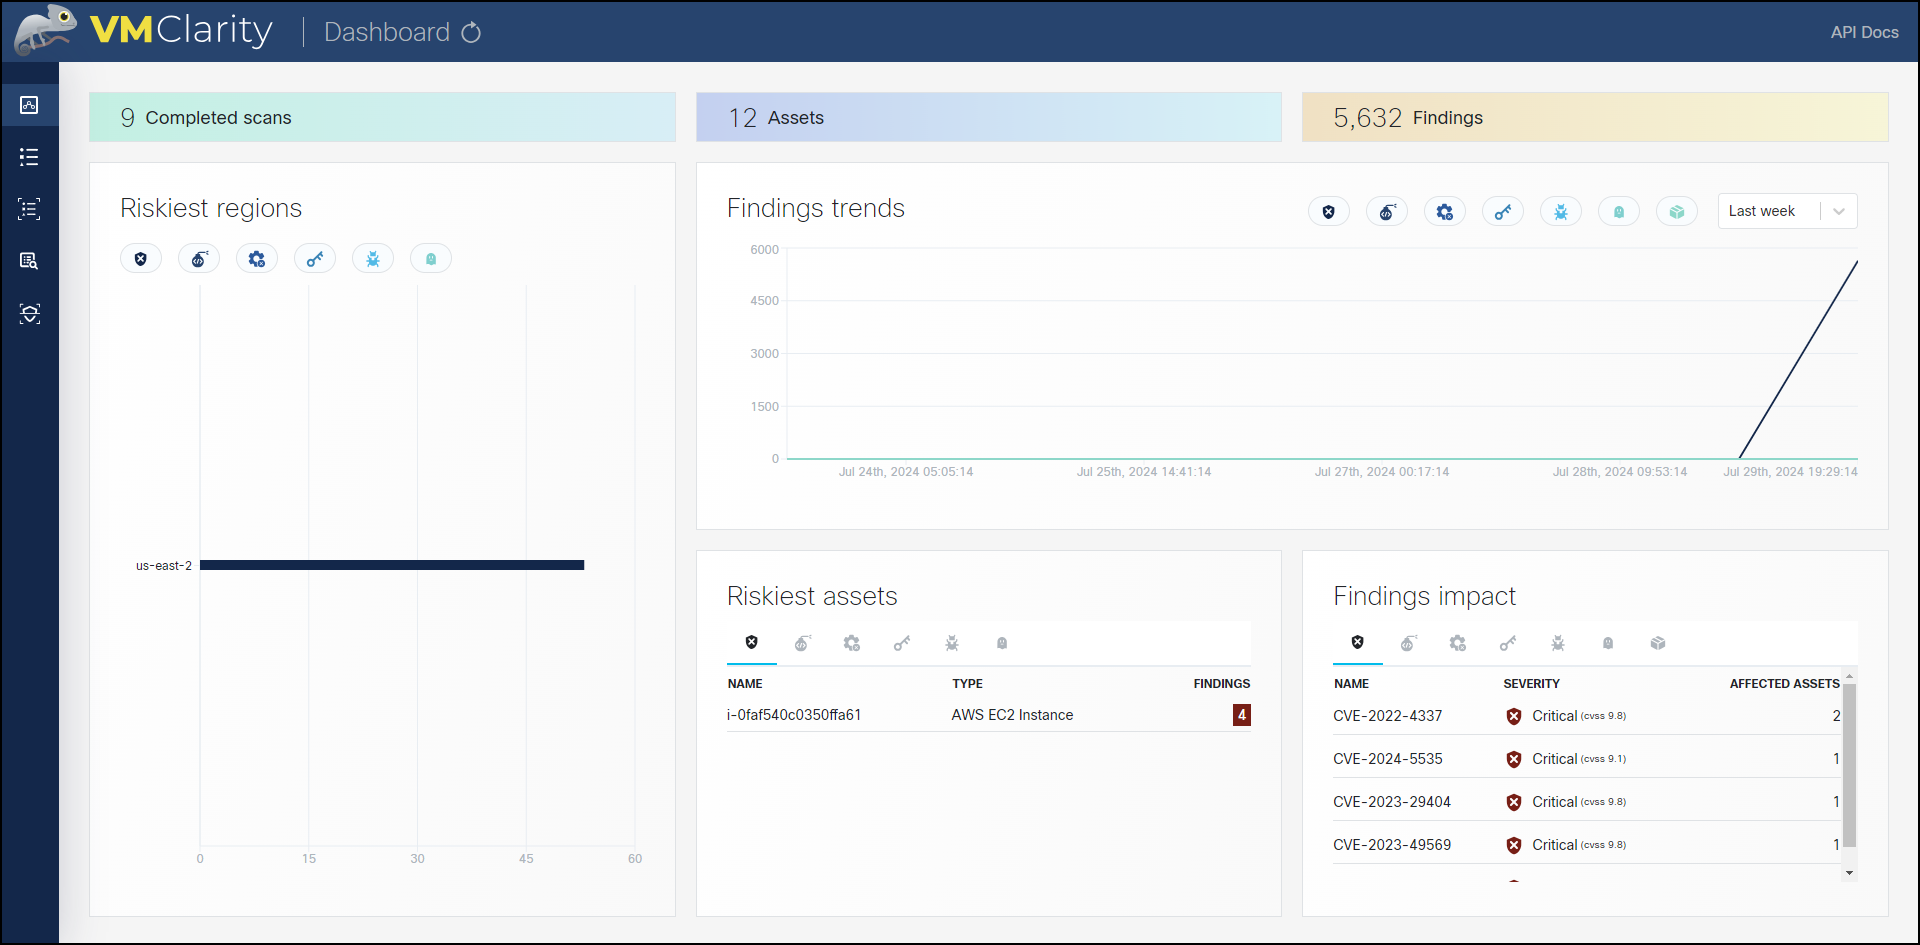
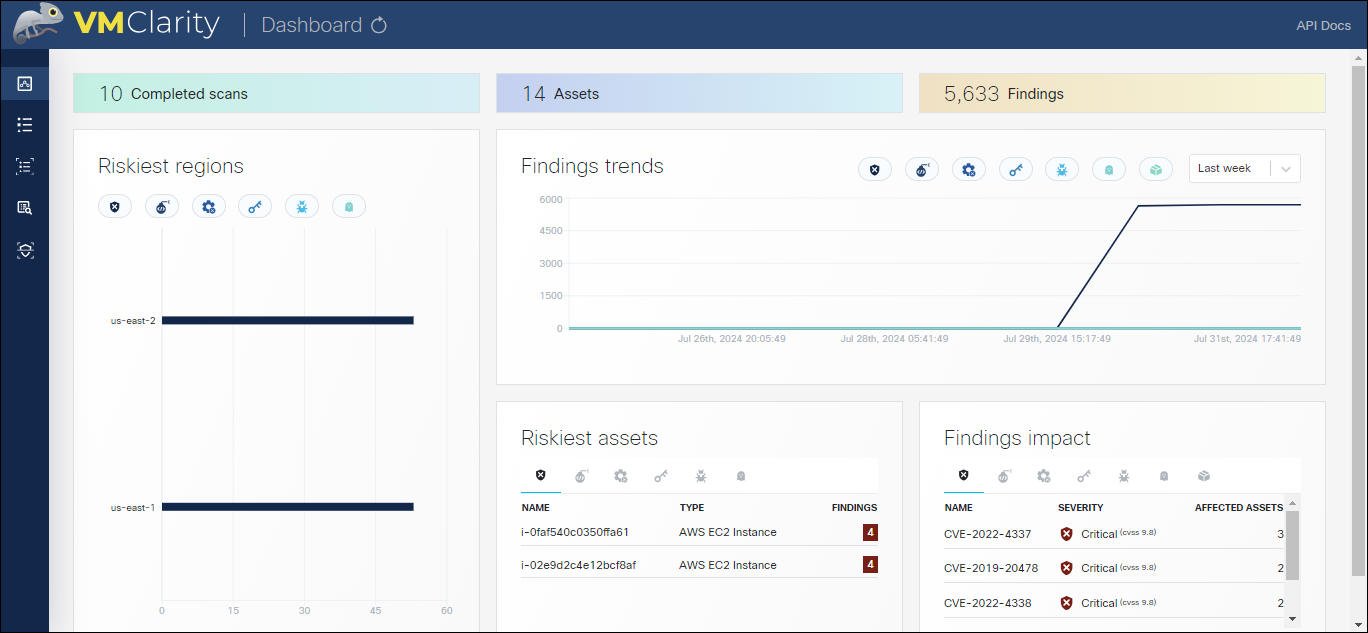
在浏览器中打开 VMClarity UI,输入 http://localhost:8080/。仪表板将打开。
5.5 Assets资产自动发现
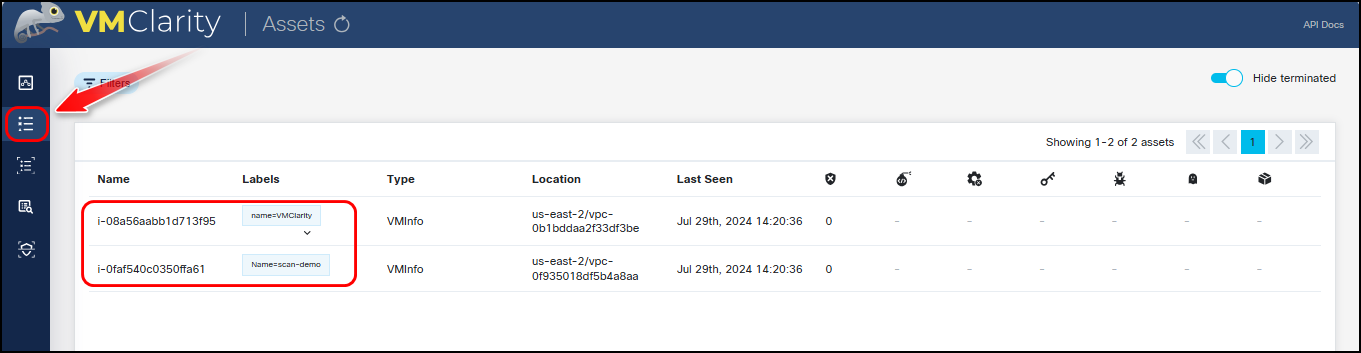
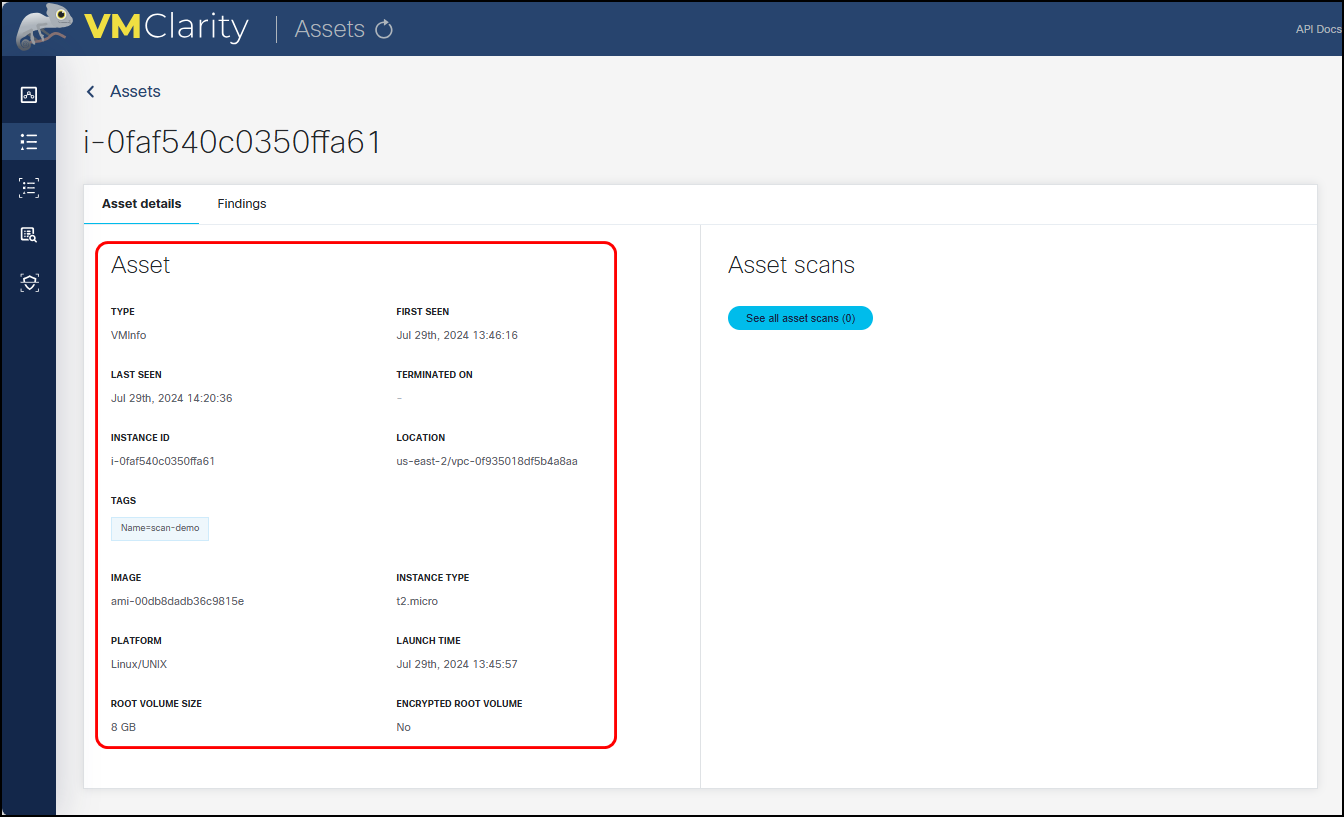
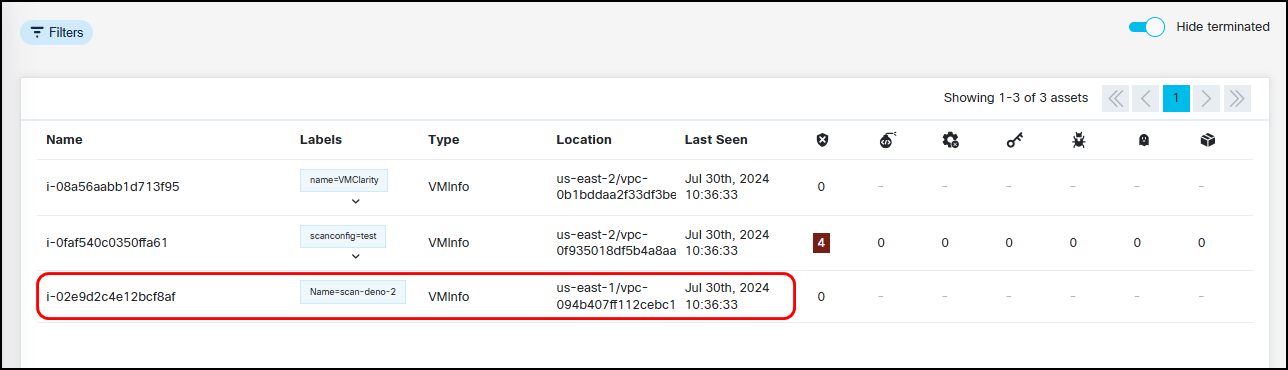
当在AWS其他区域中,新增一台EC2实例,我们可以看到资产同步到控制面板中。
六、案例:使用 VMClarity 检测云安全漏洞
使用 VMClarity 检测云安全漏洞,识别虚拟机上的一些安全问题。
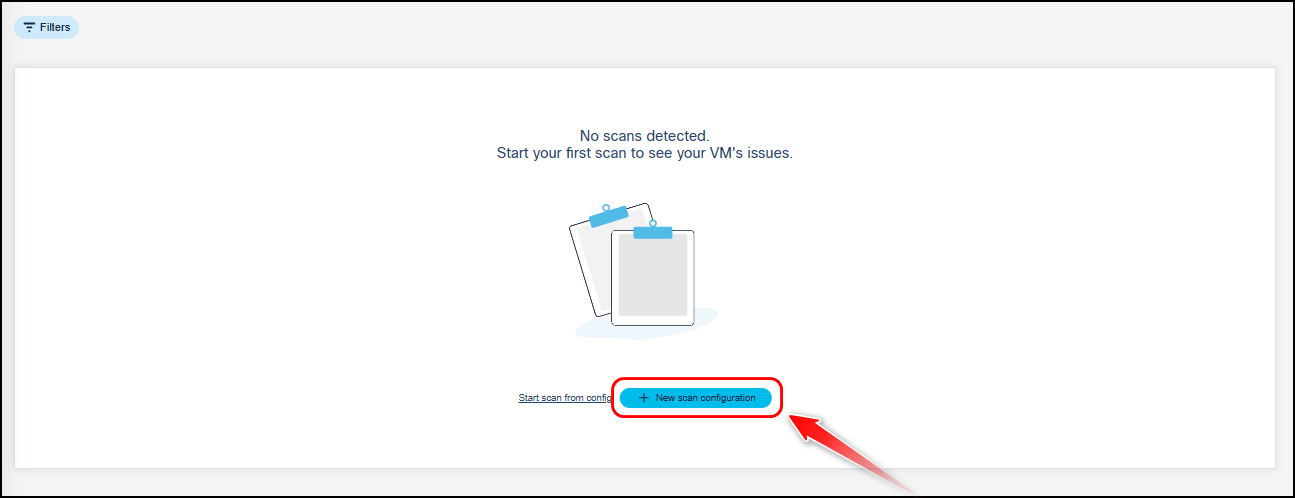
6.1 导航至扫描菜单栏
配置首次扫描任务。单击**"扫描"**图标。在"扫描"窗口中,您可以创建新的扫描配置。
点击
New scan configuration。
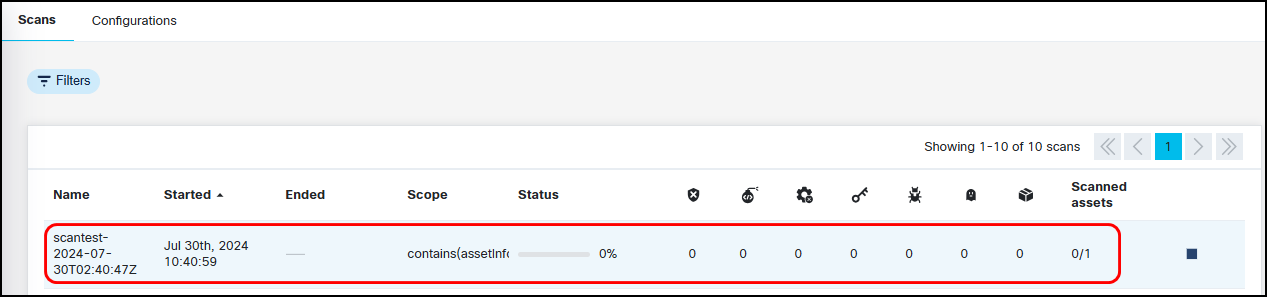
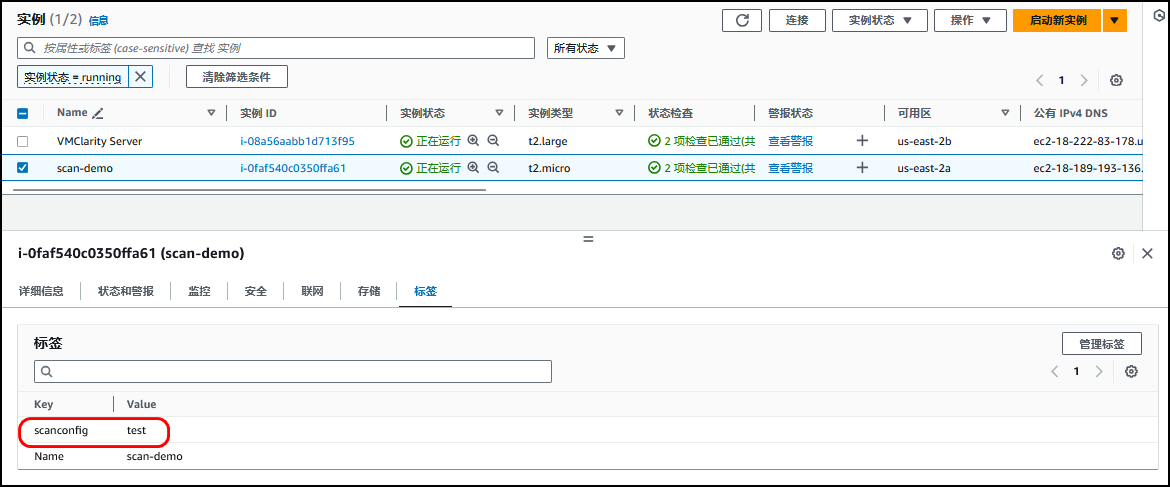
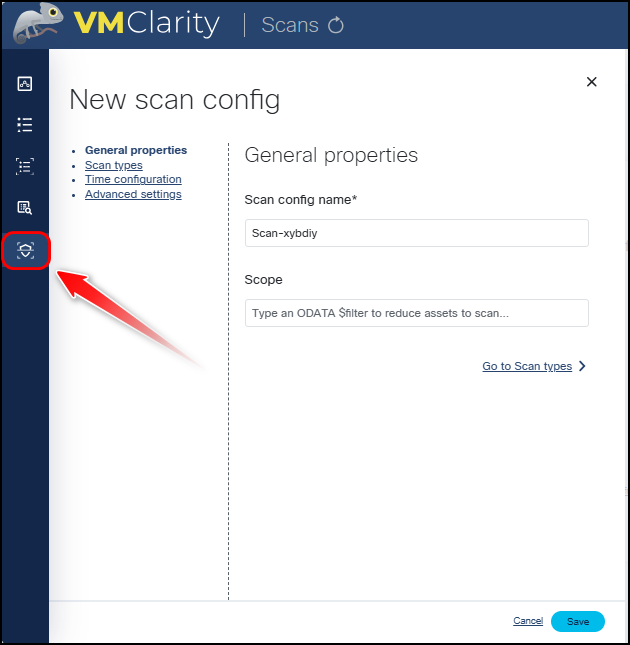
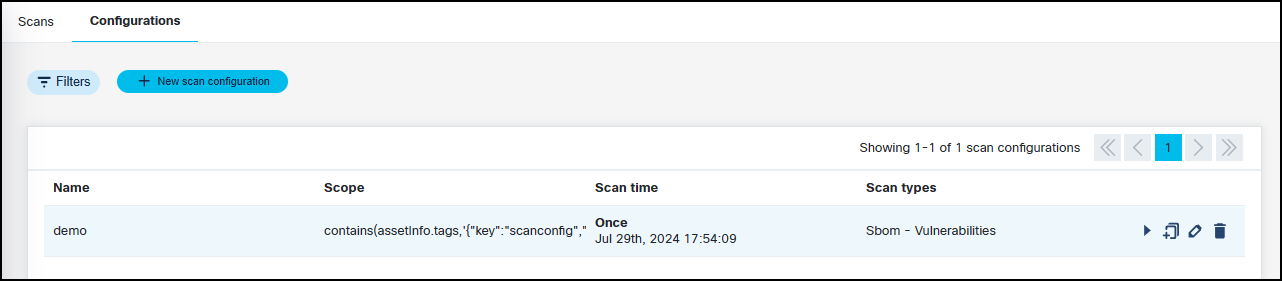
6.2 创建扫描配置名称和范围
Scan config name:demo
Scope:
contains(assetInfo.tags,'{"key":"scanconfig","value":"test"}')
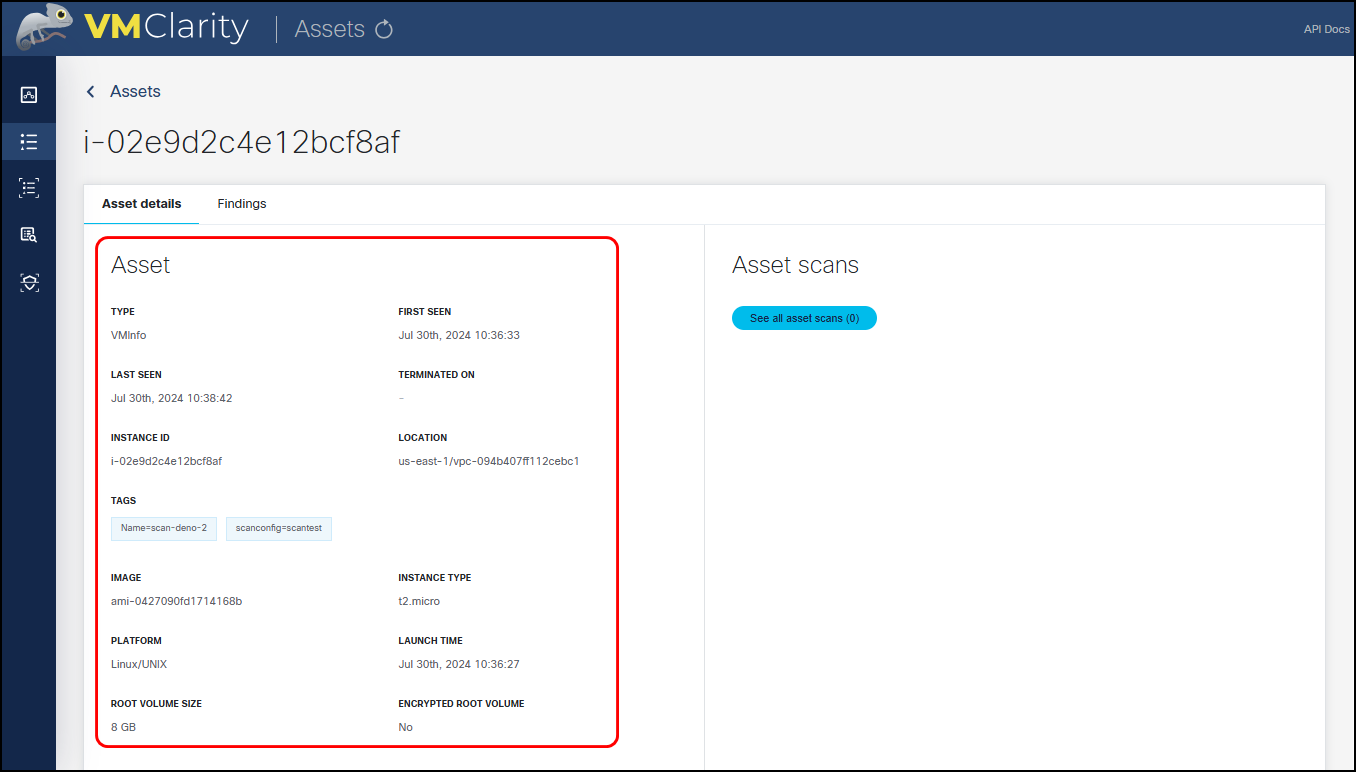
PS:为待检查的VM,添加了一个带有Key
scanconfig和Valuetest的标签。
图 EC2实例标签设置如上所示
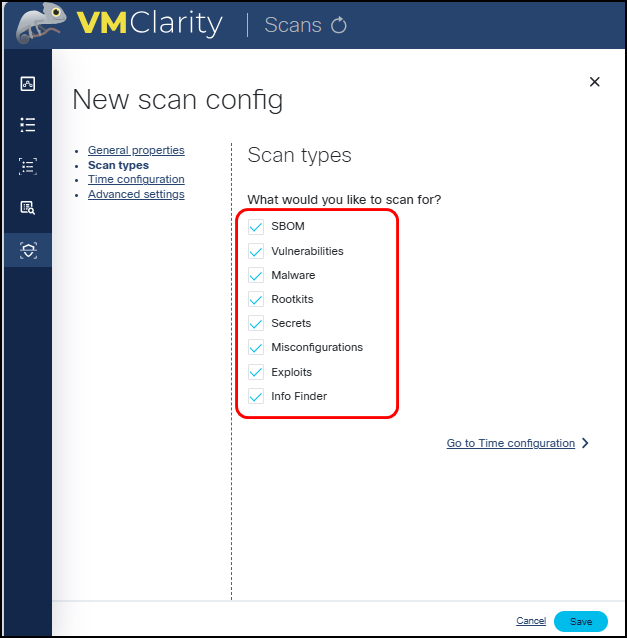
6.3 勾选扫描类型
Scan types:
What would you like to scan for?
- SBOM✅
- Vulnerabilities✅
- Malware
- Rootkits
- Secrets
- Misconfigurations
- Exploits
- Info Finder
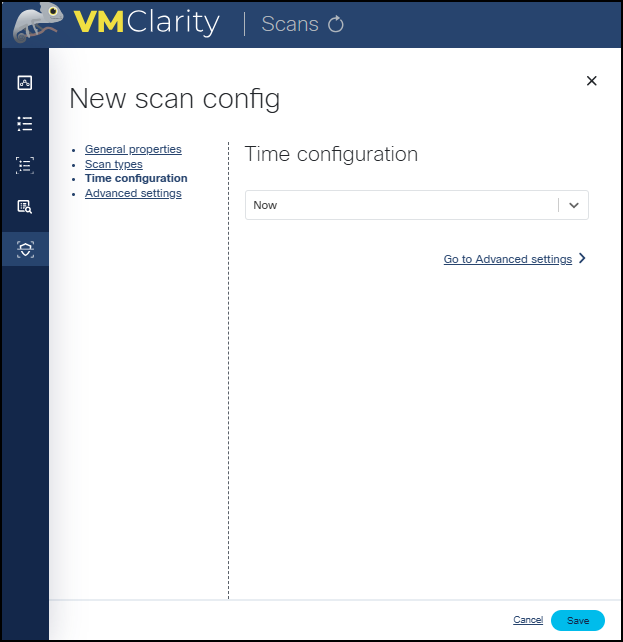
6.4 配置扫描时间
Time configuration:now
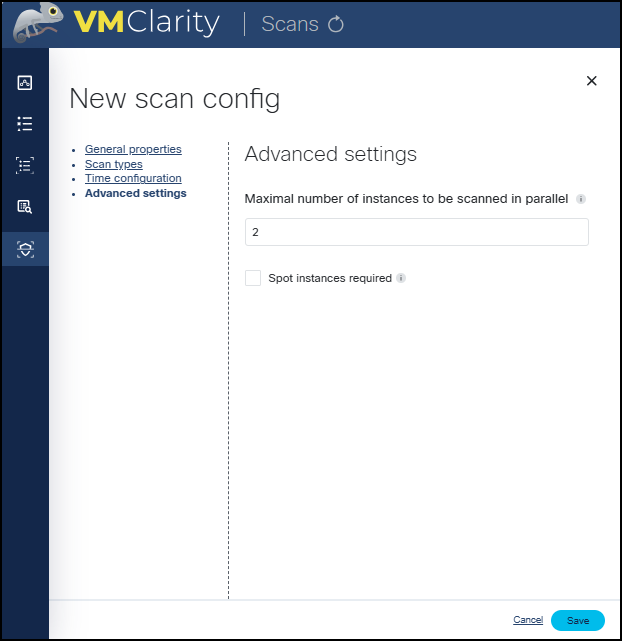
6.5 高级设置
Advanced settings
Maximal number of instances to be scanned in parallel:2(设置一次可以运行多少次扫描。默认值为两次。)
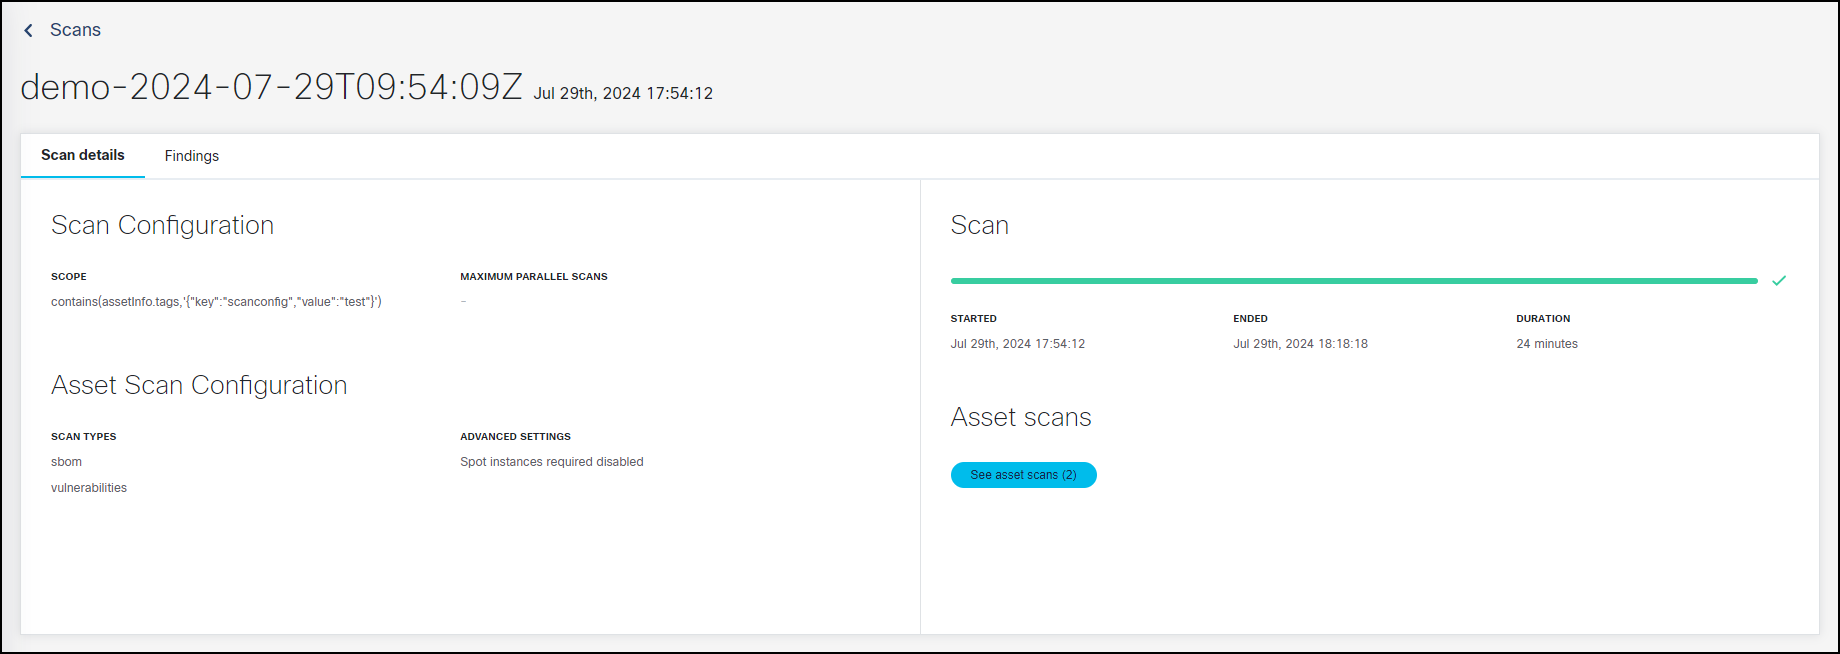
6.6 检查漏洞扫描结果

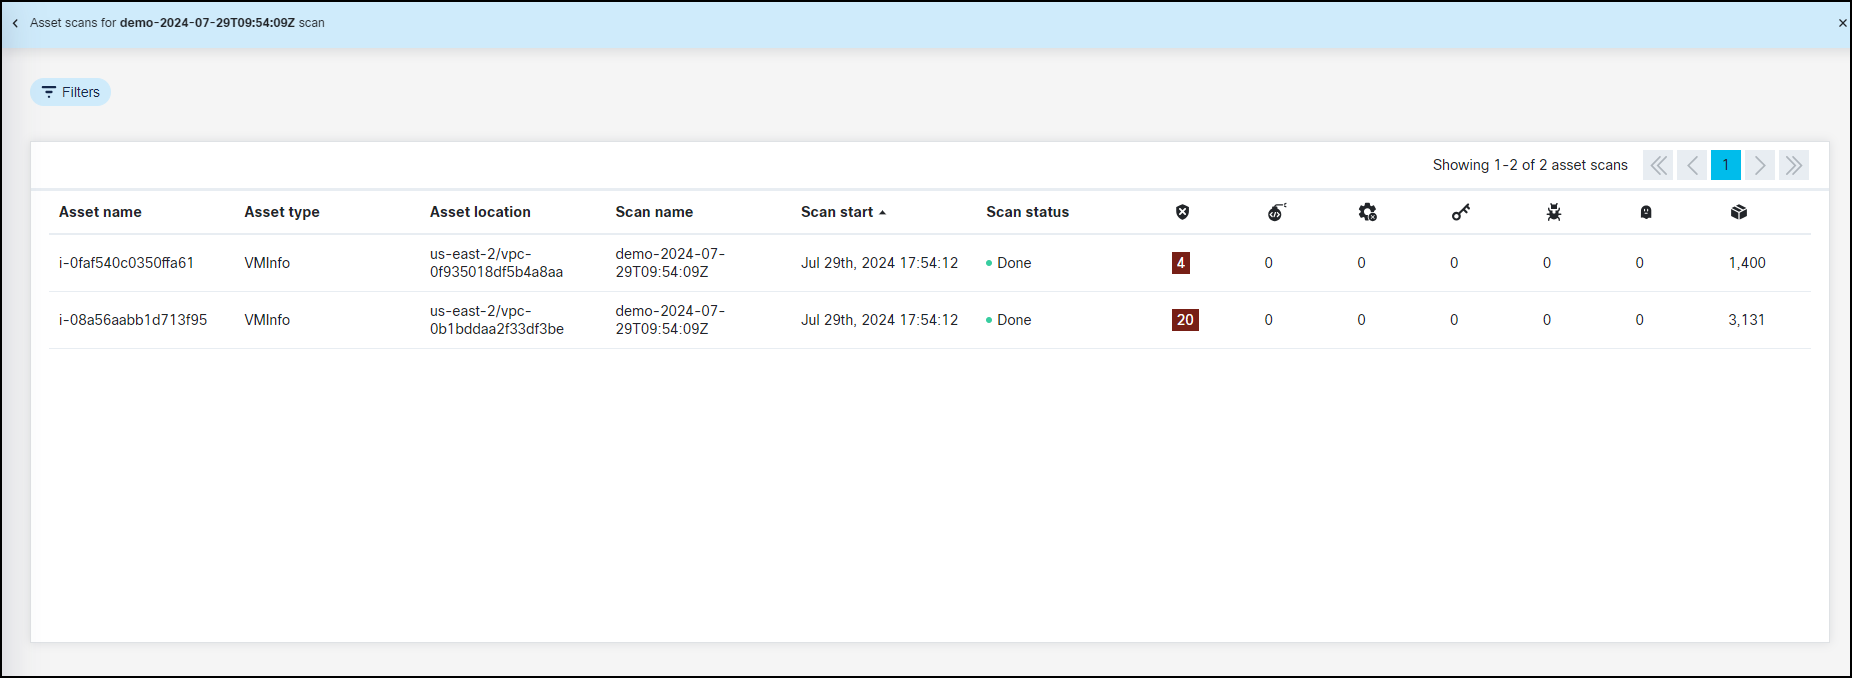
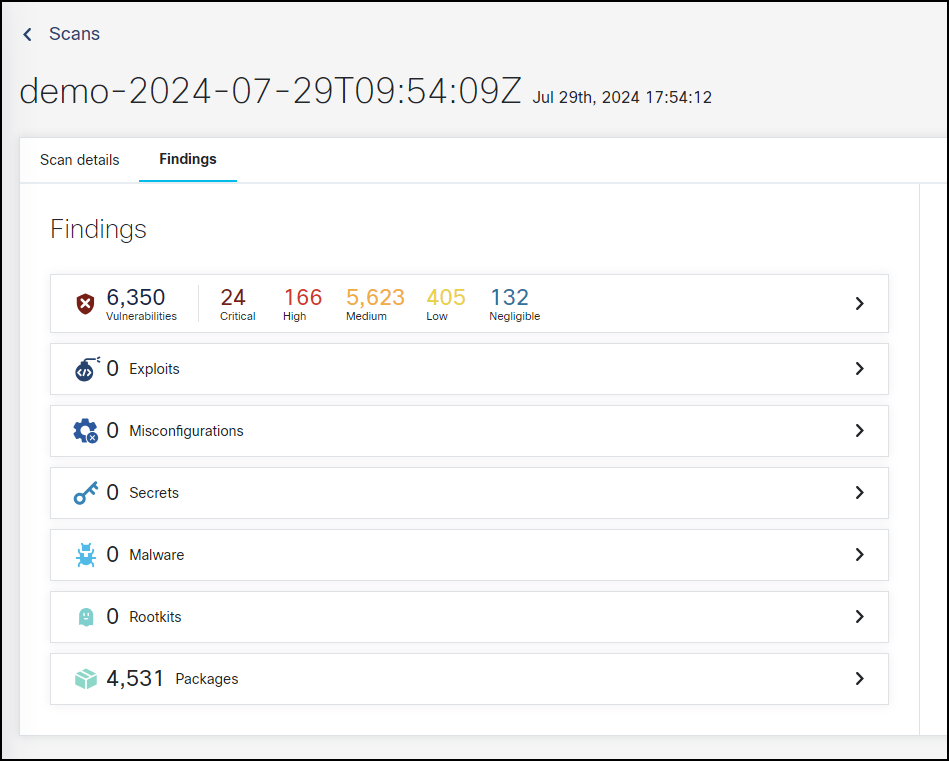

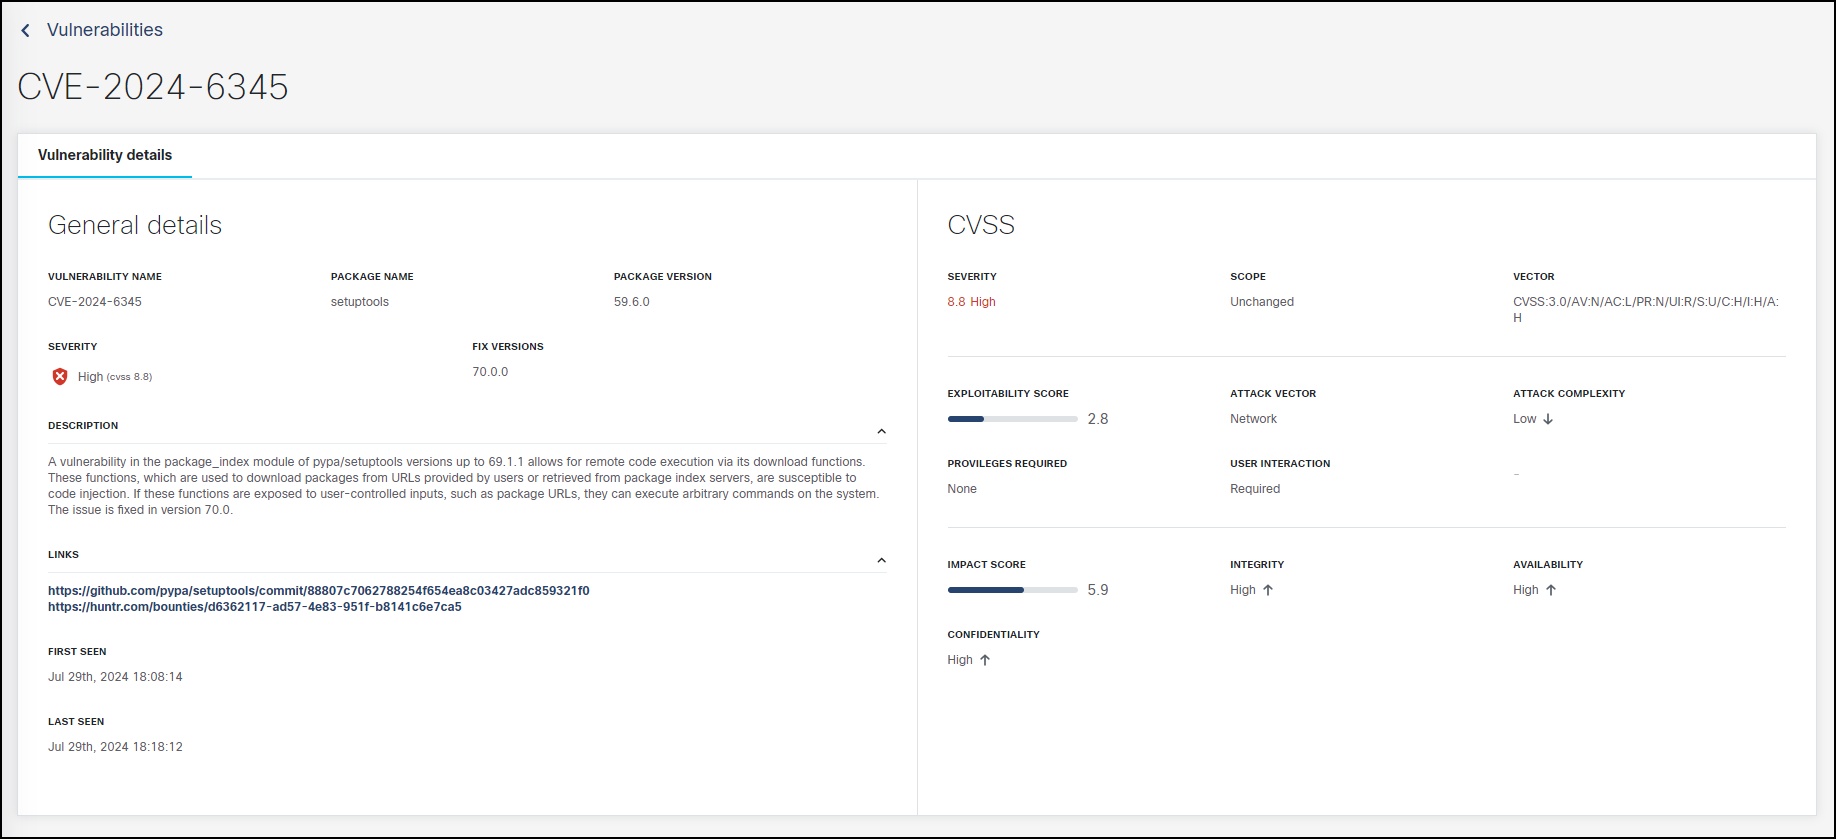
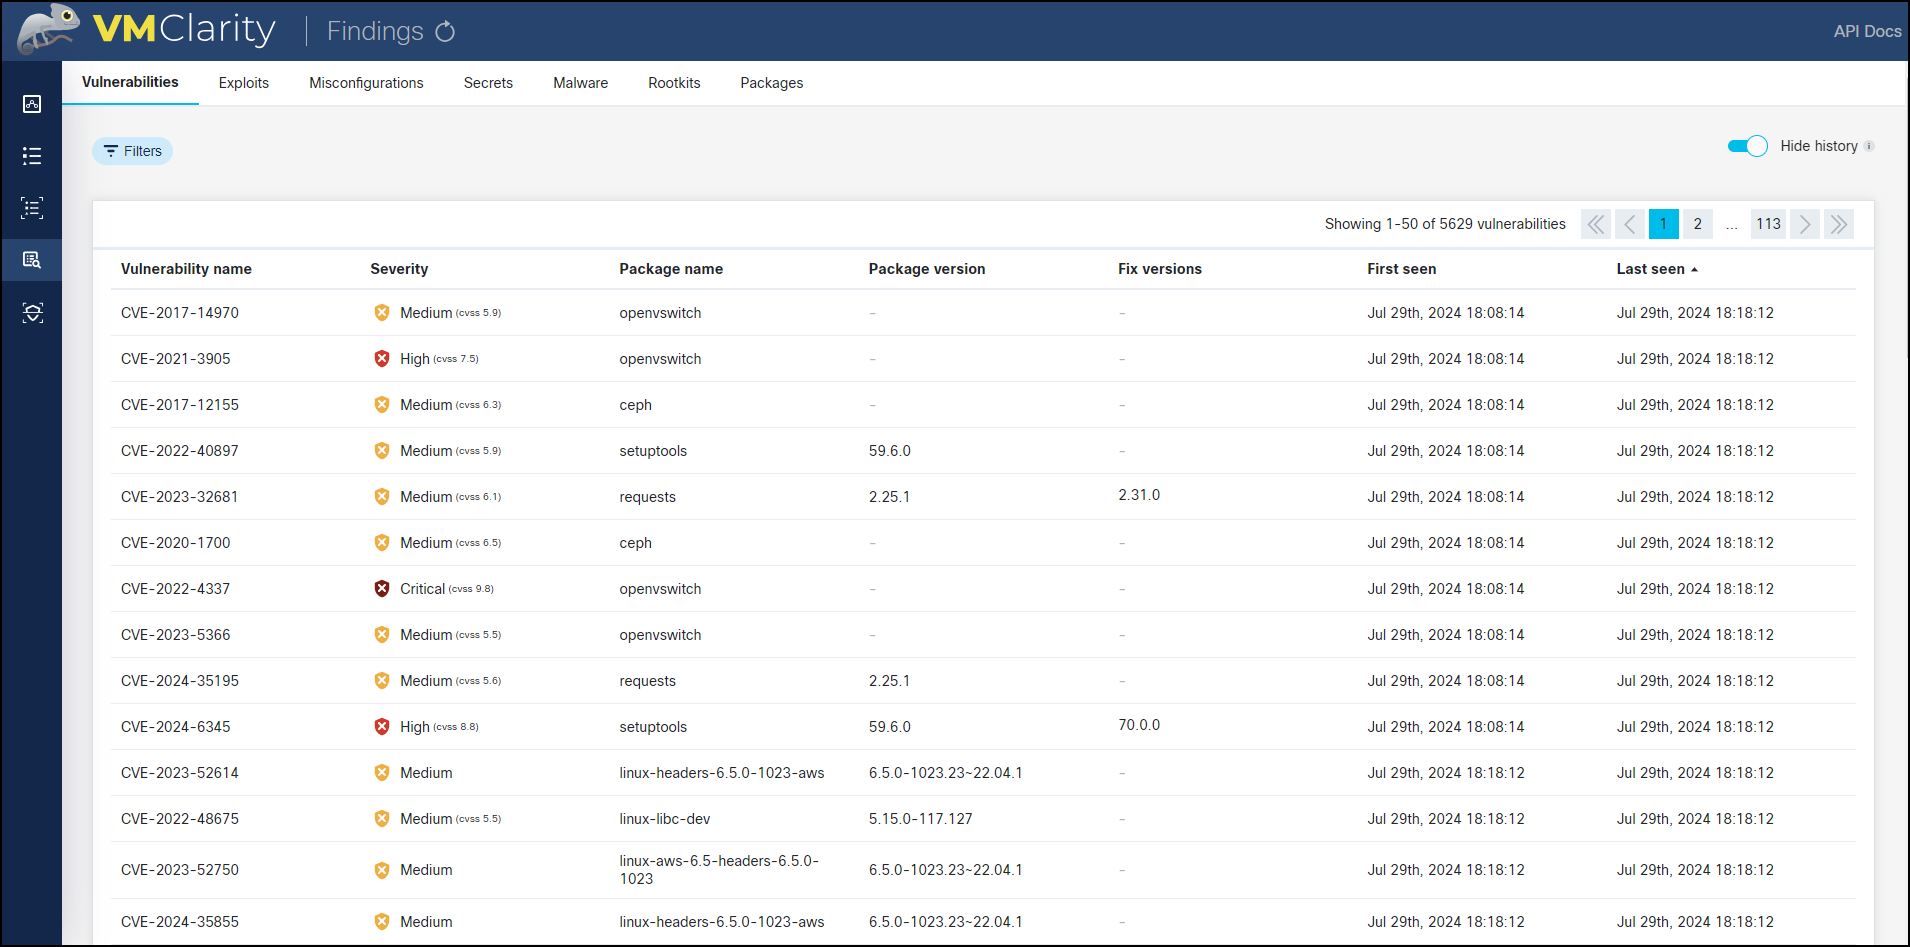
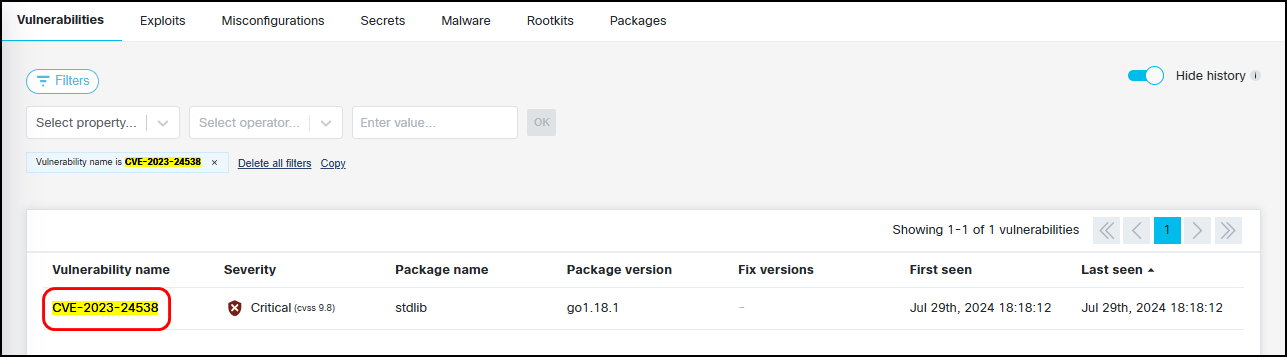
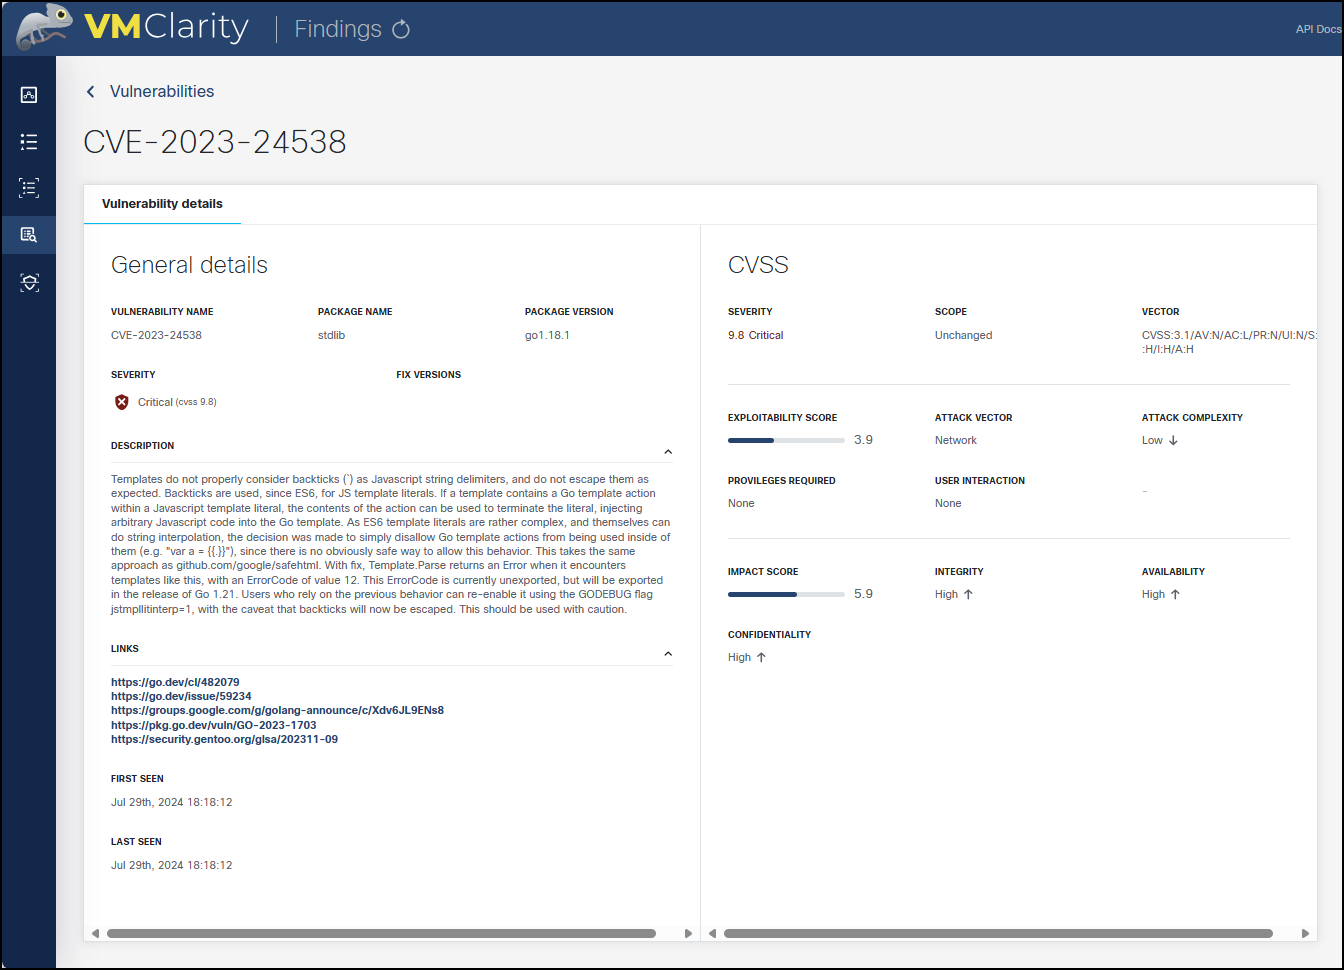
VMClarity 简化了在不同工作负载上运行多个扫描程序的过程,并使安全运营专家能够节省识别易受攻击资产的宝贵时间。
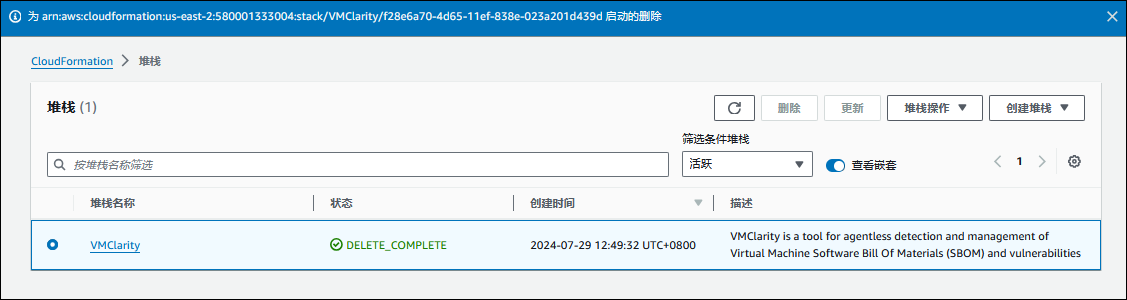
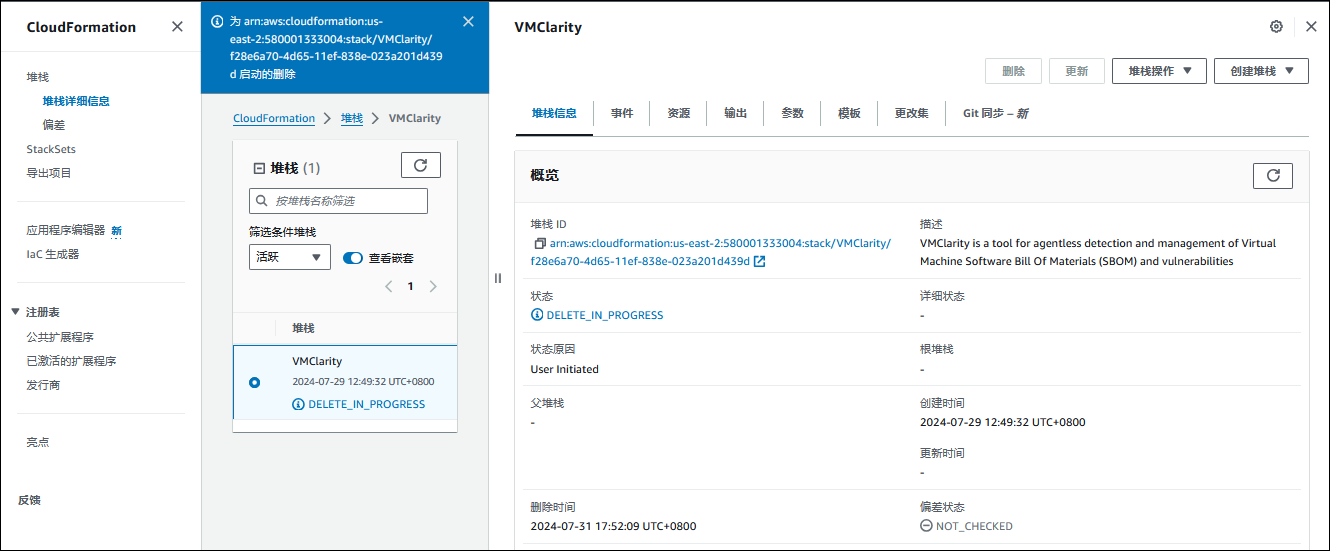
七、清除资源
八、参考链接
1️⃣OpenClarity
2️⃣Deploy on AWS | OpenClarity
3️⃣Outshift | Detecting cloud security vulnerabilities with VMClarity