控件类型
如果您想创建自己的控件,Avalonia中有三个主要的控件类型。首先要做的是选择最适合您使用场景的控件类型。
用户控件(User Controls)
UserControl是创建控件的最简单方法。这种类型的控件最适合特定于应用程序的"视图"或"页面"。UserControl的创建方式与创建Window的方式相同:通过从模板创建一个新的UserControl,并向其添加控件。
模板化控件(Templated Controls)
TemplatedControl最适用于可以在各种应用程序之间共享的通用控件。它们是无外观的控件,意味着可以为不同的主题和应用程序重新定义样式。Avalonia定义的大多数标准控件属于此类型。
信息
在WPF/UWP中,您将从Control类继承以创建新的模板控件,但在Avalonia中,您应该从TemplatedControl继承。
信息
如果您想为模板化控件提供单独的样式文件,请记得通过StyleInclude将此文件包含在您的应用程序中。
基本控件(Basic Controls)
基本控件是用户界面的基础------它们通过重写Visual.Render方法使用几何图形进行绘制。TextBlock和Image等控件属于此类型。
信息
在WPF/UWP中,您将从FrameworkElement类继承以创建新的基本控件,但在Avalonia中,您应该从Control继承。
如何创建自定义面板
这个例子展示了如何覆盖Panel元素的默认布局行为,并创建从Panel派生的自定义布局元素。
该例子定义了一个简单的自定义Panel元素,称为PlotPanel,它根据两个硬编码的x和y坐标来定位子元素。在这个例子中,x和y都设置为50,因此所有子元素都被定位在x和y轴上的该位置。
为了实现自定义的Panel行为,该例子使用了MeasureOverride和ArrangeOverride方法。每个方法返回必要的Size数据来定位和渲染子元素。
public class PlotPanel : Panel
{
    // 重写Panel的默认Measure方法
    protected override Size MeasureOverride(Size availableSize)
    {
        var panelDesiredSize = new Size();

        // 在我们的例子中,这里只有一个子元素。
        // 声明我们的面板只需要其唯一子元素的大小。
        foreach (var child in Children)
        {
            child.Measure(availableSize);
            panelDesiredSize = child.DesiredSize;
        }

        return panelDesiredSize;
    }

    protected override Size ArrangeOverride(Size finalSize)
    {
        foreach (var child in Children)
        {
            double x = 50;
            double y = 50;

            child.Arrange(new Rect(new Point(x, y), child.DesiredSize));
        }

        return finalSize; // 返回最终排列的大小
    }
}
样式化属性
如果您正在创建自定义控件,通常希望它具有可以由_Avalonia UI_样式系统设置的属性。
信息
有关如何在_Avalonia UI_中使用样式的更多信息,请参阅此处的指南。
在本页面中,您将了解如何实现属性,以便可以通过_Avalonia UI_样式系统进行更改。这是一个两步过程:
- 注册样式化属性。
- 为属性提供getter/setter。
注册样式化属性
通过定义一个静态只读字段并使用AvaloniaProperty.Register方法来注册样式化属性。
属性的命名有一个约定。它必须遵循以下模式:
[AttributeName]Property这意味着_Avalonia UI_将在XAML中查找一个属性,如下所示:
<MyCustomControl AttributeName="value" ... >例如,通过使用样式化属性,您可以从窗口样式集合中控制自定义控件的背景颜色:
MainWindow.axaml
<Window xmlns="https://github.com/avaloniaui"
        xmlns:x="http://schemas.microsoft.com/winfx/2006/xaml"
        xmlns:d="http://schemas.microsoft.com/expression/blend/2008"
        xmlns:cc="using:AvaloniaCCExample.CustomControls"
        xmlns:mc="http://schemas.openxmlformats.org/markup-compatibility/2006"
        mc:Ignorable="d" d:DesignWidth="800" d:DesignHeight="450"
        x:Class="AvaloniaCCExample.MainWindow"
        Title="Avalonia Custom Control">

  <Window.Styles>
    <Style Selector="cc|MyCustomControl">
      <Setter Property="Background" Value="Yellow"/>
    </Style>
  </Window.Styles>

  <cc:MyCustomControl Height="200" Width="300"/>

</Window>
MainWindow.axaml.cs
using Avalonia;
using Avalonia.Controls;
using Avalonia.Media;

namespace AvaloniaCCExample.CustomControls
{
    public class MyCustomControl : Control
    {
        public static readonly StyledProperty<IBrush?> BackgroundProperty =
            Border.BackgroundProperty.AddOwner<MyCustomControl>();

        public IBrush? Background
        {
            get { return GetValue(BackgroundProperty); }
            set { SetValue(BackgroundProperty, value); }
        }

        public sealed override void Render(DrawingContext context)
        {
            if (Background != null)
            {
                var renderSize = Bounds.Size;
                context.FillRectangle(Background, new Rect(renderSize));
            }
            base.Render(context);
        }
    }
}
使用属性进行绘制
在这个页面上,您将看到如何使用一个简单属性的值来绘制自定义控件,该属性定义了背景颜色。代码现在如下所示:
MainWindow.xaml
<Window xmlns="https://github.com/avaloniaui"
        xmlns:x="http://schemas.microsoft.com/winfx/2006/xaml"
        xmlns:d="http://schemas.microsoft.com/expression/blend/2008"
        xmlns:cc="using:AvaloniaCCExample.CustomControls"
        xmlns:mc="http://schemas.openxmlformats.org/markup-compatibility/2006"
        mc:Ignorable="d" d:DesignWidth="800" d:DesignHeight="450"
        x:Class="AvaloniaCCExample.MainWindow"
        Title="Avalonia Custom Control">
  <cc:MyCustomControl Height="200" Width="300" Background="Red"/>
</Window>
MyCustomControl.cs
using Avalonia.Controls;

namespace AvaloniaCCExample.CustomControls
{
    public class MyCustomControl : Control
    {
        public IBrush? Background { get; set; }

        public sealed override void Render(DrawingContext context)
        {
            if (Background != null)
            {
                var renderSize = Bounds.Size;
                context.FillRectangle(Background, new Rect(renderSize));
            }

            base.Render(context);
        }
    }
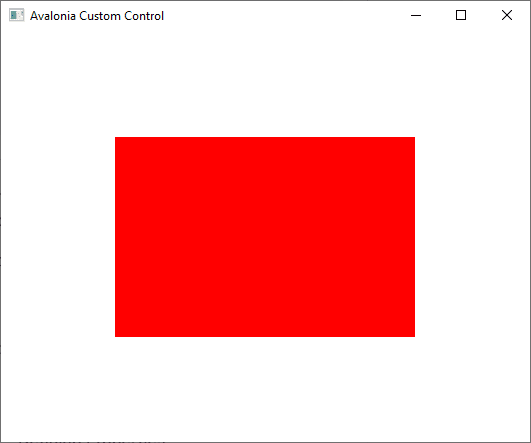
}这个示例在自定义控件上定义了一个简单的笔刷属性,用于背景颜色。然后,它重写了Render方法来绘制控件。
绘制代码使用_Avalonia UI_图形上下文(传递给渲染方法),绘制一个填充有背景颜色的矩形,大小与控件相同(由Bounds.Size对象提供)。

请注意,控件现在在运行时(如上图)和预览窗格中都显示出来。
如何创建自定义控件库
本指南将向您展示如何创建自定义控件库并在_Avalonia UI_应用程序中引用它。

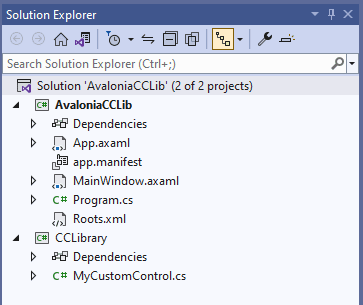
在此示例中,将一个自定义控件文件添加到一个.NET类库中。该库已安装了_Avalonia UI_ _NuGet_包:

-
XAML
-
C#
<Window xmlns="https://github.com/avaloniaui" xmlns:x="http://schemas.microsoft.com/winfx/2006/xaml" xmlns:cc="clr-namespace:CCLibrary;assembly=CCLibrary" xmlns:d="http://schemas.microsoft.com/expression/blend/2008" xmlns:mc="http://schemas.openxmlformats.org/markup-compatibility/2006" mc:Ignorable="d" d:DesignWidth="800" d:DesignHeight="450" x:Class="AvaloniaCCLib.MainWindow" Title="AvaloniaCCLib">
<Window.Styles>
<Style Selector="cc|MyCustomControl">
<Setter Property="Background" Value="Yellow"/>
</Style>
</Window.Styles></Window><cc:MyCustomControl Height="200" Width="300"/>
信息
请注意,控件库的命名空间引用中包含了程序集的名称。
XML命名空间定义
当您在_Avalonia UI_的XAML文件中添加对控件库的引用时,您可能希望使用URL标识格式。例如:
xmlns:cc="https://my.controls.url"这是因为控件库中存在XML命名空间定义。这些定义将URL映射到代码命名空间,并位于项目的Properties/AssemblyInfo.cs文件中。例如:
[assembly: XmlnsDefinition("https://github.com/avaloniaui", "Avalonia")]信息
您可以在_Avalonia UI_内置控件的源代码中查看此内容此处。
常见的命名空间定义
您还可以使一个URL映射到控件库中的多个命名空间。只需添加多个使用相同URL的XML命名空间定义,但映射到不同的代码命名空间,如下所示:
using Avalonia.Metadata;

[assembly: XmlnsDefinition("https://my.controls.url", "My.NameSpace")]
[assembly: XmlnsDefinition("https://my.controls.url", "My.NameSpace.Other")]
如何创建自定义弹出窗口
创建自定义弹出窗口
要创建自定义的弹出窗口类型,需要从FlyoutBase派生。您需要重写抽象方法CreatePresenter()来指定Flyout应该使用哪个Presenter来显示其内容。这可以是任何类型的控件,但请注意,这是内部弹出窗口的根内容,应该使用背景、边框、圆角等样式来匹配其他弹出窗口。如果希望,仍然可以使用普通的FlyoutPresenter。
以下示例创建了一个简单的Flyout,其中包含一个图像。
public class MyImageFlyout : FlyoutBase
{
    public static readonly StyledProperty<IImage> ImageProperty = AvaloniaProperty.Register<MyImageFlyout, IImage>(nameof(Image));

    [Content]
    public IImage Image { get; set; }

    protected override Control CreatePresenter()
    {
        // 在这个示例中,我们将使用默认的FlyoutPresenter作为根内容,并添加一个图像控件来显示我们的内容
        return new FlyoutPresenter
        {
            Content = new Image
            {
                // 在这里使用绑定,这样当属性更新时,图像会自动更新
                [!Image.SourceProperty] = this[!ImageProperty]
            }
        };
    }
}
如何创建高级自定义控件
从自定义控件指南中摘录的内容。
这是Border控件如何定义其Background属性的方式:
AvaloniaProperty.Register方法还接受其他一些参数:
defaultValue:为属性设置默认值。请确保只传递值类型和不可变类型,因为传递引用类型将导致所有注册了该属性的实例使用同一个对象。inherits:指定属性的默认值应来自父控件。defaultBindingMode:属性的默认绑定模式。可以设置为OneWay、TwoWay、OneTime或OneWayToSource。validate:一个类型为Func<TOwner, TValue, TValue>的验证/强制函数。该函数接受正在设置属性的类的实例和值,并返回强制后的值,或者对于无效值抛出异常。
一个样式化属性类似于其他XAML框架中的
DependencyProperty。
属性的命名约定及其对应的AvaloniaProperty字段的命名是重要的。字段的名称始终是属性的名称,后面附加了Property后缀。
在另一个类上使用StyledProperty
有时,您想要添加到自定义控件的属性已经存在于另一个控件上,Background就是一个很好的例子。要注册在另一个控件上定义的属性,您需要调用StyledProperty.AddOwner:
public static readonly StyledProperty<IBrush> BackgroundProperty =
    Border.BackgroundProperty.AddOwner<Panel>();

public Brush Background
{
    get { return GetValue(BackgroundProperty); }
    set { SetValue(BackgroundProperty, value); }
}
注意:与WPF/UWP不同,属性必须在类上注册,否则无法在该类的对象上设置属性。但这可能会在将来发生改变。
只读属性
要创建一个只读属性,您可以使用AvaloniaProperty.RegisterDirect方法。以下是Visual如何注册只读的Bounds属性:
public static readonly DirectProperty<Visual, Rect> BoundsProperty =
    AvaloniaProperty.RegisterDirect<Visual, Rect>(
        nameof(Bounds),
        o => o.Bounds);

private Rect _bounds;

public Rect Bounds
{
    get { return _bounds; }
    private set { SetAndRaise(BoundsProperty, ref _bounds, value); }
}可以看到,只读属性被存储为对象的字段。在注册属性时,传递了一个getter,用于通过GetValue访问属性值,然后使用SetAndRaise通知属性更改的监听器。
附加属性
附加属性的定义与样式化属性几乎相同,只是它们使用RegisterAttached方法进行注册,并且它们的访问器被定义为静态方法。
以下是Grid如何定义其Grid.Column附加属性:
public static readonly AttachedProperty<int> ColumnProperty =
    AvaloniaProperty.RegisterAttached<Grid, Control, int>("Column");

public static int GetColumn(Control element)
{
    return element.GetValue(ColumnProperty);
}

public static void SetColumn(Control element, int value)
{
    element.SetValue(ColumnProperty, value);
}
直接的Avalonia属性
顾名思义,RegisterDirect不仅用于注册只读属性。您还可以将一个_setter_传递给RegisterDirect,将标准的C#属性公开为Avalonia属性。
使用AvaloniaProperty.Register注册的StyledProperty维护了一个优先级列表,其中包含允许样式工作的值和绑定。然而,对于许多属性来说,这是不必要的,比如ItemsControl.Items------它永远不会被样式化,使用样式化属性的开销是不必要的。
以下是ItemsControl.Items的注册方式:
public static readonly DirectProperty<ItemsControl, IEnumerable> ItemsProperty =
    AvaloniaProperty.RegisterDirect<ItemsControl, IEnumerable>(
        nameof(Items),
        o => o.Items,
        (o, v) => o.Items = v);

private IEnumerable _items = new AvaloniaList<object>();

public IEnumerable Items
{
    get { return _items; }
    set { SetAndRaise(ItemsProperty, ref _items, value); }
}
直接属性是样式化属性的轻量级版本,支持以下功能:
- AvaloniaObject.GetValue
- AvaloniaObject.SetValue(非只读属性)
- PropertyChanged
- Binding(仅具有LocalValue优先级)
- GetObservable
- AddOwner
- Metadata
它们不支持以下功能:
- 验证/强制(尽管可以在属性setter中完成)
- 覆盖默认值。
- 继承的值
在另一个类上使用DirectProperty
与样式化属性一样,您可以在直接属性上调用AddOwner来添加一个所有者。由于直接属性引用控件上的字段,因此您还必须为该属性添加一个字段:
public static readonly DirectProperty<MyControl, IEnumerable> ItemsProperty =
    ItemsControl.ItemsProperty.AddOwner<MyControl>(
        o => o.Items,
        (o, v) => o.Items = v);

private IEnumerable _items = new AvaloniaList<object>();

public IEnumerable Items
{
    get { return _items; }
    set { SetAndRaise(ItemsProperty, ref _items, value); }
}
何时使用Direct属性和Styled属性
通常情况下,应将属性声明为样式化属性。但是,直接属性具有优点和缺点:
优点:
- 每个实例不需要额外的对象来存储属性
- 属性getter是标准的C#属性getter
- 属性setter是引发事件的标准C#属性setter
- 您可以添加数据验证支持
缺点:
- 无法从父控件继承值
- 无法利用Avalonia的样式系统
- 属性值是一个字段,因此无论属性是否在对象上设置,都会被分配内存
因此,当满足以下要求时,请使用直接属性:
- 属性不需要样式化
- 属性通常或总是具有值
数据验证支持
如果要允许属性验证数据并显示验证错误消息,则该属性必须实现为DirectProperty,并且必须启用验证支持(enableDataValidation: true)。
启用数据验证的属性示例
public static readonly DirectProperty<MyControl, int> ValueProperty =
    AvaloniaProperty.RegisterDirect<MyControl, int>(
        nameof(Value),
        o => o.Value,
        (o, v) => o.Value = v,
enableDataValidation: true);如果要重用另一个类的直接属性,也可以启用数据验证。在这种情况下,请使用AddOwnerWithDataValidation。
示例:TextBox.TextProperty属性重用TextBlock.TextProperty,但添加了验证支持
public static readonly DirectProperty<TextBox, string?> TextProperty =
    TextBlock.TextProperty.AddOwnerWithDataValidation<TextBox>(
        o => o.Text,
        (o, v) => o.Text = v,
        defaultBindingMode: BindingMode.TwoWay,
        enableDataValidation: true);
如何创建附加属性
当您需要在Avalonia元素上添加更多或者说外部属性时,附加属性是正确的选择。它还可以用于创建所谓的行为,通常用以修改托管的GUI组件。它可以用于将命令绑定到事件上。
下面是一个示例,展示了如何以符合MVVM的方式使用命令,并将其绑定到事件上。
这可能不是最理想的解决方案,因为有一些项目(如Avalonia Behaviors)可以正确地完成这个任务。但它说明了以下两个要点:
- 如何在_Avalonia UI_中创建附加属性
- 如何以MVVM的方式使用它们
首先,我们需要创建我们的附加属性。使用AvaloniaProperty.RegisterAttached方法来实现。请注意,按照约定,附加属性的public static CLR属性的名称应为 XxxxProperty 。还请注意,按照约定,附加属性的名称(参数)应为 Xxxx ,不包括 Property 。最后,请注意,按照约定,必须提供两个名为 SetXxxx(element,value) 和 GetXxxx(element) 的public static方法。
这个调用确保属性具有类型、所有者类型和可以使用的类型。
验证方法可以用来清理正在设置的值。可以通过返回更正后的值或返回AvaloniaProperty.UnsetValue来丢弃该过程。或者可以执行与托管属性的元素相关的特殊任务。获取器和设置器方法应该只设置值,不要做其他任何操作。实际上,它们通常不会被调用,因为绑定系统会识别约定并直接在存储属性的位置设置属性。
在这个示例文件中,我们创建了两个相互交互的附加属性:一个 Command 属性和一个 CommandParameter 属性,用于在调用命令时使用。
/// <summary>
/// 附加属性的容器类。必须继承自<see cref="AvaloniaObject"/>。
/// </summary>
public class DoubleTappedBehav : AvaloniaObject
{
    static DoubleTappedBehav()
    {
        CommandProperty.Changed.AddClassHandler<Interactive>(HandleCommandChanged);
    }

    /// <summary>
    /// 标识<seealso cref="CommandProperty"/> avalonia附加属性。
    /// </summary>
    /// <value>提供一个派生自<see cref="ICommand"/>的对象或绑定。</value>
    public static readonly AttachedProperty<ICommand> CommandProperty = AvaloniaProperty.RegisterAttached<DoubleTappedBehav, Interactive, ICommand>(
        "Command", default(ICommand), false, BindingMode.OneTime);

    /// <summary>
    /// 标识<seealso cref="CommandParameterProperty"/> avalonia附加属性。
    /// 用作<see cref="CommandProperty"/>的参数。
    /// </summary>
    /// <value>任何类型为<see cref="object"/>的值。</value>
    public static readonly AttachedProperty<object> CommandParameterProperty = AvaloniaProperty.RegisterAttached<DoubleTappedBehav, Interactive, object>(
        "CommandParameter", default(object), false, BindingMode.OneWay, null);


    /// <summary>
    /// <see cref="CommandProperty"/>的变化事件处理程序。
    /// </summary>
    private static void HandleCommandChanged(Interactive interactElem, AvaloniaPropertyChangedEventArgs args)
    {
        if (args.NewValue is ICommand commandValue)
        {
             // 添加非空值
             interactElem.AddHandler(InputElement.DoubleTappedEvent, Handler);
        }
        else
        {
             // 删除之前的值
             interactElem.RemoveHandler(InputElement.DoubleTappedEvent, Handler);
        }
        // 本地处理函数
        static void Handler(object s, RoutedEventArgs e)
        {
            if (s is Interactive interactElem)
            {
                // 这是如何从GUI元素中获取参数的方法。
                object commandParameter = interactElem.GetValue(CommandParameterProperty);
                ICommand commandValue = interactElem.GetValue(CommandProperty);
                if (commandValue?.CanExecute(commandParameter) == true)
                {
                    commandValue.Execute(commandParameter);
                }
            }
        }
    }


    /// <summary>
    /// 附加属性<see cref="CommandProperty"/>的访问器。
    /// </summary>
    public static void SetCommand(AvaloniaObject element, ICommand commandValue)
    {
        element.SetValue(CommandProperty, commandValue);
    }

    /// <summary>
    /// 附加属性<see cref="CommandProperty"/>的访问器。
    /// </summary>
    public static ICommand GetCommand(AvaloniaObject element)
    {
        return element.GetValue(CommandProperty);
    }

    /// <summary>
    /// 附加属性<see cref="CommandParameterProperty"/>的访问器。
    /// </summary>
    public static void SetCommandParameter(AvaloniaObject element, object parameter)
    {
        element.SetValue(CommandParameterProperty, parameter);
    }

    /// <summary>
    /// 附加属性<see cref="CommandParameterProperty"/>的访问器。
    /// </summary>
    public static object GetCommandParameter(AvaloniaObject element)
    {
        return element.GetValue(CommandParameterProperty);
    }
}在验证方法中,我们利用路由事件系统来附加一个新的处理程序。请注意,处理程序应该被再次分离。属性的值是通过正常的程序机制使用GetValue()方法来请求的。
这个示例UI展示了如何使用附加属性。在将命名空间告知XAML编译器后,可以通过在前面加上一个点来使用它。然后可以使用绑定。
<UserControl xmlns="https://github.com/avaloniaui"
             xmlns:x="http://schemas.microsoft.com/winfx/2006/xaml"
             xmlns:loc="clr-namespace:MyApp.Behaviors"
             x:Class="MyApp.Views.TestView">
    <ListBox ItemsSource="{Binding Accounts}"
             SelectedIndex="{Binding SelectedAccountIdx, Mode=TwoWay}"
             loc:DoubleTappedBehav.Command="{Binding EditCommand}"
             loc:DoubleTappedBehav.CommandParameter="test77"
             >
      <ListBox.ItemTemplate>
        <DataTemplate>
          <TextBlock Text="{Binding }" />
        </DataTemplate>
      </ListBox.ItemTemplate>
    </ListBox>
</UserControl>虽然CommandParameter只使用了一个静态值,但它也可以与绑定一起使用。当与这个视图模型一起使用时,一旦发生双击,EditCommandExecuted就会运行。
public class TestViewModel : ReactiveObject
{
    public ObservableCollection<Profile> Accounts { get; } = new ObservableCollection<Profile>();

    public ReactiveCommand<object, Unit> EditCommand { get; set; }

    public TestViewModel()
    {
        EditCommand = ReactiveCommand.CreateFromTask<object, Unit>(EditCommandExecuted);
    }

    private async Task<Unit> EditCommandExecuted(object p)
    {
        // p包含"test77"

        return Unit.Default;
    }
}
如何创建模板化控件
数据绑定
当你创建一个控件模板并且想要绑定到模板化的父级时,你可以使用以下方式:
<TextBlock Name="tb" Text="{TemplateBinding Caption}"/>

<!-- 这与以下方式相同 -->
<TextBlock Name="tb" Text="{Binding Caption, RelativeSource={RelativeSource TemplatedParent}}"/>
虽然这里展示的两种语法在大多数情况下是等效的,但是有一些区别:
-
TemplateBinding只接受单个属性而不是属性路径,所以如果你想要使用属性路径进行绑定,你必须使用第二种语法:<!-- 这样是行不通的,因为 TemplateBinding 只接受单个属性 --> <TextBlock Name="tb" Text="{TemplateBinding Caption.Length}"/> <!-- 在这种情况下必须使用以下语法 --> <TextBlock Name="tb" Text="{Binding Caption.Length, RelativeSource={RelativeSource TemplatedParent}}"/> -
由于性能原因,
TemplateBinding只支持OneWay模式(这与 WPF 相同)。这意味着TemplateBinding实际上等同于{Binding RelativeSource={RelativeSource TemplatedParent}, Mode=OneWay}。如果在控件模板中需要TwoWay绑定,则需要使用完整的语法,如下所示。请注意,Binding也将使用默认的绑定模式,不同于TemplateBinding。{Binding RelativeSource={RelativeSource TemplatedParent}, Mode=TwoWay} -
<GeometryDrawing Brush="{TemplateBinding Foreground}"/> <GeometryDrawing Brush="{Binding Foreground, RelativeSource={RelativeSource TemplatedParent}}"/>TemplateBinding只能在IStyledElement上使用。
如何创建自定义控件
本指南将向您展示如何使用_Avalonia UI_创建一个简单的自定义控件。
在开始创建自己的控件之前,您必须决定要实现哪种类型的自定义控件,选择如下:
- 自定义控件
- 模板化自定义控件
自定义控件
自定义控件使用_Avalonia UI_图形系统绘制自身,使用基本的形状、线条、填充、文本等方法。您可以定义自己的属性、事件和伪类。
_Avalonia UI_的一些内置控件就是这样的。例如,文本块控件(TextBlock类)和图像控件(Image类)。
模板化自定义控件
模板化自定义控件创建了一个"无外观"的控件,可以通过项目中包含的主题或样式字典设置样式。该控件有用于属性和事件以及处理的代码,但没有关于如何绘制的属性或指令。模板化控件会根据主题或样式选择属性,如画笔颜色、线条粗细、圆角等。绘制指令在主题中。
大部分_Avalonia UI_的内置控件都是模板化的。
信息
有关如何创建模板化控件的指导,请参见此处。
以下页面将向您展示如何创建一个简单的自定义控件(继承自Control)。
添加自定义控件类
您可以使用继承自_Avalonia UI_ Control 类的类来创建自定义控件。您可以将自定义控件类放置在应用程序项目的任何位置,或者将其包含在另一个控件库项目中。
信息
有关创建自定义控件库的更多信息,请参阅此处。
无论您选择将自定义控件类放置在何处,您都必须能够在XAML中引用它。例如,以下代码显示了将自定义控件MyControl类放置在主窗口中的示例;自定义控件类定义在/CustomControls命名空间和项目文件夹中:
XAML
<Window xmlns="https://github.com/avaloniaui"
        xmlns:x="http://schemas.microsoft.com/winfx/2006/xaml"
        xmlns:d="http://schemas.microsoft.com/expression/blend/2008"
        xmlns:cc="using:AvaloniaCCExample.CustomControls"
        xmlns:mc="http://schemas.openxmlformats.org/markup-compatibility/2006"
        mc:Ignorable="d" d:DesignWidth="800" d:DesignHeight="450"
        x:Class="AvaloniaCCExample.MainWindow"
        Title="Avalonia Custom Control">
  <cc:MyCustomControl Height="200" Width="300"/>
</Window>
C#
using Avalonia.Controls;

namespace AvaloniaCCExample.CustomControls
{
    public class MyCustomControl : Control
    {
    }
}请注意,您已经可以为自定义控件添加高度和宽度属性。这些属性来自基类:Control。
然而,目前什么都没有显示。在下一页中,您将看到如何定义属性并教会自定义控件如何使用它进行绘制。