1. 理解 "文件"
1.1 狭义理解
- 文件在磁盘里
- 磁盘是永久性存储介质,因此文件在磁盘上的存储是永久性的
- 磁盘是外设(即是输出设备也是输入设备)
- 磁盘上的文件 本质是对文件的所有操作,都是对外设的输入和输出 简称 IO
1.2 广义理解
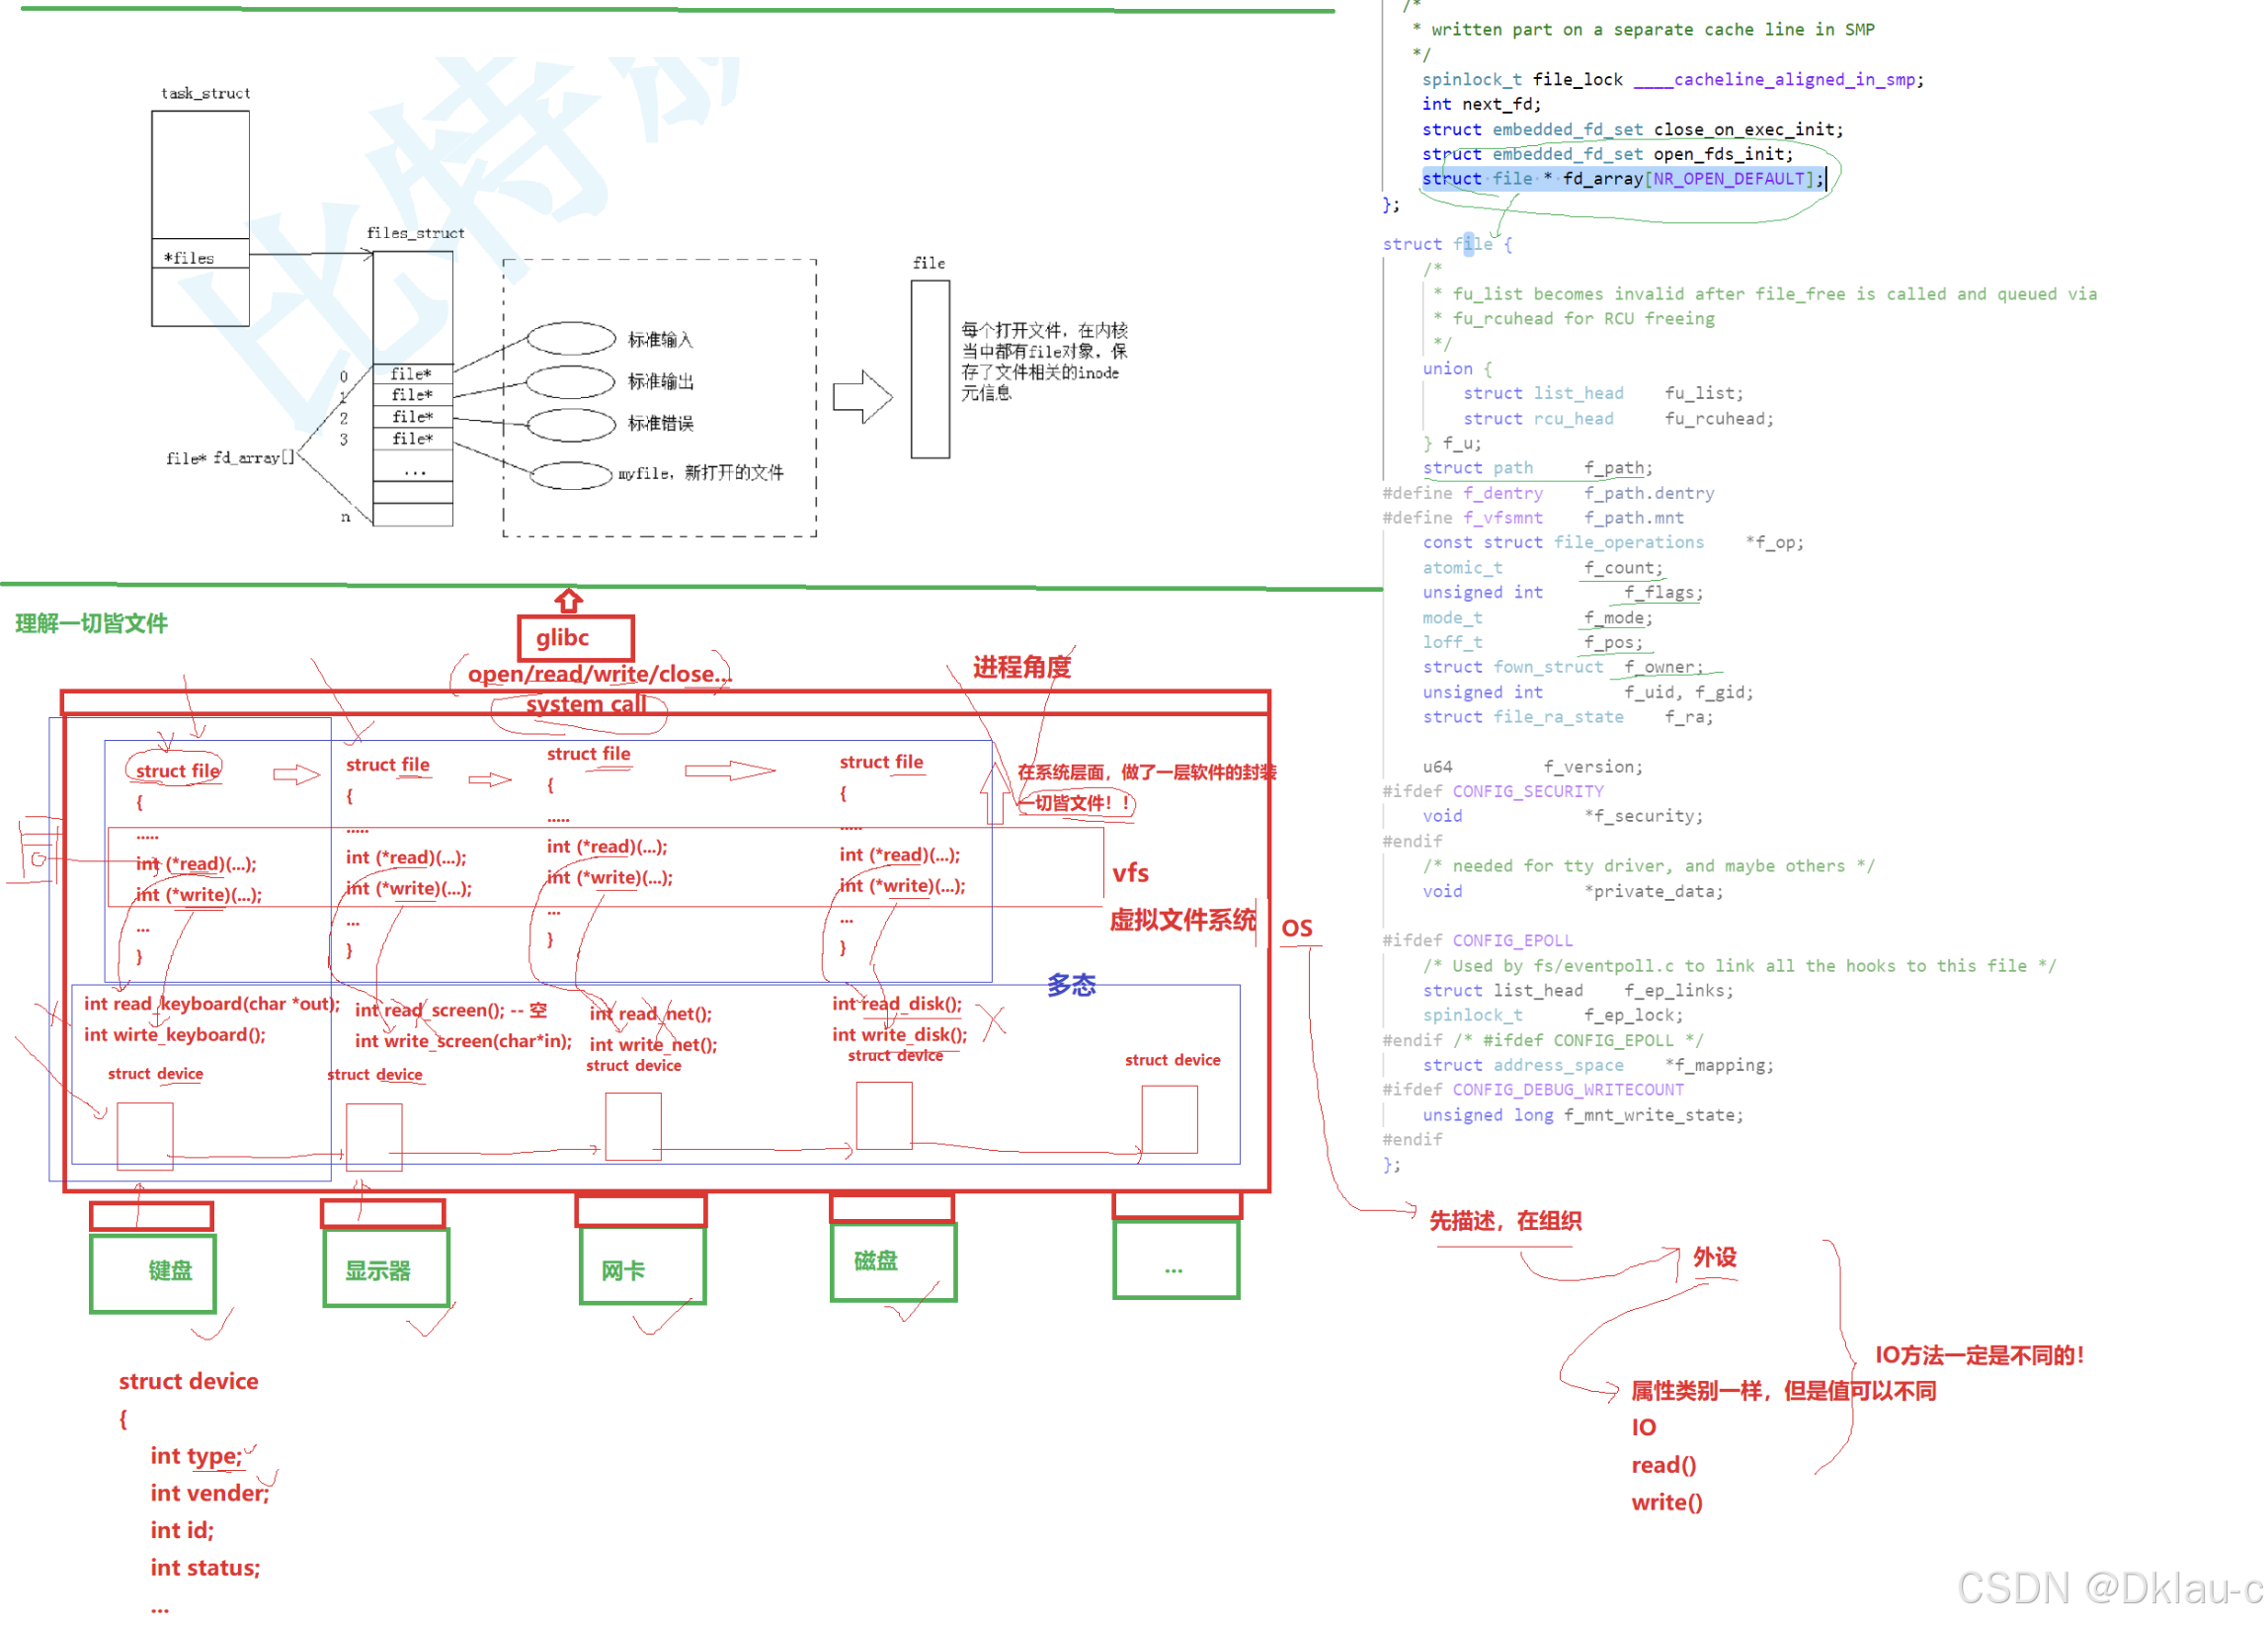
- Linux 下一切皆文件(键盘、显示器、网卡、磁盘......这些都是抽象化的过程)(后面会说如何去理解)
- 文件 = 内容 + 属性
- 访问文件之前,都必须先打开它!因为我们需要将它的内容或者属性加载到内容中
- 那么一个进程可以打开多个文件,那么多个进程呢? OS需不需要管理加载到内存中的文件呢?
- 必须要!! 那么如何管理文件的?
- 先描述,在组织!!!
- 所以在内核中,文件 = 文件内核结构(struct) + 文件的内容
- 同样,加载到内存的文件需要管理,那么还在磁盘上的文件需不需要管理?
- 当然需要,所以,在磁盘内部也会有一个相对应的内核结构体和数据结构维护着
- 而 这些在内存中的被打开的文件 和在磁盘中没有被打开的文件 共同就构成了 文件系统
1.3 文件操作的归类认知
- 对于0KB的空文件是占用磁盘空间的
- 文件是文件属性(元数据)和文件内容的集合(文件=属性(元数据)+内容)
- 所有的文件操作本质上是文件内容操作和文件属性操作
1.4 系统角度
- 用户对文件的操作本质是进程对文件的操作
- 磁盘的管理者是操作系统
- 文件的读写本质不是通过 C语言/C++ 的库函数来操作的(这些库函数只是封装之后为用户提供方便),而是通过文件相关的系统调用接口来实现的。
2.回顾C文件接口
2.1 hello.c 打开文件
cpp
#include <stdio.h>
#include <string.h>
int main()
{
FILE *fp = fopen("myfile", "w");
if(!fp){
printf("fopen error!\n");
}
const char *msg = "hello bit!\n";
int count = 5;
while(count--){
fwrite(msg, strlen(msg), 1, fp);
}
fclose(fp);
return 0;
}
2.3 hello.c读文件
cpp
#include <stdio.h>
#include <string.h>
int main()
{
FILE *fp = fopen("myfile", "r");
if(!fp){
printf("fopen error!\n");
return 1;
}
char buf[1024];
const char *msg = "hello bit!\n";
while(1){
//注意返回值和参数,此处有坑,仔细查看man⼿册关于该函数的说明
ssize_t s = fread(buf, 1, strlen(msg), fp);
if(s > 0){
buf[s] = 0;
printf("%s", buf);
}
if(feof(fp)){
break;
}
}
fclose(fp);
return 0;
}
稍作修改,实现简单cat命令
cpp
#include <stdio.h>
#include <string.h>
int main(int argc, char* argv[])
{
if (argc != 2)
{
printf("argv error!\n");
return 1;
}
FILE *fp = fopen(argv[1], "r");
if(!fp){
printf("fopen error!\n");
return 2;
}
char buf[1024];
while(1){
int s = fread(buf, 1, sizeof(buf), fp);
if(s > 0){
buf[s] = 0;
printf("%s", buf);
}
if(feof(fp)){
break;
}
}
fclose(fp);
return 0;
}
2.4 输出信息到显示器,你有哪些方法
cpp
#include <stdio.h>
#include <string.h>
int main()
{
const char *msg = "hello fwrite\n";
fwrite(msg, strlen(msg), 1, stdout);
printf("hello printf\n");
fprintf(stdout, "hello fprintf\n");
return 0;
}
2.5 stdin&stdout&stderr
- C默认会打开三个输入输出流,分别是stdin,stdout,stderr
- 仔细观察发现,这三个流的类型都是FILE*,fopen返回值类型的文件指针
cpp
#include <stdio.h>

extern FILE *stdin;
extern FILE *stdout;
extern FILE *stderr;
2.6 打开文件的方式

如上,是我们之前学的文件相关操作。还有feek ftell rewind 的函数,在C部分已经有所涉猎,可以自行返回复习。
3. 系统文件I/O
打开文件的方法不仅仅是fopen,iostream等流式,这些都是语言层的方案,其实系统才是打开文件最底层的方案。不过在学习系统文件IO之前,先要了解下如何给函数传递标志位,该方法在系统文件IO接口中会使用到:
3.1 一种传递标志位的方法
cpp
#include <stdio.h>
#define ONE 0001 //0000 0001
#define TWO 0002 //0000 0010
#define THREE 0004 //0000 0100
void func(int flags) {
if (flags & ONE) printf("flags has ONE! ");
if (flags & TWO) printf("flags has TWO! ");
if (flags & THREE) printf("flags has THREE! ");
printf("\n");
}
int main() {
func(ONE);
func(THREE);
func(ONE | TWO);
func(ONE | THREE | TWO);
return 0;
}
操作文件,除了上小节的C接口(当然,C++也有接口,其他语言也有),我们还可以采系统接口来进行文件访问,先来直接以系统代码的形式,实现和上面一模一样的代码:
3.2 hello.c 写文件
cpp
#include <stdio.h>
#include <sys/types.h>
#include <sys/stat.h>
#include <fcntl.h>
#include <unistd.h>
#include <string.h>
int main()
{
umask(0);
int fd = open("myfile", O_WRONLY|O_CREAT, 0644);
if(fd < 0){
perror("open");
return 1;
}
int count = 5;
const char *msg = "hello bit!\n";
int len = strlen(msg);
while(count--){
write(fd, msg, len);
//fd: 后⾯讲, msg:缓冲区⾸地址, len: 本次读取,期望写⼊多少个字节的数据。
//返回值:实际写了多少字节数据
}
close(fd);
return 0;
}
3.3 hello.c 读文件
cpp
#include <stdio.h>
#include <sys/types.h>
#include <sys/stat.h>
#include <fcntl.h>
#include <unistd.h>
#include <string.h>

int main()
{
int fd = open("myfile", O_RDONLY);
if(fd < 0){
perror("open");
return 1;
}
const char *msg = "hello bit!\n";
char buf[1024];
while(1){
ssize_t s = read(fd, buf, strlen(msg));
// fd: 后面讲,msg:缓冲区首地址,len:本次读取,期望读入多少个字节的数据。
// 返回值:实际读了多少字节数据
printf("%s", buf);
}else{
break;
}
}
close(fd);
return 0;
}
3.4 接口介绍
open (man 2 open)
cpp
#include <sys/types.h>
#include <sys/stat.h>
#include <fcntl.h>

int open(const char *pathname, int flags);
int open(const char *pathname, int flags, mode_t mode);

pathname: 要打开或创建的⽬标⽂件
flags: 打开⽂件时,可以传⼊多个参数选项,⽤下⾯的⼀个或者多个常量进⾏"或"运算,构成
flags。
参数:
        O_RDONLY: 只读打开
        O_WRONLY: 只写打开
        O_RDWR : 读,写打开
            这三个常量,必须指定⼀个且只能指定⼀个
        O_CREAT : 若⽂件不存在,则创建它。需要使⽤mode选项,来指明新⽂件的访问
权限
        O_APPEND: 追加写
返回值:
        成功:新打开的⽂件描述符
失败: -1通过上面对于open的返回值我们也知道了原来fd的类型就是int
下面是man对于mode_t的描述
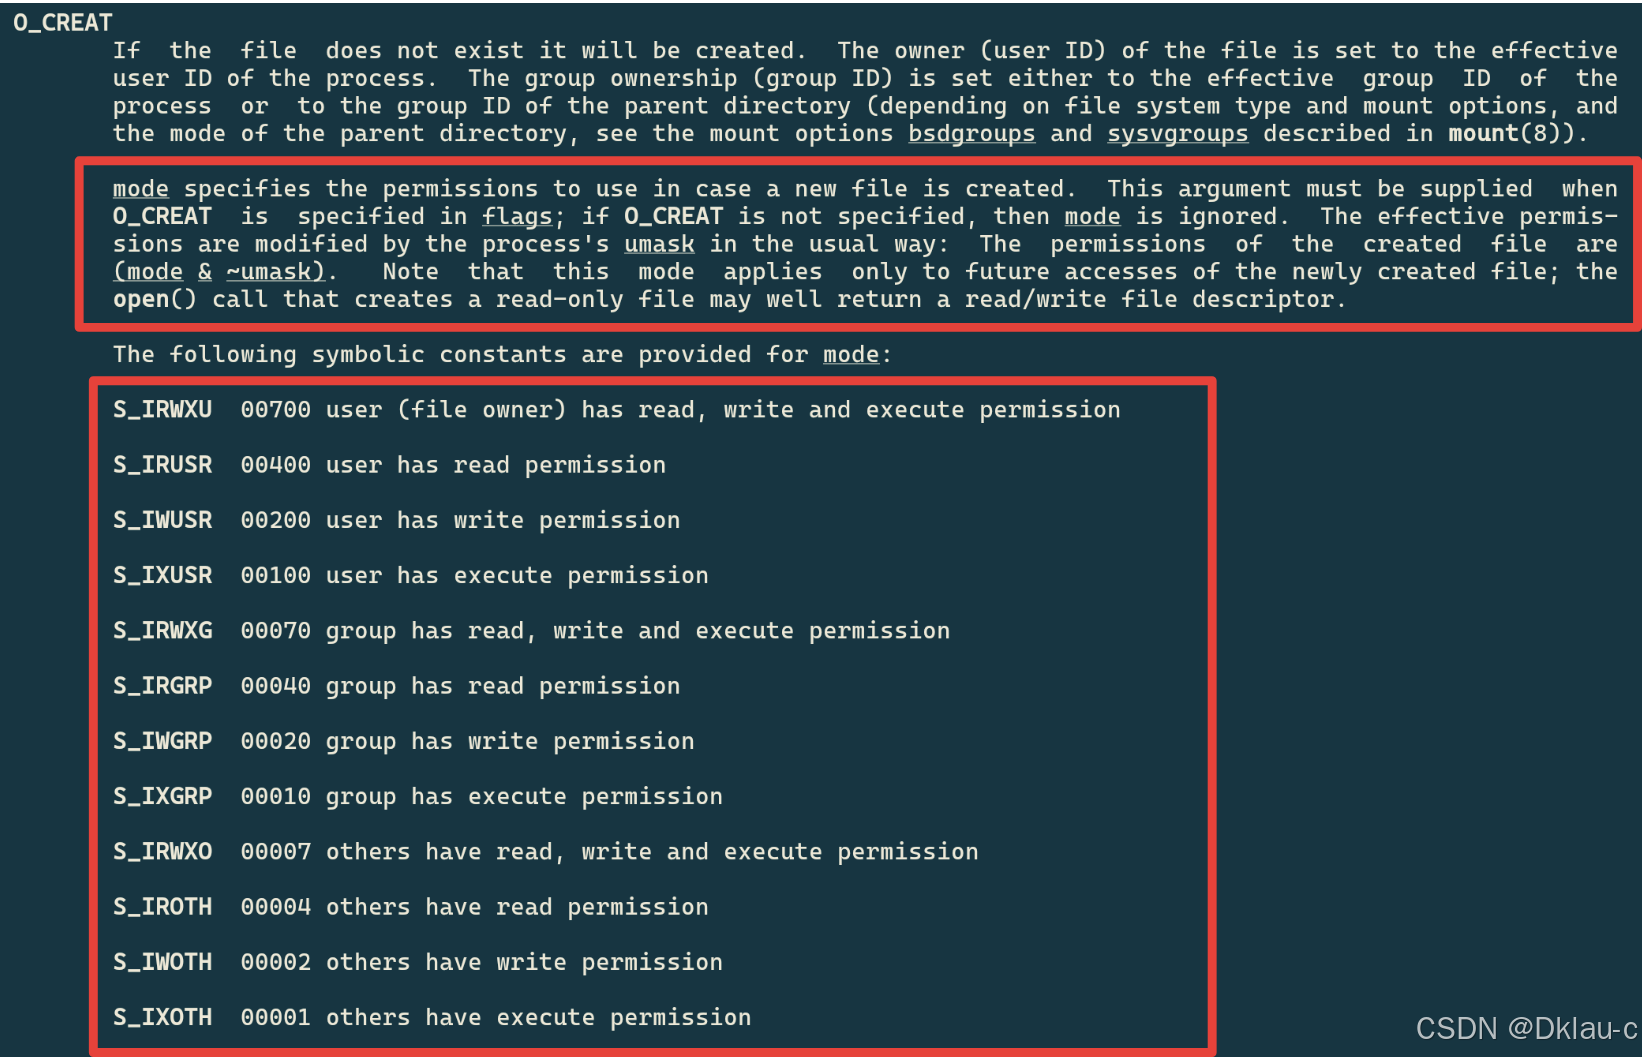
mode 参数的作用是 但创建新文件(O_CREAT 标志时),mode参数定义了新文件的访问权限,它是一个由9个权限位组成的掩码,这些权限位于三组,分别对应文件所有者(user)、用户组(group)和其他用户(others)。
每一组都包含读(r,对应权限位4),写(w,对应权限位2),执行(x,对应权限位1)权限,如同我们之前讲的chmod一样,这里文件的实际权限是 我们设置的mode & ~umask
open 函数具体使用哪个,和具体应用场景相关,如目标文件不存在,就需要open创建,则第三个参数就表示创建文件的默认权限,否则使用两个参数的open。
write,read,close,lseek,类比文件相关接口
3.5 open函数返回值
在认识返回值之前,先来认识一下两个概念:系统调用 和库函数
- 上面的 fopen,fclose ,fread ,fwrite 都是C标准库当中的函数,我们称之为库函数(libc)
- 而 open,close,read,write,lseek 都属于系统提供的接口,称之为系统调用接口
- 回忆一下我们讲操作系统概念时,画的一张图
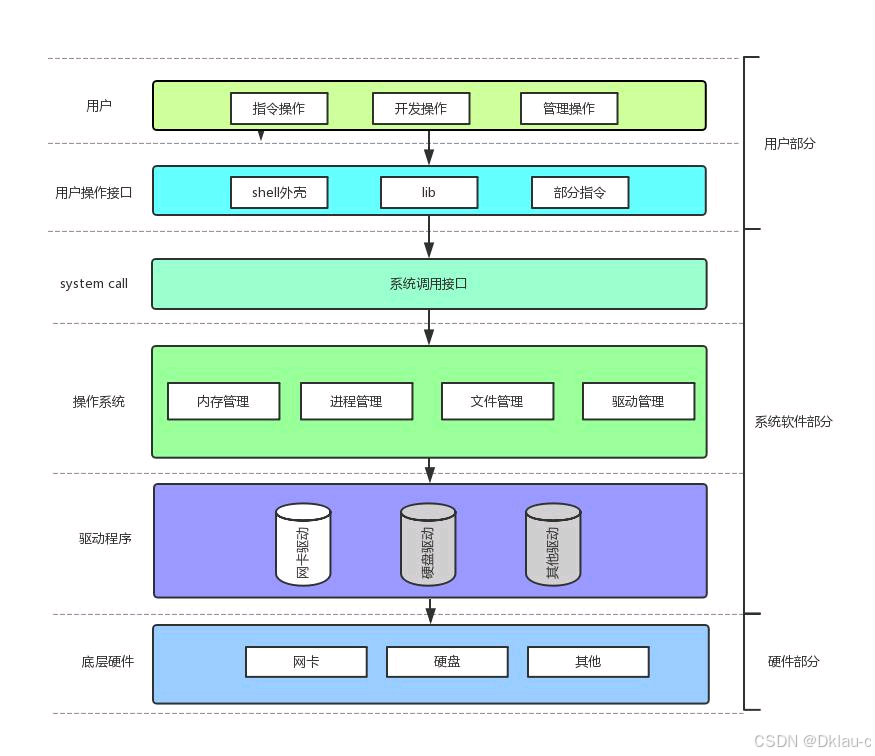
系统调用接口和库函数的关系,一目了然
所以,可以认为, **f#**系列的函数,都是对系统调用的封装,方便二次开发。
那么,这里我们需要思考两个问题:
1. 为什么语言都喜欢做封装? C/C++
- 如果不是linux呢?如果是win或者mac os或者其他系统呢?
首先,我们先回答第一个问题,语言之所以喜欢封装系统接口,
-
方便用户操作,比如c语言库中将 read接口 封装为 scanf 就是为了方便用户操作,首先 键盘是一种字符设备(指在I/O传输过程中以字符为单位进行传输的设备),使用read(0,buffer)读入之后,只是将数据放入到我们所创建的临时缓冲区中,而无法分辨用户需要的是文本写入还是二进制写入,而如果我们将read封装为 scanf (""%d", &a) -> read(0,buffer) buffer->%d ->&a这样就能更加符合用户的使用
-
提高语言的可移植性! 这一点就和我们的第二个问题相对应了,我们在第二个问题中回答
-
提高代码的安全性,如果将系统接口直接暴露给程序员随意调用,可能会因为错误操作而导致系统崩溃或者安全漏洞。封装后的系统接口可以在内部进行参数检查、权限验证等操作,就可以避免程序员过度使用系统接口。
对于第二个问题
首先,不同的操作系统有着不同的系统接口,所以每种库才会有多个版本,例如,linux版本,window版本等,这也是语言封装系统接口的理由,经过封装之后,就可以使得不同用户所使用C语言接口一致,这也就意味着,程序员使用封装后的接口能够在不同的操作系统下运行,不需要去关注底层系统的差异。
3.6 文件描述符fd
通过对于open函数的学习,我们知道了文件描述符就是一个小整数
3.6.1 0 & 1 & 2
- Linux进程默认情况下会有3个缺省打开的文件描述符,分别是标准输入0,标准输出1,标准错误2
- 0,1,2 对应的物理设备一般是:键盘,显示器,显示器
所以输入输出还可以采用如下方式:
cpp
#include <stdio.h>
#include <unistd.h>
#include <string.h>

int main()
{
    char buf[1024];
    ssize_t s=read(0,buf,sizeof(buf));
    if(s>0)
  {
    buf[s]=0;
    write(1,buf,s);
    write(2,buf,strlen(buf));
  }
   return 0;
}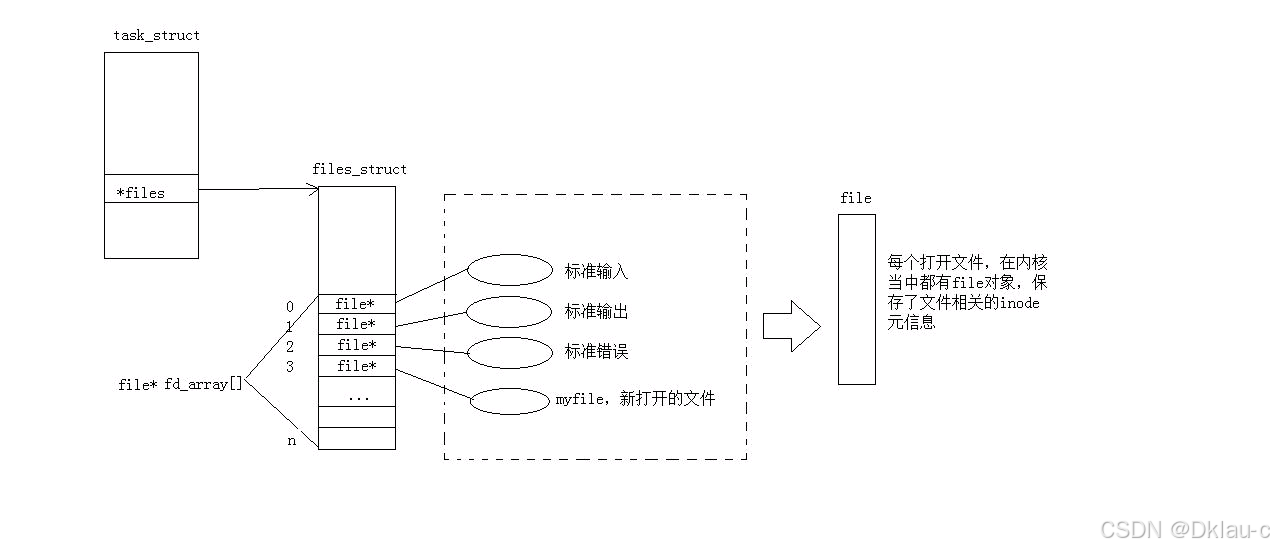
而现在知道,文件描述符就是从0开始的小整数。当我们打开文件时,操作系统在内存中要创建相应的数据结构来描述目标文件。于是就有了file结构体。表示一个已经打开的文件对象。而进程执行open系统调用,所以必须让进程和文件关联起来。每个进程都有一个指针*files,指向一张表files_struct,该表最重要的部分就是包含一个指针数组,每个元素都是一个指向打开文件的指针!,所以,本质上,文件描述符就是该数组的下标。所以,只要拿着文件描述符,就可以找到对应的文件。
对于以上原理结论我们可以通过内核源码验证:
首先要找到task_struct 结构体在内核中的位置,地址为:/usr/src/kernels/3.10.0-
1160.71.1.el7.x86_64/include/linux/sched.h(3.10.0-1160.71.1.el7.x86_64 是内核版本,可以使用uname -a 自行查看服务器配置,因为这个文件夹只有一个,所以也不用可以去分辨,内核版本其实也随意)
- 要查看内容可直接用 vscode 在windows下打开内核源代码
- 相关结构体所在位置
- struct task_struct : /usr/src/kernels/3.10.0-1160.71.1.el7.x86_64/include/linux/sched.h
- struct files_struct : /usr/src/kernels/3.10.0-1160.71.1.el7.x86_64/include/linux/fdtable.h
- struct file : /usr/src/kernels/3.10.0-1160.71.1.el7.x86_64/include/linux/fs.h
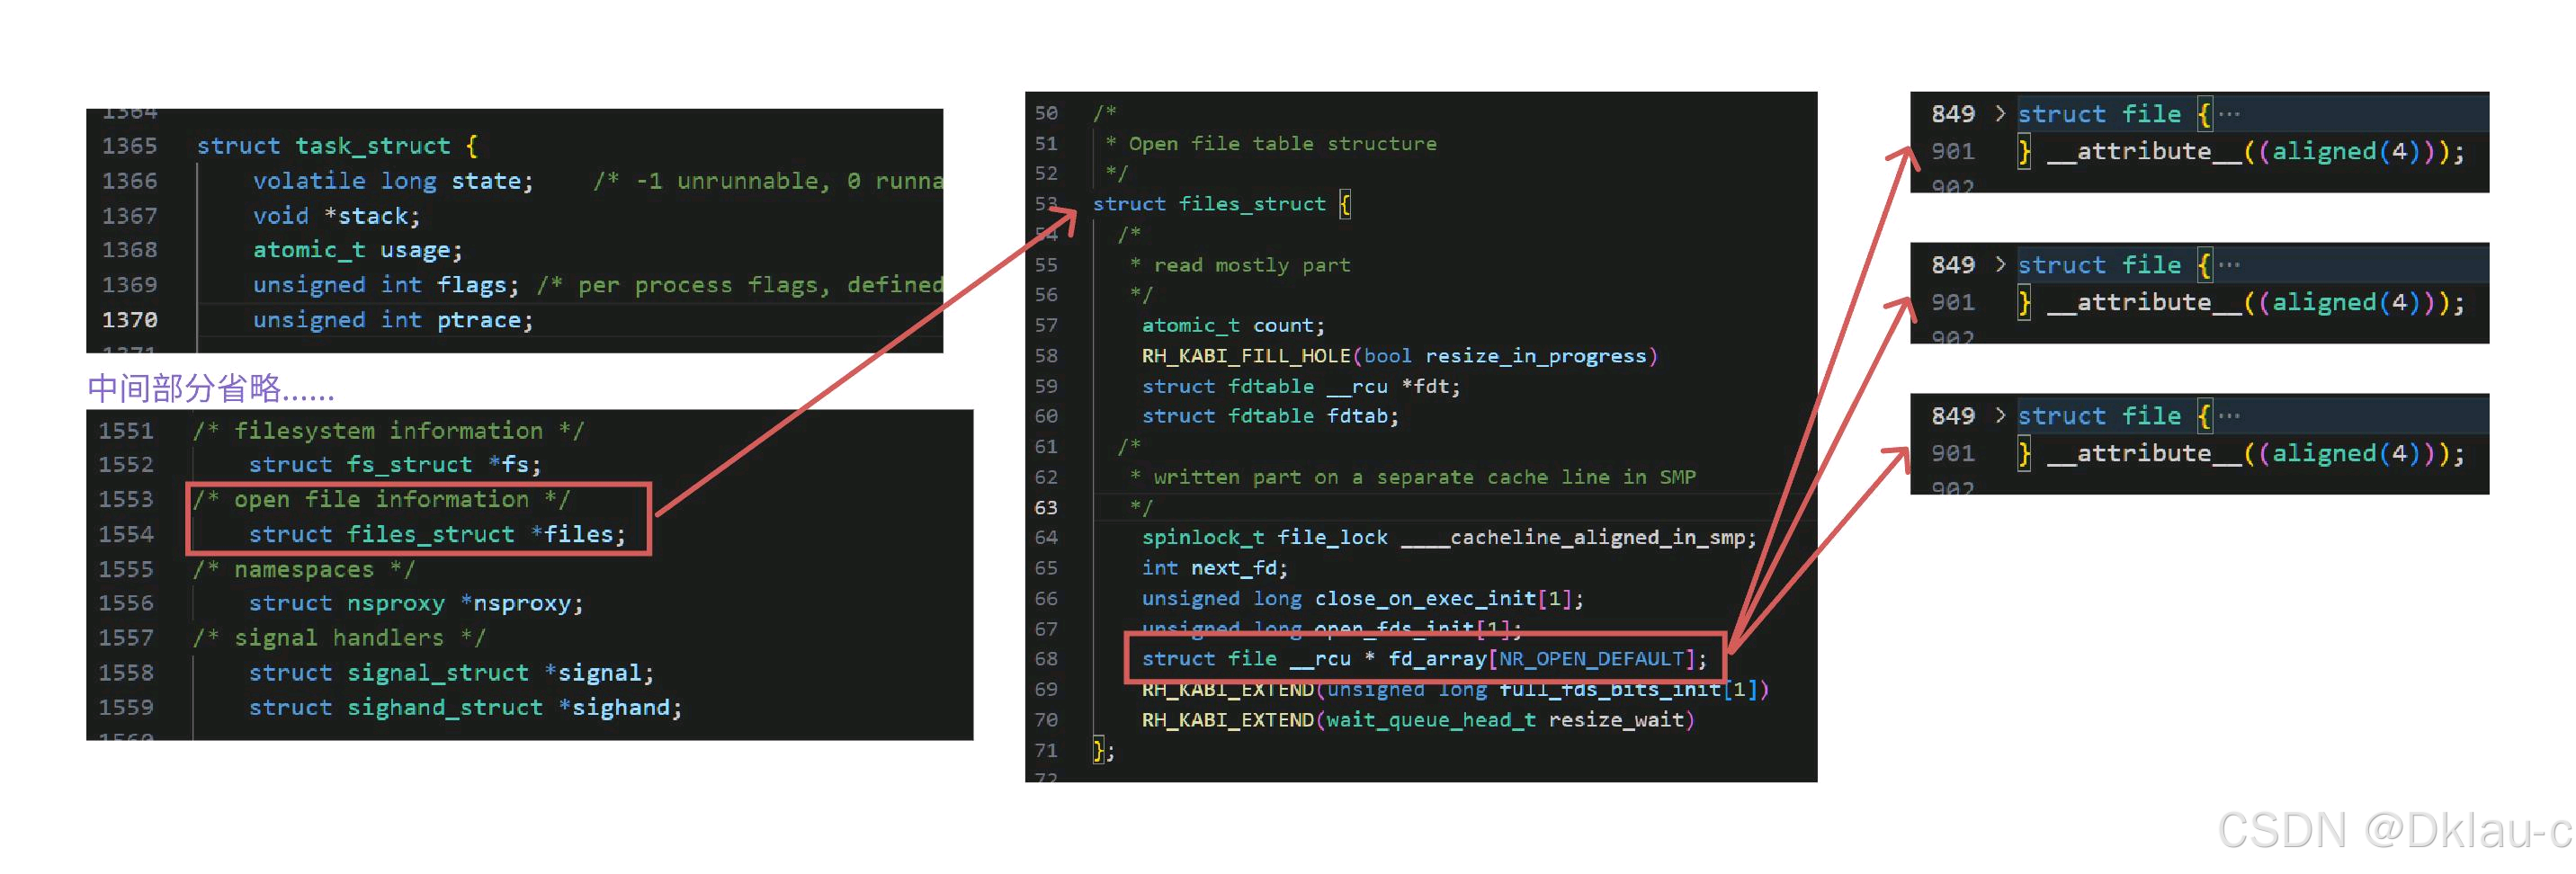
每一个进程结构体中包含一个files指针,指向各自的files_struct(每个进程一个),然后files_struct 中有一个file*的指针数组,它根据文件标识符(下标)指向硬件。
因为Linux下一切皆文件,且硬件实际也需要先管理再组织,所以其实file*指针数组的元素实际也是指向了一个file结构体,而这个结构体就是描述硬件,文件所用的。
也就是如下
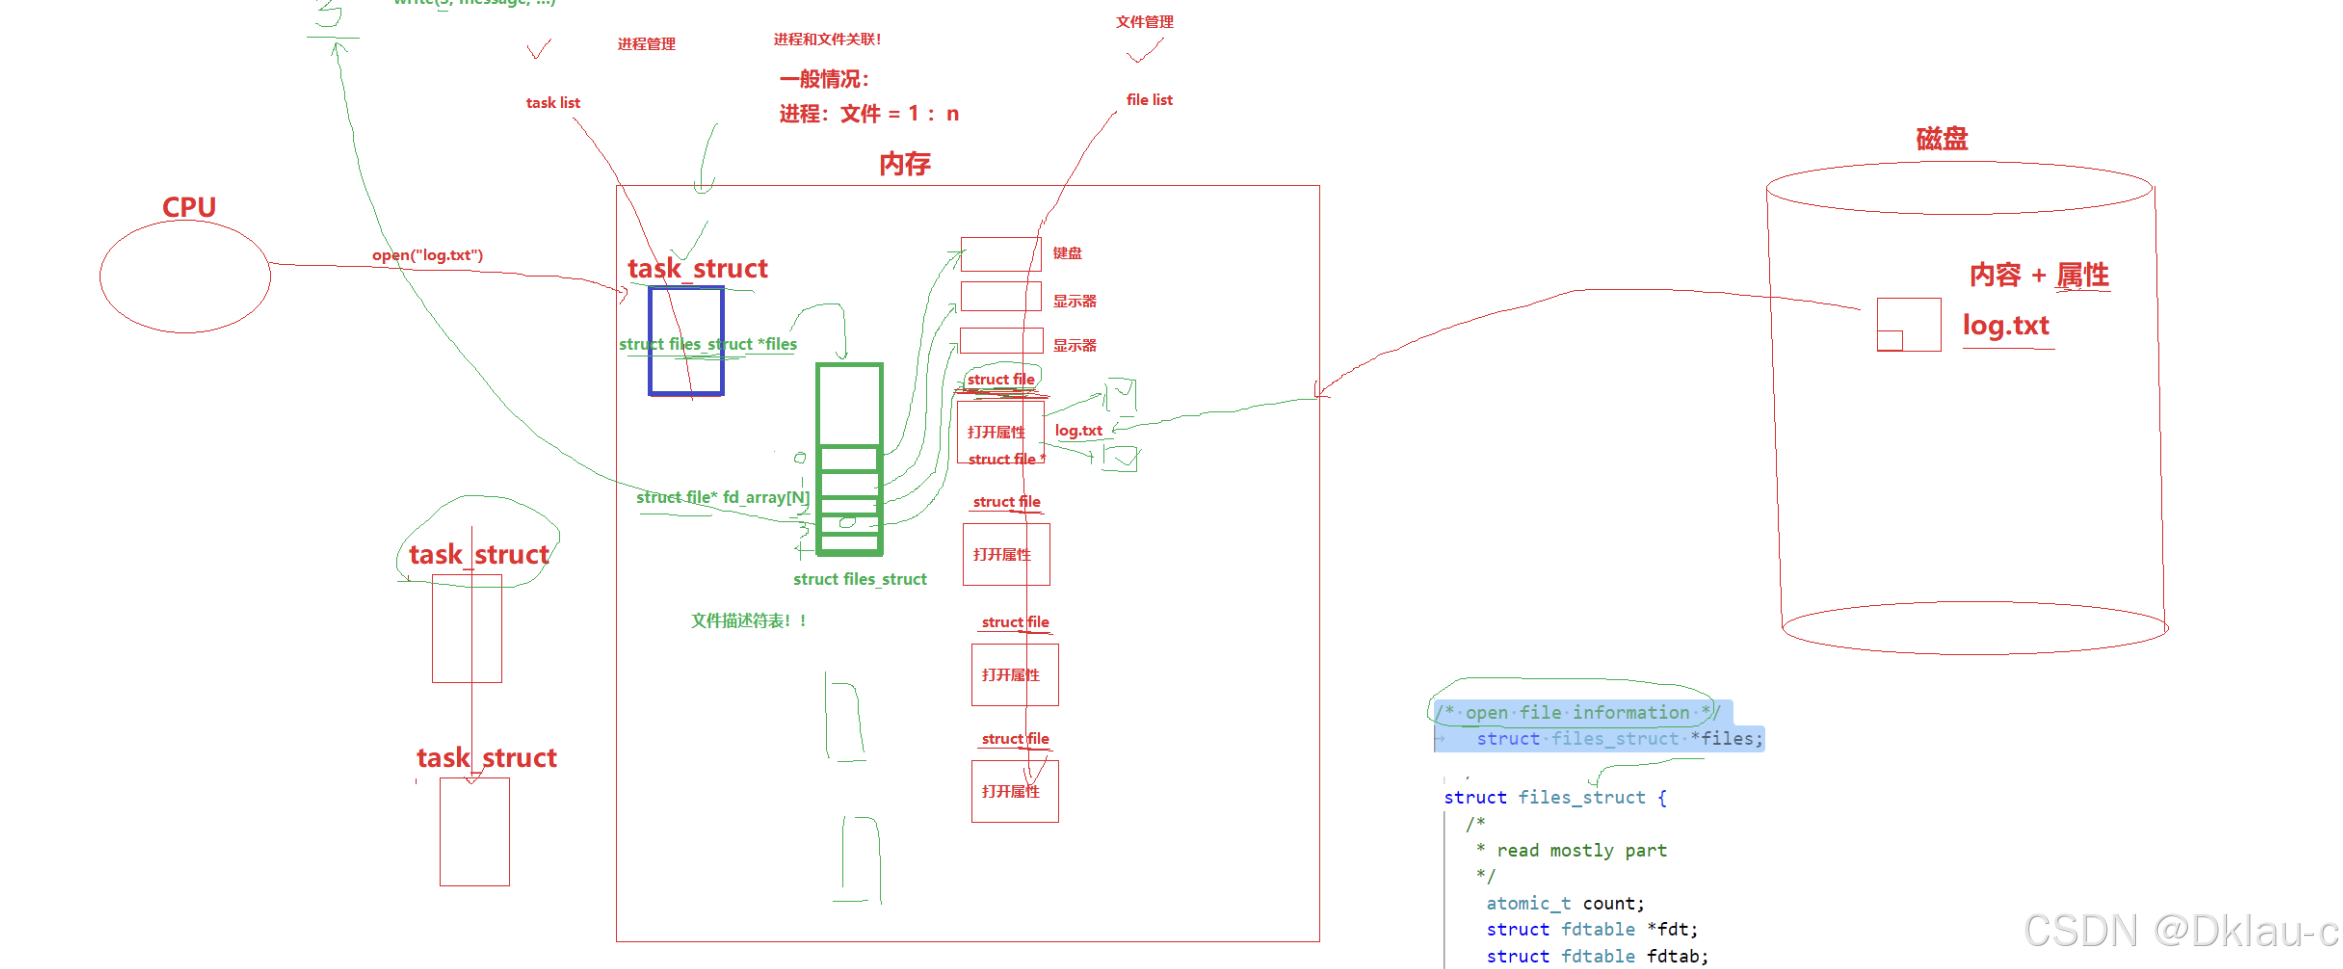
结合我们之前我们对于操作系统模型的那张图,现在我们可以将其具象化为
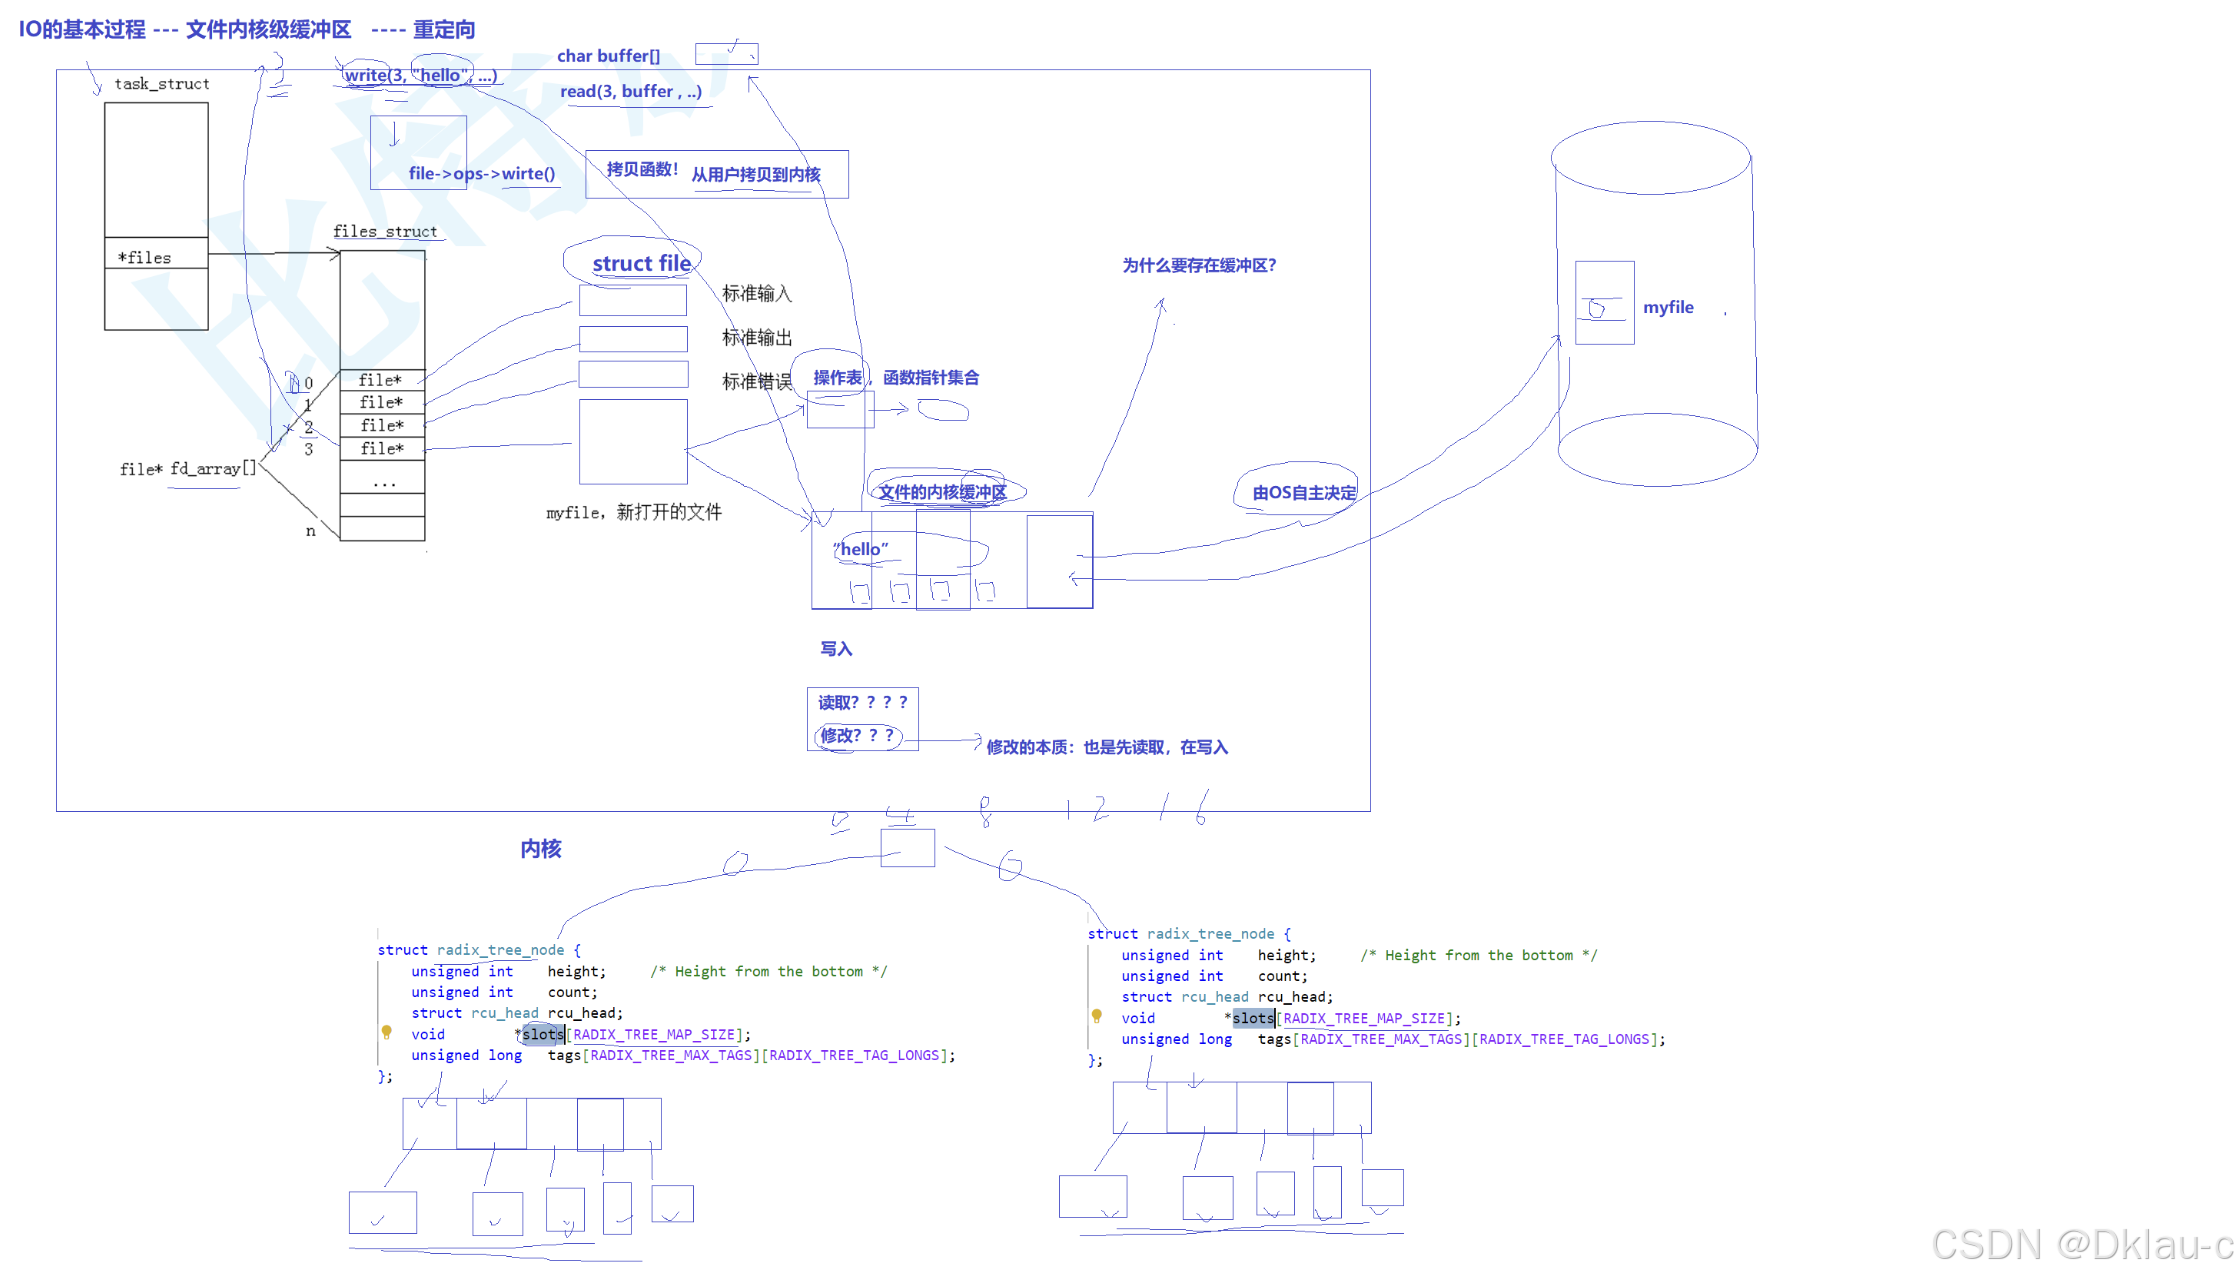
整个IO的基本过程
这里,我们在说明下整个IO的基本过程
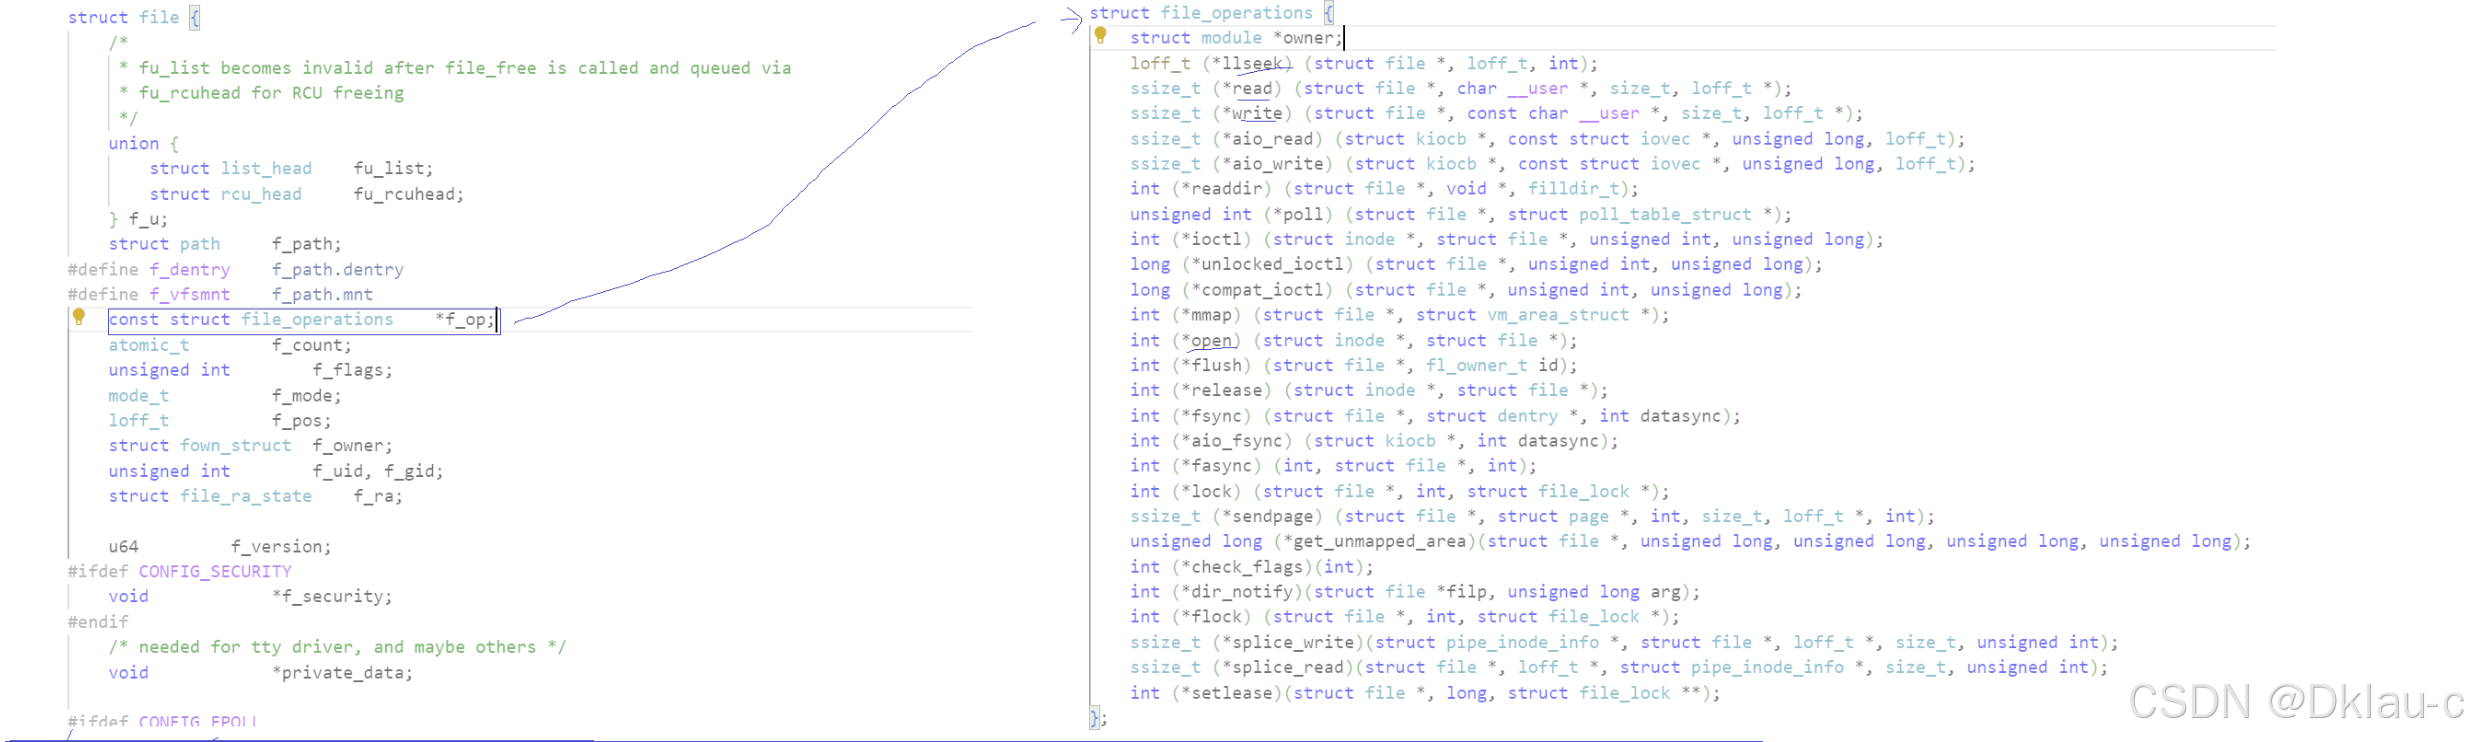
上面很多东西我们上文都介绍过了,这里再介绍下 file结构体里面的内容,
file结构体内部结构如下:
大致我们可以将struct file 内部元素划分为三部分:指向设备的元信息,操作表,文件内核缓冲区。
元信息:就是该设备的基本信息,如:设备名称,设备类型,状态,使用者ID,使用者组ID,大小等,这个信息也可以通过 系统接口 stat,fstat 来获得,感心趣的可以自行使用下man 手册查看
操作表:系统再度封装的表,也就是上图的 *f_op 。因为底层设备功能参差不齐,实现方式各有不同,所以统一在此之上又封装了一个表,表中均是函数指针,指向该设备所对应的功能函数。
文件内核缓冲区 : 功能是为了降低系统I/O的次数,因为系统I/O也需要时间调用,消耗依旧很大,所以功能和之前的语言层缓冲区是一样的,就是为了降低系统I/O访问的次数, 当系统写入到文件时,并不会立刻写入到硬件上的文件上,而是会写入到文件缓冲区中,至于什么时候才会写入到磁盘文件上,由OS自主决定!!
那么有没有什么方法能够强制OS刷新内核缓冲区到磁盘上呢?
当然有了!

这个函数就可以实现将OS内核缓冲区刷新到磁盘上
3.6.2 文件描述符的分配规则
直接看代码:
cpp
#include <stdio.h>
#include <sys/types.h>
#include <sys/stat.h>
#include <fcntl.h>
#include <unistd.h>

int main()
{
int fd = open("myfile", O_RDONLY);
if(fd < 0){
perror("open");
return 1;
}
printf("fd: %d\n", fd);
close(fd);
return 0;
}
输出发现是 fd:3
那么,我们试着关闭0或者2,再输出,看下结果
cpp
#include <stdio.h>
#include <sys/types.h>
#include <sys/stat.h>
#include <fcntl.h>
#include <unistd.h>

int main()
{
close(0);
//close(2);
int fd = open("myfile", O_RDONLY);
if(fd < 0){
perror("open");
return 1;
}
printf("fd: %d\n", fd);
close(fd);
return 0;
}
发现结果是: fd:0 或者 fd 2 , 可见,文件描述符的分配规则是:在file_struct 数组当中,找到当前没有被使用的最小的一个下标,作为新的文件描述符。
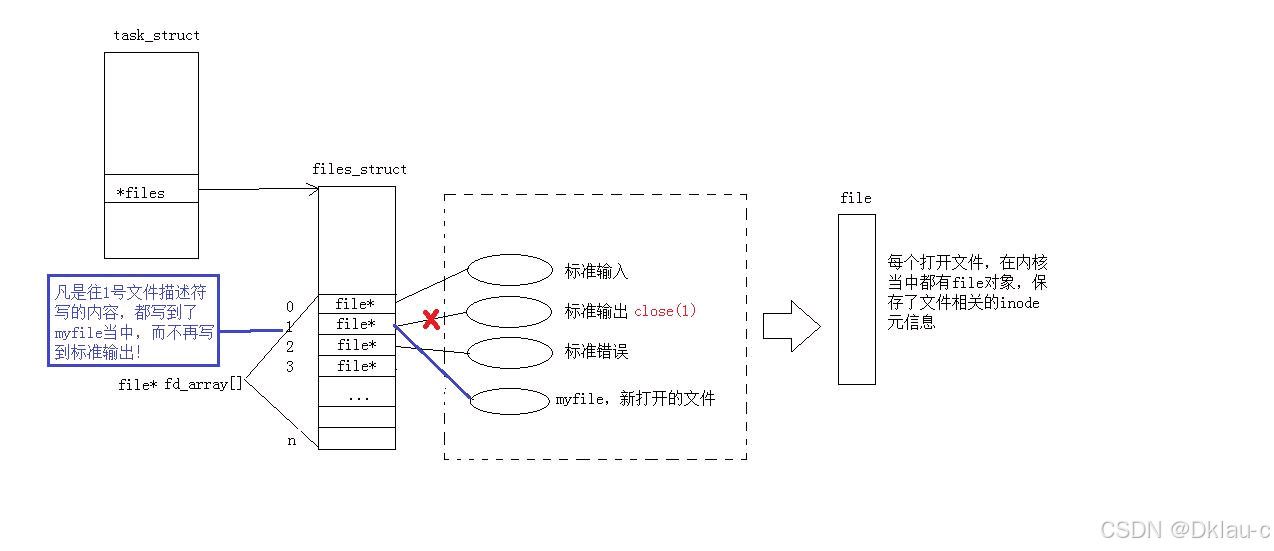
3.6.3 重定向
那如果关闭1呢?
cpp
#include <stdio.h>
#include <sys/types.h>
#include <sys/stat.h>
#include <fcntl.h>
#include <stdlib.h>
int main()
{
close(1);
int fd = open("myfile", O_WRONLY|O_CREAT, 00644);
if(fd < 0){
perror("open");
return 1;
}
printf("fd: %d\n", fd);
fflush(stdout);
close(fd);
exit(0);
}运行之后,此时,我们发现,本来应该输出到显示器上的内容,却输出到文件myfile当中,其中,fd=1,这种现象叫做输出重定向。 常见的重定向由:>,>>,<
在调试代码的时候,我们发现,上面的测试代码,在将stdout重定向到文件之后,printf输出,如果不加fflush(stdout) (强制刷新stdout缓冲区),就不会刷新到文件中,并且我们输出中也写了'\n'了,那么为什么会在文件中看不到呢?
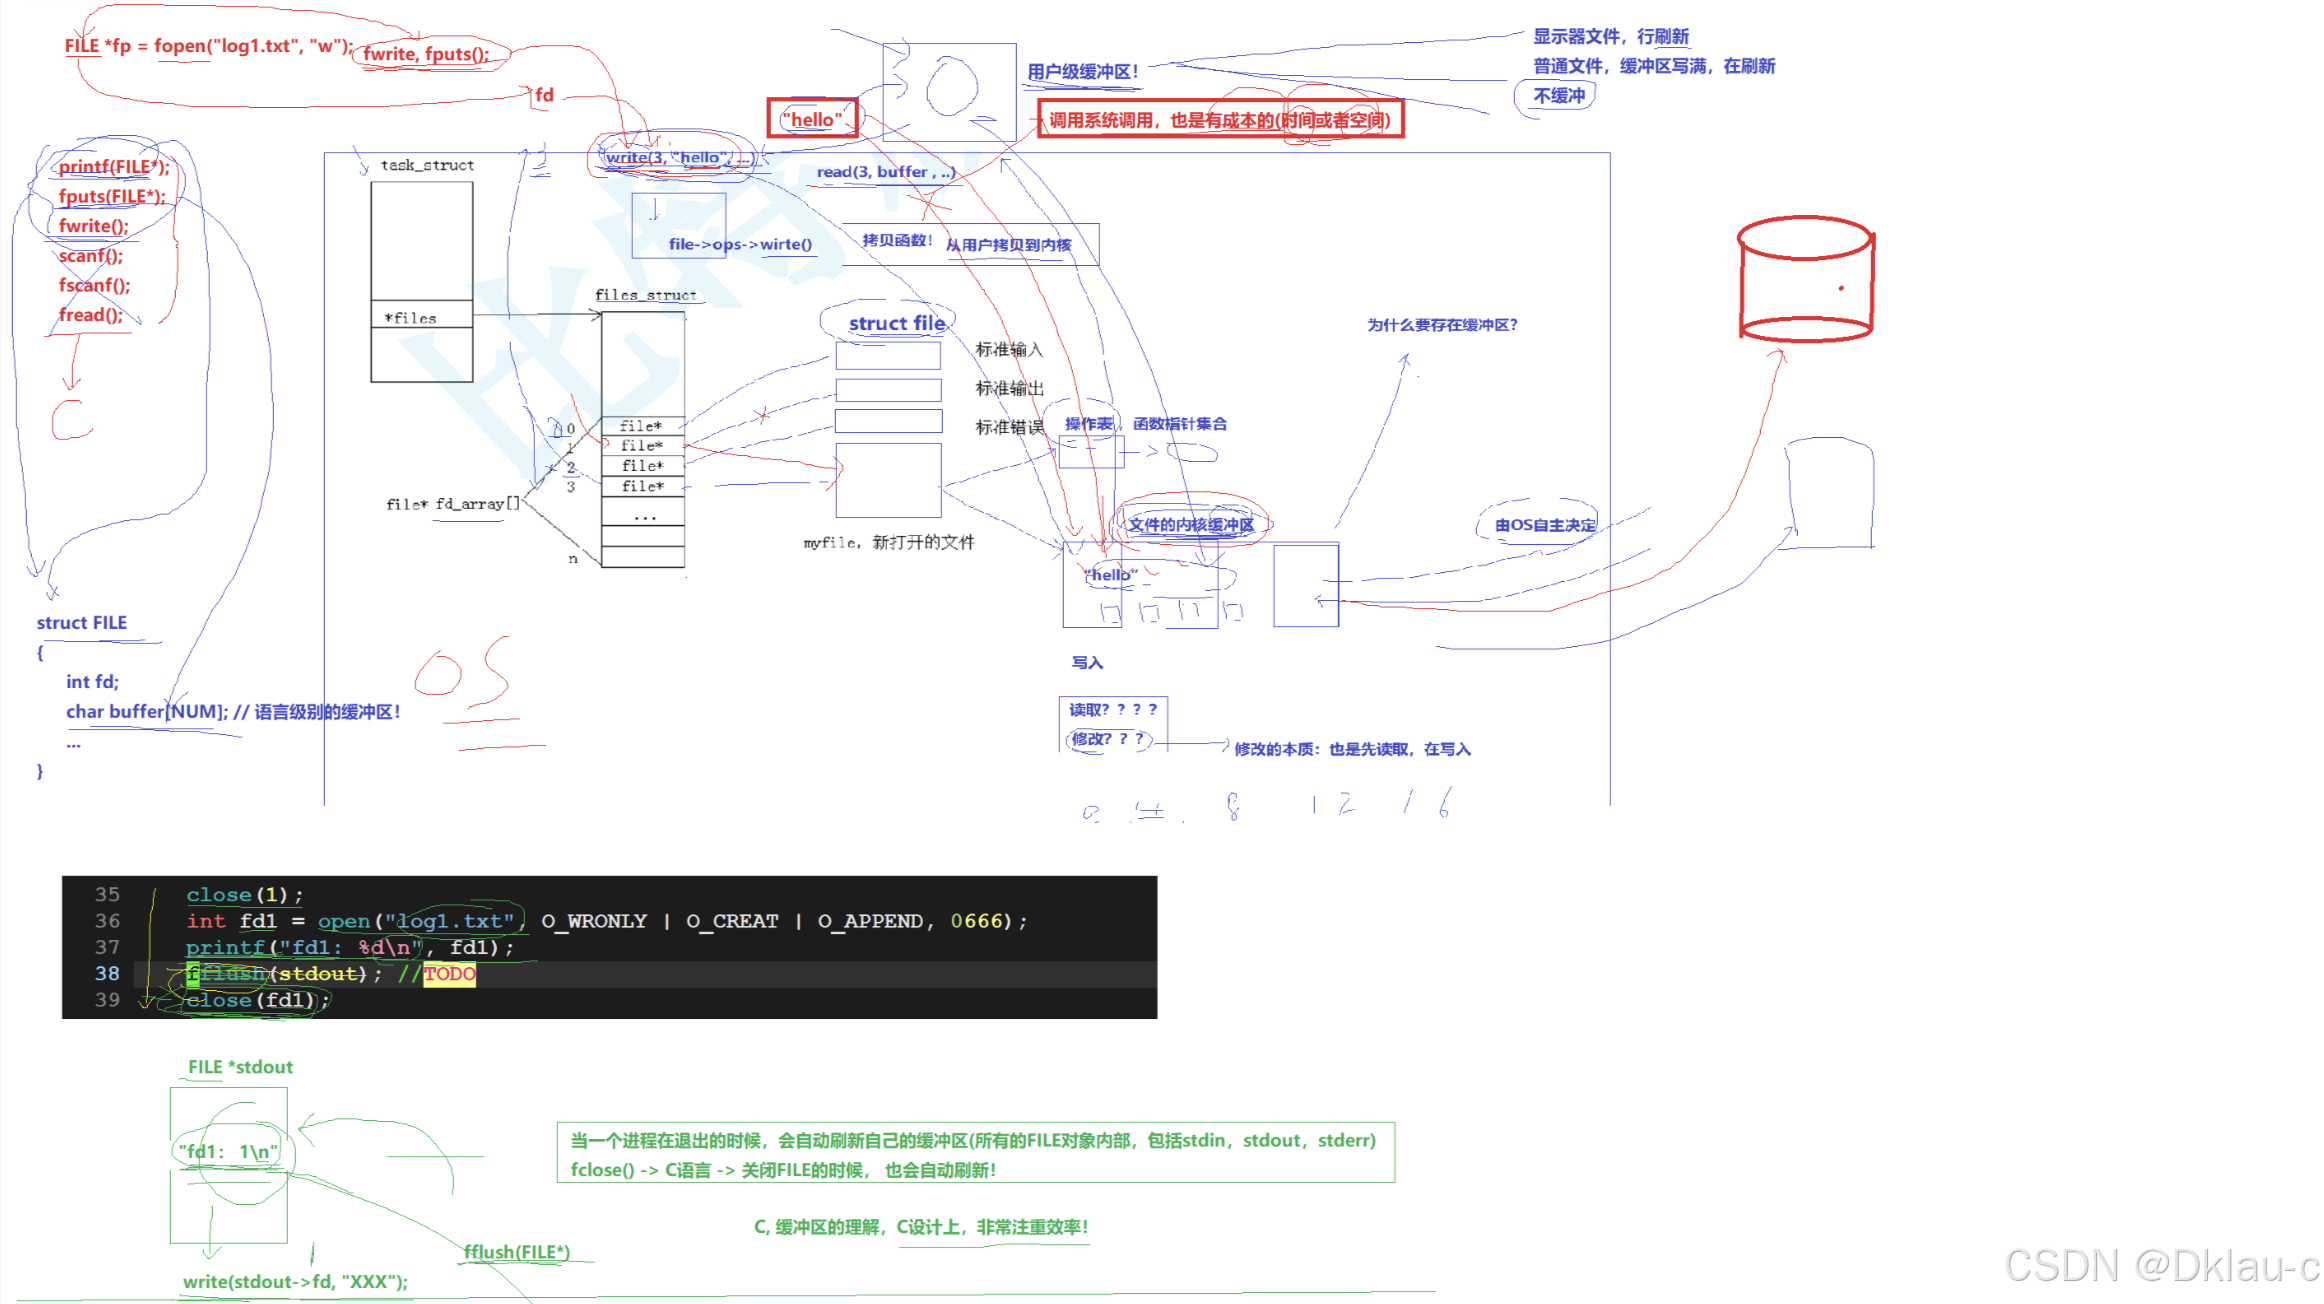
在之前的文章中,我们知道了glic库中封装了一个用户级缓冲区,功能是减少调用系统接口的频率,而这个用户级缓冲区,根据刷新的文件不同,也有两种刷新模式
第一种,对于显示器文件,由于用户需要时刻读取,所以这类文件,缓冲区通常采用行刷新,即 每输入一行刷新一次,也就是识别换行符'\n'来实现刷新
第二种,对于普通文件,这类文件用户通常访问的并不及时,所以这类文件,缓冲区通常采用写满刷新,当缓冲区写满时,刷新
而这个缓冲区实际上也就是被glic封装到了FILE结构体中,
这里其实 当一个进程在退出的时候,会自动刷新自己的缓冲区(所有的FILE对象内部,包括stdin,stdout,stderr) fclose()-> C语言-> 关闭FILE的时候,也会自动刷新
实际最后关闭的时候会执行 以FILE* stdout为例 write(stdout->fd,"xxxx"); fflush(stdout(FILE*));
经过C语言封装之后就是这样的
cpp
#include <stdio.h>
#include <sys/types.h>
#include <sys/stat.h>
#include <fcntl.h>
#include <stdlib.h>
int main()
{
close(1);
FILE* FD = open("myfile", "w");
if(FD ==NULL){
perror("open");
return 1;
}
printf("this is myfile\n");
//fflush(stdout);
  fclose(stdout);  // 注意这里不能写成fclose(FD);
}
这里,由于C接口是封装的上层的东西,而fd是底层系统的东西,虽然我们这里已经将fd 1 关闭了,并且将我们创建的FD的fd指向了1,但是在上层上FILE* stdout 的缓存区依旧存在,输出时依旧输出到了stdout的缓存区中,而不是FD的缓冲区,所以这里需要fclose(stdout)而不是 fclose(FD)
那么,重定向的本质是什么呢?
3.6.4 使用 dup2 系统调用
函数原型如下:
cpp
#include <unistd.h>

int dup2(int oldfd, int newfd);
示范代码
cpp
#include <stdio.h>
#include <unistd.h>
#include <fcntl.h>
#include <sys/stat.h>

int main() {
umask(0);
int fd = open("./log", O_CREAT | O_RDWR,0777);
if (fd < 0) {
perror("open");
return 1;
}
close(1);
dup2(fd, 1);
for (;;) {
char buf[1024] = {0};
ssize_t read_size = read(0, buf, sizeof(buf) - 1);
if (read_size < 0) {
perror("read");
break;
}
printf("%s", buf);
fflush(stdout);
}
return 0;
}
printf 是C库当中的IO函数,一般往stdout中输出,但是stdout底层访问文件的时候,找的还是fd:1,但此时 fd:1下标所表示内容,已经变成了myfile 的地址,不再是显示器文件的地址,所以,输出到任何消息都会往文件中写入,进而完成输出重定向。那追加和输入重定向是如何完成呢?
和修改输出重定向一样,只需要修改fd打开文件的权限位O_RDONLY或者O_APPEND ,然后dup2(fd,1/0)即可
3.6.5 在minishell中添加重定向功能
既然我们已经学习了重定向功能,那么我们就将它也实现进我们的minishell吧
注: fd是会被子程序继承的,程序替换并不影响fd重定向
代码如下:
cpp
#include <iostream>
#include <cstdio>
#include <cstring>
#include <string>
#include <unistd.h>
#include <cstdlib>
#include <sys/wait.h>
#include <sys/types.h>
#include <fcntl.h>
#include <sys/stat.h>

const int basesize=1024;
const int envnums=64;
const int argcnums=64;

//我的系统的环境变量
char* Genv[envnums];
char* Gargv[argcnums];
int Gargc;

// 全局的当前工作路径
char pwd[basesize];
char pwdenv[basesize];

//最后一次运行的返回值
int lastcode=0;

// 全局变量与重定向有关
#define NoneRedir    0
#define InputRedir   1
#define OutputRedir  2
#define AppendRedir  3

int Redir = NoneRedir;
char* FileName = nullptr;
#define Trim(pos) do{ \
    while(isspace(*pos)) pos++;\
}while(0);


enum RedirError
{
    InReDirError =1,
    OutReDirError =2,
    AppReDirError =3,
    FileNameError=4
};


void InitEnv()
{
    extern char** environ;
    int index=0;
    while(environ[index])
    {
        Genv[index]=new char[strlen(environ[index])+1];
        strncpy(Genv[index],environ[index],strlen(environ[index])+1);
        index++;
    }
    Genv[index]=nullptr;

}

std::string GetPwd()
{
    if(nullptr==getcwd(pwd,sizeof(pwd))) return "None";
    snprintf(pwdenv,sizeof(pwdenv),"PWD=%s",pwd);
    putenv(pwdenv);
    return pwd;
}


std::string GetLastDir()
{
    std::string cur=GetPwd();
    if(cur=="" || cur=="None") return cur;
    size_t pos=cur.rfind("/");
    return cur.substr(pos+1);
}


std::string GetHostName()
{
    std::string Hostname=getenv("HOSTNAME");
    return Hostname.empty()?"None":Hostname;
}


std::string GetUserName()
{
    std::string name=getenv("USER");
    return name.empty()? "None": name;
}


std::string MakeCommandLine()
{
    // [yang@huawei-cloud myshell]$
    char command_line[basesize];
    snprintf(command_line,basesize,"[%s@%s %s]&",GetUserName().c_str(),GetHostName().c_str(),GetLastDir().c_str());
    return command_line;
}


void PrintCommandLine()
{
    printf("%s",MakeCommandLine().c_str());
    fflush(stdout);
}

bool GetCommandLine(char command_buffer[],int size)
{
    // 我们认为:我们要将用户输入的命令行,当做一个完整的字符串
    // "ls -a -l -n"

    char* result=fgets(command_buffer,size,stdin);

//    printf("%p\n %p\n",result,command_buffer);

    if(!result)
    {
        return false;
    }
    command_buffer[strlen(command_buffer)-1]=0; // 将结尾的回车设为0
    if(strlen(command_buffer)==0) return false;
    return true;
}

void ParseCommand(char command_buffer[])
{
   memset(Gargv,0,sizeof(Gargv));  // 清空之前的代码痕迹
   Gargc=0;

   //"ls -l -a -n"

   const char* const sep=" ";
    Gargv[Gargc++]=strtok(command_buffer,sep);  // 将第一个空格前的值切给Gargv[0];

    // 将剩下的值依次切给Gargv, 这里=的含义是 将切完的Gargv的值转为bool 进行比较
    while((bool)(Gargv[Gargc++]=strtok(nullptr,sep)));
    Gargc--;
}

void ResetCommandLine()
{
    memset(Gargv,0,sizeof(Gargv));
    Gargc=0;
    Redir=0;
    FileName=nullptr;
}

void ParseRedir(char command_buffer[],int len)
{
    int end=len;
    while(end>=0)
    {
        if(command_buffer[end]=='<')
        {
            Redir=InputRedir;
            command_buffer[end]=0;
            FileName=&command_buffer[end]+1;
            Trim(FileName);  // 文件名去空格
            break;
        }
        else if(command_buffer[end]=='>')
        {
            if(command_buffer[end-1]=='>')
            {
                Redir=AppendRedir;
                command_buffer[end-1]=0;
                command_buffer[end]=0;
                FileName=&command_buffer[end]+1;
                Trim(FileName);
                break;
            }
            else
            {
                Redir=OutputRedir;
                command_buffer[end]=0;
                FileName=&command_buffer[end]+1;
                Trim(FileName);
                break;
            }
        }
        else end--;
    }

}


void ParseCommandLine(char command_buffer[],int len)
{
   ResetCommandLine();
   ParseRedir(command_buffer,len);
   ParseCommand(command_buffer);
}

void DoRedir()
{
    if(Redir==NoneRedir) return;
    if(FileName==nullptr) exit(FileNameError);

    if(Redir==InputRedir)
    {
            int fd=open(FileName,O_RDONLY);
             if(fd<0)
             {
                 exit(InReDirError);
             }
             else dup2(fd,0);
    }
    else if(Redir==OutputRedir)
    {
        int fd=open(FileName,O_CREAT | O_WRONLY | O_TRUNC,0666);
        if(fd<0) exit(OutReDirError);
        else dup2(fd,1);
    }
    else if(Redir==AppendRedir)
    {
        int fd=open(FileName,O_CREAT | O_WRONLY  | O_APPEND,0666);
        if(fd<0) exit(AppReDirError);
        else dup2(fd,1);
    }
}
bool ExecuteCommand()
{
    // 让子进程执行
    pid_t id=fork();
    if(id<0)  return false;
    if(id==0)
    {
        // 子进程部分
        // 重定向
         DoRedir();
        // 1.执行命令
         execvpe(Gargv[0],Gargv,Genv);
       // execve(Gargv[0],Gargv,Genv);
        //2.退出  正常是不会返回的,如果执行了下面的就说明出错了,所以退出值为1
        exit(1);
    }
    int status=0;
    pid_t rid=waitpid(id,&status,0);
    if(rid>0)
    {
        if(WIFEXITED(status))
        {
            lastcode=WEXITSTATUS(status);
        }
        else
        {
            lastcode=100;
        }
         return true;
    }
     return false;
}

void AddEnv(const char* item)
{
    int index=0;
    while(Genv[index])
    {
       index++;
    }
    Genv[index]=new char[strlen(item)+1];
    strncpy(Genv[index],item,strlen(item)+1);
    Genv[++index]=nullptr;
}


bool CheckAndExecBuilCommand()
{
    if(strcmp(Gargv[0],"cd")==0)
    {
        if(Gargc==2)
        {
           chdir(Gargv[1]);
           lastcode=0;
        }
          else
         {
             lastcode=1;
         }
         return true;
    }
    else if(strcmp(Gargv[0],"export")==0)
    {
        // export 也是内建命令 因为子进程改变了,父进程不会改变
        if(Gargc==2)
        {
            AddEnv(Gargv[1]);
            lastcode=0;
        }
        else
        {
            lastcode=1;
        }
        return true;
    }
    else if(strcmp(Gargv[0],"env")==0)
    {
        for(int i=0;Genv[i];i++)
        {
            printf("%s\n",Genv[i]);
        }
        lastcode=0;
        return true;
    }
    else if(strcmp(Gargv[0],"echo")==0)
    {
        if(Gargc==2)
        {
            // echo $
            // echo $PATH
            // echo hello
            if(Gargv[1][0]=='$')
            {
                if(Gargv[1][1]=='?')
                {
                    printf("%d\n",lastcode);
                    lastcode=0;
                }
                else
                {
                    char* temp=&Gargv[1][1];
                    printf("%s\n",getenv(temp));
                    lastcode=0;
                }
            }
            else
            {
                printf("%s\n",Gargv[1]);
                lastcode=0;
            }
        }
        else
        {
            lastcode=3;
        }
        return true;
    }
    return false;
}


int main()
{
    InitEnv();
    char command_buffer[basesize];

      while(true)
    {
        PrintCommandLine();  // 1. 命令行提示符
        // command_buffer -> output

        if(!GetCommandLine(command_buffer,basesize))   //2.获取用户命令
        {
            continue;
        }

        ParseCommandLine(command_buffer,strlen(command_buffer));  // 3.分析命令
        if(CheckAndExecBuilCommand())  // 内建指令,因为shell有部分指令只能又自己调用,而这类指令我们称之为内建指,这里就是检查输入是否为内建指令
        {
            continue;
        }
        ExecuteCommand() ;   //4. 执行命令
    }
    return 0;
}