用GPT零负担学单片机之点亮一颗cpu
第3节 训练or特征匹配?AI写代码
大家好,我是小杰学长
如果你是大学生 遇到电子技术 学习 成长 入行难题
我曾经通过大学比赛赚钱 从事嵌入式AI 航天军工
用特别的学习和求职方法线下半年带50+学弟学妹入行开发
主页佳喔威信,给你提供一定资源和战略方法上的帮助
相信我的职业经历的专业性,一定能帮到你
我的gitee仓库分享 海量嵌入式资源入行求职技巧-->
目录
- [1. 概述](#1. 概述)
- [2. 神经网络和机器视觉](#2. 神经网络和机器视觉)
- [3. 用ai写ai代码](#3. 用ai写ai代码)
- [4. 参考博客和lvgl桌面应用](#4. 参考博客和lvgl桌面应用)
- [5. 结语](#5. 结语)
- [6. 资源下载地址](#6. 资源下载地址)
1. 概述
哈喽 让大家久等了
上一节课和大家说一周后见
结果因为主页工作忙 鸽了两周
但是只要一有空我也没有闲着
一直在翻阅visionboard的博客
visionboard的例程文档不多
但是作品创作博客不少
话不多说 简述本章主题
相对内容较多且杂 但是有所进展 但进展不大
哈哈哈哈哈哈
从主题可以看出来
人脸识别 是要通过训练得到高精度人脸识别效果
还是使用传统的Eigen\fisher\LBPH
等传统机器视觉提取关键特征识别
这是个问题
最后我选择了在漫长等待训练的过程中
转而选择了传统的机器视觉提取关键特征识别
嘻嘻!!!
并且发现已经有人用visionboard
完成了LBP人脸识别考勤机
但是在一次次犹豫中
还是不搬运吧
第二个事
既然要从AI人脸识别
为什么不同AI工具自己写代码呢?
所以用起了Cursor工具
让他自己从0-1实现这个项目
第三个事
visionboard的官方例程、文档、教程不多
所以我在用一些硬件的时候卡了我很多时间
但是在一些作品博客中找到了使用方法
最后一个事
安装了LVGL上位机
为后面的UI开发做准备
2. 神经网络和机器视觉
玩过openMV的小伙伴应该都知道edgeImpule

那天我在搜集自拍样本和训练准备到自闭的时候
突然想到上次在写机器学习博客的时候
有提到过传统的人脸识别机器视觉算法
图中可以看到我对这几个算法的简介

对上图博客感兴趣的记得主页佳喔威信
后续能第一时间获取更新博客和课程资料
于是我在漫长等待训练的过程中
转而选择了传统的机器视觉提取关键特征识别

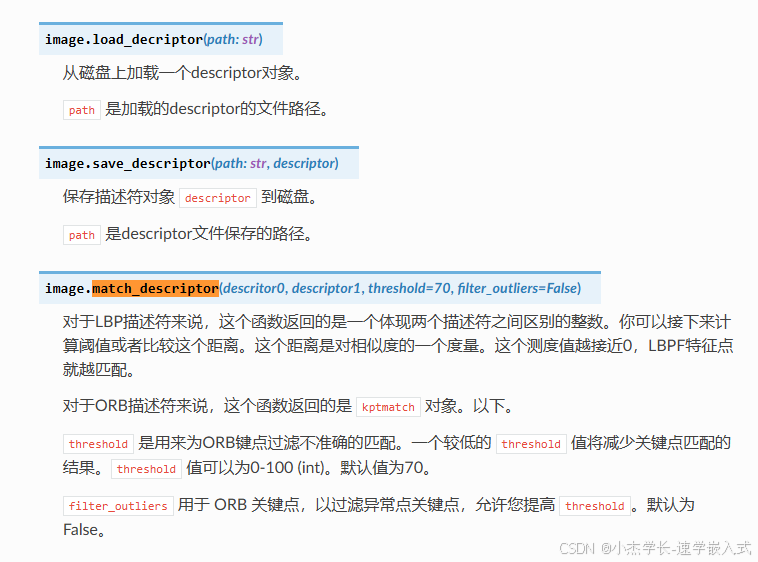
在omv的官方文档中我找到了如下API:

开始肝代码:
这个是我自己测试实现的
注释齐全
后面加了一些其他代码
运行不起来 就自行调试
py
import sensor
import os
import time
import image
import machine
import lcd
from machine import Pin
from face_recg import match_face, register_face
def LED_INIT():
    #led init
    led_green = machine.LED("LED_GREEN")
    led_red = machine.LED("LED_RED")
    led_blue = machine.LED("LED_BLUE")
def LED_BLACK():
    led_green.off()
    led_blue.off()
    led_red.off()
def LED_WHITE():
    led_green.on()
    led_blue.on()
    led_red.on()
def LED_RED():
    led_green.off()
    led_blue.off()
    led_red.on()
def LED_BLUE():
    led_blue.on()
    led_green.off()
    led_red.off()
def LED_GREEN():
    led_blue.off()
    led_green.on()
    led_red.off()
LED_WHITE()
time.sleep(1)
LED_BLACK()
time.sleep(1)
LED_WHITE()
time.sleep(1)
LED_BLACK()
# Initialize the lcd screen.
lcd.init()
#文件夹初始化
try:
    os.mkdir(rootpath)
except:
    print(os.listdir("/"))
#按键初始化
key_flag = 0
def key0_func(v):
    global key_flag
    if key_flag == 0:
        LED_WHITE()
        key_flag = 1
    else:
        LED_BLACK()
        key_flag = 0
key_0 = Pin(("key_0", 0x907))
key_0.irq(trigger=Pin.IRQ_RISING, handler=key0_func)

sensor.reset()  # Reset and initialize the sensor.
# Sensor settings
sensor.set_contrast(3)
sensor.set_gainceiling(16)

# HQVGA and GRAYSCALE are the best for face tracking.
sensor.set_framesize(sensor.HQVGA)
sensor.set_pixformat(sensor.RGB565)  # Set pixel format to RGB565 (or GRAYSCALE)
sensor.set_vflip(True)
sensor.set_hmirror(True)
sensor.skip_frames(time=2000)  # Wait for settings take effect.

# Load Haar Cascade
# By default this will use all stages, lower satges is faster but less accurate.
face_cascade = image.HaarCascade("frontalface", stages=25)
print(face_cascade)

print('loop start')
clock = time.clock()  # Create a clock object to track the FPS.
while True :
    res = "NONE"
    clock.tick()  # Update the FPS clock.
    img = sensor.snapshot()  # Take a picture and return the image.
    img_gray = img.copy().to_grayscale()
    if key_flag == 0:
#        人脸识别
        # Find objects.
        # Note: Lower scale factor scales-down the image more and detects smaller objects.
        # Higher threshold results in a higher detection rate, with more false positives.
        objects = img_gray.find_features(face_cascade, threshold=0.75, scale_factor=1.25)

        if len(objects) == 1:
            LED_GREEN()
            # Draw objects
            img.draw_rectangle( objects[0], color=(0,255,0))
#            for x, y, w, h in objects:
#                img.draw_rectangle( (x, y, w, h), color=(0,255,0))
#                img.draw_string(x, y, "M", color=(0,255,0), scale=3, mono_space=False)
            src_lbp = img_gray.find_lbp(objects[0])
            res = match_face(src_lbp)
        else:
            LED_BLACK()
    else:
#        人脸注册
        ...
    img.draw_string(0, 0, "FPS"+str(int(clock.fps()))+" "+res, color=(0,255,0), scale=1, mono_space=False)
    lcd.display(img) # Take a picture and display the image.
def match_face(src_lbp):  # 人脸识别
    dir_lists = os.listdir(rootpath)  # 路径下文件夹
    dir_num = len(dir_lists)          # 文件夹数量
#    print("Total %d Folders -> %s"%(dir_num, str(dir_lists)))
    for i in range(0, dir_num):
        item_lists = os.listdir(rootpath+'/'+dir_lists[i])  # 路径下文件
#        print("The %d Folder[%s], Total %d Files -> %s" %(i+1, dir_lists[i], item_num, str(item_lists)))
        for j in item_lists:  # 文件依次对比
#            debug(">> Current File: " + item_lists[j])
            try:
                img = image.Image("/orl_faces/%s/%s" % (dir_lists[i], item_lists[j]), copy_to_fb=True)
            except Exception as e:
                debug(e)
                break
            d1 = img.find_lbp((0, 0, img.width(), img.height()))  # 提取特征值
            dist = image.match_descriptor(src_lbp, d1)                 # 计算差异度
            debug(">> Difference Degree: " + str(dist))
            if dist < DIST_THRESHOLD:
                debug(">> ** Find It! **")
                green.on()
                time.sleep(1000)
                green.off()
                return item_lists[j]
    debug(">> ** No Match! **")
    return 0
def register_face(face_cascade, img):
    # ...
   global REGISTER_MODE
   if find(face_cascade, img) == 1:
       debug(">> Existing without registration!")
       REGISTER_MODE = 0
       return 0
   dir_lists = os.listdir(rootpath)  # 路径下文件夹
   dir_num = len(dir_lists)          # 文件夹数量
   new_dir = ("%s/%d") % (rootpath, int(dir_num)+1)
   os.mkdir(new_dir)                 # 创建文件夹
   cnt = 5  # 拍摄5次图片
   while cnt:
       img = sensor.snapshot()
       objects = img.find_features(face_cascade, threshold=0.75, scale_factor=1.25)  # 人脸检测
       if objects:
           width_old = 0
           height_old = 0
           index = 0
           for r in objects:  # 寻找最大的face
               if r[2] > width_old and r[3] > height_old:
                   width_old = r[2]
                   height_old = r[3]
                   index += 1
           index -= 1
           #print("index:", index)
           item_lists = os.listdir(new_dir)  # 新路径下文件
           item_num = len(item_lists)        # 文件数量
           img.save("%s/%d.pgm" % (new_dir, item_num))  # 写入文件
           debug(">> [%d]Regist OK!" % cnt)
           img.draw_rectangle(objects[index])
           green.on()
           time.sleep(50)
           green.off()
           cnt -= 1
           if cnt==0:
               green.on()
               time.sleep(1000)
               green.off()
       REGISTER_MODE = 0
3. 用AI写AI代码
既然要从AI人脸识别
为什么不用AI工具自己写代码呢?
所以用起了Cursor工具
让他基于我上面写的测试代码
从0-1实现这个项目

大家感兴趣代码的生成过程
可以关注我的短视频自媒体
b站 嵌入式男友杰哥
抖音 小杰学长
不过想让ai帮我们写好一个可以跑的代码
确实需要很好的文字表达功底
以下代码还没验证
但是过程基本是没什么毛病
等下期注册人脸的博客实现了
我在一起调好
py
import sensor
import os
import time
import image
import lcd
from machine import Pin
from led import LED_BLACK,LED_WHITE,LED_RED,LED_BLUE,LED_GREEN

LED_WHITE()
time.sleep(1)
LED_BLACK()
time.sleep(1)
LED_WHITE()
time.sleep(1)
LED_BLACK()

# Initialize the lcd screen.
lcd.init()

#文件夹初始化
rootpath = "/orl_faces"
print(os.listdir(rootpath))
#按键初始化
key_flag = 0
def key0_func(v):
    global key_flag
    if key_flag == 0:
        LED_WHITE()
        key_flag = 1
    else:
        LED_BLACK()
        key_flag = 0
key_0 = Pin(("key_0", 0x907))
key_0.irq(trigger=Pin.IRQ_RISING, handler=key0_func)

sensor.reset()  # Reset and initialize the sensor.
# Sensor settings
sensor.set_contrast(3)
sensor.set_gainceiling(16)

# HQVGA and GRAYSCALE are the best for face tracking.
sensor.set_framesize(sensor.HQVGA)
sensor.set_pixformat(sensor.RGB565)  # Set pixel format to RGB565 (or GRAYSCALE)
sensor.set_vflip(True)
sensor.set_hmirror(True)
sensor.skip_frames(time=2000)  # Wait for settings take effect.

# Load Haar Cascade
# By default this will use all stages, lower satges is faster but less accurate.
face_cascade = image.HaarCascade("frontalface", stages=25)
# ----------------------
# 在文件开头添加全局变量
face_descriptors = {}  # 格式: {'person_name': [descriptor1, descriptor2, descriptor3]}

# 修改加载人脸特征描述符的函数
def load_face_descriptors():
    global face_descriptors
    for person_name in os.listdir(rootpath):
        person_path = os.path.join(rootpath, person_name)
        if os.path.isdir(person_path):
            face_descriptors[person_name] = []
            # 遍历文件夹中的所有描述符文件
            for file in os.listdir(person_path):
                if file.endswith('.bin'):
                    descriptor_path = os.path.join(person_path, file)
                    descriptor = image.load_descriptor(descriptor_path)
                    face_descriptors[person_name].append(descriptor)
            print(f"Loaded {len(face_descriptors[person_name])} descriptors for {person_name}")

# 在主循环开始前添加
load_face_descriptors()  # 程序启动时加载所有已存储的人脸特征
# -------------
# 修改人脸匹配函数
def match_face(src_lbp):
    min_diff = float('inf')
    matched_name = "NONE"

    for name, descriptors in face_descriptors.items():
        # 对每个人的所有特征描述符进行匹配
        for descriptor in descriptors:
            diff = image.match_descriptor(src_lbp, descriptor, threshold=70, filter_outliers=False)
            if diff < min_diff:
                min_diff = diff
                matched_name = name

    # 设置一个阈值,如果差异度太大,则认为是未知人脸
    if min_diff > 70:
        return f"NONE"
    return f"{matched_name}({min_diff})"

clock = time.clock()  # Create a clock object to track the FPS.
while True :
    res = "NONE"
    clock.tick()  # Update the FPS clock.
    img = sensor.snapshot()  # Take a picture and return the image.
    img_gray = img.copy().to_grayscale()
    if key_flag == 1:
        LED_GREEN()
        # Find objects.
        # Note: Lower scale factor scales-down the image more and detects smaller objects.
        # Higher threshold results in a higher detection rate, with more false positives.
        objects = img_gray.find_features(face_cascade, threshold=0.75, scale_factor=1.25)
        # 首先找到人脸
        if len(objects) == 1:
            # Draw objects
            img.draw_rectangle( objects[0], color=(0,255,0))
#            for x, y, w, h in objects:
#                img.draw_rectangle( (x, y, w, h), color=(0,255,0))
#                img.draw_string(x, y, "M", color=(0,255,0), scale=3, mono_space=False)
            src_lbp = img_gray.find_lbp(objects[0])
            res = match_face(src_lbp)
            # 识别完成后关闭识别功能
            if res=="NONE":
                key_flag = 0
            LED_WHITE()
        else:
            LED_BLACK()

    img.draw_string(0, 0, "FPS"+str(int(clock.fps()))+" "+res, color=(0,255,0), scale=1, mono_space=False)
    lcd.display(img) # Take a picture and display the image.
4. 参考博客和LVGL桌面应用
LVGL桌面应用 GUI-guider
下载安装就不需要我教了吧!!!

5. 结语
下周见